SaaS E-mall Operation Manual(V1.8.1)
SaaS E-mall Operation Manual
Rev.: V1.8.1
Mustard Boat Technology
Sep 2020
Revision history
| Version | Date | Update records | Approved by | Modifier |
|---|---|---|---|---|
| 1.1.0 | 11/8/2019 | Huang Shuyan | ||
| 1.2.0 | 11/25/2019 | Added product sharing, message notification, dialogue search and customs clear identity | Huang Shuyan | |
| 1.3.0 | 1/2/2020 | Added the service function of direct distribution | Li Xiaodong | |
| 1.3.2 | 2/25/2020 | Added recipient ID card information to POS member prices and points and updated some module descriptions and captures | Huang Shuyan | |
| 1.3.3 | 6/3/2020 | Voucher optimization, add gift coupon configuration instructions | Huang Shuyan | |
| 1.4.0 | 23/3/2020 | E-Mall products, E-Mall settings, E-Mall menu adjustments, E-Mall menu links, new categories and customer personal center, and Shop-in-shop. | Huang Shuyan | |
| 1.4.1 | 2020-04-01 | Added package activities, my QR code, new default logistics set in the mall | Huang Shuyan | |
| 1.4.3 | 2020-04-20 | Add self-delivery and dispatch, after-sales functions. | Huang Shuyan | |
| 1.4.4 | 2020-05-06 | Notifications settings | Huang Shuyan | |
| 1.5.1 | 2020-5-20 | Newly added commercial Add | Huang Shuyan | |
| 1.5.2 | 2020-06-05 | Add third-party authorization, homepage exclusive and packages | Huang Shuyan | |
| 1.6.1 | 2020-07-13 | Newly added browser page mall login registration procedure and user center. . | Li Xiaodong | |
| 1.7.2 | 2020-07-27 | wallet function optimization | Huang Shuyan | |
| 1.7.3 | 2020-08-11 | Newly added category page custom template, category bar supports setting first level category | Huang Shuyan | |
| 1.8.1 | 2020-09-01 | Added the function of opening sub-stores without an OA account | Huang Shuyan |
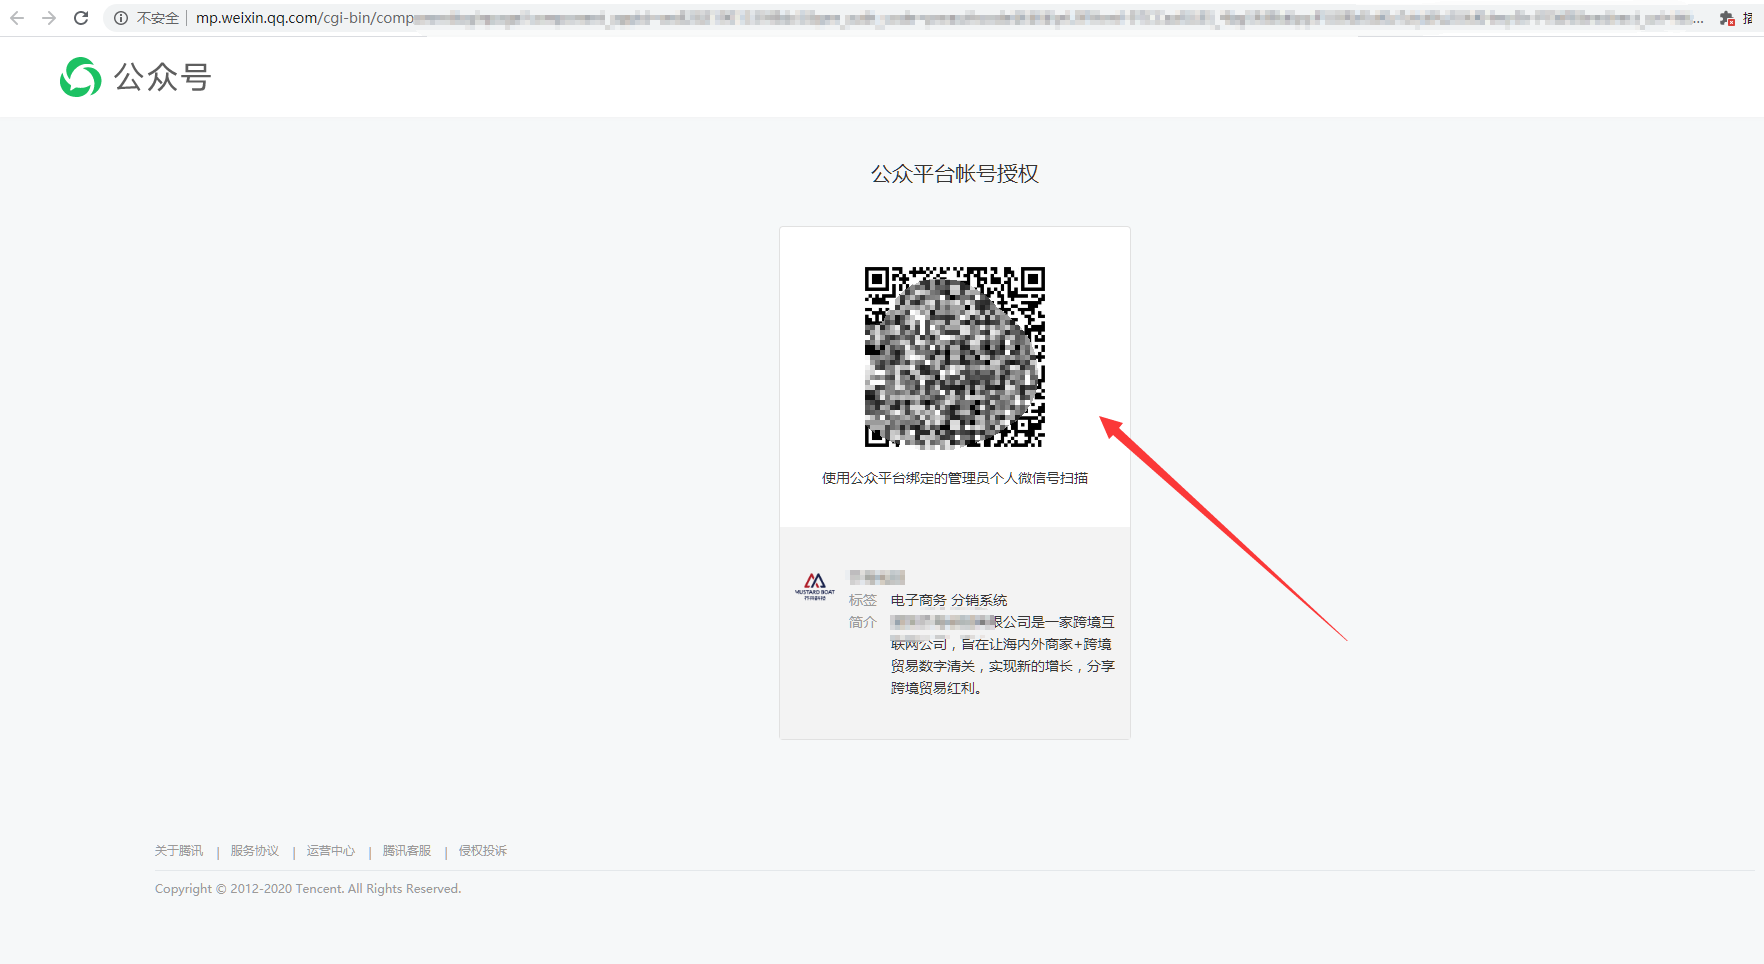
ⅠBind with WeChat Public Account
1.1 Authorized WeChat third-party platform**
You must bind with an authenticated WeChat public account (service account) before using SaaS E-mall.
Note;There is a one-to-one binding relationship between the commercial tenant and the public account. After the binding, switching is not supported. Please carefully choose the procedure for binding the public account.
[Operating steps]
Step 1; Enter the Apos server, click "E-Mall> Mall Auth> Auth" to jump to the WeChat OA authorization page, scan the code using the administrator's personal WeChat account bound to the OA, scan the code and click on the mobile phone Authorize, go back to the background, click authorized, and the bound public account will be displayed after refreshing.

II Mall Settings
2.1 Service settings
Using SaaS mall requires binding a store and performing some settings to the mall.
[Operating steps]
Step 1; Log in Apos server, click the menu of "E-Mall-E-Mall Settings-Business Settings" and click "Modify Binding".

Step 2; Select a store for binding.
Step 3; Set the name of the store and display it at the top of the store homepage Title.
Step 4; Set the store logo and it will be displayed on the homepage of the share store.
Step 5;Set "Default Status for New Products". This operation is performed to set the corresponding activating / deactivating status in the mall when there are new products in the store. The initialization default status is not activating.
Step 6;Select "Mall Price” mode. When it is selected as "Store Price", the price of products in the mall is the store price by default, and it cannot be edited. When it is selected as "E-Mall sales Price", it can be edited, and the mall price is the set price.
Step 7; Set whether to display the exchange rate bar.
Step 8;Set whether to display the RMB price. If “Yes” is selected, the price of products in the mall will display the reference RMB price.
Step 9; Set whether the recipient needs to upload the ID card number and ID card picture, the default is not required, the recipient's ID card information is required for customs clearance
Step 10; Set the default logistics billing. When the order split fails, the logistics fee will be calculated according to this setting.
Step 11; Set "default sender address" to display in user sender address.
Step 12; Set whether the merchant tenant delivers, Set product delivery fee and remark information.
Step 13; Set whether to pick up the package by yourself, add the pickup address and remark information.
Step 14; Set "Search for Hot Products". Hot products will be displayed under hot products item on the mall search page.
Step 15; Upload the picture (customer service agent’s WeChat QR code), and enter the customer service agent’s phone number. The customer service agent’s information will be displayed in "My-Contact Customer Service" and under customer service item of product details in the mall.
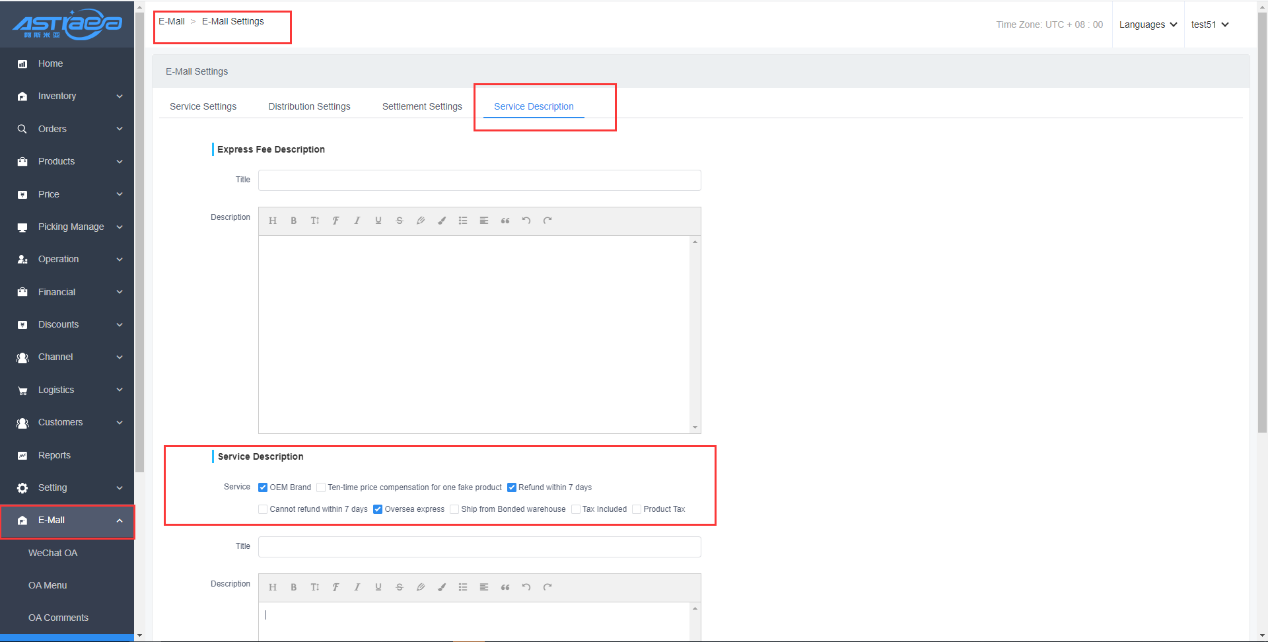
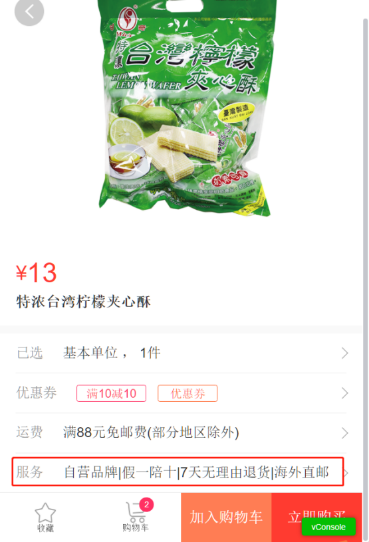
2.2 Description of the service
If you need to set special postage and service notes for the products, you can set them in the service notes
[Operating steps]
Step 1: Click the menu of "E-Mall - E-Mall Settings - Service Settings" to enter the service settings page.
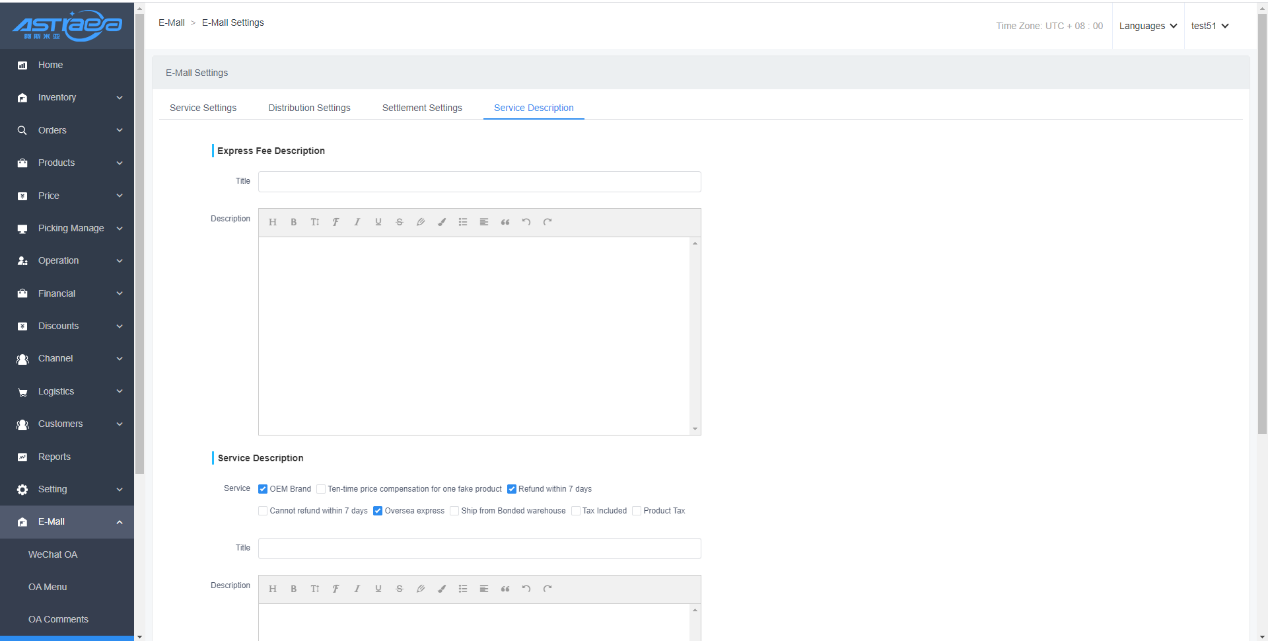
Step 2: Edit postage notes: title and detailed description. The postage notes will be displayed in corresponding freight of all product details.
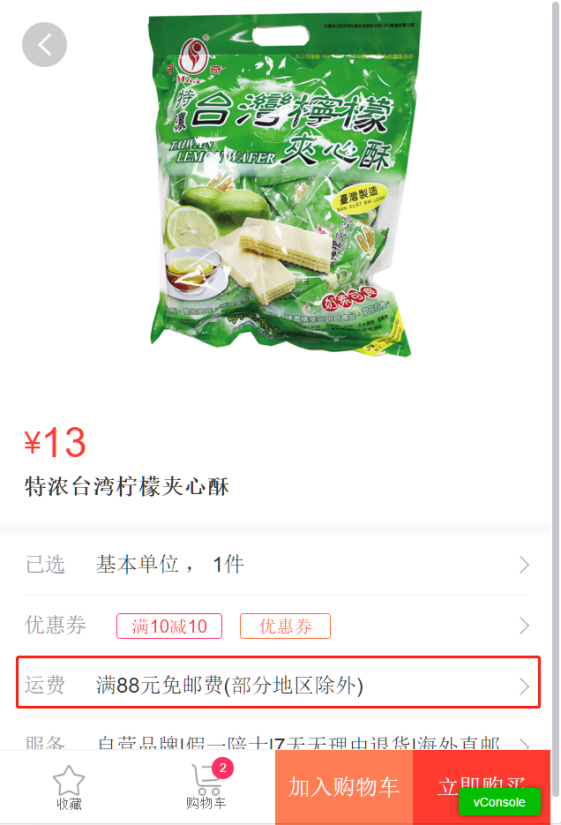

Step 3: Check the service, edit the title and description, The service will be displayed in corresponding service of all product details.

III. Public Account Settings
3.1 OA menu
[Operating steps]
Step 1: Log in Apos server, click "E-Mall-OA Menu” to enter the custom menu page.

Step 2: Click “Add Menu” button.

Step 3: Edit the menu name.

Step 4: If selecting the menu link as the homepage of the mall, then clicking the menu will jump to the homepage.

Step 5: Set menu link to custom link.

Step 6: Click the menu name to automatically add the primary menu, up to three.
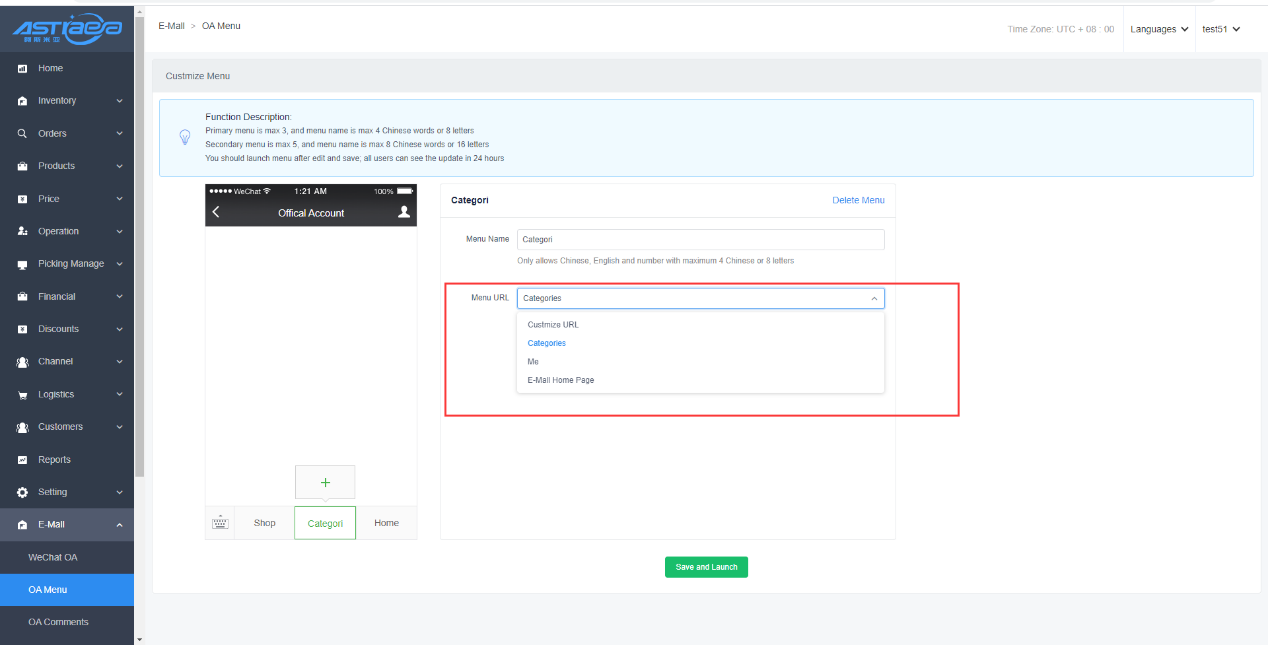
Step 7: Click "+" icon on the primary menu to automatically add the secondary menu.

Step 8: Edit the secondary menu name and jump link.

Step 9: Then click “Add Secondary Menu”. One primary menu will have at most five secondary menus.

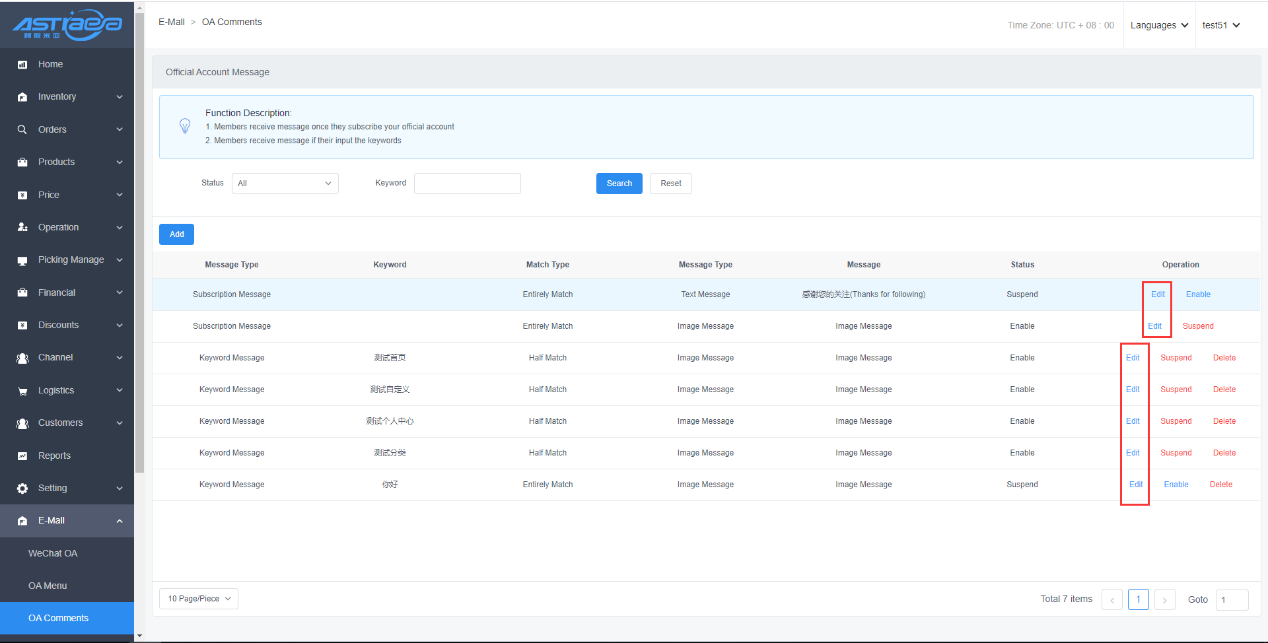
3.2 OA comments
3.2.1 Attention reply
We can show our advantages and brands in simple words, and increase the user's understanding and favorability through attention reply
[Operating steps]
Step 1: Log in Apos server, click "E-Mall-OA Comments" to enter the OA comments page.

Step 2: Click editing "Attention Reply" to enter the editing page.
Step 3: Select graphic message or text message, and set title, description and link.

Step 4: Click on the picture to upload the cover picture, and the setting effect will be synchronously displayed on the left.

Step 5: Click “Save”, and click “Enable” in the list, and it will automatically make a replay after the new user pays attention to the public account.


3.2.2 Keyword reply
Guide users to solve problems and increase users' attention through keyword reply
[Operating steps]
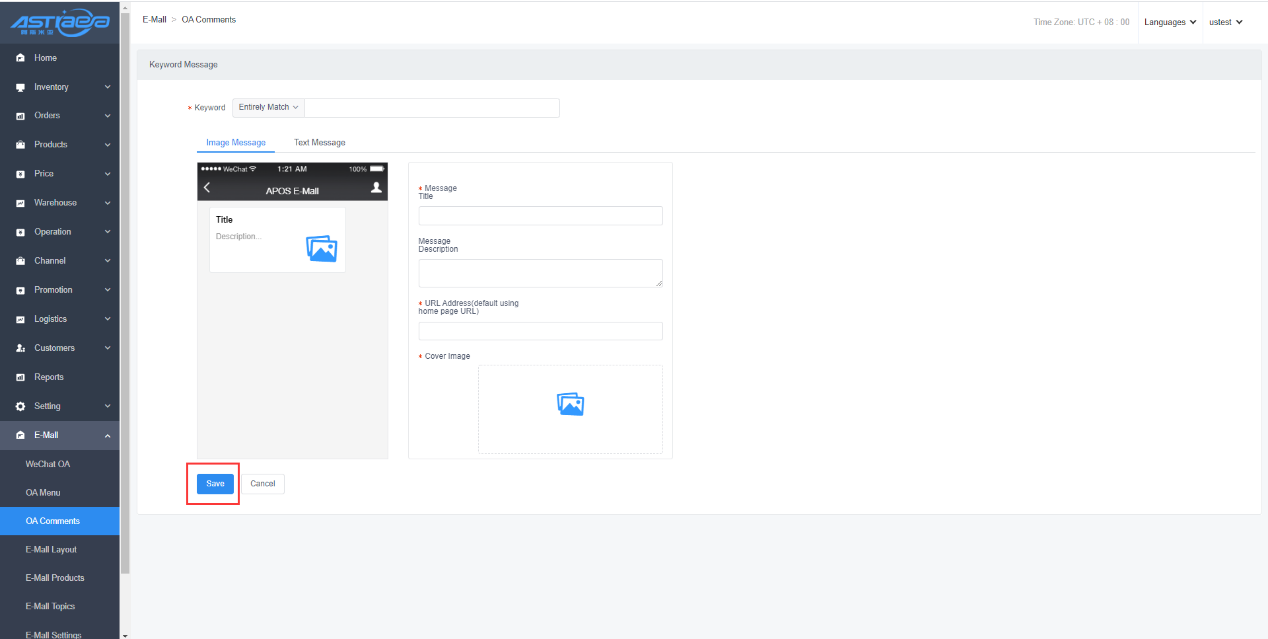
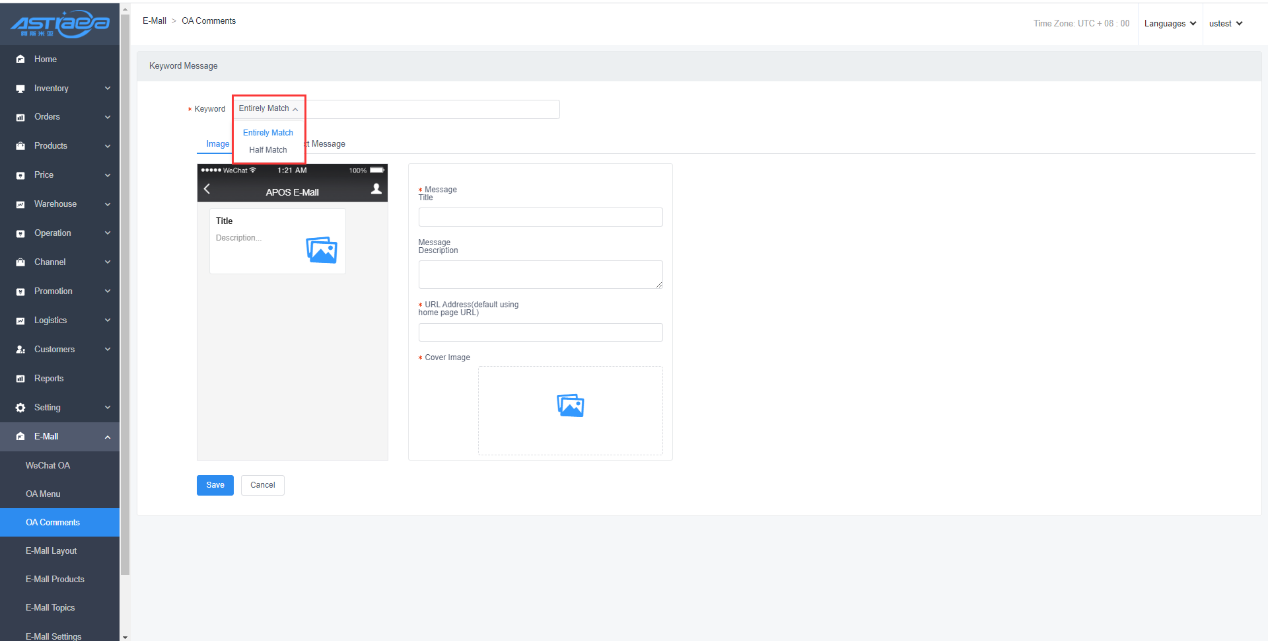
Step 1: Click “Newly Add” button in the list to enter the new keyword reply page.

Step 2: Select graphic message or text message, and set title, description and link.

Step 3: Click on the picture to upload the cover picture, and the setting effect will be synchronously displayed on the left.

Step 4: Click “Save”.

Step 5: Click “Enable” in the list, and it will automatically make a reply after the user sends the keywords in the public account.


Step 6: Multiple keywords can be set for a keyword reply.
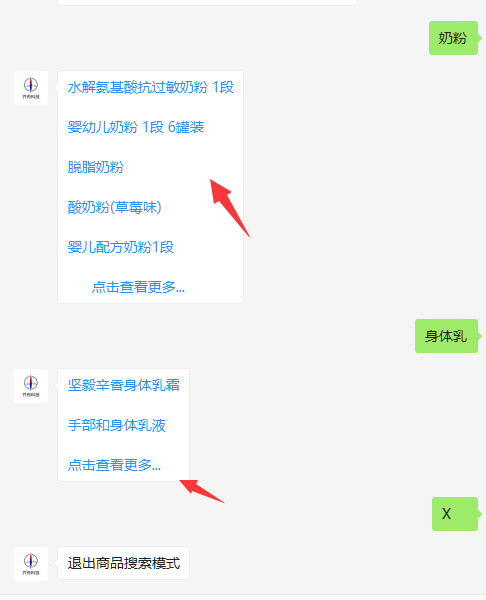
3.2.3 Dialogue search products
Step 1: Enable server configuration in WeChat Background-Basic Configuration.
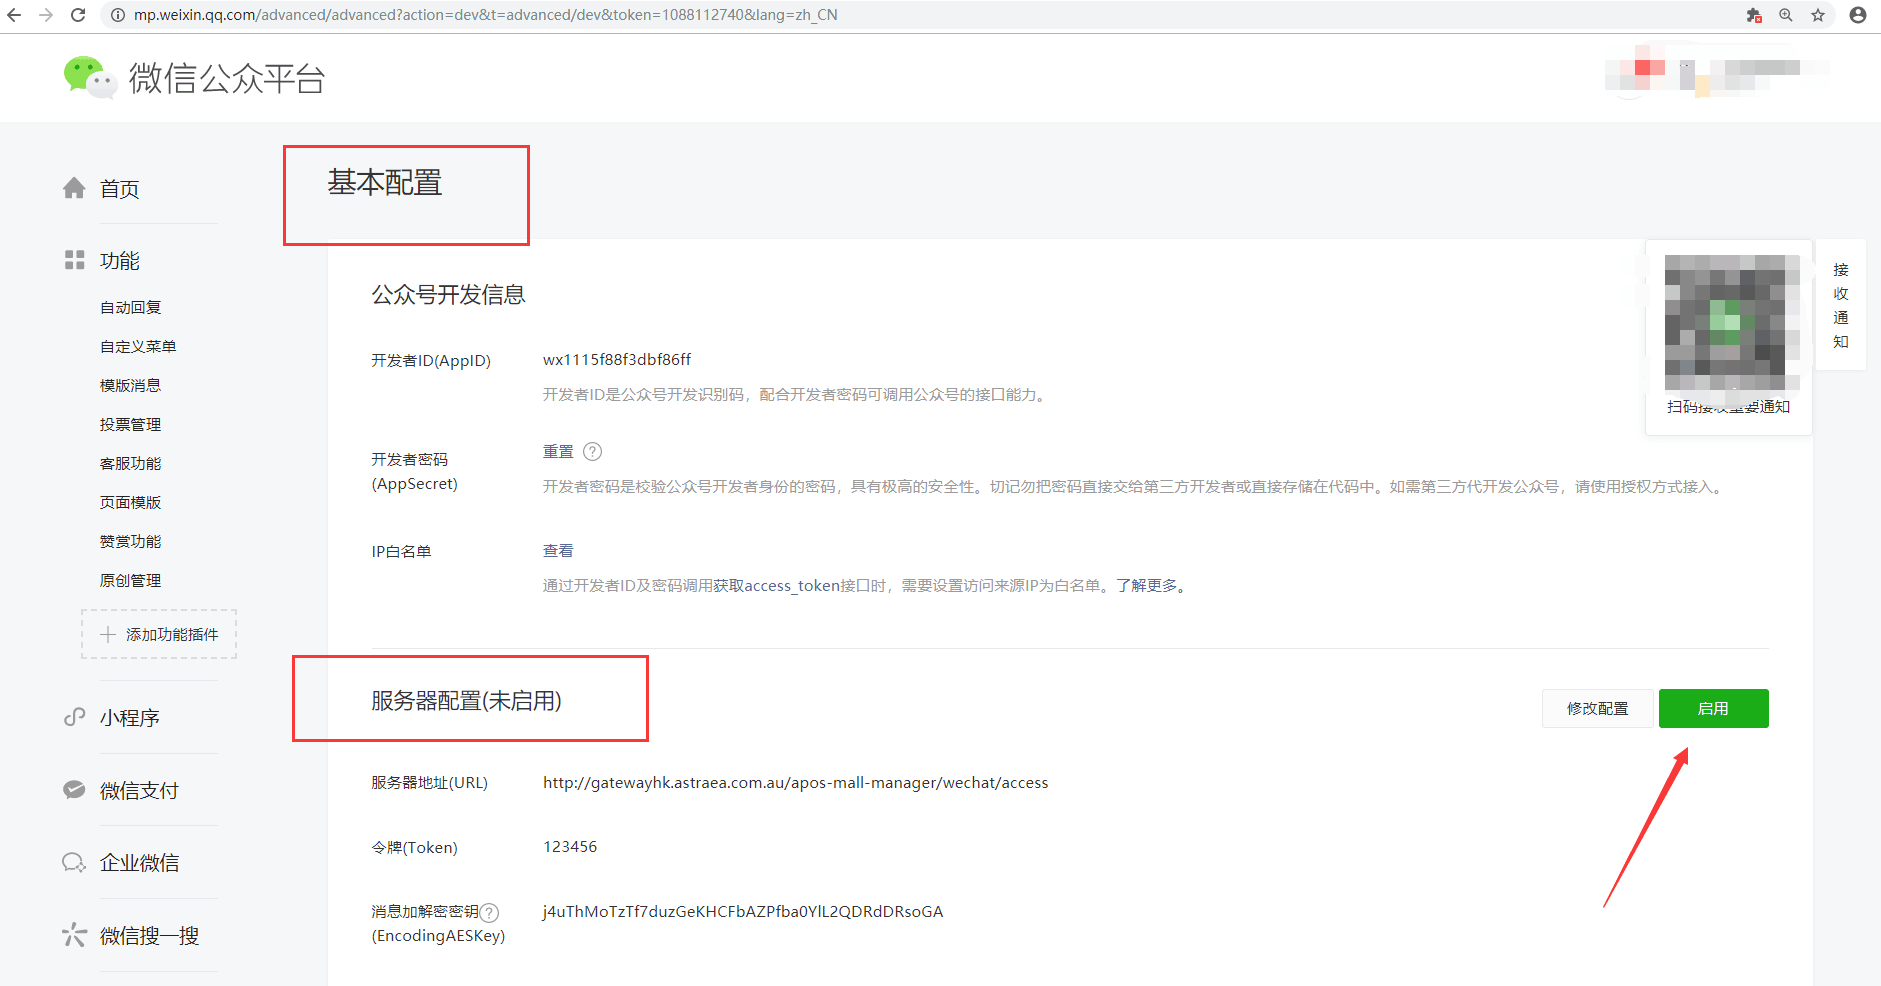
Step 2: When the words sent by the user do not match the keyword reply set in the background, it will enter the product search mode.
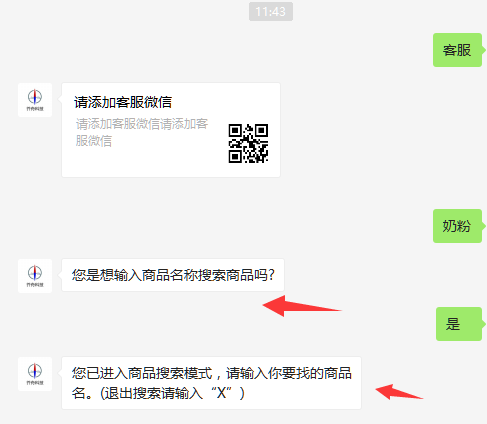
Step 3: Push top five products.
IV. E-mall Layout
4.1 Layout template
4.1.1 Homepage template
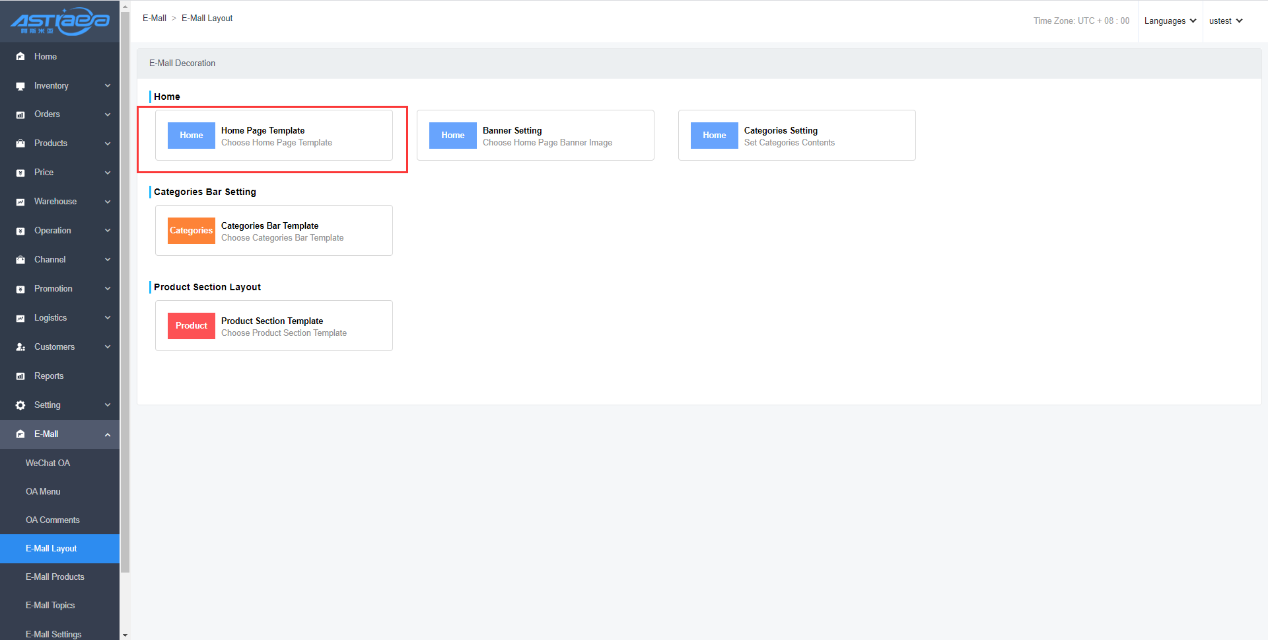
[Operating steps]
Step 1: Log in Apos server, click "E-Mall-E-mall Layout".
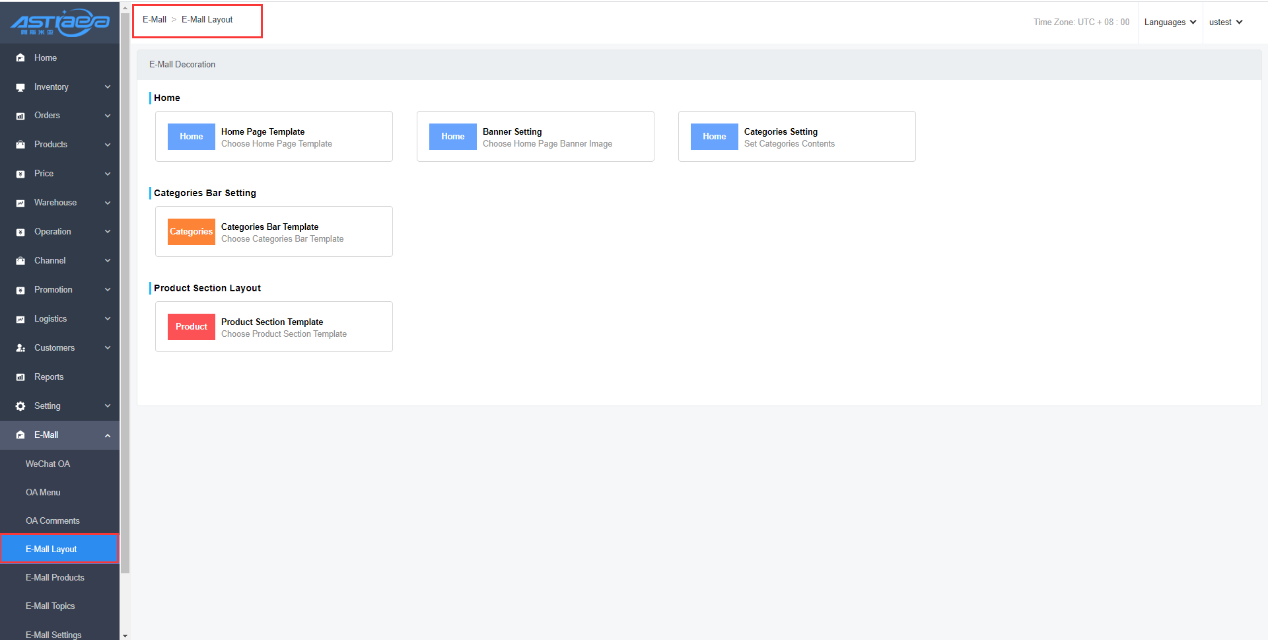
Step 2: Click homepage template to enter template selection. Currently, there are three templates available on homepage.
Step 3: If template 1 is enabled, the homepage of the mall will be displayed according to template 1 (The difference between the three homepage templates is that the hot sell topics display is different. They are one row and one column, one row and two columns, one row and three columns, respectively)


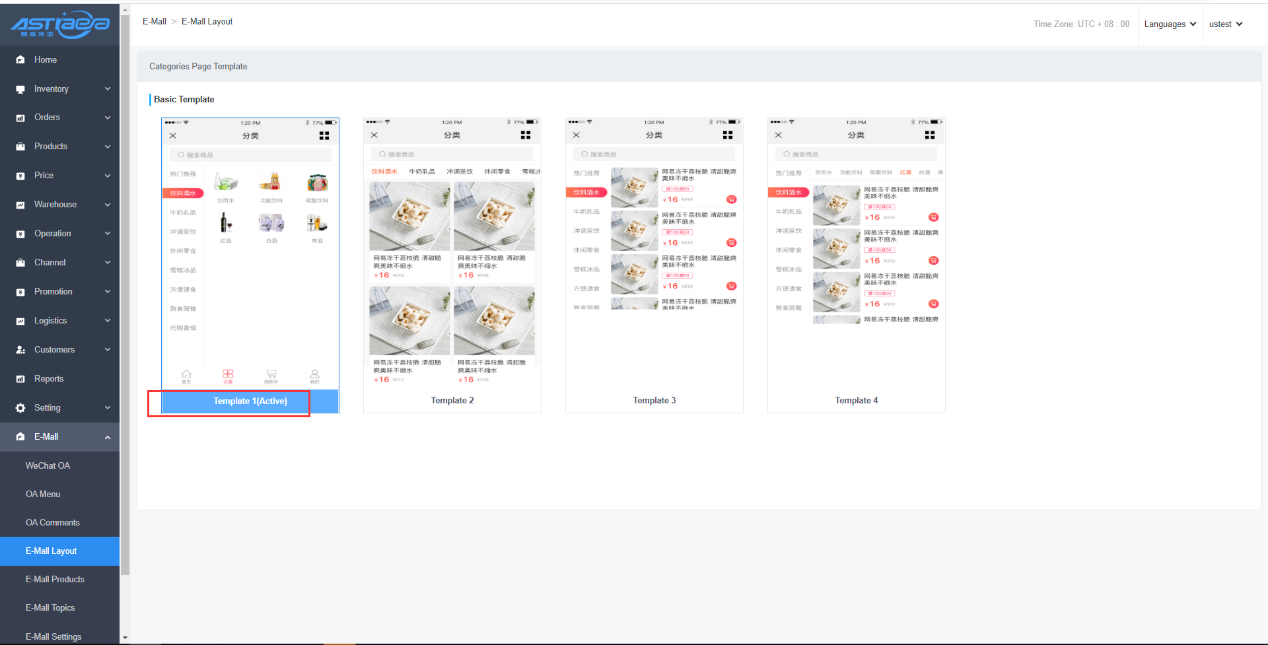
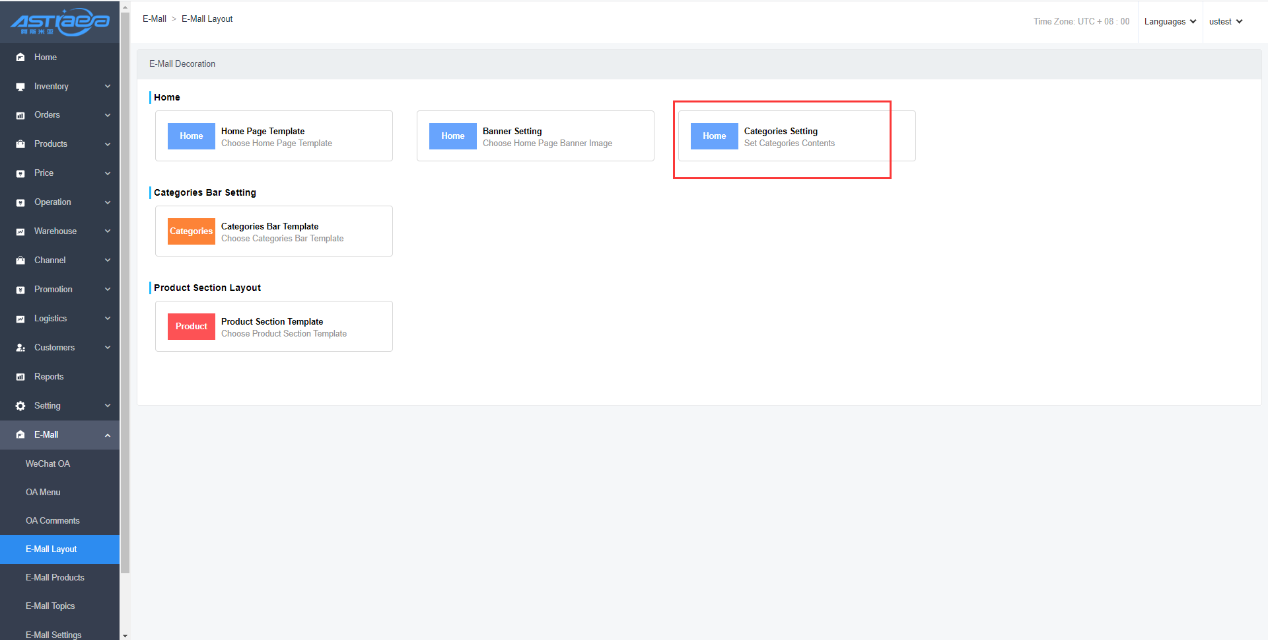
4.1.2 Category page template
Quickly guide users to find the products they want by setting the category bar
[Operating steps]
Step 1: Log in Apos server, click "E-Mall-E-mall Layout".

Step 2: Click category page template to enter template selection. Currently, there are five templates available for the category page (the effect is shown in the template).

Step 3; Templates 2-5 are fixed templates. After activation, the mall category page will be displayed as shown in the template.
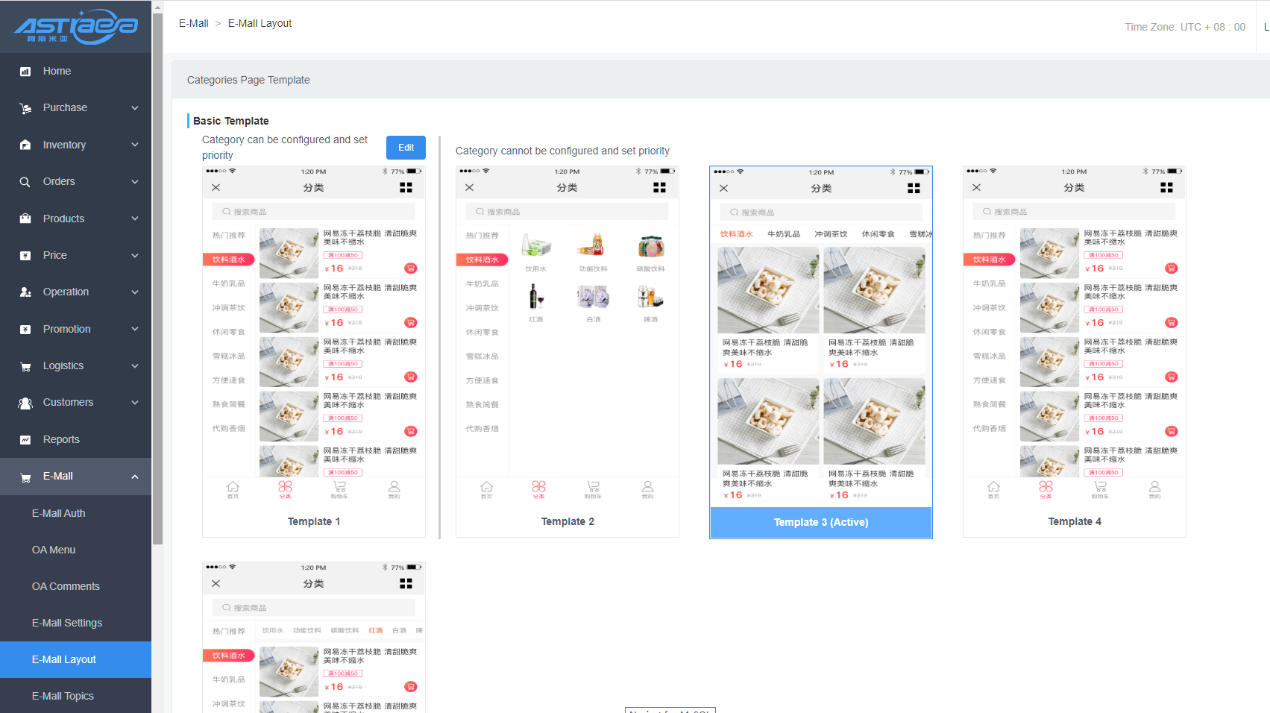
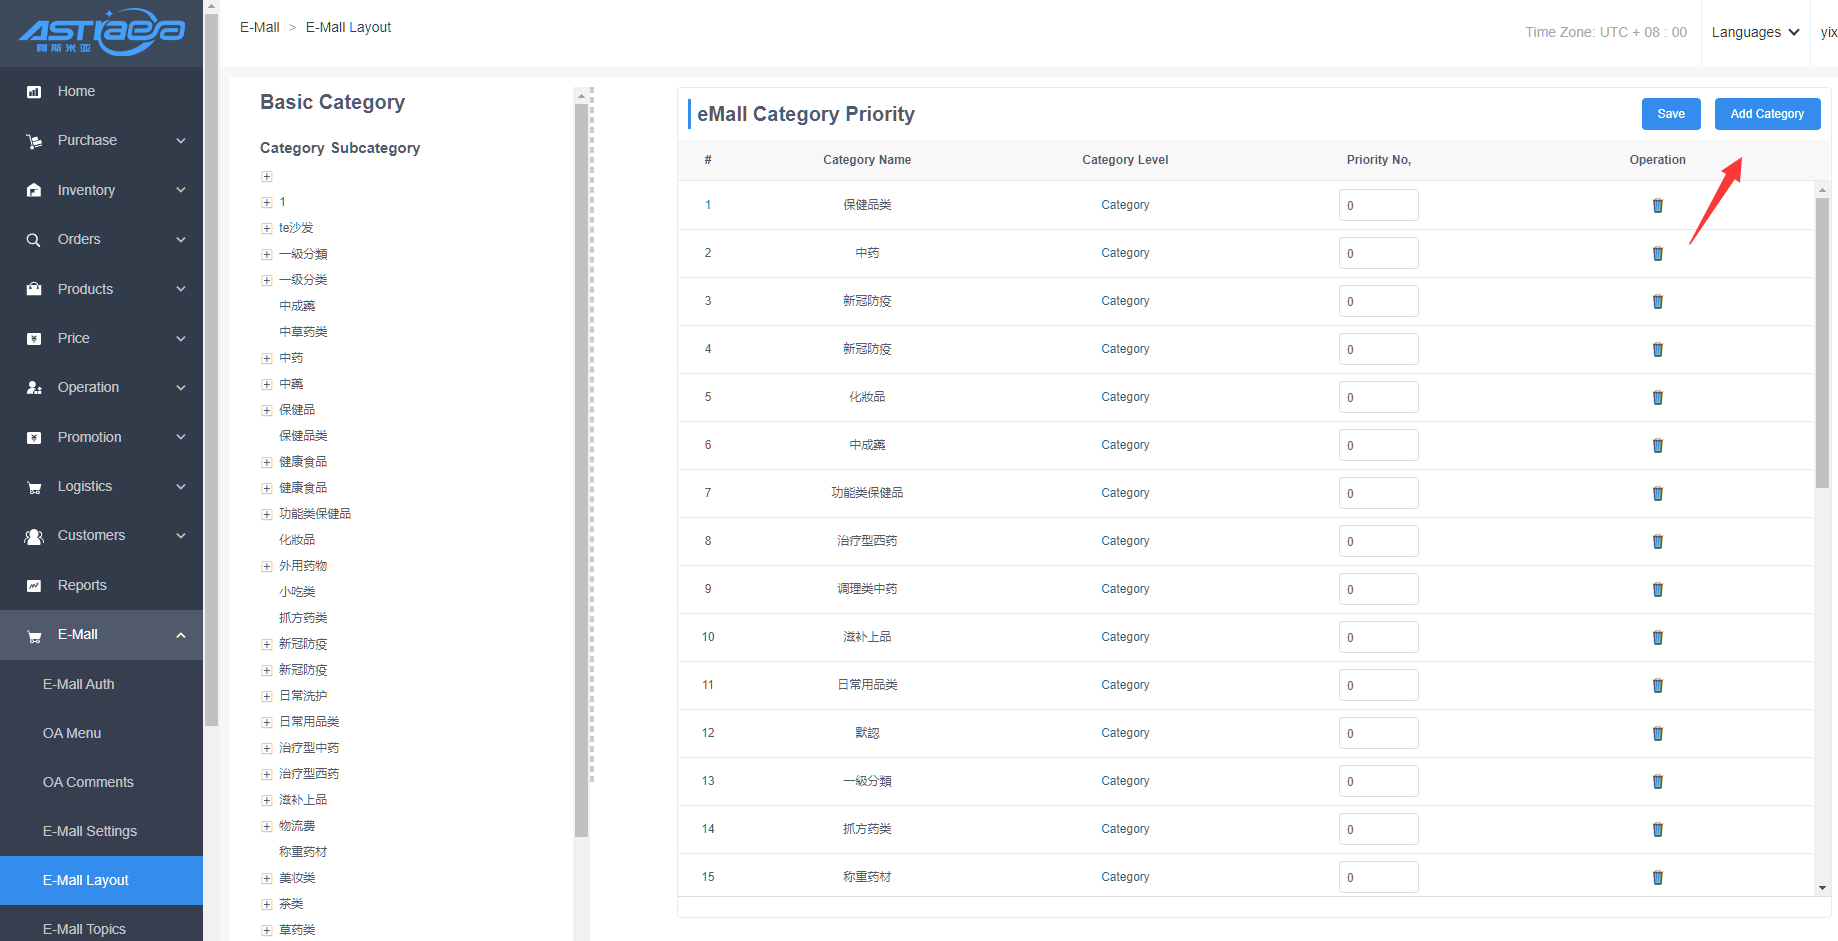
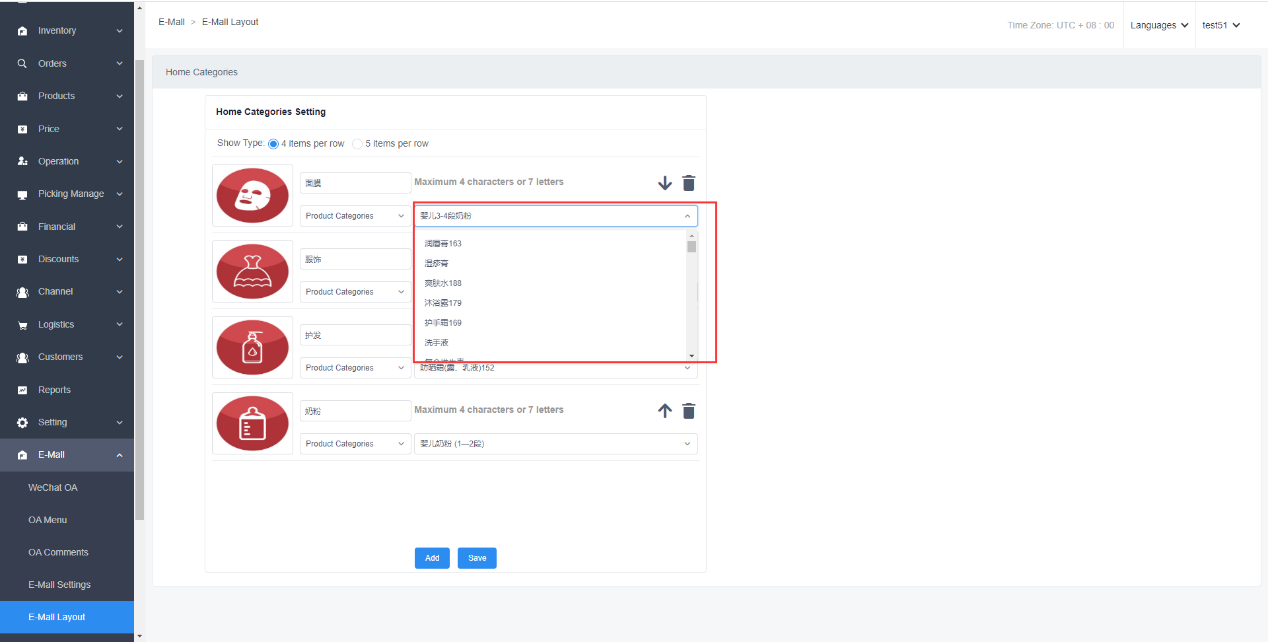
Step 4;Template 1 is a custom classification. To enable this template, you need to set up the classification and sorting first.
4.1. Click Edit to enter the setting page, and all the first-level categories are displayed in the list on the right by default, and the sort value is 0 by default
4.2. Click Add category to enter the category list page, select the first or second level category you want to display on the mall category page, after clicking save, the selected category will be ranked first in the list by default, and the sorting default is 0
4.3. Set the sort order, the smaller the value, the higher the order, click save
4.4 Once the template is enabled, the mall category page will take effect


4.1.3 Product page template
[Operating steps]
Step 1: Log in Apos server, click "E-Mall-E-mall Layout".

Step 2: Click product layout template to enter template selection. Currently, there are three templates available (the effect is shown in the template).

Step 3: If template 1 is enabled, the mall product layout will be displayed according to template 1.

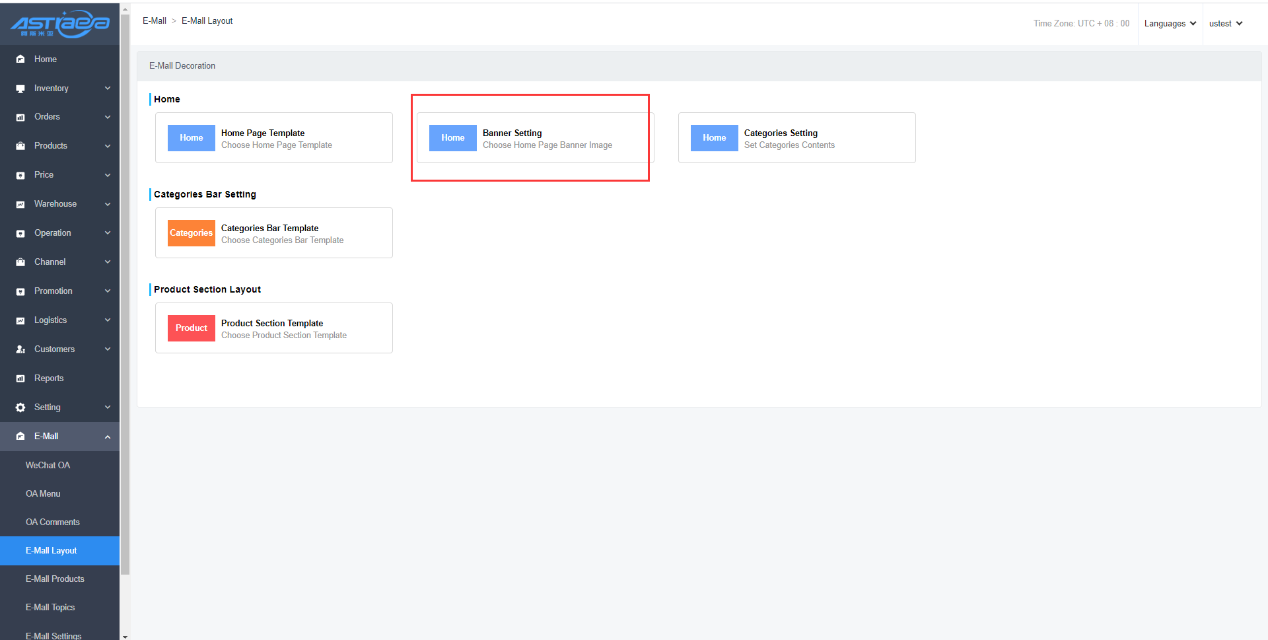
4.2 Banner picture
[Operating steps]
Step 1: Log in Apos server, click "E-Mall-E-mall Layout", and click Banner settings to enter the editing page.
Step 2: Set the rotation time. The default time is 3 seconds. The minimum time is 3 seconds and the maximum time is 60 seconds.
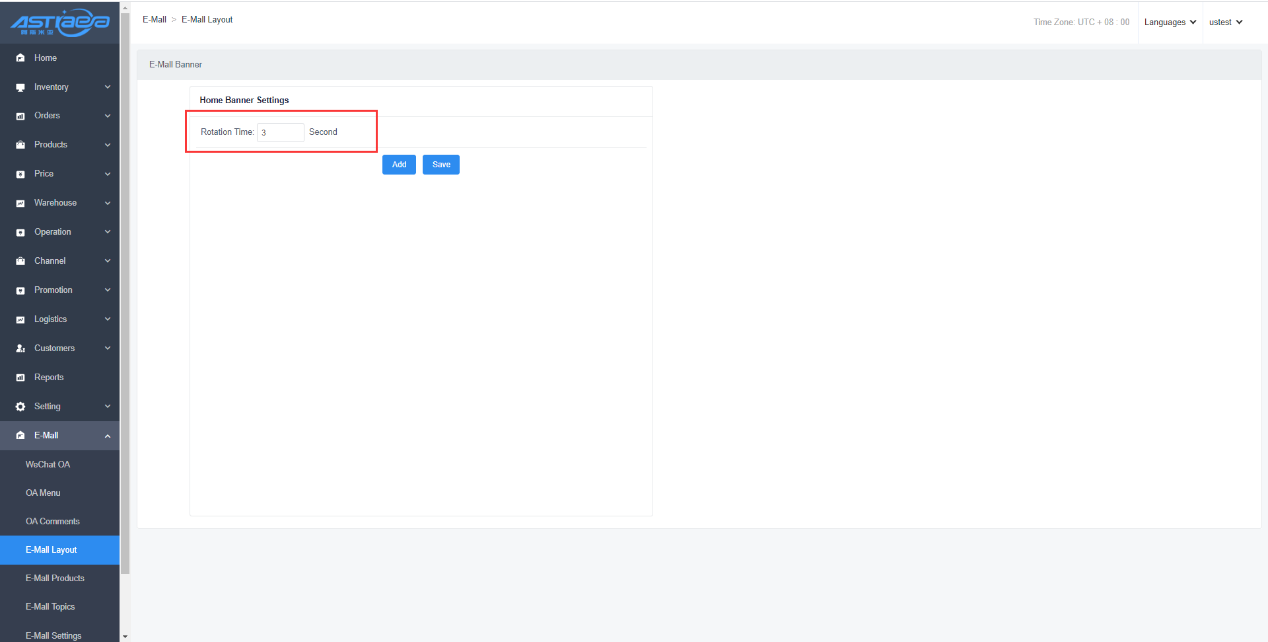
Step 3: Click “Add” button to automatically add a row, up to 5 rows.

Step 4: Upload rotation pictures. You can add 5 pictures at most and 1 picture at least.
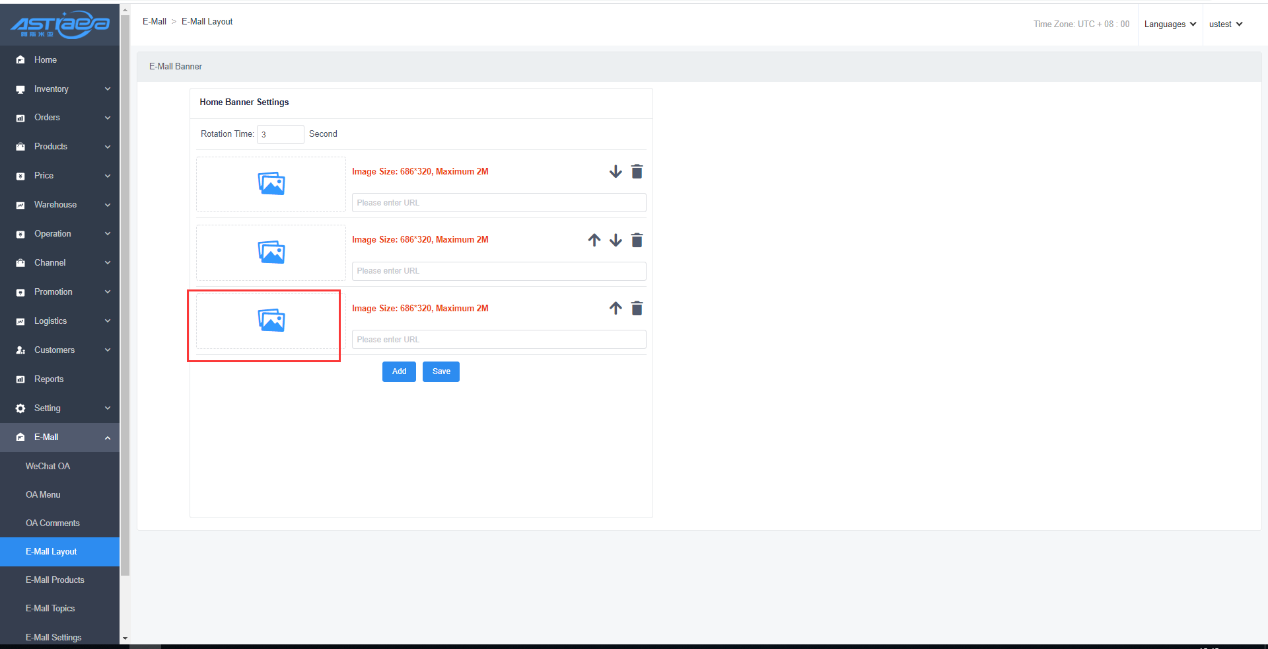
Step 5: Set jump link for rotation pictures.
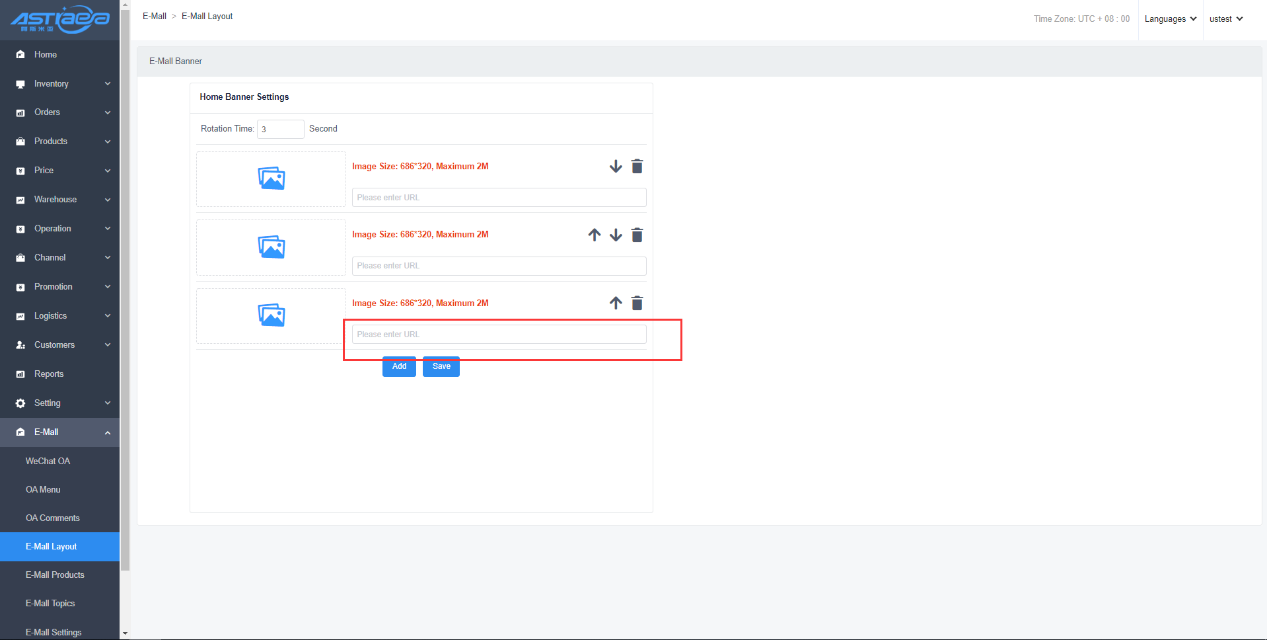
Step 6: The rotation order of pictures can be adjusted by up and down arrows.

Step 7: Click “Delete” button to delete the rotation picture.

Step 8: Click “Save” and view the effect.

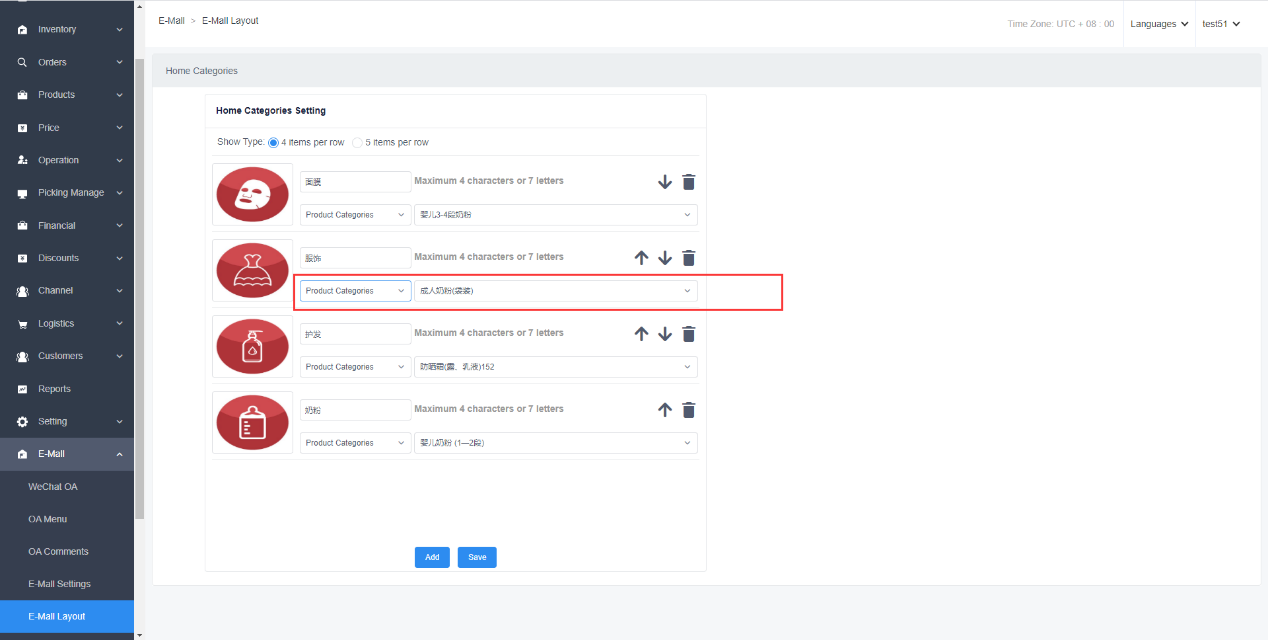
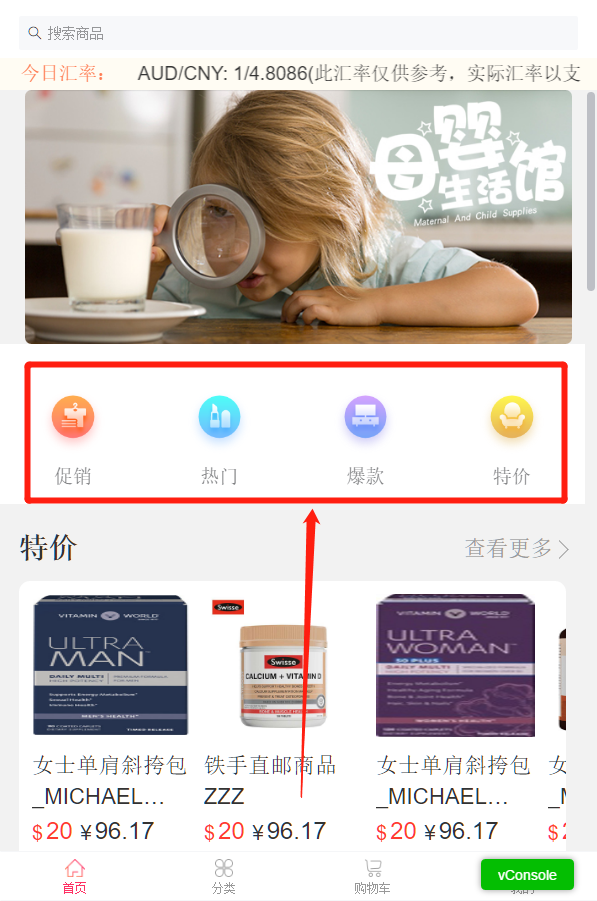
4.3 Category bar settings
Effectively classify and manage the products in the more, making it easier for buyers to find the needed treasure
[Operating steps]
Step 1: Log in Apos server, click "E-Mall-E-mall Layout", and click category bar settings to enter the editing page.
Step 2: Click “Add” button and add one row by default.

Step 3: Set category jump, support switch selection of primary and secondary categories.
Step 4: Or set a custom link and enter a jump link.
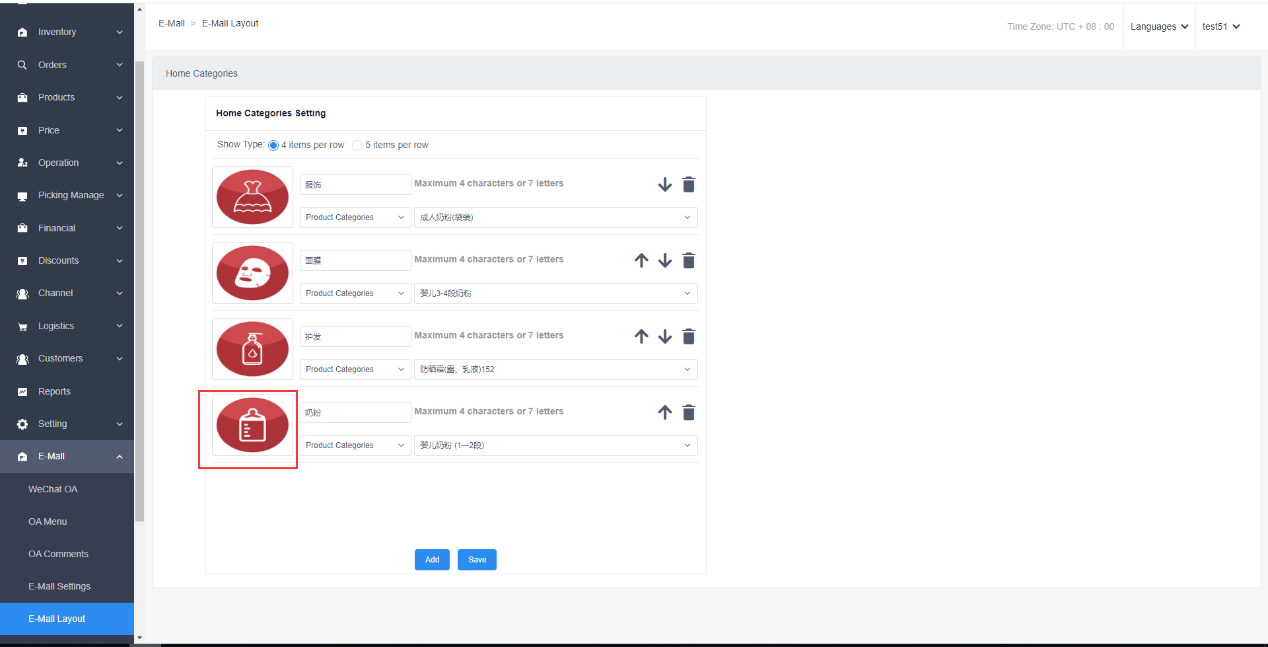
Step 5: Click on the picture to upload it.
Step 6: Set the title name of the category bar, with a maximum of 4 Chinese characters or 7 letters.
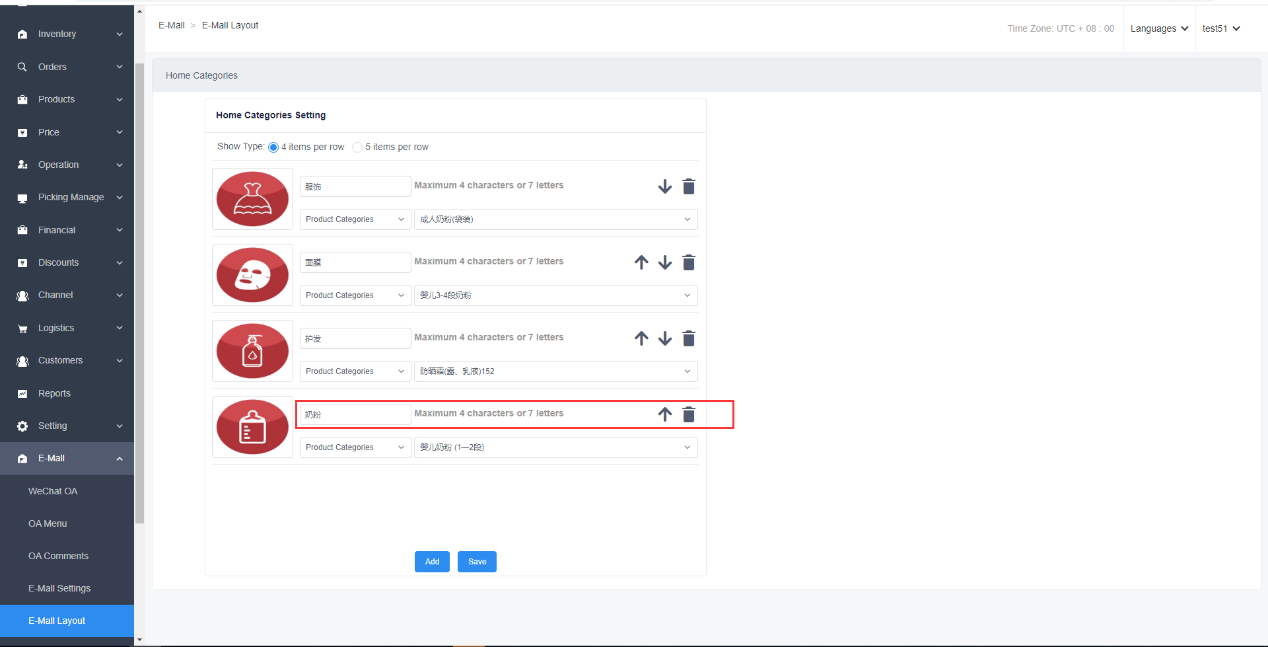
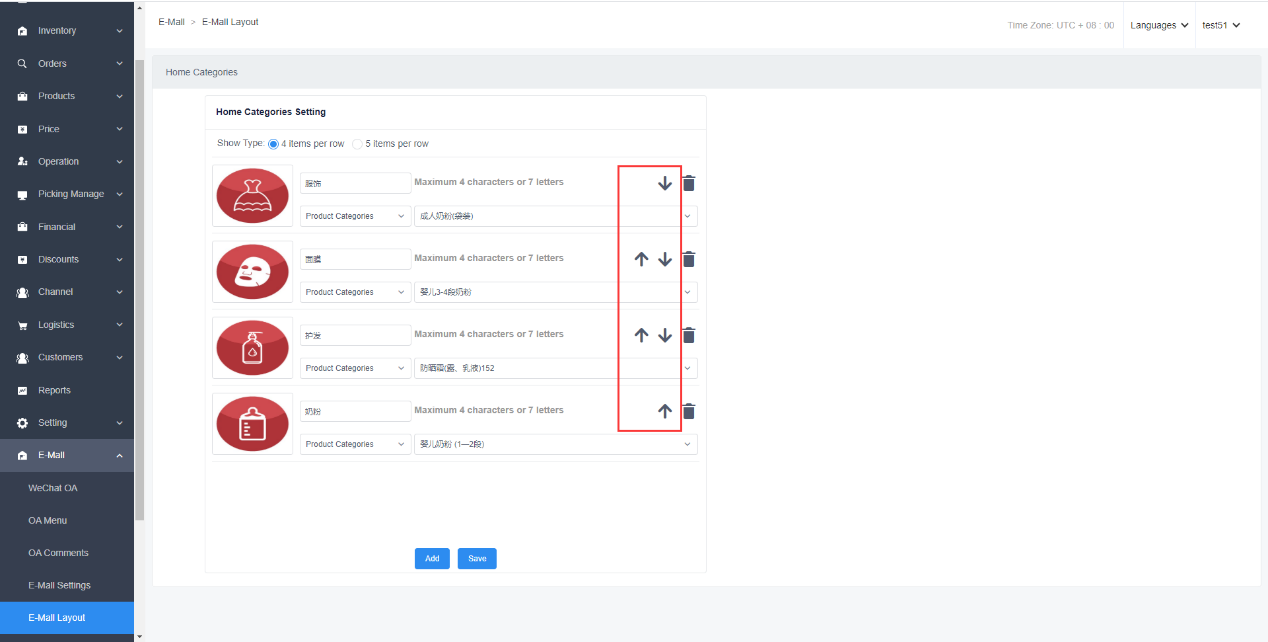
Step 7: The display order of category can be adjusted by up and down arrows.
Step 8: Delete a category, Click “Delete”, click “Confirm” to delete it.
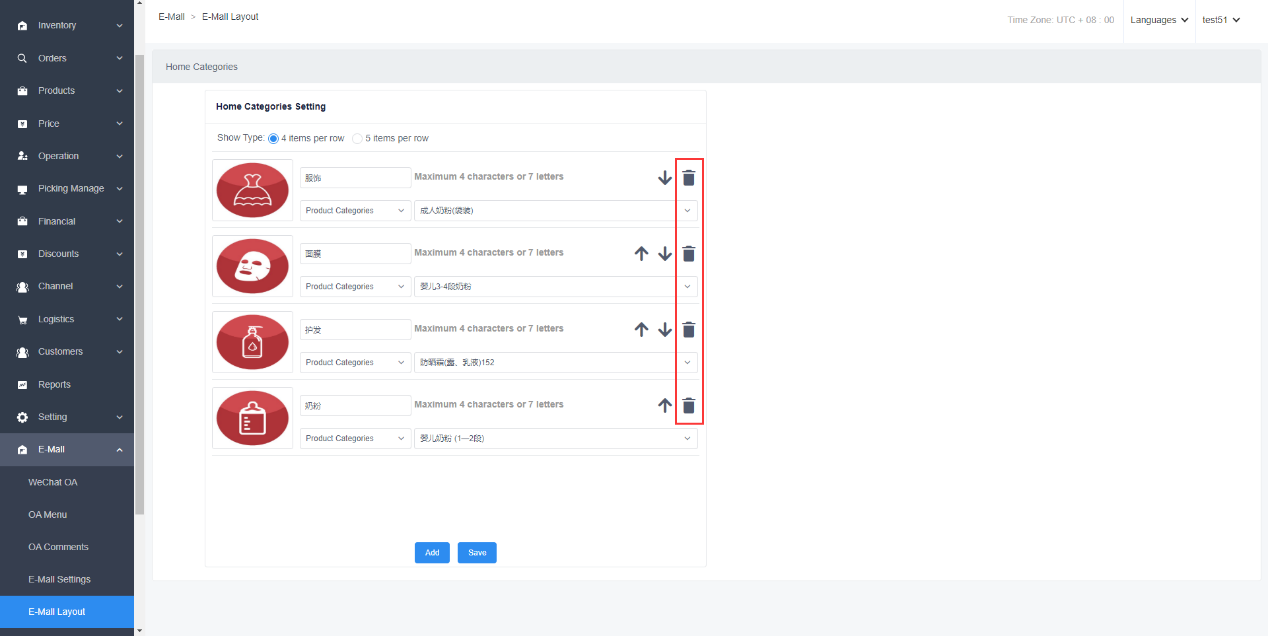
Step 9: Click “Save” to view the effect in the mall.


4.4 E-mall topics
Set hot and promotional products to be displayed on the homepage, so that users can browse and buy them quickly
4.4.1 Hot product topics
[Operating steps]
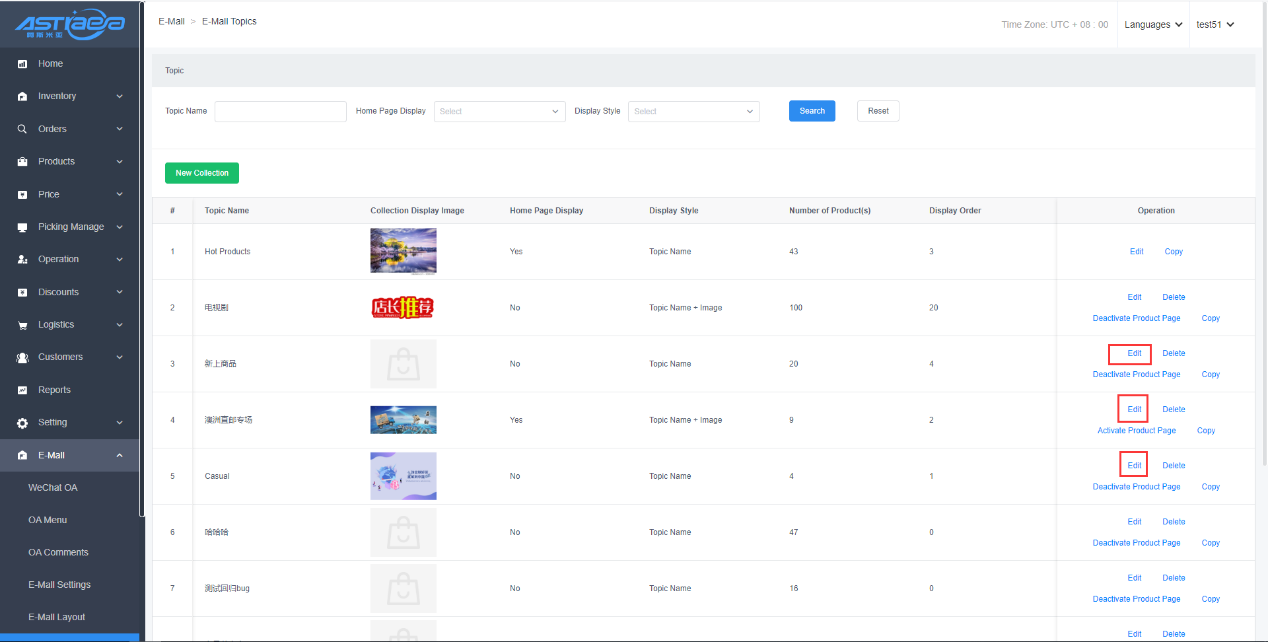
Step 1: Log in Apos server, click "E-Mall-E-mall Topics".

Step 2: Click Hot product topics, click edit button to enter edition page

Step 2: Enter topic name.

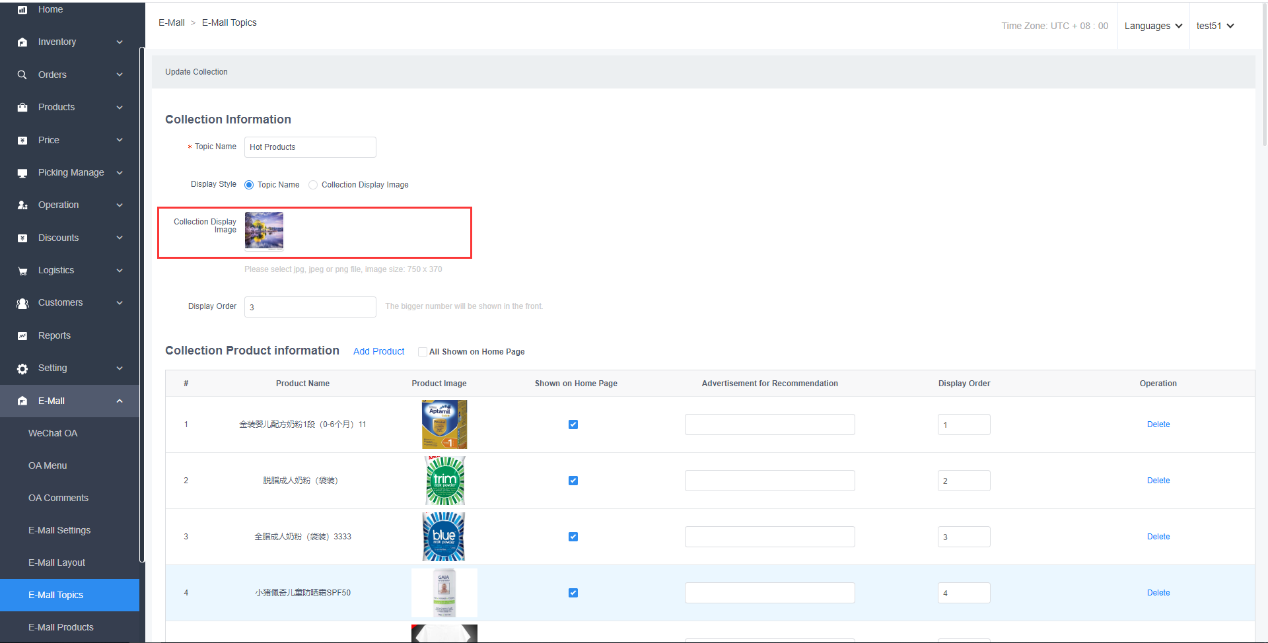
Step 3: Select topic display style as topic name or topic picture.
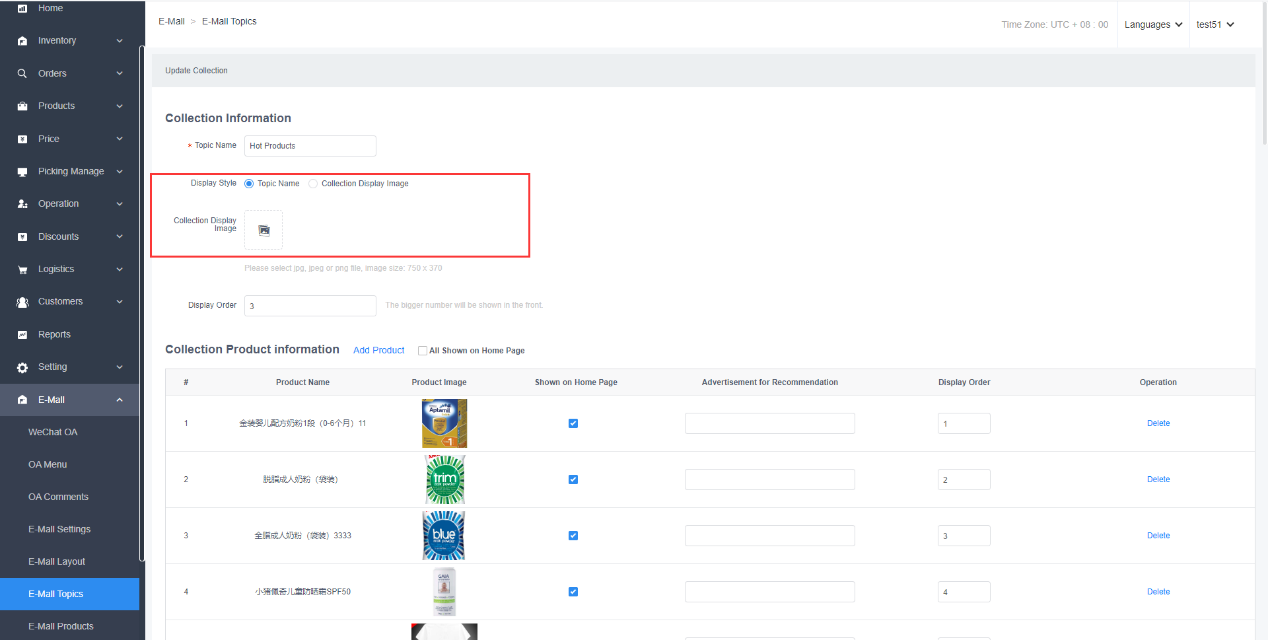
Step 4: When selecting a topic picture, click on the picture to upload it.
Step 5: Set the display order. The larger the value, the earlier the position.
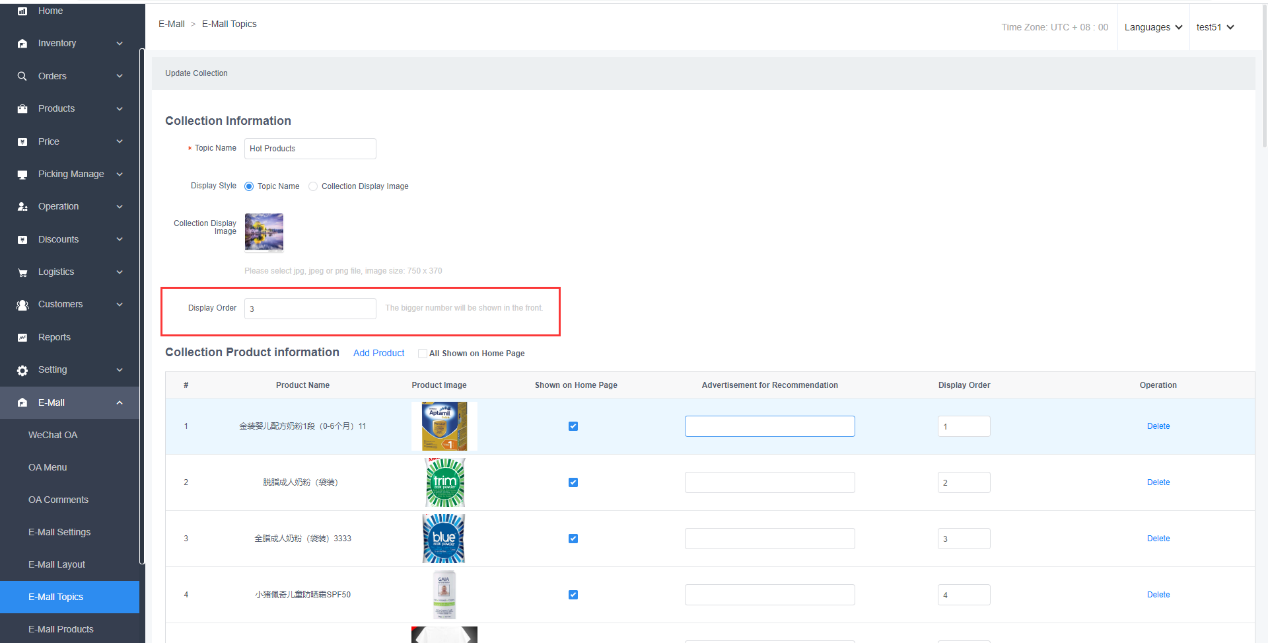
Step 6: Click “Add Products” to enter the product selection page.
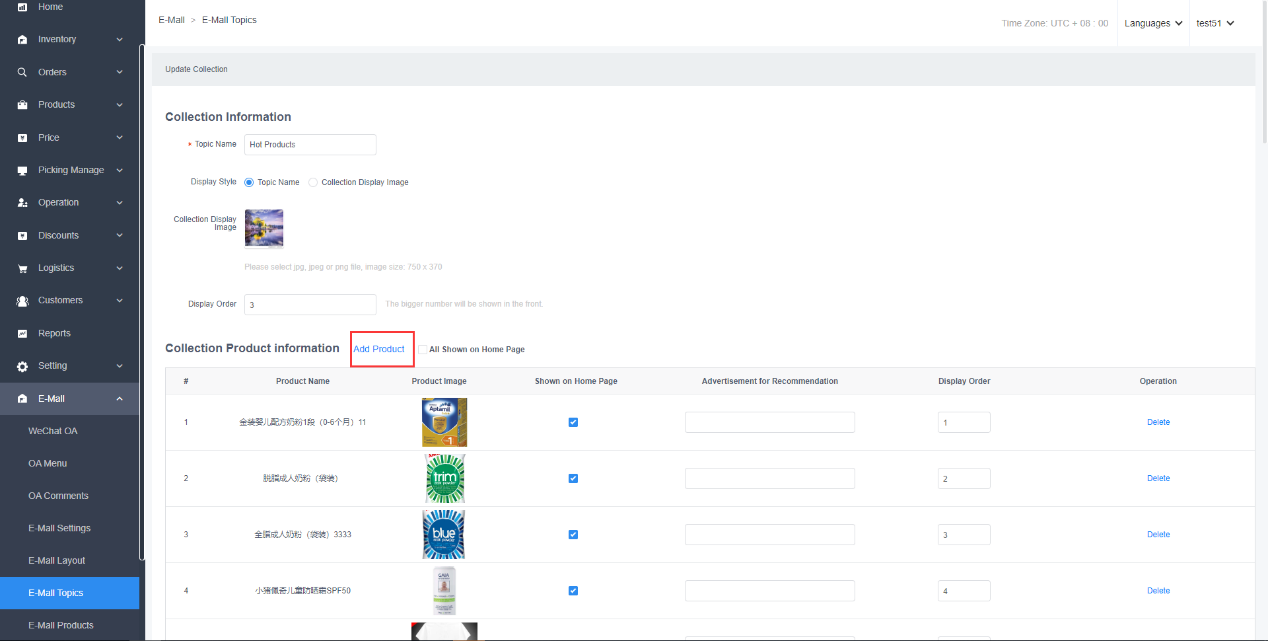
Step 7: Select the topic product, and click “Confirm”.

Step 8: Check the products displayed on the homepage, up to 10.

Step 9: Set the display order of products on the mall homepage. The larger the value, the earlier the position.
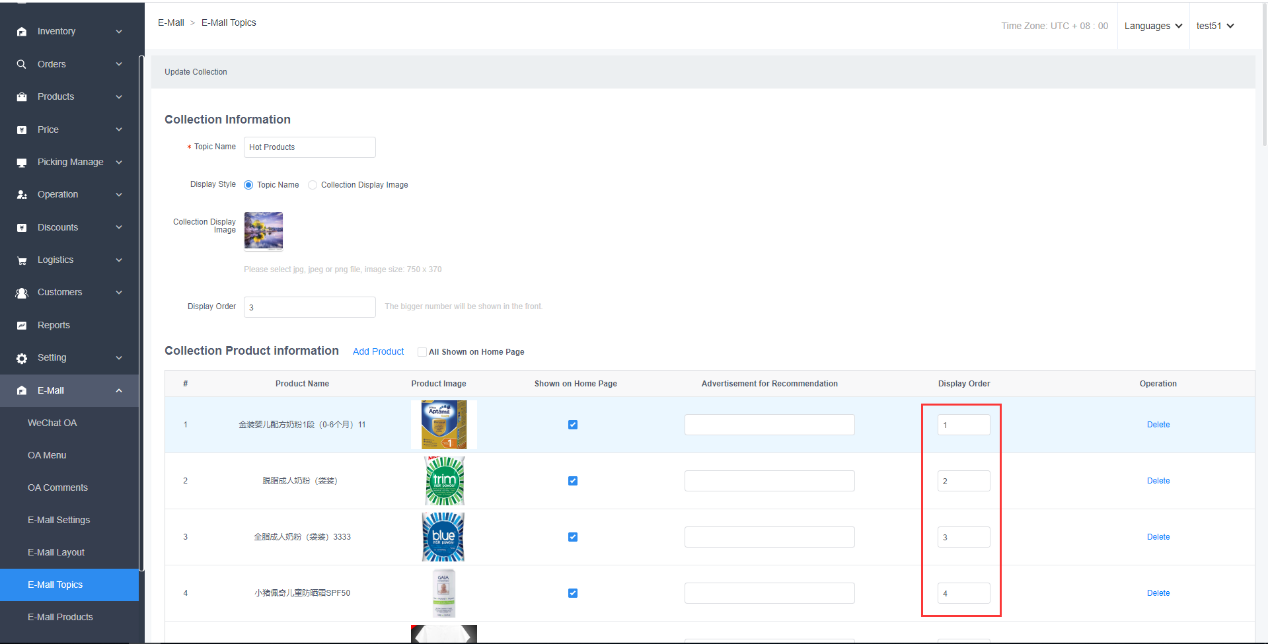
Step 10: Support deletion. Click “Delete” button to delete products.

Step 11: Unchecked products are displayed in “View More” of “E-mall Topics”.


Step 12: Click “Submit” to go back to the list.

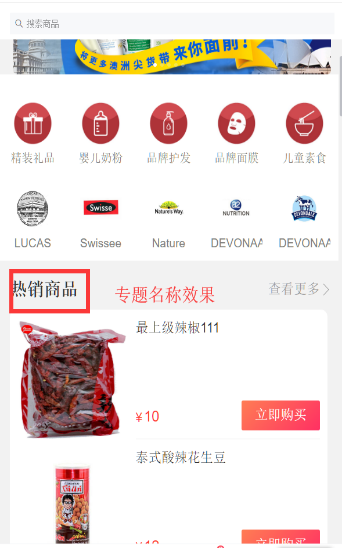
Step 13: There is no operation of activating for hot products, which are activating by default.

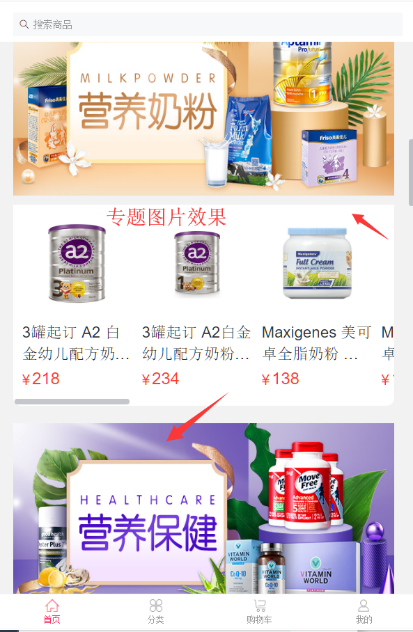
Step 14: The following picture shows the effect of "topic name" and "topic picture” for hot product topics.

4.4.2 E-mall topics
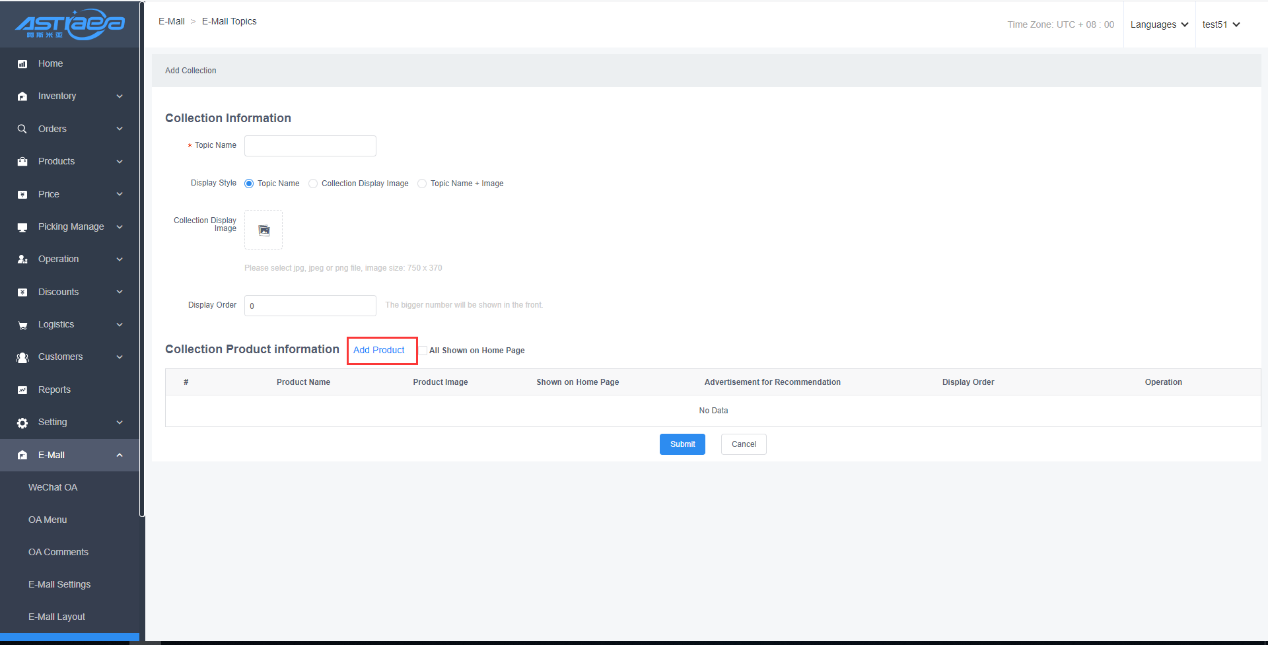
[Operating steps]
Step 1: Click “Add Topics” button in the list to enter the new product topic page.
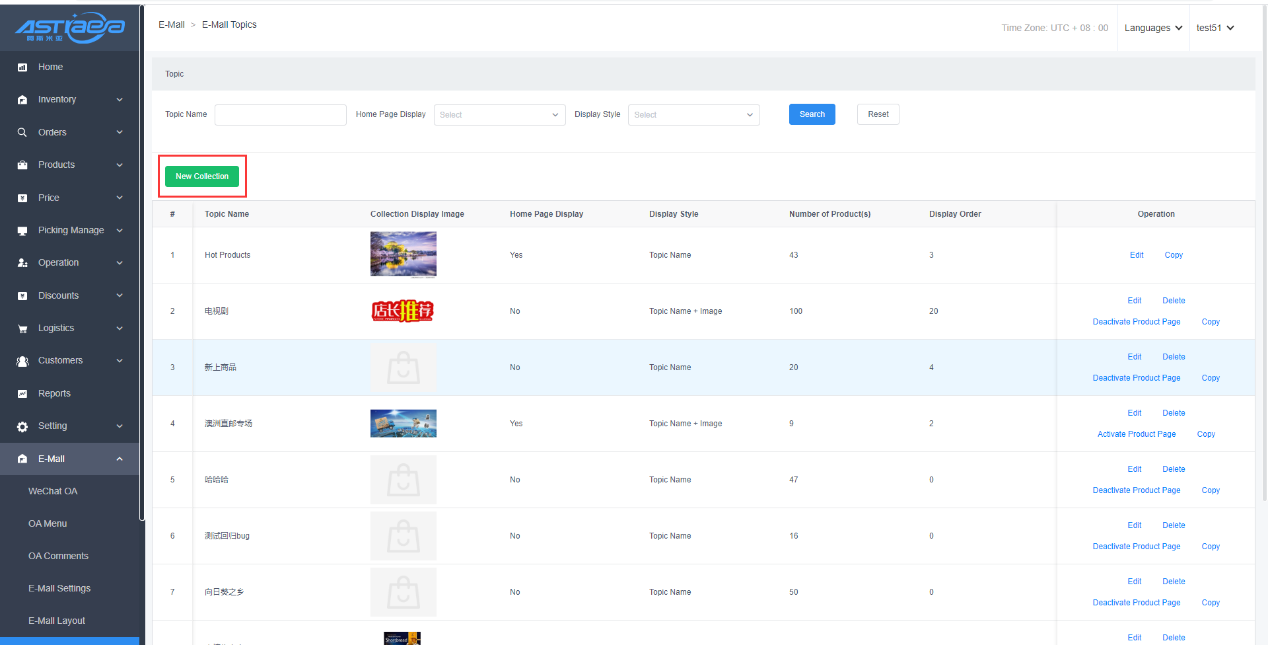
Step 2: Enter topic name.
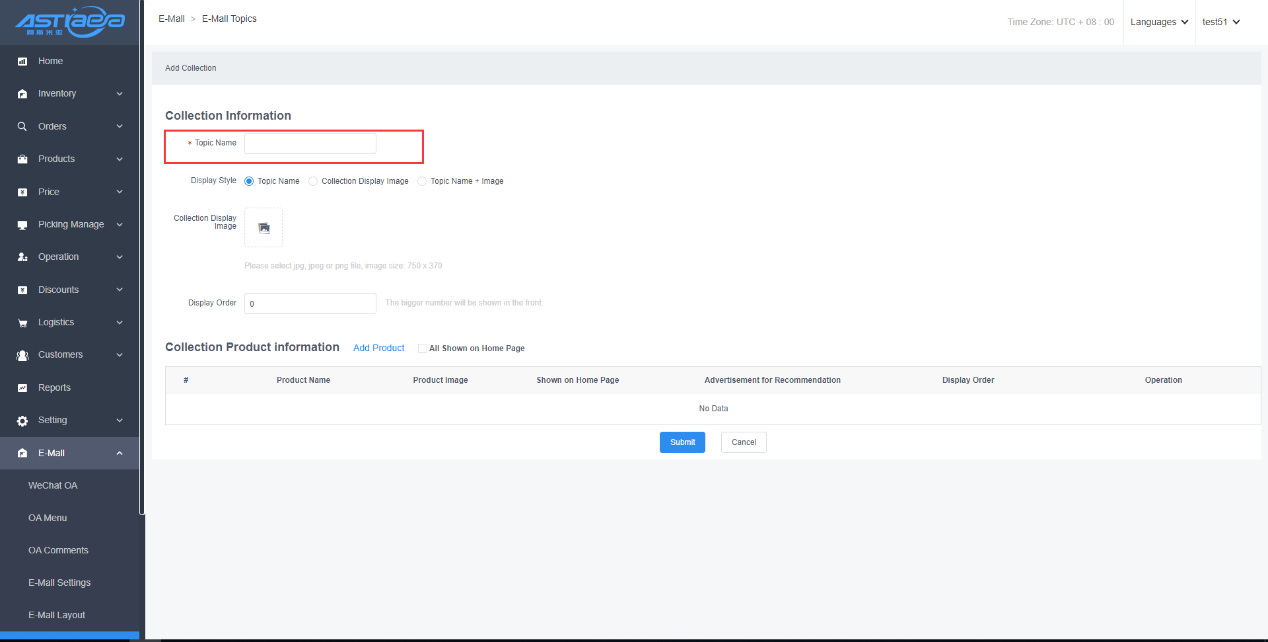
Step 3: Select display style as topic name or topic picture.
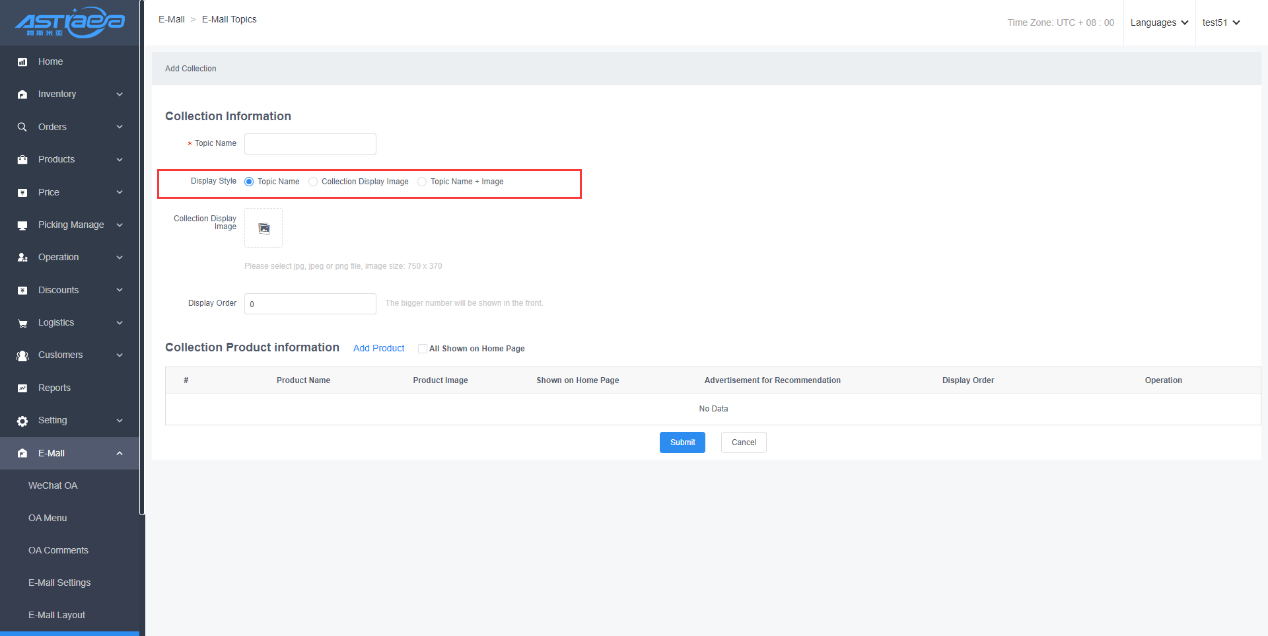
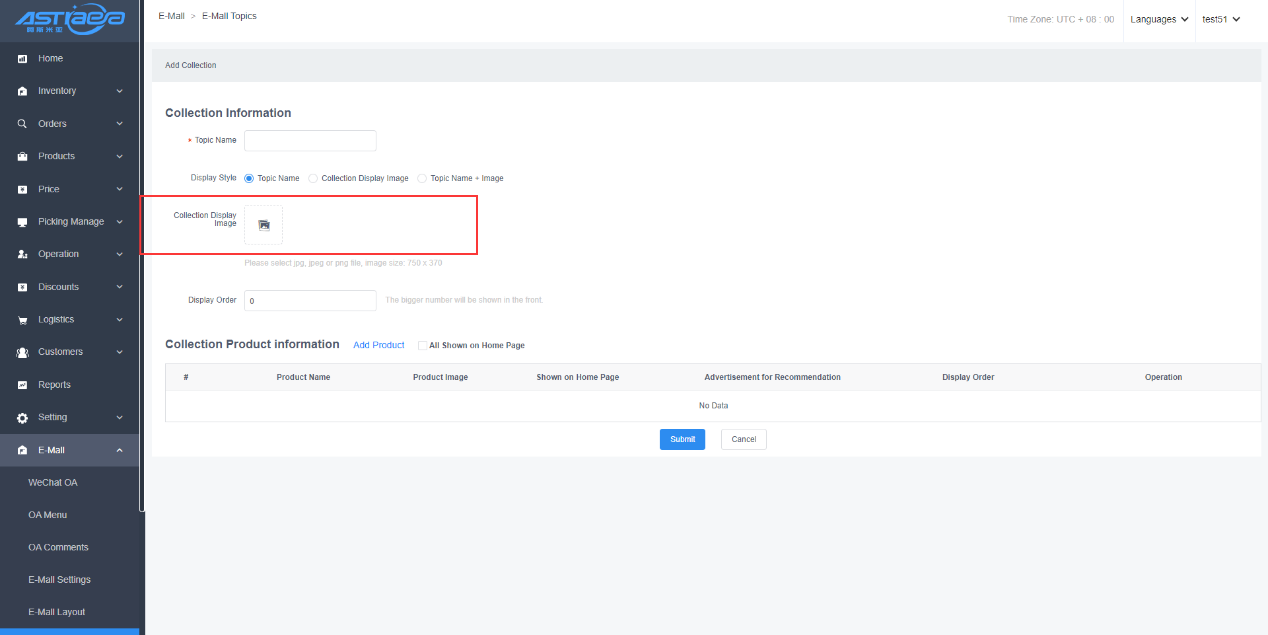
Step 4: When selecting the display style as topic picture, click on the picture to upload it.
Step 5: Set the display order of topics. The smaller the value, the earlier the position.

Step 6: Click “Add Products” to enter the product selection page.
Step 7: Check the products, and click “Confirm”.

Step 8: Check the products displayed on the homepage, up to 10.
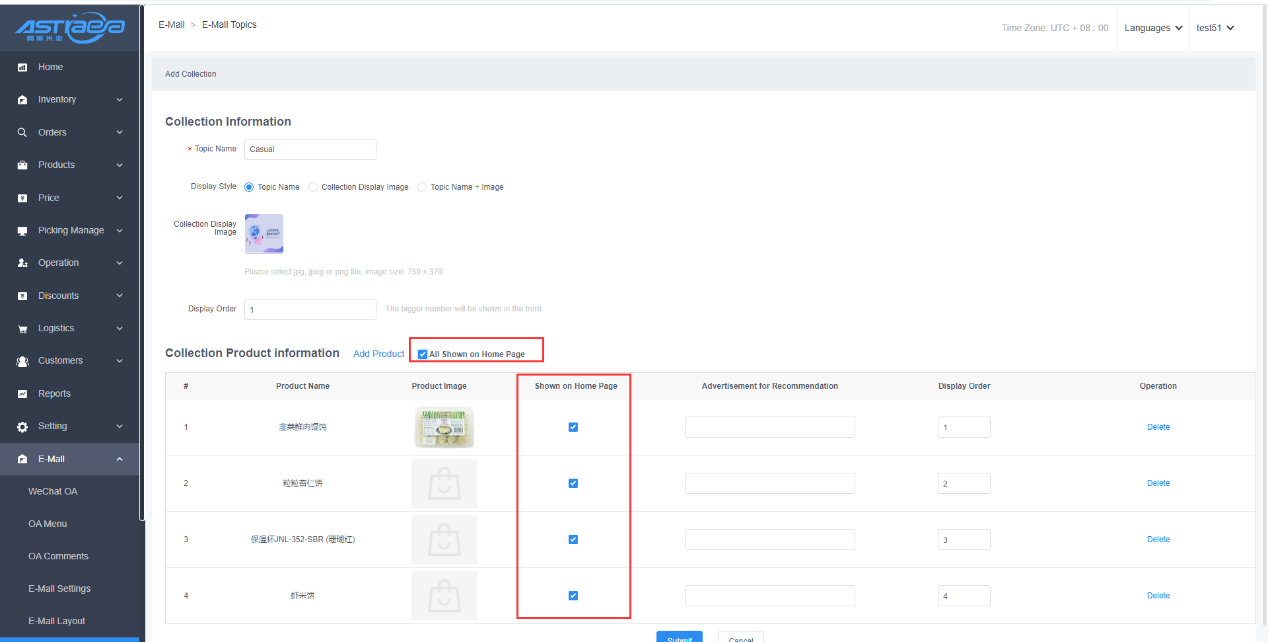
Step 9: Set the display order of products on the homepage. The smaller the value, the earlier the position.

Step 10: Click “Delete” button to delete the product.
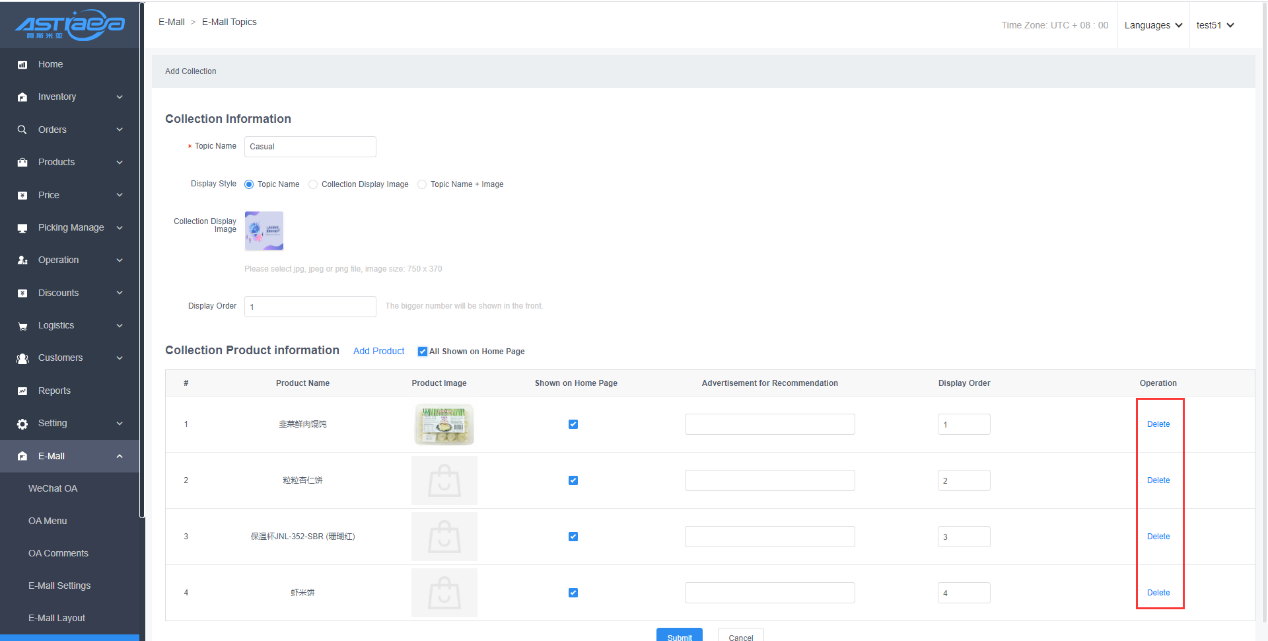
Step 11: Click “Submit” button to save the data.

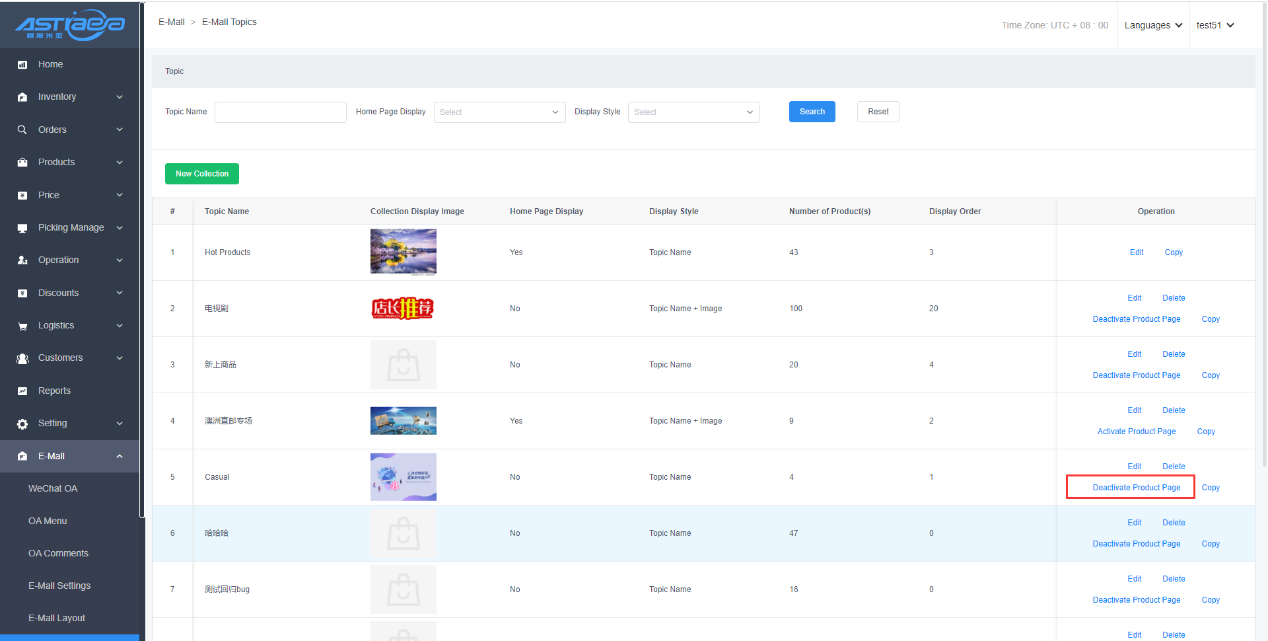
Step 12: Click “Activate” button on the list page, the topic will be displayed on the mall homepage.
Step 13: The following picture shows the effect of "topic name" and "topic picture" for product topics.

Step 14: Click “Delete” button to delete the topic, but only the topic of products in the deactivating status can be deleted.

Step 15: Copy topic links and add them to other custom links, click to jump to the topic product page.

Step 16: Click “Edit” button to edit the topic again.
V. E-mall Products
After binding with a store, you can manage the products in the mall
5.1 Import cross-border products (for domestic commercial tenants)
Domestic commercial tenants can import cross-border products from the background to sell overseas products in the mall by binding with overseas suppliers
[Operating steps]
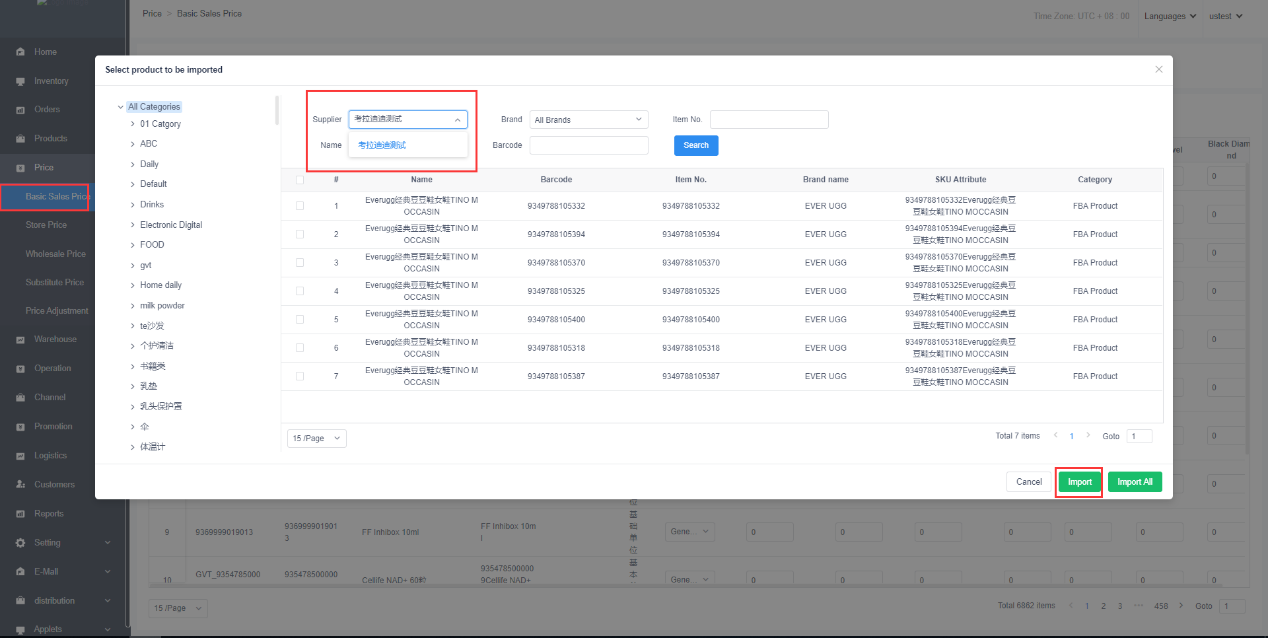
Step 1: Click "Price-Basic Sales Price" menu and click "Import Substitute Product".

Step 2: Select a supplier and then import the products.
Step 3: Edit the product price in the product list, or conduct batch operation by importing and exporting.

Step 4: After the product price is edited and saved, it will be synchronized to the mall product.
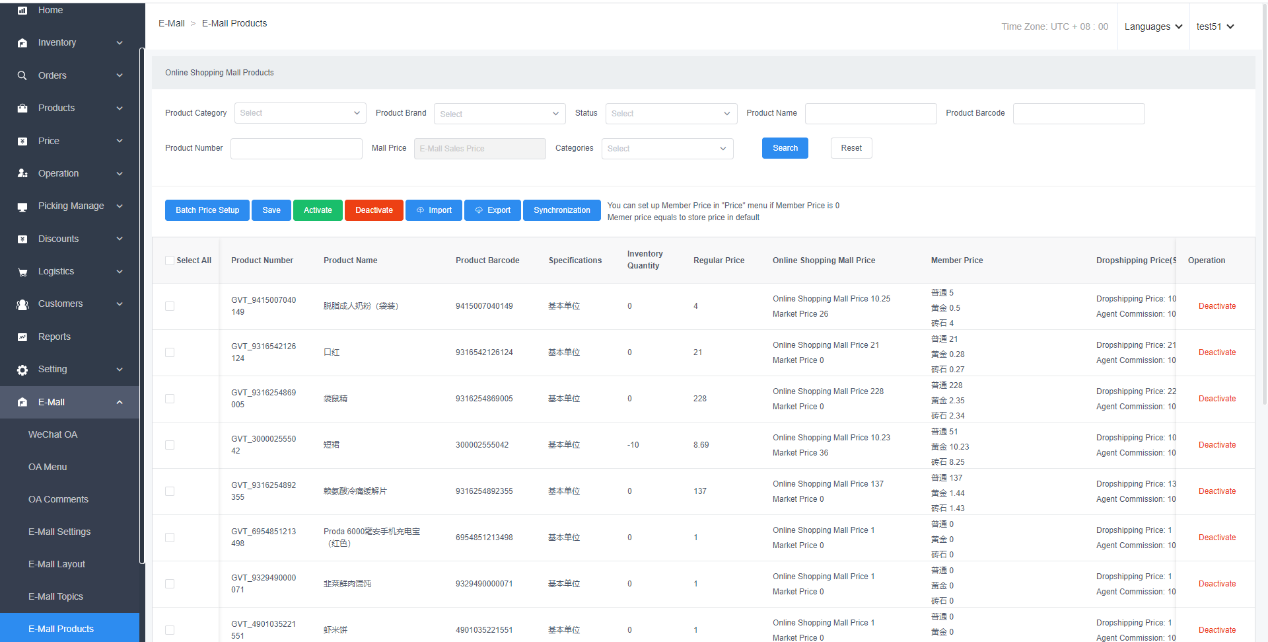
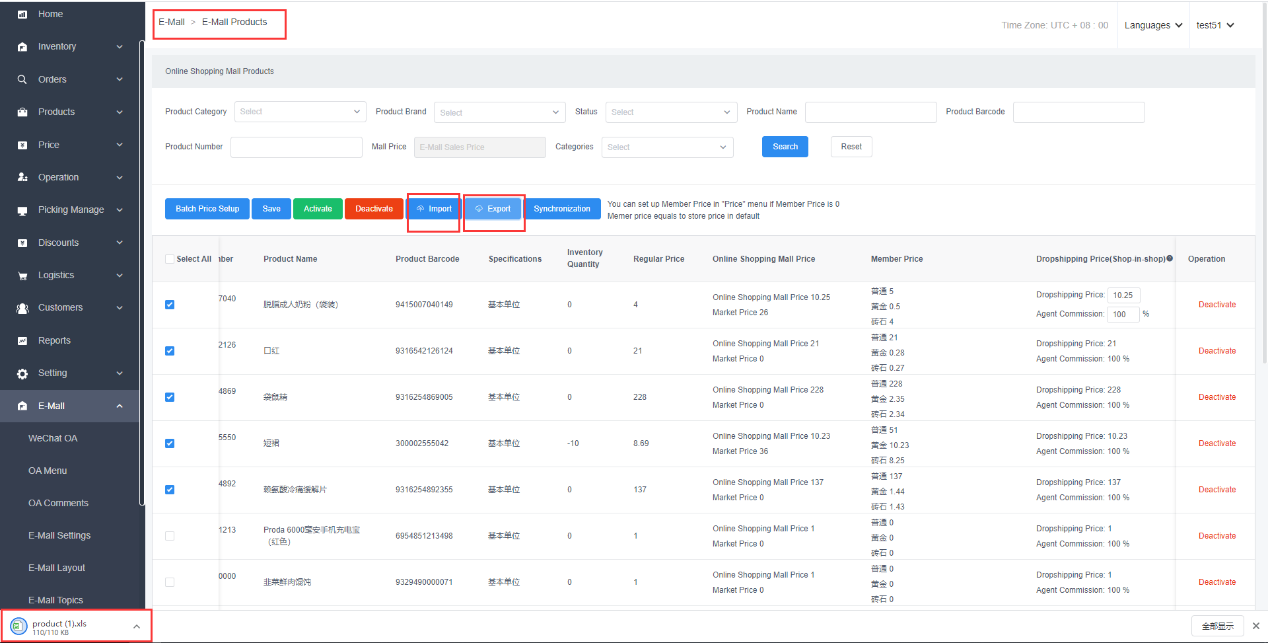
5.2 E-mall products
[Operating steps]
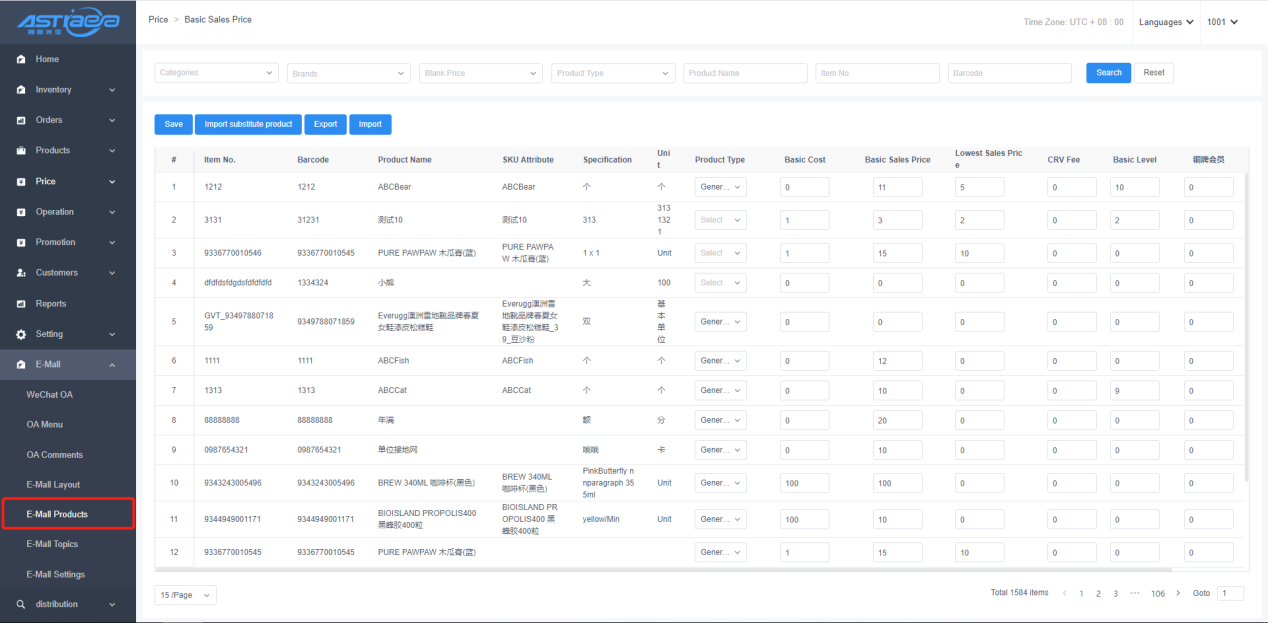
Step 1: Log in Apos server, click "E-Mall-E-mall Products” to enter the mall products page.

Step 2: Query products by category, brand, name, status, barcode, inventory, etc.
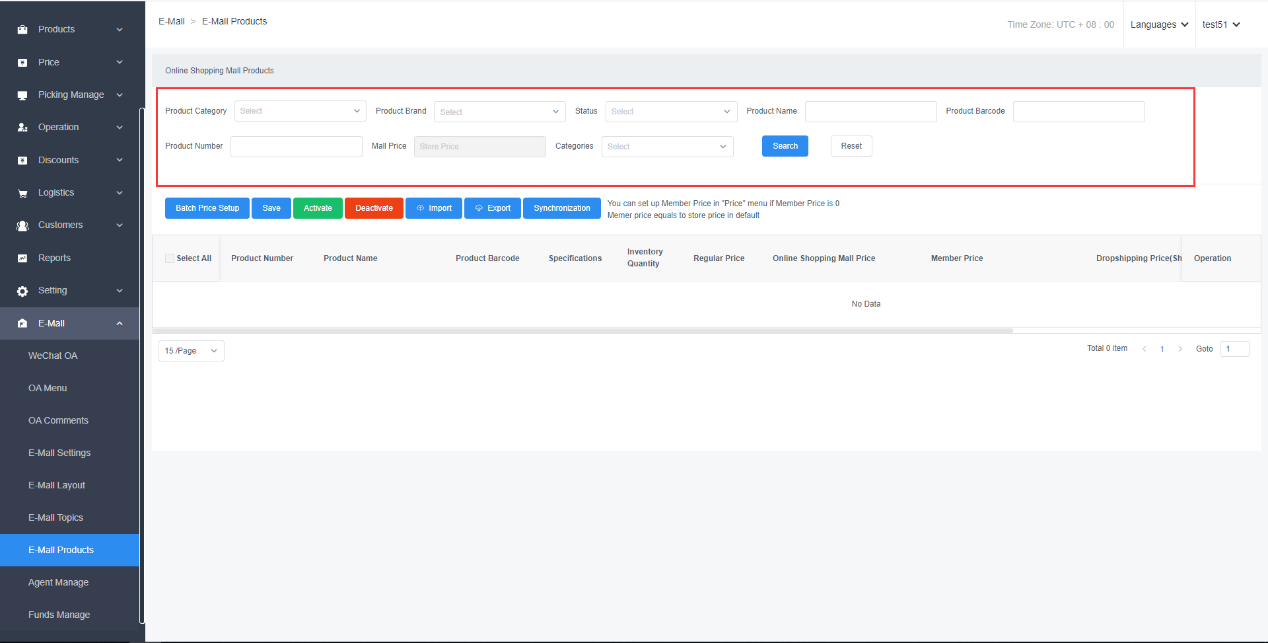
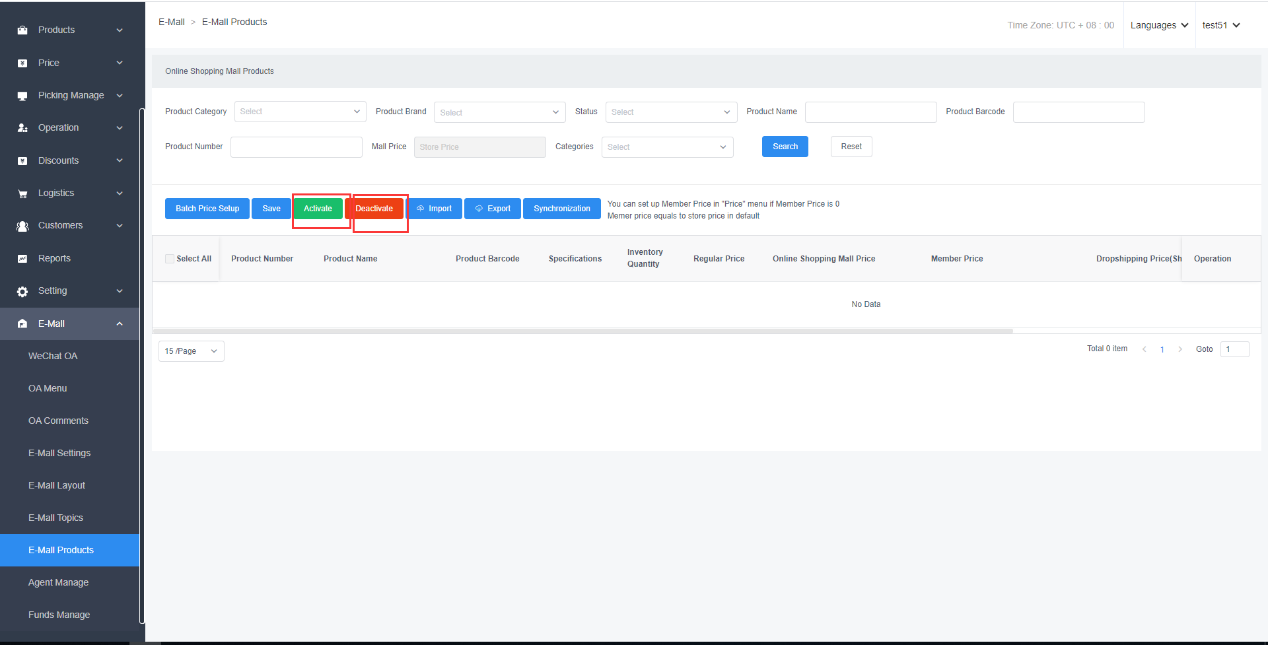
Step 3: Set activating and deactivating status for products. The products that are in deactivating status are not displayed in the mall.
Step 4: Edit the market price. The market price will be displayed only when it is greater than the mall price, with a horizontal line on the market price.
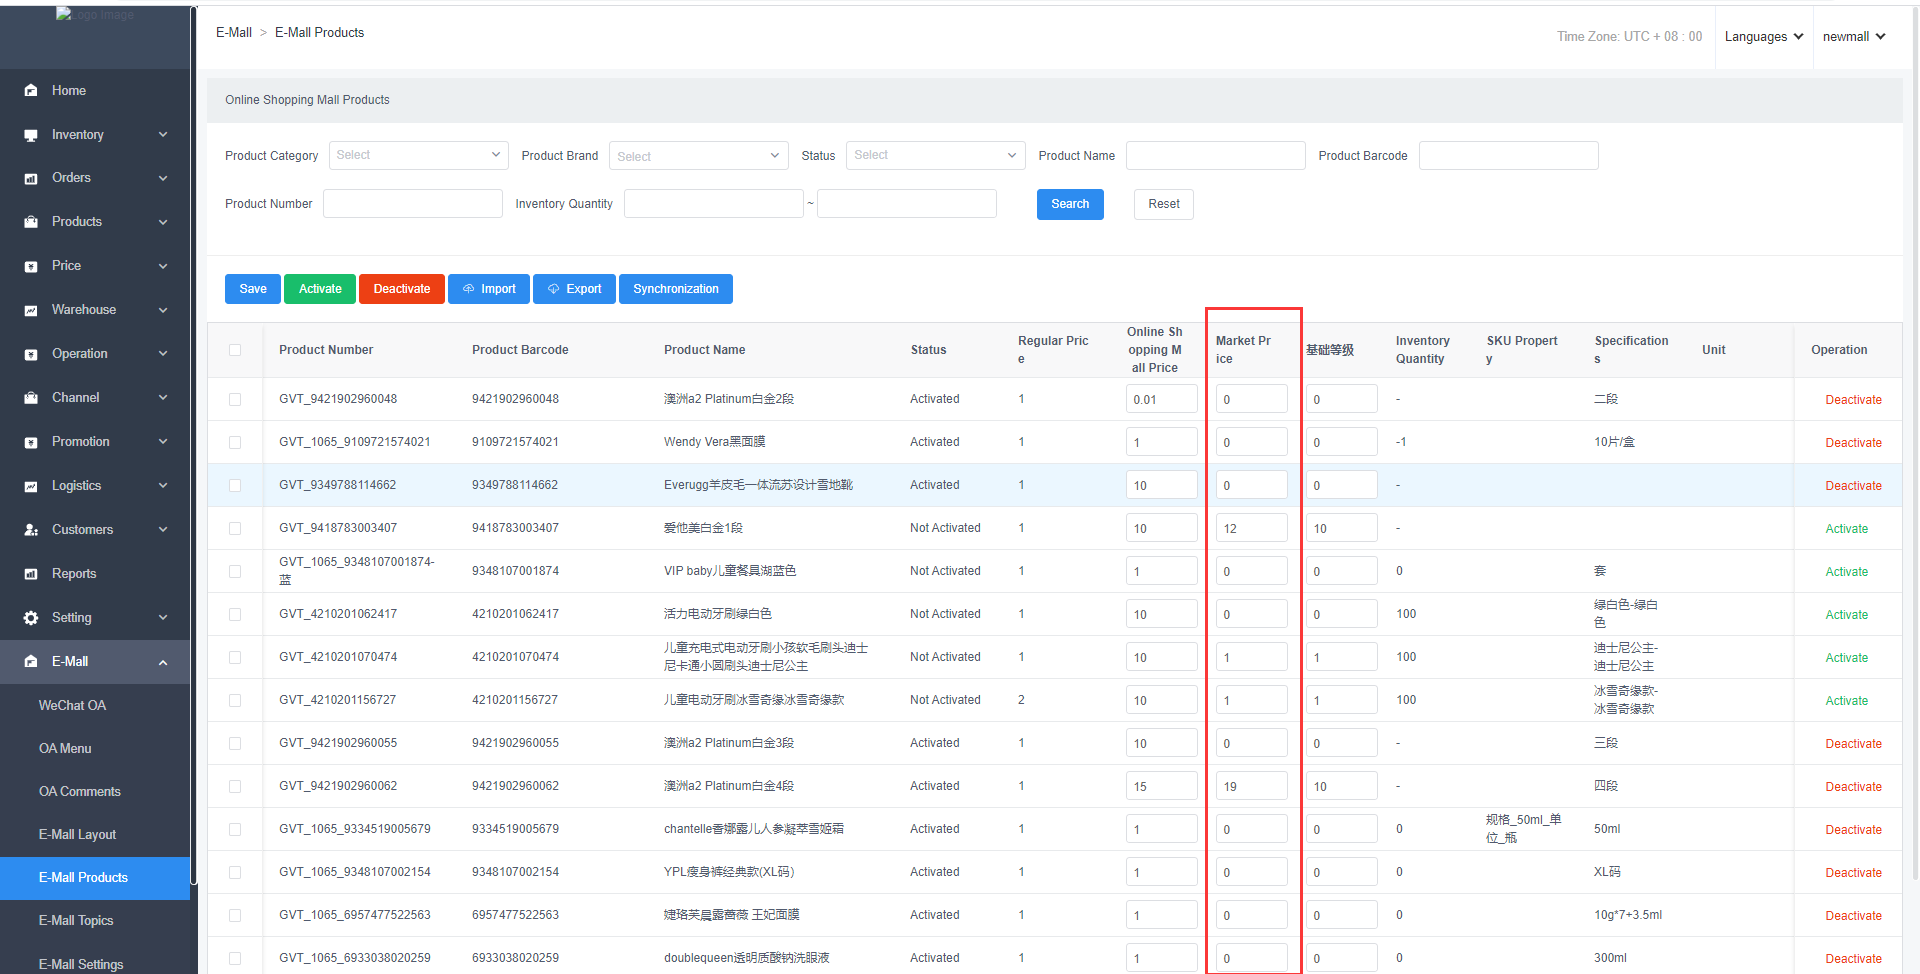

Step 5: When the mall price is the mall independent price, you can edit the product price and member price. When initializing or adding a product, the mall price is the store price by default.

Step 6: Batch maintenance of mall prices and market prices can be performed by importing and exporting.
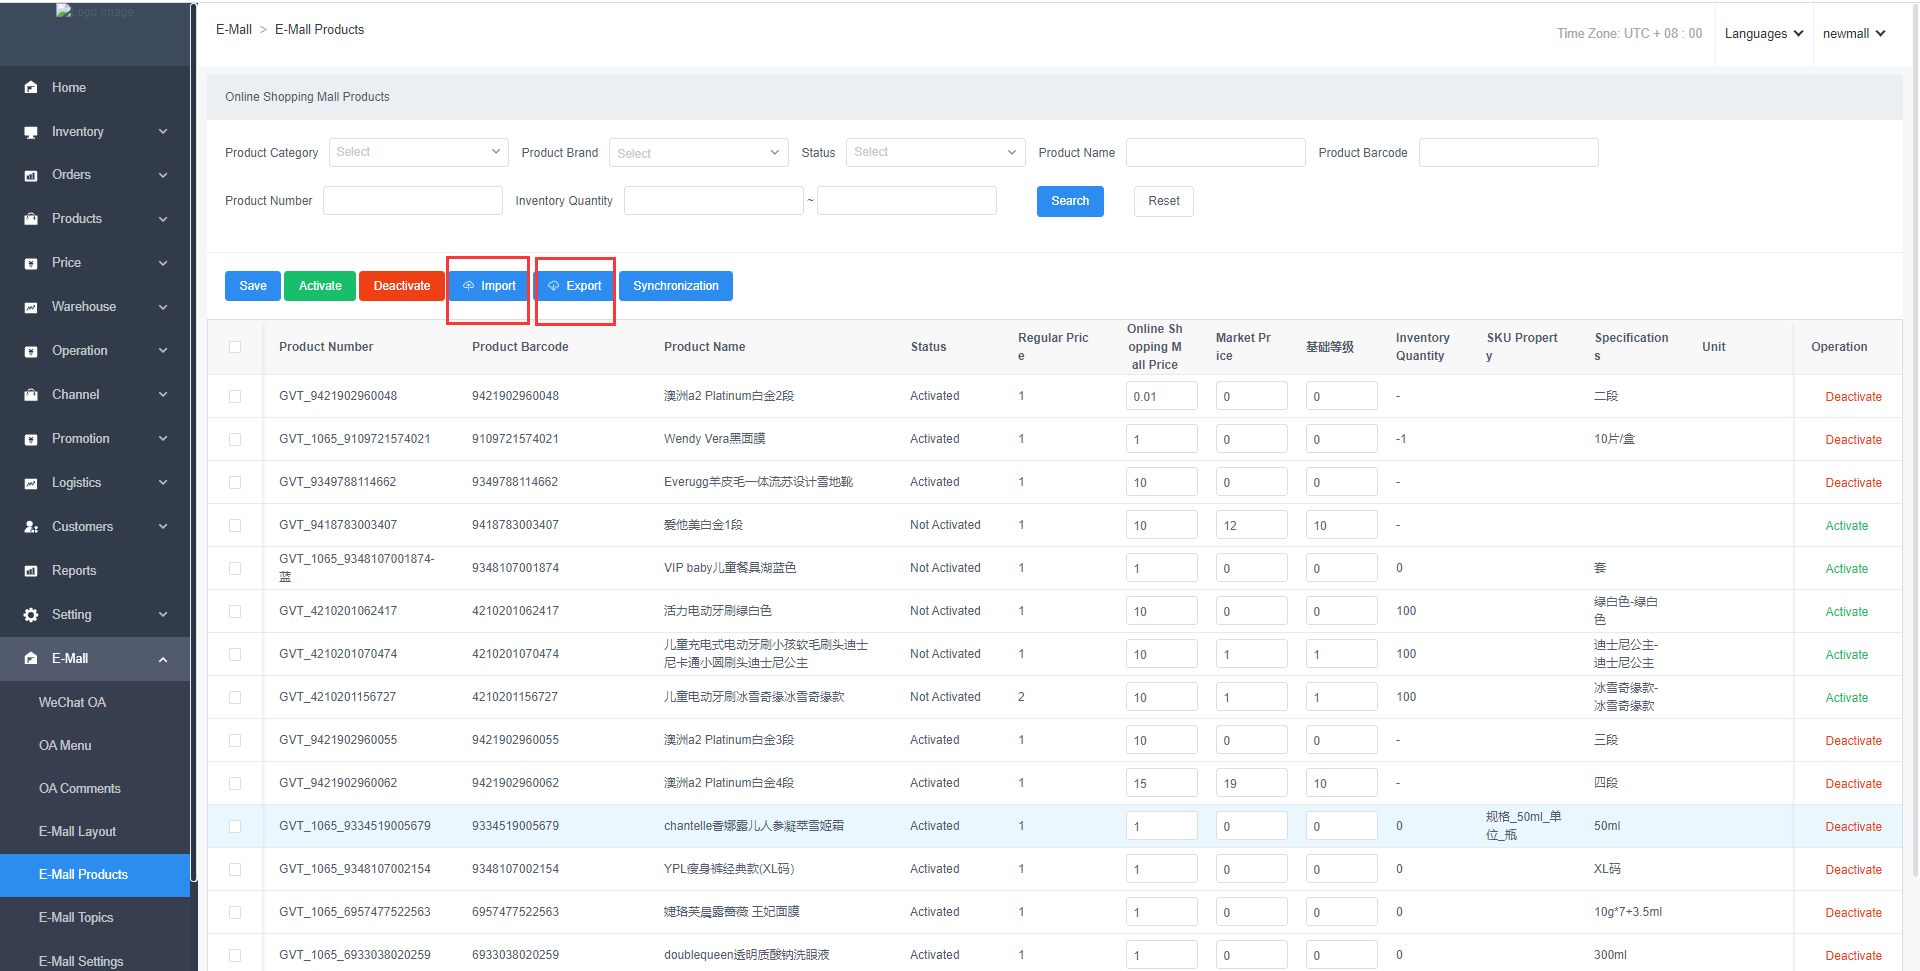
Step 7: If the product data is modified, it can be synchronized through the "Synchronization" button, and it will be automatically synchronized under normal circumstances

VI. Price-break / Rebate
6.1 Price-break activities
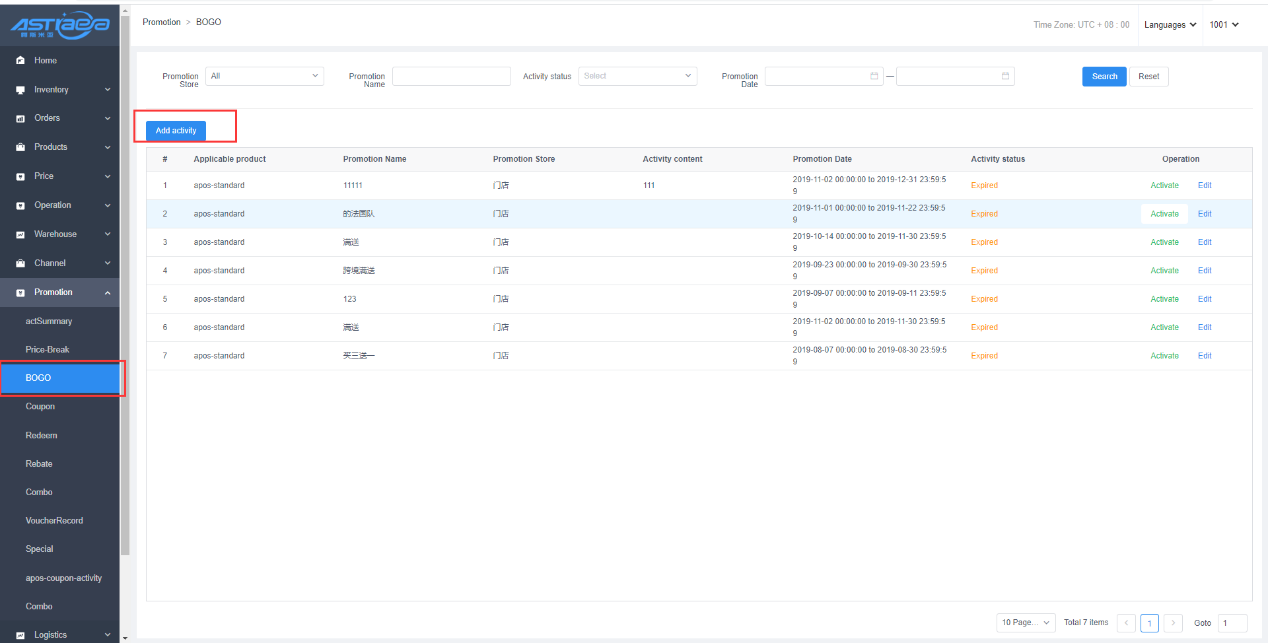
[Operating steps]
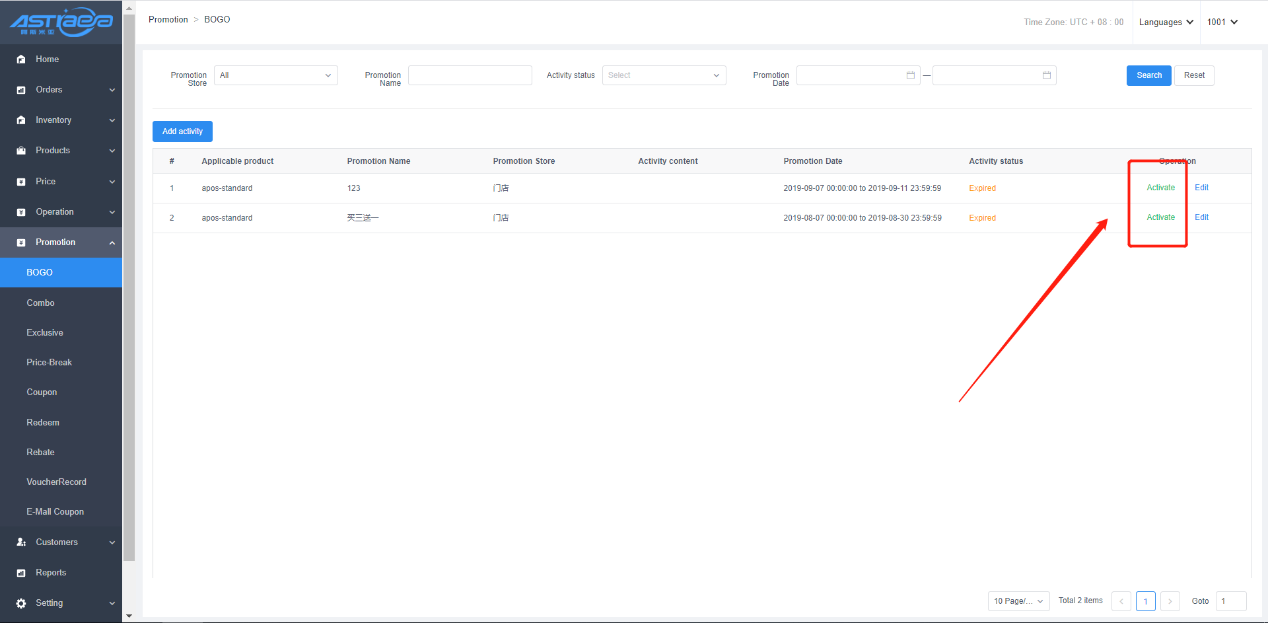
Step 1: Click price-break in promotion management to enter the list page.

Step 2: Click add activity.
Step 3: Select the activity organizer (the corresponding store bound by the mall).
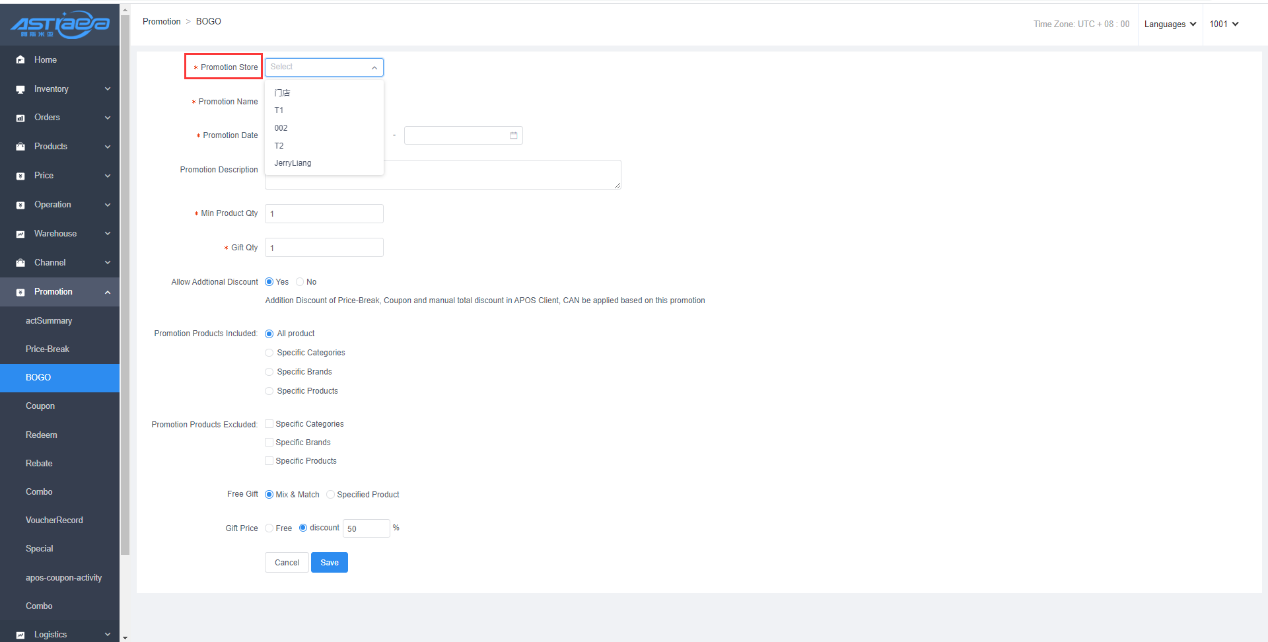
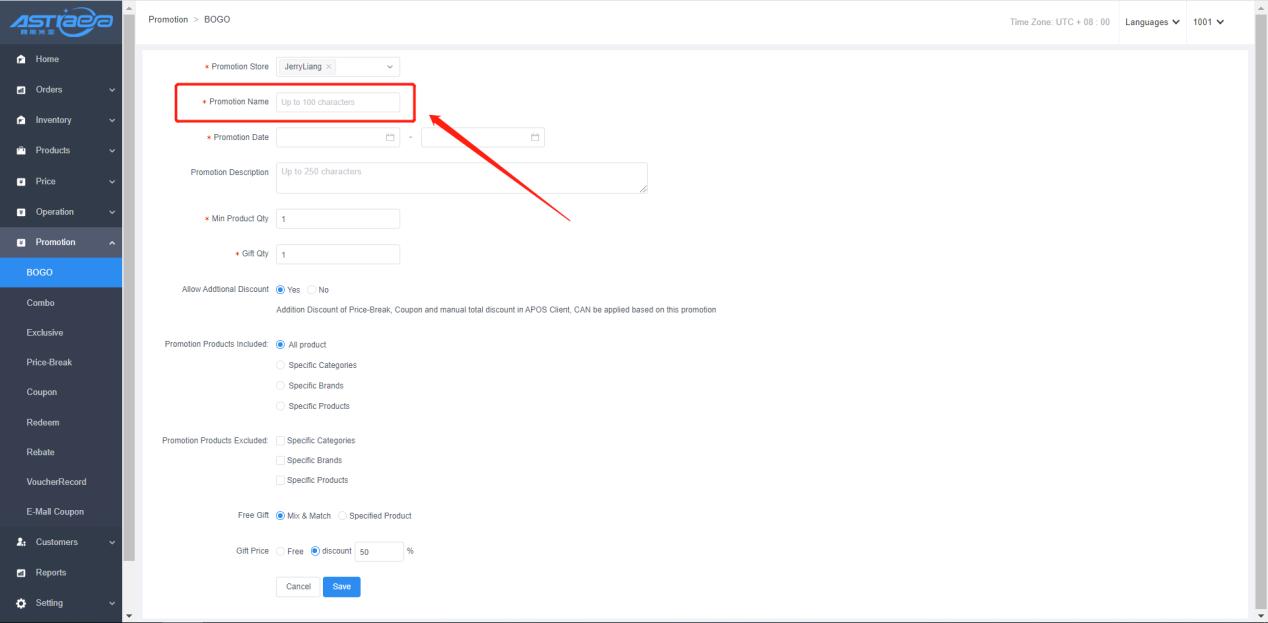
Step 4: Set the activity name.
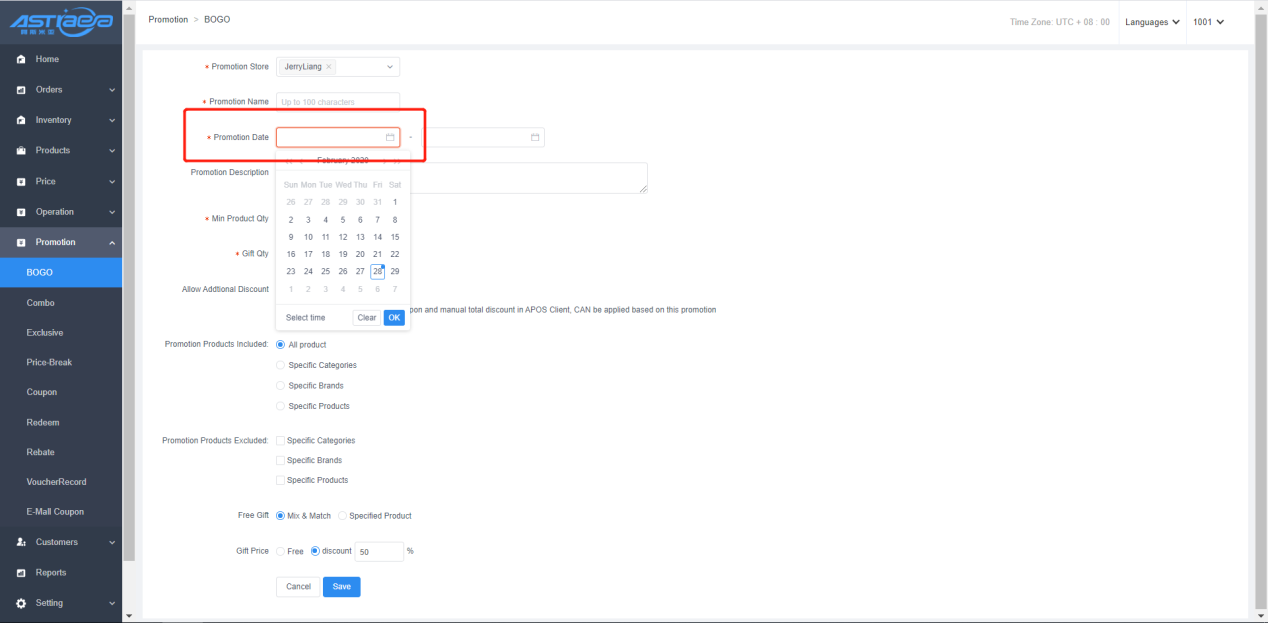
Step 5: Select the activity date.
Step 6: Select the discount type: amount price-break (only full amount price-break is supported in the mall currently)

Step 7: Set the price-break amount rule.

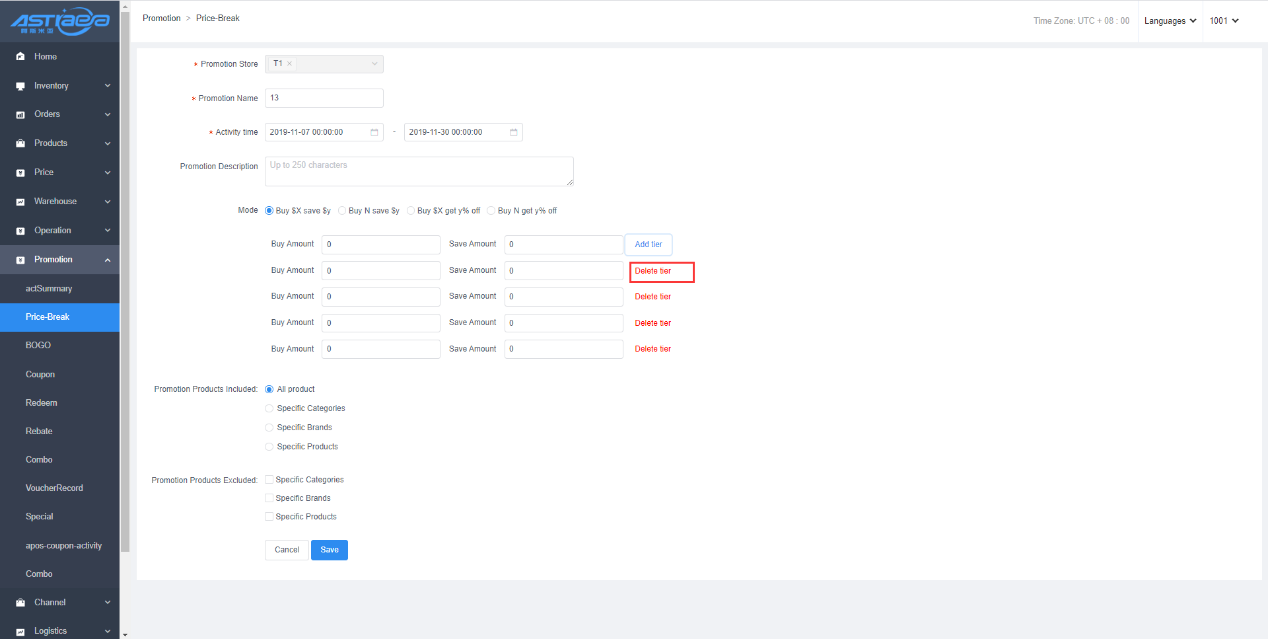
Step 8: Click add ladder to set up multiple price-break ladder rules.
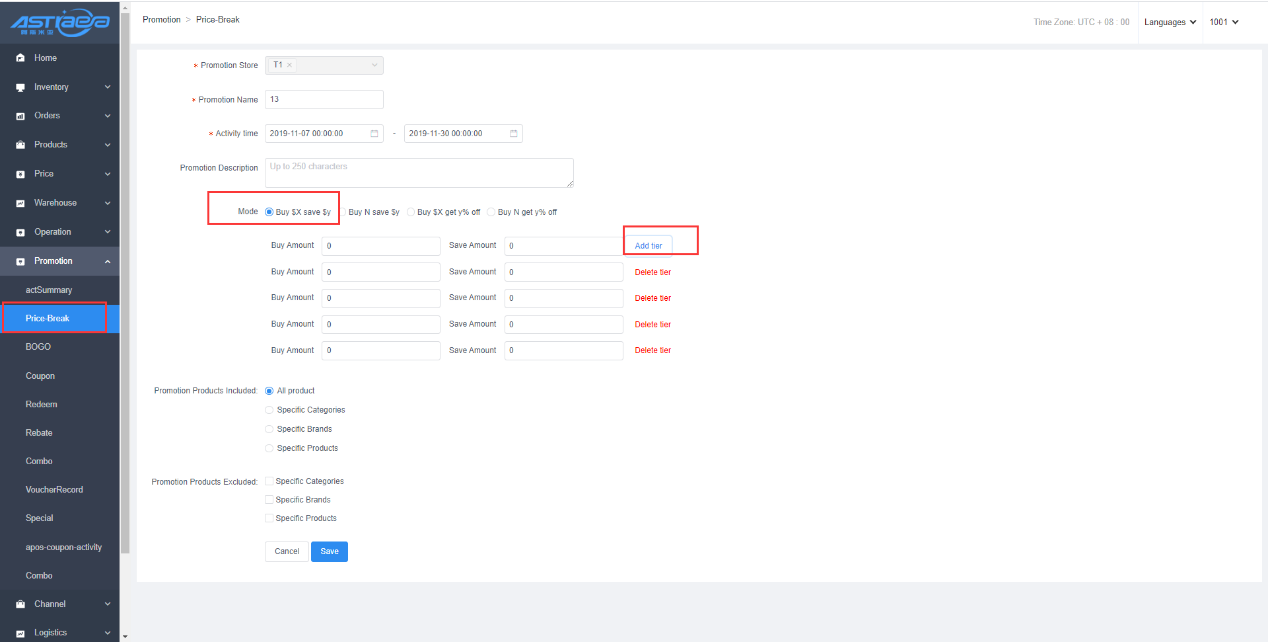
Step 9: Click “Delete” button to delete the ladder.
Step 10: Click all products and all products will be in price-break promotion.

Step 11: Click the specified categories if you want them to participate in the promotion. Click the specified categories and save them.
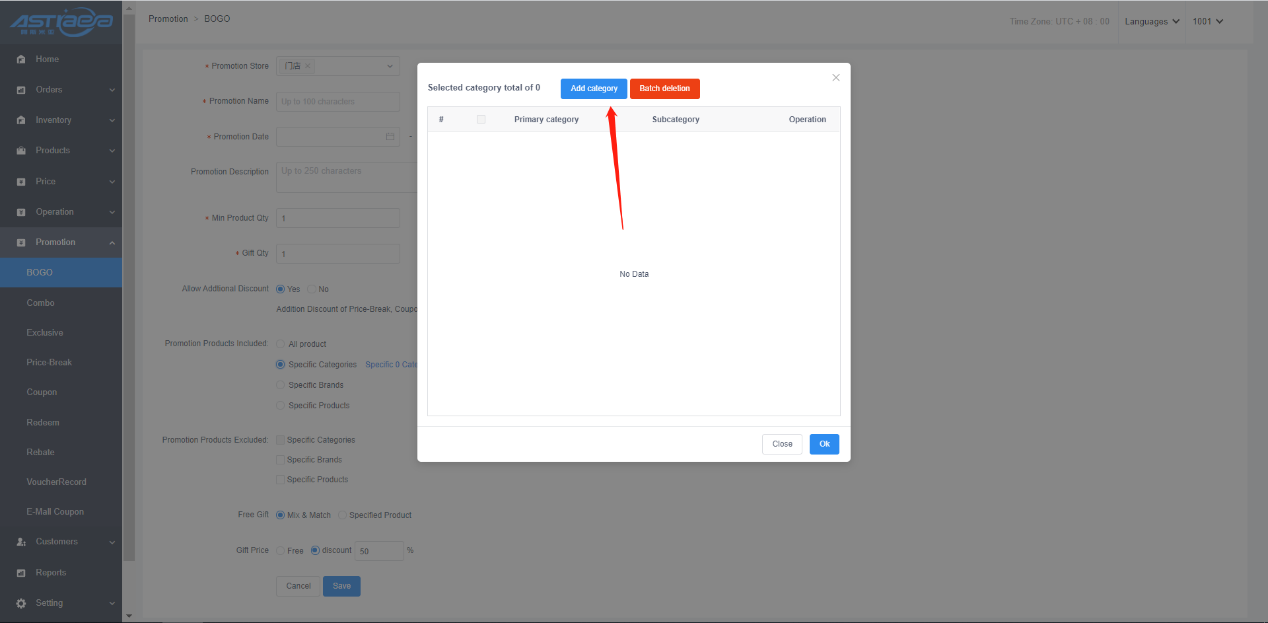

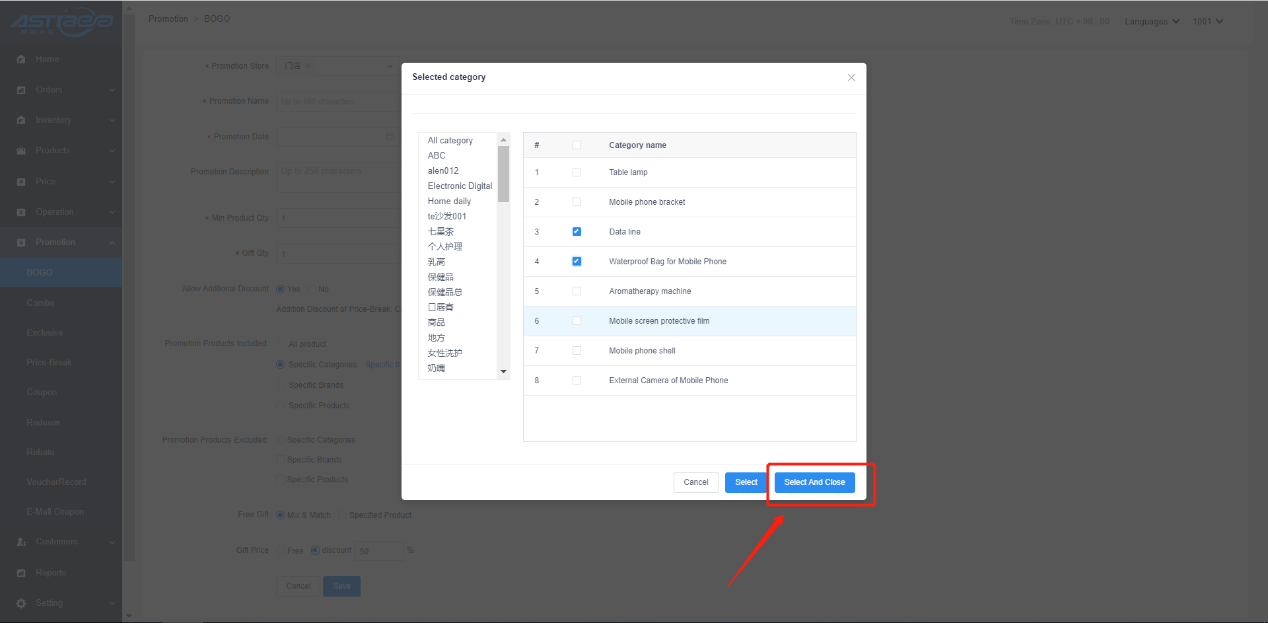
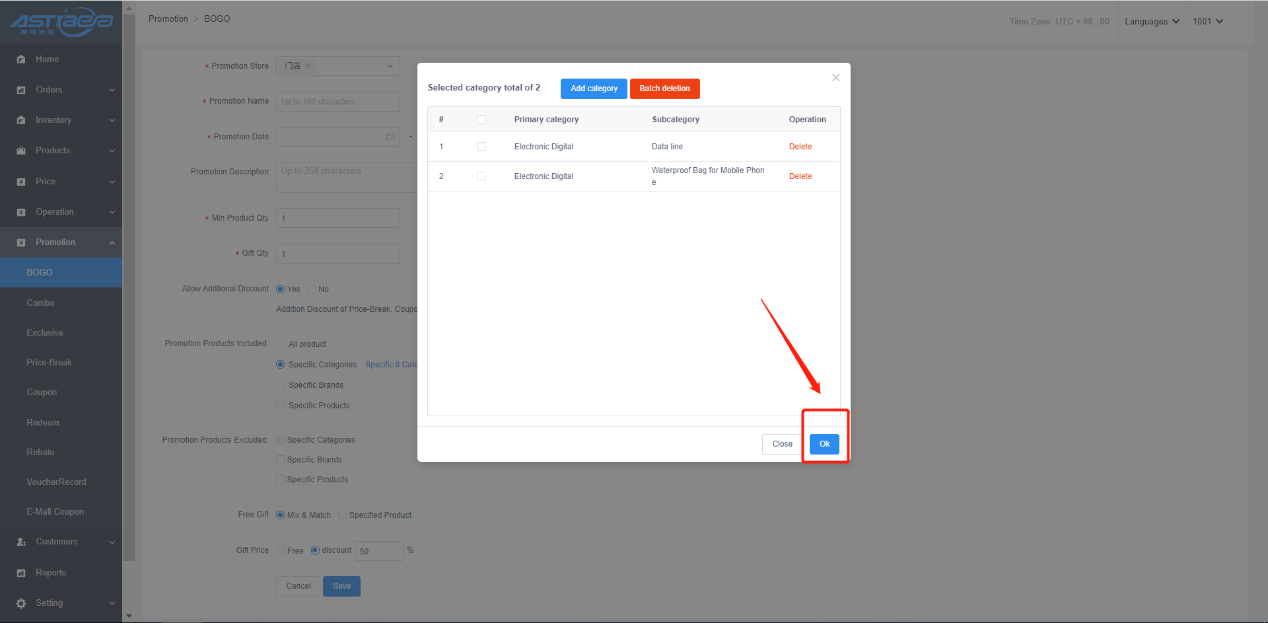

Step 12: The setting of the specified brand and product is the same as that of the specified categories, so does the product not participating in the promotion.
Step 13: Click the enable button of the promotion on the list page to enable the promotion.
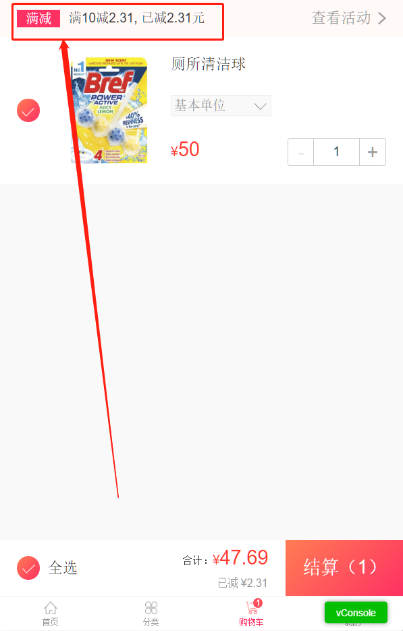
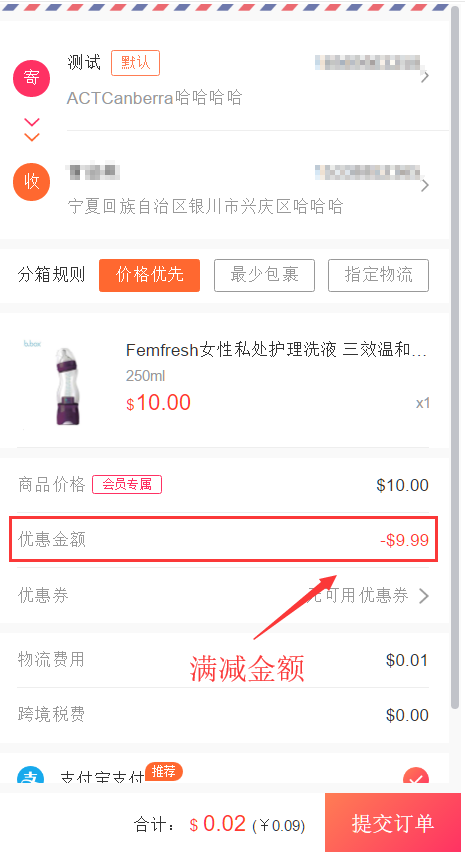
Step 14: The information of price-break promotion will be displayed on the details page and shopping cart of the promoted products after promotion, and the price-break amount will be displayed on the order submission page, as shown below.

6.2 Rebate
6.2.1 Rebate
[Operating steps]
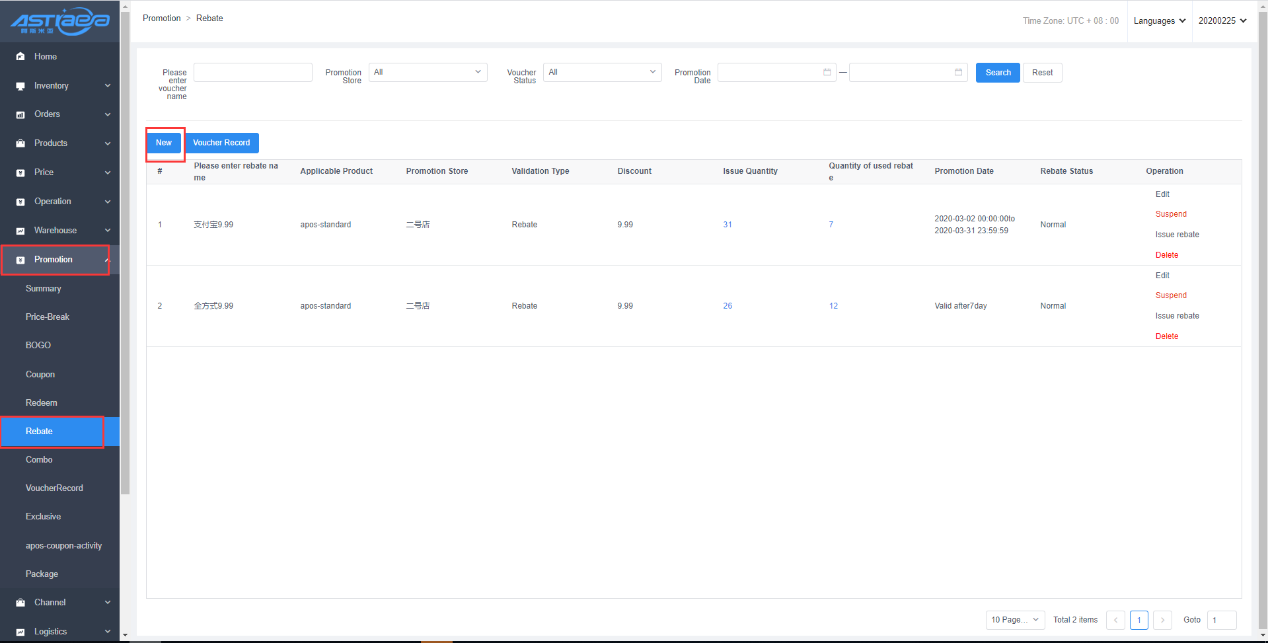
Step 1: Click the rebate in promotion management to enter the list page.
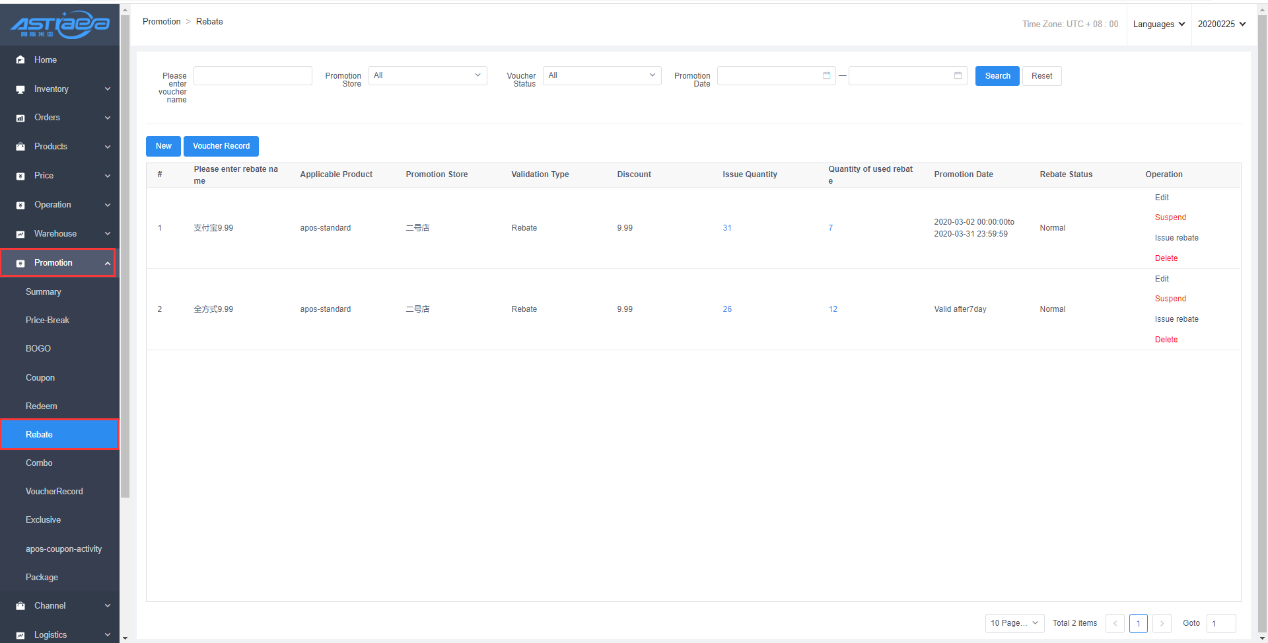
Step 2: Click “Add” button to enter the new page.
Step 3: Set activity organizer (the corresponding store bound by the mall) ) and the coupon name.
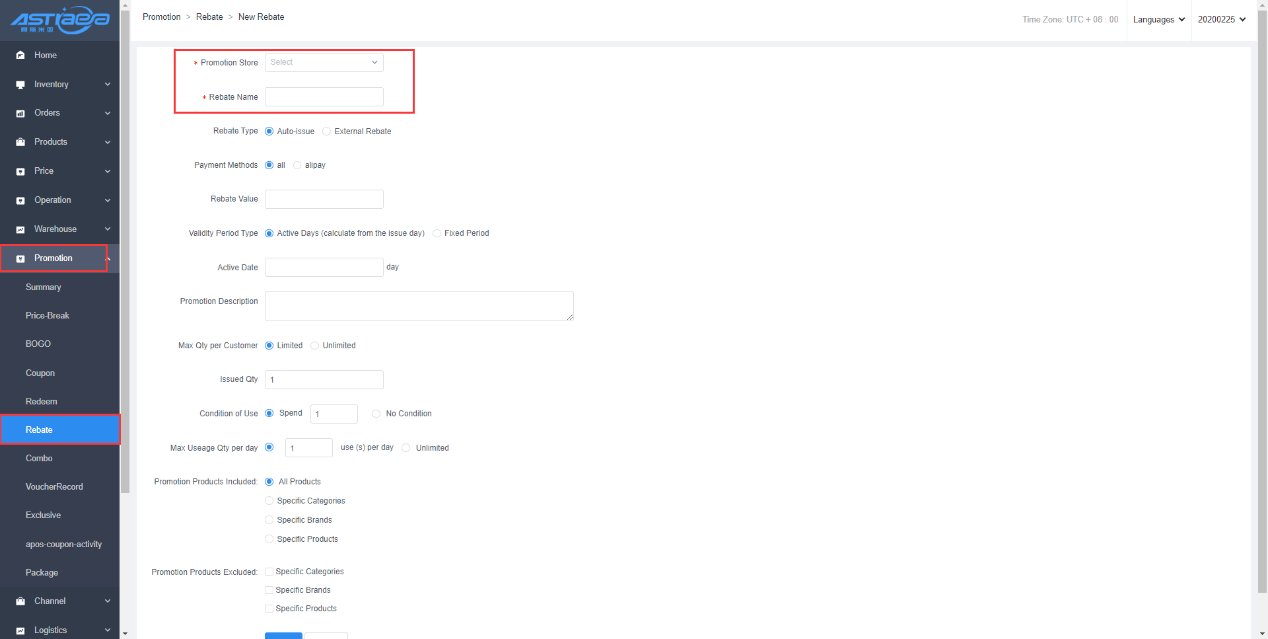
Step 4: Select auto-issue as the rebate type.
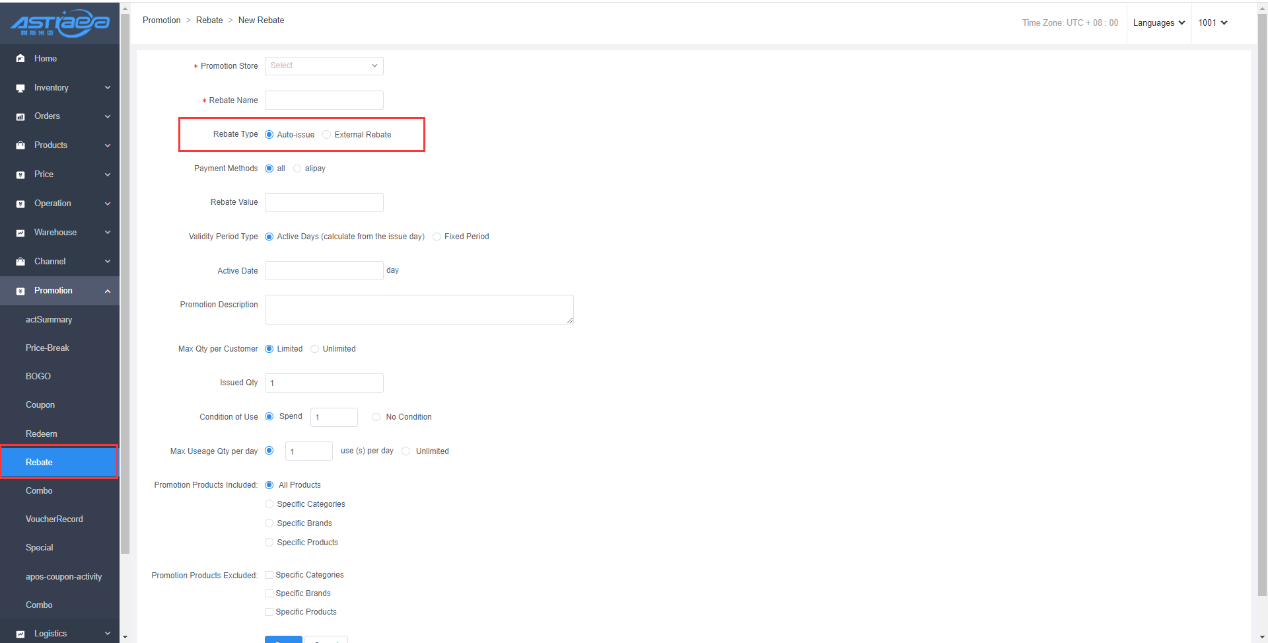
Step 5: Select the payment method used

Step 6: Enter the denomination of the coupon.
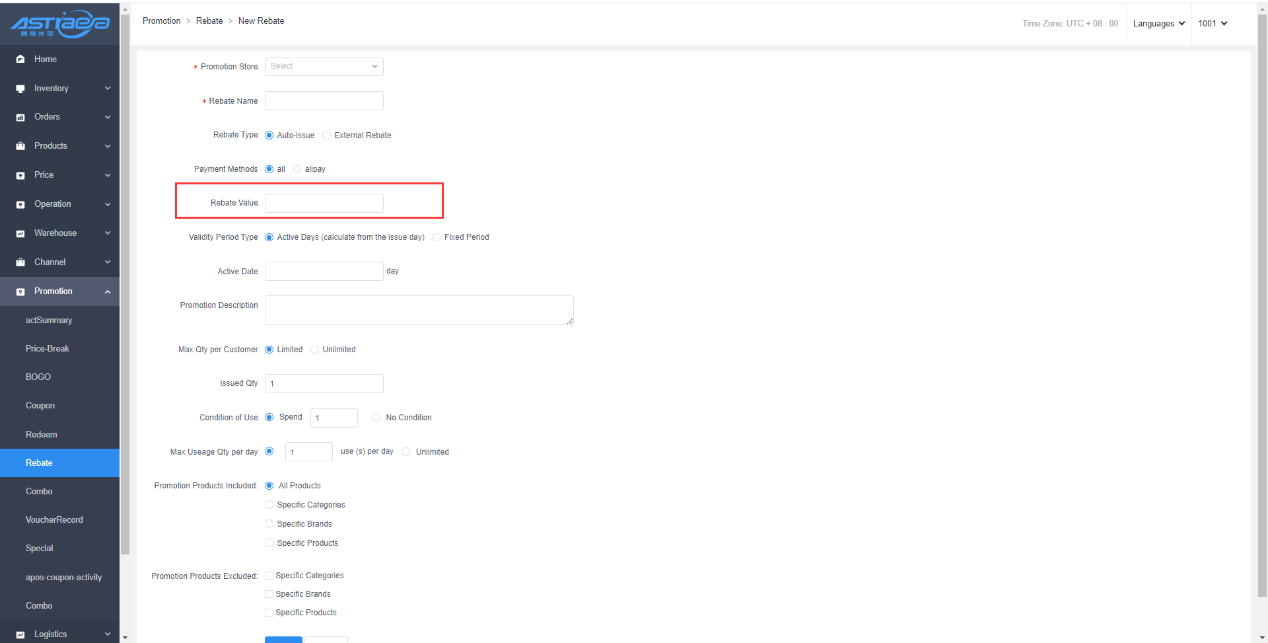
Step 7: Set the validity period of the rebate.

Step 8: Set the activity description of the rebate.

Step 9: Set limit quantity, use threshold and daily limit rules for each person.

Step 10: Set products participating and not participating in promotion and save the data.
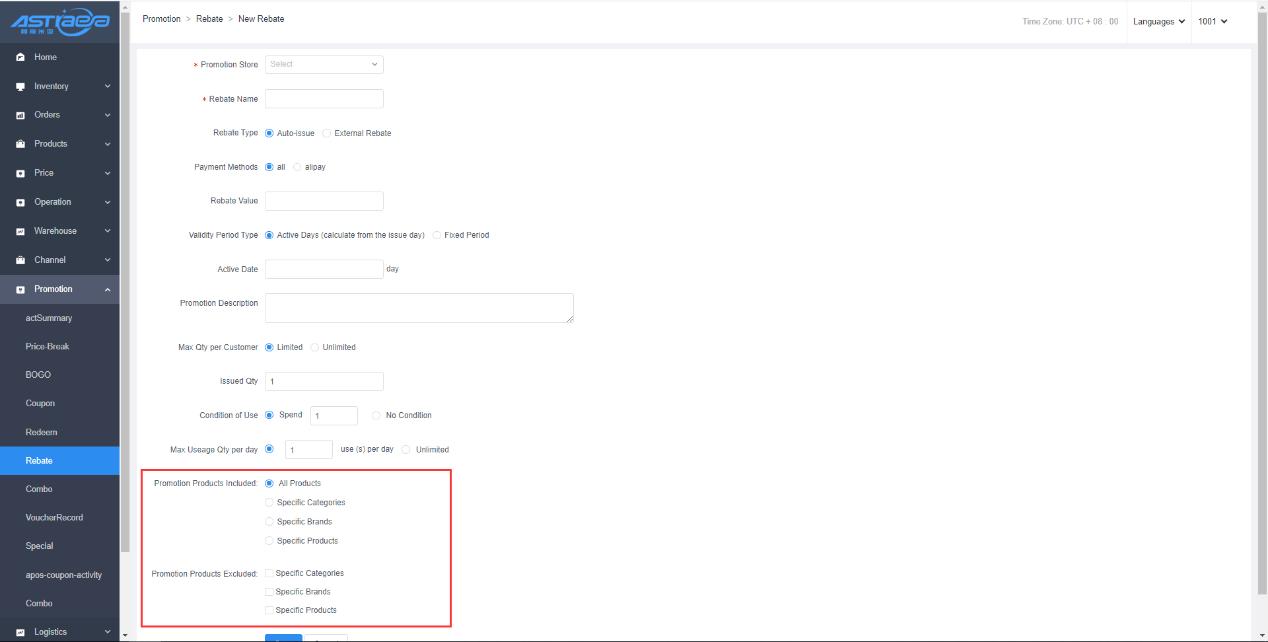
Step 11: Enable the rebate.

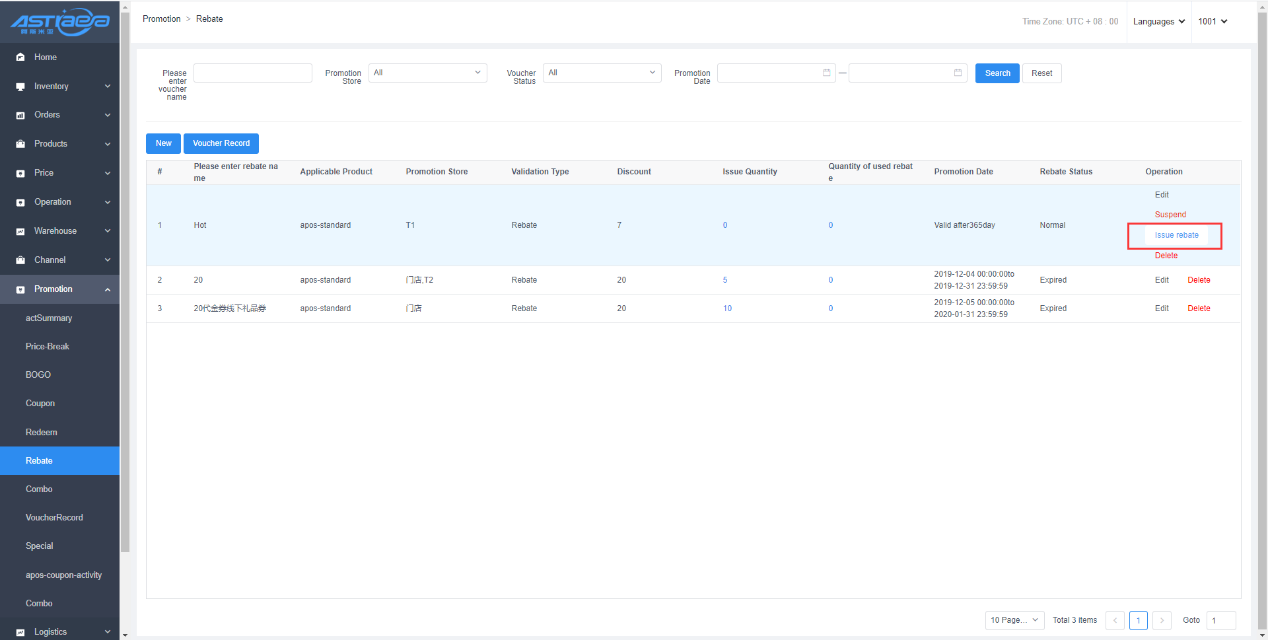
Step 12: Manually issue rebates to users and click the “Rebate Issuance" button in the list operation bar.
Step 13: Bind users, please select the "Yes" option, set the number of gift coupons that each person should receive and the customers who are to be issued, and then click the “issue”.
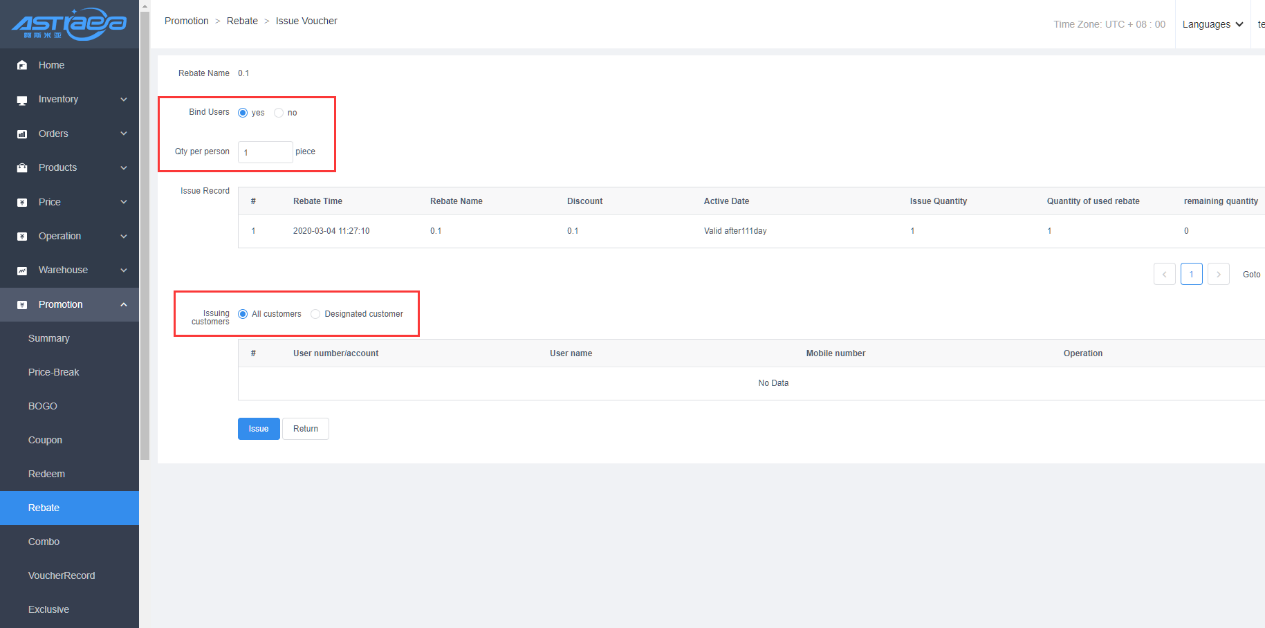
Step 14: Click the voucher record to search for manual voucher issuance, and you can view all the records of manual voucher issuance.
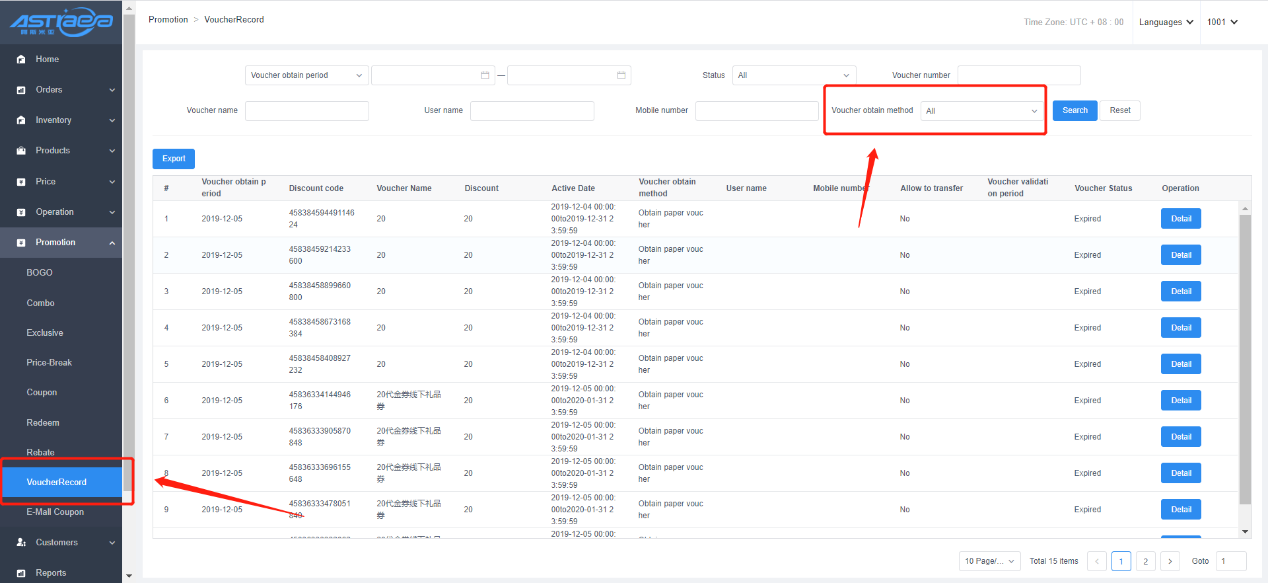
Step 15: Bind user operations when issuing gift coupons. Please select "No" mode to enter the number of coupons and export data. You can make offline gift coupons based on the coupon number and password and issue them offline to users. The user can bind the gift coupon to the online mall according to the received coupon number and password, and then can use the online Giftcoupon.

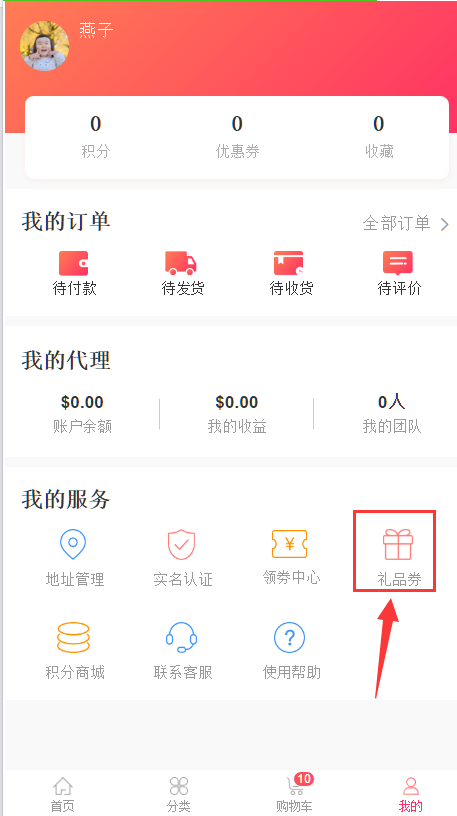
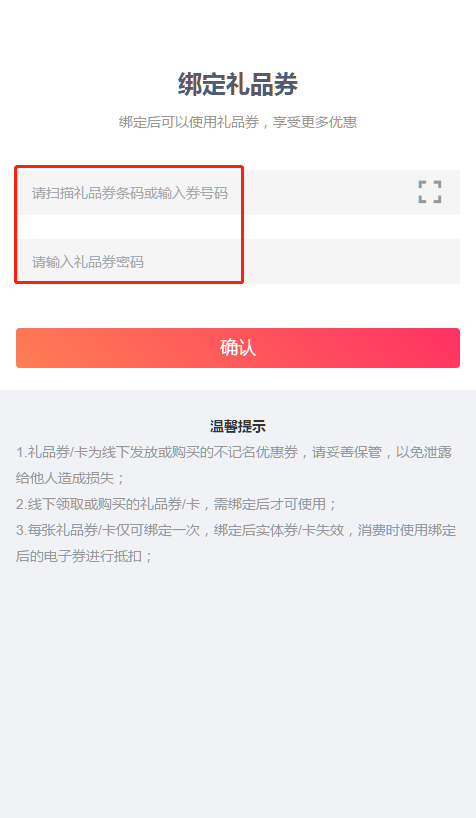
Step 16: Regarding the binding of the gift coupon, the user can enter the gift coupon number and password in the "My-Gift Coupon" verification entrance of the mall to bind successfully.
6.2.2 Coupon activities
[Operating steps]
Step 1; Click Promotion Management > Coupon Activity to enter the activity list.

Step 2: Click “Add” button to enter the new page.

Step 3; Edit the activity organizer (store), name, type, time, picture and content.
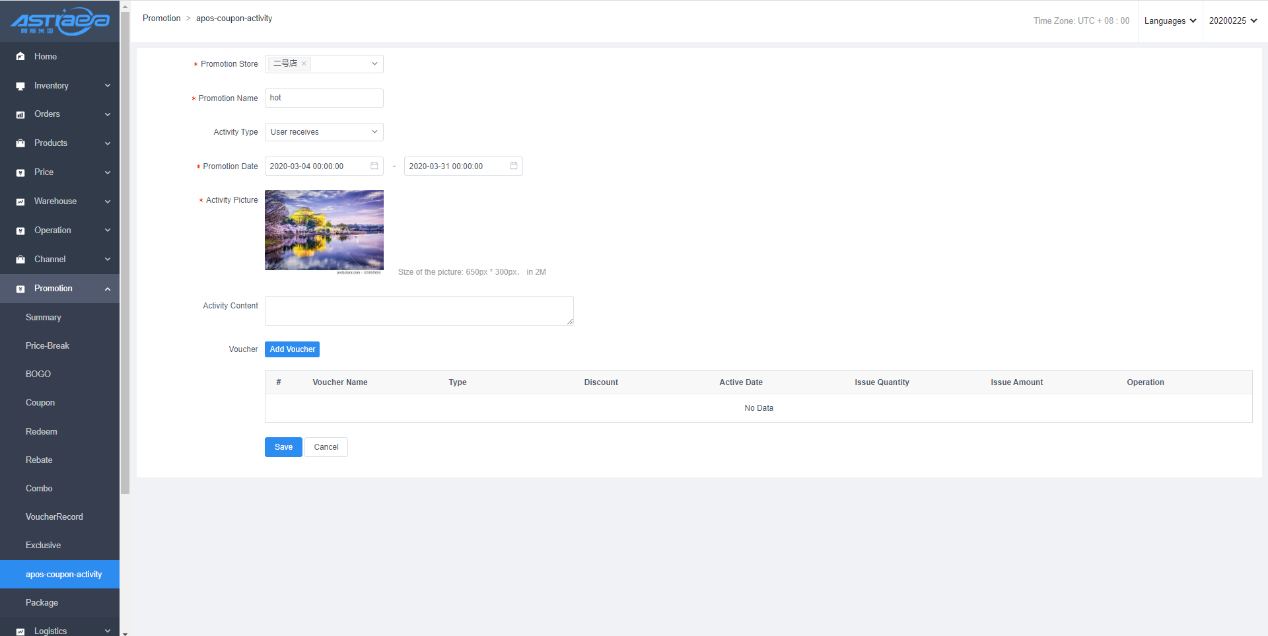
Step 4; Click “Add Voucher” button and select the voucher.

Step 5: Set the “Issuance Quantity” and “Total Issuance” of the active coupon.

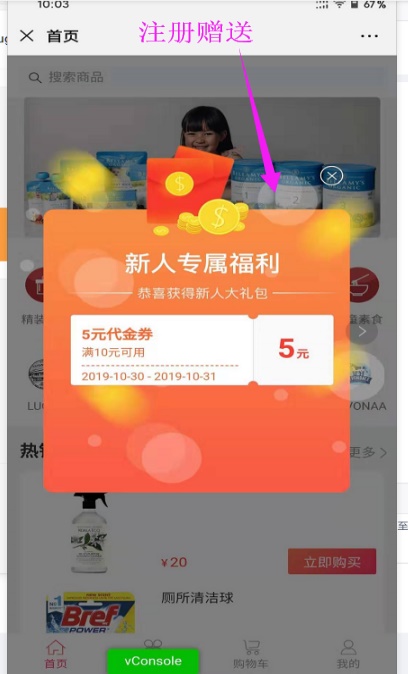
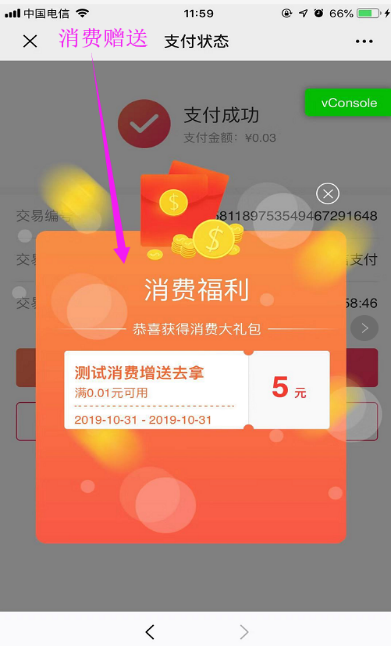
Step 6; Set "Consumption Amount" and "Promotional Products” if the activity is "Consumption Gift”.
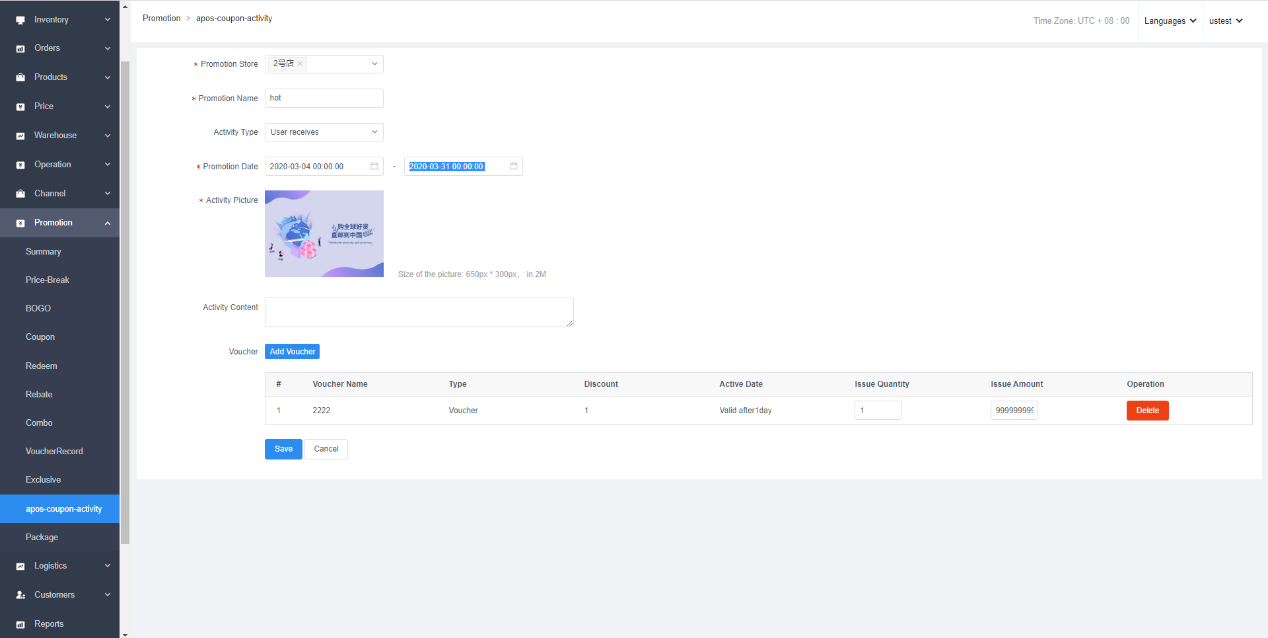
Step 7; Click “Save” button to save the data.

Step 8; Click “Enable” button on the list page to start the activity.

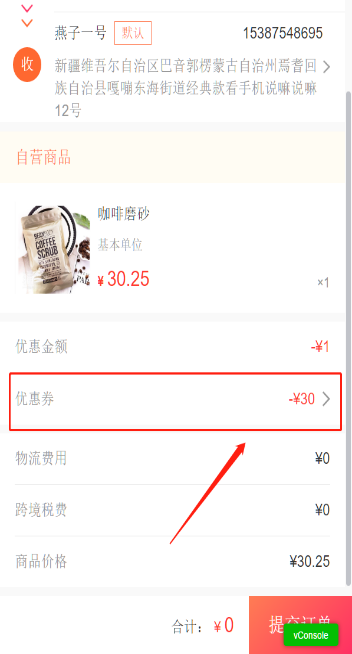
Step 9; The buyer can collect the coupon on the product details page and coupon collection center, and use the coupon on the order checkout page. As shown in the figure below.


6.3 Package
[Operating steps]
Step 1: Click Promotion Management-Package, and click Add Package

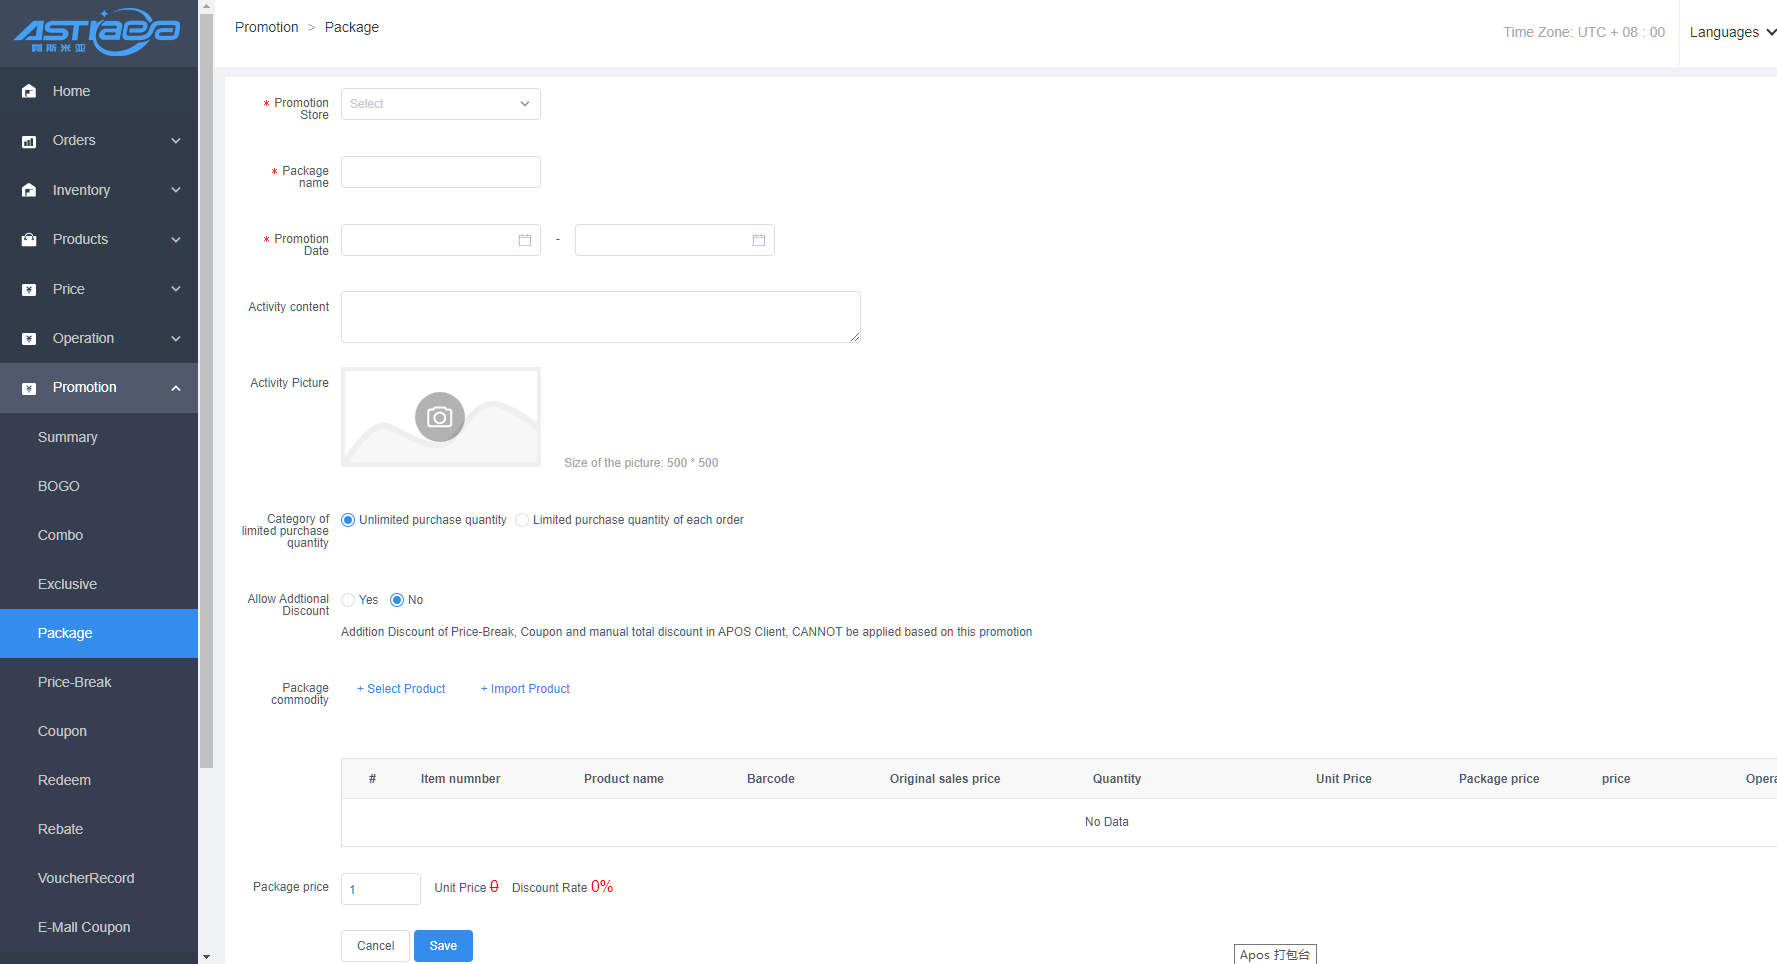
Step 2; Activity store; select the store to which the mall is bind
Step 3; Set the package name
Step 4; Set activity time
Step 5; Set activity image
Step 6; Set whether to restrict purchases
Step 7; Set whether to allow additional discount
Step 8; Select the package
Step 9; Set the price for this package
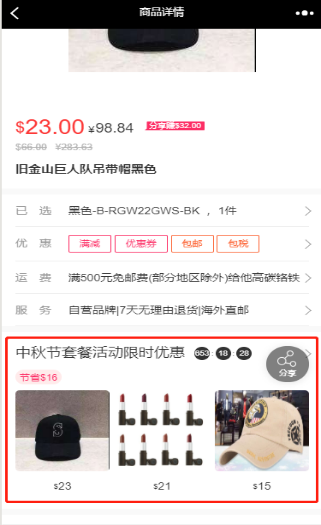
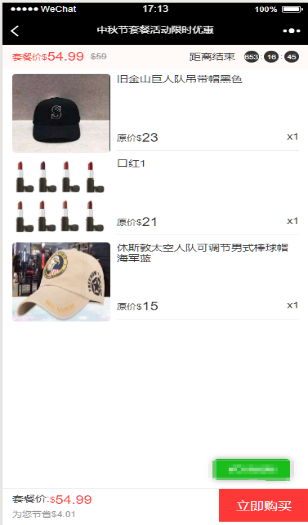
Step 10; Save and enable the package. You can see the package on the product details page.
6.4 Exclusive activities
[Operating steps]
Step 1; Click ”Promotion”-Exclusive,click New Activities.
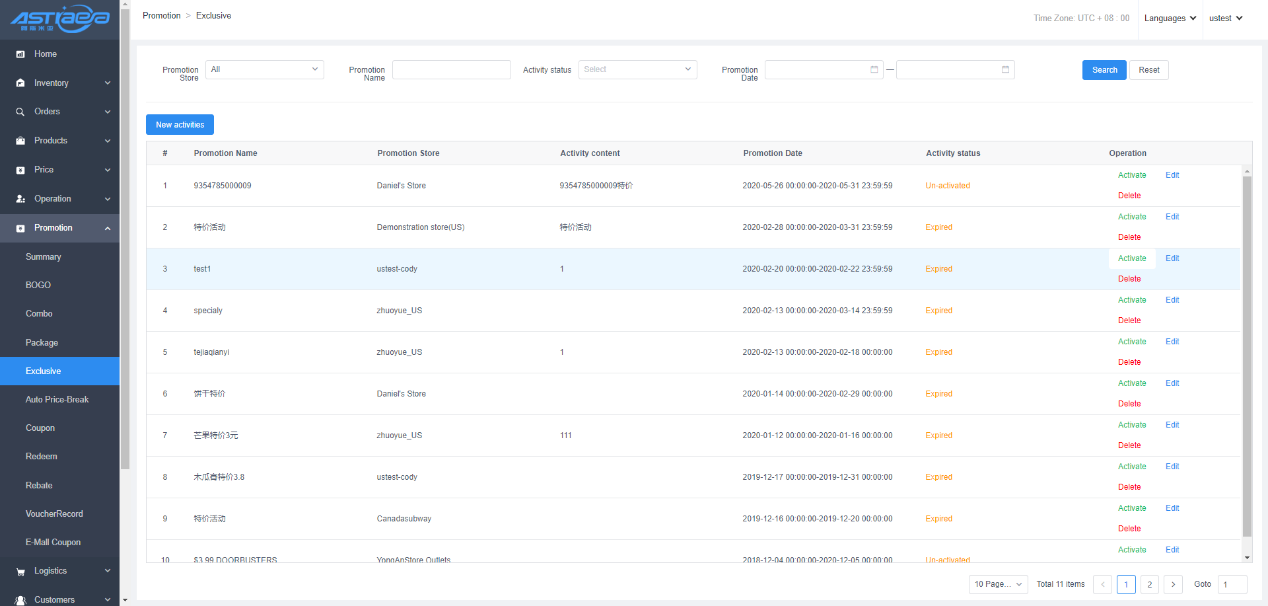
Step 2: The promotion store chooses the store bound to the mall
Step 3: Set promotion name
Step 4: Set the promotion date.
Step 5: Set whether to limit purchases
Step 6: Set whether to allow additional discount.
Step 7: Choose activity products.
Step 8: Set a exclusive price for a product
Step 9: Save, and then enable the exclusive activity, the price of the goods seen in the mall is the exclusive price.
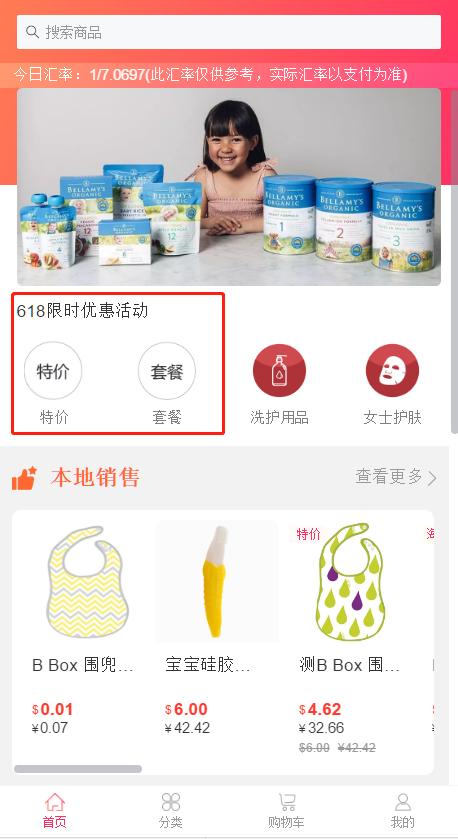
6.5 Category bar to set home specials/package activities
[Operating steps]
Step 1: Click E-Mall E-Mall layout-Home Category Bar Settings
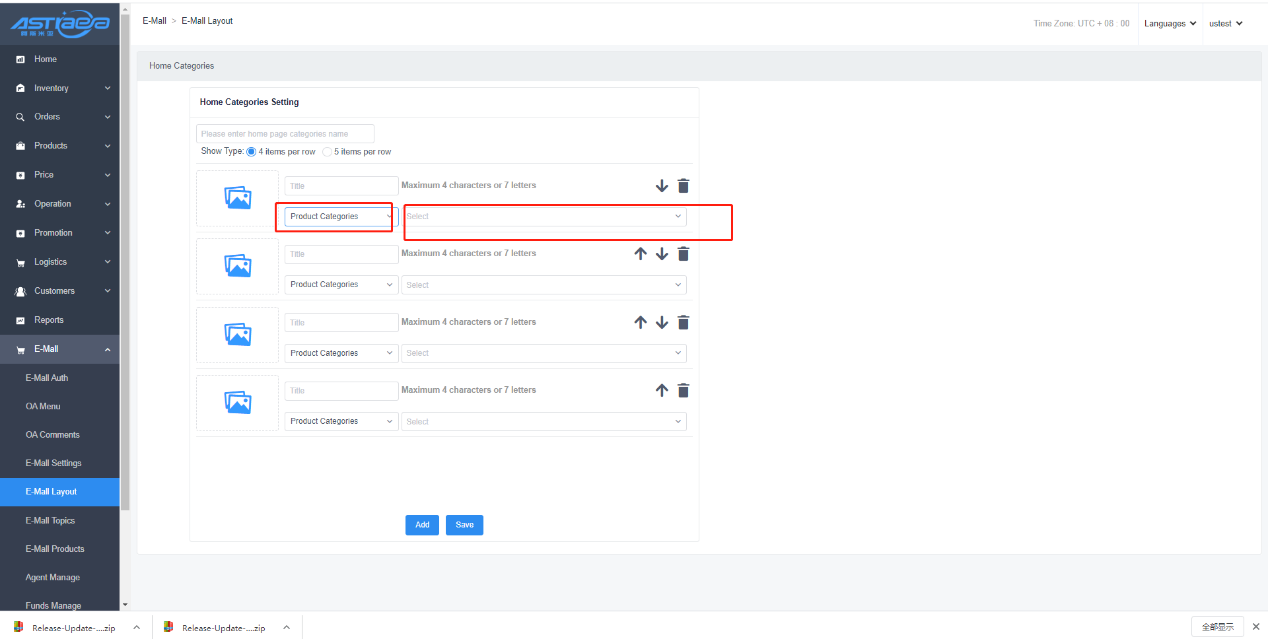
Step 2: You can set the title of the category bar displayed on the home page, not required.
Step 3: Select the activity by category jump type,
Step 4: Optional special price or package, only one special price or package can be set
Step 5: The user clicks the picture on the home page to jump to the corresponding special offer/package activity page. By default, all normal or non-started special offer/package activities are displayed (as shown below)


VII Notification
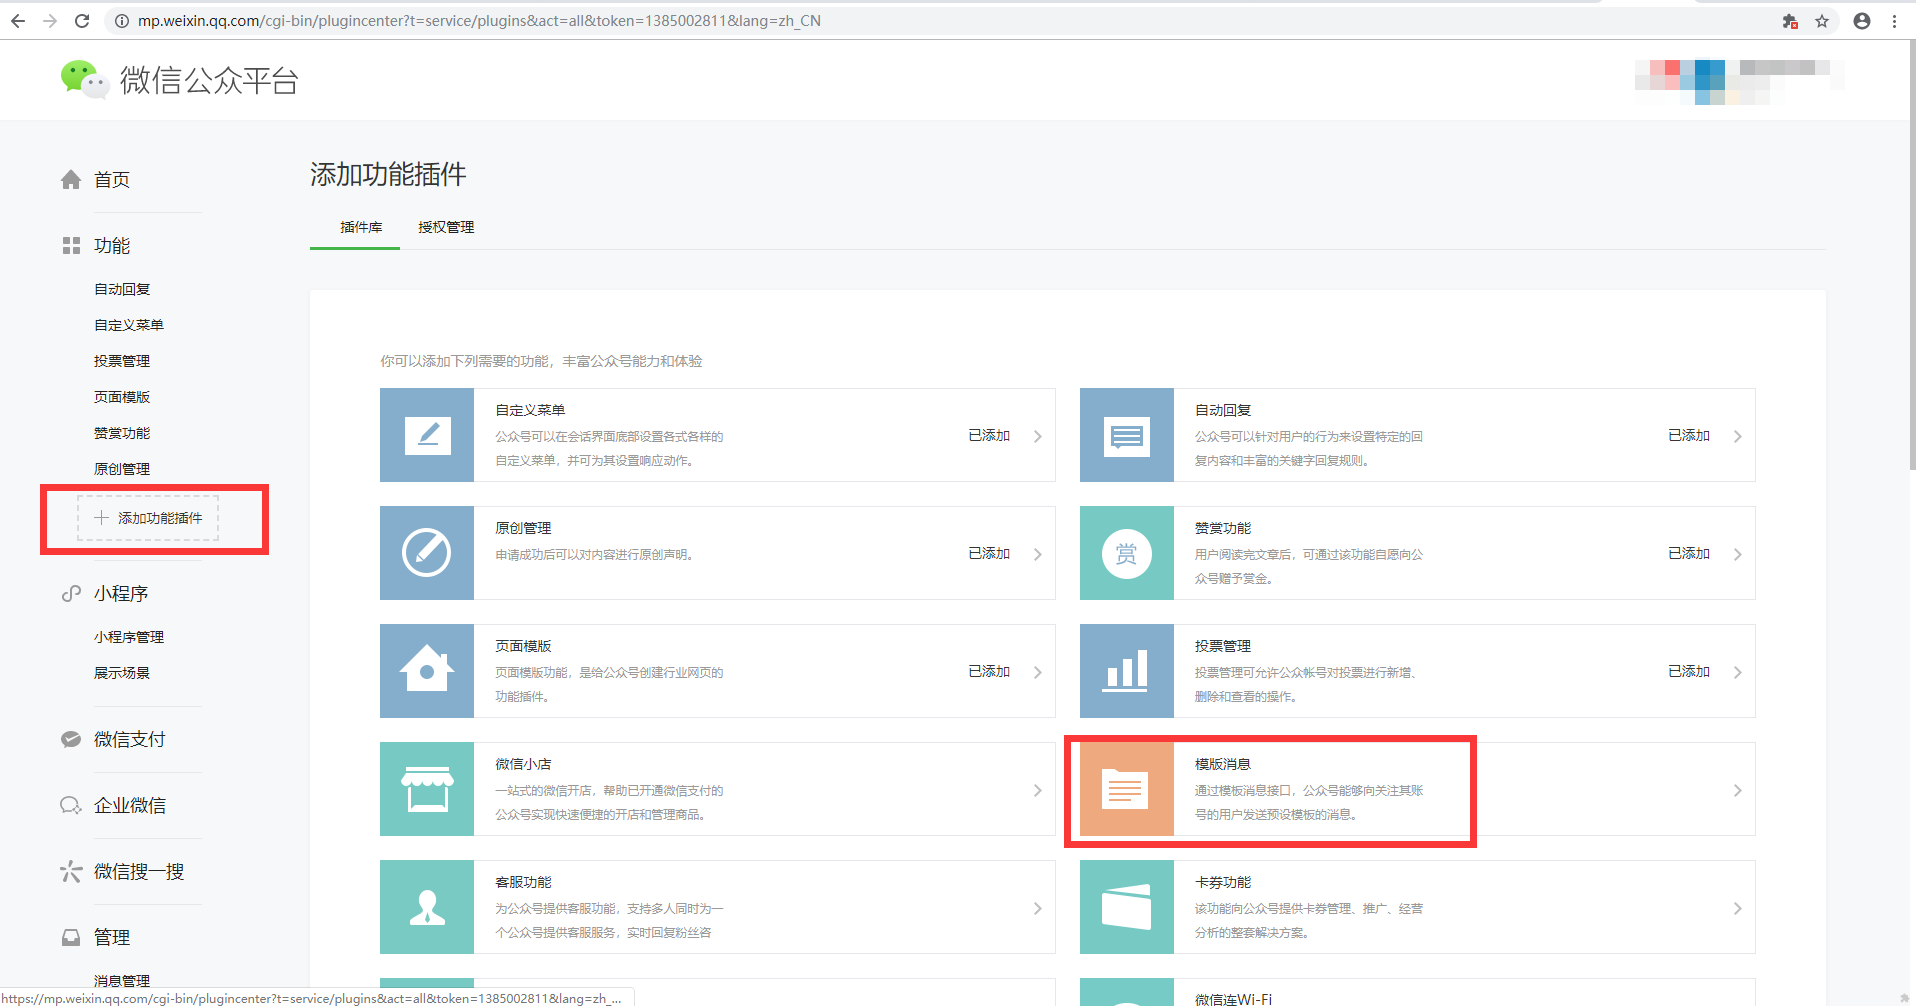
7.1 Application message template
Step 1: Click "Add Function Plug-in" under the Function in the Wechat Background, and click "Template Message" on the "Plug-in Database”.
Step 2: Click “Apply”.
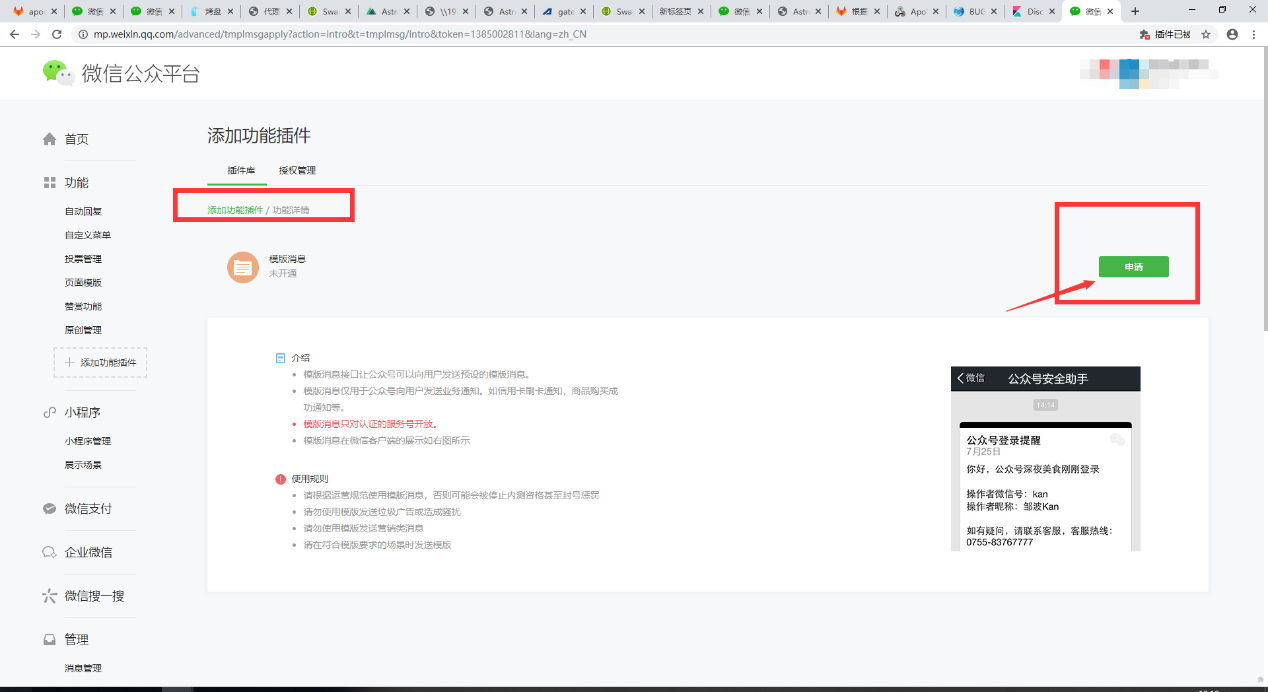
Step 3: Select "IT Technology" and "Internet | E-commerce" in the primary business.

Step 4: Select "IT Technology" and "IT Software and Services" in the sub-business.
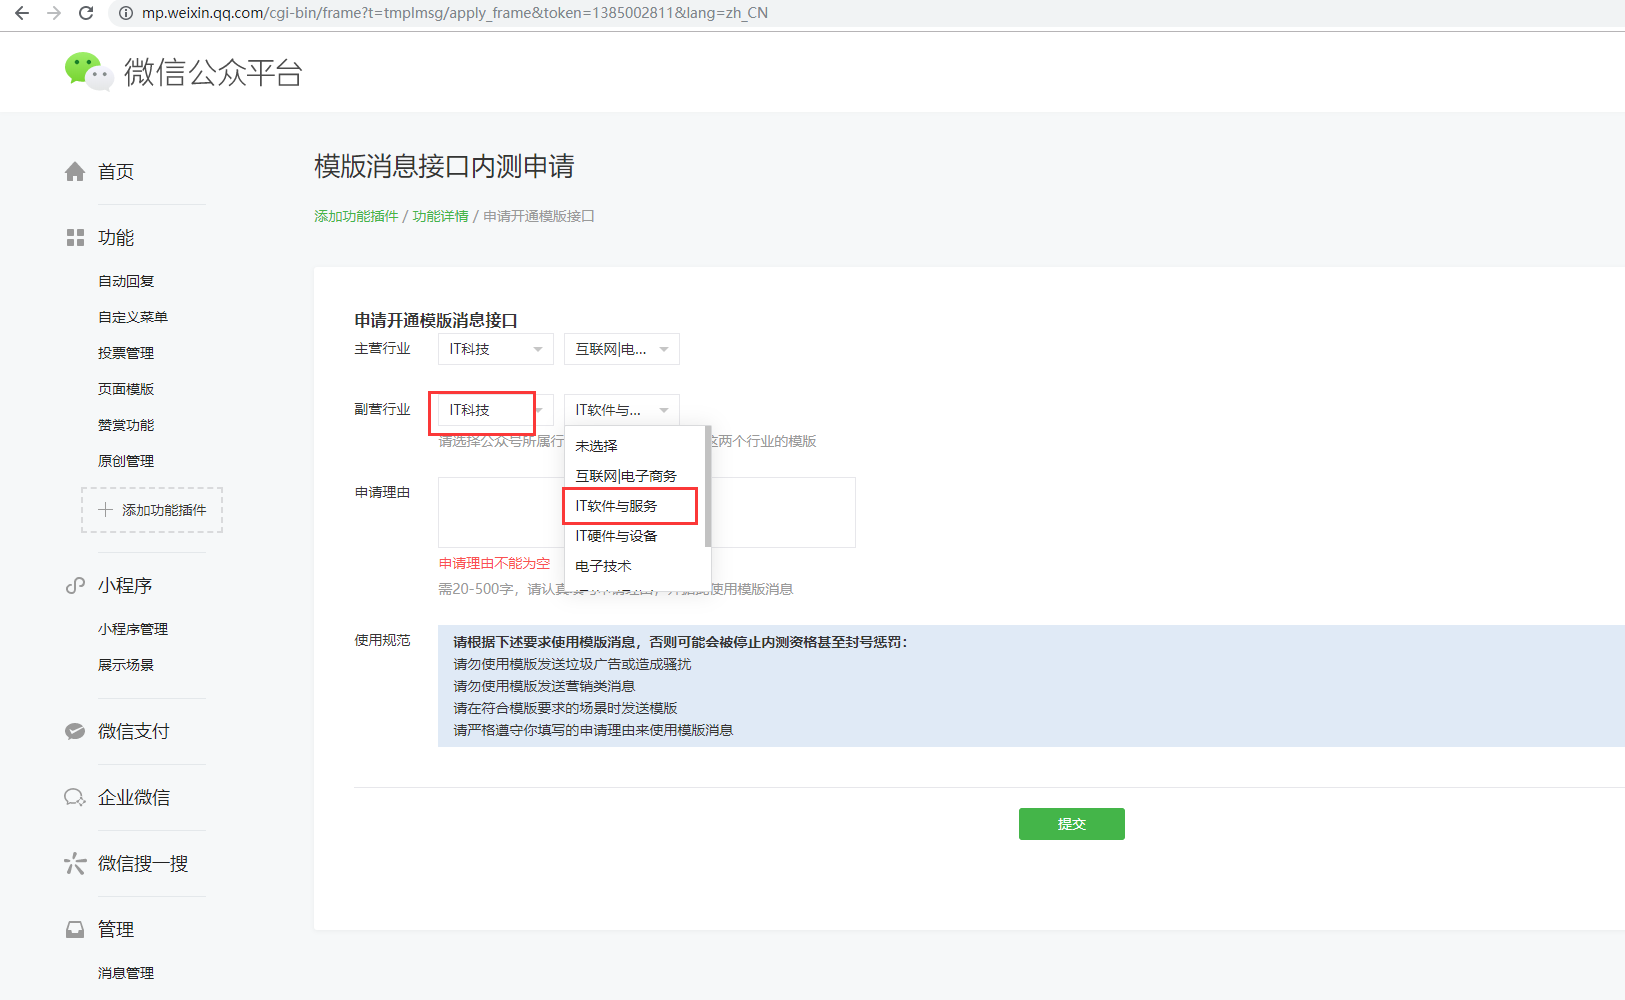
Step 5: Enter application reason. Please refer to the screenshot (access to advanced interface functions, enrich customized development needs and wish customer service passing, thank you.)

Step 6: Click “Submit”.
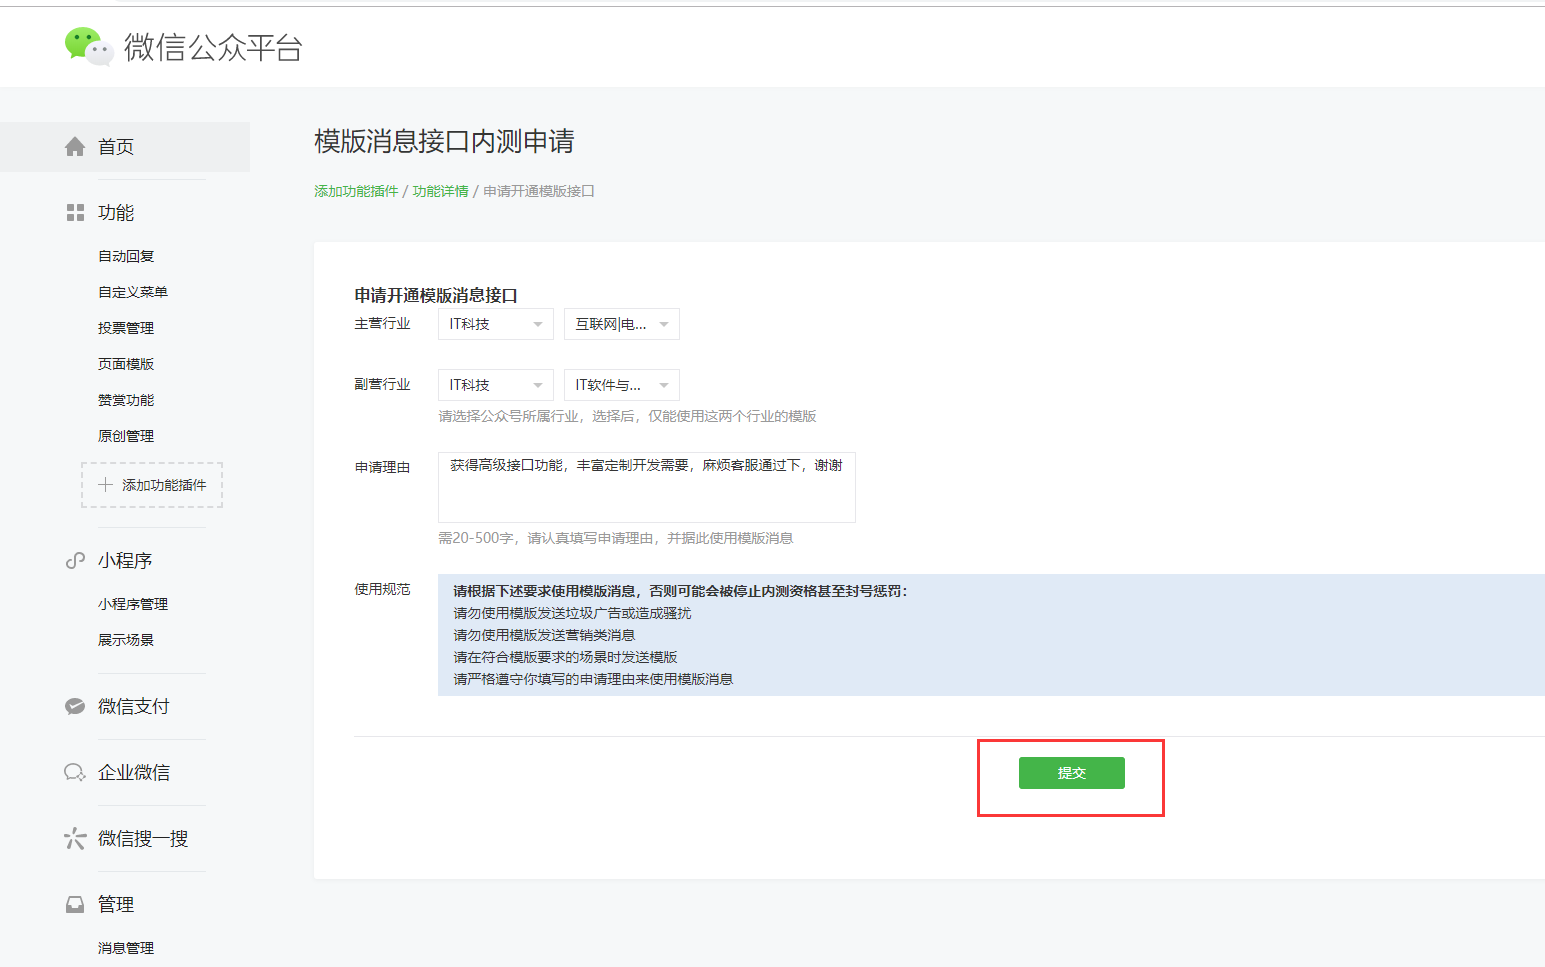
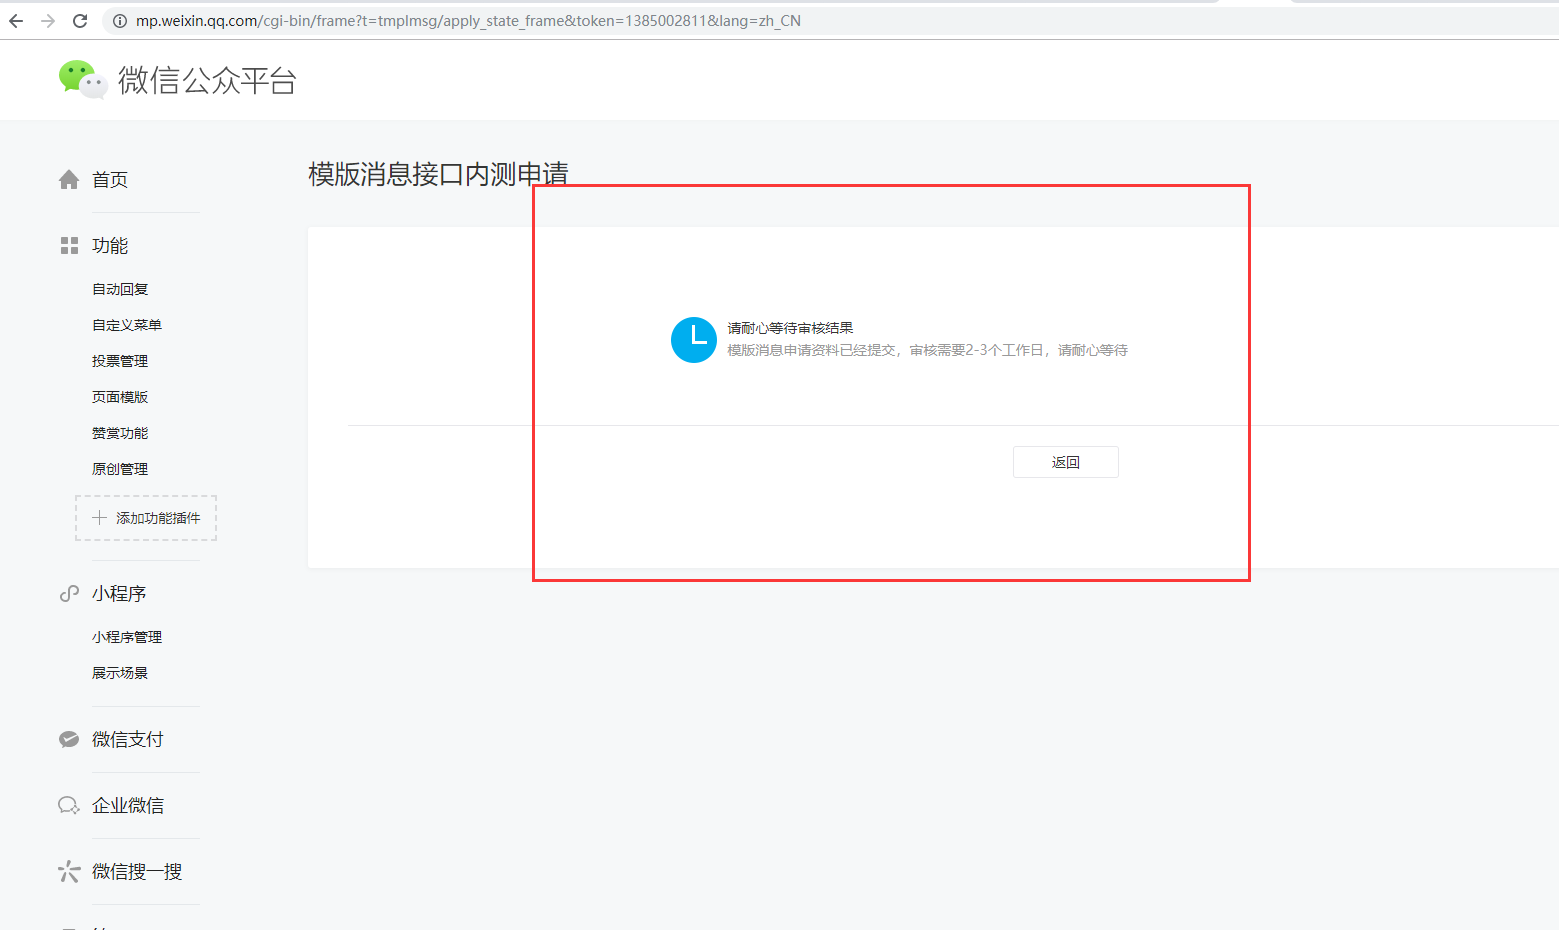
Step 7: The application has been submitted and please wait for the approval result for 2-3 days. No further operation is required for using after the review is passed.
7.2 Message notification
a. Notification of order message includes: successful payment, order cancellation, unpaid order (ten minutes from the automatic cancellation of the order), order delivery and receipt confirmation
b. Notification of user message includes: phone binding
c. It supports the management of background preview template message and the content is non-editable


VIII. Share
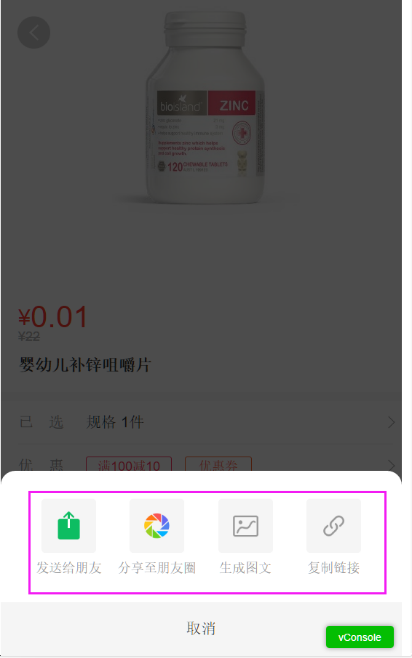
8.1 Product details sharing
Step 1: Enter the product details page and support sharing to friends, sharing to moments, generating graphics and text and copying links.

8.2 Special share
Step 1: Enter more pages of the topic and support sharing to friends, sharing to moments and copying links.

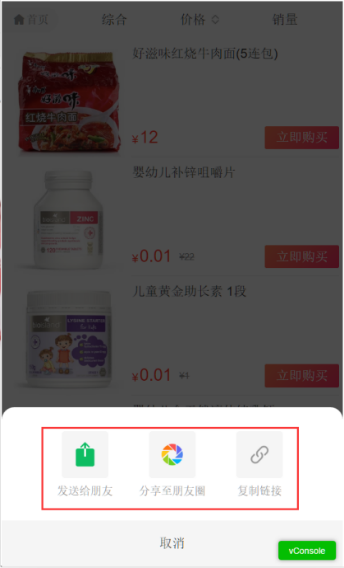
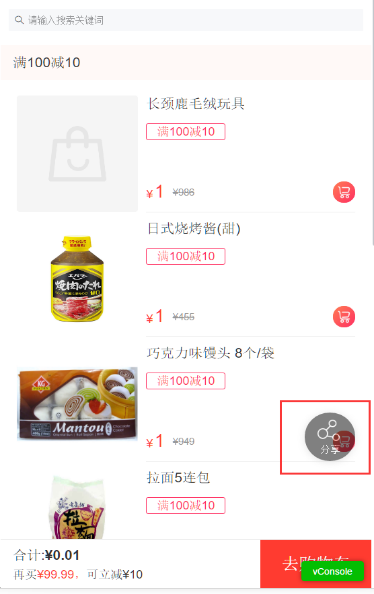
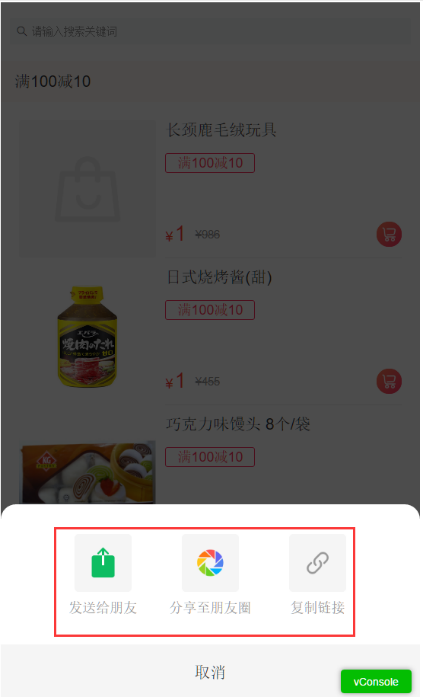
8.3 Activity products sharing
Step 1: Enter price-break activity product page and support sharing to friends, sharing to moments and copying links.
IX. Distribution
Business description
Distribution is divided into two types: Distribution and Shop-in-shop. Users can only choose one of the two when applying for it. Both cannot exist at the same time.
Distribution;The user directly becomes a distribution agent in the E-Mall, and the agent obtains revenue by sharing and developing subagency. For example, A is an agent, A is shared with new user B, and B is shared with new user C, then B and C are A's subagency, B places an order and A has a corresponding income, C places an order and A and B have corresponding income.
Shop-in-shop; the user applies to become a distribution agent in the E-Mall, the agent sets up the store information in the E-Mall, operates the agent's own product data, and promotes the mall. The user places an order in the agent mall, and the agent obtains the corresponding income.
9.1 Distribution Rule settings
9.1.1 Basic setting
[Operating steps]
Step 1; Log in Apos server, click "E-Mall -E-Mall Settings" to enter the basic setting page of agent set.

Step 2; Click direct distribution or Shop-in-shop, or both (distribution function is enabled after clicking related options.
Step 3; Enable the recruitment agent (the front-end shows the entrance to apply for the agency)
Step 4; Set up direct distribution agency mode (the first level can be switched to the second level, but the second level cannot be switched back to the first level)
Step 5; Upload the agent page (optional, displayed on the application agent page)
Step 6: Set join conditions
Step 7; Set whether the rule description is displayed (optional, displayed on the application page)
Step 8; Select whether the auditing agent needs to be audited (select Yes, then merchants need to review whether or not there are joining conditions)
Step 9; Click “Save”option.
9.1.2 Settlement setting
[Operating steps]
Step 1; Log in Apos server, click "E-Mall-E-Mall Settings - Settlement Settings”

Step 2; Support bank card as withdrawal method
Step 3; Open the withdrawal rules and display on the withdrawal page (the default value is no less than 10 and no more than 5 K, once a day)
Step 4; Set withdrawal rate and display on the withdrawal page
Step 5; Set the settlement time. The income to be settled will be converted into settled income after the receipt of the order is confirmed and the settlement time is reached
Step 6; Click”Save” option
9.2 Agent products
Business description;
Product profit = E-Mall selling price-inventory cost
Distribution income = product profit*n%
Distribution price = distribution revenue + cost
Agency revenue = sub-store selling price-distribution price (without discount)
Agency revenue=(product sales price-product inventory costs)*(1-n%)
Note;Under discount condition,n% stands for distribution profit rate.
- Primary and secondary income of direct distribution = commodity profit*n%
9.2.1 Distribution settings
[Operating steps]
Step 1: Log in Apos server, click "E-Mall -E-Mall products”
Step 2: For a single product setting, directly edit the primary / secondary income (for a fixed value)
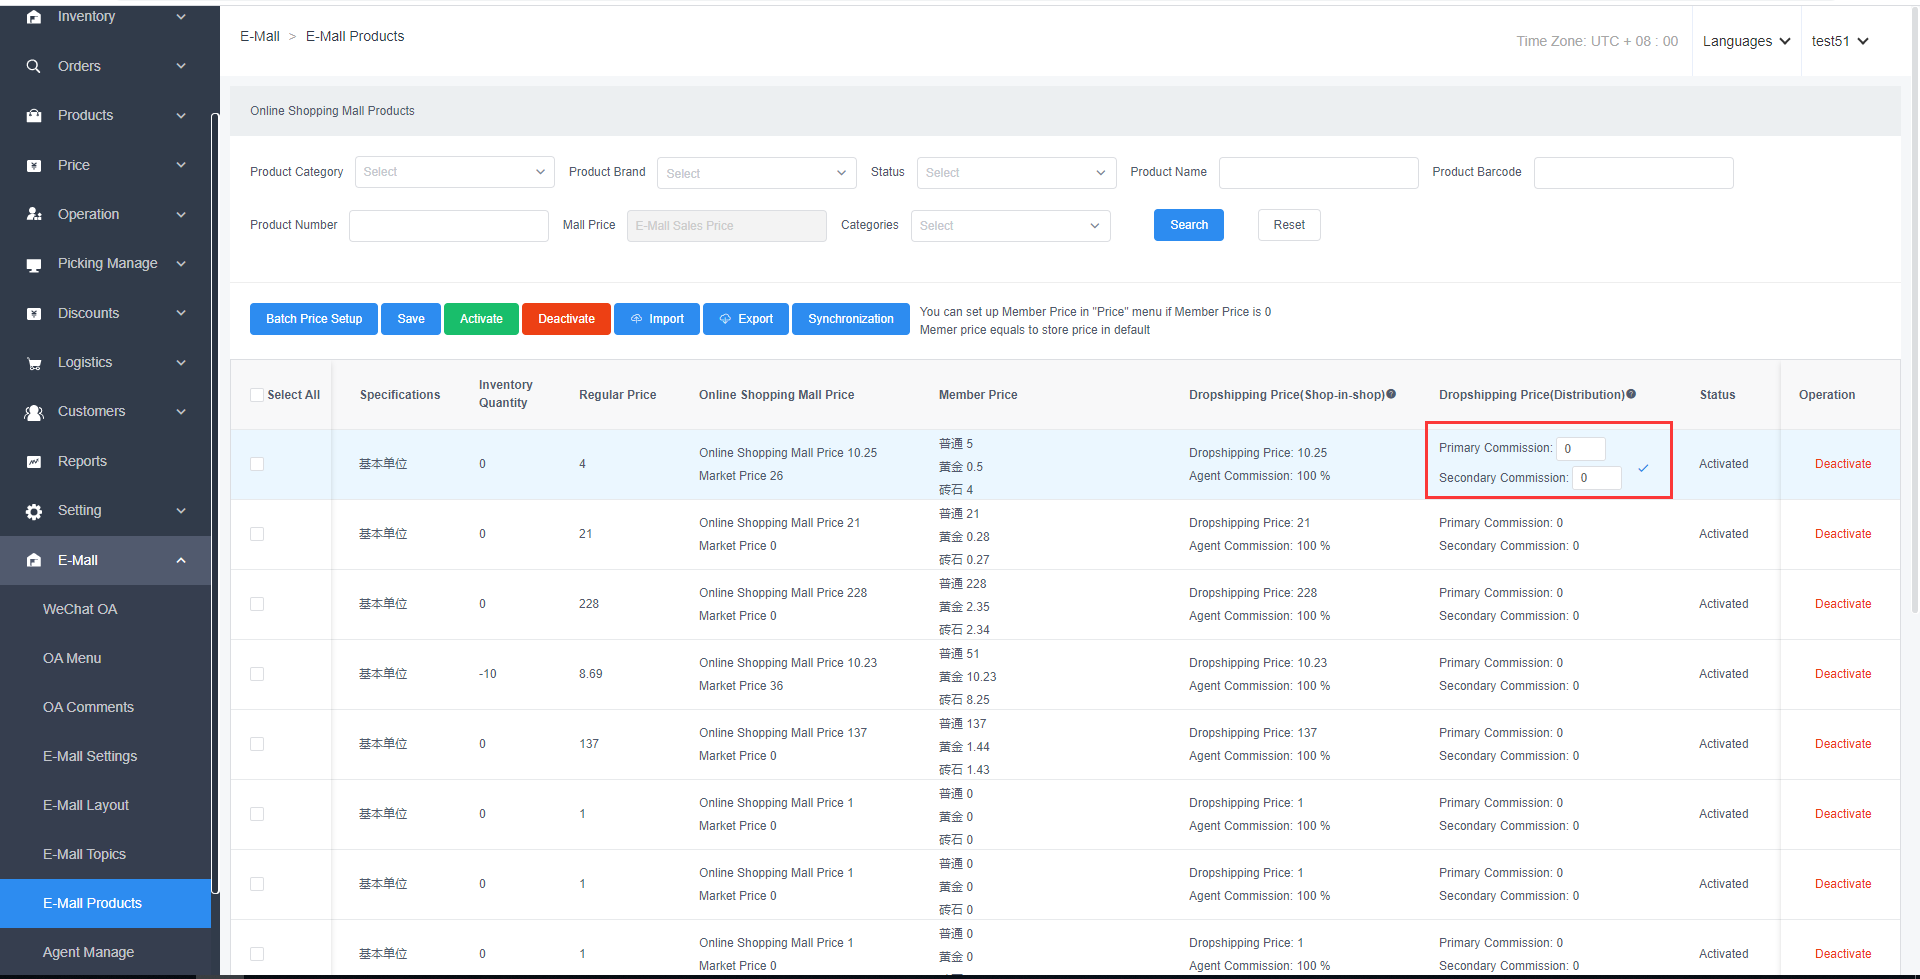
Step 3;Batch setting, check the products, click the percentage to set the price, enter the first / secondary income ratio, and automatically calculate the result value after saving option.
Step 4; Import and export settings, click Import, download the template, and set the data import

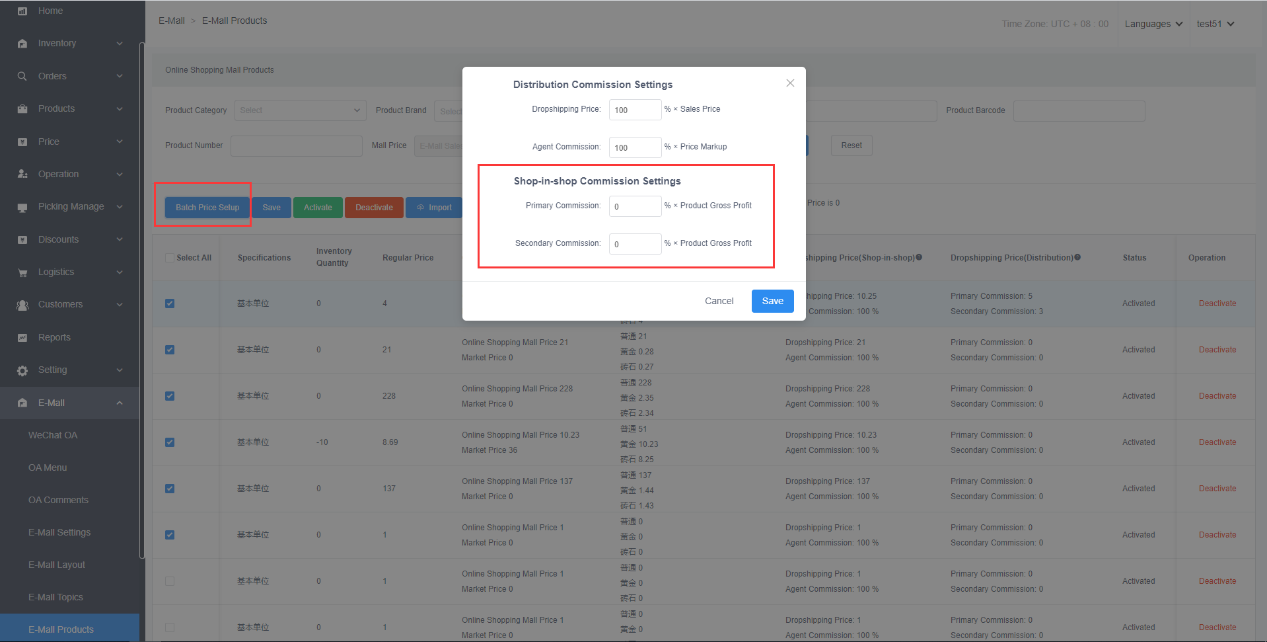
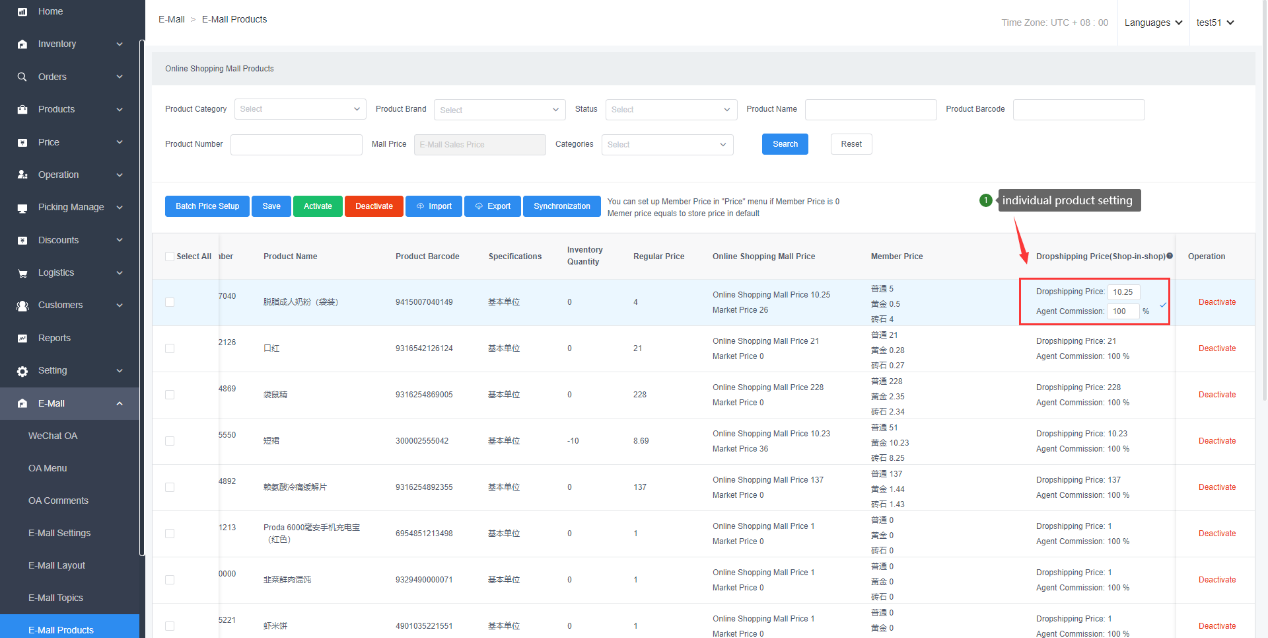
9.2.2 Shop-in-shop product settings
[Operating steps]
Step 1; For a single product setting, directly edit the distribution revenue or distribution profit rate. These two cannot be edited at the same time. Editing the distribution revenue/distribution profit rate will calculate the distribution price and the distribution profit rate/distribution revenue according to the formula and display it on the list.
Step 2; Batch setting, after checking the product, click batch setting distribution price, enter the proportion, and after saving, automatically calculate the distribution income of the product according to the proportion, and the distribution price will finally be displayed in the product list.
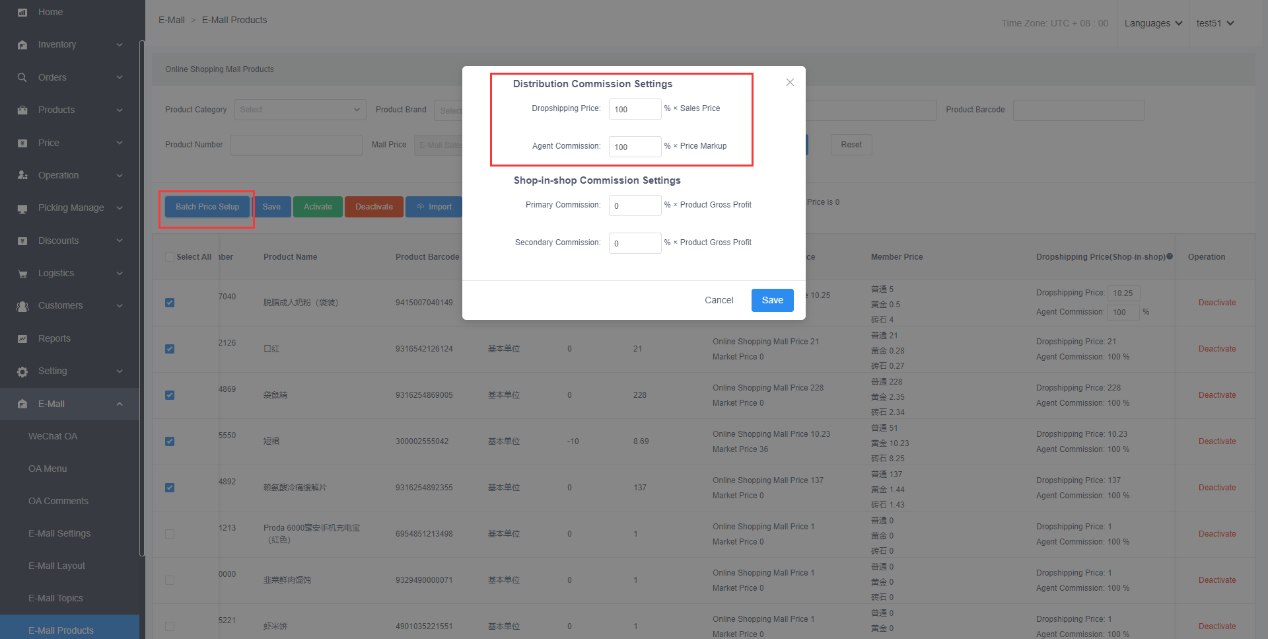
Step 3; Import and export settings, click Import, download the template, set the data, and import.
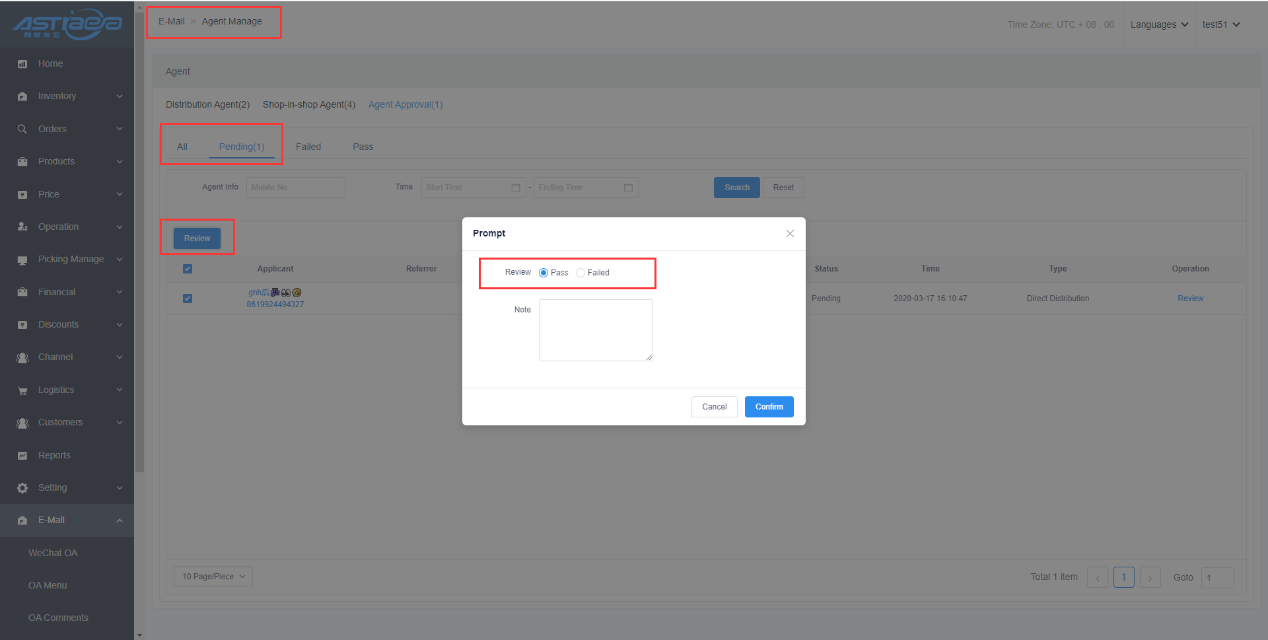
9.3 Agent approval
Note; Because the user can only choose one distribution mode, the merchant should pay attention to it when reviewing, once the review is passed, the user cannot change the distribution mode.
[Operating steps]
Step 1; Click Agent Management-Agent Audit to enter the review page for distribution and shop-in-shop
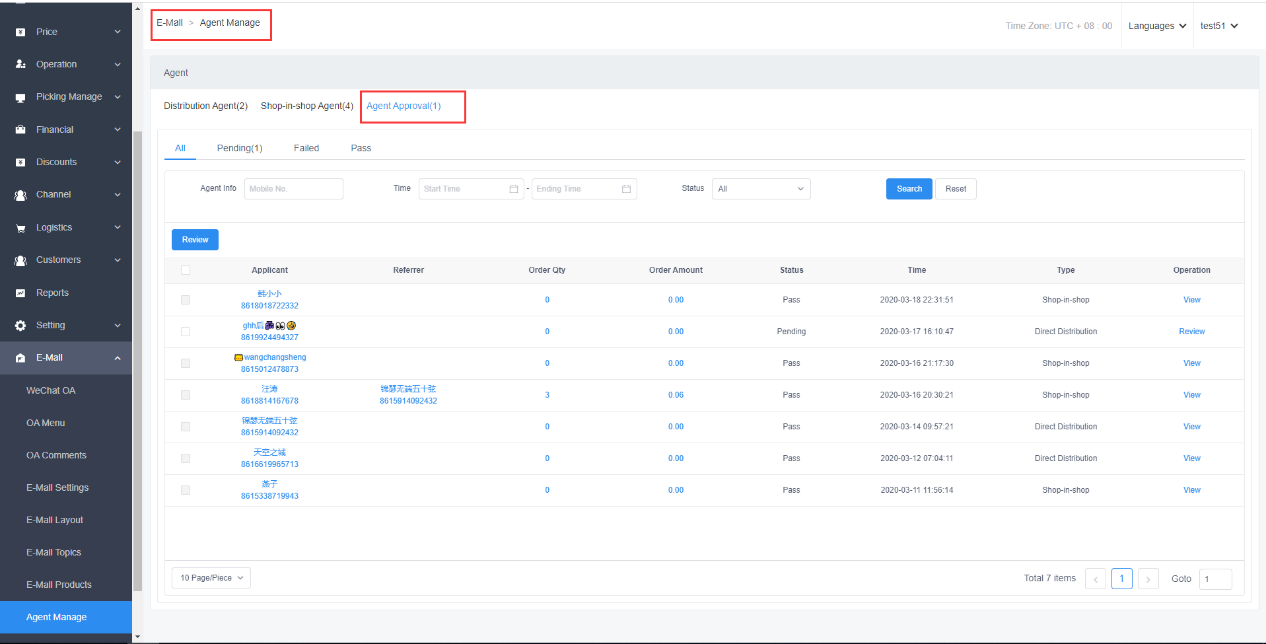
Step 2; Support the review application on all tabs or waiting for review tabs, click on review, select whether to pass, enter a comment, and confirm, the user will receive the result of the pass on the application page.
9.4 Agent Management
[Operating steps]
Step 1;Click the agent management, choose distribution or Shop-in-shop, the list displays the information of all agents.
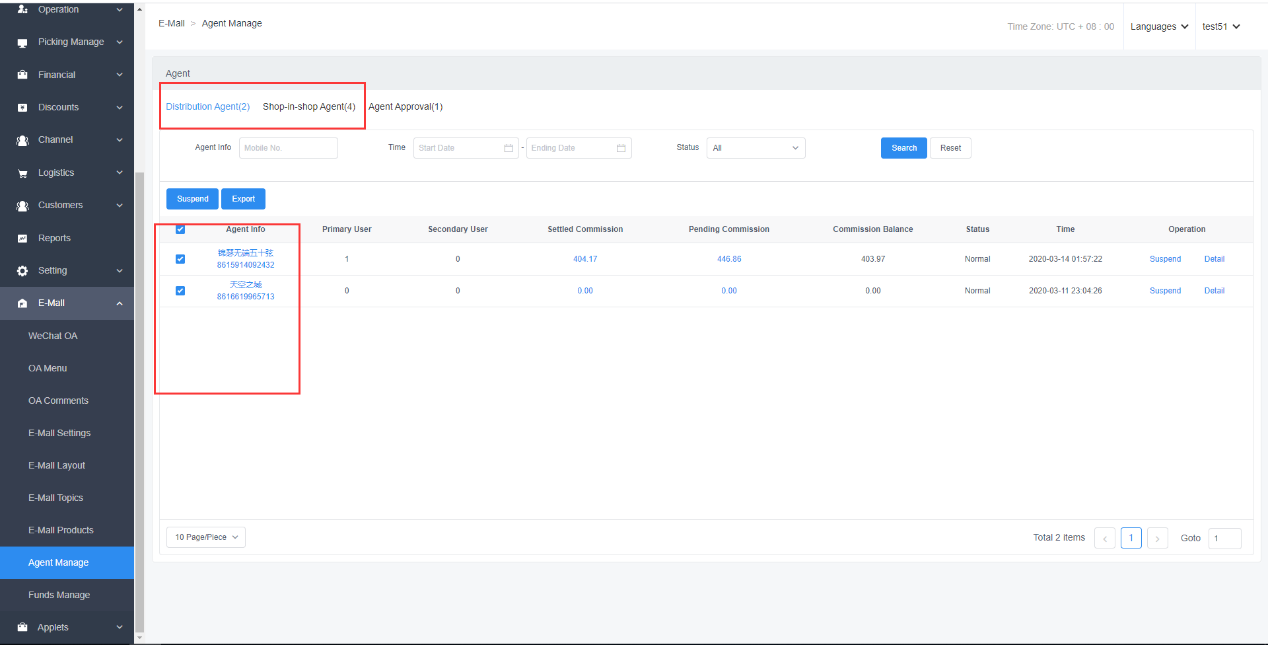
Step 2; Click on the pending commission, settled commission, details, and a pop-up box displays all the commission details generated by the agent.
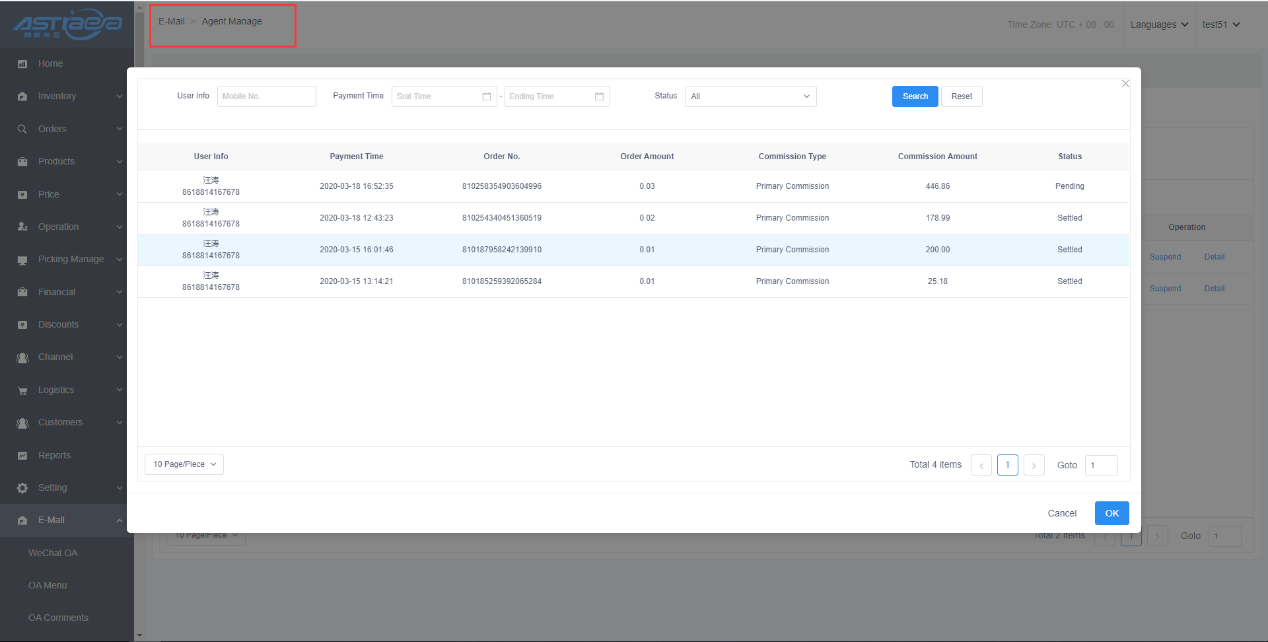
Step 3; Select the agent and click Suspend. After suspending, the agent will no longer generate pending commission and return to normal after the freeze is lifted.

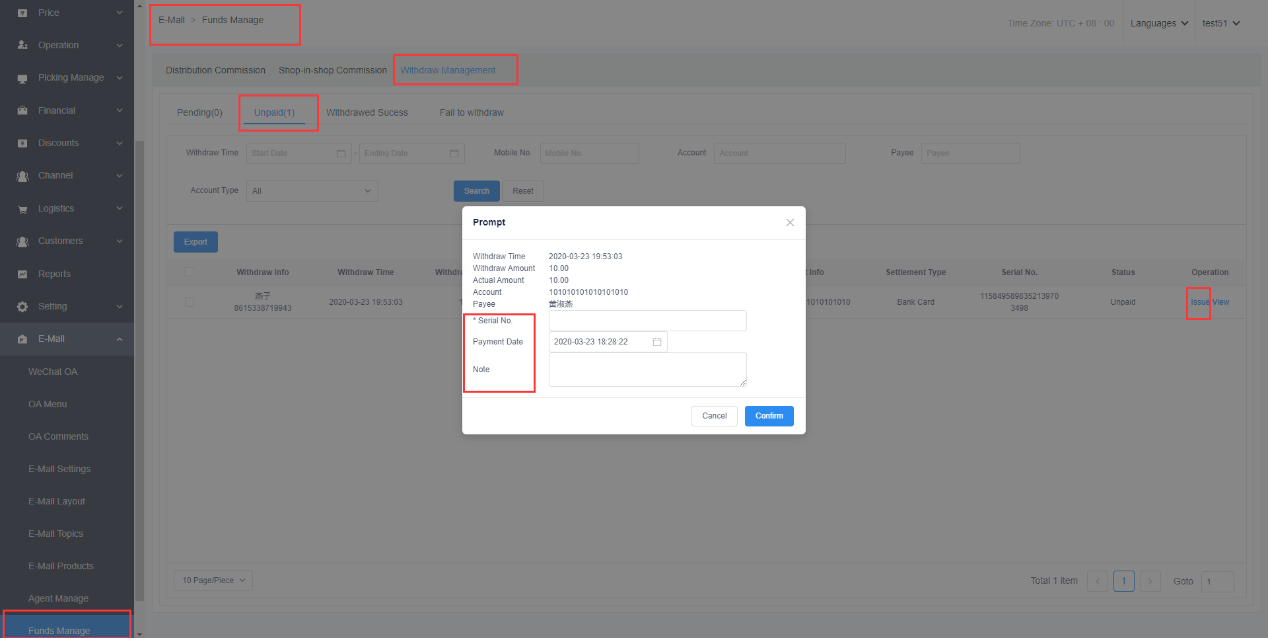
9.5 Funds Management
[Operating steps]
Step 1; Click on Fund Management and select distribution or Shop-in-shop. The list shows the details of the revenue generated by users under all agents.

Withdrawal management
[Operating steps]
Step 1; Click on Fund Management and select Withdrawal Management. The list displays four status tabs

Step 2;On the Waiting for Review tab, click Review. If the review is successful, you will be transferred to the Waiting for Payment page.

Step 3: In the waiting review, click Issue, confirm the cash withdrawal amount, enter the transfer number, payment time, remarks, and save the record to the withdrawal success tab
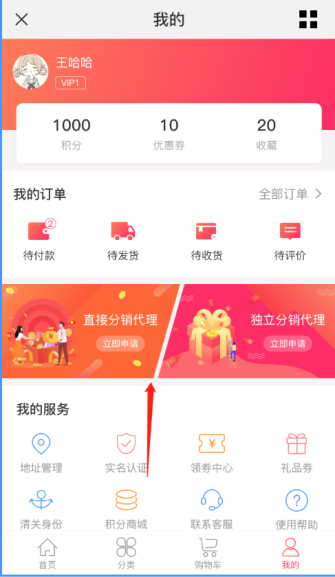
9.6 User Application Agent
[Operating steps]
Step 1; Click on the application on the "My" page of the WeChat OA, and it will become an agent after the merchant passes the approval or meets the conditions.User can only apply for one distribution mode.

9.7 My Agent
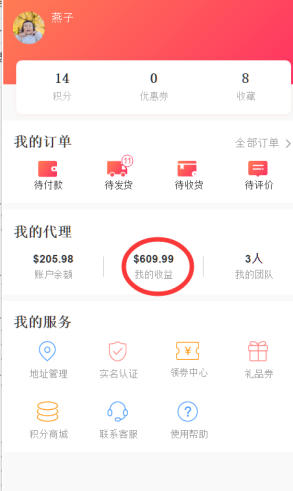
9.7.1 Account balance
[Operating steps]
Enter the WeChat E-Mall and click "My-My Agent-Account Balance" The account balance is equal to the settled income + member balance, and the fund details record each flow.

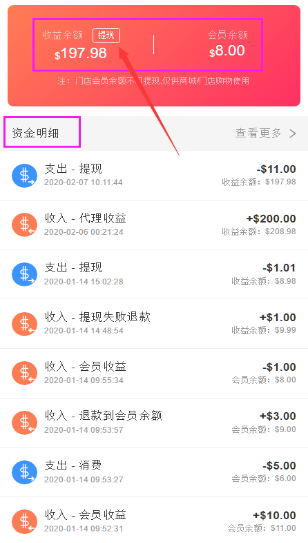
withdraw
You can only withdraw the amount of the proceeds that have been settled. The merchant tenant will complete the review in the background. The merchant tenant will transfer the money offline. Each payment information will be recorded in the withdrawal details option.
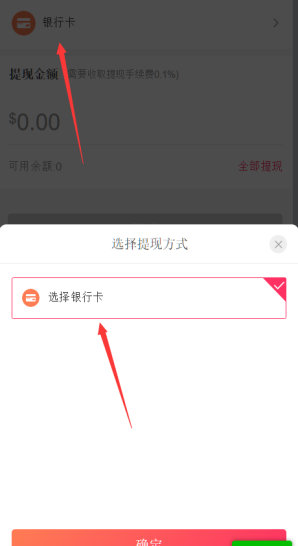
Step 1; Click “withdrawal” option in the account balance to enter the withdrawal page
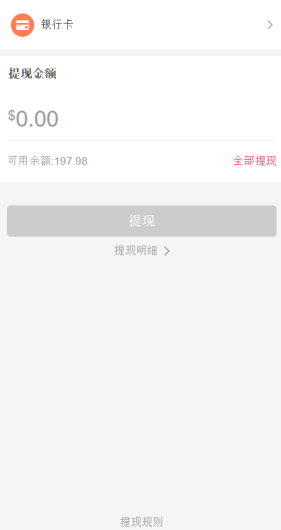
Step 2; Click the bank card option to enter the new page. The user name and mobile phone number will pop up automatically. The default is the real name verification user name and mobile phone number when registering. It cannot be edited. Only the bank card number can be edited.

Step 3; Enter the cash withdrawal amount (which can’t be greater than the settled balance),click withdraw option and the status will automatically change to “withdrawing” mode.The user initiates a withdrawal without deducting the settled income.
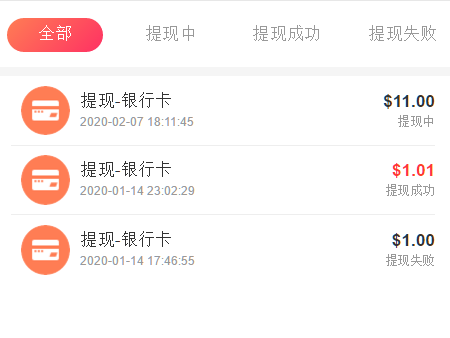
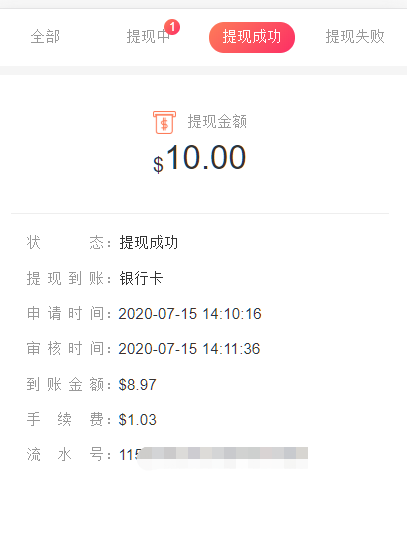
Step 4;After the merchant tenant's background audit is passed, the status changes to Withdrawal Success, and the flow records will be generated simultaneously.

9.7.2 My income
Enter the E-Mall and click "My-My Agent-My Income". My income is equal to the income that has been settled + the income to be settled. The details of the income are recorded for each transaction.

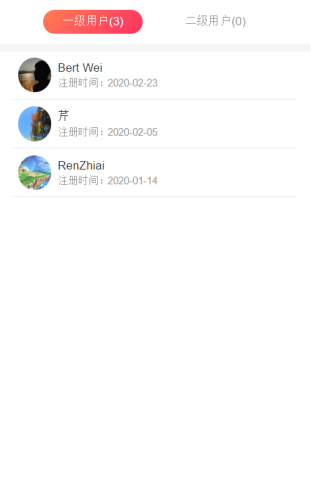
9.7.3 My Team (Distribution)
View my primary and secondary user information
[Operating steps]
Enter the E-Mall and click "My--My Agent--My Team" to record my first and second level user WeChat nickname and registration time

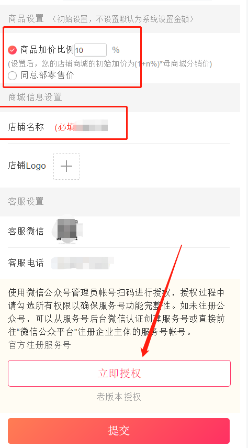
9.7.4 Store Management (Shop-in-shop tenant bind E-Mall)
a. Agent binds the E-Mall**
There are currently two ways to bind, one is that the agent uses its own OA account to authorize the binding.
[Operating steps]
Step 1: The user enters the "My Store" page, clicks Authorize Now, and jumps to the WeChat OA account authorization page, long press to identify the QR code, and click Authorize on the phone after scanning the code.
Note;The authorized WeChat account must be public Administrator.
Step 2: Set the markup ratio and store name in "My Store" and save it. After saving, it will automatically synchronize the merchant's products.Completed all steps of operation.
Note;The markup ratio is only valid for agent mall products when initializing the product, so this ratio must be confirmed.
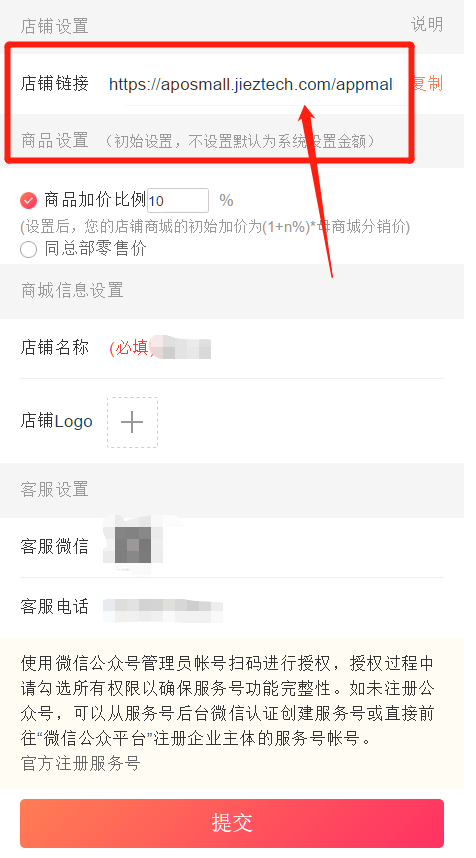
The second is that the agent does not have its own OA account, so fill in the required information directly, save it and bind it.
Step 1; The user enters the "My Store" page, sets the markup ratio and the store name, and clicks Save, the binding is successful, and a store link is automatically generated in the "My Store". This link is the agent's mall. One way of binding is that there is no official account, so some functions of the official account will not be available, such as message push, sharing, etc.
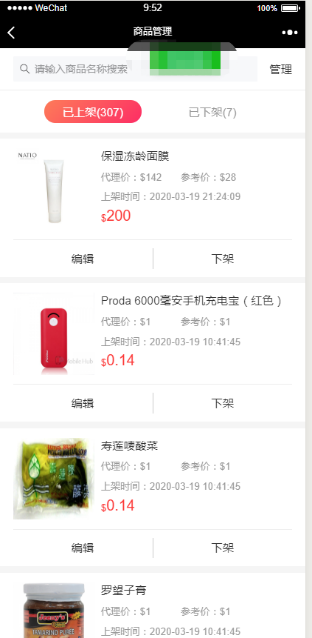
9.7.5 My Products (Shop-in-shop)
[Operating steps]
Step 1; Enter the OA E-Mall and click "My-My Agent-My Products"
Step 2; The products in the product management options come from the parent mall with the agency price and agency income set. And it is already on sale and has inventory or allows zero inventory out of stock
Step 3; Store products are on sale by default. You can operate the products on the non-sale status. After no sale, the products will be automatically switched to the forbidden list.
Step 4; Click Edit to modify the product sales price, but it cannot be less than the agency price

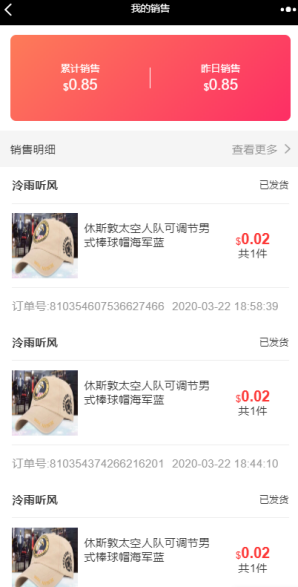
9.7.6 My Sales (Shop-in-shop)
[Operating steps]
Step 1; Enter the OA E-Mall and click "My--My Agent--My Sales"
Step 2; Cumulative sales are the amount of all paid orders
Step 3; Yesterday's sale is the amount of the order paid yesterday
Step 4; Sales details record all orders generated by all users under the agent (including paid, cancelled, pending, shipped, completed)
9.8 Developing Subordinate Users (Distribution)
Definitions for Level 1 and Level 2
For example; User A shares to new user B, User B shares to new user C, and User C shares to new user D.Then, B is the first-level user of A, C is both the second-level user of A and the first-level user of B, and D is the first-level user of C and the second-level user of B, with a maximum of two levels of distribution.
[Operating steps]
Step 1: Enter the OA E-Mall and click on the "three dots" in the upper right corner.
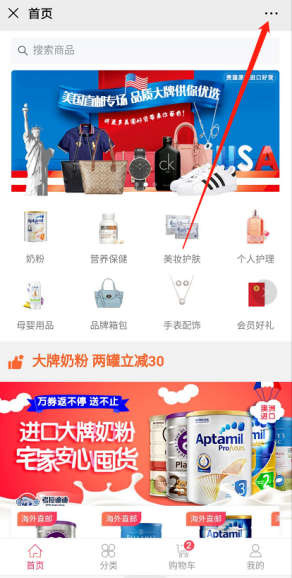
Step 2: Send to friends or share to WeChat moments, friends can follow the OA account from this link.
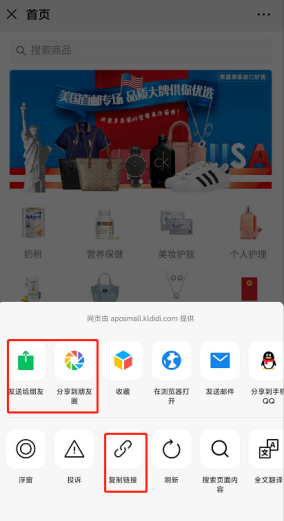
Step 3: Show my QR code, others can enter the mall by scanning the code to bind the mall.

X. After-sales refund
10.1 After-sales audit
[Operating steps]
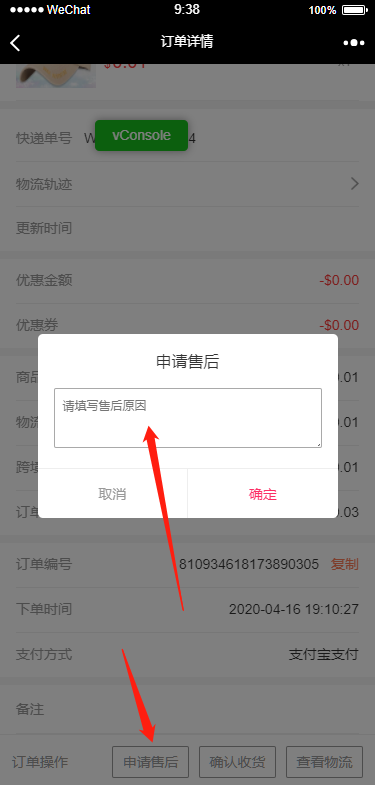
Step 1; C end user enters a remark on the mall order details page to initiate an after-sales application (to be shipped, shipped, and completed, all can apply for after-sales, an order can only be initiated once)
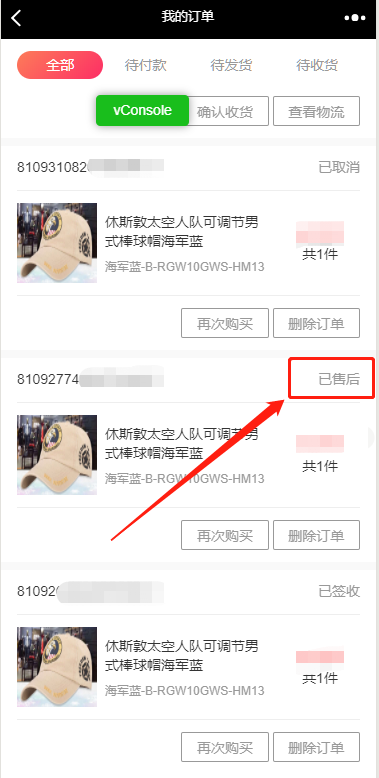
Step 2; Click Order Management, the after-sales menu of the E-Mall, enter the list of after-sales orders, the order to be reviewed is ranked first.

Step 3; Click the review option, a review box pops up, showing the reason for the refund, the amount of products, the amount of logistics, the amount of taxes and fees, the amount of discount, and the amount of payment.

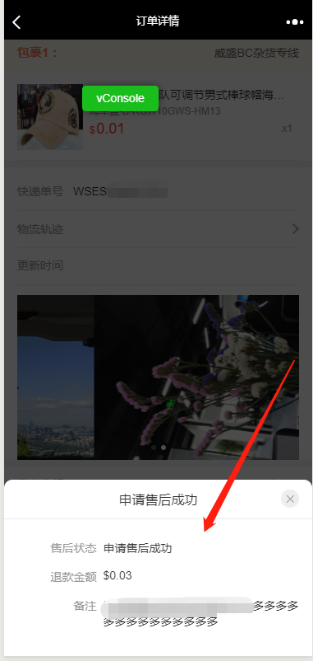
Step 4; When the review is passed, the remarks are optional. The refund amount is required and cannot be greater than the payment amount, and can be less than or equal to the payment amount. It cannot be 0. After clicking, the corresponding refund amount will be returned to the user account On, the status is updated to pass, and the user's order status is updated to after sale.
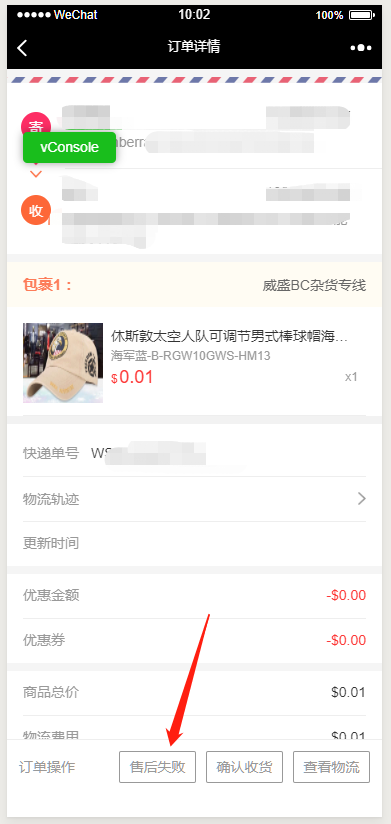
Step 5; When the approval is not passed, the remarks must be filled up to a maximum of 100 words. After you click Fail, the status is updated to Fail, the user ’s order status remains unchanged, and the order details page after-sales review status is updated to after-sales.

XI. Notifications Settings
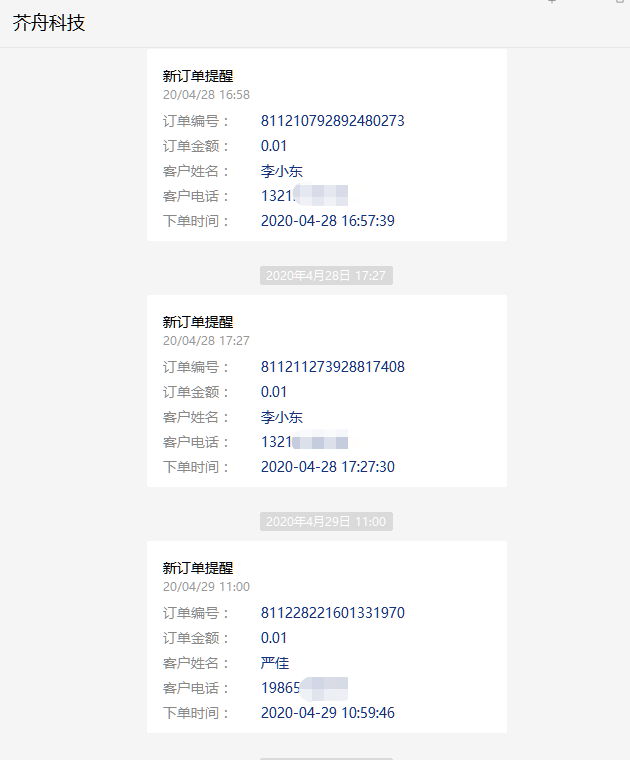
11.1 Notifications Settings
[Operating steps]
Step 1; Enter ”E-Mall-User Management” to set whether to receive commercial tenants notifications,the default mode is no.The store manager or customer service staff can choose to turn on/off the notifications push switch.
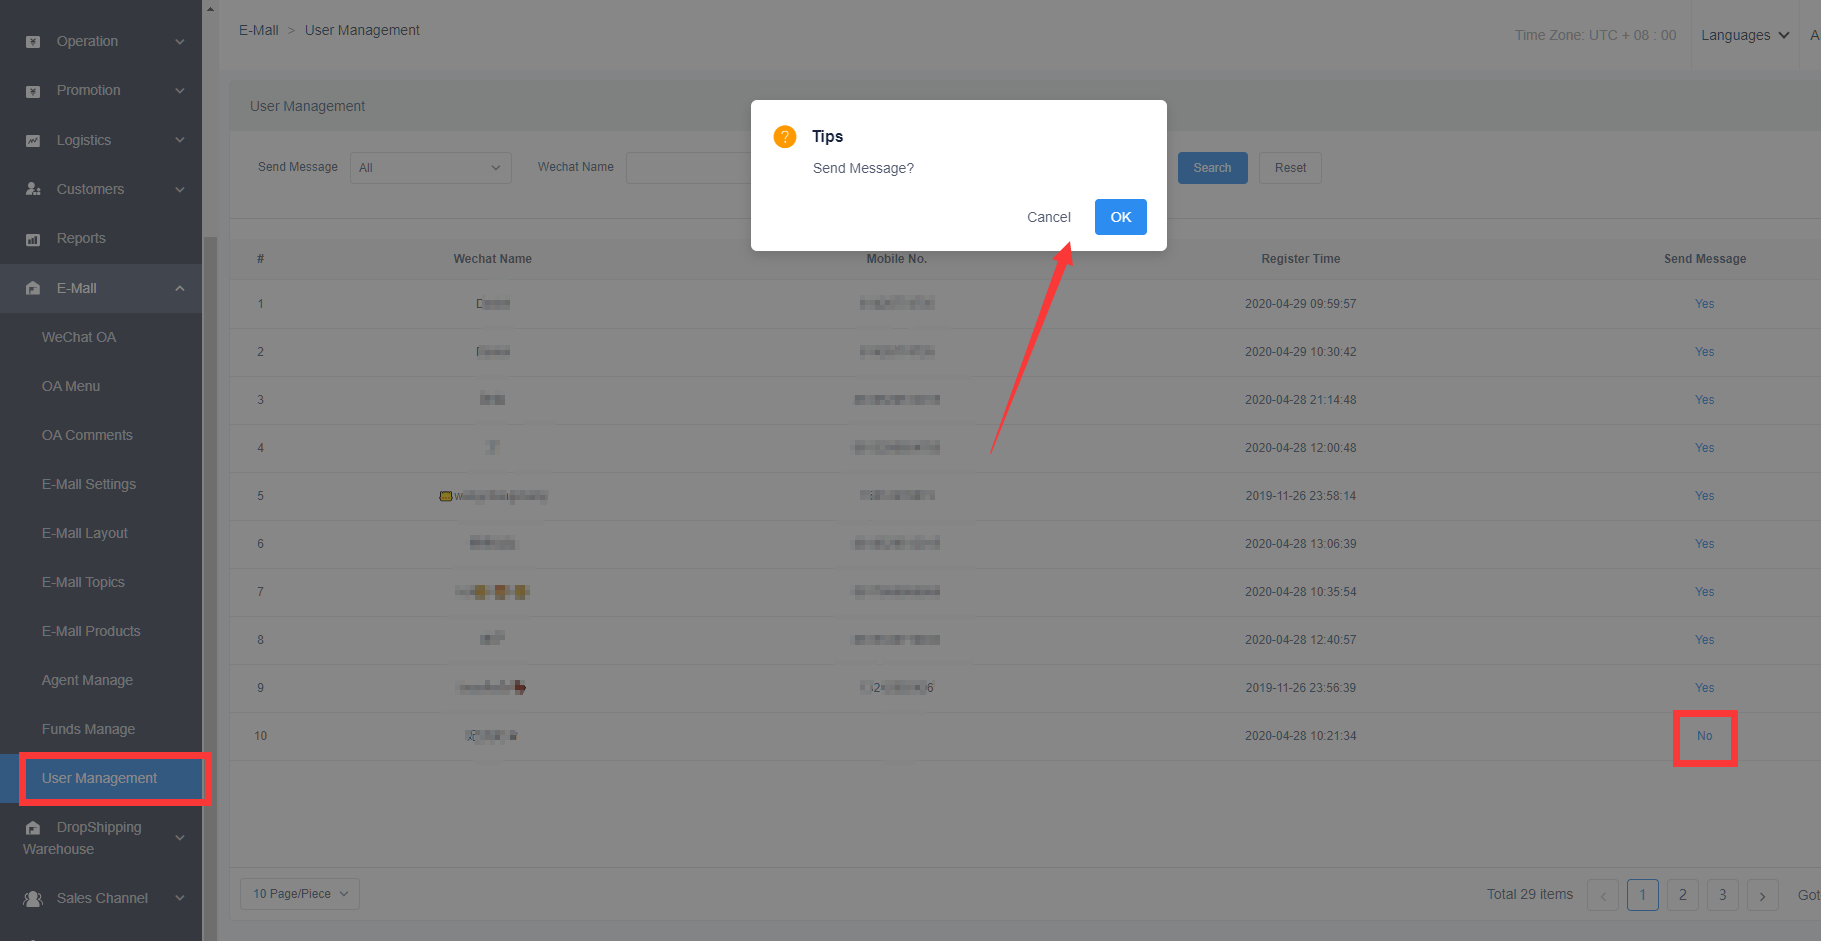
Step 2; Set to ”Yes”mode, then all orders placed by the commercial tenant will push a notification to the user after payment,as show bellow.
XII.Registration/Login
Business description;
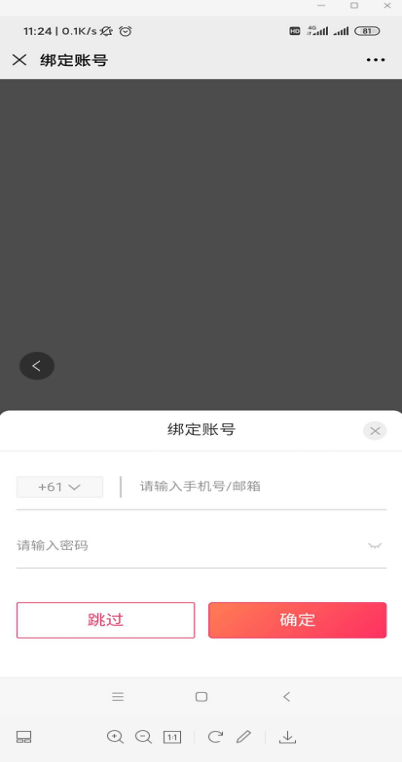
Login and registration are divided into login and registration in E-Mall opened with WeChat OA account, and login and registration in E-Malls opened without OA account; from another perspective, it is divided into login and registration in WeChat and non-WeChat.If you are logging in to a mall opened with a WeChat OA account, you will first pop up the bind account password box when accessing in WeChat (if you already have a mobile phone number/email account, you can bind WeChat to the same user), click skip to recall WeChat Authorization Use the current WeChat to automatically log in, and you need to enter an account to log in in a browser other than WeChat.If it is to log in and use a mall opened without an official account. You need to enter an account to log in to the mall inside and outside of WeChat.
12.1Register on the website with phone number/email, and login E-Mall
Prerequisite; The E-Mall has been opened.
[Operating steps]
Step 1: Choose open the mall from the browser.

Step 2; Click ”My”,click ”Login”option to enter the account and password login page.
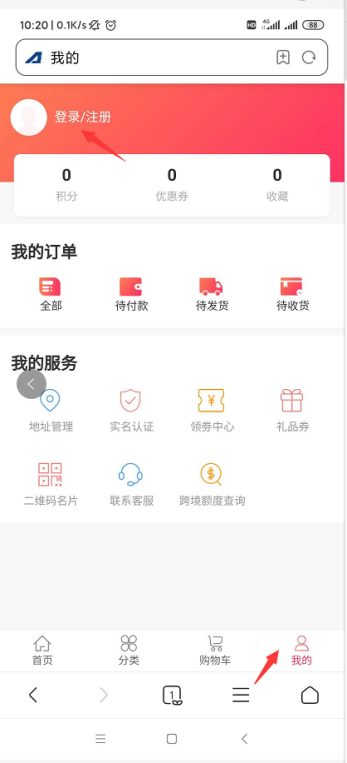
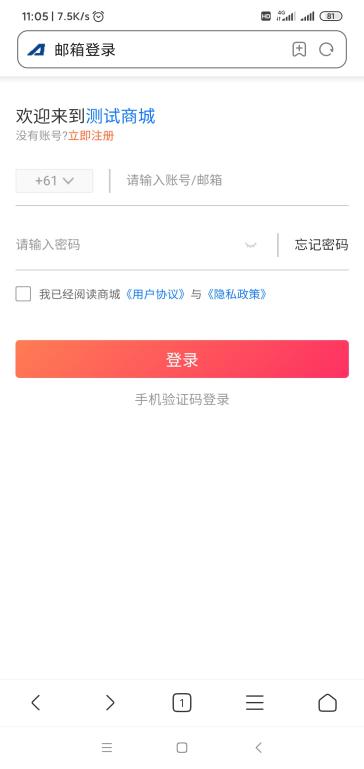
Notes;If you have already registered with your phone number/mail,you can directly enter your phone number/mail account and password to login in. If not,please click”Register Now”option.
Step 3; Click ”Register Now” to jump to the registration page (switch mode according to the store subordinate country,if the store bound to the mall is non-China,it will automatically switch to the mail registration page, if the store country bound to the mall is China,it will automatically jump to the phone number registration page.
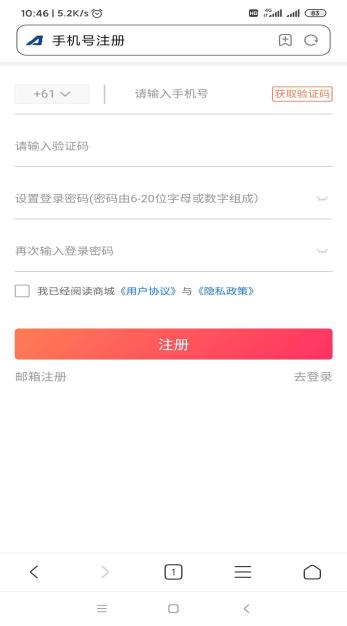
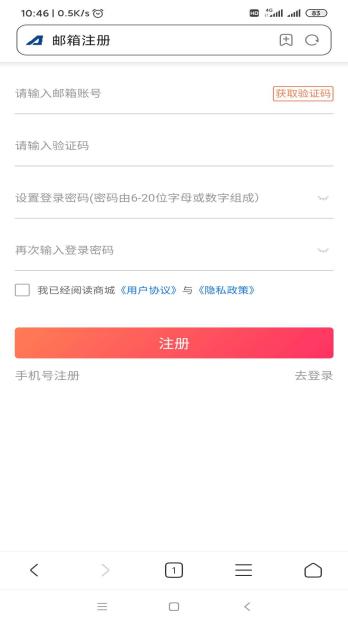
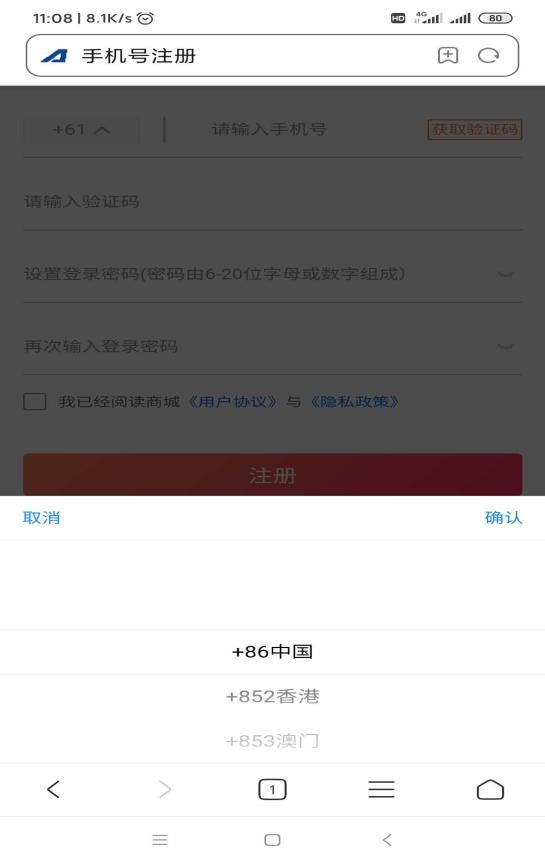
Step 4; If it is a phone number registration, first drop down to select the international area code, then fill in the phone number, obtain the verification code and register. if it is a mail account registration,do not need to select the international area code.
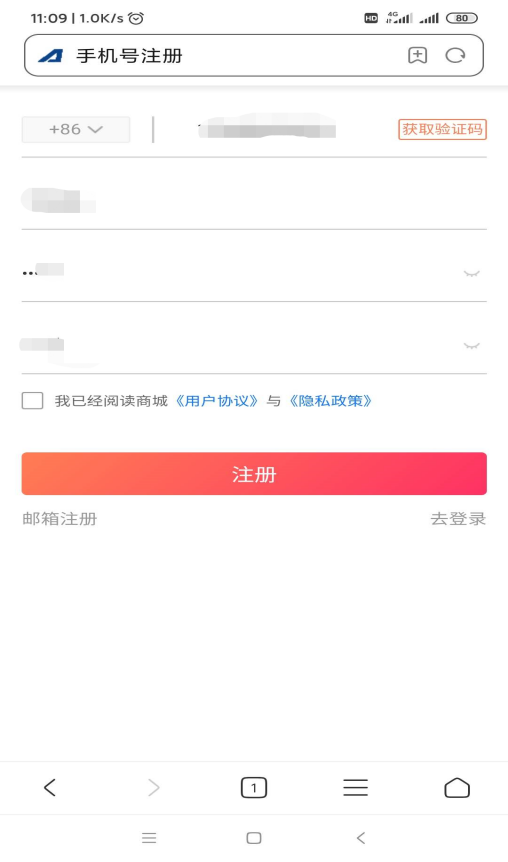
Step 5; After the registration is completed, return to the account password login page, enter the correct account password, after logging in, it will jump to the home page of the mall.
12.2 Register with your mobile phone number/email on your browser and log in to the mall
Prerequisite;Only for the malls without WeChat OA account.
Business description;
Register with your mobile phone number/email on the browser and log in to the mall. Currently, opening a store without an official account is supported. To register and log in to a store without an official account, you must first become an independent distribution agent and open a store without using the WeChat official account. In the store management interface, copy the store link, and use the store link in WeChat, not in WeChat. The registration and login process is the same as in chapter 12.1.
12.3 New users login to the E-Mall for the first time via WeChat**
Instructions for new users logging into the E-Mall for the first time via WeChat;
When a new user logs into the mall for the first time via WeChat, a page for binding an account will pop up. If the user has already registered with a phone number/mail in the browser, you can enter the account binding, the original phone number/mail account and this WeChat is bound to an account with the same personal data. If you click Skip, a new account will be automatically created for the user.
XIII. User Center
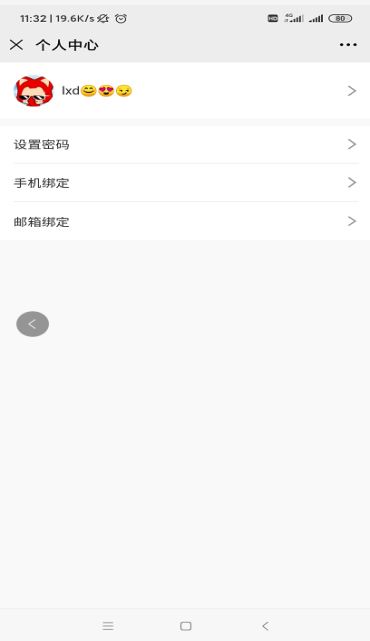
13.1 How to enter the user center**
[Operating steps]
Step 1; Log in to the homepage of the E-Mall
Step 2; Click ”My” option.
Step 3; Click on the log pic or nickname to enter the user center page.

13.2 Modify log pic/nickname and other information**
[Operating steps]
Step 1; On the user center page, click the first column to enter the personal information page.

Step 2; Modify the nickname, click on the log pic column,it will pop up phone album,select the related picture and set it as the log picture.
Step 3; Click the nickname column to update the nickname.
Step 4; Click the birthday bar, slide the year, month and day to set the birthday.
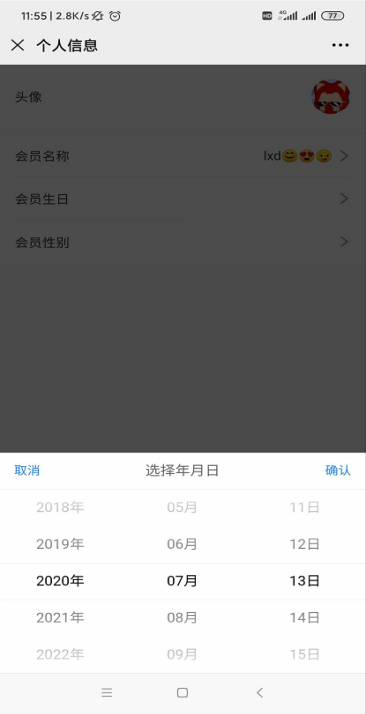
Step 5: Click on the gender bar and swipe up and down to select the gender.

13.3 Set Password
[Operating steps]
Step 1: Click to set the password, the update password page will pop up.You can select update your new login password.

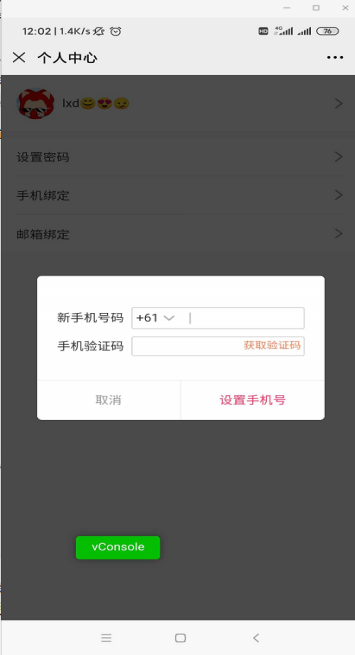
13.4 Switch binding phone number
[Operating steps]
Step 1; Click the phone binding, enter the phone number in the pop-up box, and obtain the verification code setting.
Note; To bind or change the phone number, you need to provide a new phone number, a mobile phone number that has not been bound in the current E-Mall.
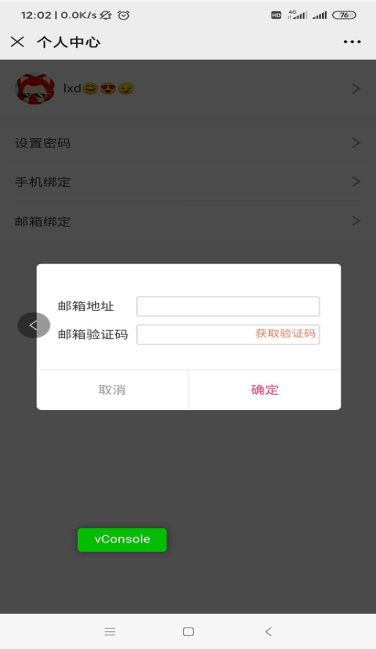
13.5 Switch bind Mail
[Operating steps]
Step 1; Click the mail binding option,it will pop up new binding mail page.and obtain the verification code.
Note;To bind or change the mail, you need to provide a new mail, a mail that has not been bound under the current mall.