Operation Manual for Apos Client
Version: V 4.5.2
Mustard Boat Technology
June 2020
Revision history
| Version | Date | Update Records | Approved by | Modifier |
|---|---|---|---|---|
| V4.4.1 | 2020/4/21 | First draft | Xiong Chao/Liang Zhilu | |
| V4.5.1 | 2020/5/20 | Added the function of creating new products on the client, the client supports input of decimals for weighted products. | ChenXingyi/Yang Zhuo /Wang Guoqun | |
| V4.5.2 | 2020/6/8 | Newly added inventory management module on the client.Apos client retail support order tax-free(VW). | ChenXingyi/Yang Zhuo /Wang Guoqun |
Business model description
The Apos system supports three sales models; local sale,CC-sale, and BC-sale.
Local Sale; Local customers buy at the store, non-cross-border sales, Local sales tax is charged.
CC-Sale;CC-Sale, collect postal tax
BC-Sale;BC-Sale, charge cross-border comprehensive tax.
I Client Menu
Users can add a client menu through the background of the system to add frequently-sold products, common logistics channels, or other consumables to the cashier desktop, and quickly place an order after selection.
For the method of adding client menu, please refer to section 5.1.4 “Client Menu” under “Operation Management” in Chapter 5 of “Operation Manual for Apos V4.4.1”
[Operating steps]
Select related items and add to Shopping Cart.
Note: After adding and enabling the client menu in the sever background, the client needs to click "Sync" to display the client menu.
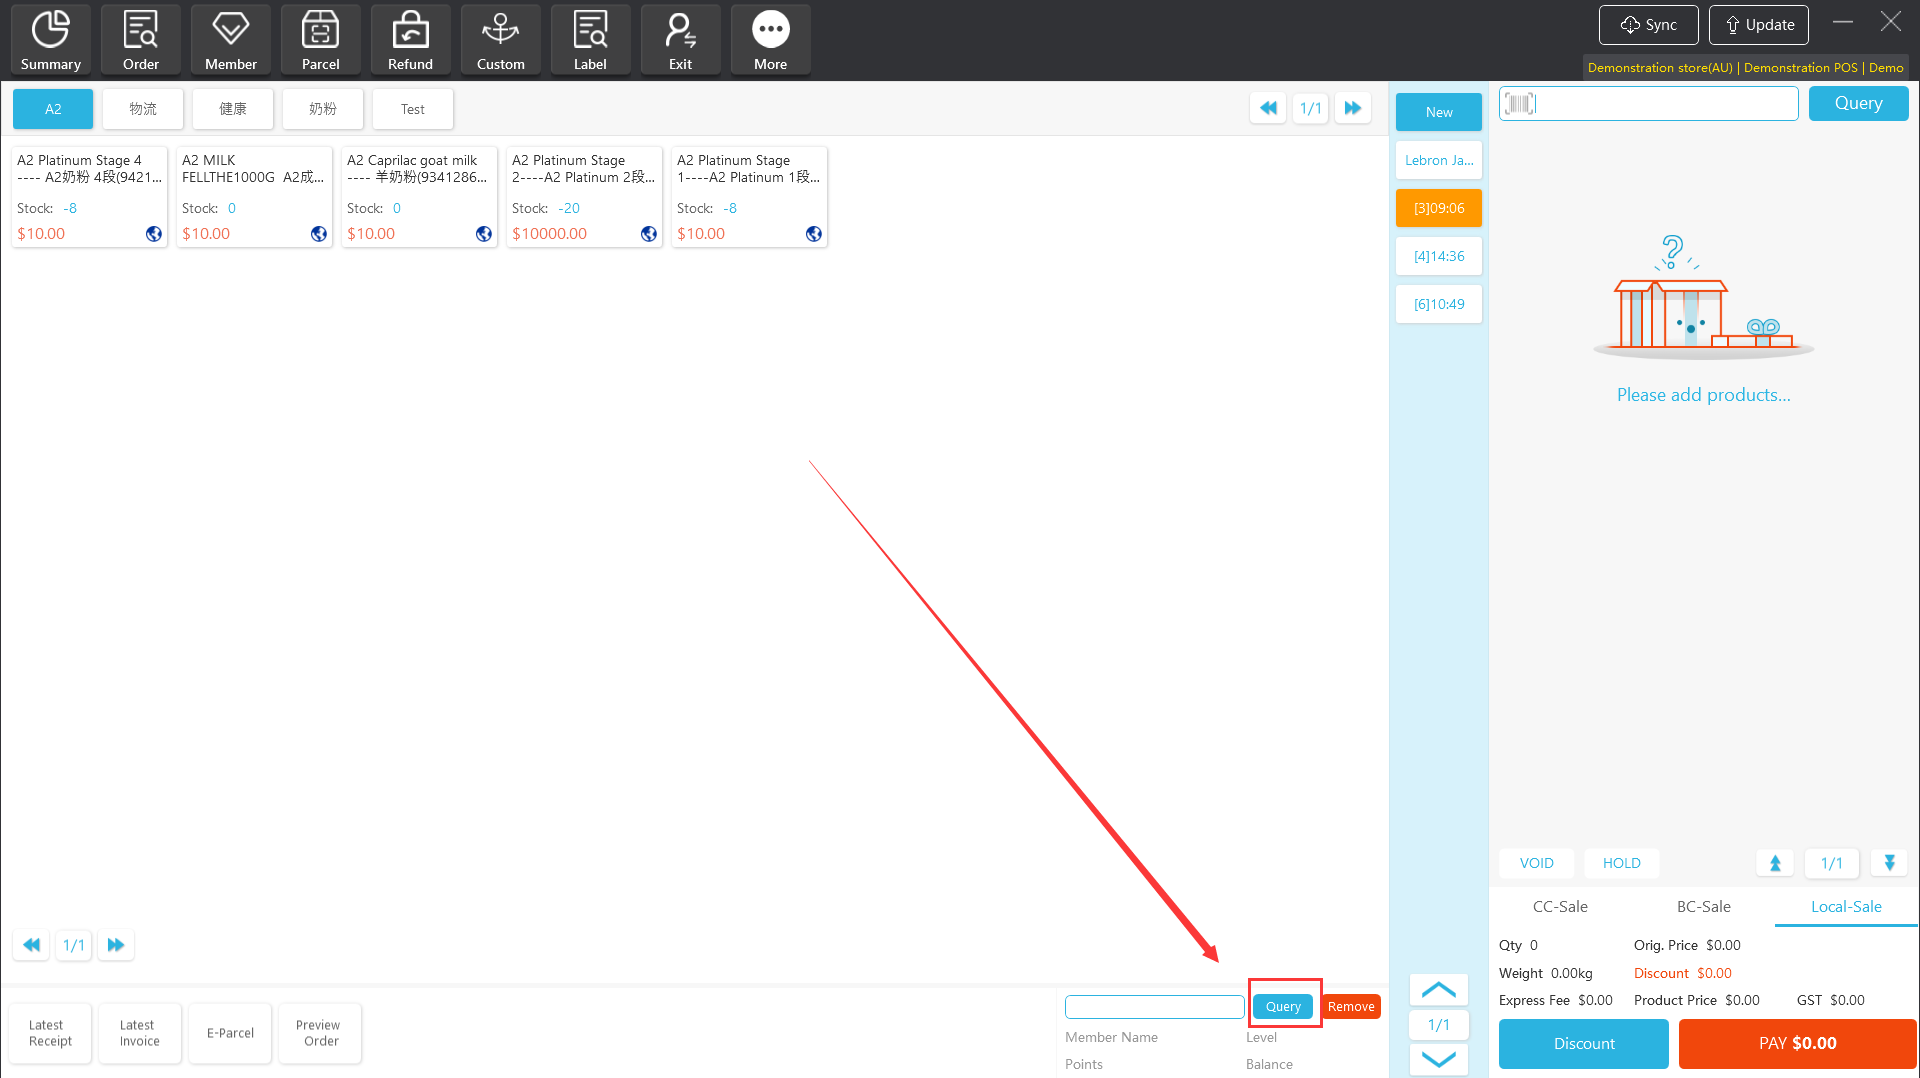
II Shopping Cart
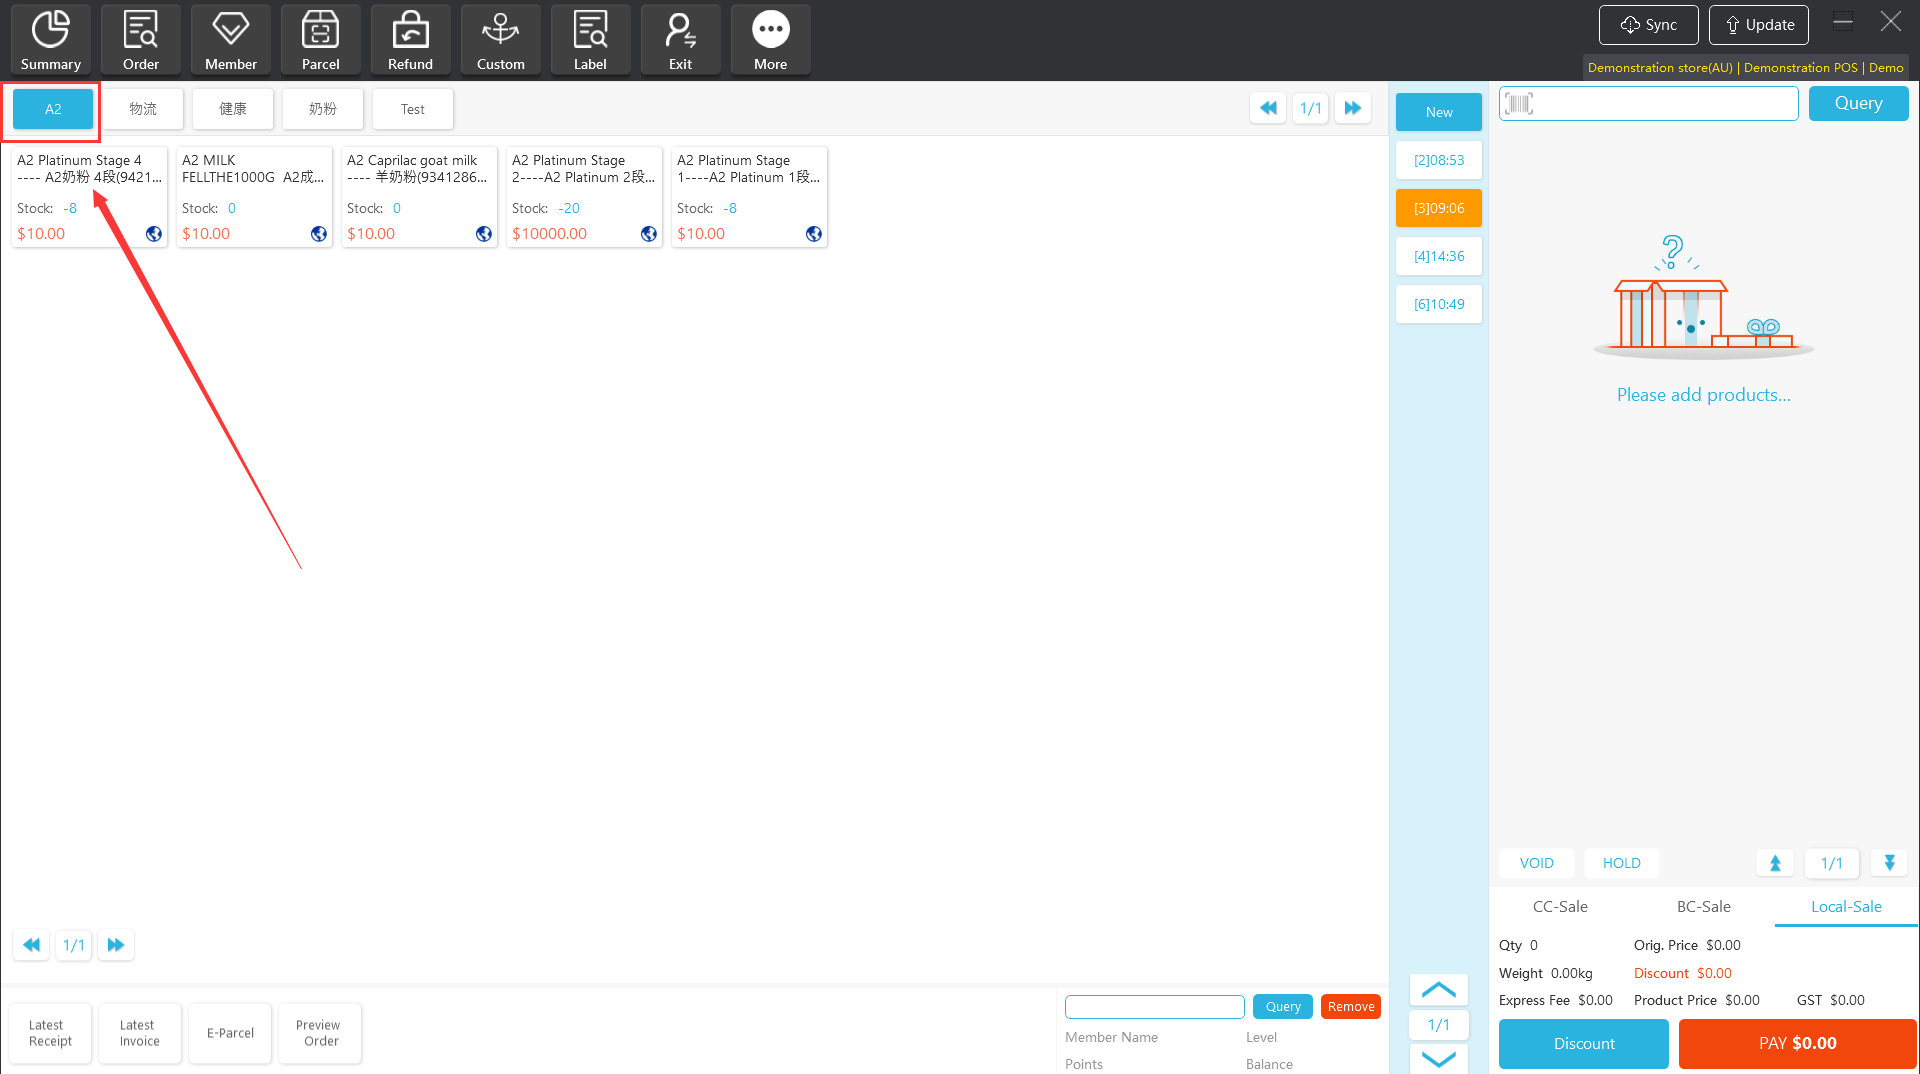
2.1 Add products to shopping cart
The Apos client supports multiple ways to add products to the shopping cart.
Method 1:Through scan the product bar code to add the product to the shopping cart.
[Operating steps]
Step 1: After logging into the Apos client, the cursor will automatically focus on the query product input box, use the scanning gun to directly scan the product barcode, you can add the product to the shopping cart, and add the number of products 1 in one scan.
Method 2: Manually enter the product barcode or product code to add.
[Operating s teps]
Step 1: Enter the product barcode or product code in the query product input box, click Enter or “Query” to add the product to the shopping cart;
Remarks: The barcode and code of the product support fuzzy matching query.

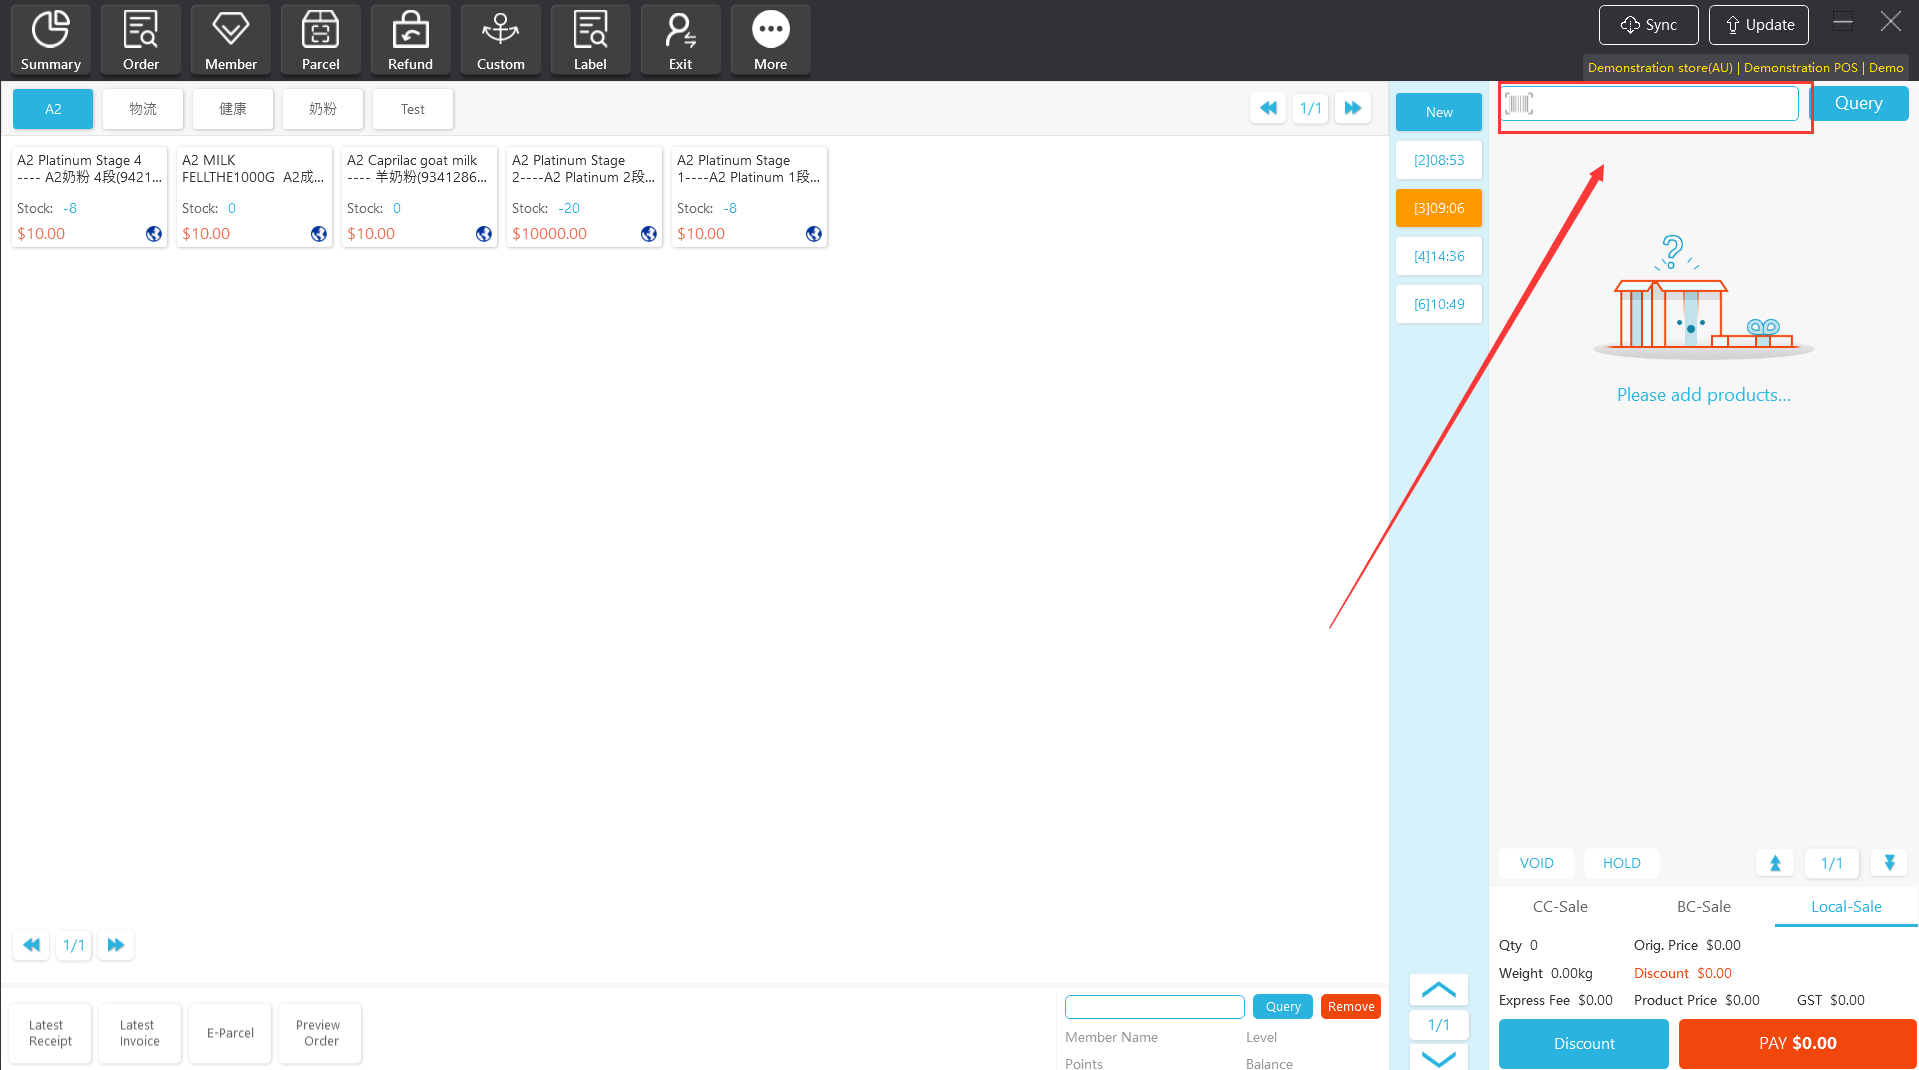
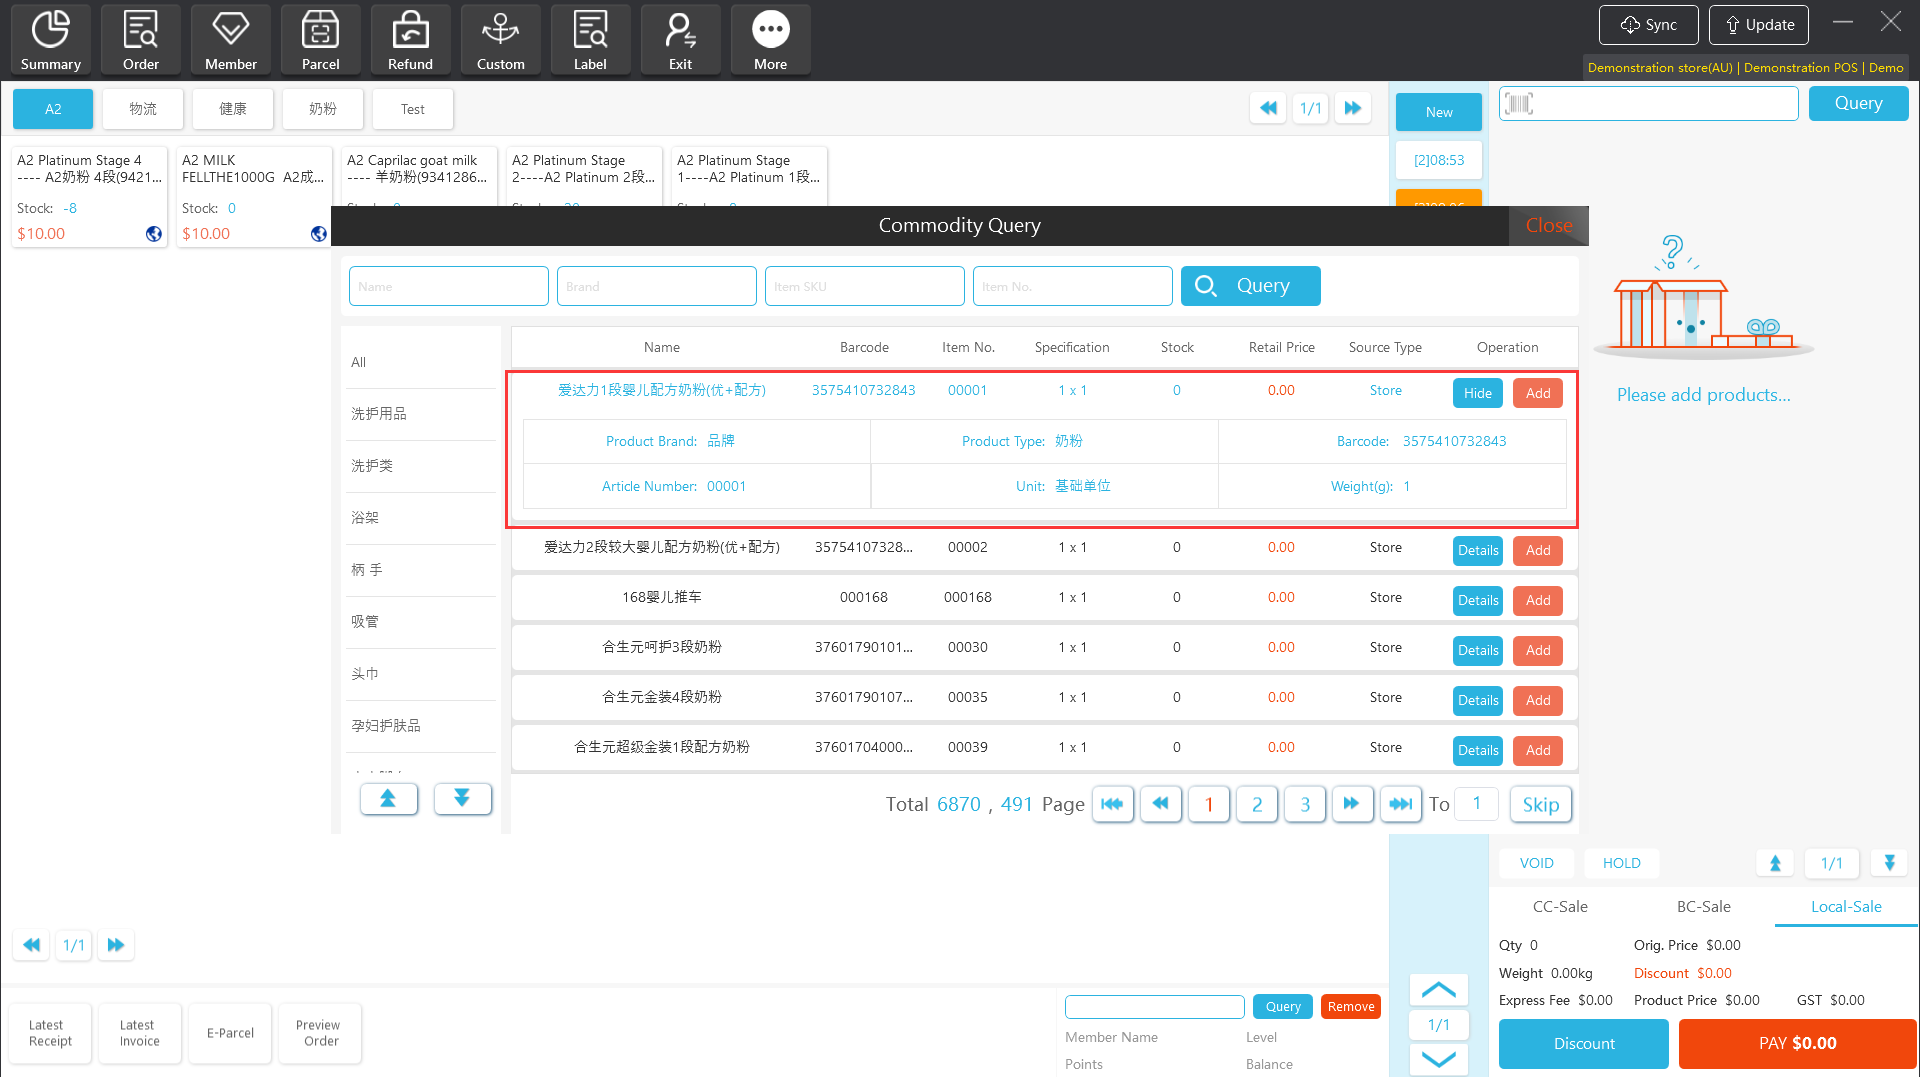
Method 3 Through “Query”, select the products to be added to the shopping cart.
[Operating steps]
Step 1: Click “Query”, a product query interface will pop up, you can find the sold product by the product name, brand, category, barcode or item No, and click "Add" to add it to the shopping cart.
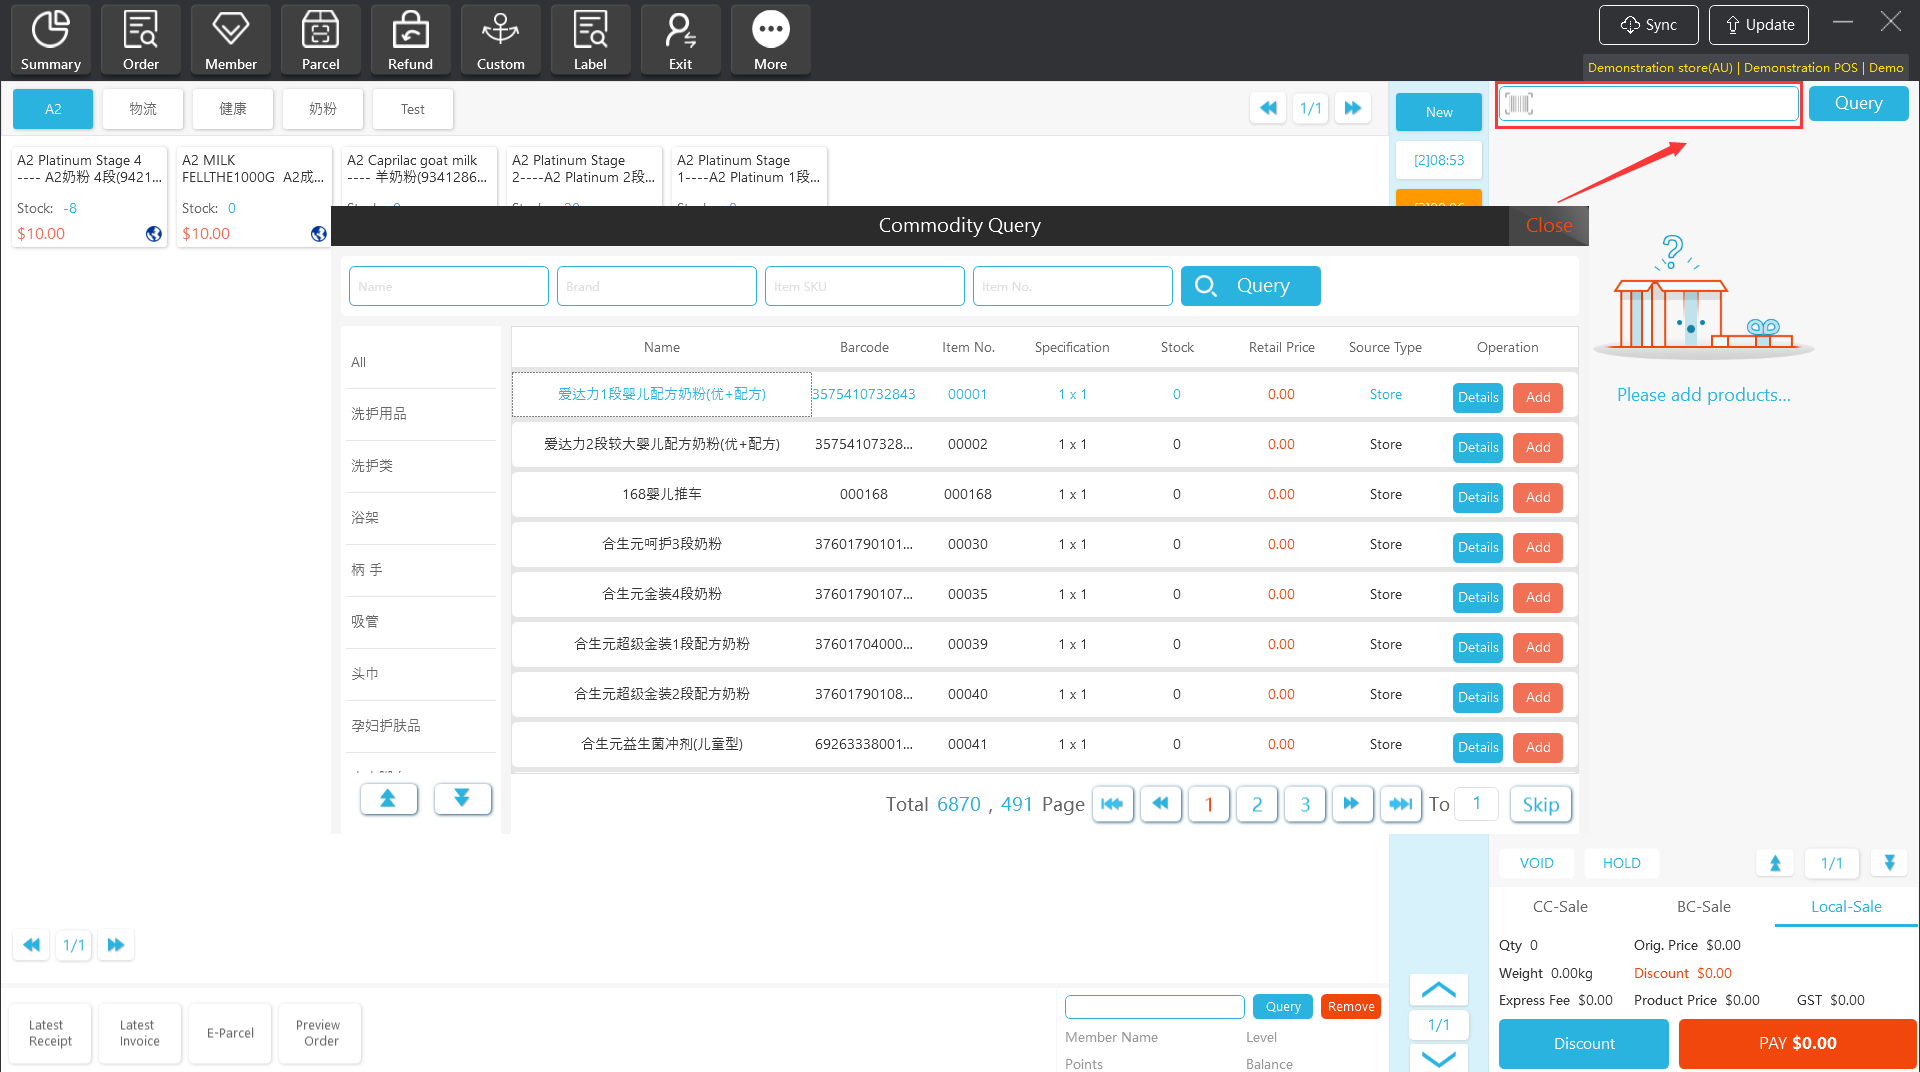
Users can click the “Details” option to view basic information related to the product.
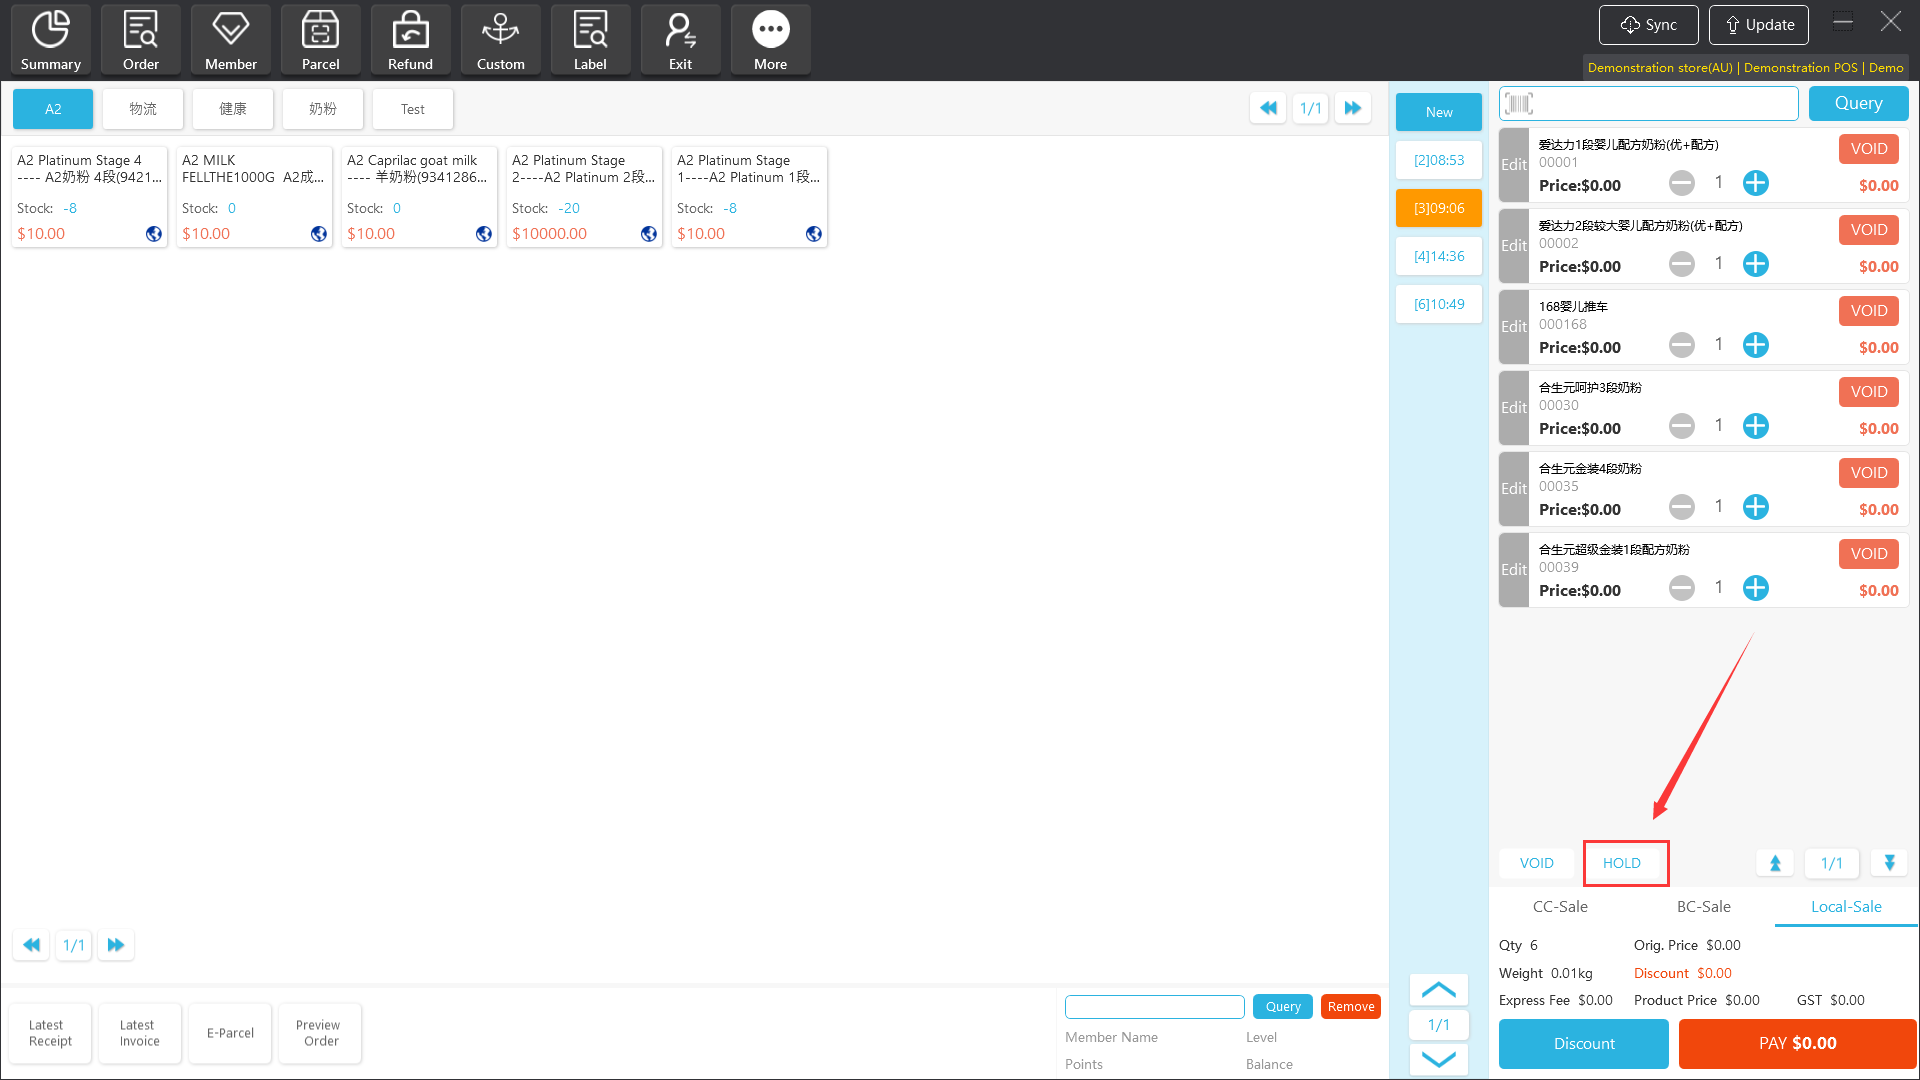
2.2 Pending Order
When there are a large number of customers waiting in line for settlement in the store, the Apos client supports pending orders for unfinished orders. Users can continue to perform cashier operations for new orders and re-enable pending orders when re-settlement.
2.2.1 Pending Order
[Operating steps]
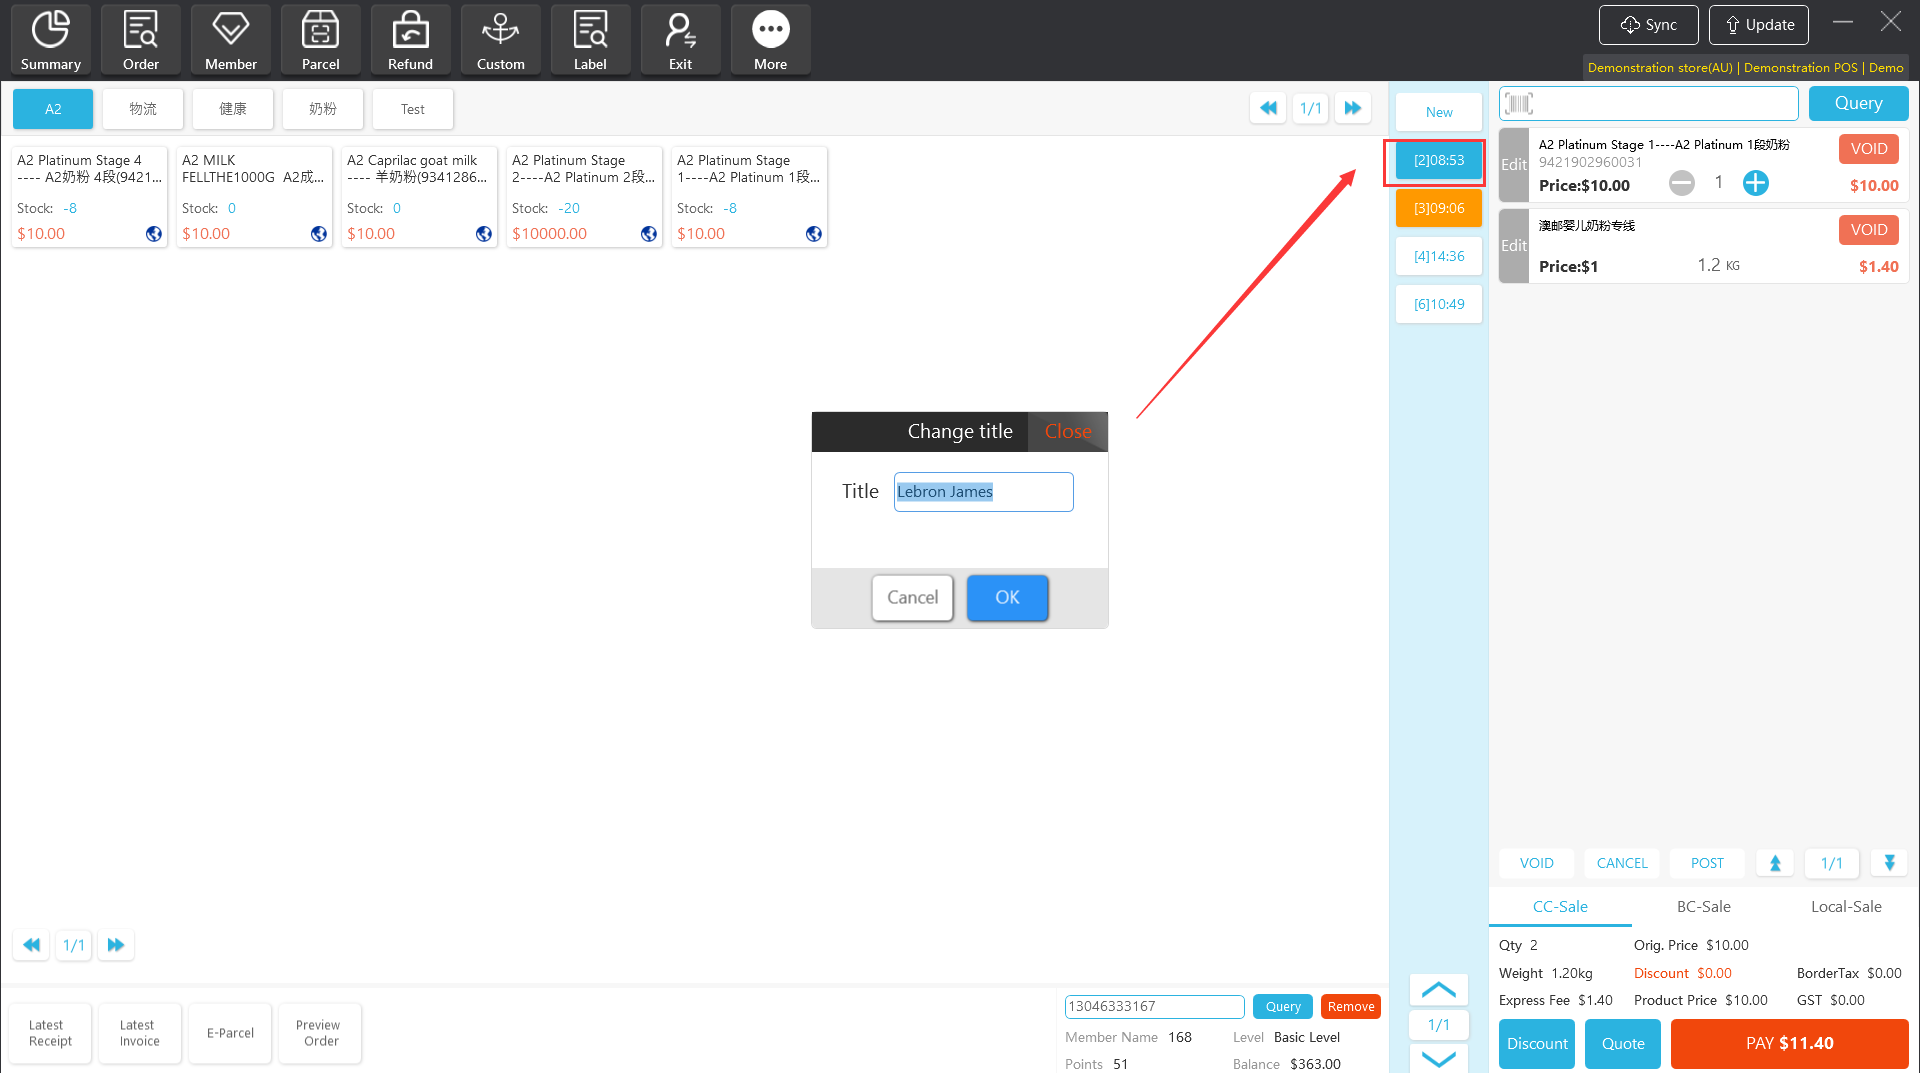
Step 1: Click “HOLD” button to suspend the order.
Step 2: Double-click the Hold order, you can customize the name of the pending order to facilitate identification when multiple pending orders.
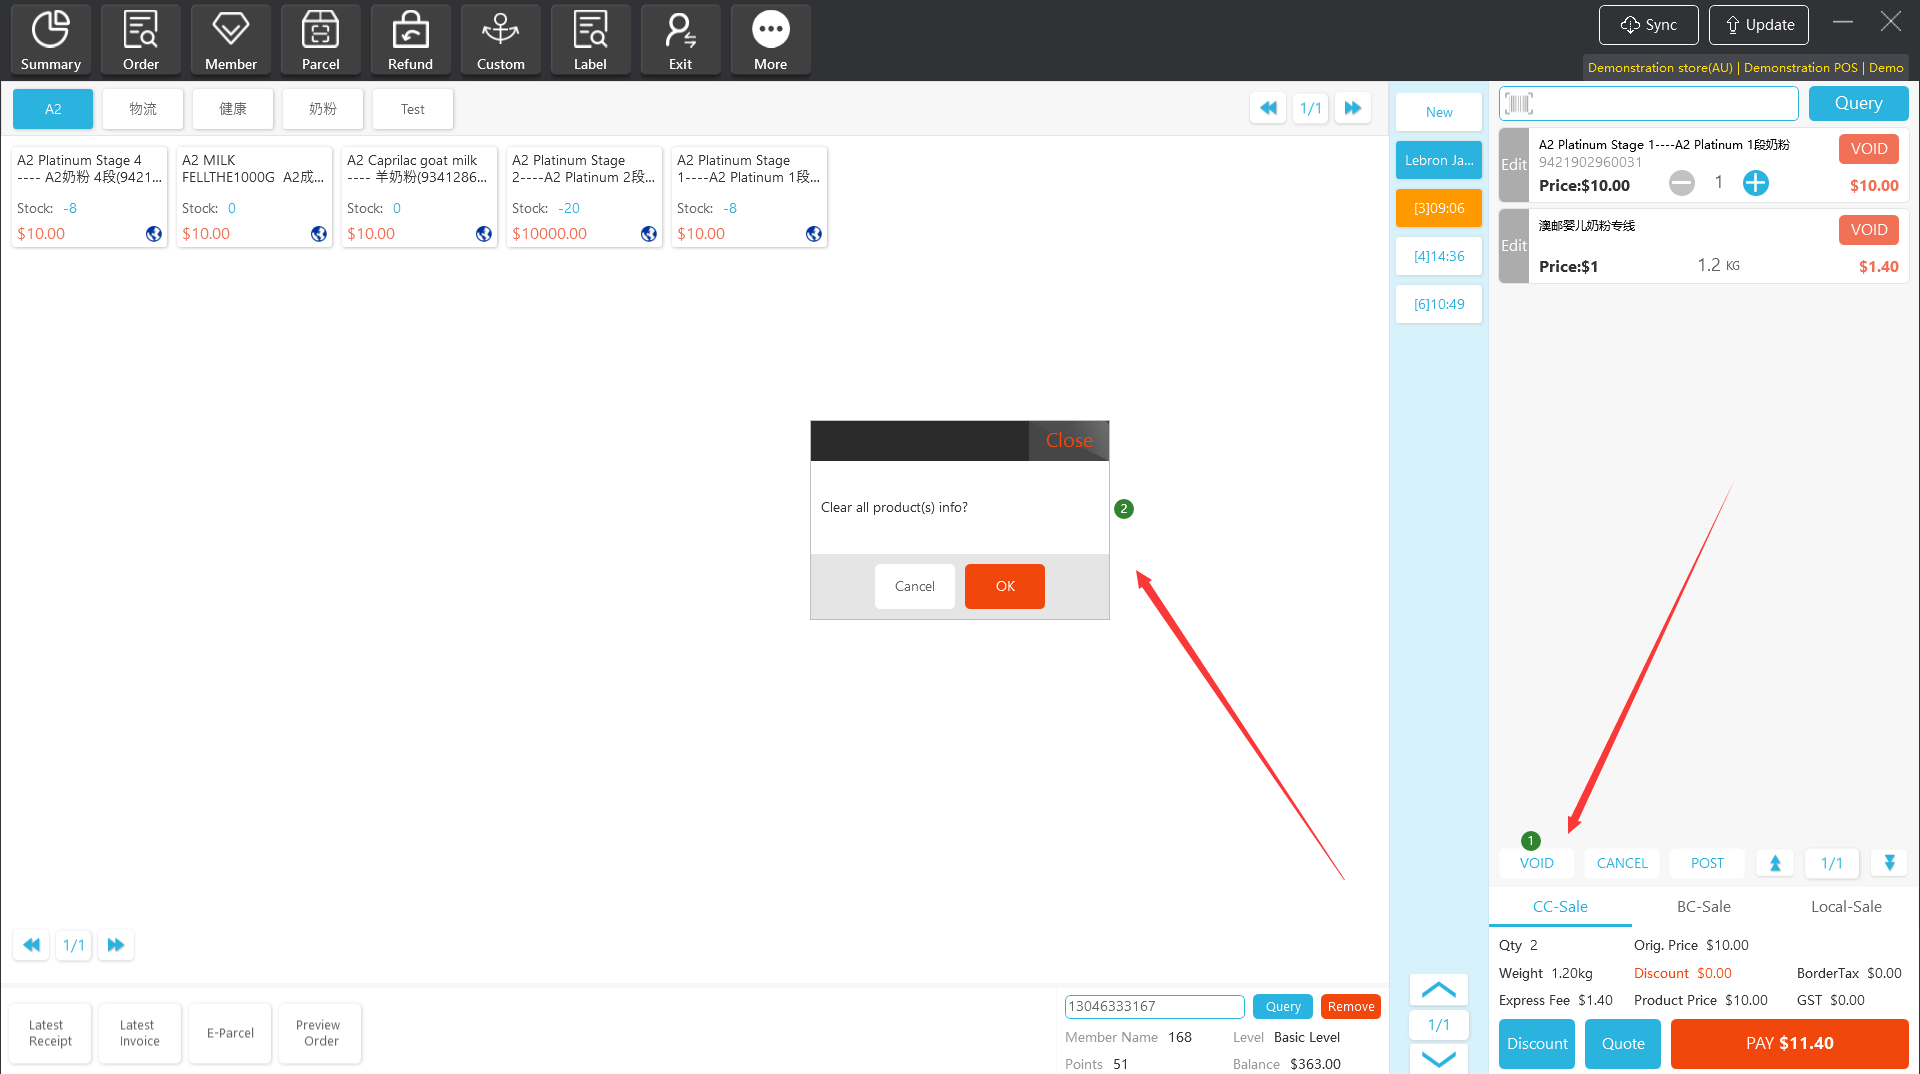
2.2.1 Cancel Pending Orders
When the pending order is no longer settled, you can directly “cancel” the pending order to clear this order
[Operating steps]
Step 1:Select the pending order to be canceled, click the “Cancel”option, and click "OK" in the pop-up box.

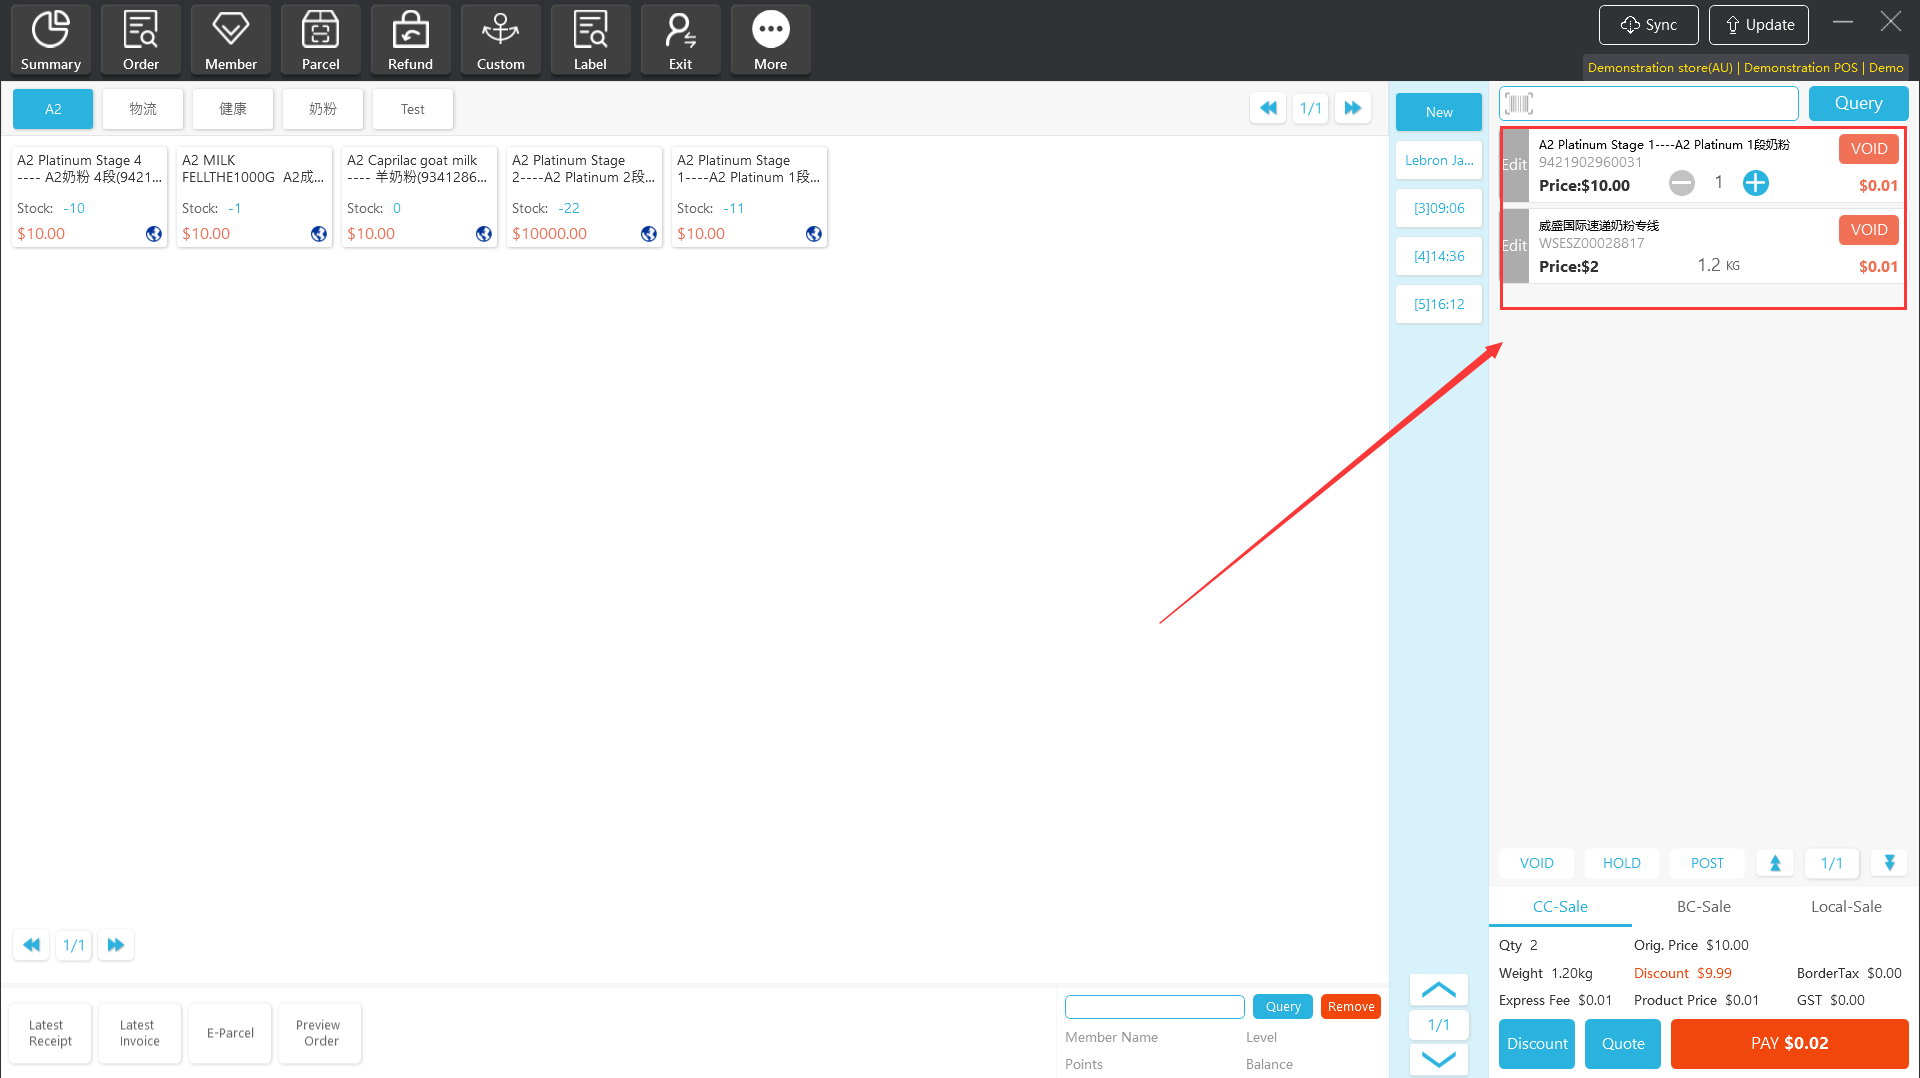
2.3 VOID Order
APOS client supports one-click void shopping cart function
[Operating steps]
Step 1:Click the "VOID" button.
Note:For pending orders, “VOID” only clears all the goods in the pending order. To clear the pending order, please click “Cancel” order operation.
2.4 Modify products in the shopping cart
2.4.1 Modify products in the shopping cart
For goods that have been added to the shopping cart, the cashier can manually increase or decrease the number of products and the sales price (permission required).
[Operating steps]
Method 1:Modify the quantity of the products of the order placed directly through the “-” and “+” option.
NoteThe product cannot be cleared, and the quantity “-” to 1 cannot be reduced.
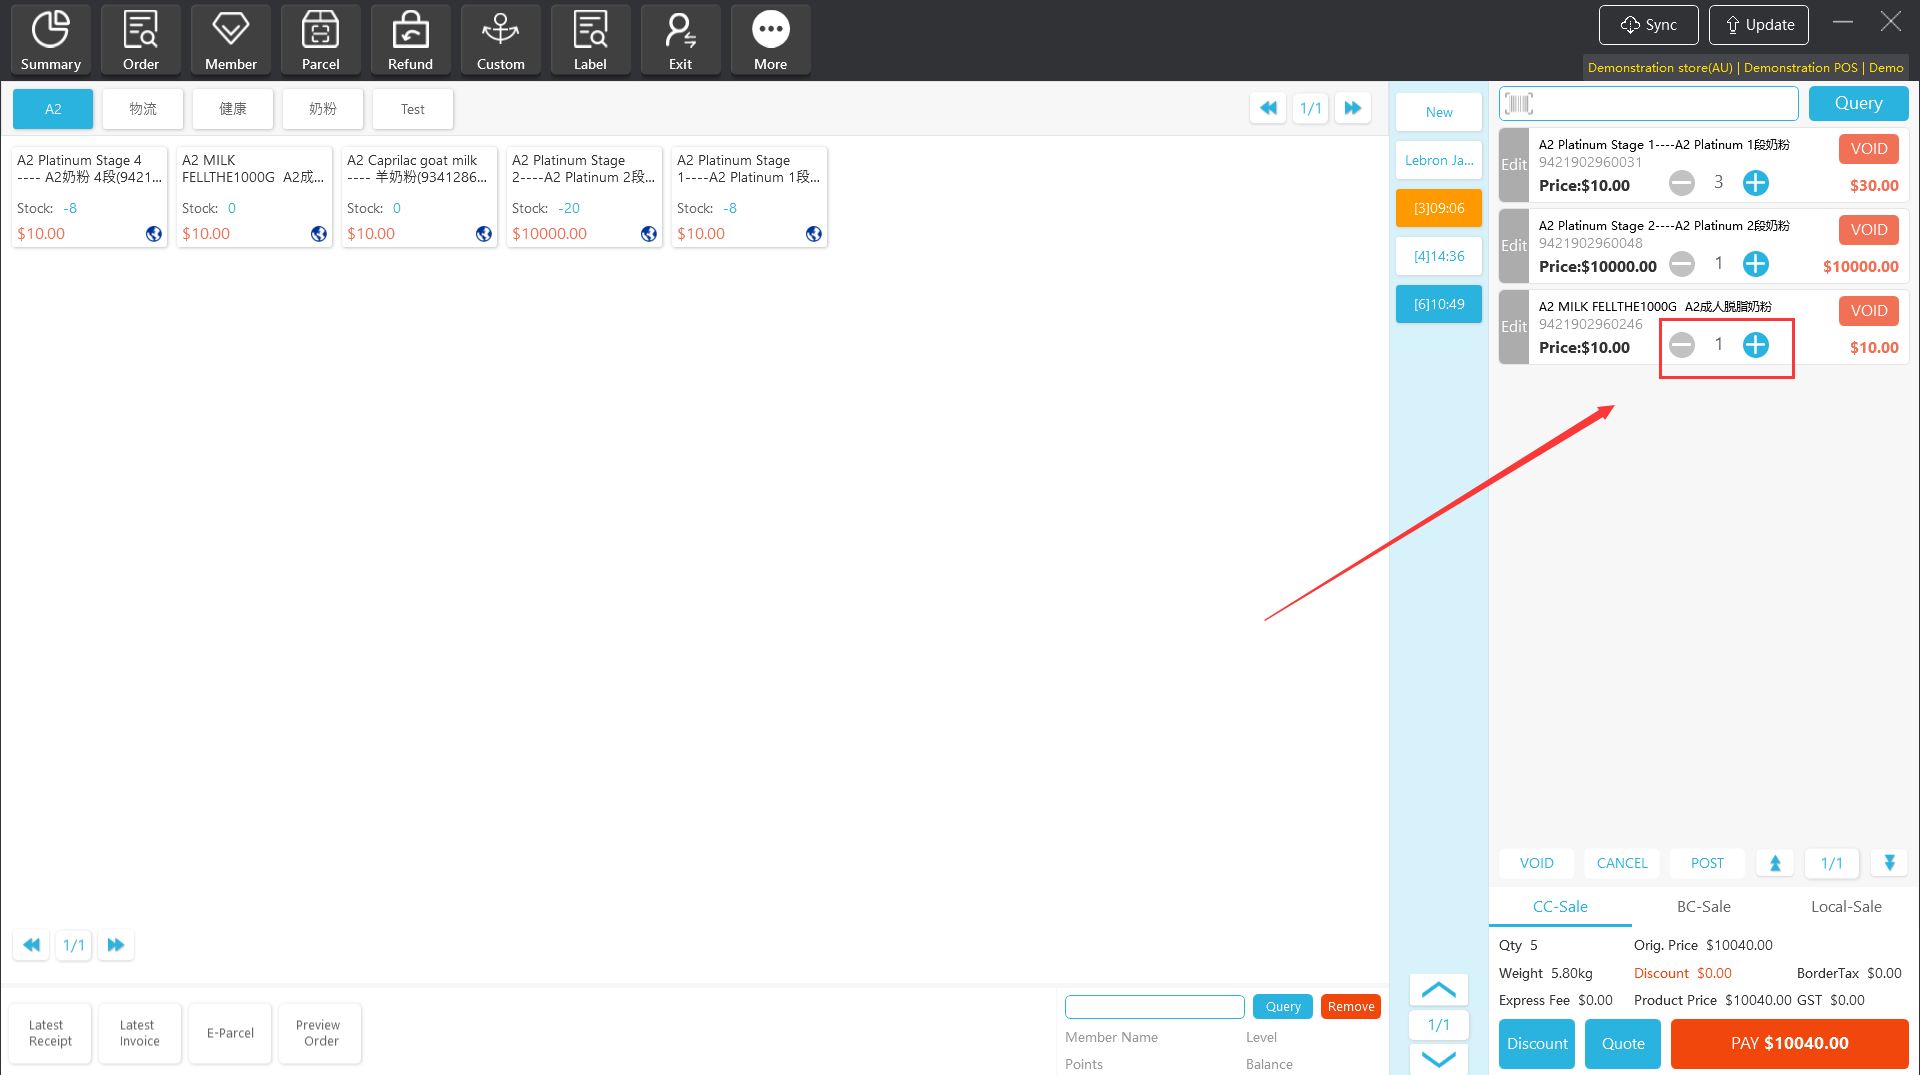
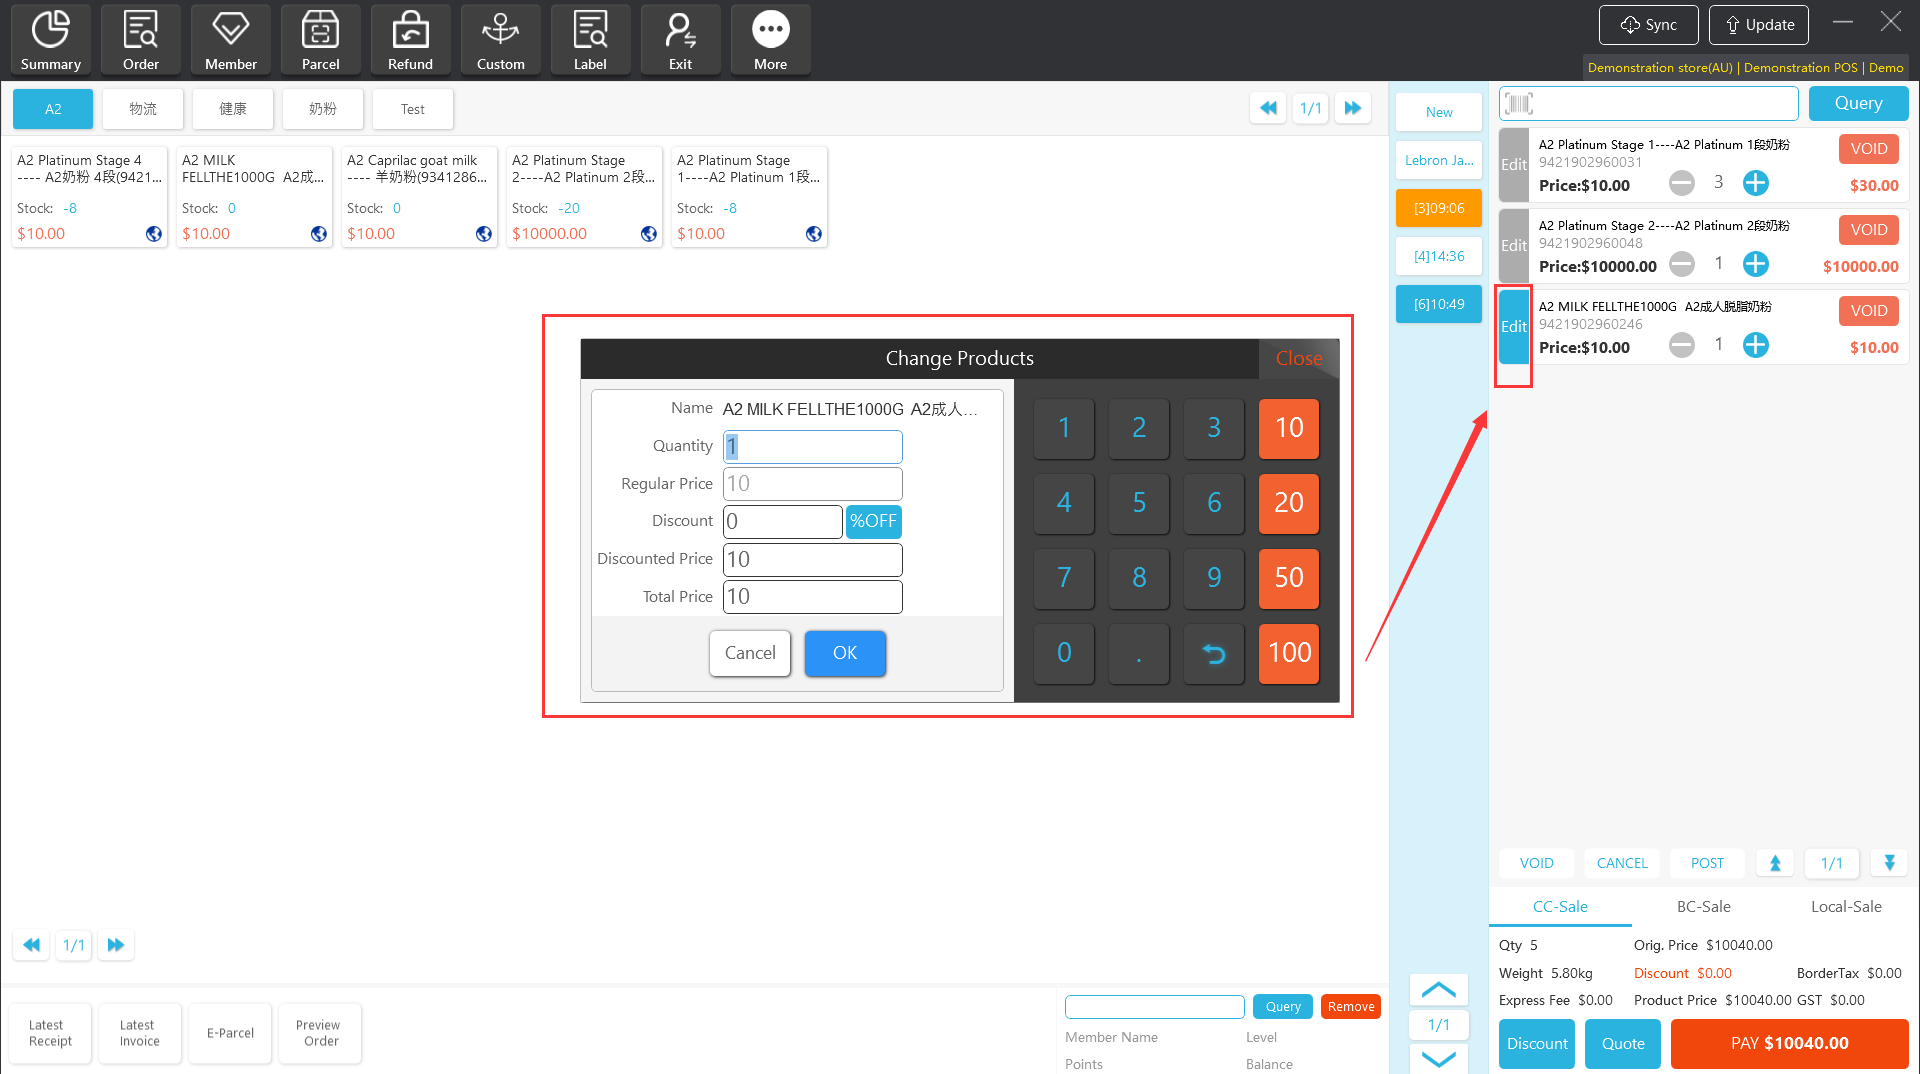
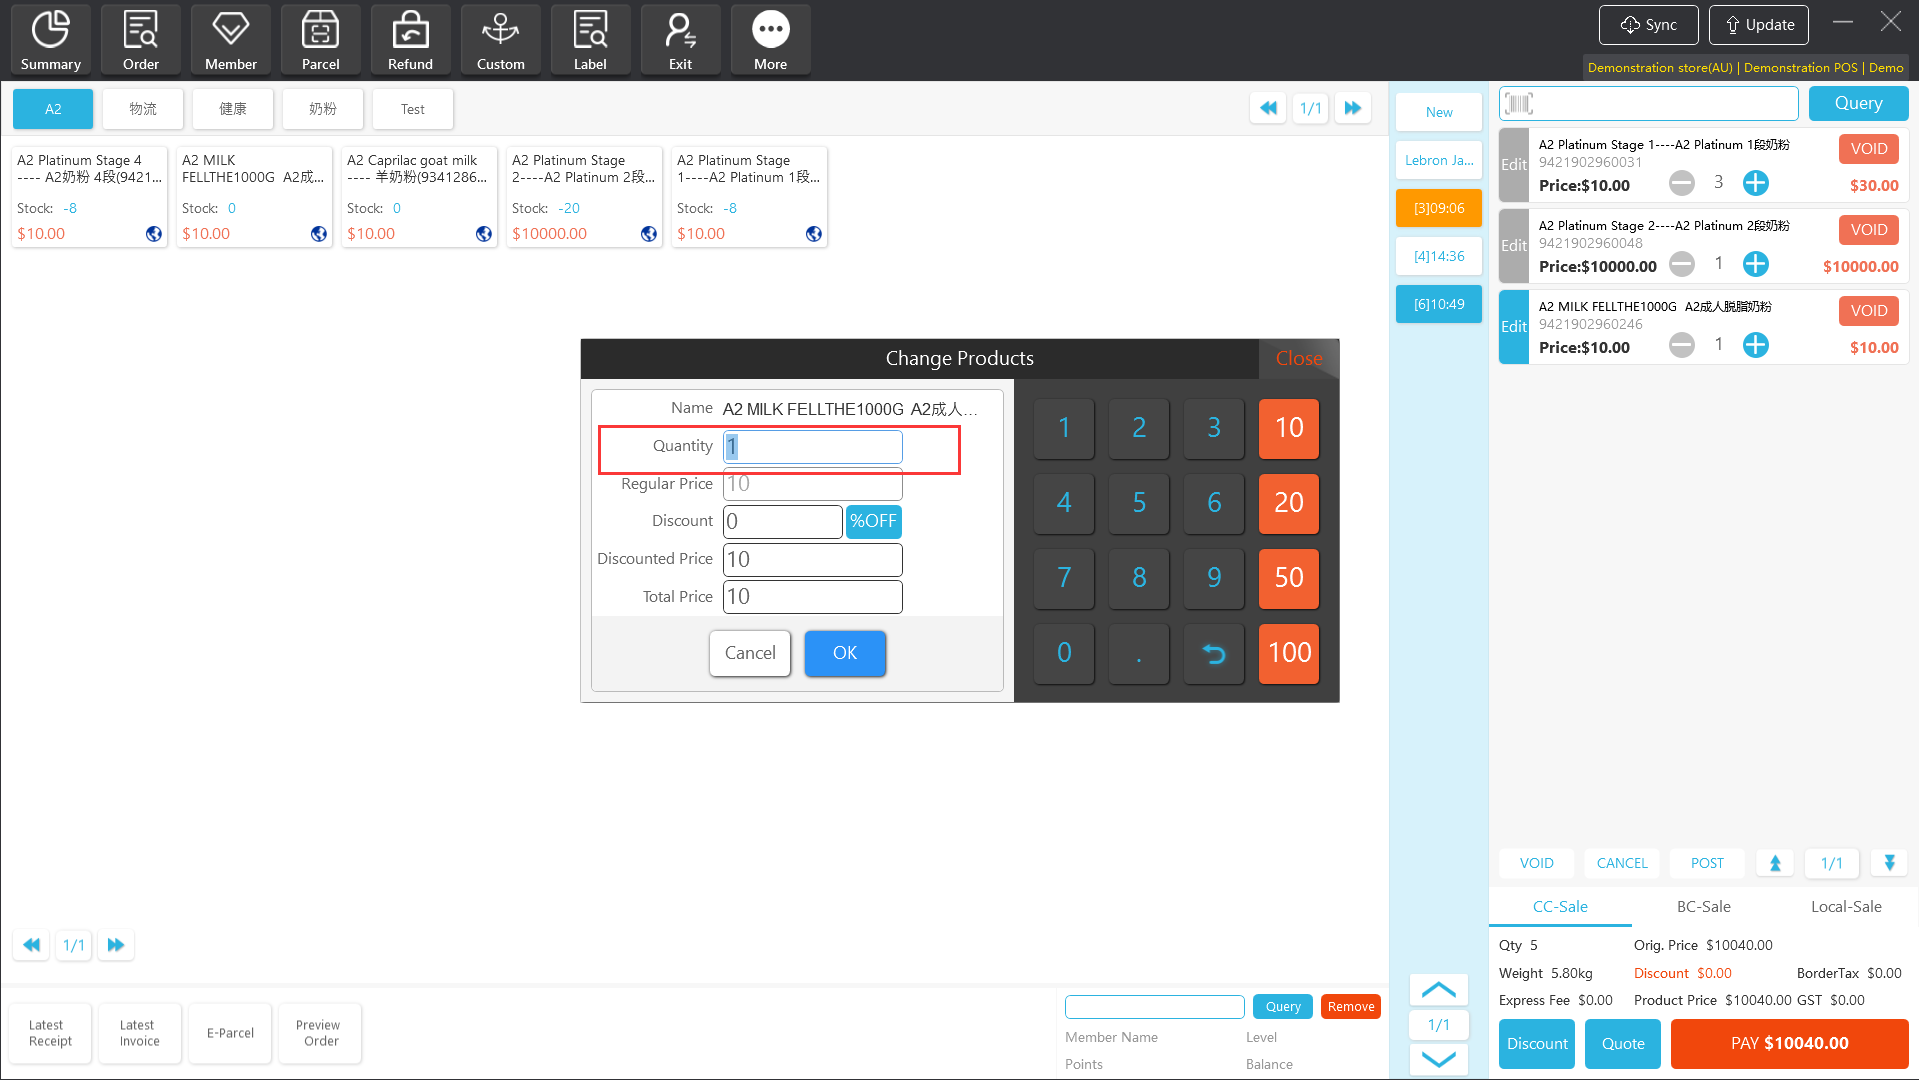
Method 2: Click the "Edit" option on the left side of the product, and directly modify the quantity of the ordered product in the pop-up window.
Notes:You can enter decimals for weighted goods. The display of the decimal format on the client is consistent with the display format of the number of weighed goods in the server background system settings.
Note: The product quantity cannot be modified to 0.
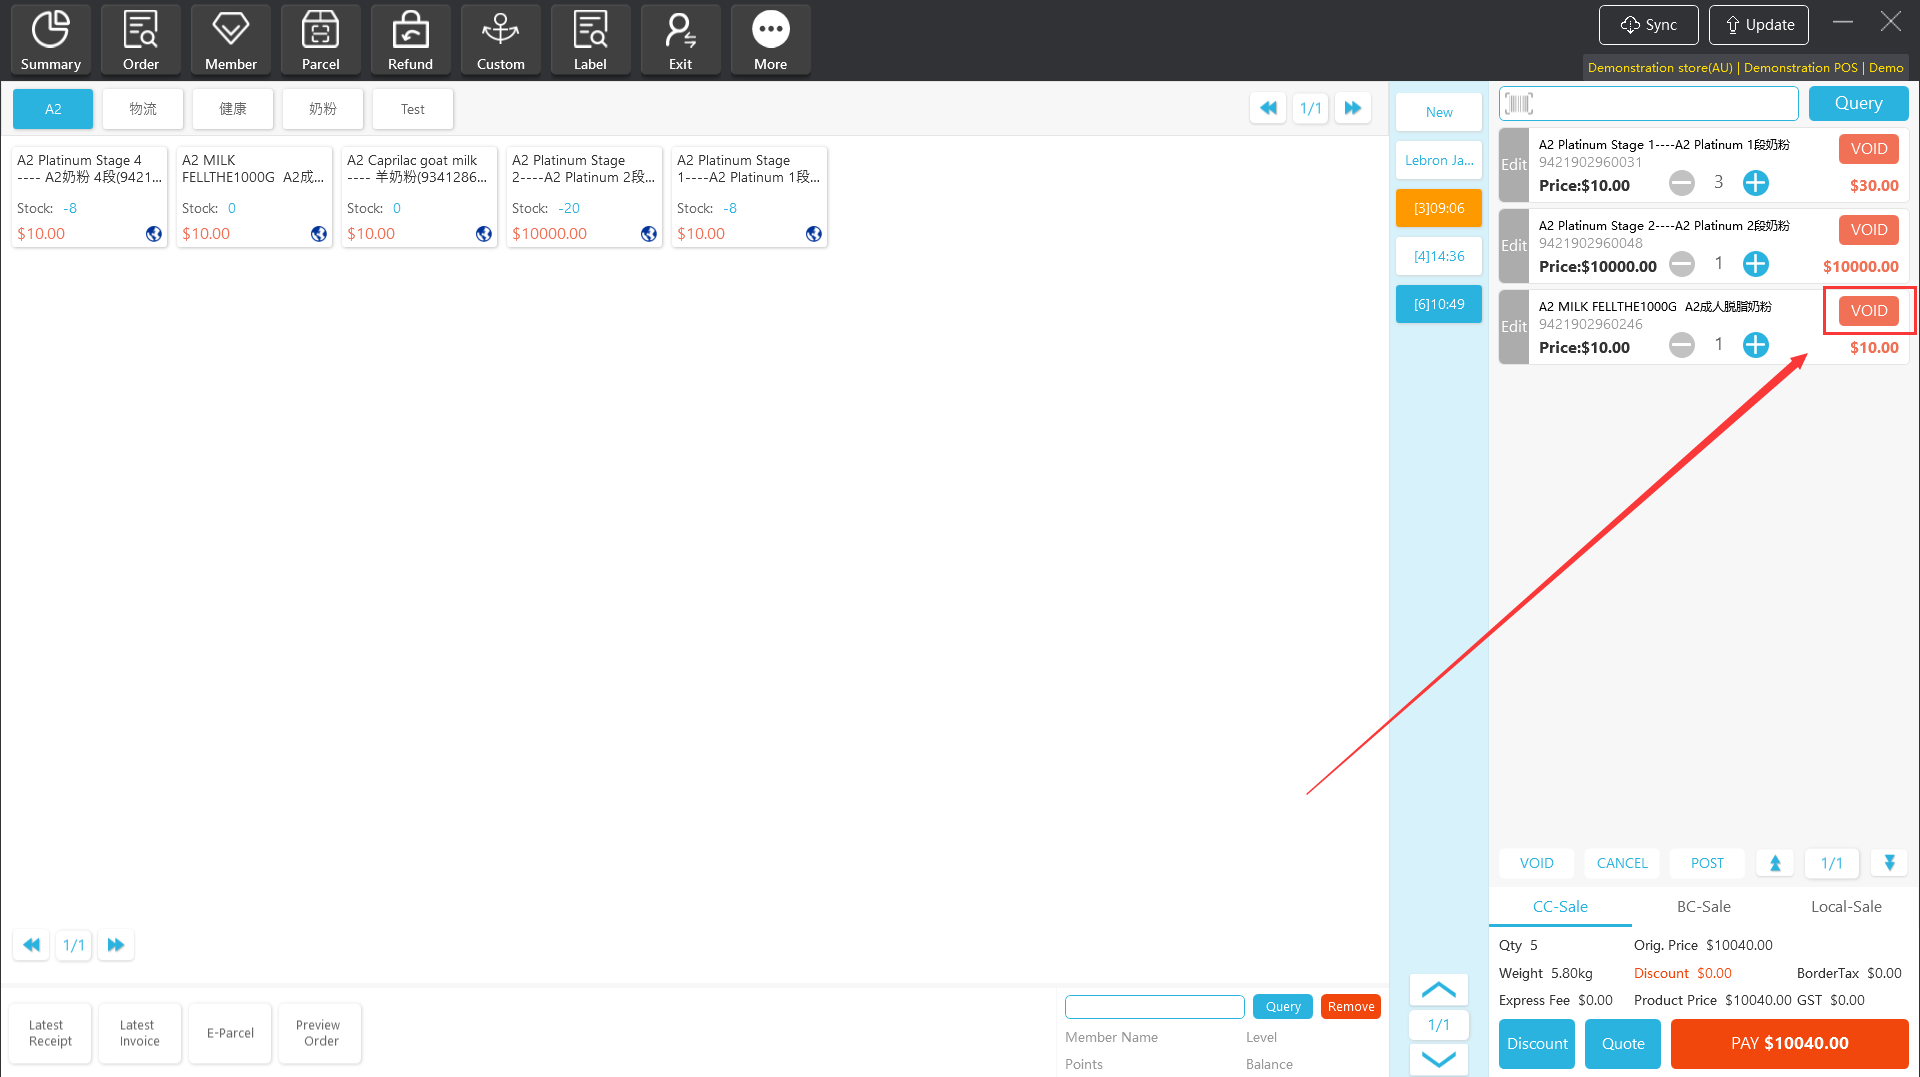
To clear a product in the shopping cart, simply click the "VOID" button on the right side of the product.
[Operating steps]
Step 1: Select the product and click “VOID”.
2.4.2 Change Price
The cashier can manually modify the settlement price of the goods when authorized.
Please refer to Section 5.2 “Department Management” of Chapter 5 “Operation Management” of the “Operation Manual for Apos V4.5.2” for the account rights allocation operation.
[Operating steps]
Step 1:Click the “Edit” option on the left side of the shopping cart products, you can adjust the product's settlement price by modifying the product's discount rate, regular price, or total price.

Note;By manually modifying the settlement price of goods, will not participate in any promotional activities and discounts for the entire order, the revised price is the final settlement price.
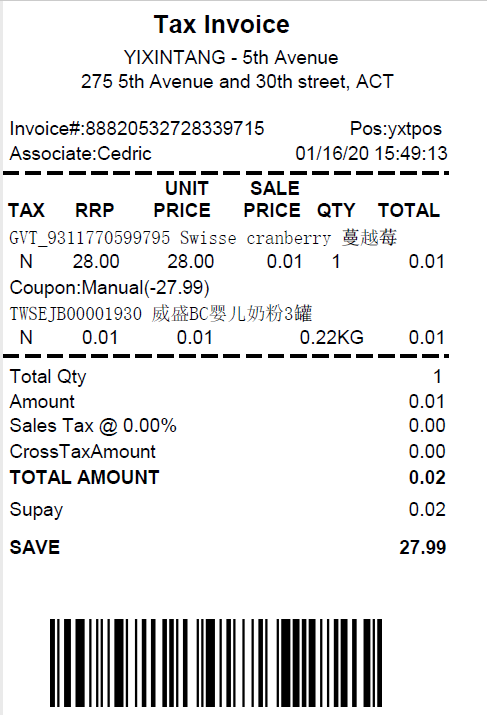
2.5 Apos client retail support order tax-free
[Operating steps]
Step 1:Add the product to the shopping cart, you can see that the sales tax is $9 on the Apos client.

Step 2: Click the ”sales tax” button, an order tax window pops up, select ”No Tax” mode.
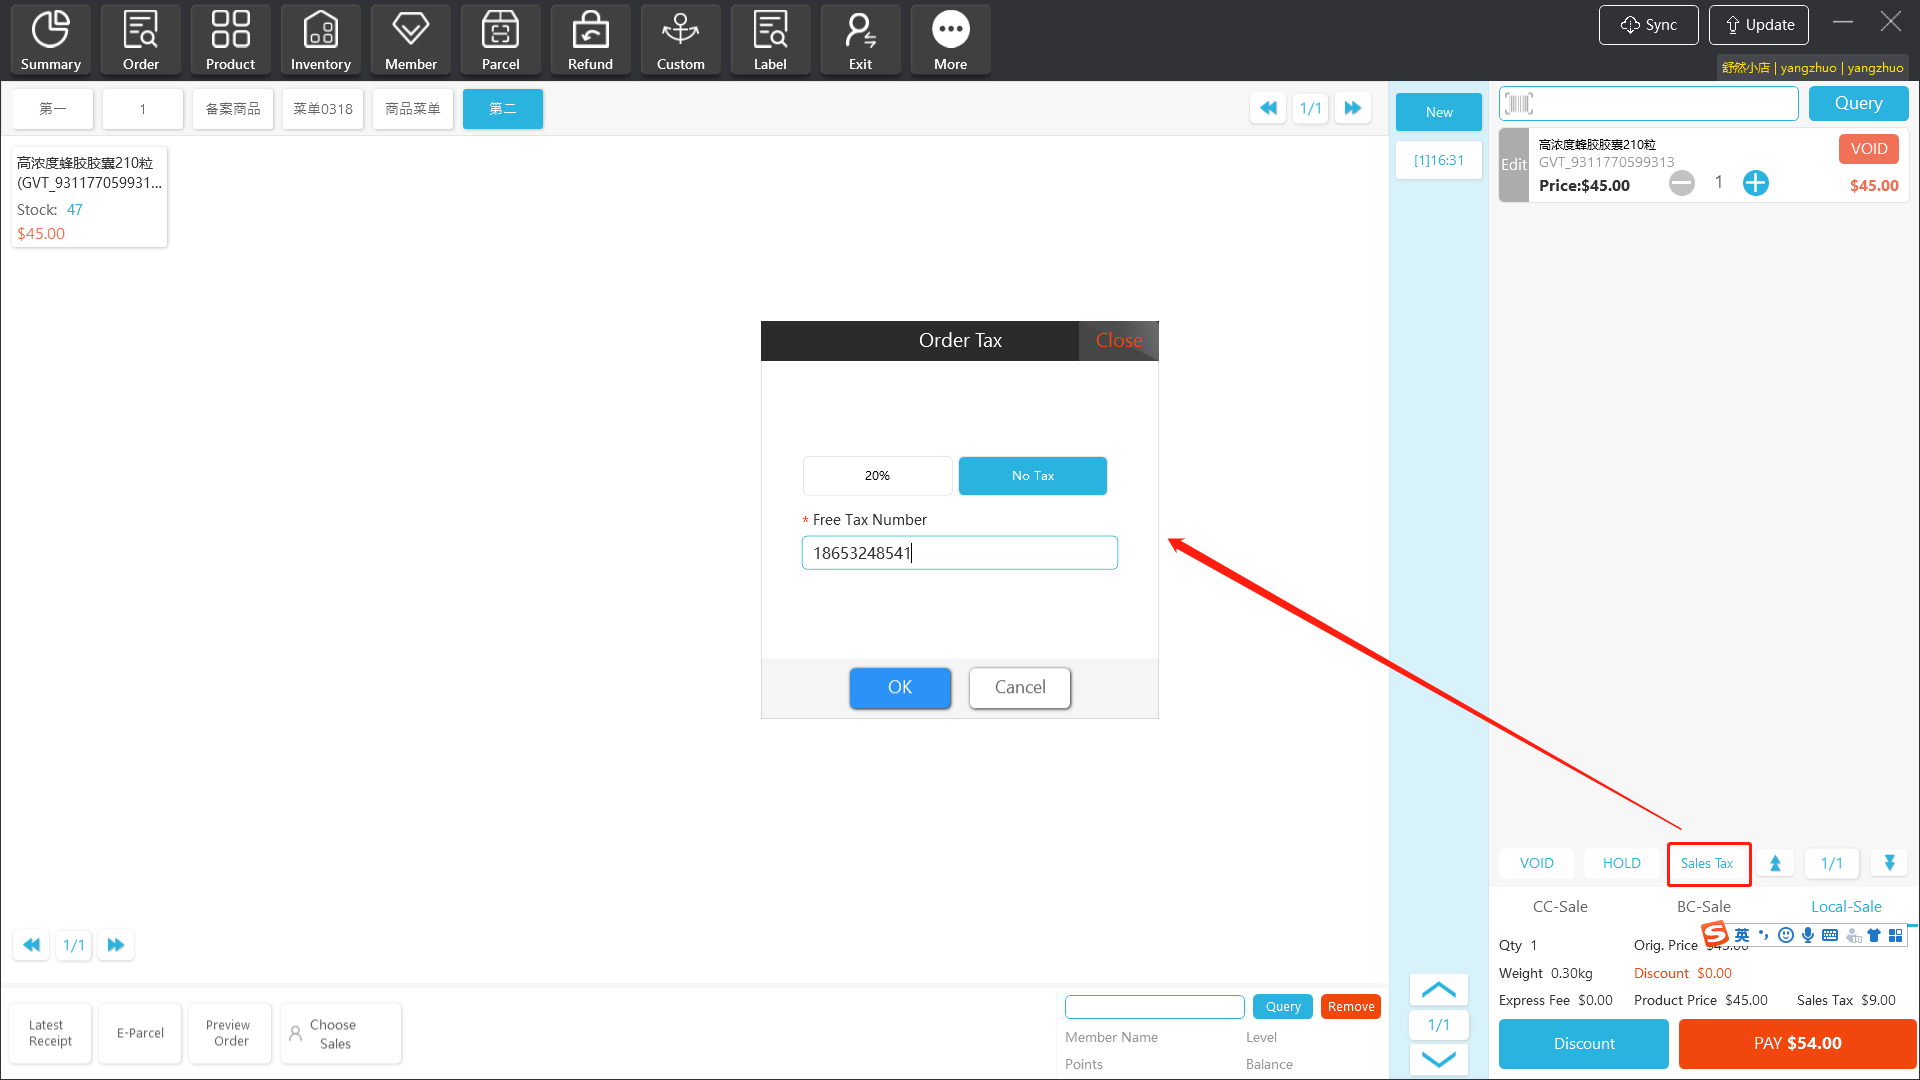
Step 3: The sales tax is displayed as 0 now, click the”Pay” button to complete the tax-free settlement operation of the order.

Step 4: Go to the Apos-background report center to view the tax report-duty-free order report, you can view the details of the order record.

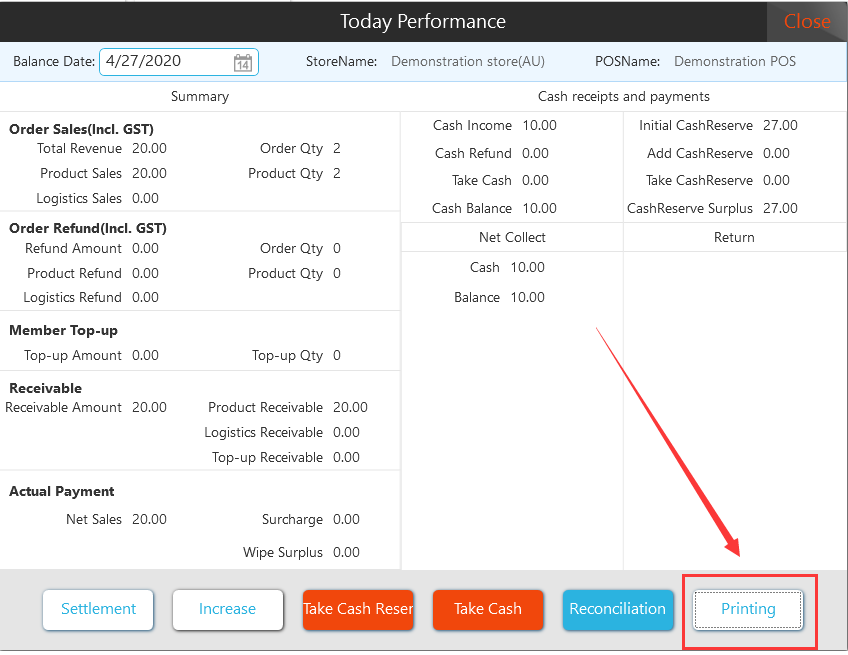
III. Today's Performance
Today's performance is real-time statistics of the store sales of the day, including the order information of the transaction, the order information of the returned goods, the order information of the member's consumption, the amount of receivable / received money, the amount of payment received by each payment method, the use of cash/cash Reverse.
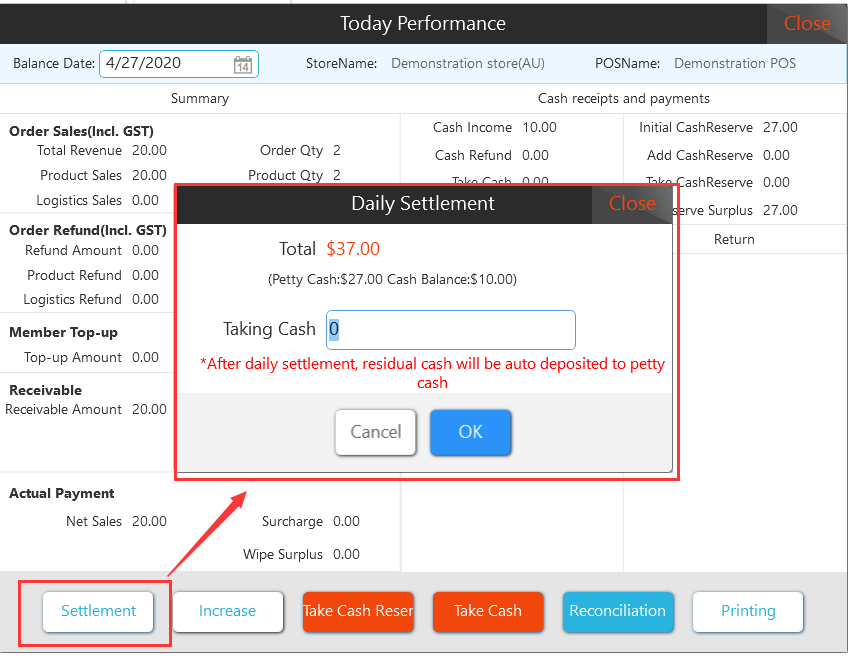
3.1 Settlement
The Apos client supports the daily settlement function. On the same day, when the operation of the store is over, the daily sales and receipts can be settled and the daily settlement receipt can be printed. Support multiple daily settlement during the day.
Note: Every time the settlement is completed on the clearing day, the unfinished cash will be automatically added into the reserve cash.
[Operating steps]
Step 1: Click “Today's performance”, a prompt box for today's performance will pop up.
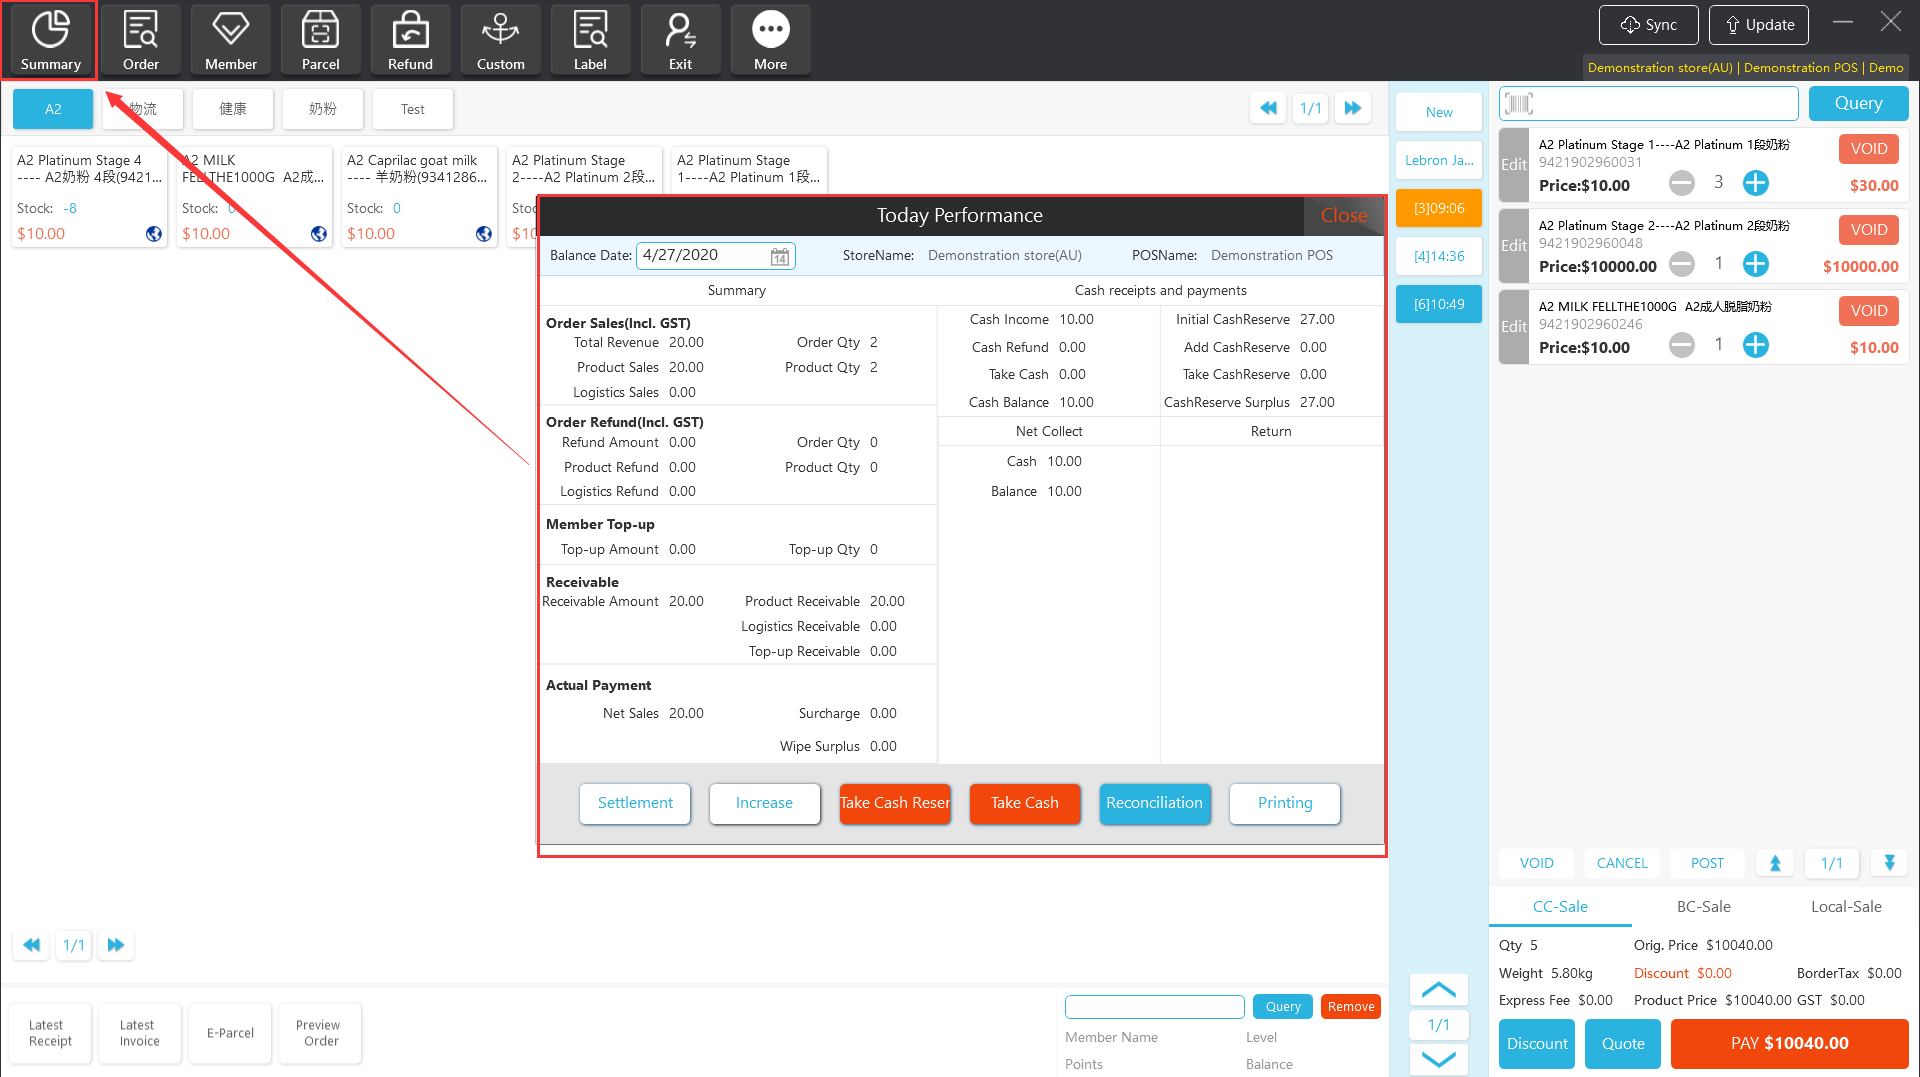
Step 2: Click “Settlement”, a prompt box for daily settlement will pop up, enter “Taking Cash”, and the daily settlement receipt will be printed automatically after confirmation.
3.2 Cash Reserve Management
The Apos client provides a special store cash reserve management function, which records the daily increase and take of the store cash reserve. For details, please refer to the "Cash reverse Details" report in the sever background.
Notes: Each time the manual settlement day ends or the system automatically ends in the early morning, the system will automatically transfer the remaining cash to the reserve cash.
3.2.1 Increase petty cash
[Operating steps]
Step 1: Click “Increase”option, a pop-up window pops up, and enter the cash reserve to be deposited in "Increase Amount".

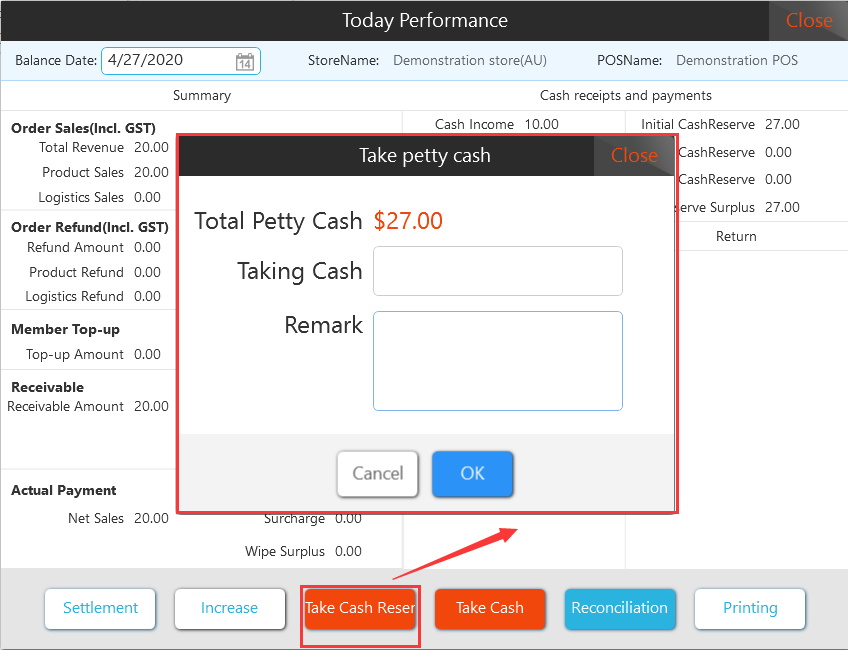
3.2.1 Take cash reverse
When the store needs to use the cash reserve for special expenditures, you can use the function of “Taking cash reverse”, the system will record the use details of the cash reserve, see the “Cash reverse Details” report in the sever background.
[Operating steps]
Step 1: Click “Taking cash reverse”, a pop-up window will pop up, “Take petty cash” enter the amount. “Remarks”describe the reason for taking cash reverse, click “OK”, the cash box will automatically open.
3.3 Cash Management
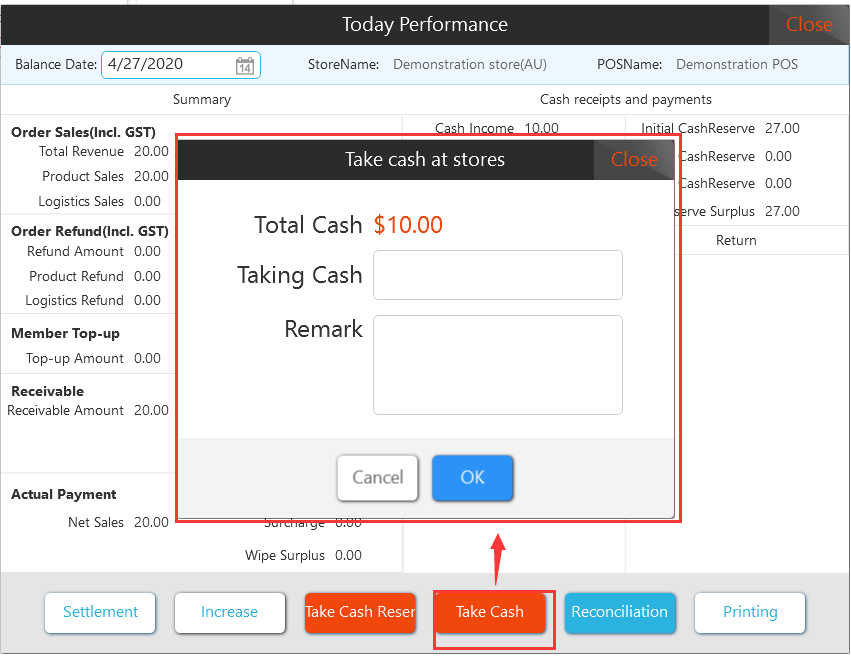
Apos client provides ”Take Cash” function, the system will record the details of each cash withdrawal. See the “Cash-in/Cash-out Details” report in the sever background.
3.3.1 Take Cash
When the store needs to take cash from the cash drawer for other expenses, you can use the”Take Cash” function.
[Operating steps]
Step 1: Click “Take Cash”, a pop-up window pops up, “Take Cash” enter the amount, “Remarks” describe the reason for withdrawing cash, click “OK”, the cash drawer will automatically open.
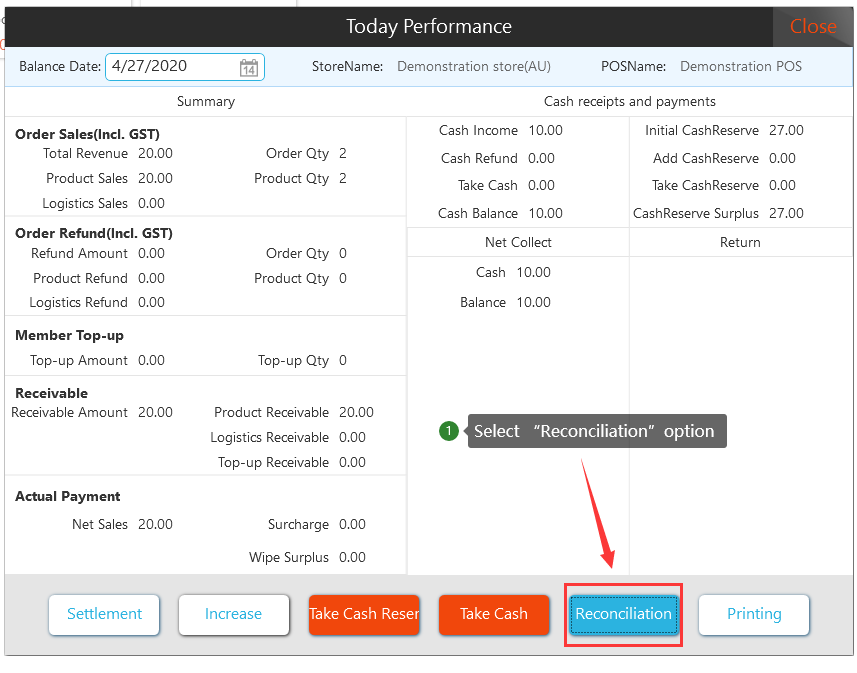
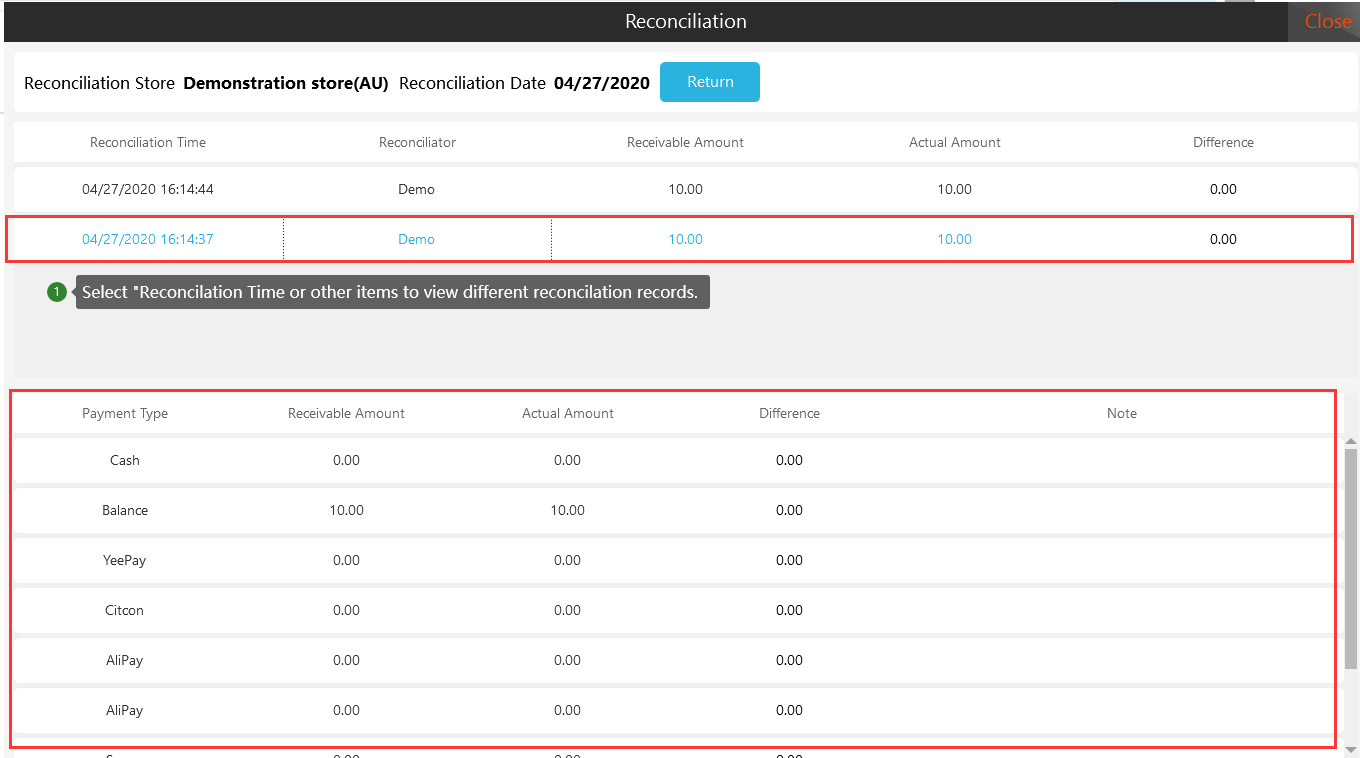
3.4 Reconciliations
The Apos client provides a “Reconciliation” function. After the cashier finishes the day's work, he/she can count the amount of the POS of each payment method and complete the reconciliation with the revenue amount calculated by the system. The system will record the details of each reconciliation.
Both the client and the sever background can view the details of each reconciliation. For the sever background, please refer to the “Reconciliation” report under Operation Management.
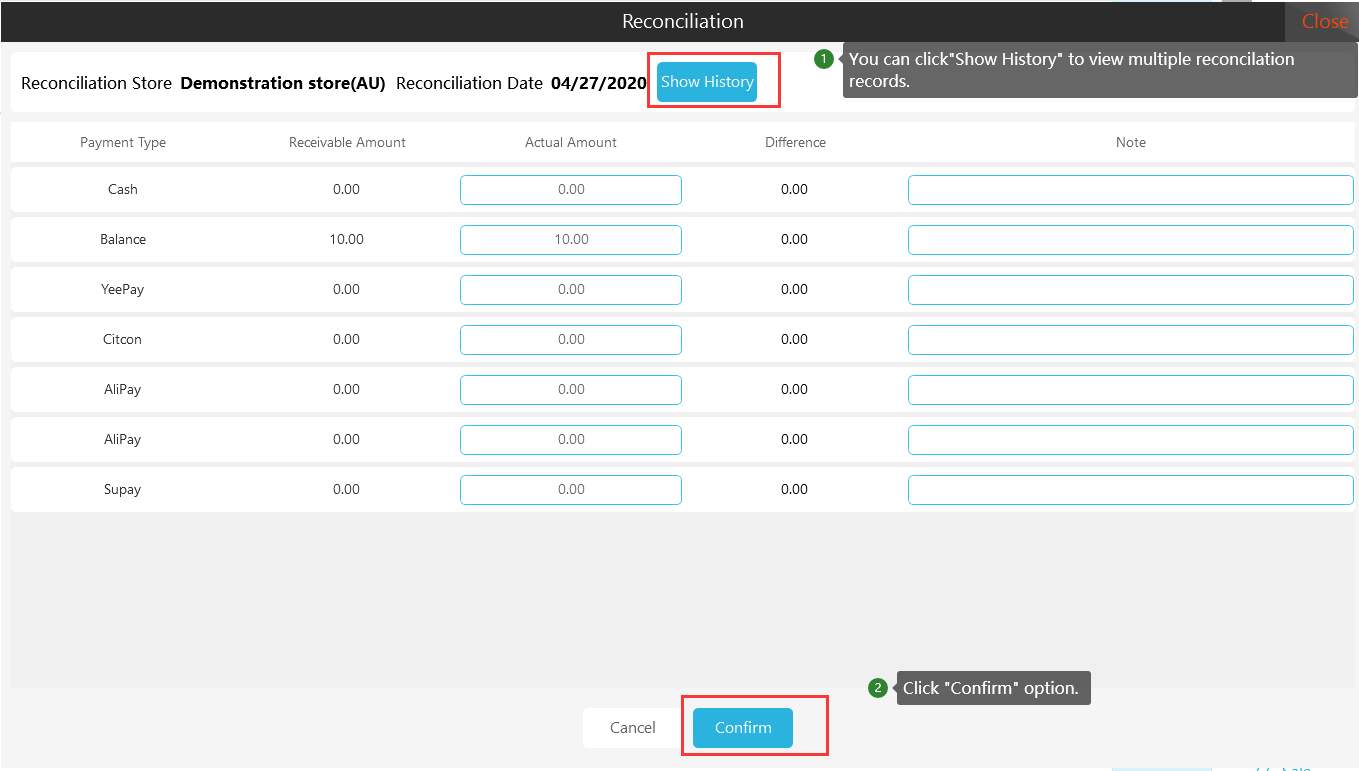
Notes: Support multiple reconciliations.
[Operating steps]
Step 1; Click "Reconciliation", a prompt box for reconciliation will pop up.
Step 2: The cashier counts the amount of each payment method and enters it into the "actual payment amount". If the actual payment amount is not consistent with the receivable amount, describe the reason in the “Remarks” and click “OK”.
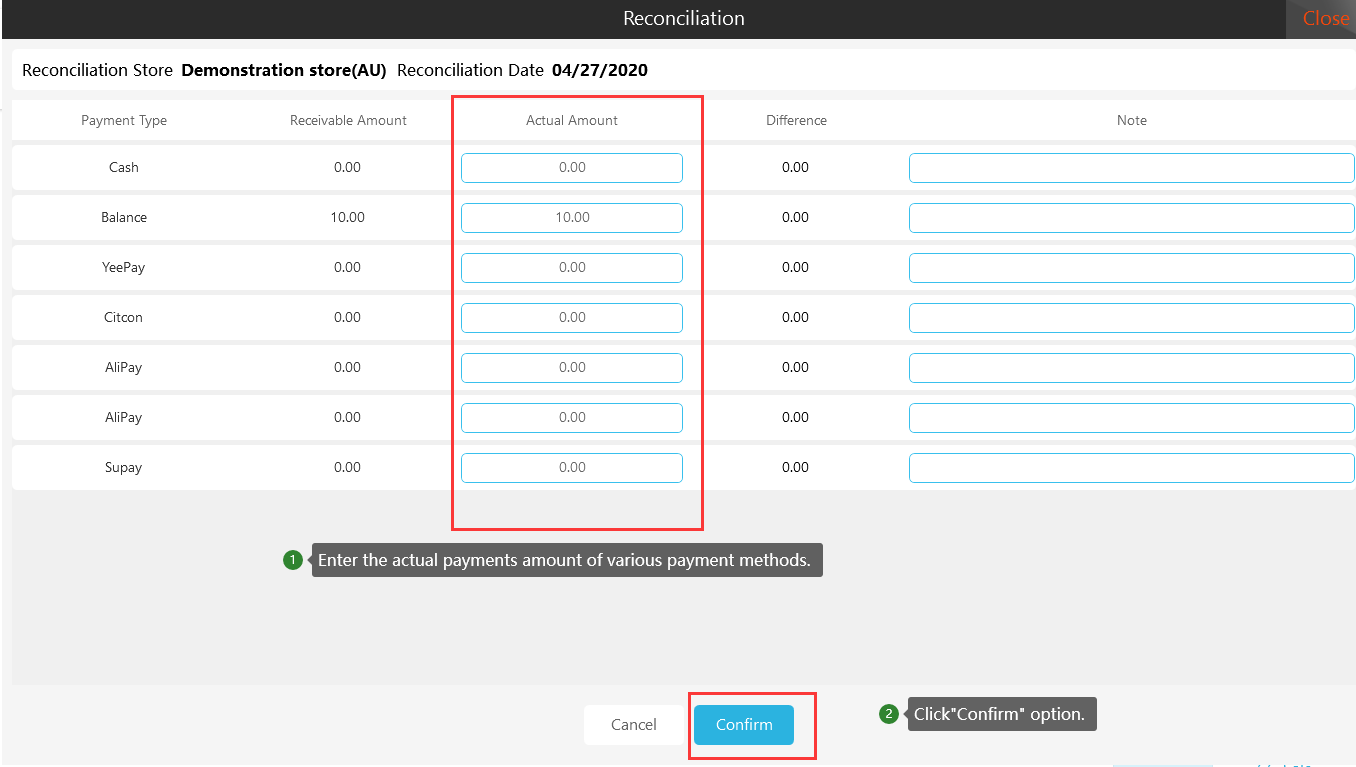
Step 3: Click “Reconciliation Record” to view the details of reconciliation.
3.5 Printing
The client supports the function of printing today performance.
[Operating steps]
Step 1: After the Apos client is connected to the printer, click “Print” to print the current business performance receipt.
IV. Order Management
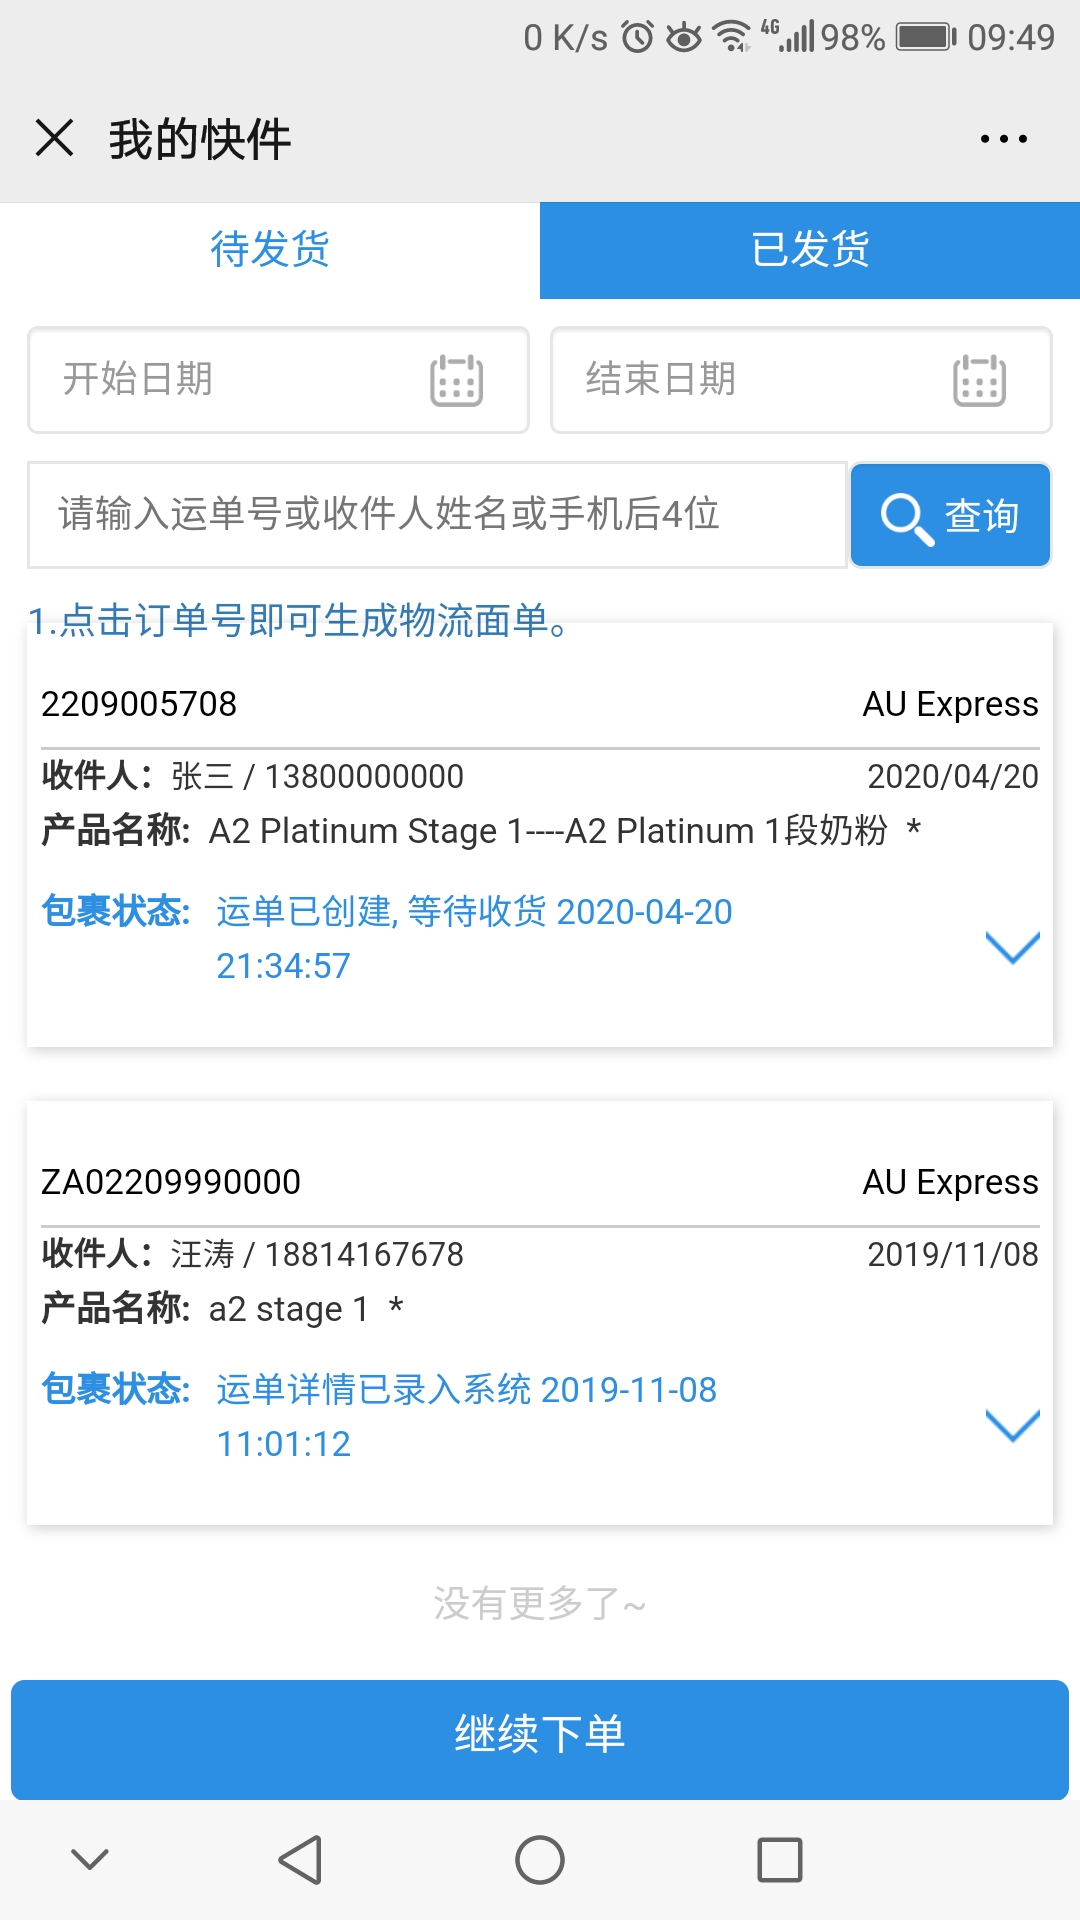
4.1 Order inquiry
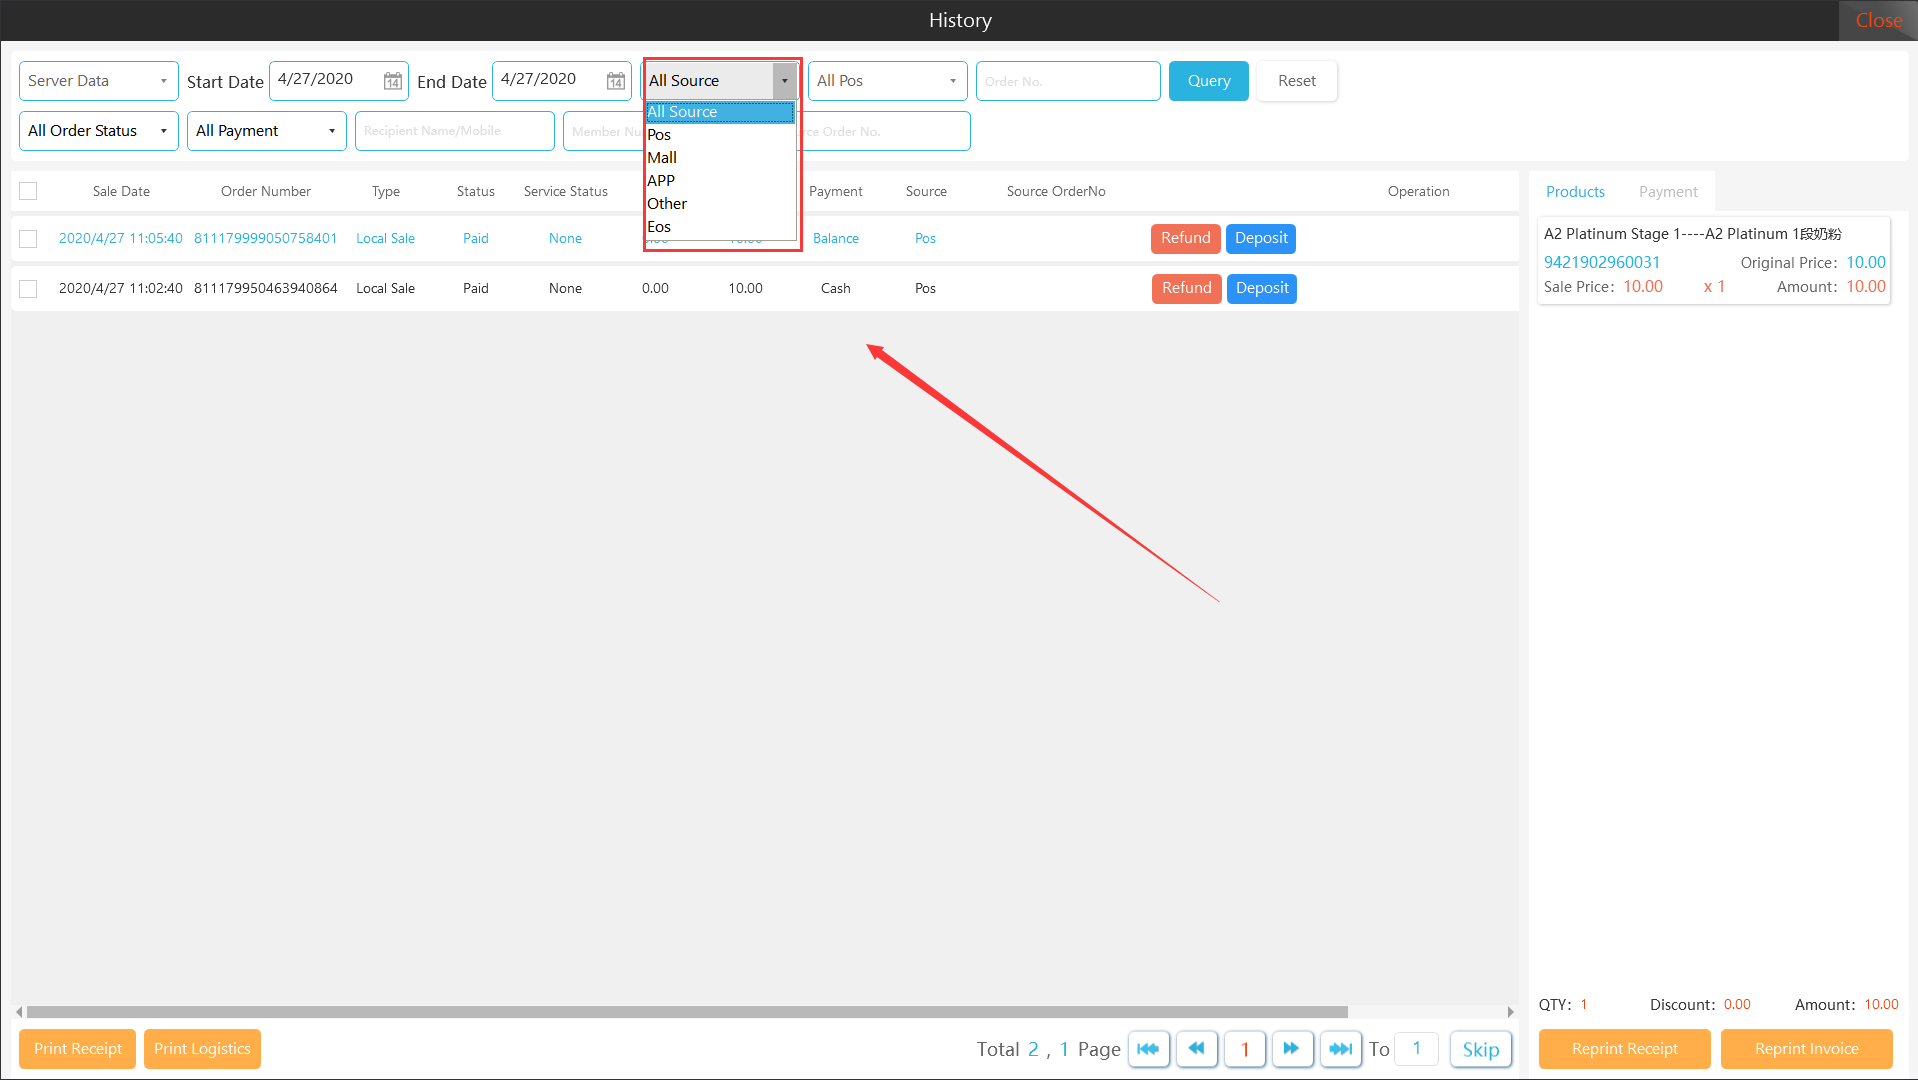
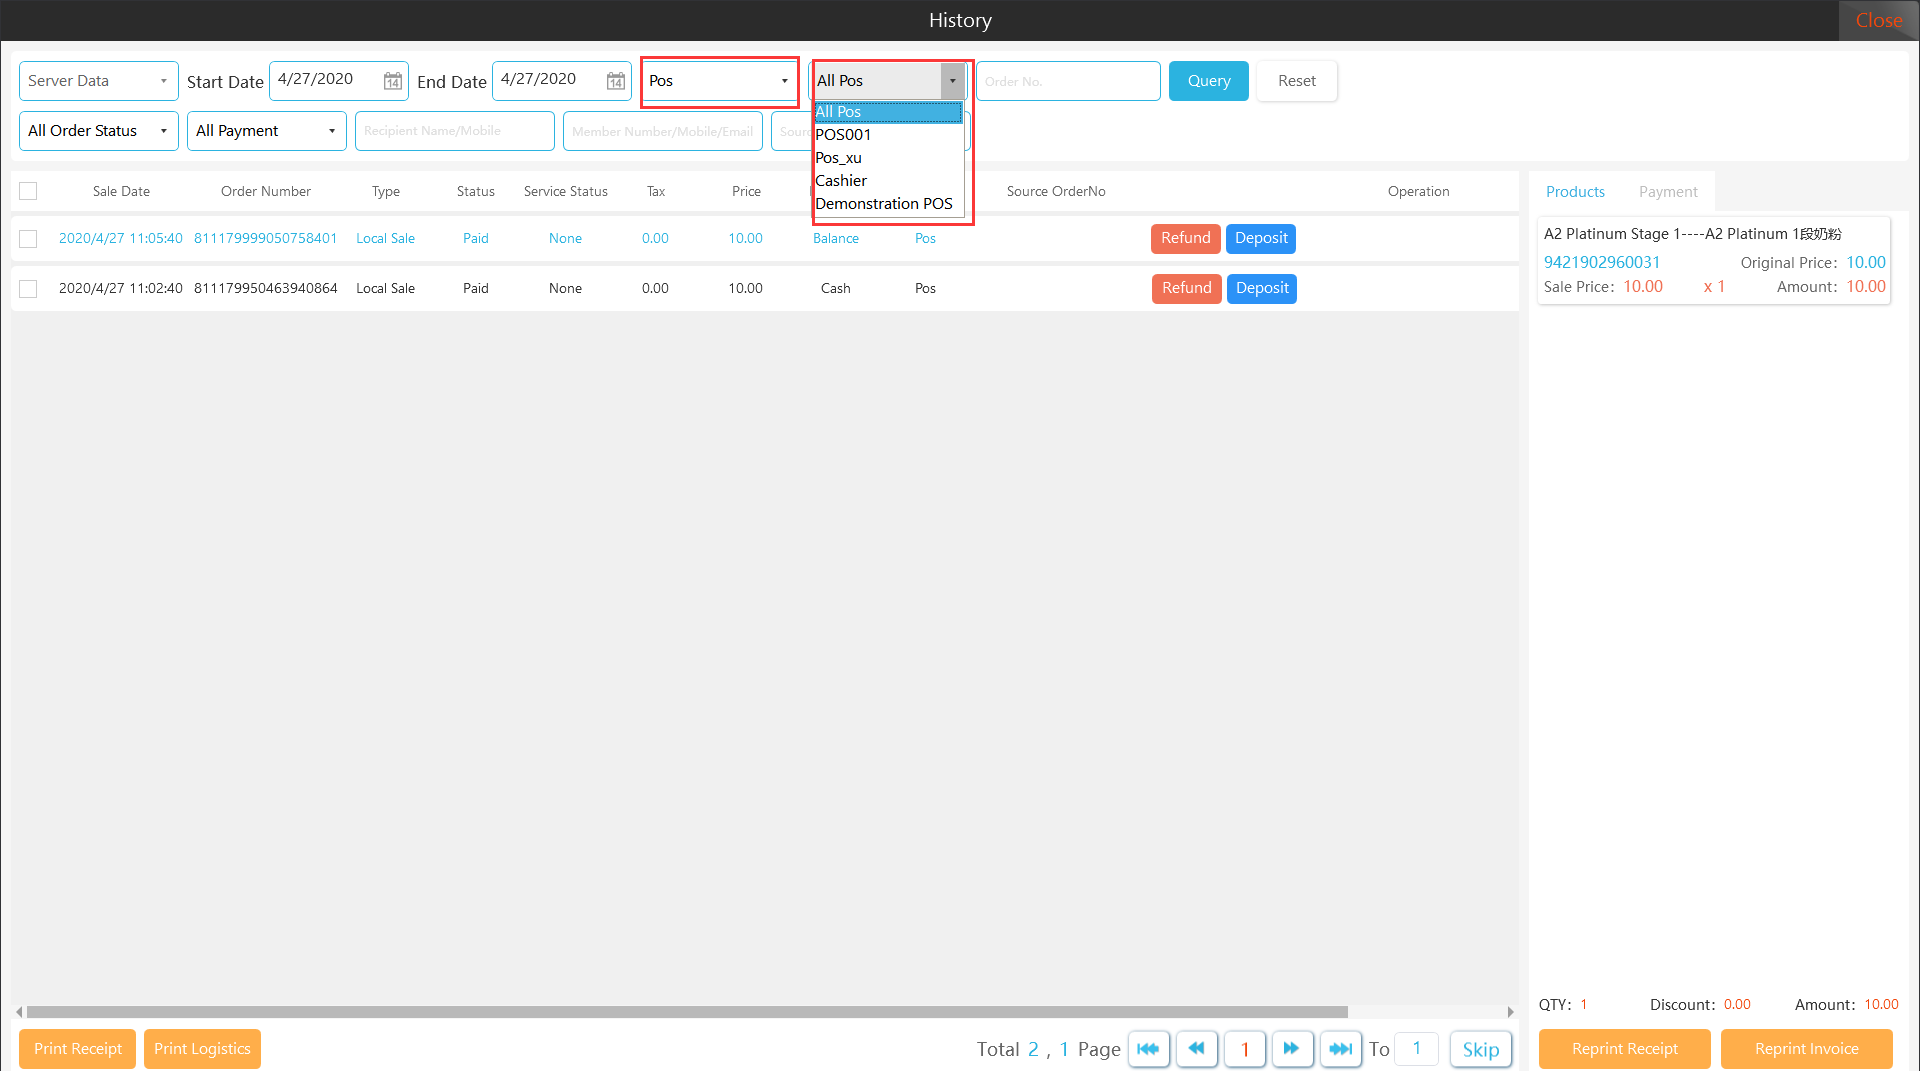
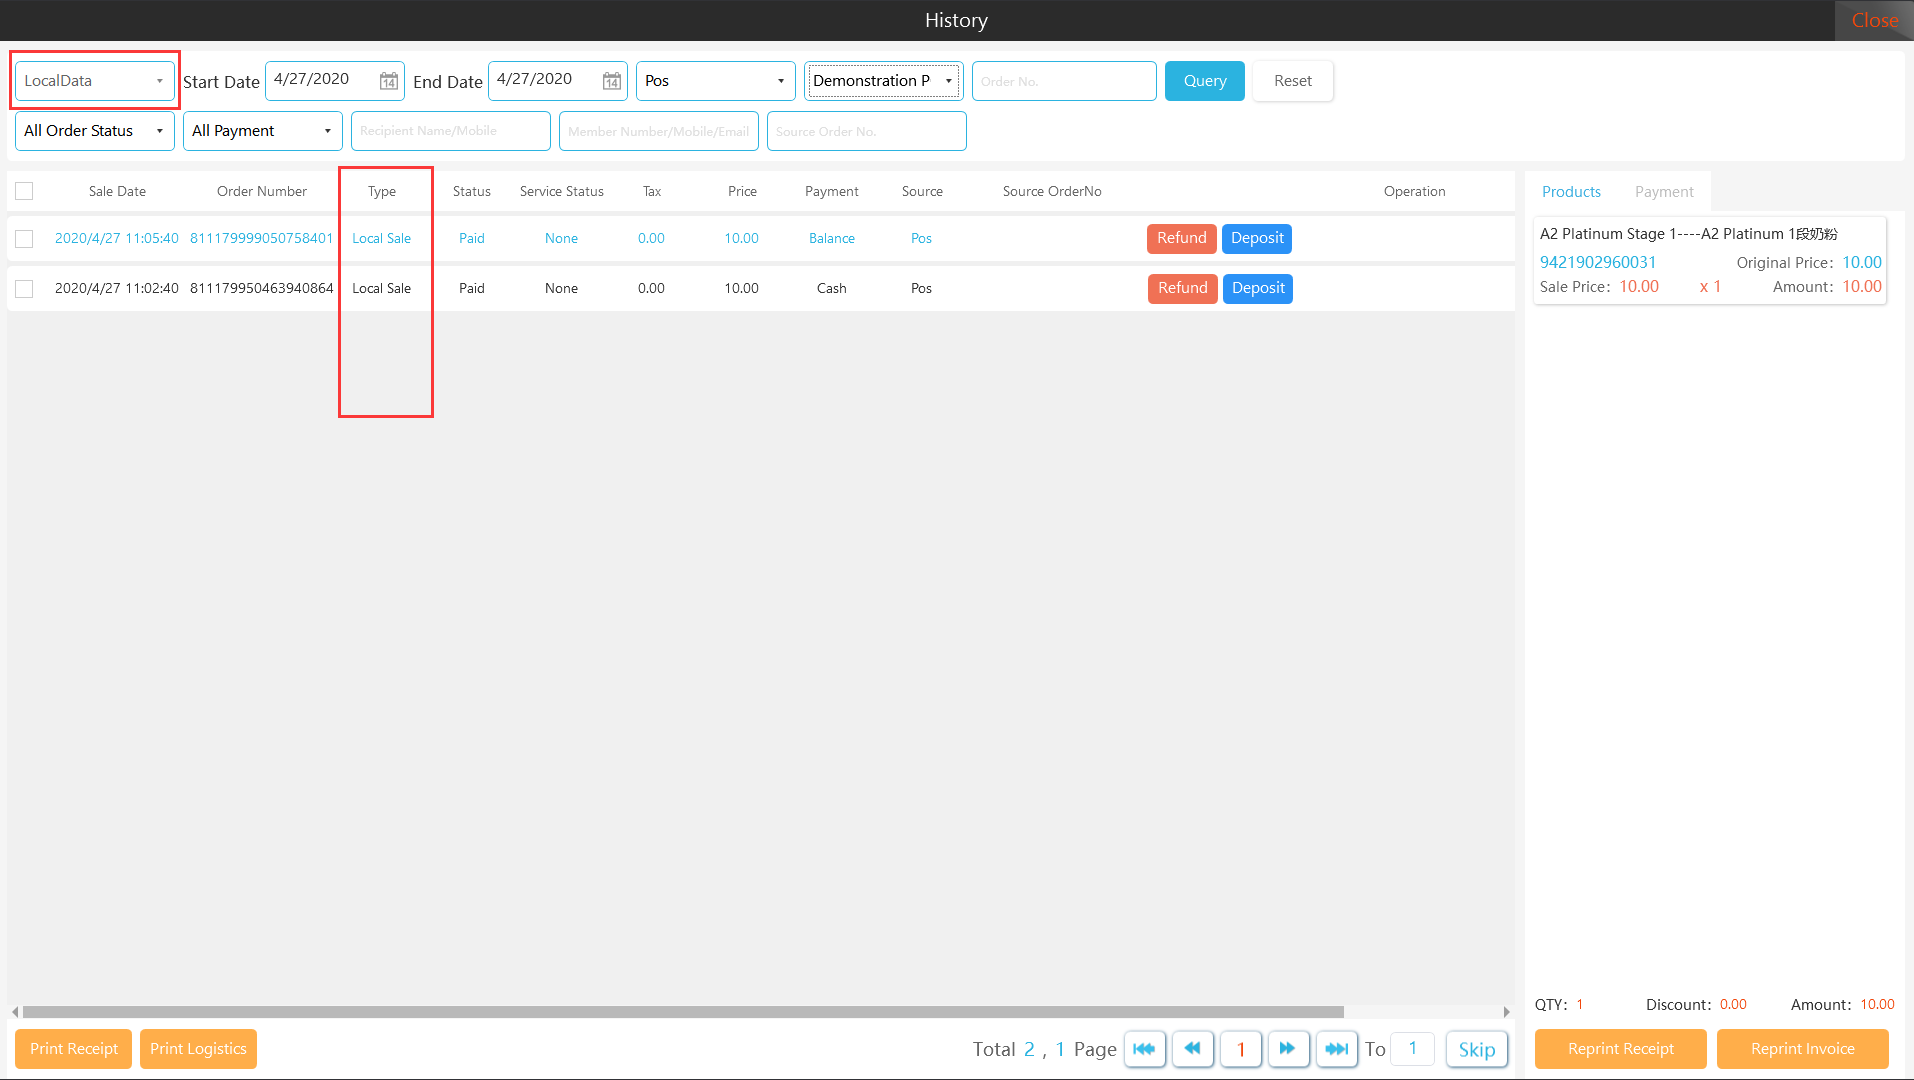
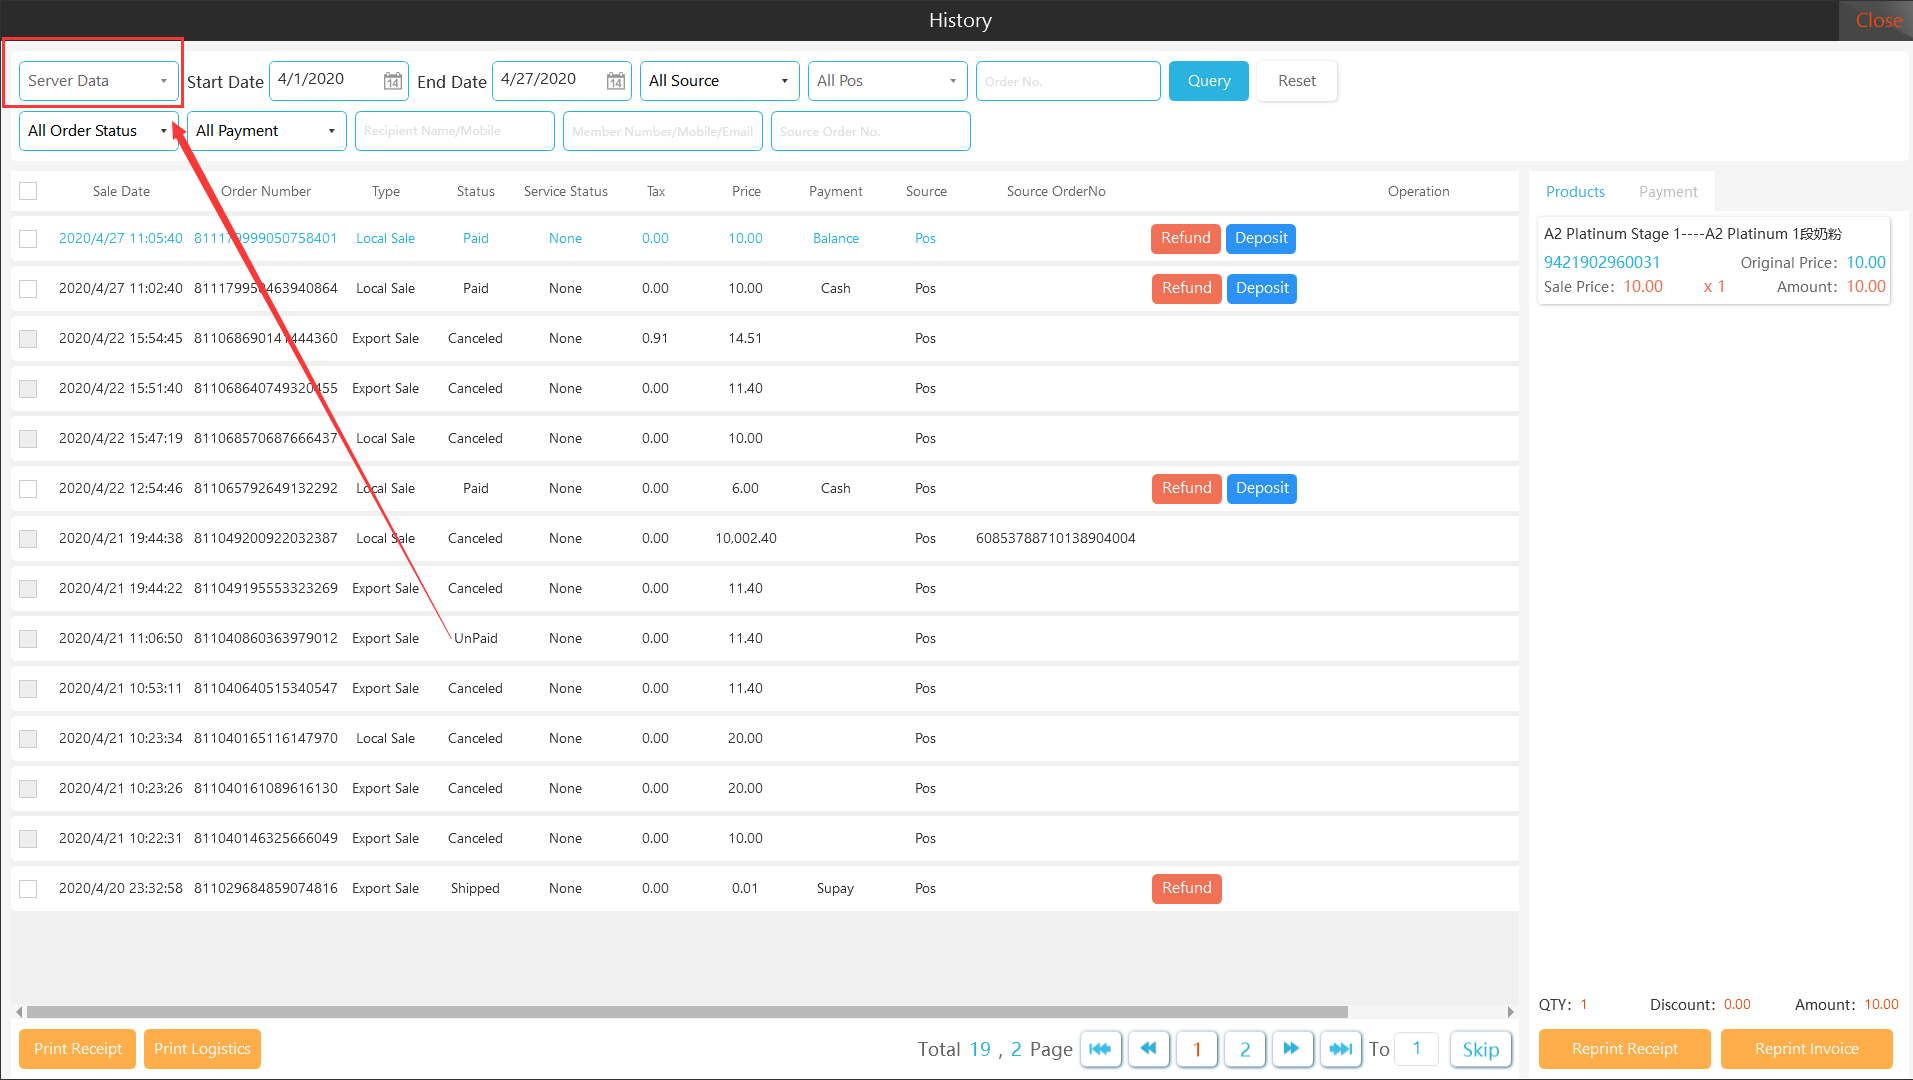
For historical orders, the Apos client supports multiple order query methods, referring to the query conditions provided on the order management page.
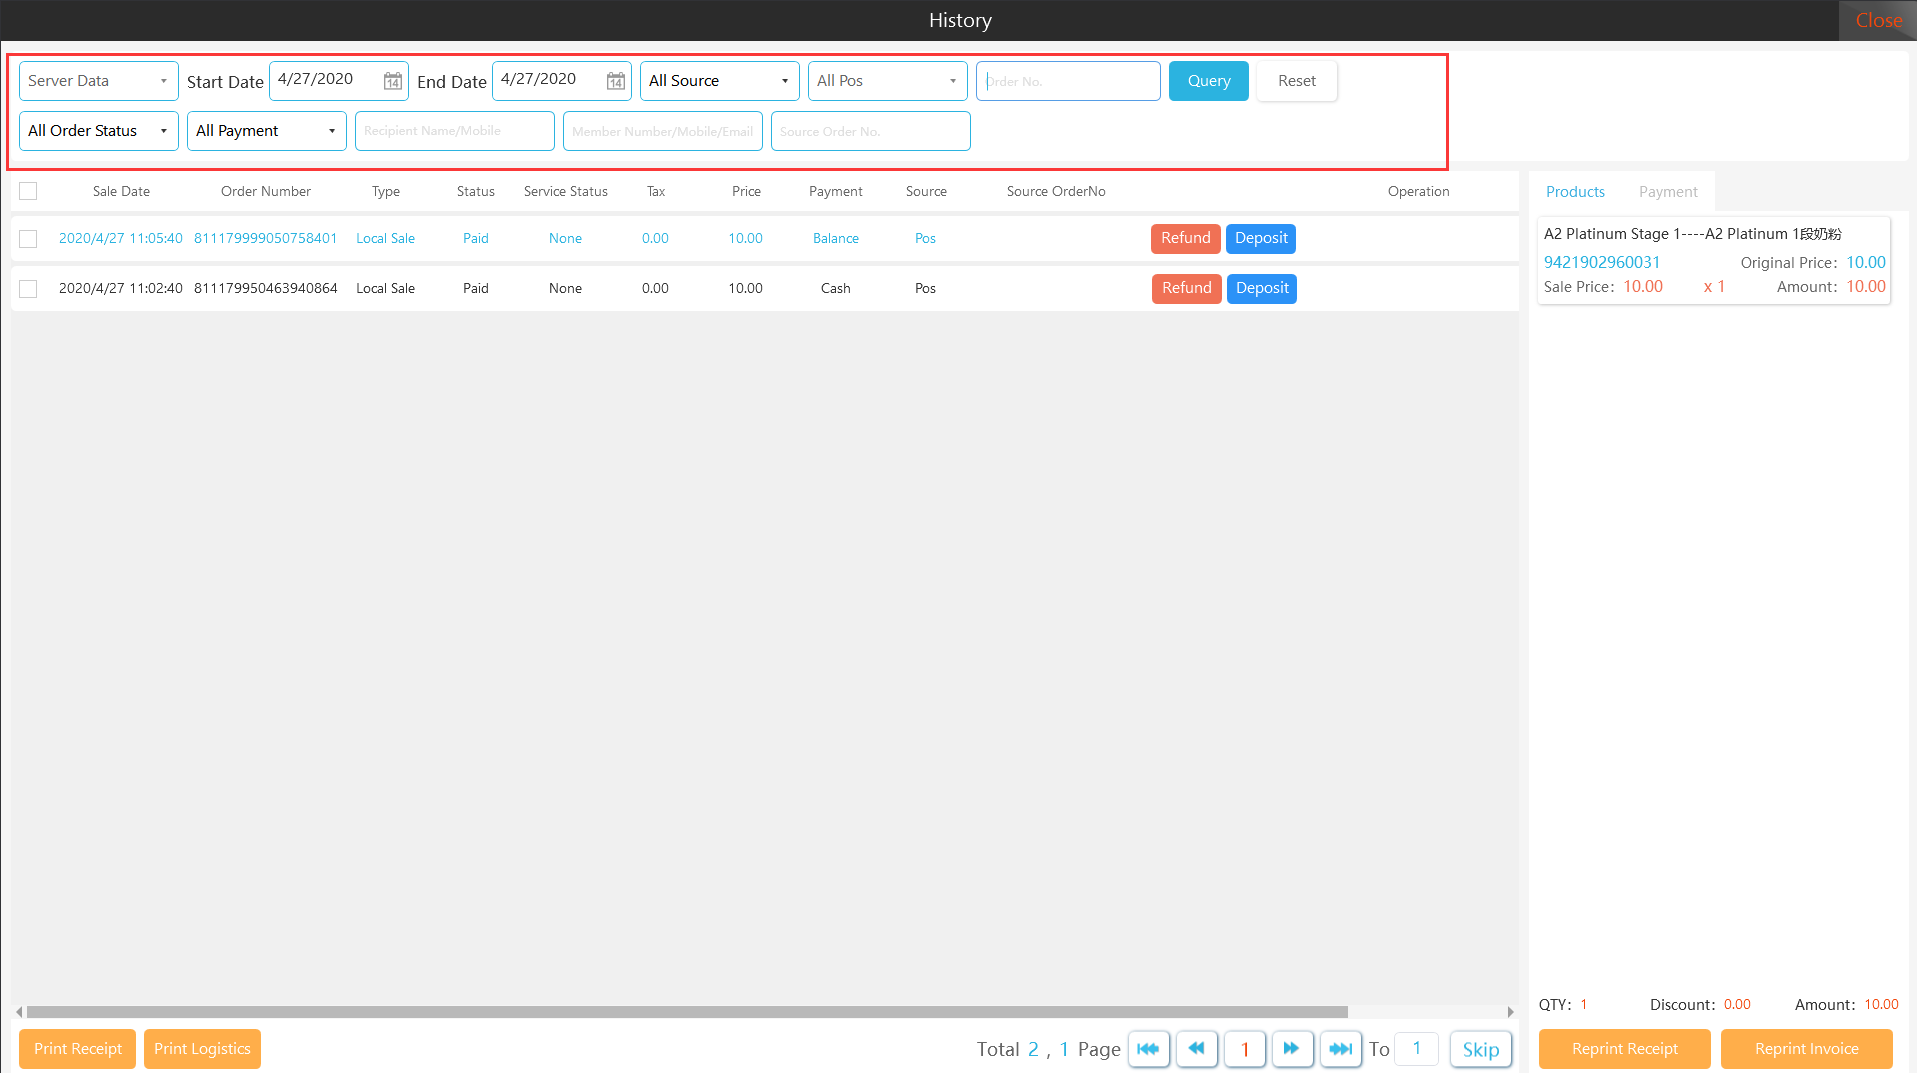
The order management page displays the orders of all Apos terminals under this store by default, and supports the query of orders from other Pos terminals under this store.
4.1.1 Order inquiry of current POS
[Operating steps]
Step 1: Select "Pos terminal" as the query condition.
Step 2: Select this Pos.
Step 3: At this time, the local order data of this Pos is displayed, and then search according to other specific query conditions.
4.1.2 Order inquiry via different Pos terminals
[Operating steps]
Step 1: Select”Pos terminal” as the query condition.

Step 2: Select the terminal Pos to be queried.
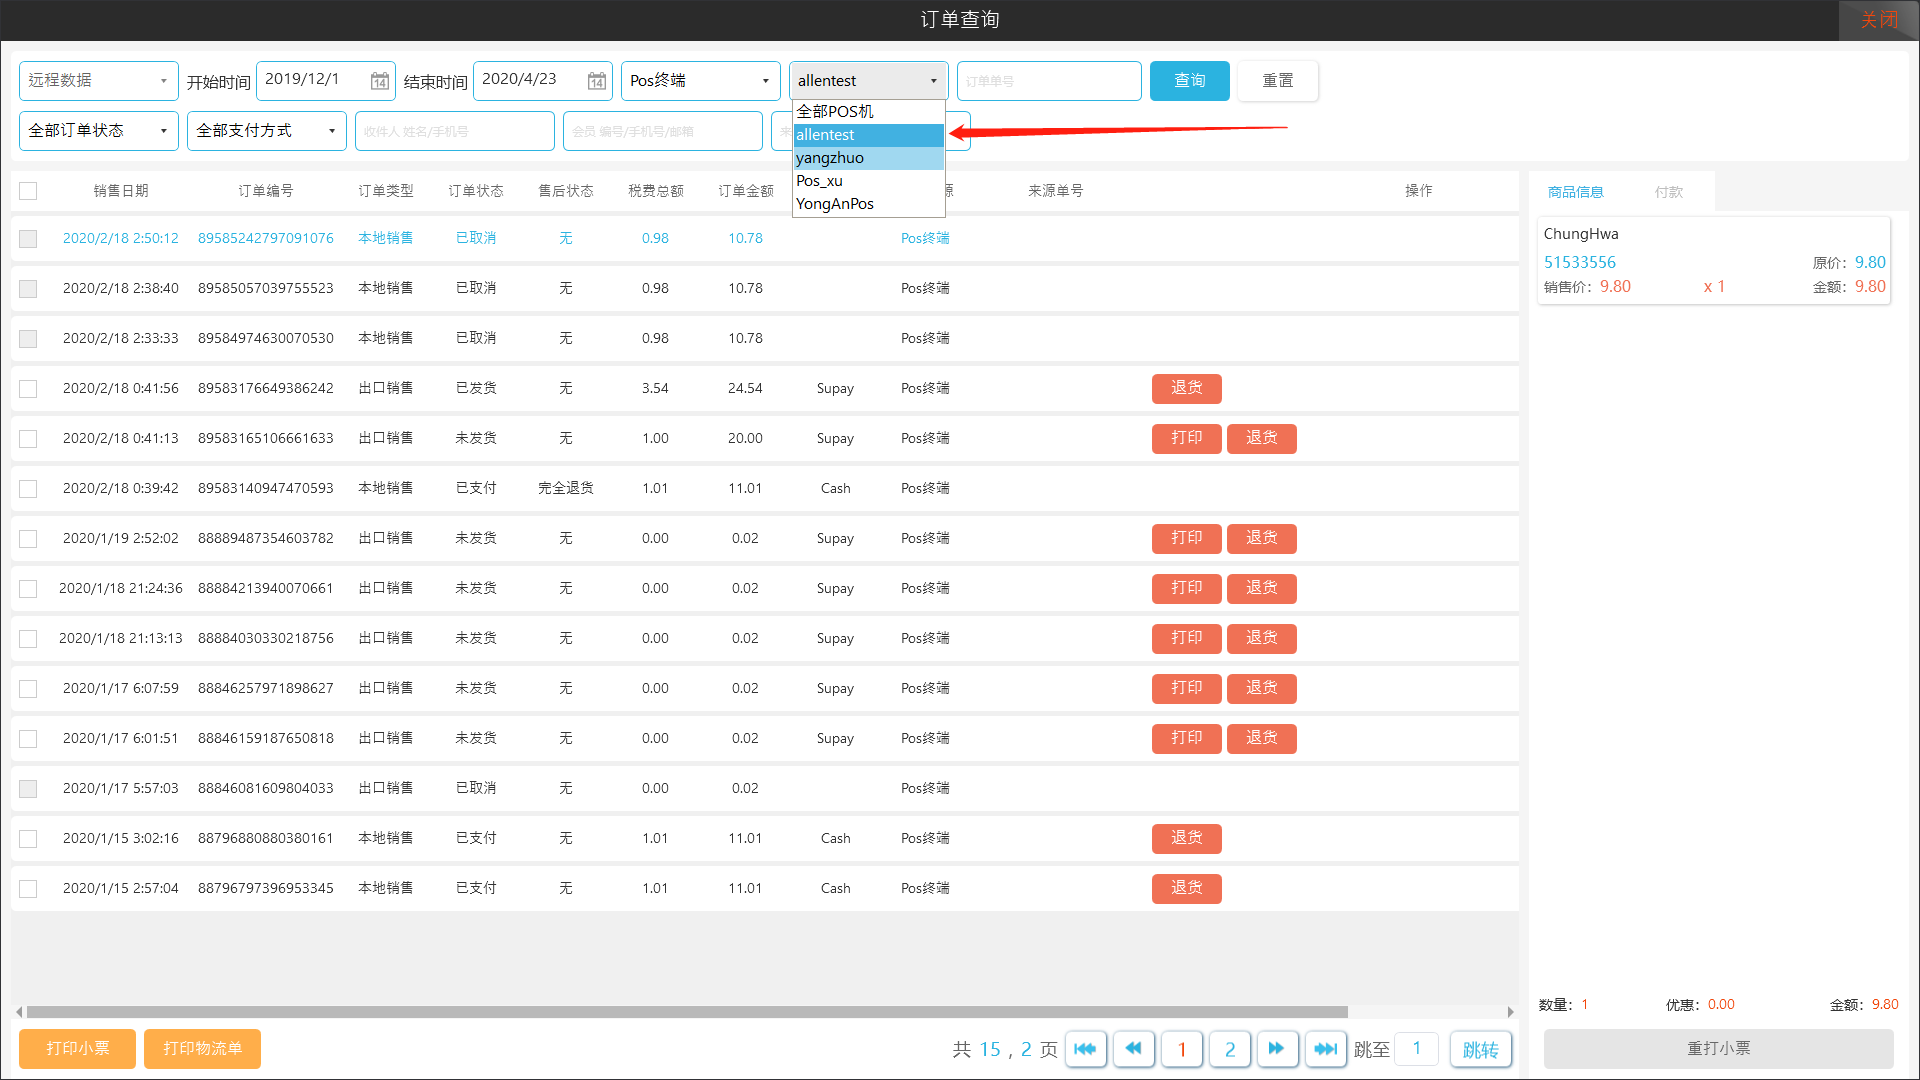
Step 3: At this time, the remote data of other Pos terminals is displayed, and then search for orders according to specific query conditions.
4.2 Print
The order management page provides the functions of batch printing shopping receipts and logistics thermal bills, as well as reprinting functions of order receipts, logistics thermal bills and invoices.
4.2.1 Batch printing receipts/logistics bills
[Operating steps]
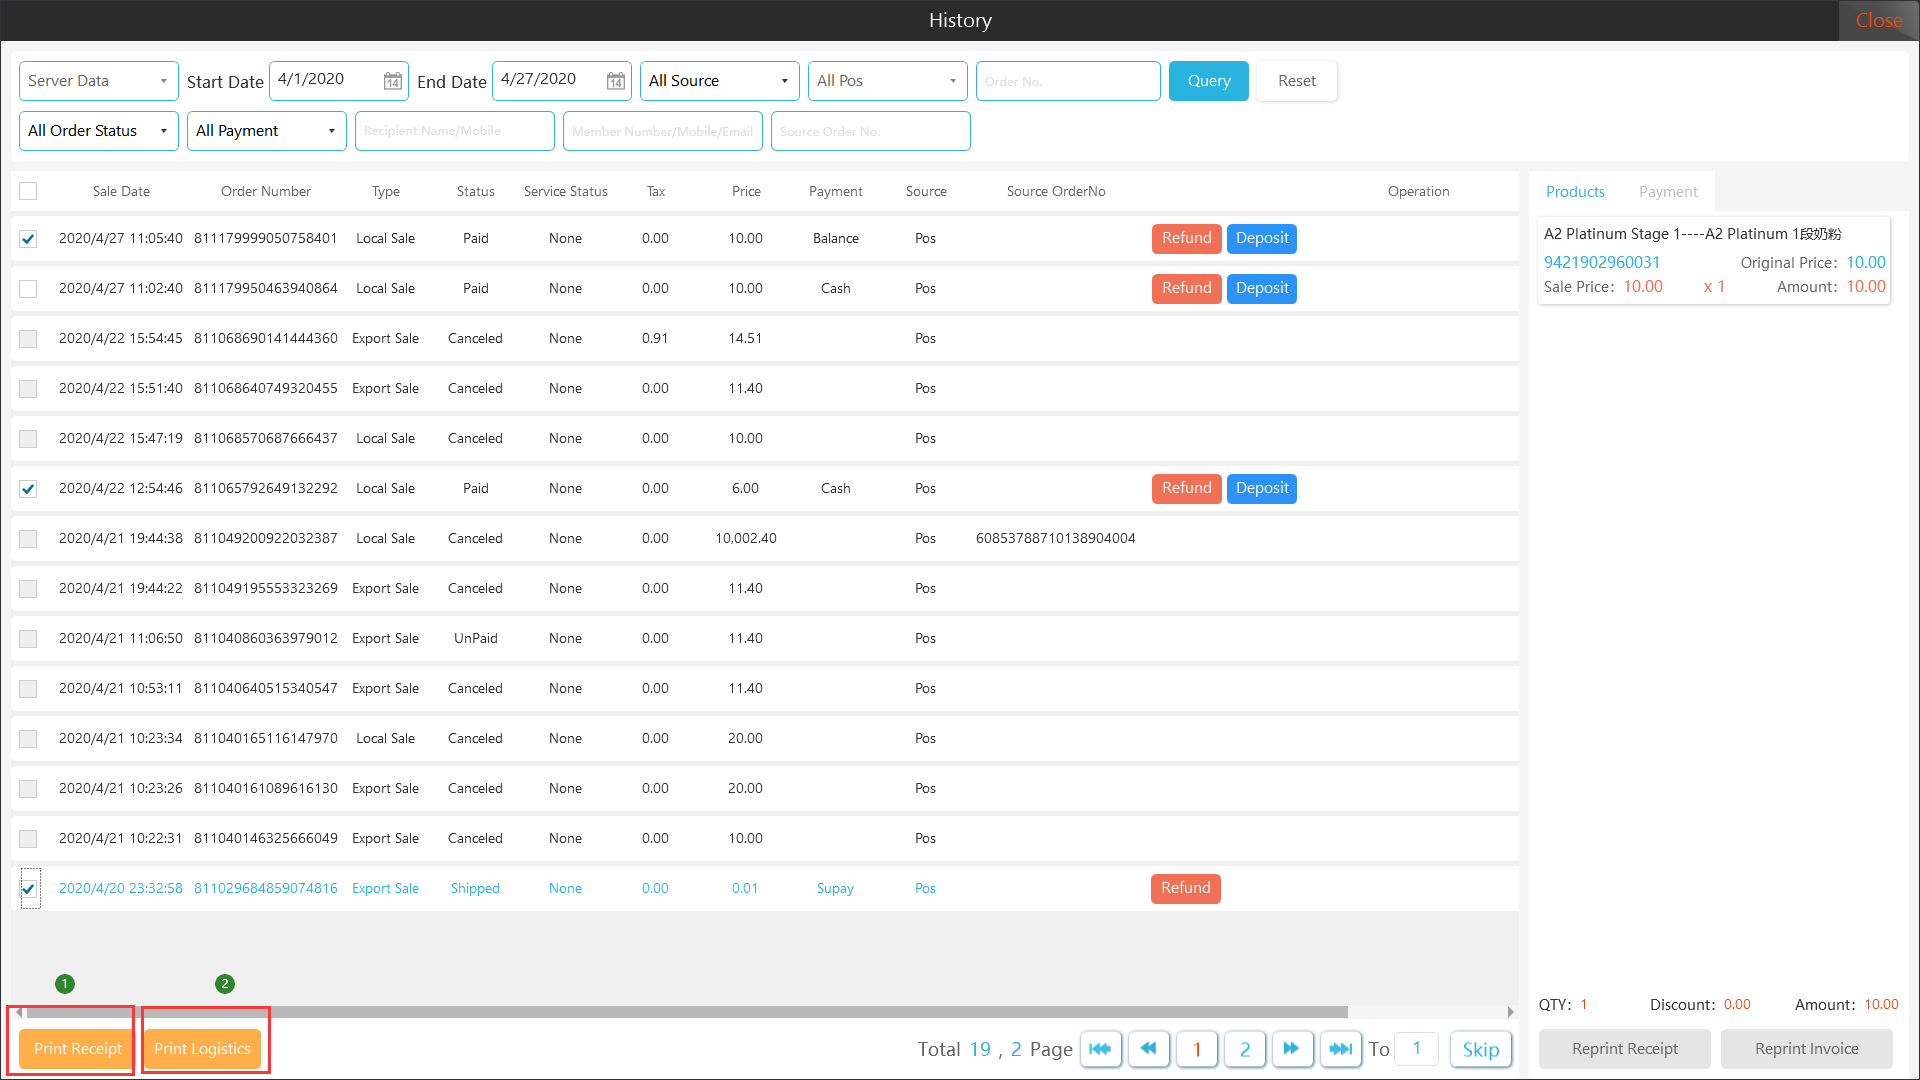
Step 1: Check the order that needs to print the receipt / logistics bills.
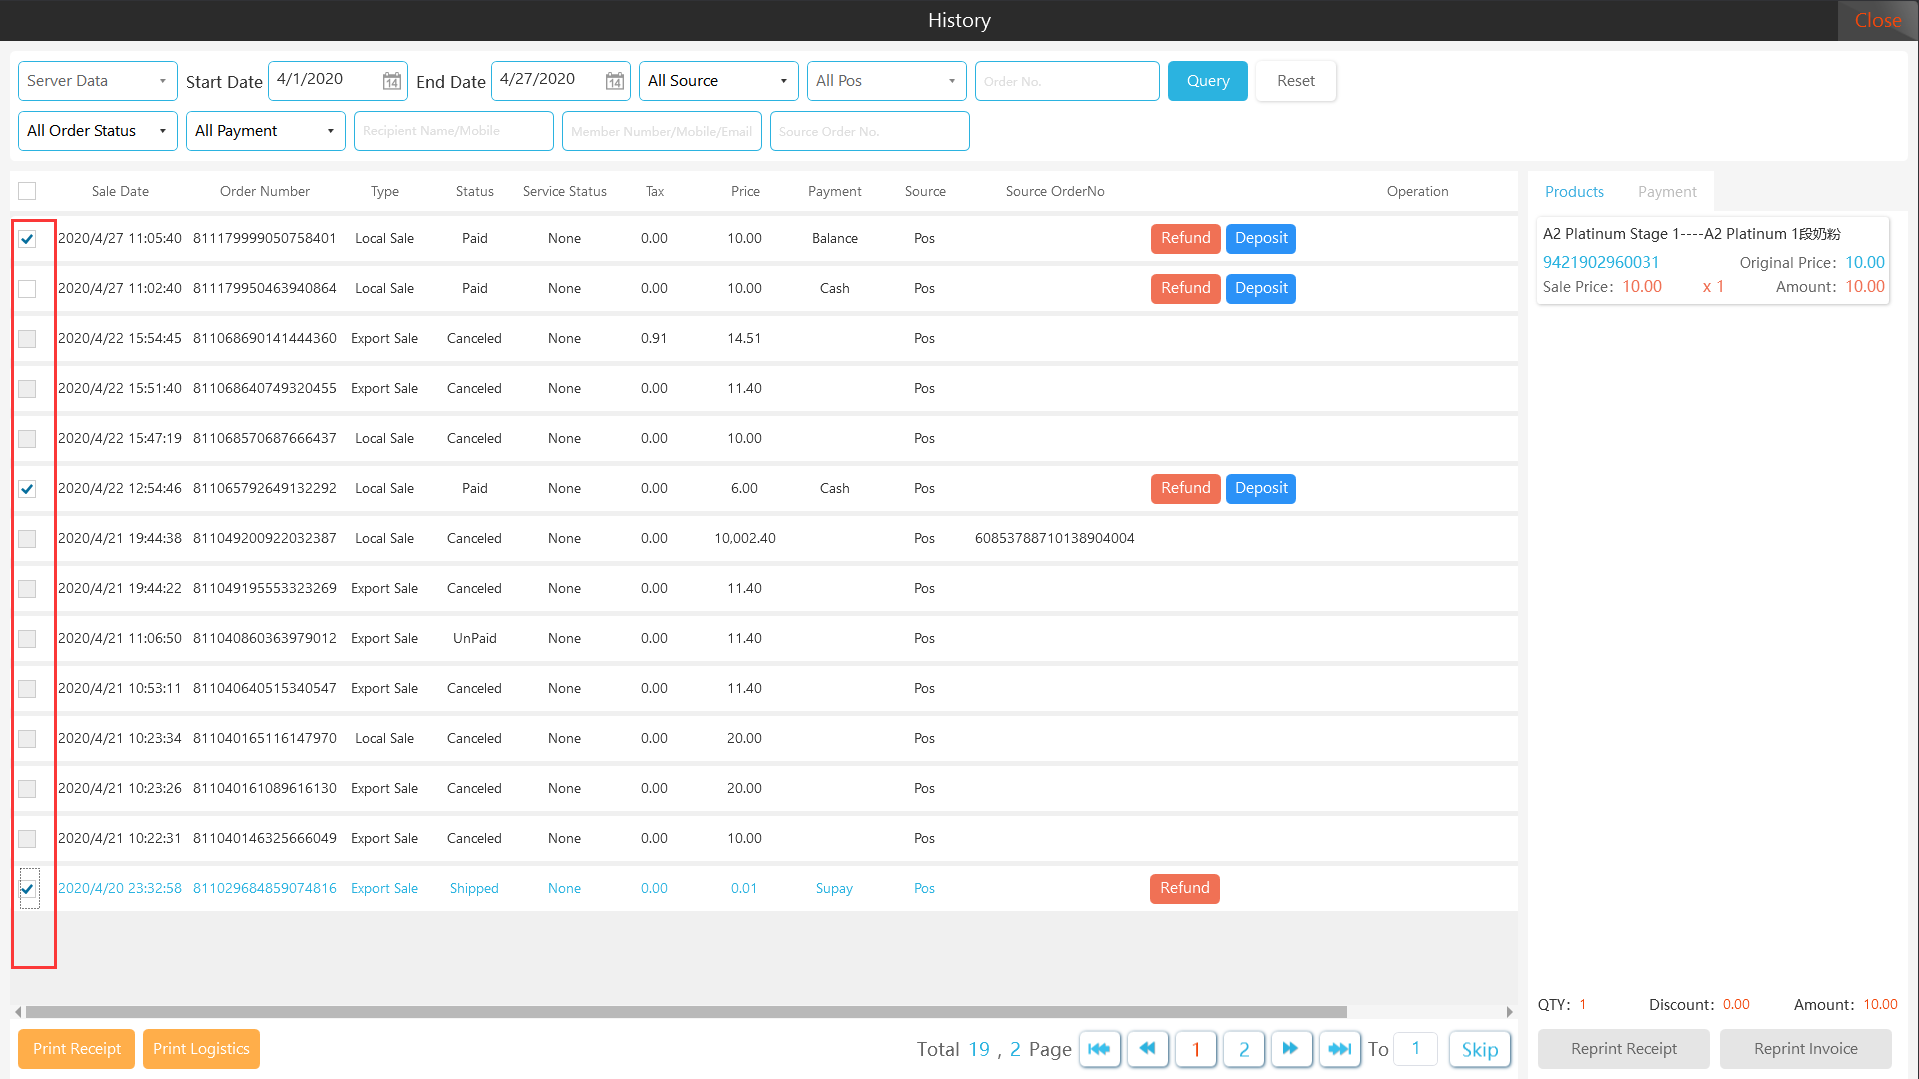
Step 2: Click the “Print Receipt/Logistics List” button, the printer will print automatically.
4.2.2 Reprint the receipt/logistics bills/invoice
The reprint invoice function is currently only open to Australian commercial tenants.
[Operating steps]
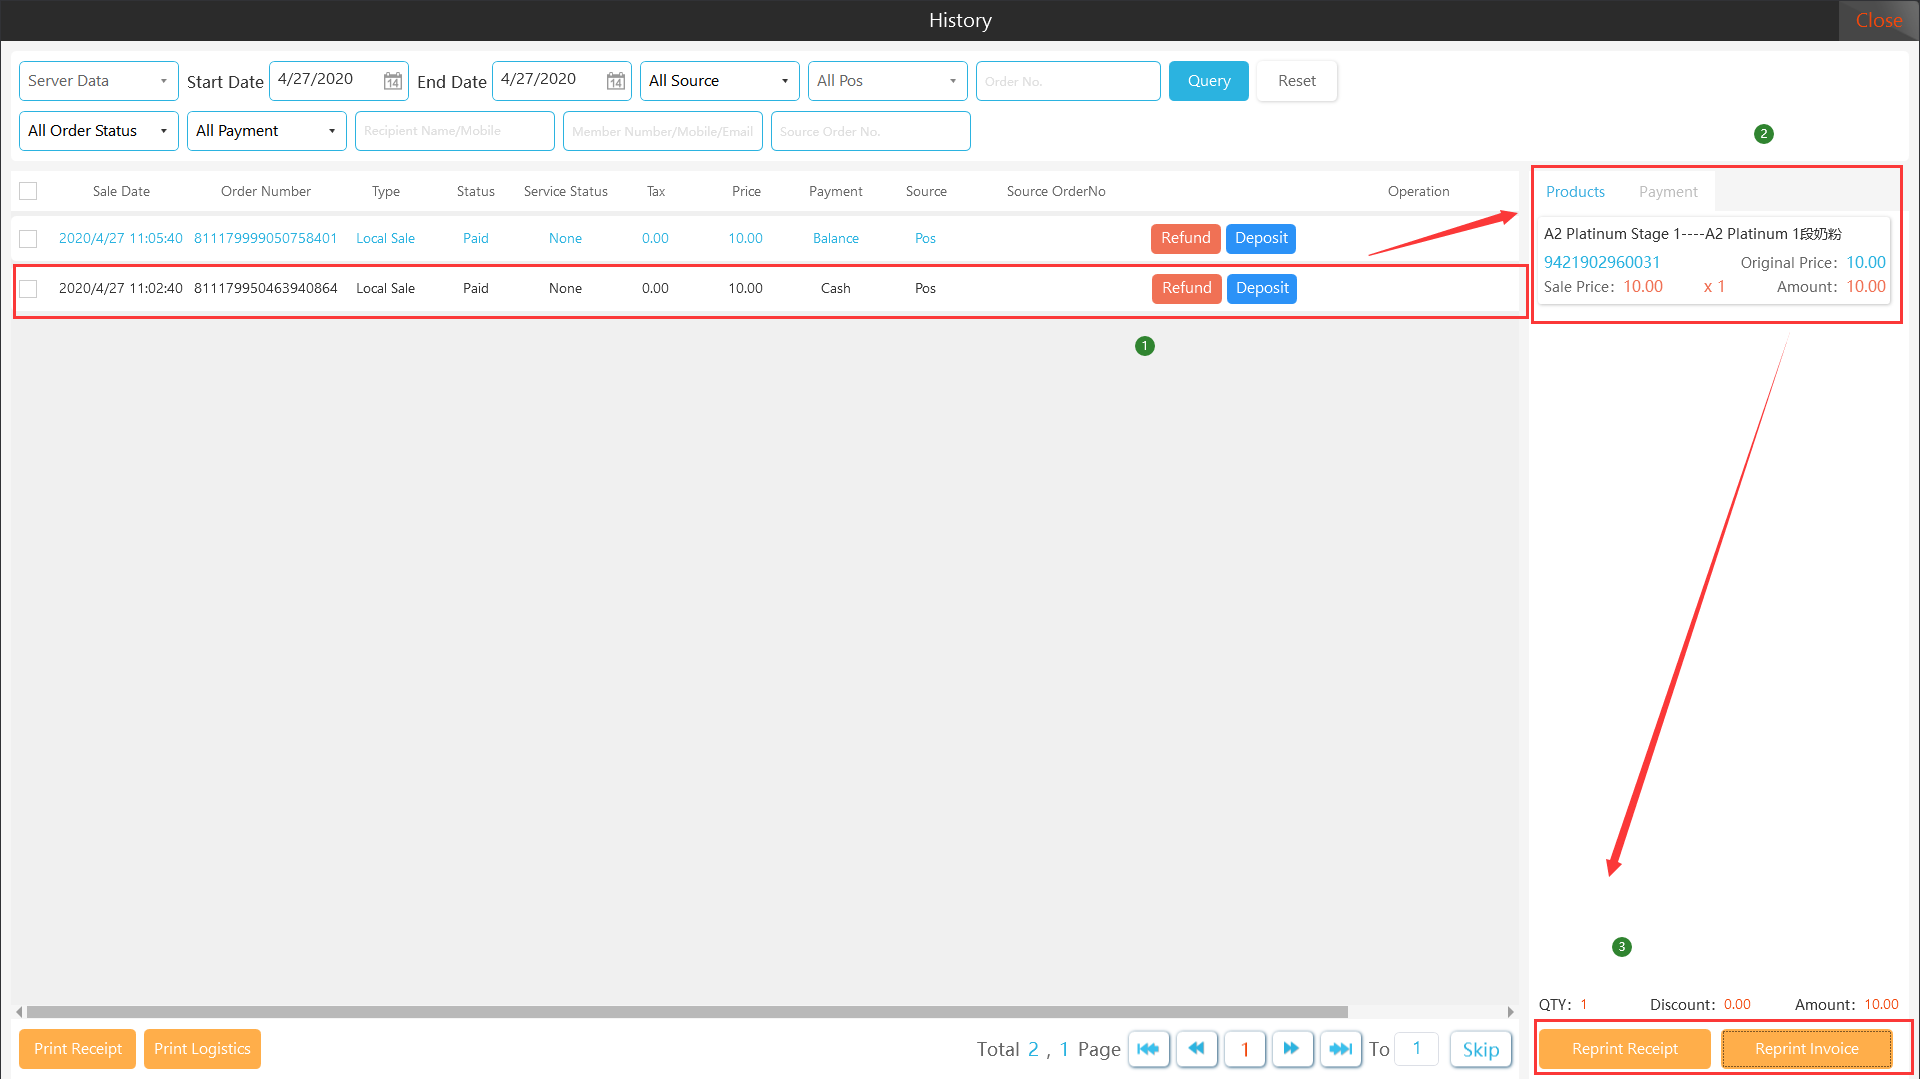
Step 1: Select the order that needs to reprint the receipt/invoice. On the right side of the order details “Product Information” page, click Reprint receipt/ Reprint invoice.
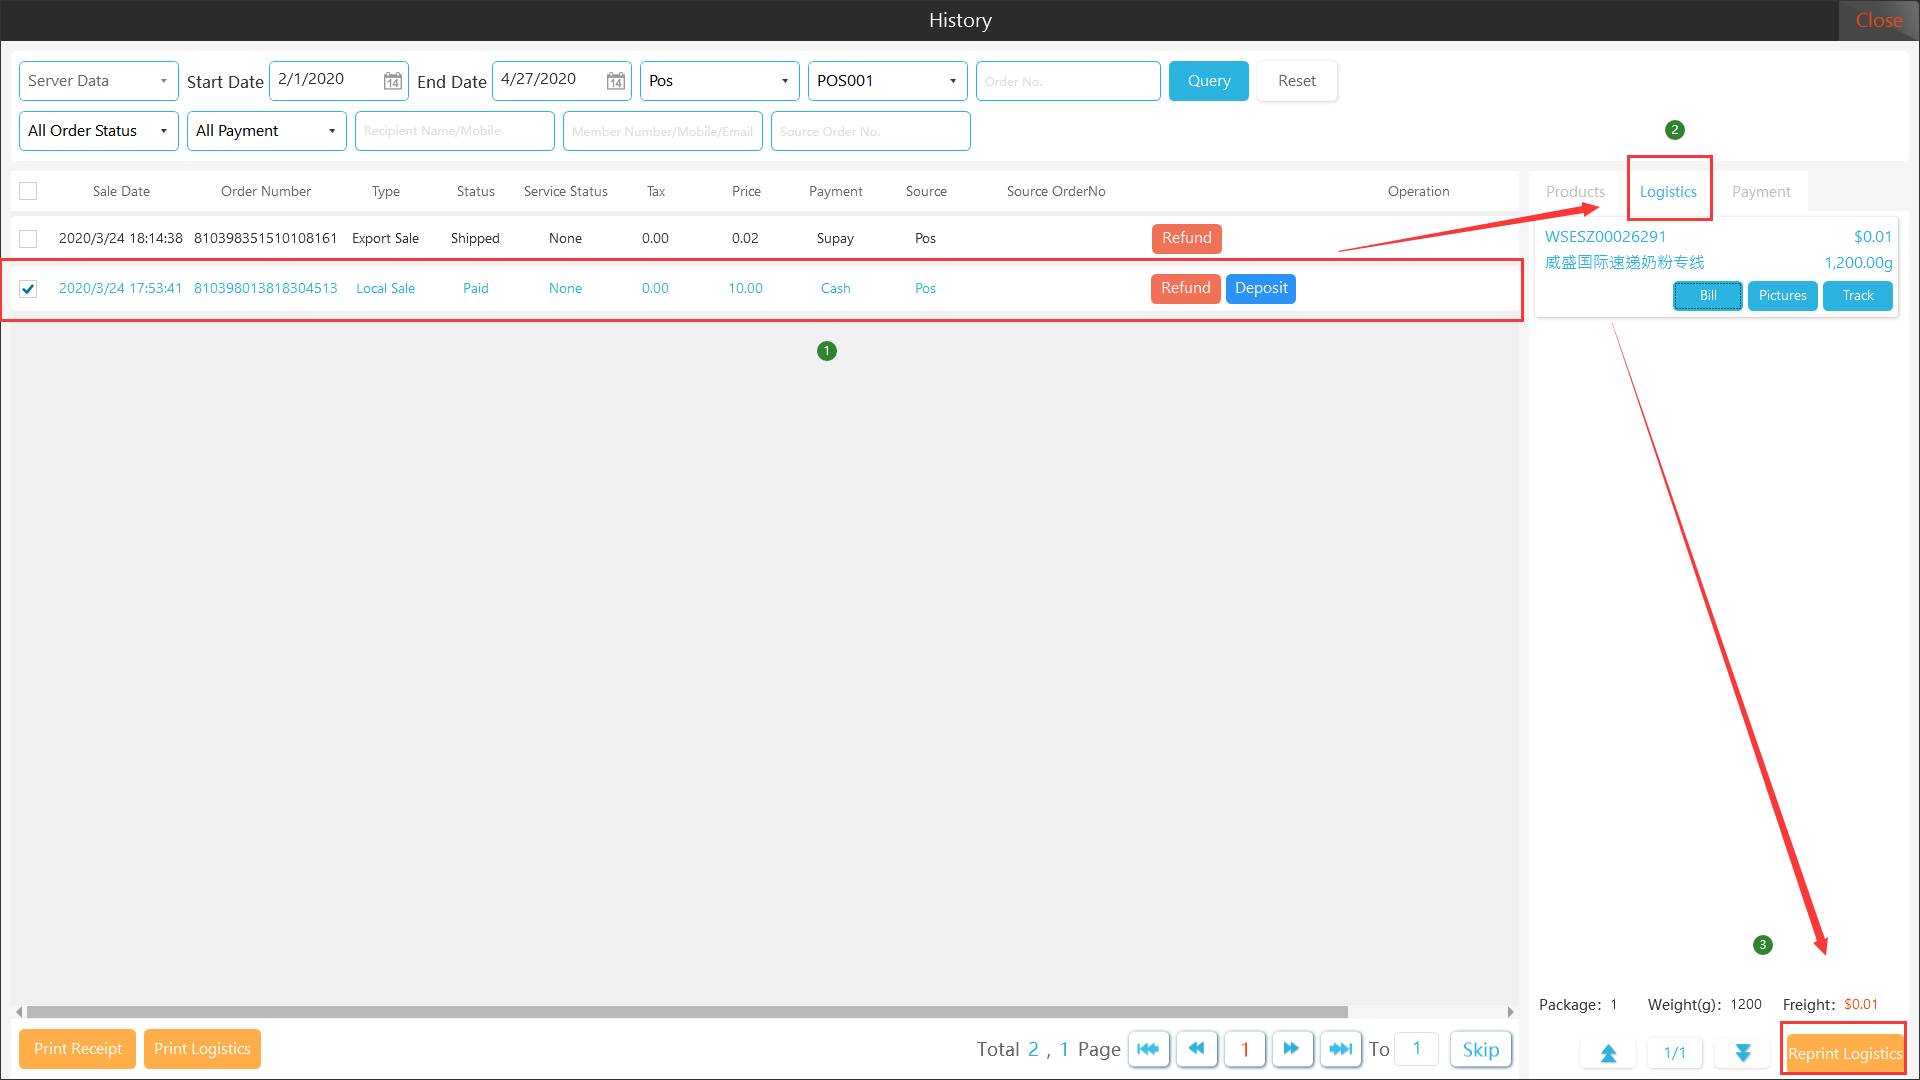
Step 2: Switch the order details to the “Logistics Information” page, select the package that needs to be reprinted, and click “Reprint Logistics”.
4.3 Order details
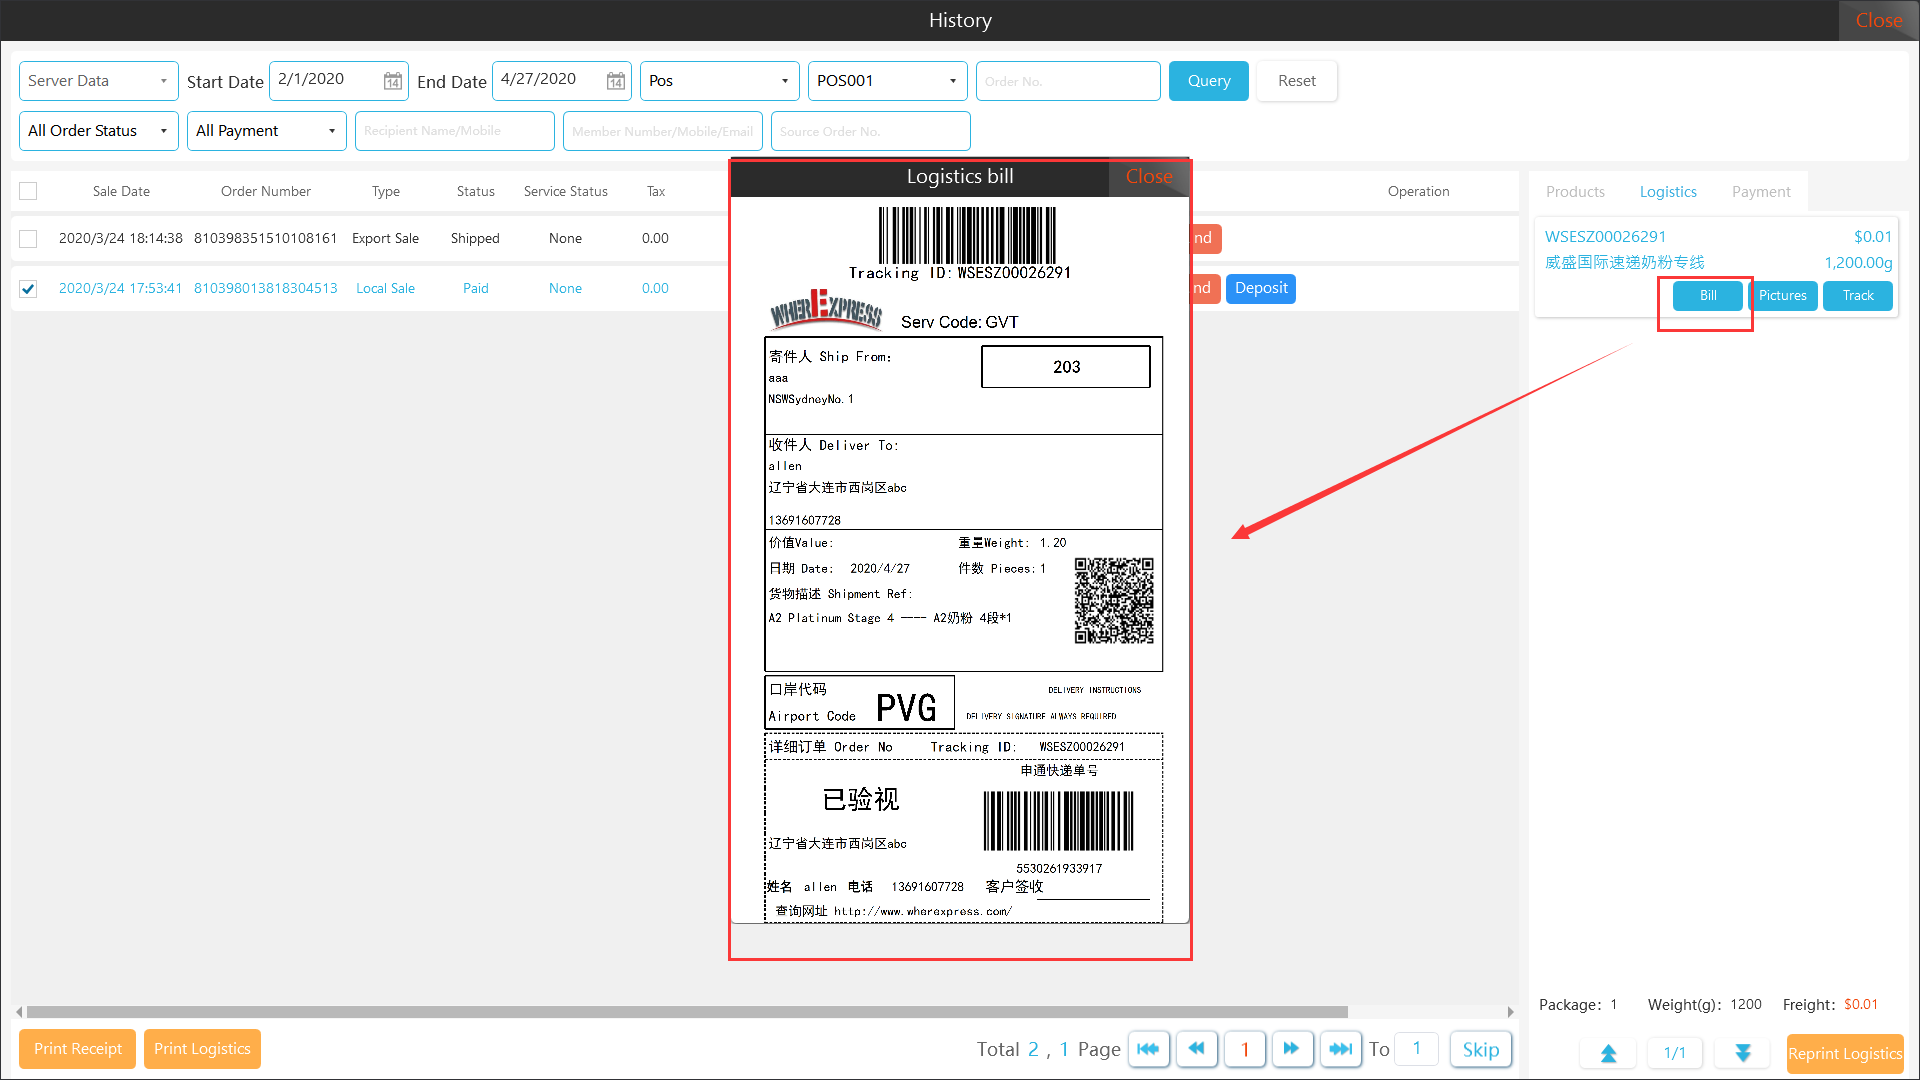
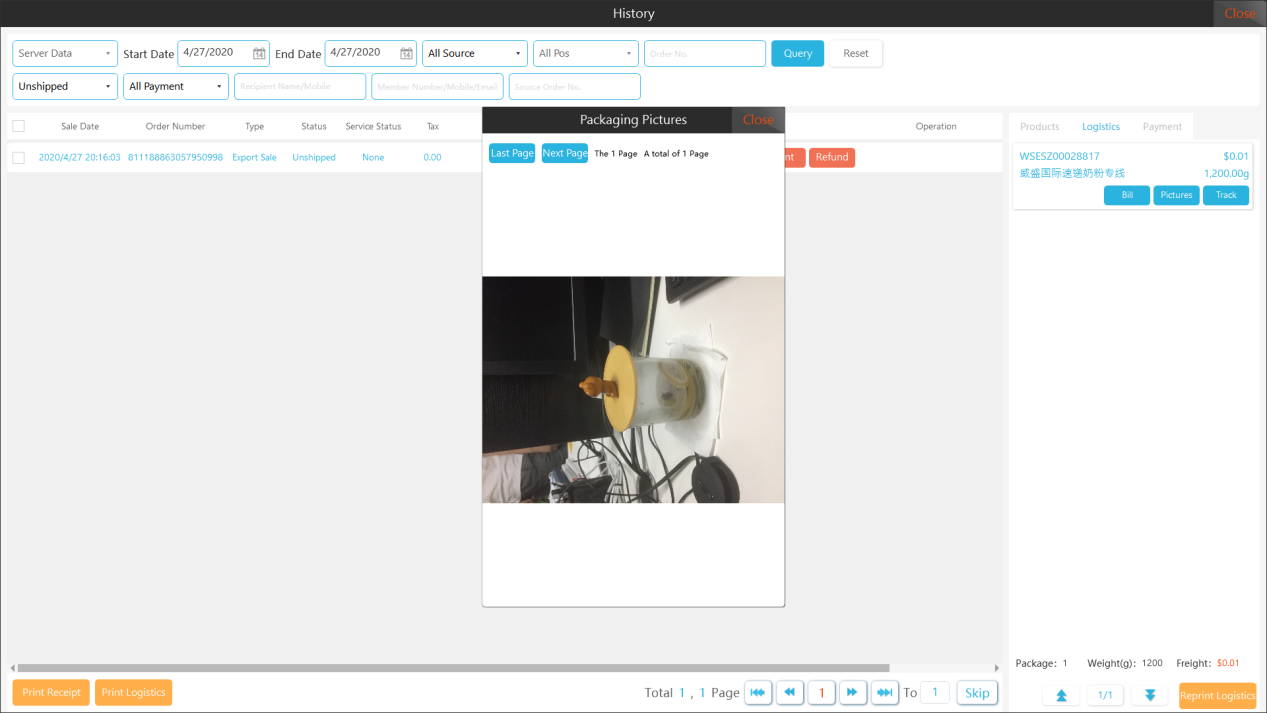
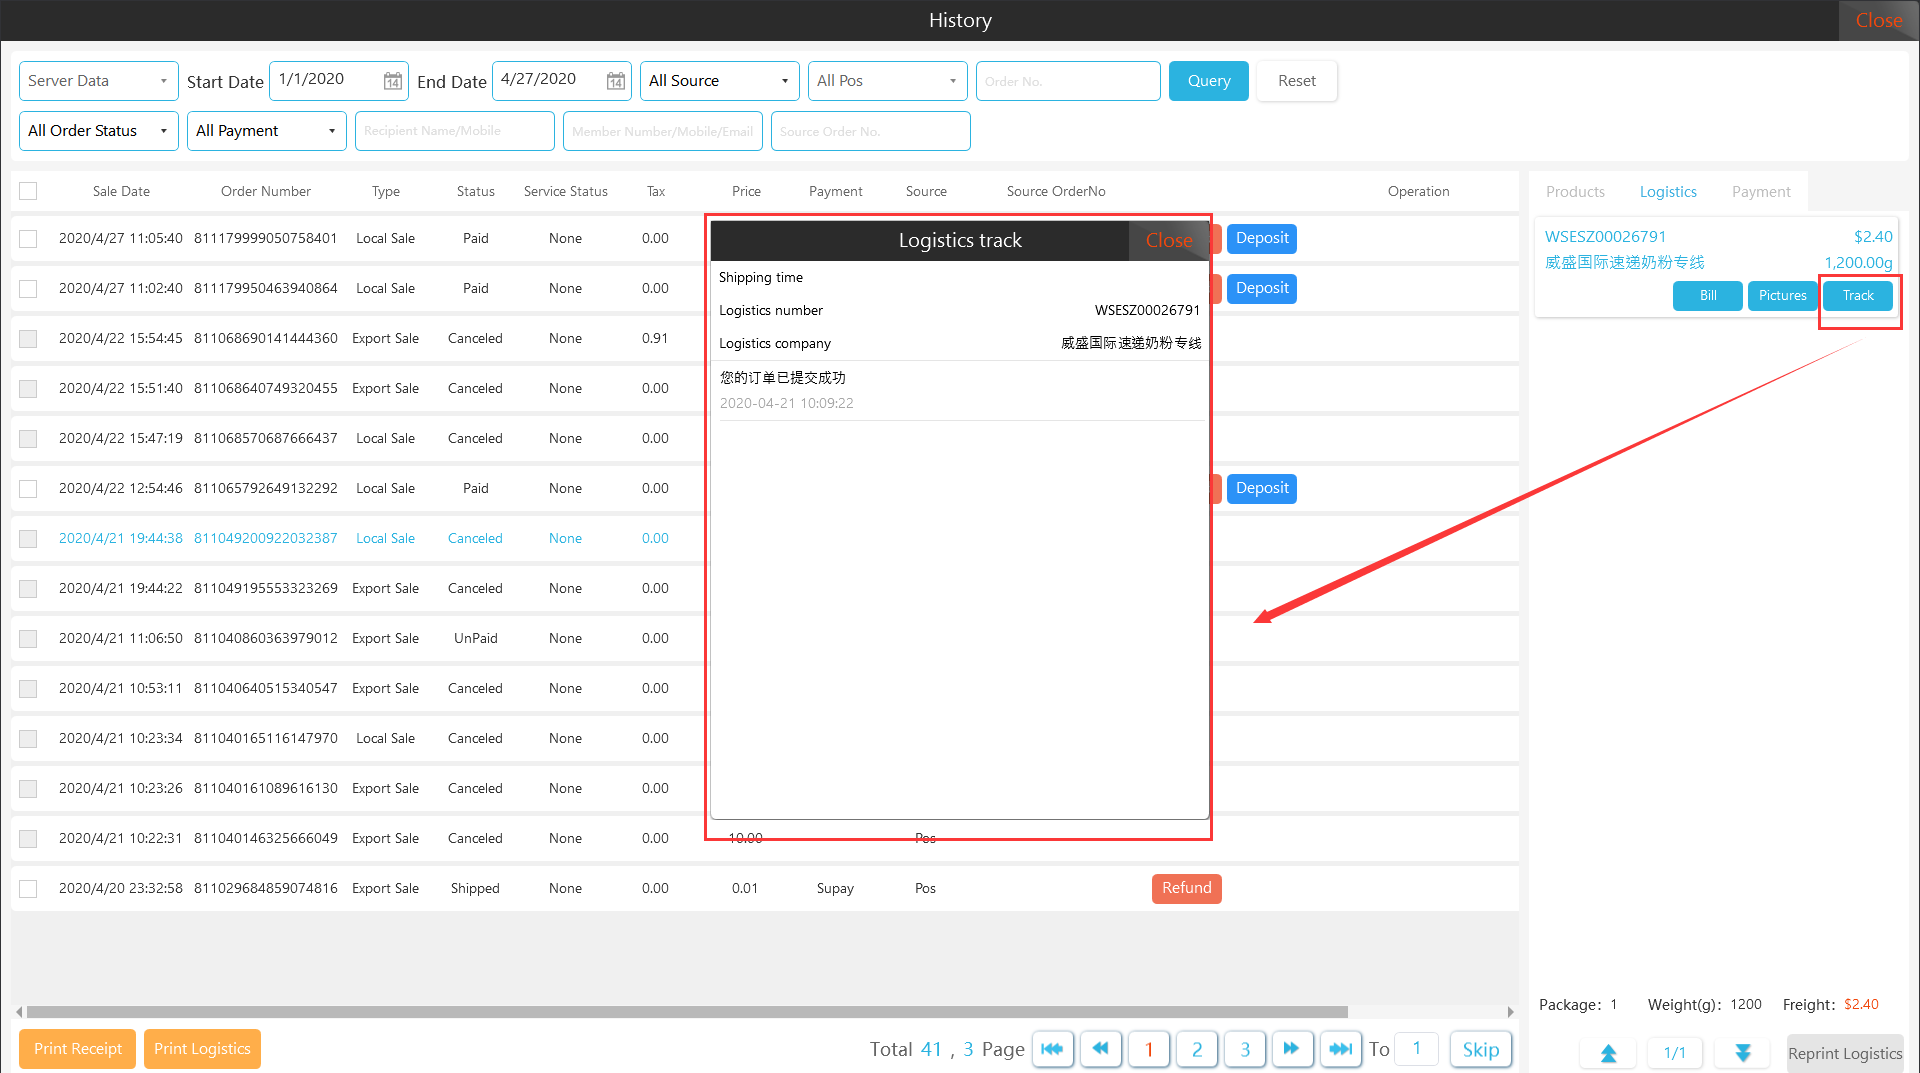
The order details page of the Apos client terminal displays the product information, logistics information, and payment information of the order. Among them, the logistics information (cross-border order) page can query the logistics bills of the package, the package picture,and the logistics track.
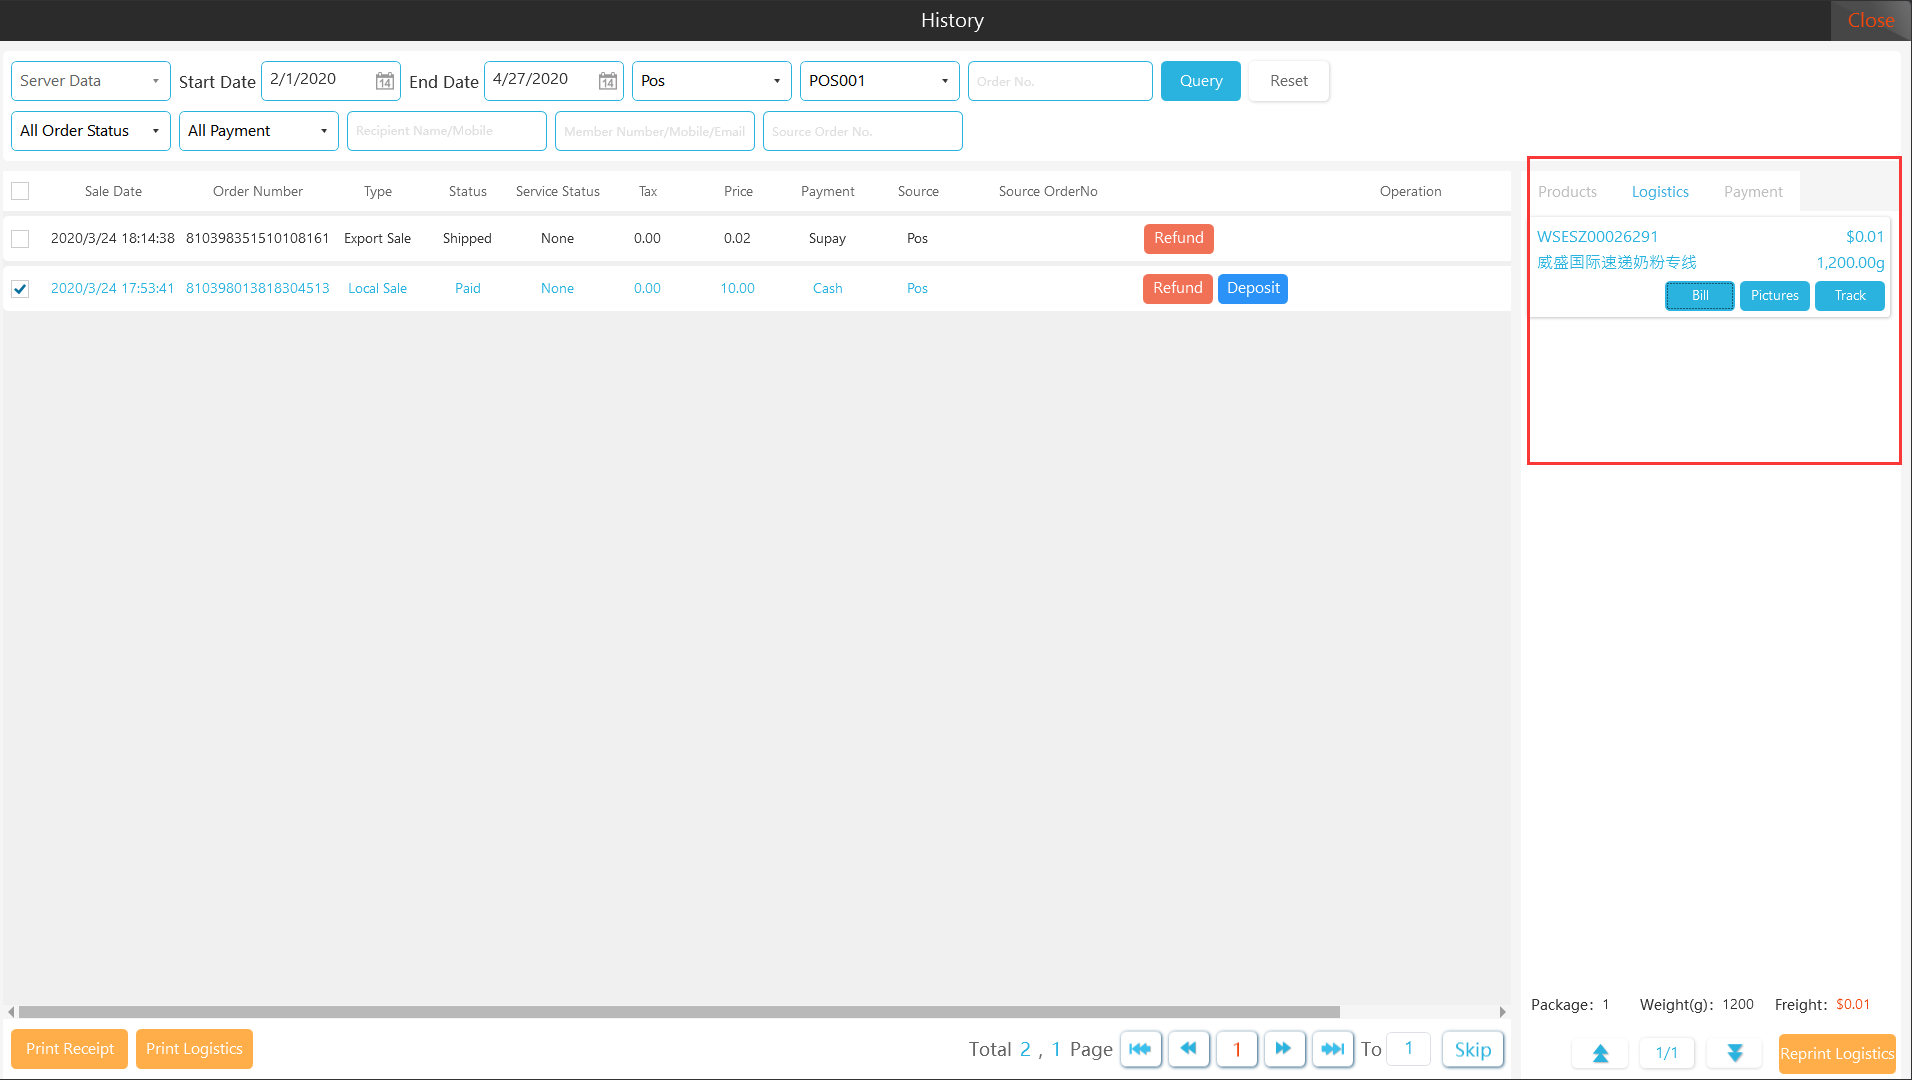
4.3.1 Viewing logistics bills
[Operating steps]
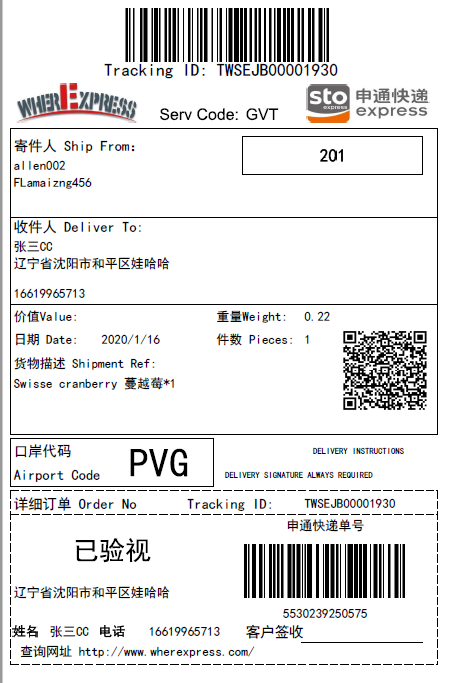
Step 1: On the “Logistics Information” page of the order details, click “Bill” to display the logistics thermal bill.
4.3.2 Packing picture view
[Operating steps]
Step 1: Click on “Pictures” to bring up the packaging pictures page.

4.3.3 Logistics Track
[Operating steps]
Step 1: Click “Track” to display the logistics track of the package.
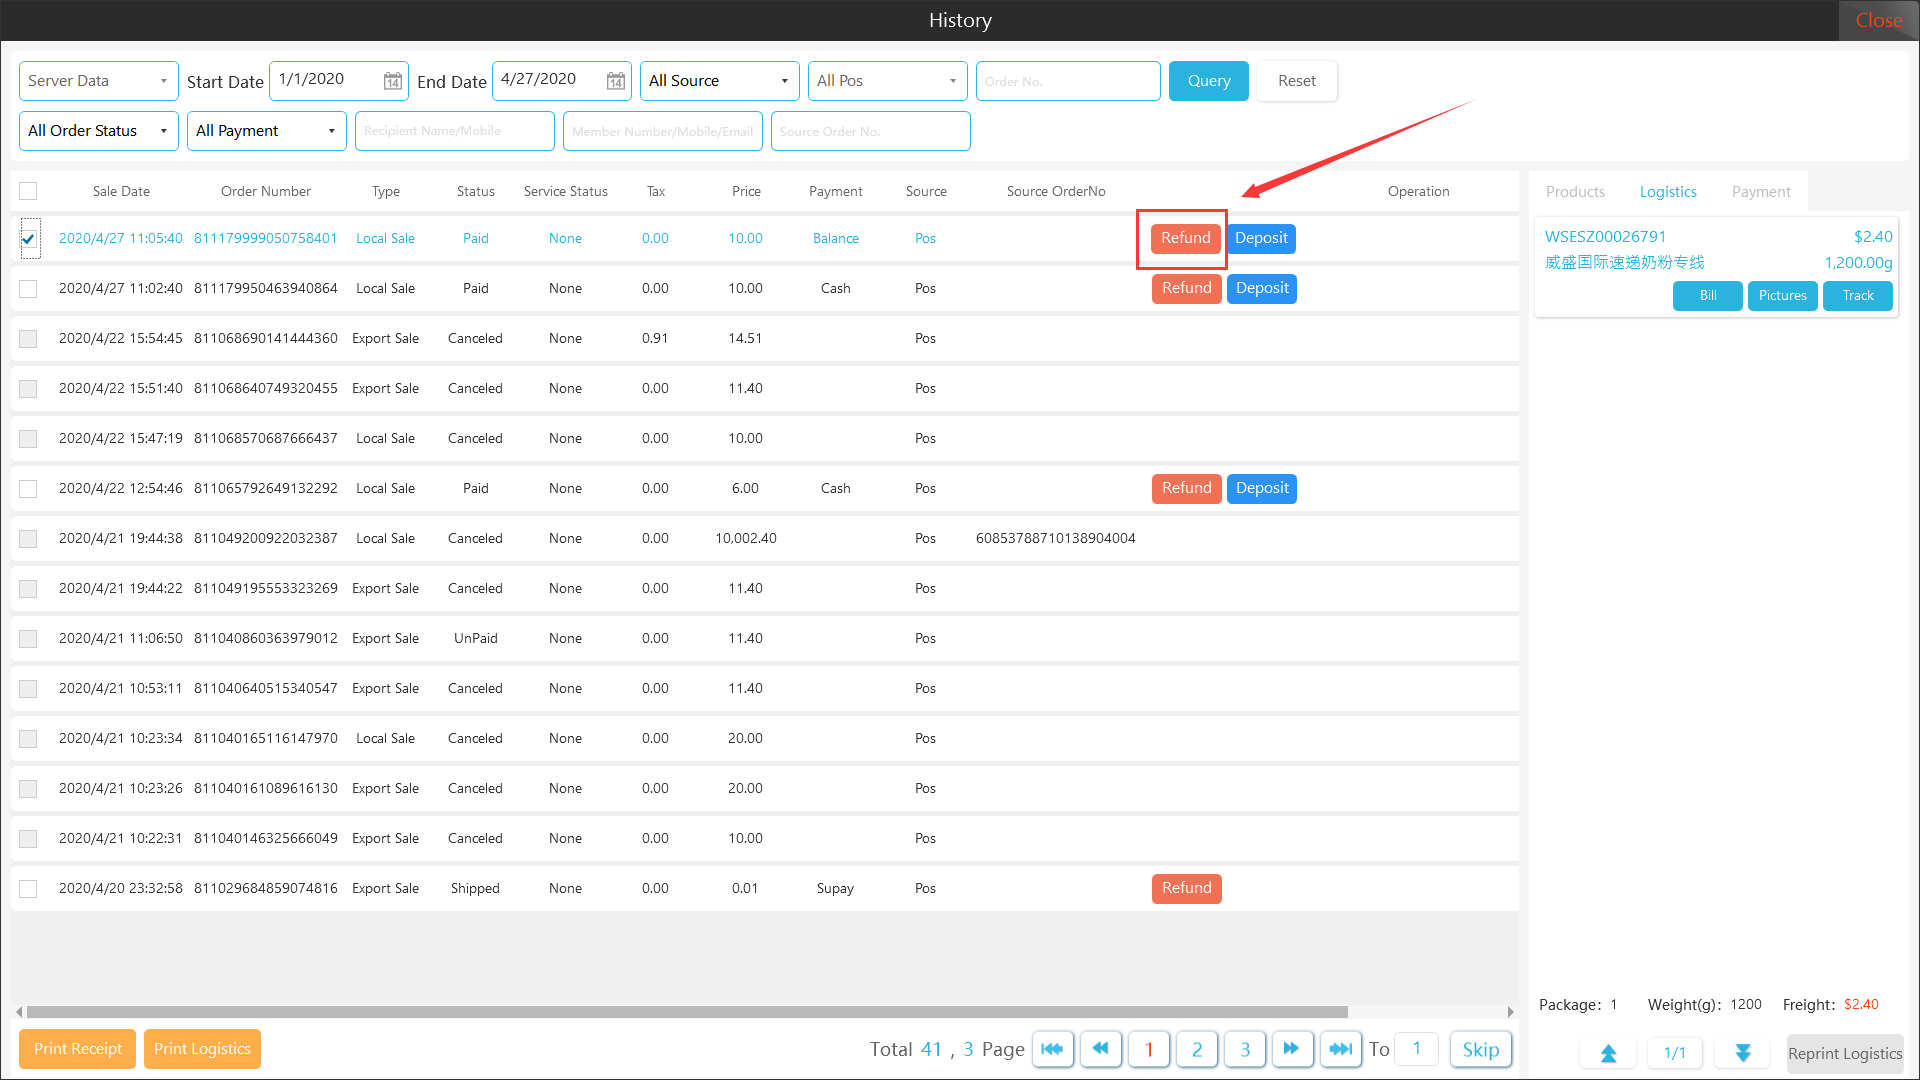
4.4 Refund
The order management page provides a one-click return function for orders. Click the “refund” option to jump to the”Refund Management”page. For the specific refund operation process, please refer to Chapter 8 ”Returns”.
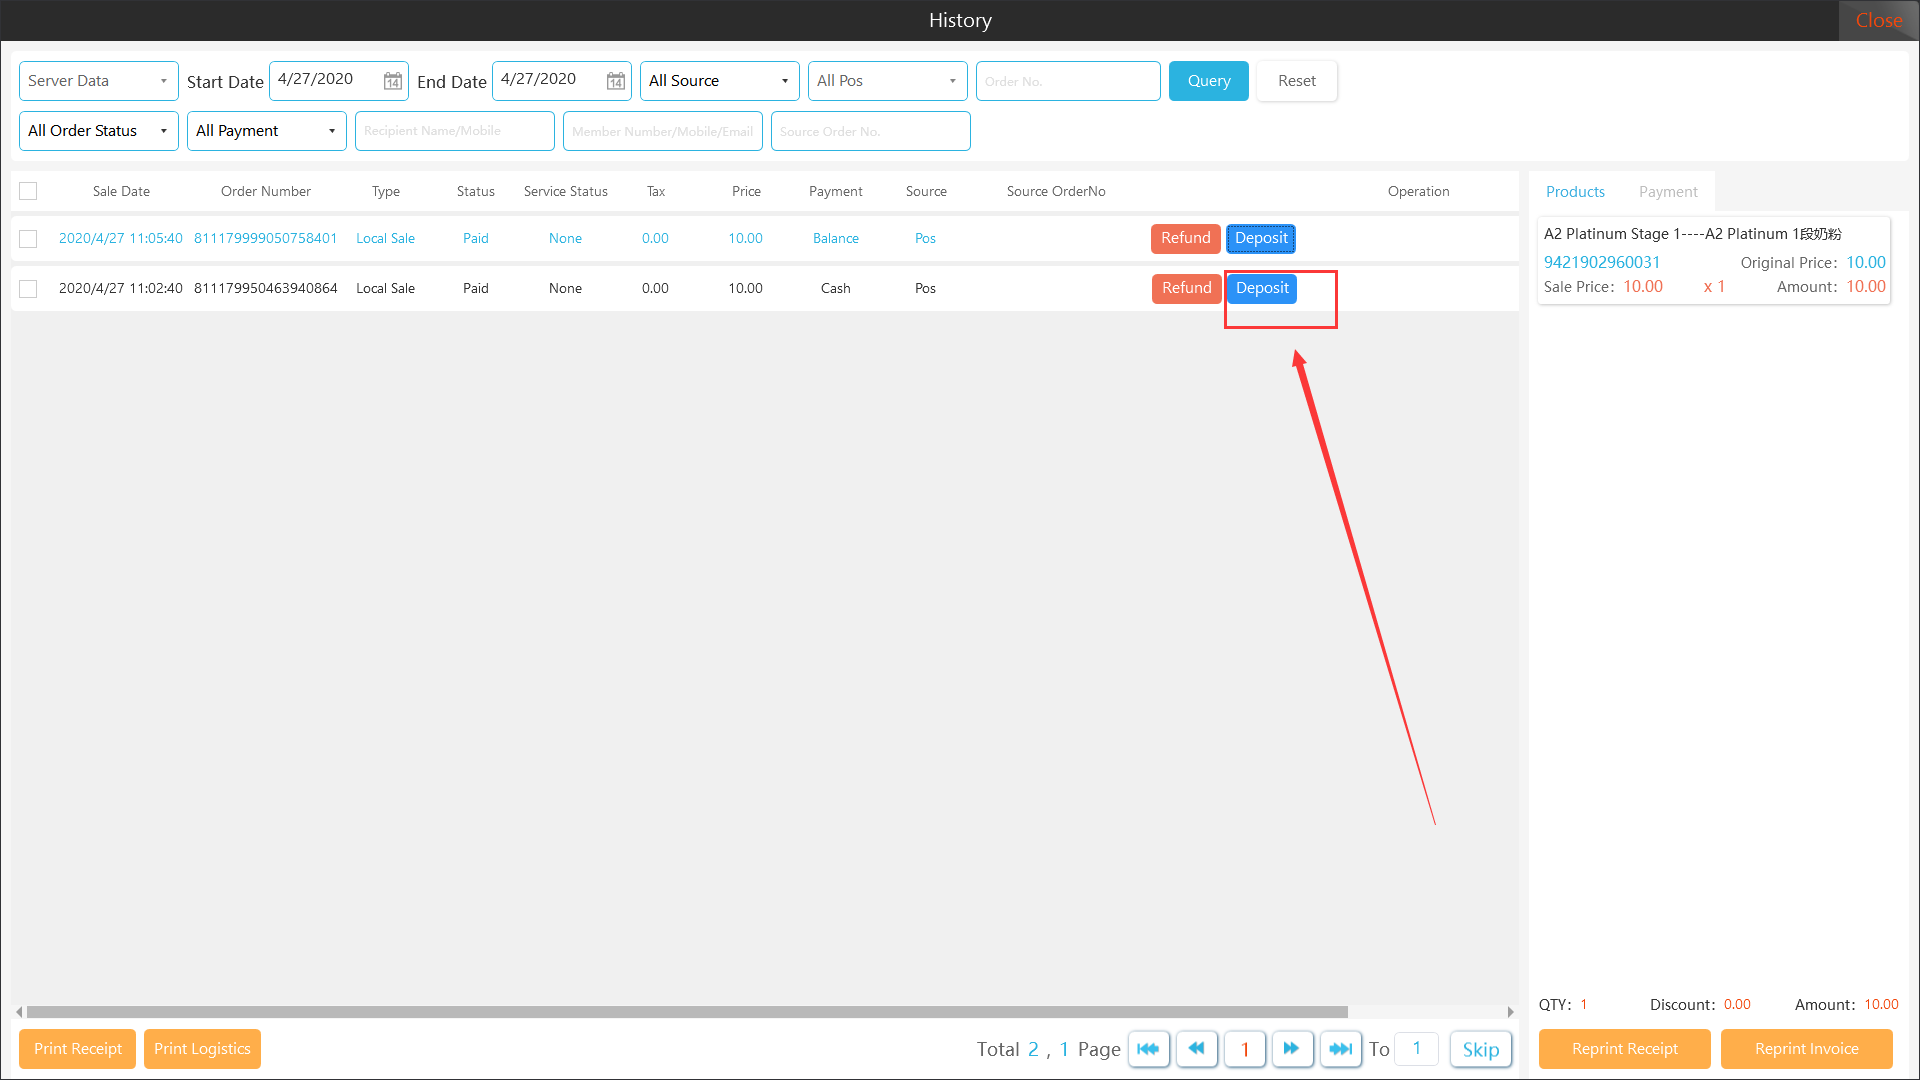
4.5 Deposit
The Apos client provides a deposit function for members. After the member places an order, they can choose to deposit the goods to the store, and the goods deposited does not occupy the product inventory of the store. The system will record the details of the member's deposit and delivery. Please refer to “Deposit Details” and”Deposit product summary” under the member report of the sever background system.
Notes: At present, the “Deposit” function is only open to Australian and Chinese commercial tenants.
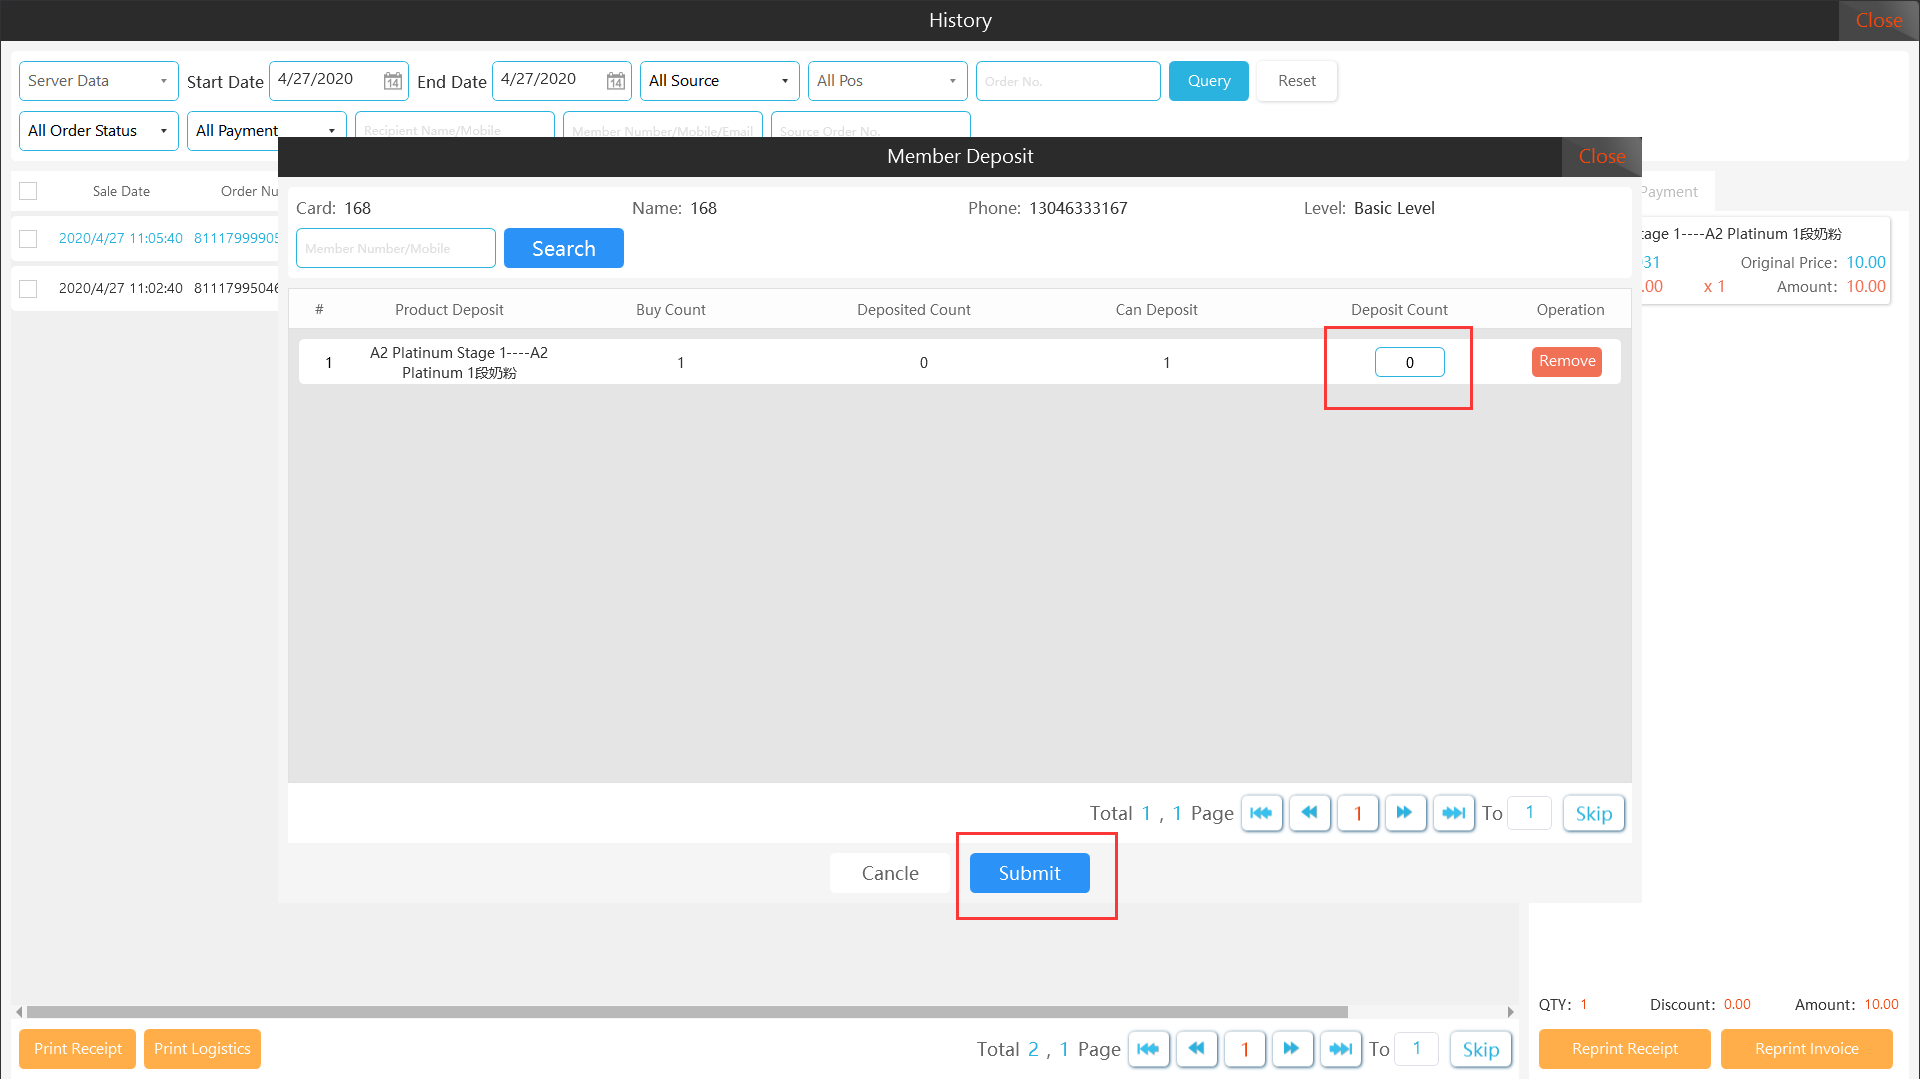
4.5.1 Deposit
[Operating steps]
Step 1: After the member completes the order, click “Order” to open the order query page.

Step 2: Find the order and click “Deposit” to pop up the member deposit page.
Step 3: After entering the member,enter the “deposits count” and click OK.
Notes:You can enter decimals for weighted goods. The display of the decimal format on the client is consistent with the display format of the number of weighed goods in the server background system settings.
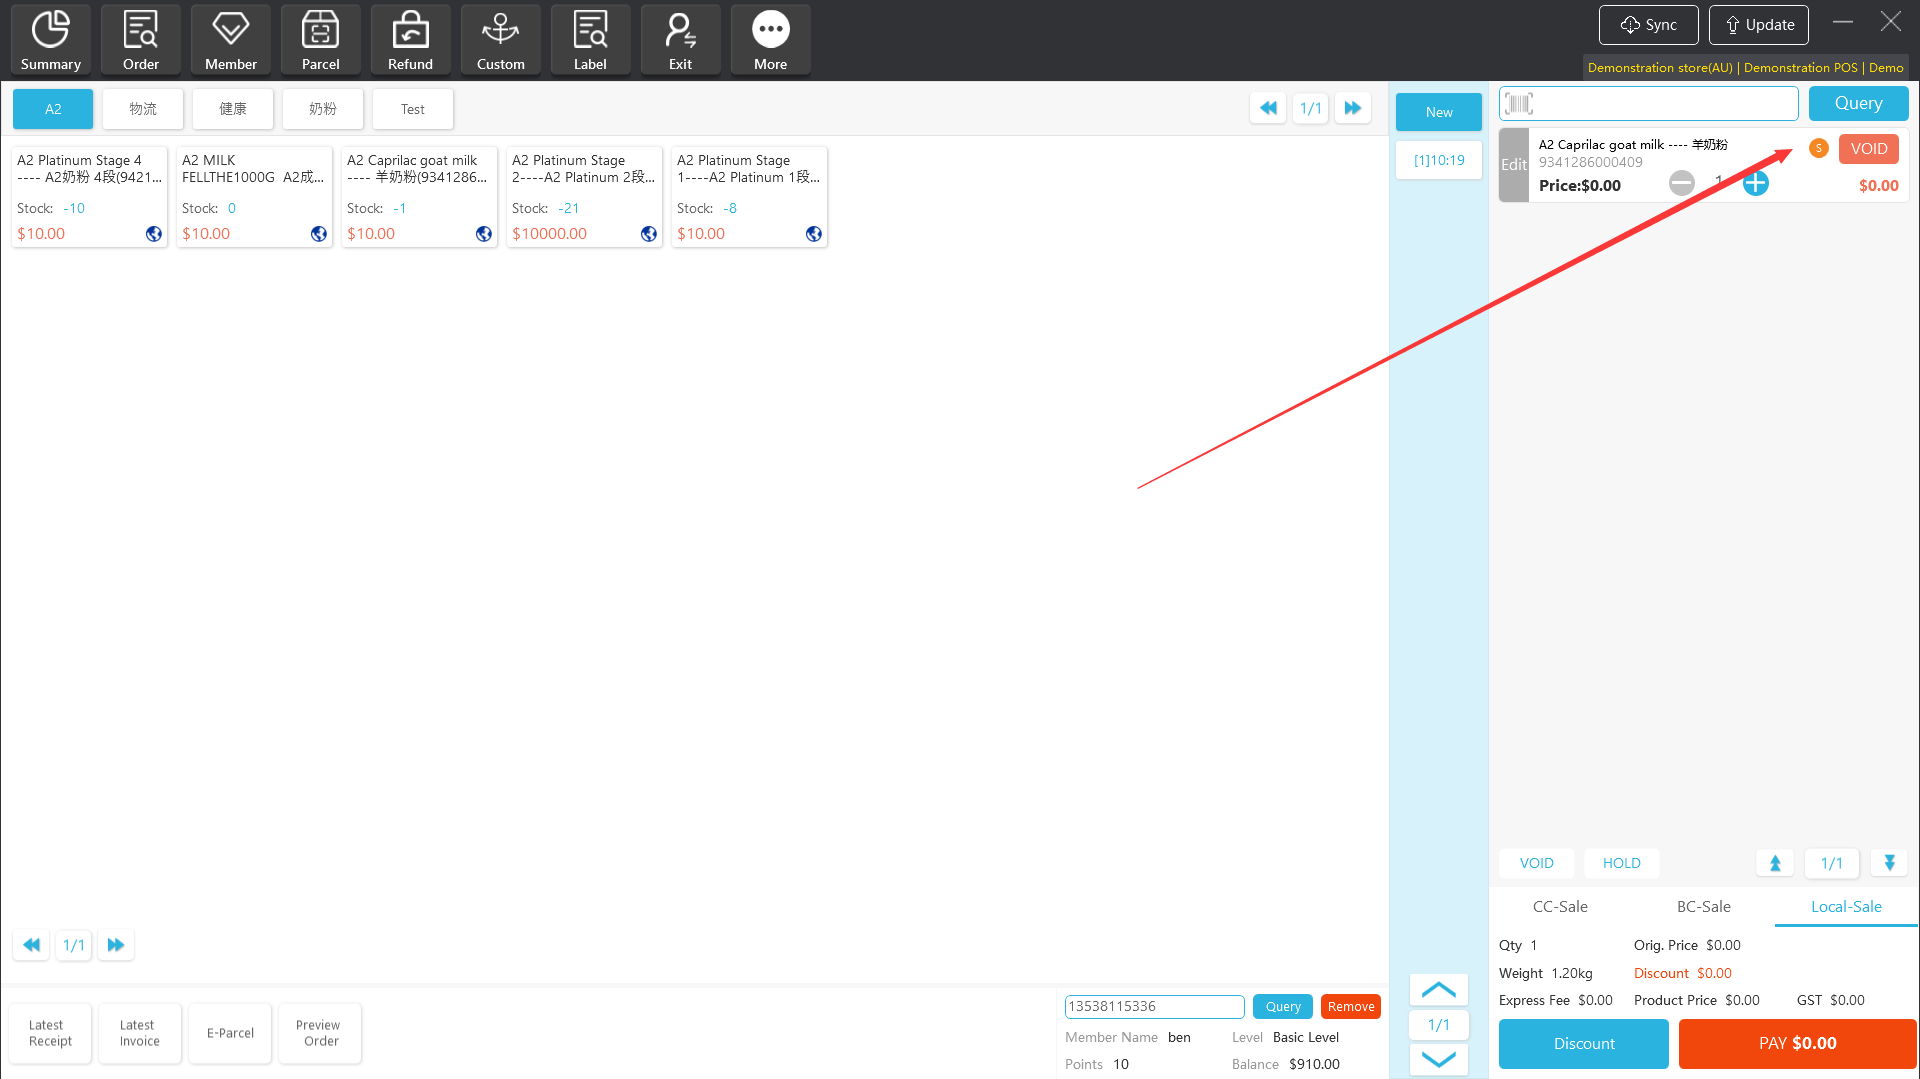
4.5.1 Pick Up
[Operating steps]
Step 1: Enter the member information, add the deposited product into the shopping cart, the product will have a yellow red “S” logo, the price of the deposited product will automatically default to 0, click “settlement” to complete the delivery, the sever background “Reports” can also view related records.
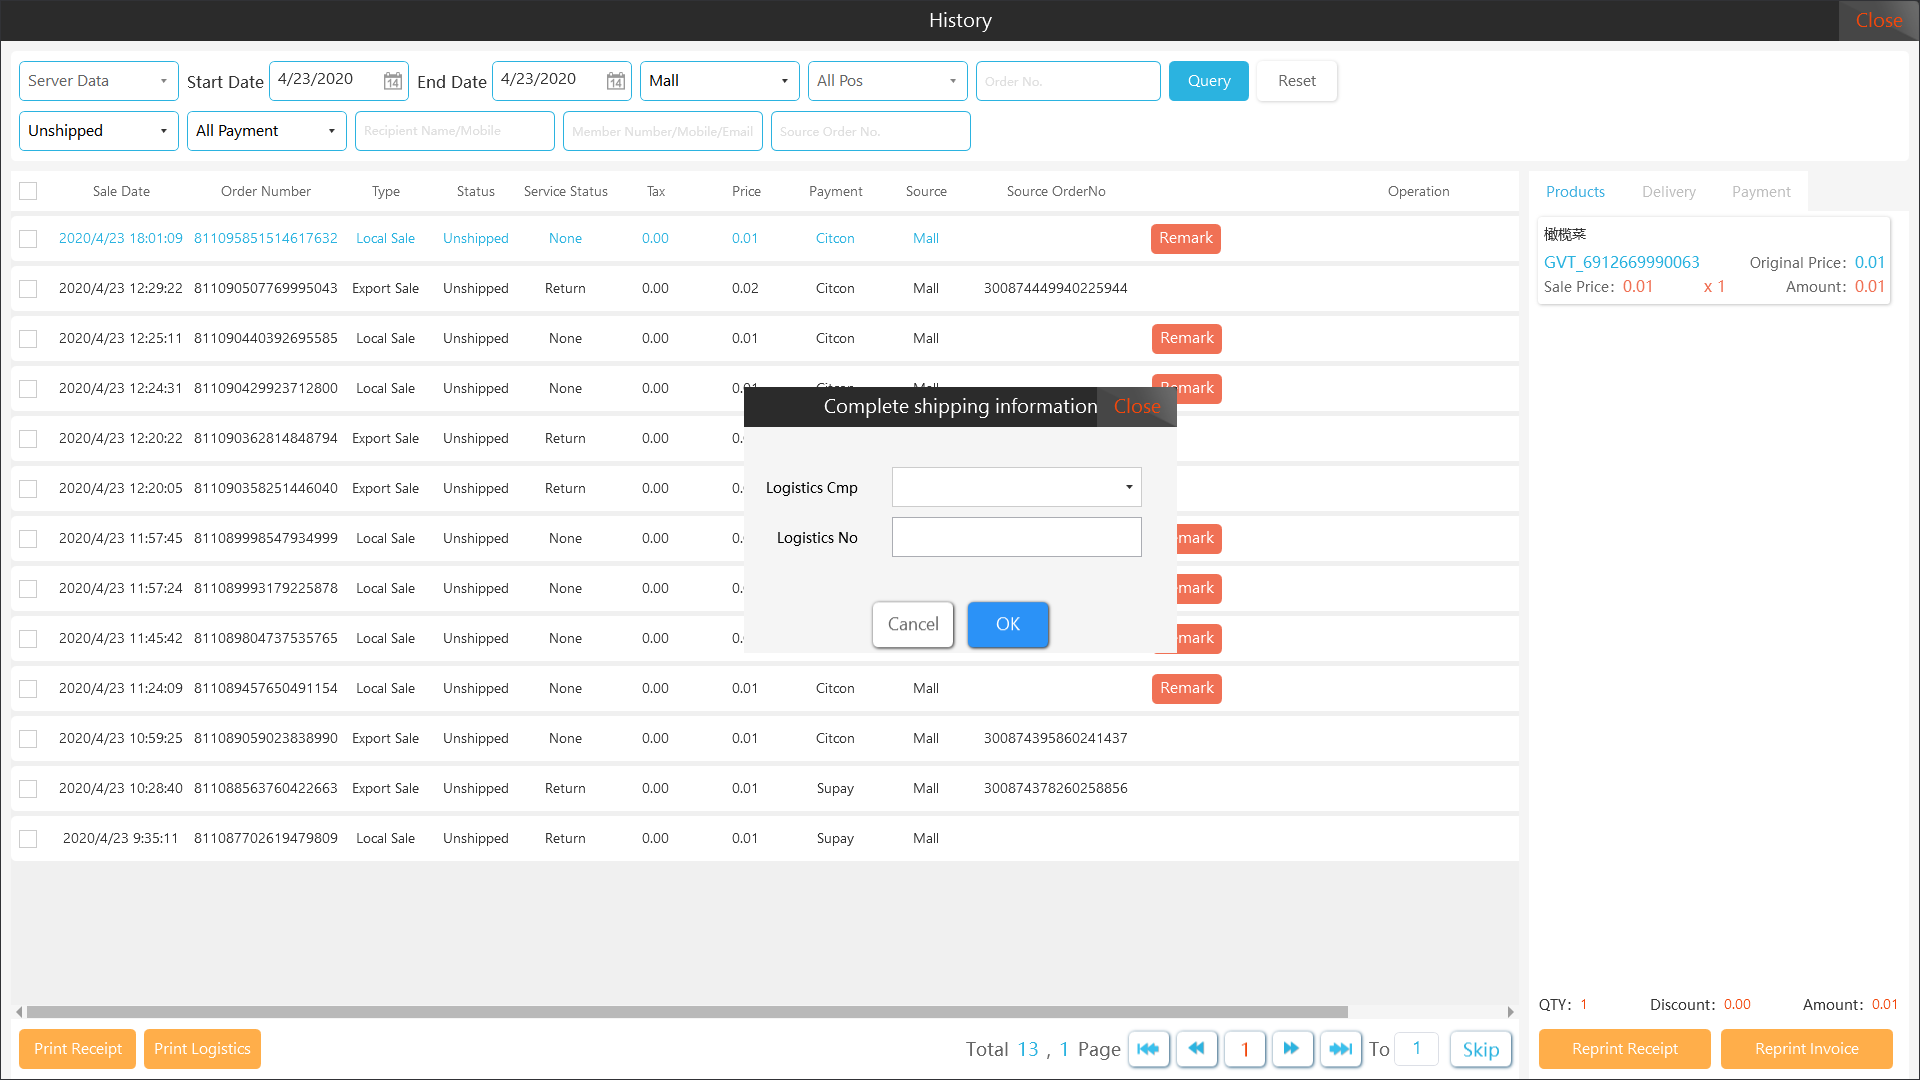
4.6 Remarks
In order management page,for the local orders of the E-Mall, it provides a shipping remark function, and for the online orders shipped offline, it notes the logistics company and logistics order number of the shipment.
[Operating steps]
Step 1: Click the “Remarks” button to pop up a pop-up window.
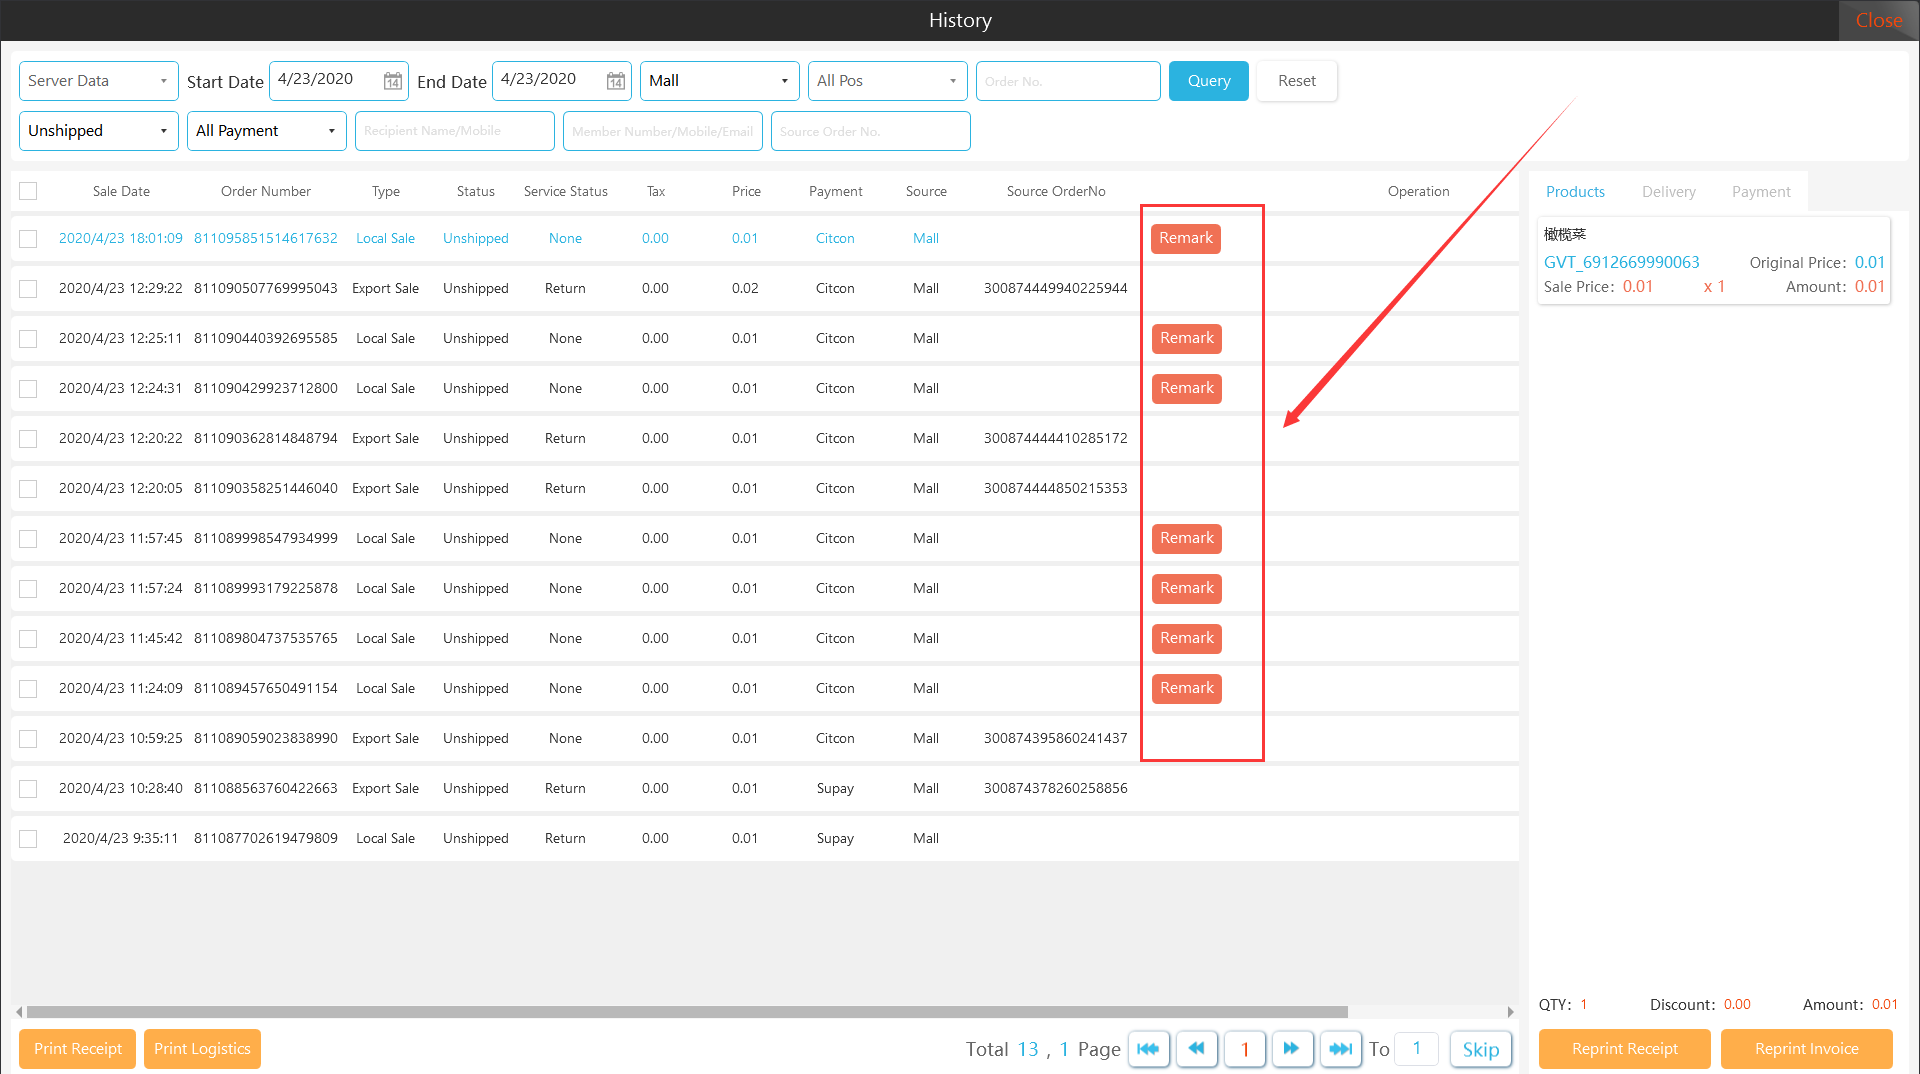
Step 2: After the express package is picked up, fill in the logistics company and logistics tracking ID of the shipment.
V. Products
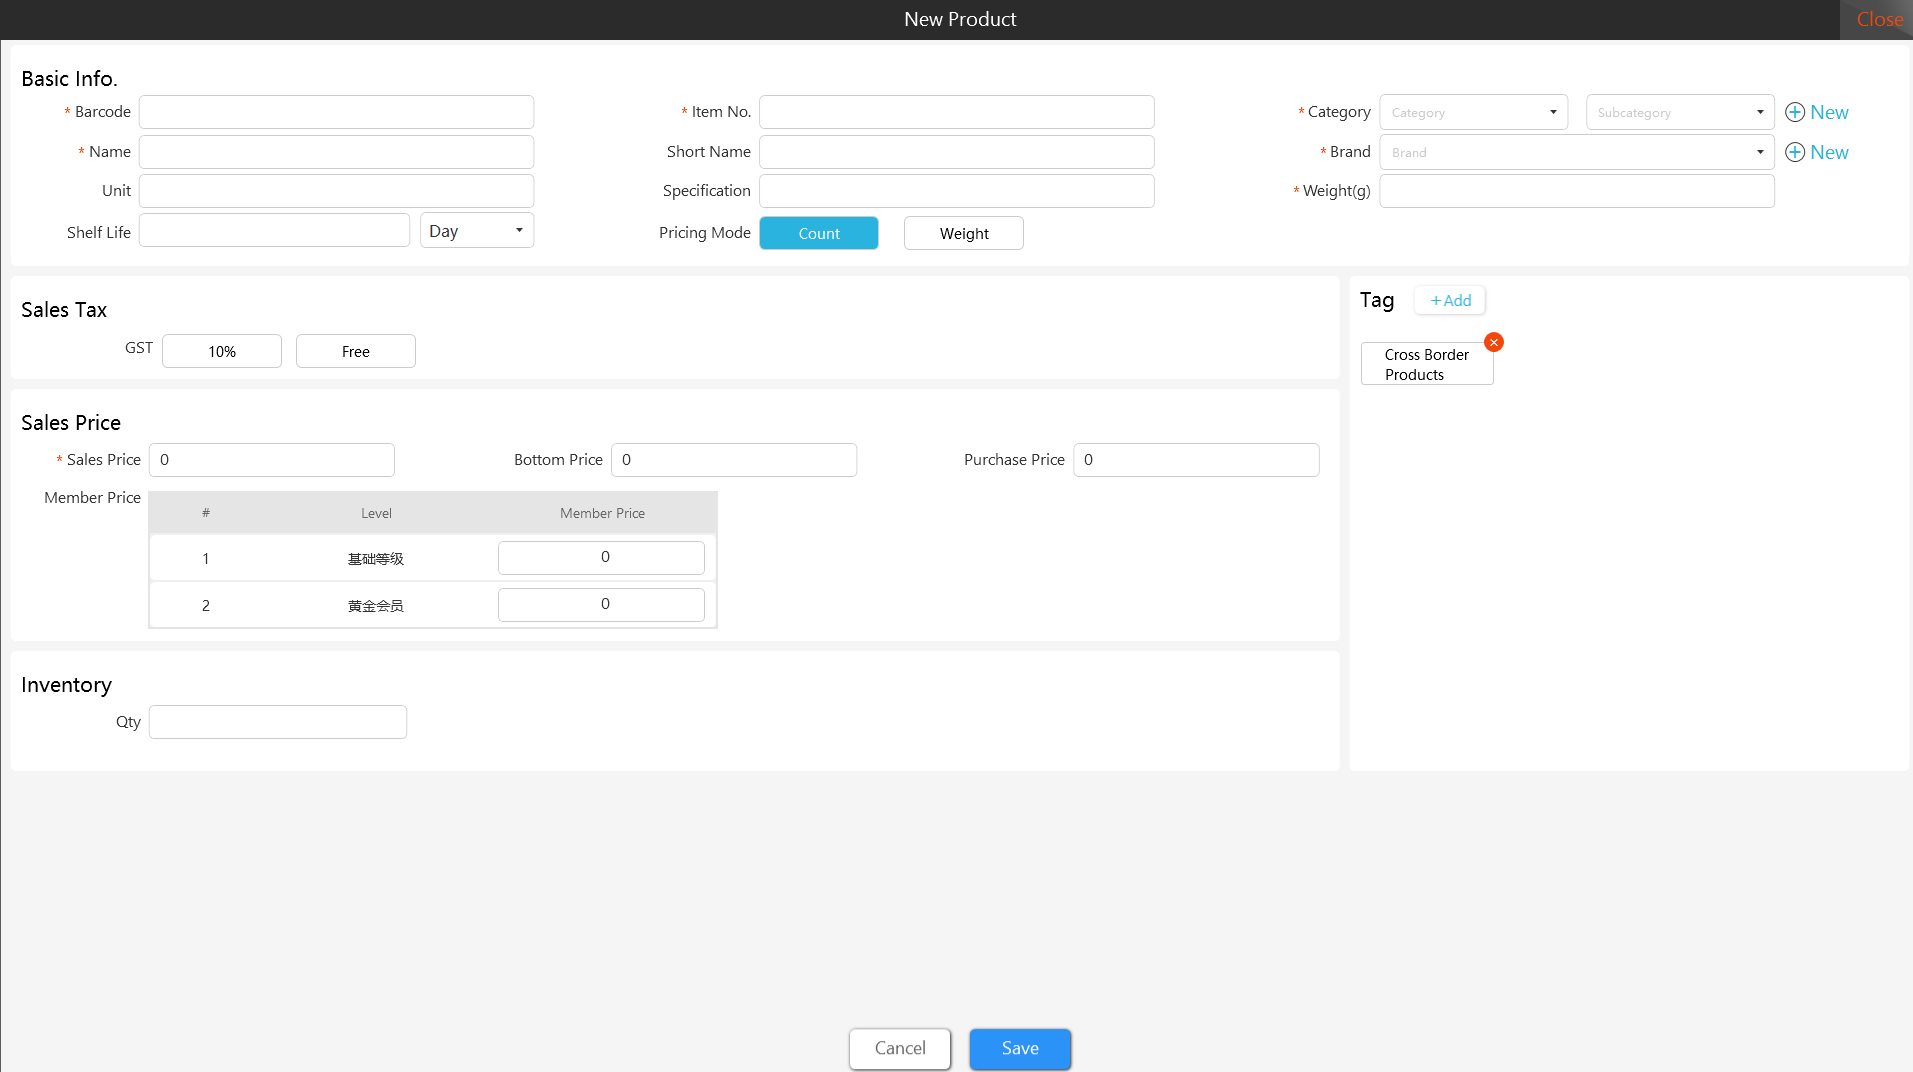
5.1 New Product
You can create new products with new barcodes and item numbers on the client,or you can enter the barcode info of the existing products in the GMS commodity library,which will be automatically synchronized. After creating a product,it can be directly added into the shopping cart for sale.
[Operating steps]
Step 1: Enter the ”Product Management” interface and click "New"option.
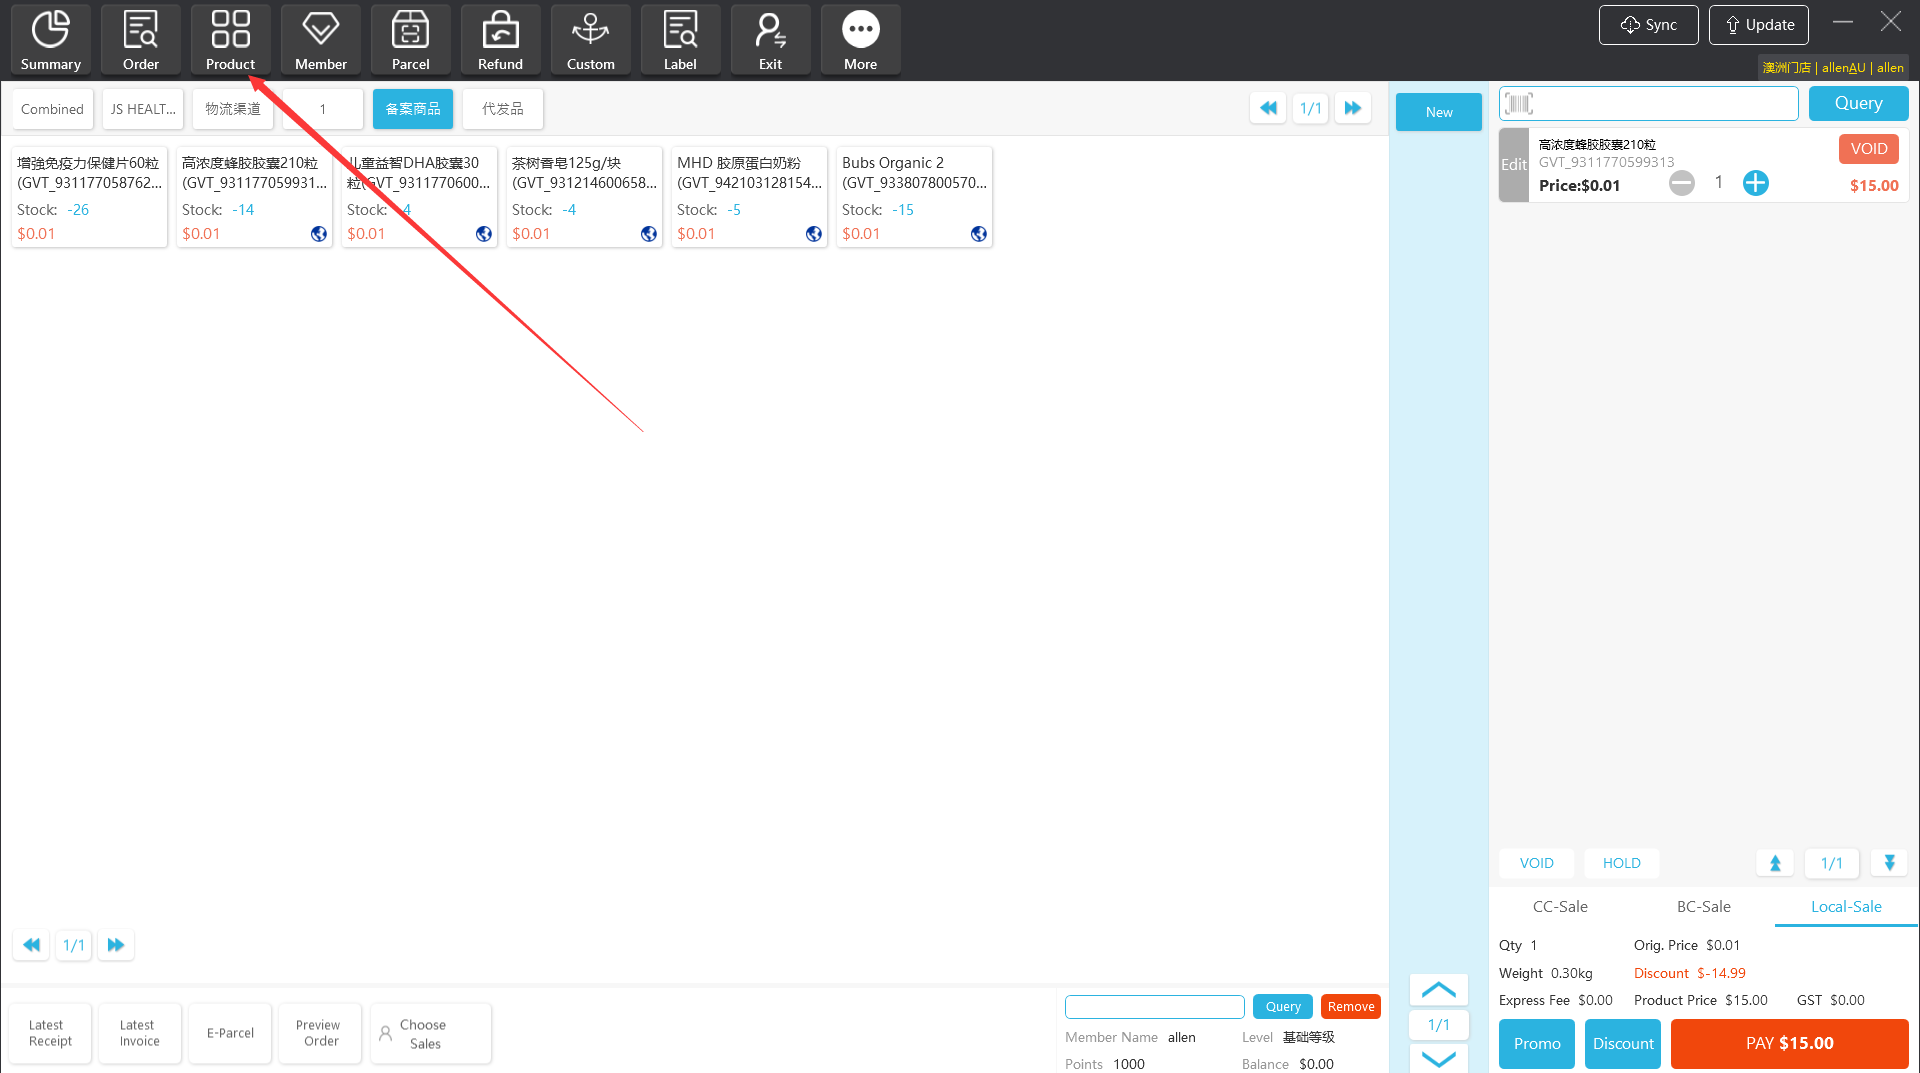

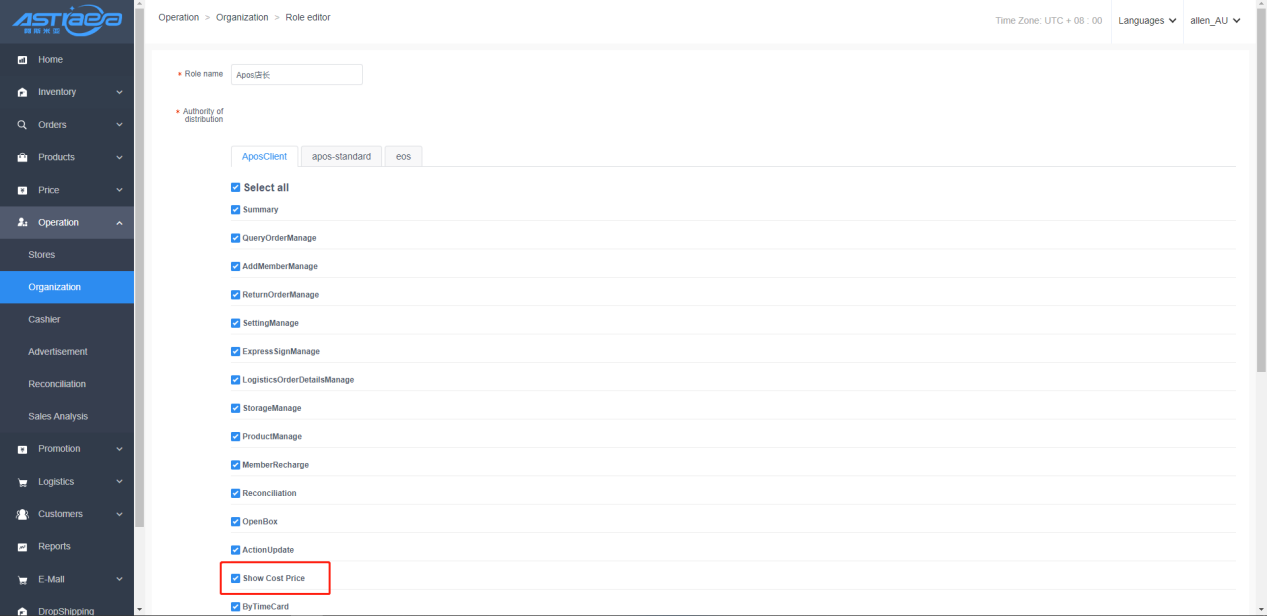
Step 2; Fill in the basic information of the product, sales tax,标签,price(其中进价的显示需要登录员工对应的角色有勾选“查看成本价”的权限),inventory,and click “Save”option.
Notes; 1,sales tax not display in US stores. 2,The inventory management method that needs to set the store business rules in the sever background,please select “Simple Mode”.

5.2 Products Query
Apos client product management interface supports multiple query methods ,according to status,product category,brand name,product name/barcode/item number to query.
[Operating steps]
Step 1; Query the product based on the search conditions in the product management interface.
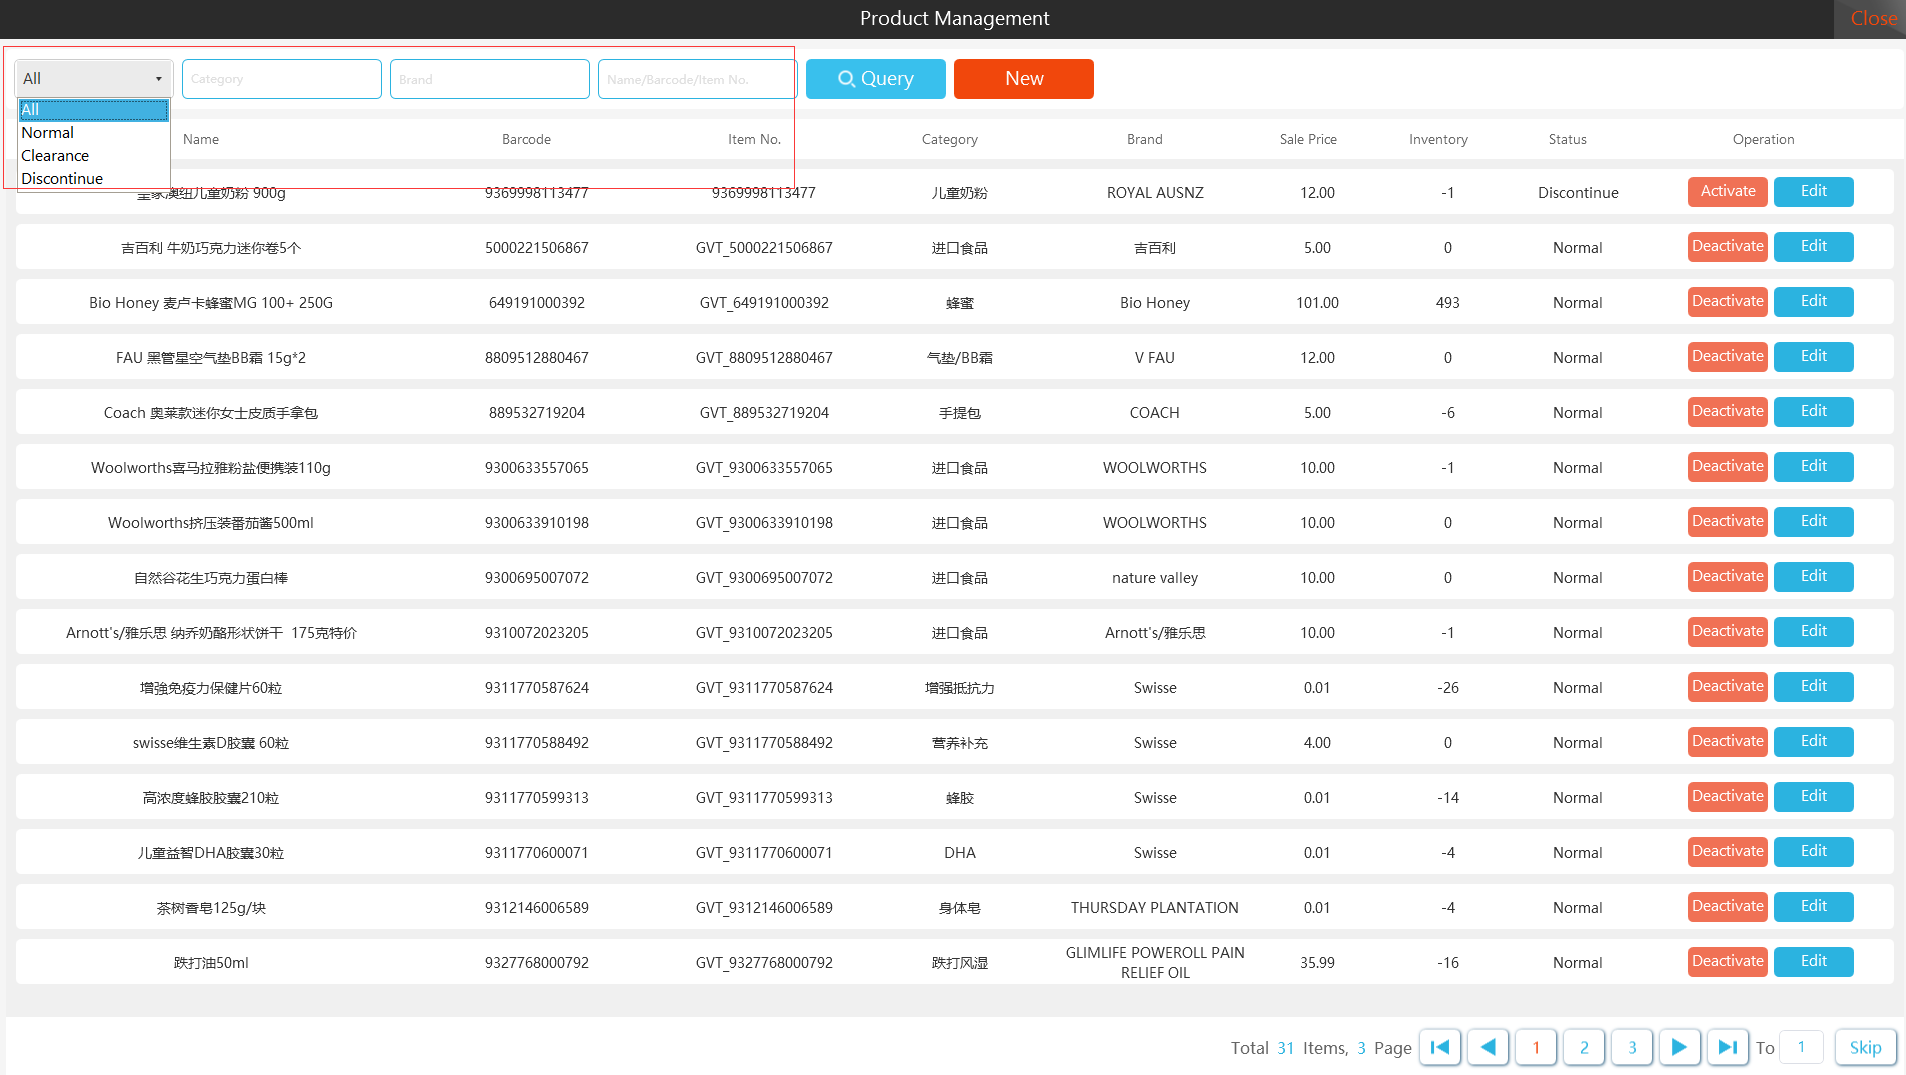
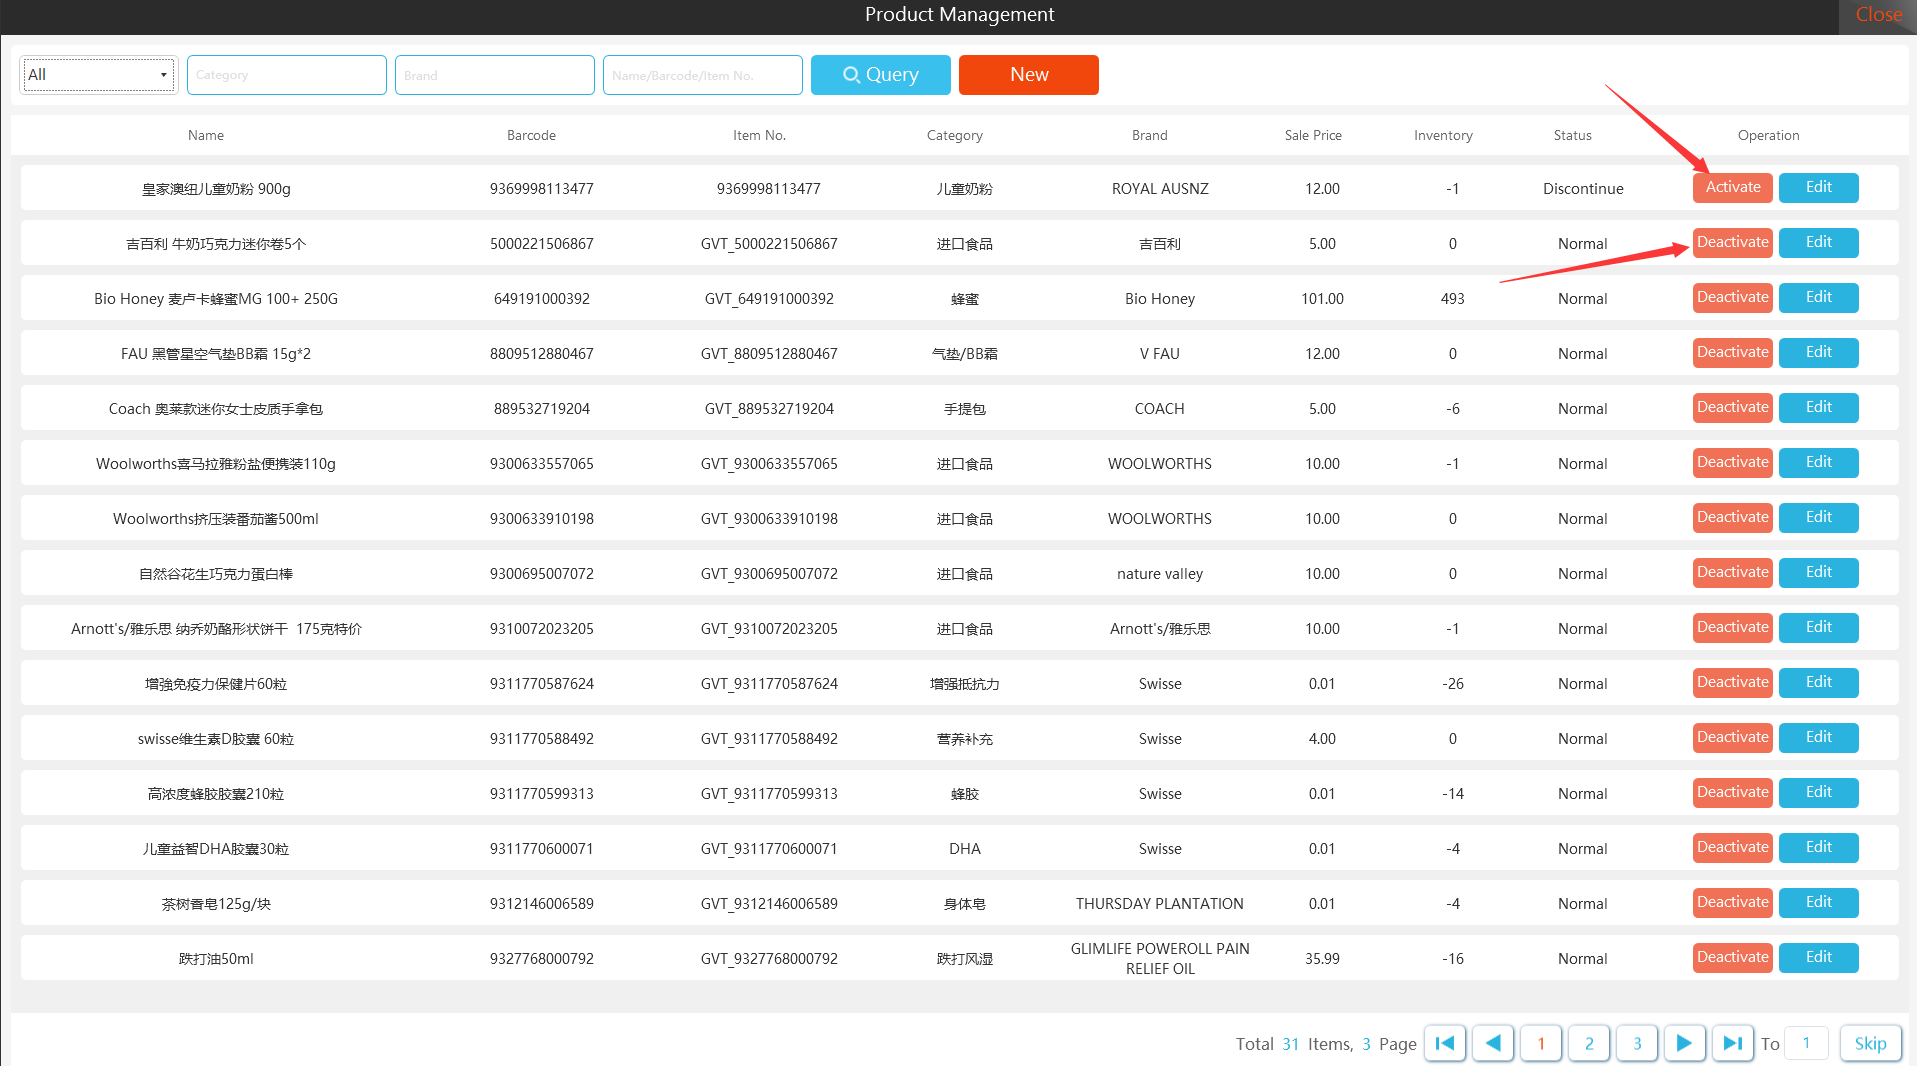
5.3 Active/Deactivate Product
Product that are no longer sold when the operation status become”Deactivate”mode.The change status is normal when the products are re-activated,and they can be sold again. [Operating steps]
Step 1: In the ”Product Management” interface, click the "Active/Deactivated" options.
5.4 Modify Product Info
Edit the created product information
[Operating steps]
Step 1: Click the "Edit" option in the product management interface.

Step 2: Modify the information that needs to be changed, and then click”Save” option.

VI. Member
6.1 Member inquiry
Apos client members support multiple query methods (member name, member card number, member mobile phone number, member email,Last four digits of mobile number).
Method 1: Inquire about members through the member center (only open to Australian and Chinese commercial tenants)
[Operating steps]
Step 1: Click “Member”, a drop-down selection menu pops up.
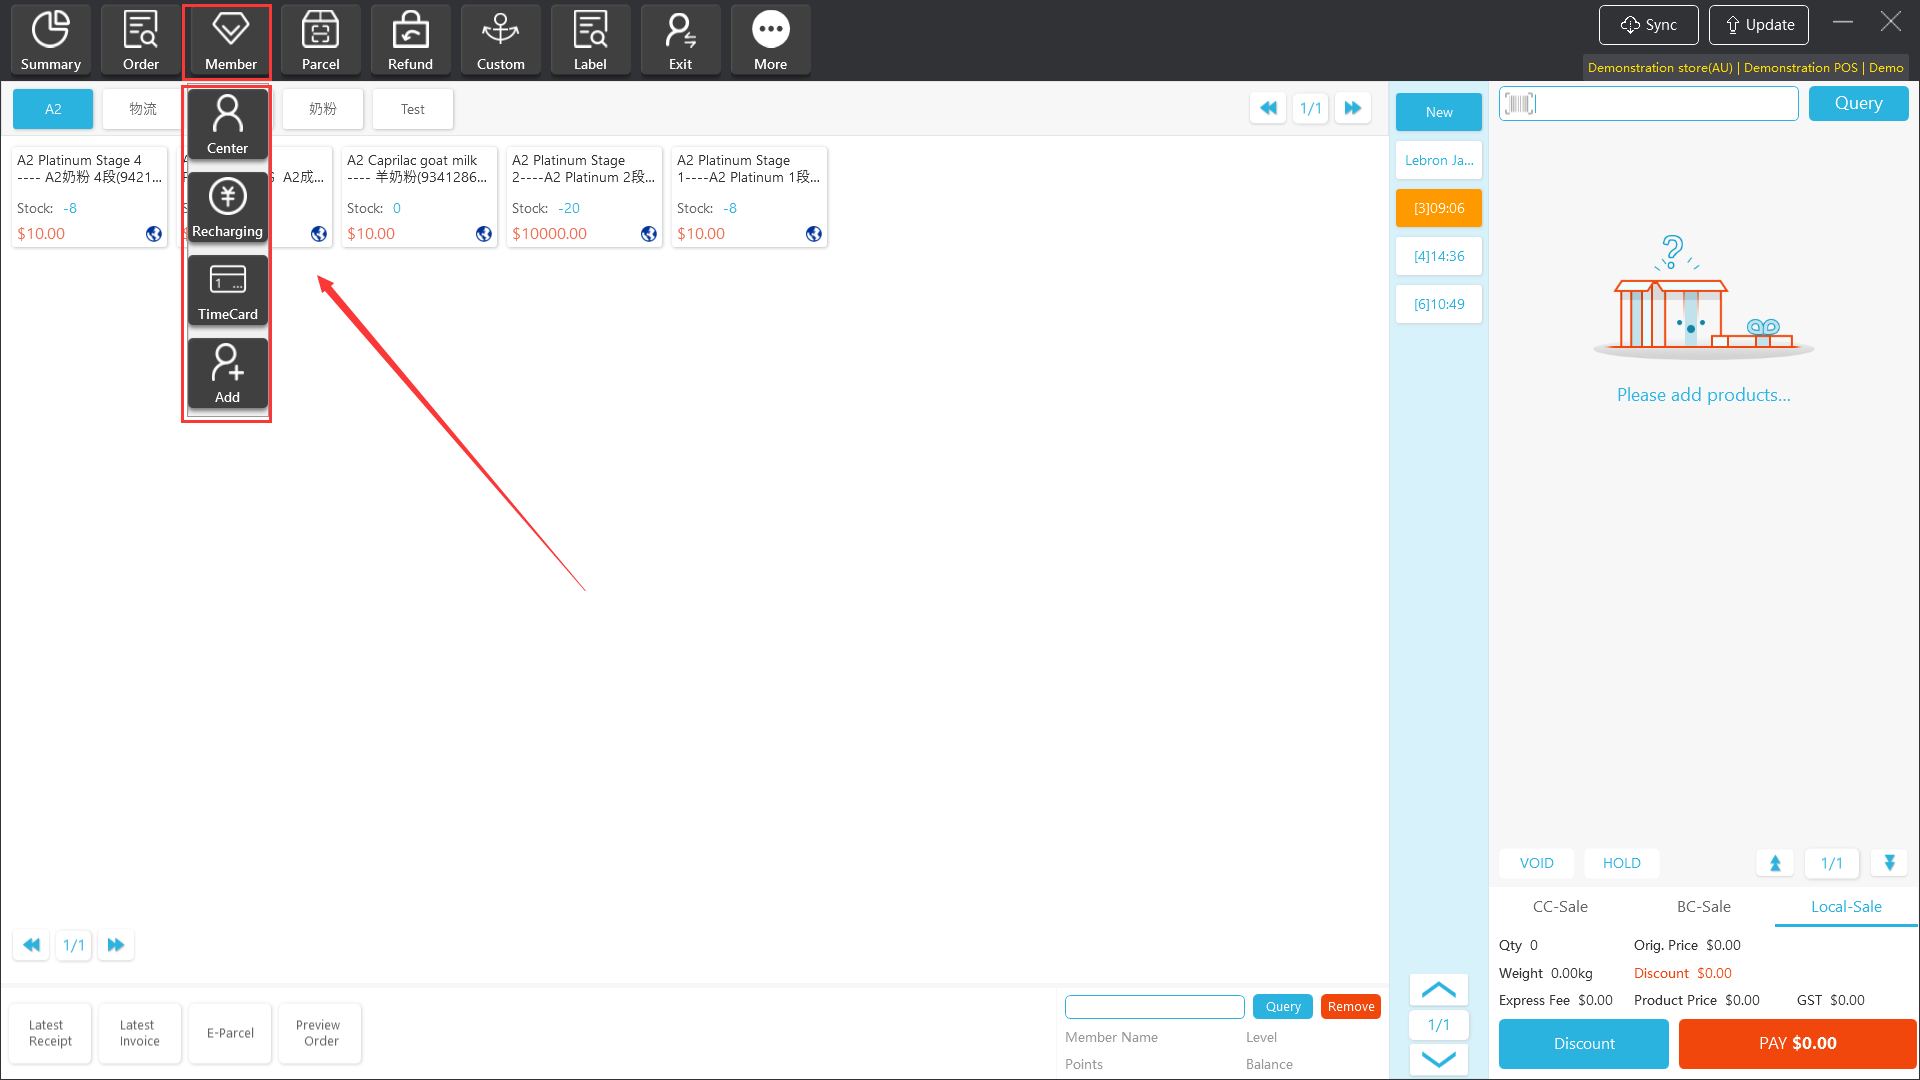
Step 2: Click “Member Center” to pop up the search for members, enter the member name/card number/mobile phone number/email, click “Query” to pop up the member member details page.

Method 2: Inquire directly through the member search box on the cashier main page.
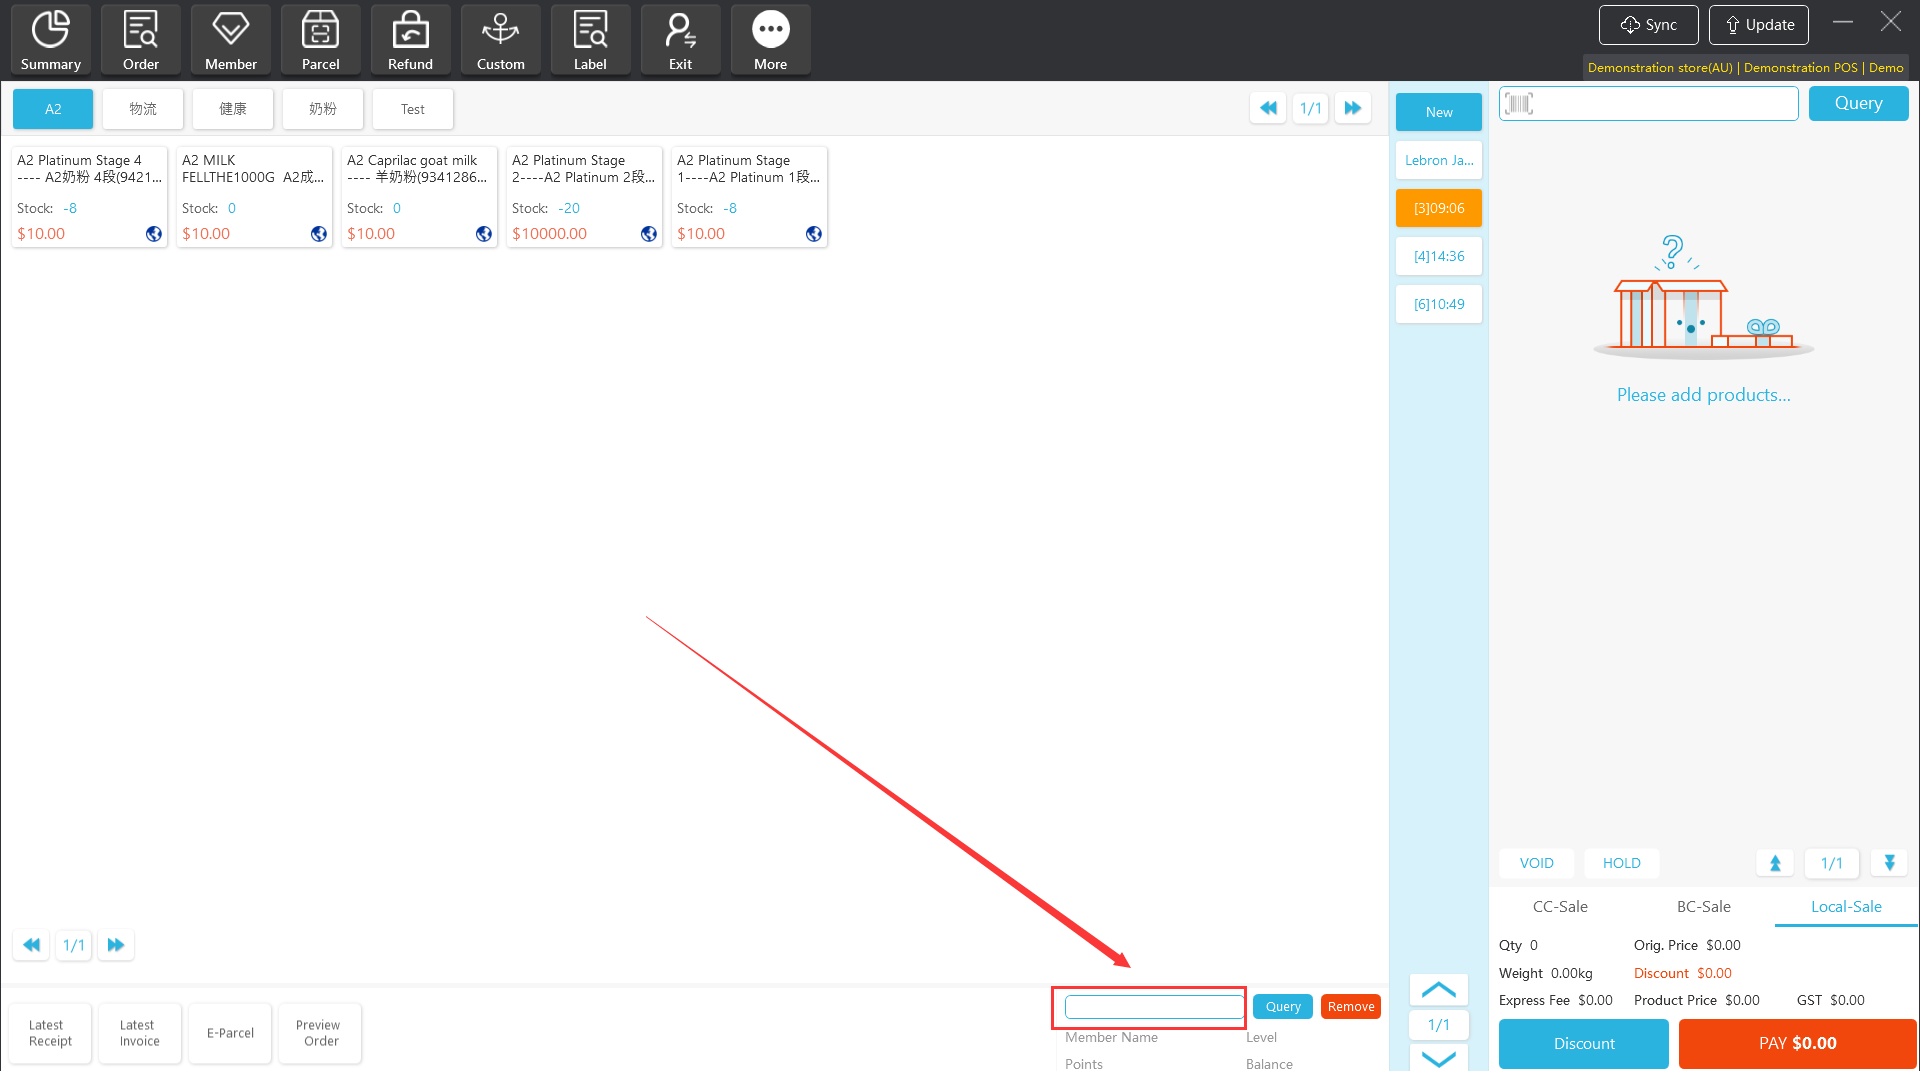
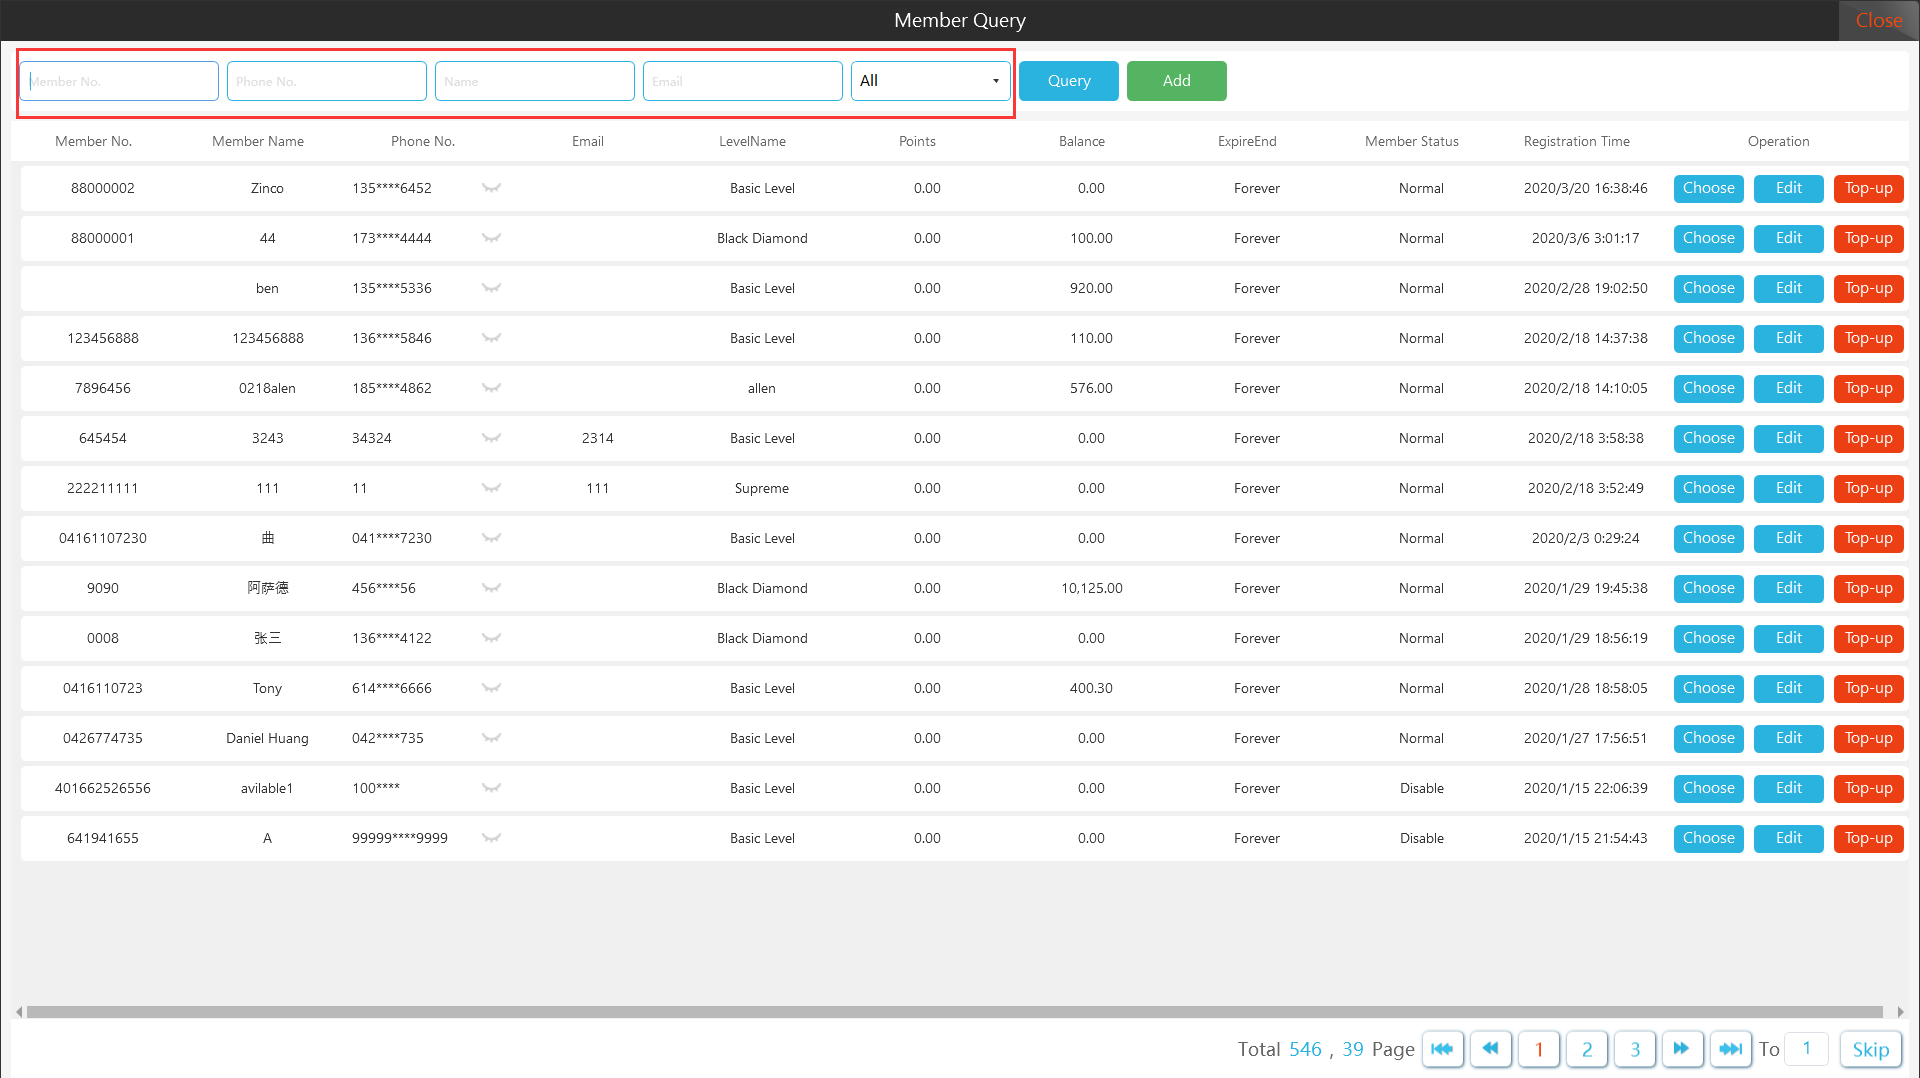
Method 3: Query members through the member query list.
[Operating steps]
Step 1: Click “Query” to pop up the member list.
Step 2: Query members based on search conditions.
6.2 Modify Member Information
Apos client supports member information modification function.
[Operating steps]
Step 1: Click “Query” to pop up the member query page.
Step 2; Click “Edit”, the edit member page pops up, after modifying the member information, click “Save”.

6.3 Member Top-up
The top-up function is opened for members. The system background records top-up details and balance after change. For details, please refer to “Top-up Details” under the member report in the sever background.
6.3.1 Member Recharge
[Operating steps]
Step 1; Click “Member Recharge” to pop up the member recharge page.

Step 2: Enter the member number or mobile phone number, click “Query”, enter the recharge amount, and finally click “OK”.

6.4 Timecard(only open to Australian/Chinese commercial tenants)
Time-card: Merchants can sell multiple products or multiple activities to member customers at one time, and merchants can set the time period, validity period, and daily/weekly/monthly consumption times allowed.
The Apos client provides members with the function of Time-card consumption.
For the configuration rules of the Time-card, please refer to “Timecard” management” under “Customer Center” in Chapter 10 of the ”Operation manual for Apos V4.5.2”.
6.4.1 Purchase a Time-card
When the store is equipped with time-cards, the Apos client can directly sell time-card to members.
[Operating steps]
Step 1: After entering the member information to find the member, click "Time-card”.

Step 2;The pop-up window will display the Time-card that can be sold, select the Timecard to be purchased, and “Buy”. Before confirming the purchase, you can “choose a shop guide” to record who has promoted the time card.
Note; At present, the sales system of the time card is not recorded in the form of an order, and the payment process is not recorded by the system. The system will not count the sales of the secondary card. The only report that you can select some details of time-card is “Time-Card details Report” in the sever background.
6.4.2 Use Time-card in the sever
Because the time-card is a one-time sale,the member will not charge when the time card is consumed, and the system will automatically judge and display the validity of the time card according to the setting of the time card in the background, daily/weekly/every Monthly consumption.
[Operating steps]
Step 1; Log in to the member and add the products in the time card to the shopping cart. At this time, the products in the shopping cart will have a ”C” mark, and the product price is 0, you can directly settle the order. The sever background ”Time card details”report will record the time card Consumption records and remaining times.

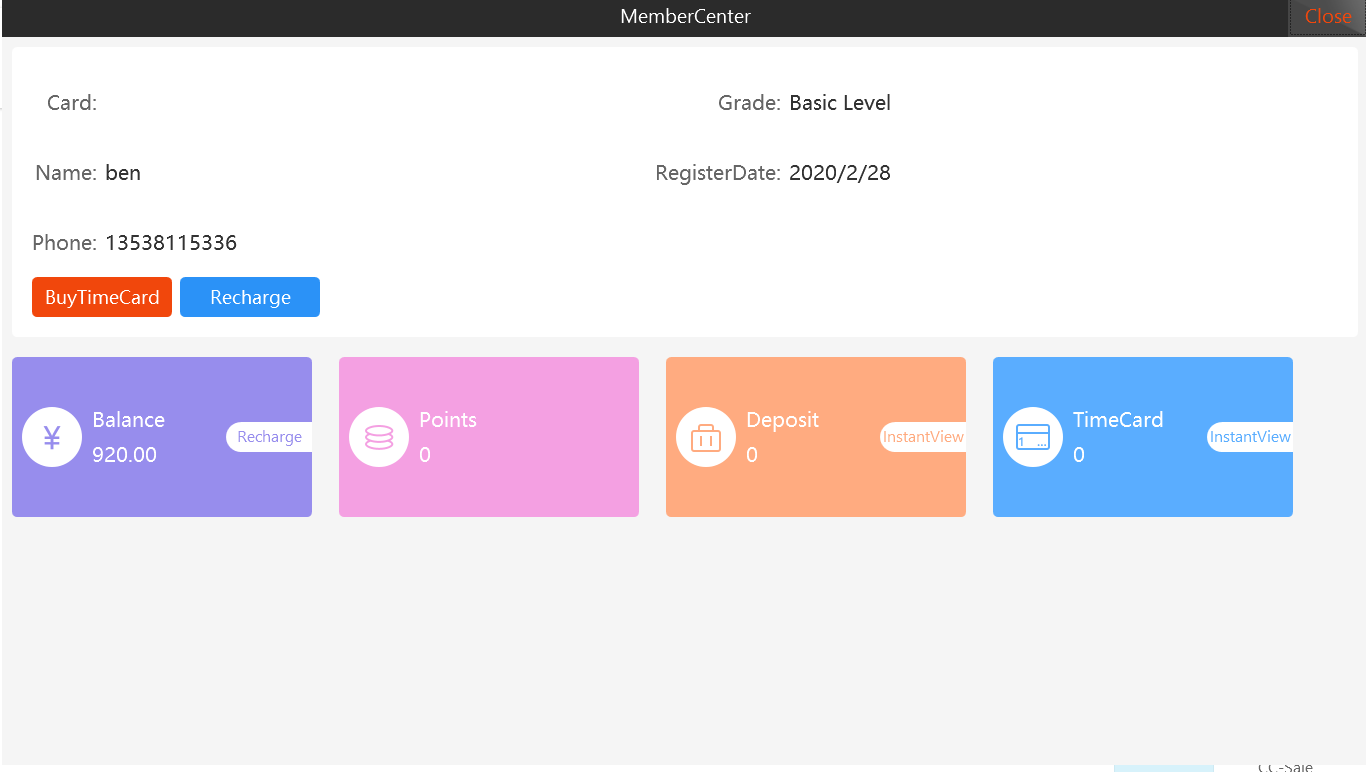
Step 2:The member center of the client can also inquire the member's remaining card consumption times.

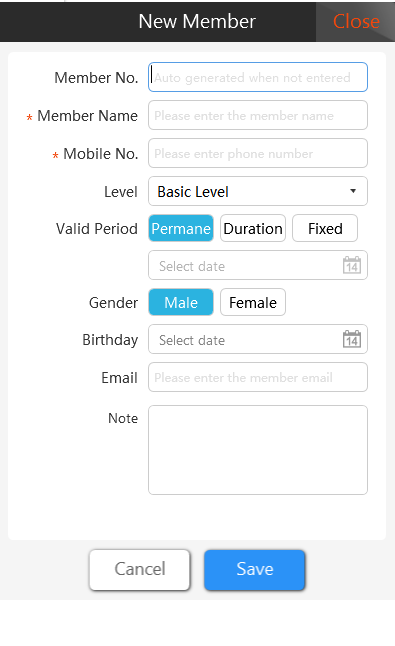
6.5 New Members
[Operating steps]
Step 1: Click “Add “ to pop up the new member interface.
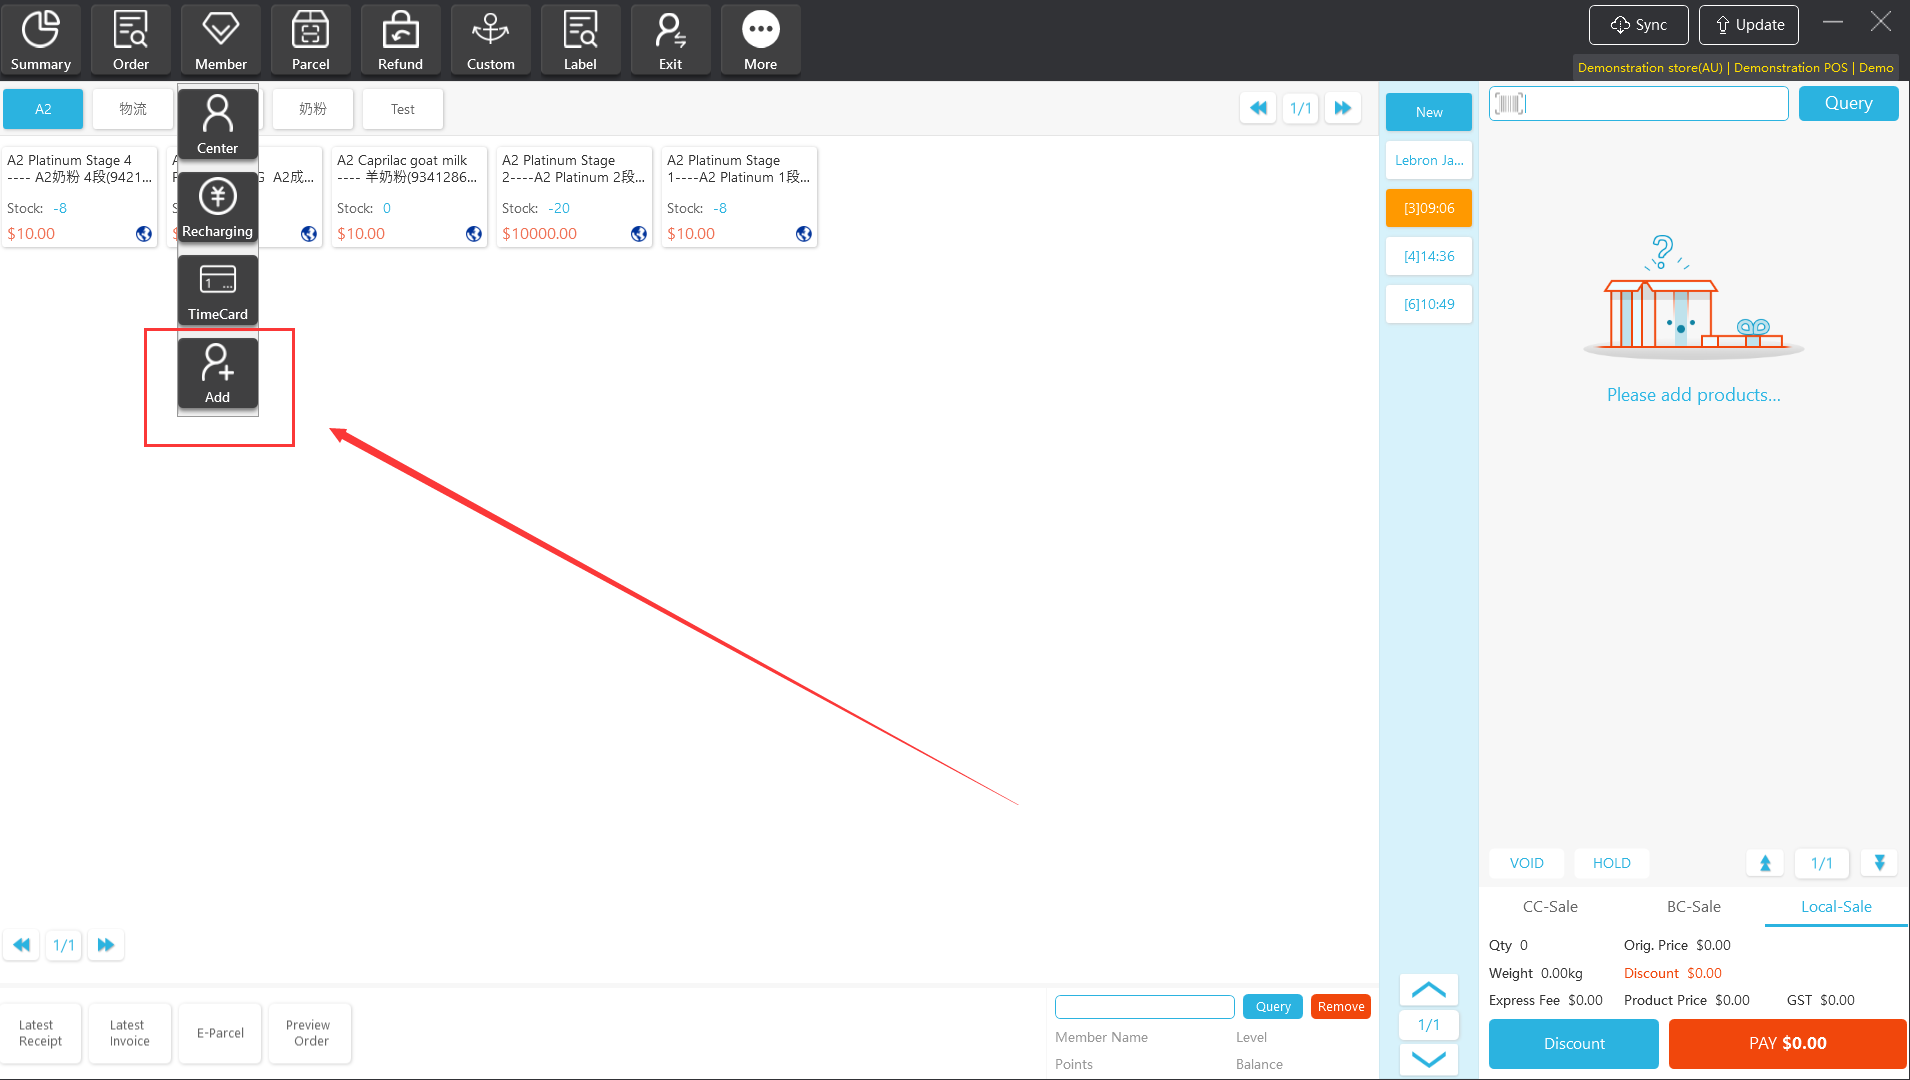
Step 2: Fill in the member information and click “Save”, (With * is required)
VII. Parcel
The Apos client provides the pick up parcel function. For packages that need to be shipped from the store, you can print the logistics bills and record the parcel status in the “parcel”.
7.1 Parcel Query
Parcel query supports multiple methods. For details, please refer to the query conditions listed in the parcel detail list.
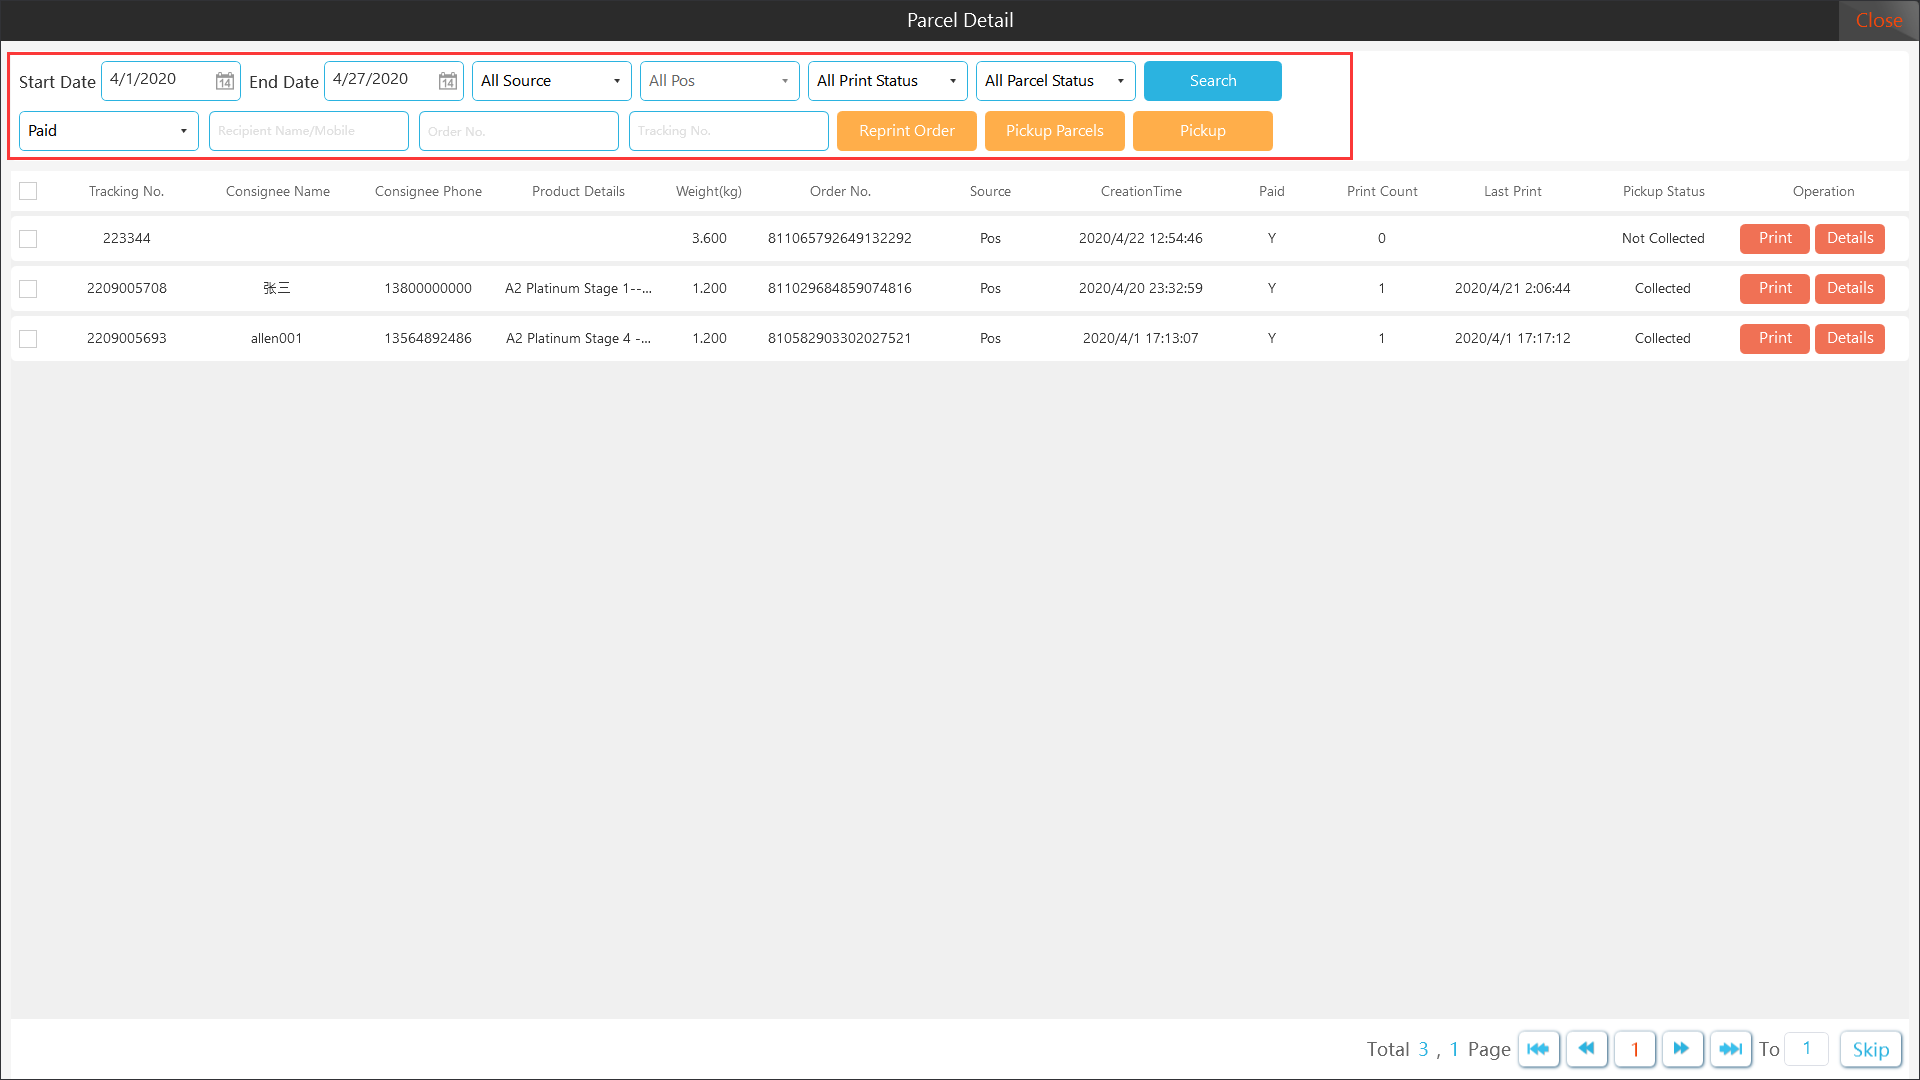
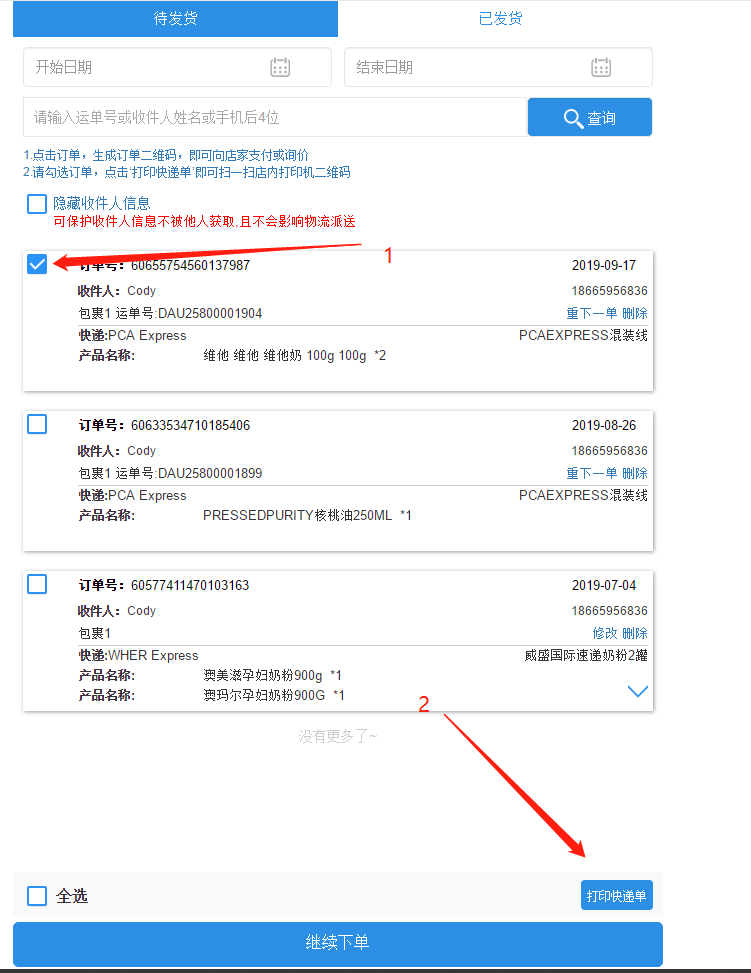
7.2 Logistics bills printing
On the parcel details page, you can directly print the logistics bill of the package, and at the same time support the function of batch reprinting. The package that has printed the bill will record the latest printing time.
7.2.1 Single Print
[Operating steps]
Step 1: Directly click the “Print” button after the package that needs to print out the logistics bill.

7.2.2 Batch Printing
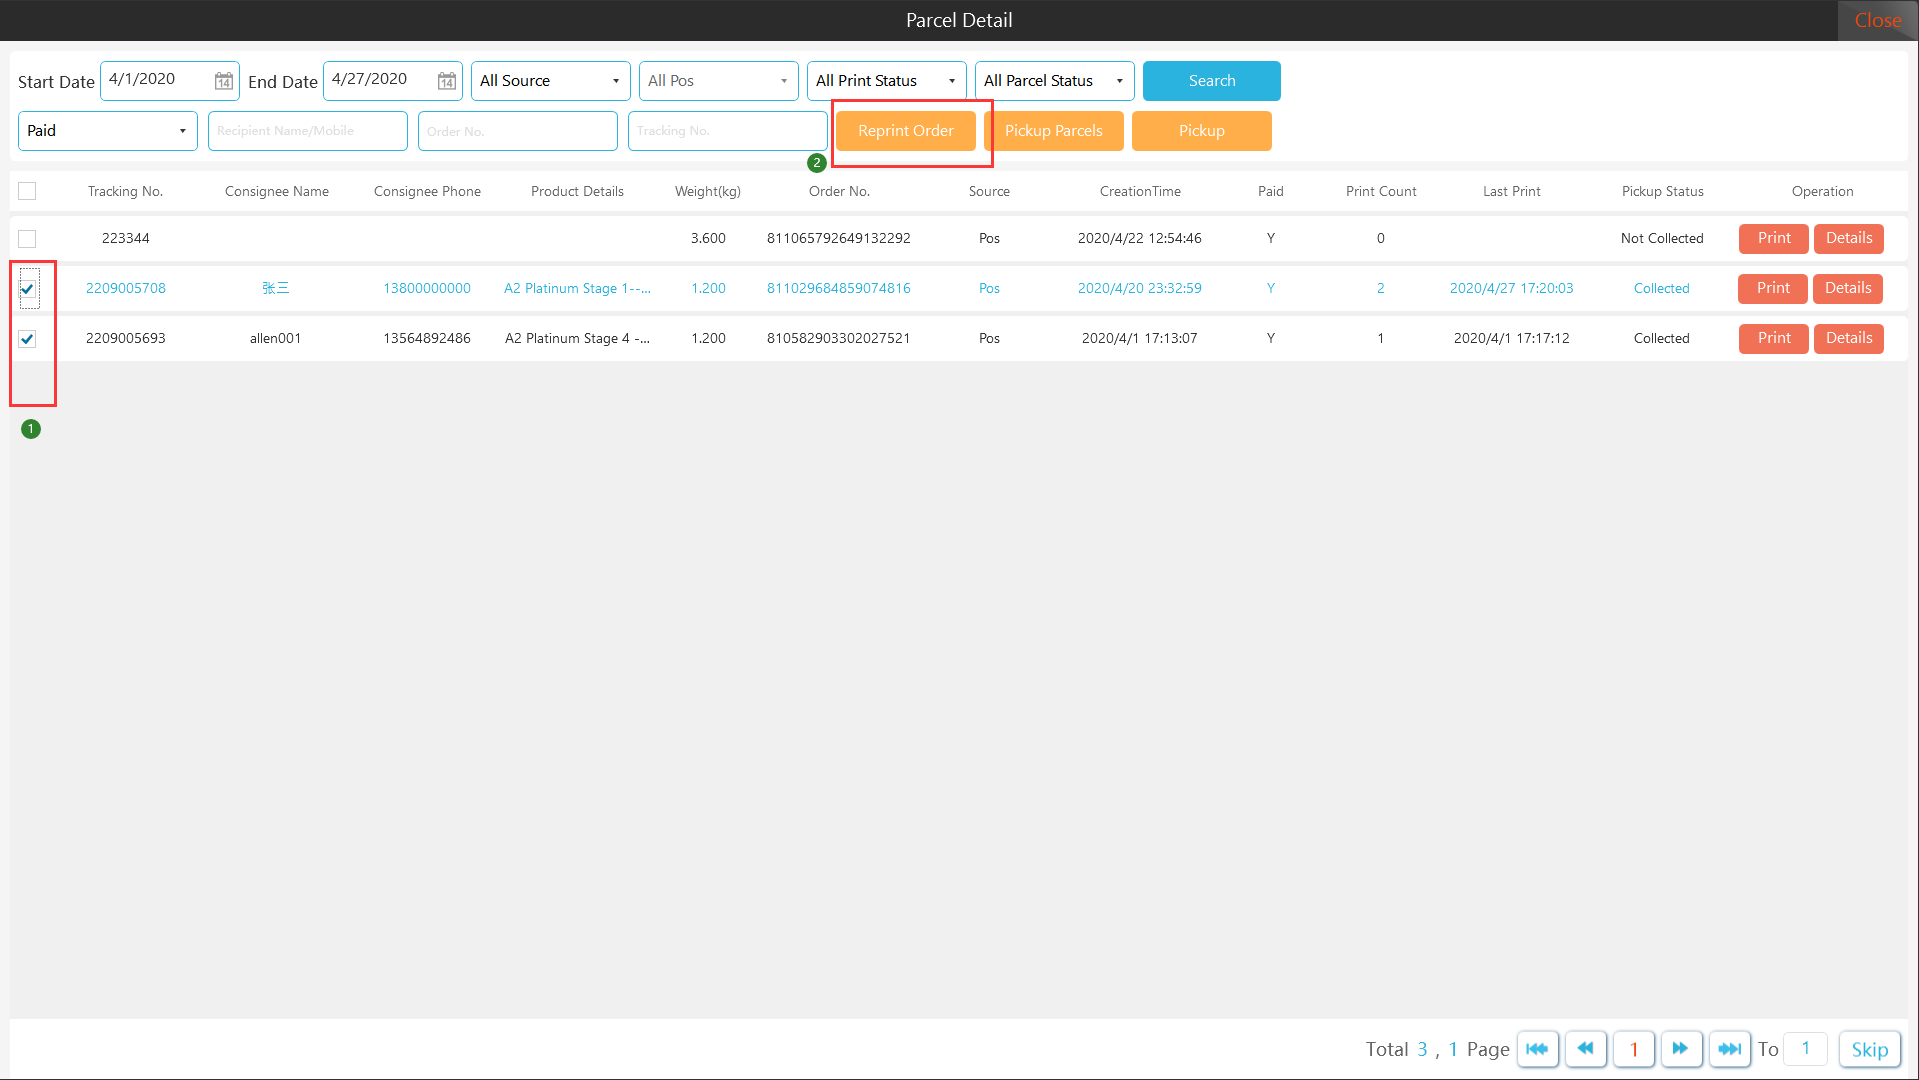
[Operating steps]
Step 1: Check the packages that need to print the logistics bill, click "Reprint Order", and the client will print out the logistics bill one by one.
7.3 Pick up parcel
The parcel details page provides parcel pick up function, the system will automatically update the parcel pick up status and support batch pick up.
7.3.1 Pick Up
[Operating steps]
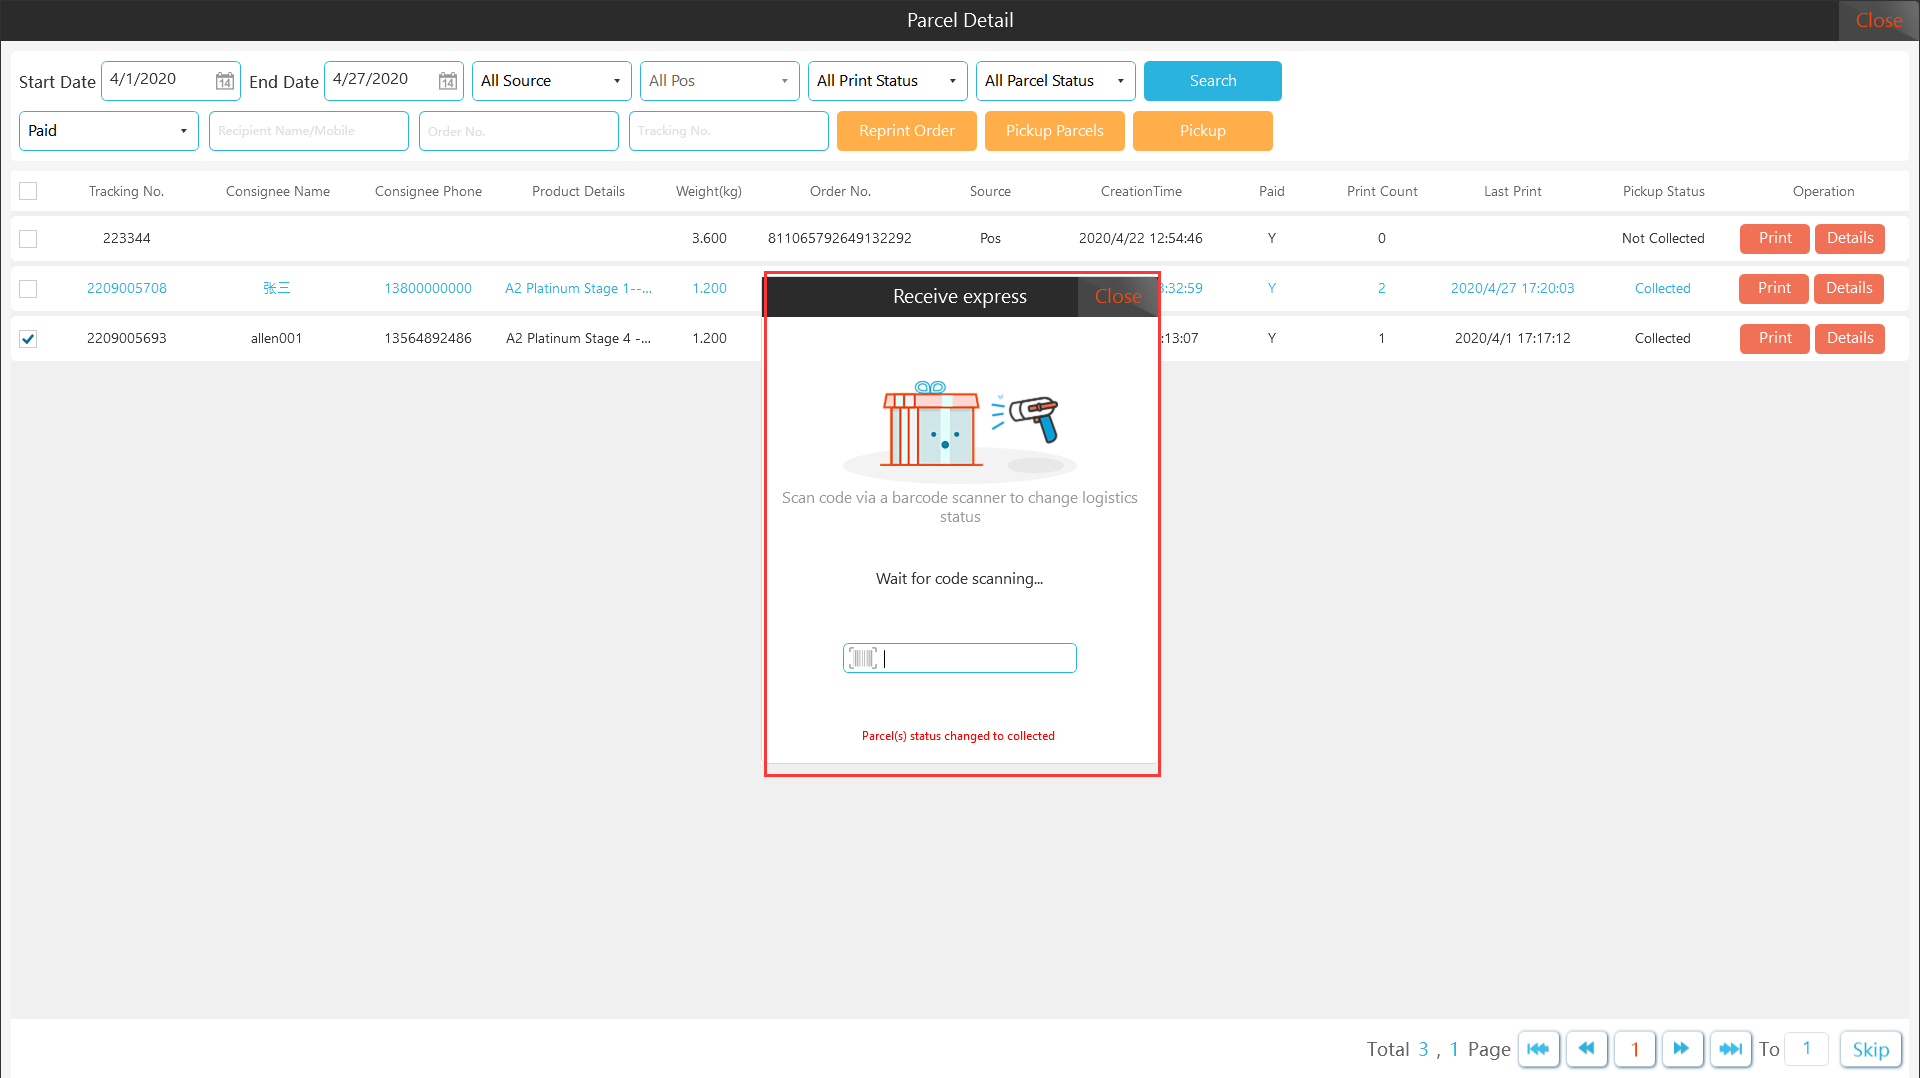
Step 1: Select the package that the courier has packed and click "Collect".
Step 2: Pop up the pick up interface, use the scanner to scan the logistics bills attached to the package, the pick up is completed, and the status of the package is automatically updated to the "collected" state.
7.3.2 Pick up parcels
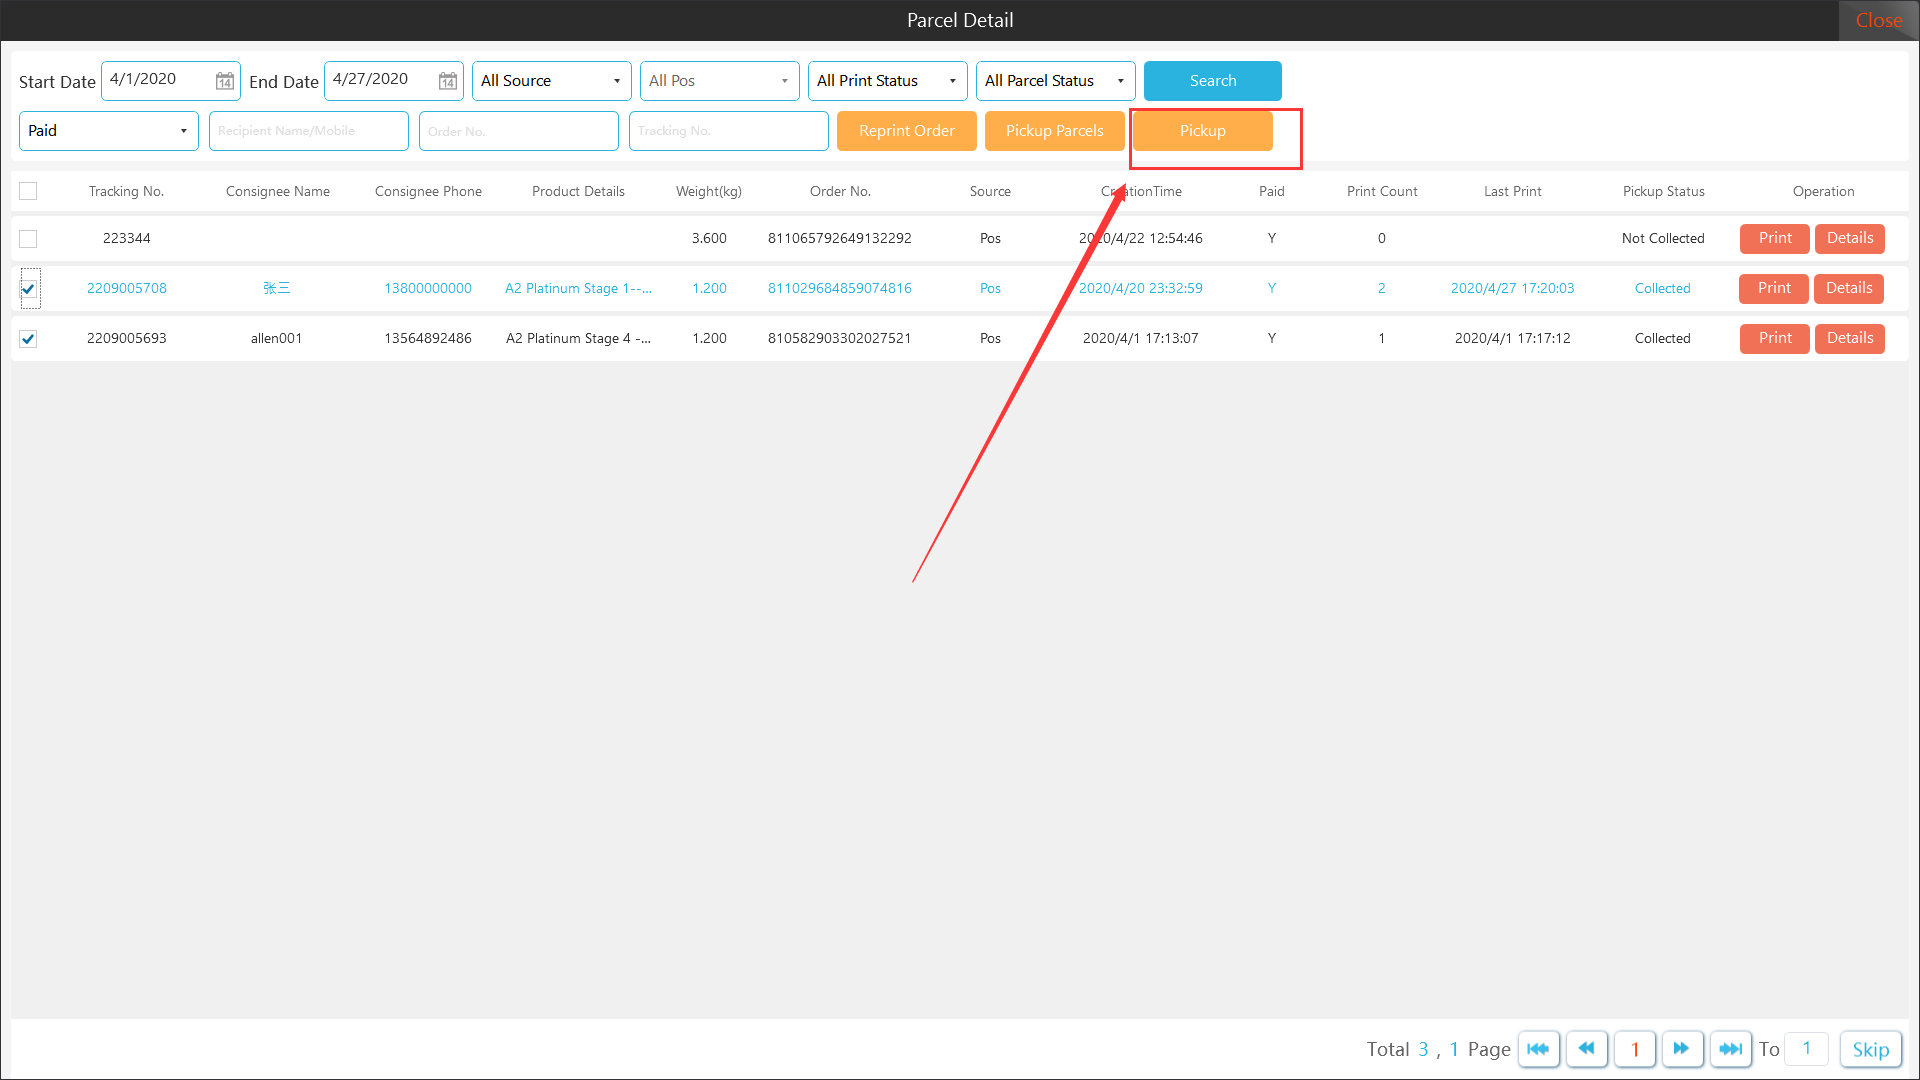
[Operating steps]
Step 1: Check the shipments that need to be collected and click "Pick up parcels".

Step 2: Pop up the pick up interface, use the scanning gun to scan the logistics bill on the package in sequence, the collection is completed, and the package status is automatically updated to the "collected" state.

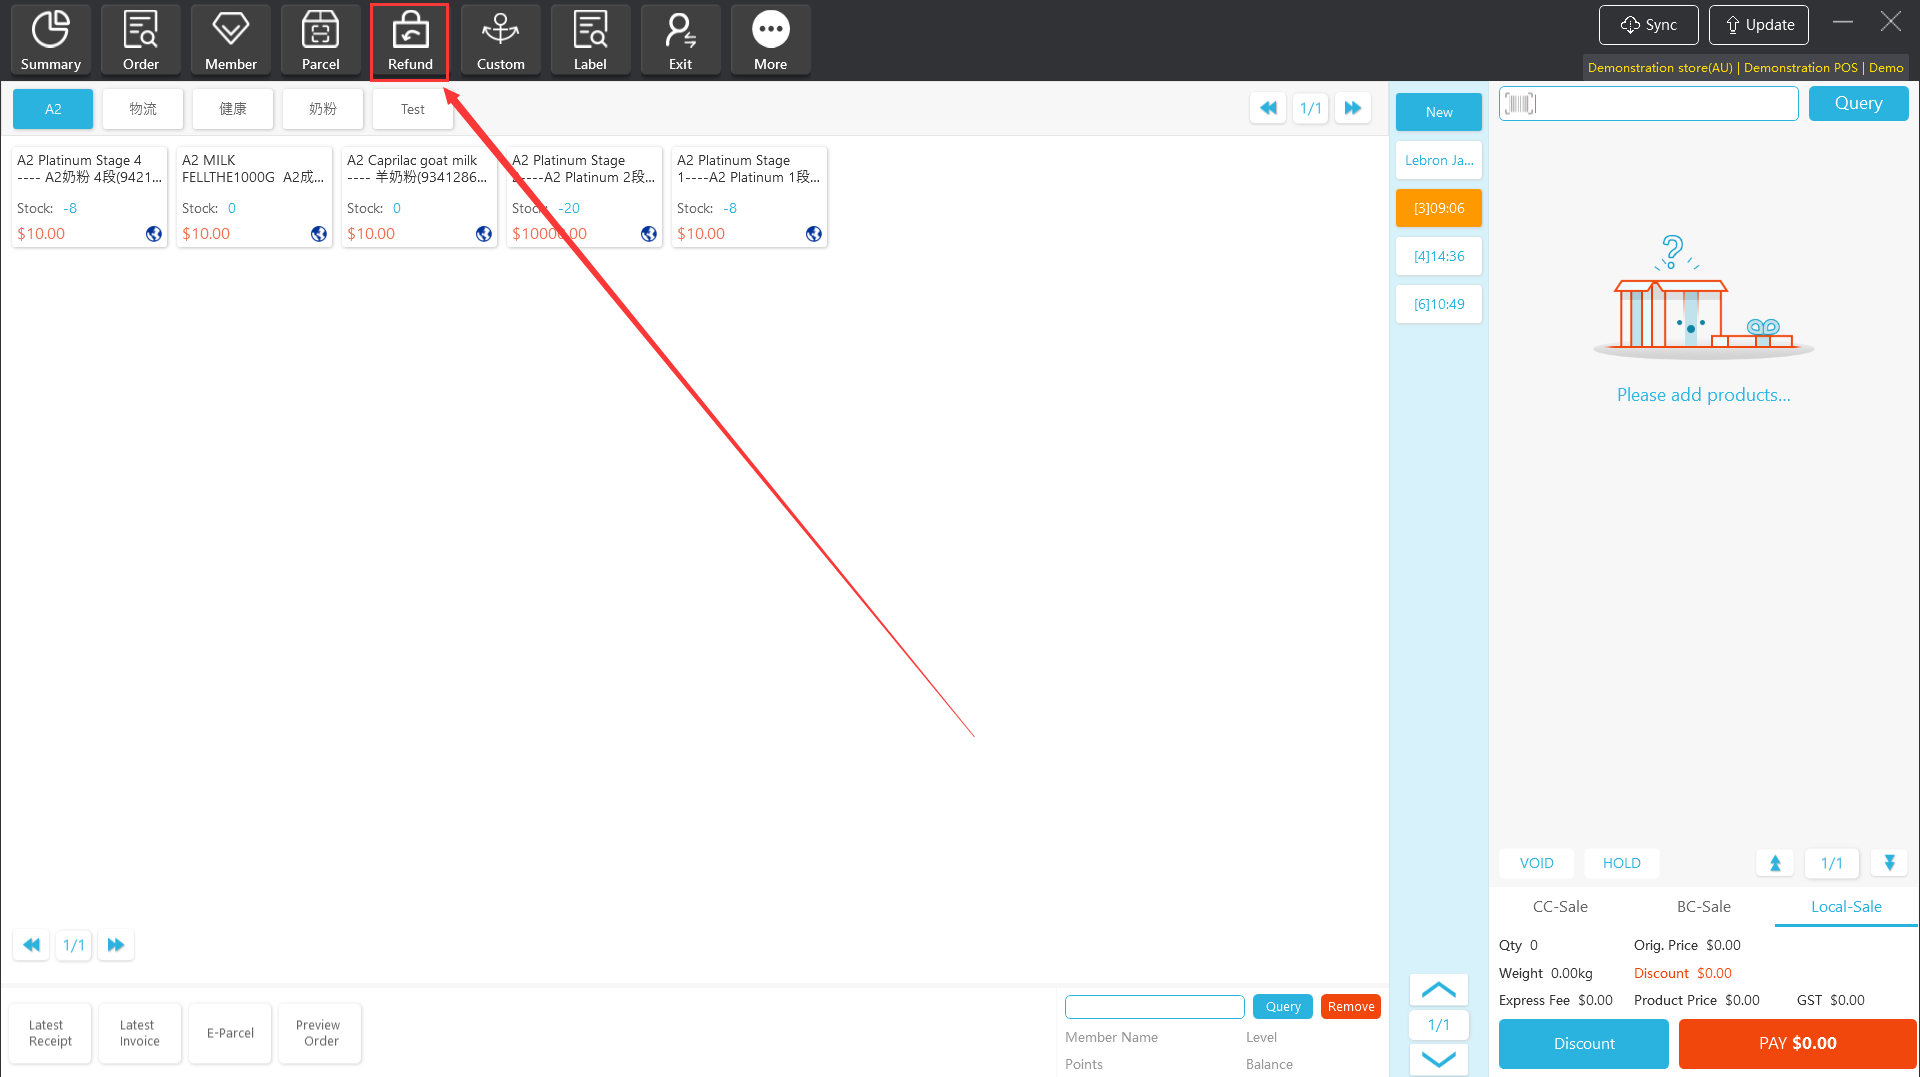
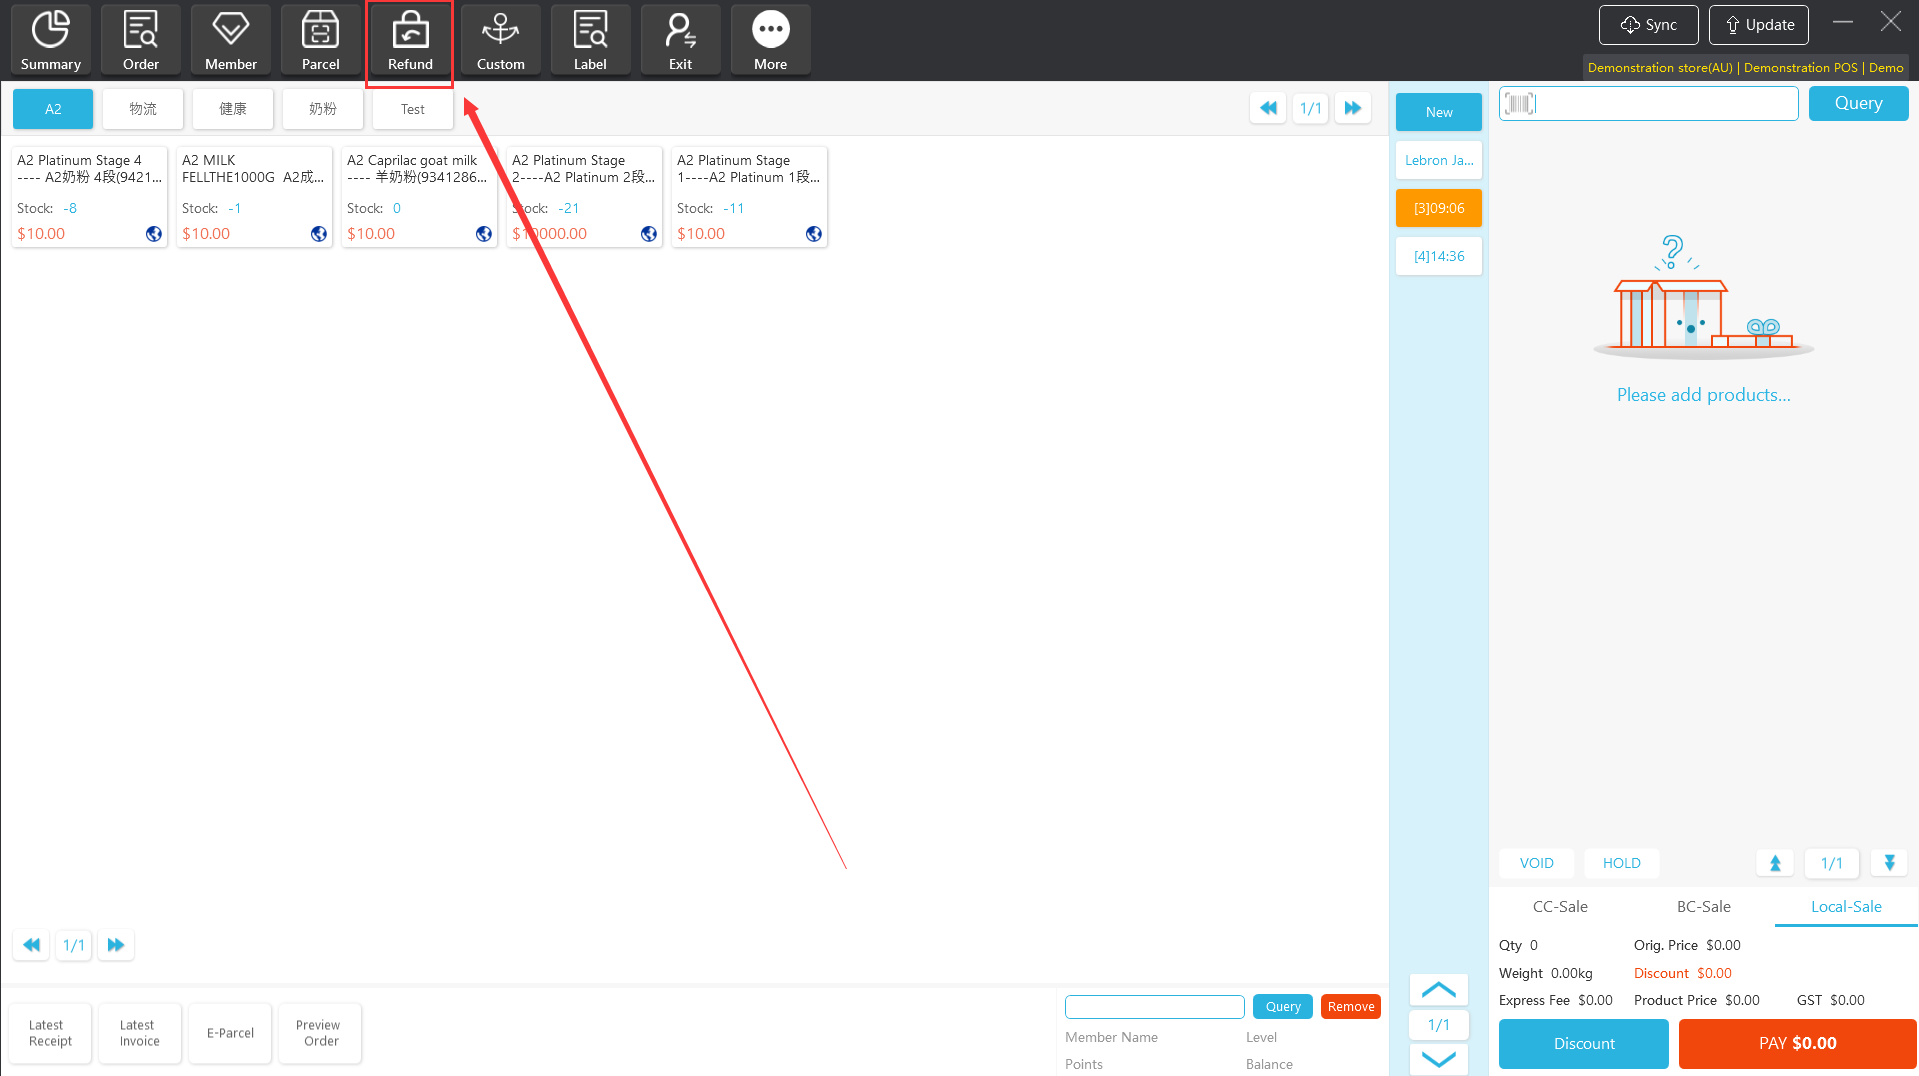
VIII Refund
The Apos client provides a refund function. Order refunds support the original payment method refunds. For member orders, all payment methods can be refunded to the member balance.
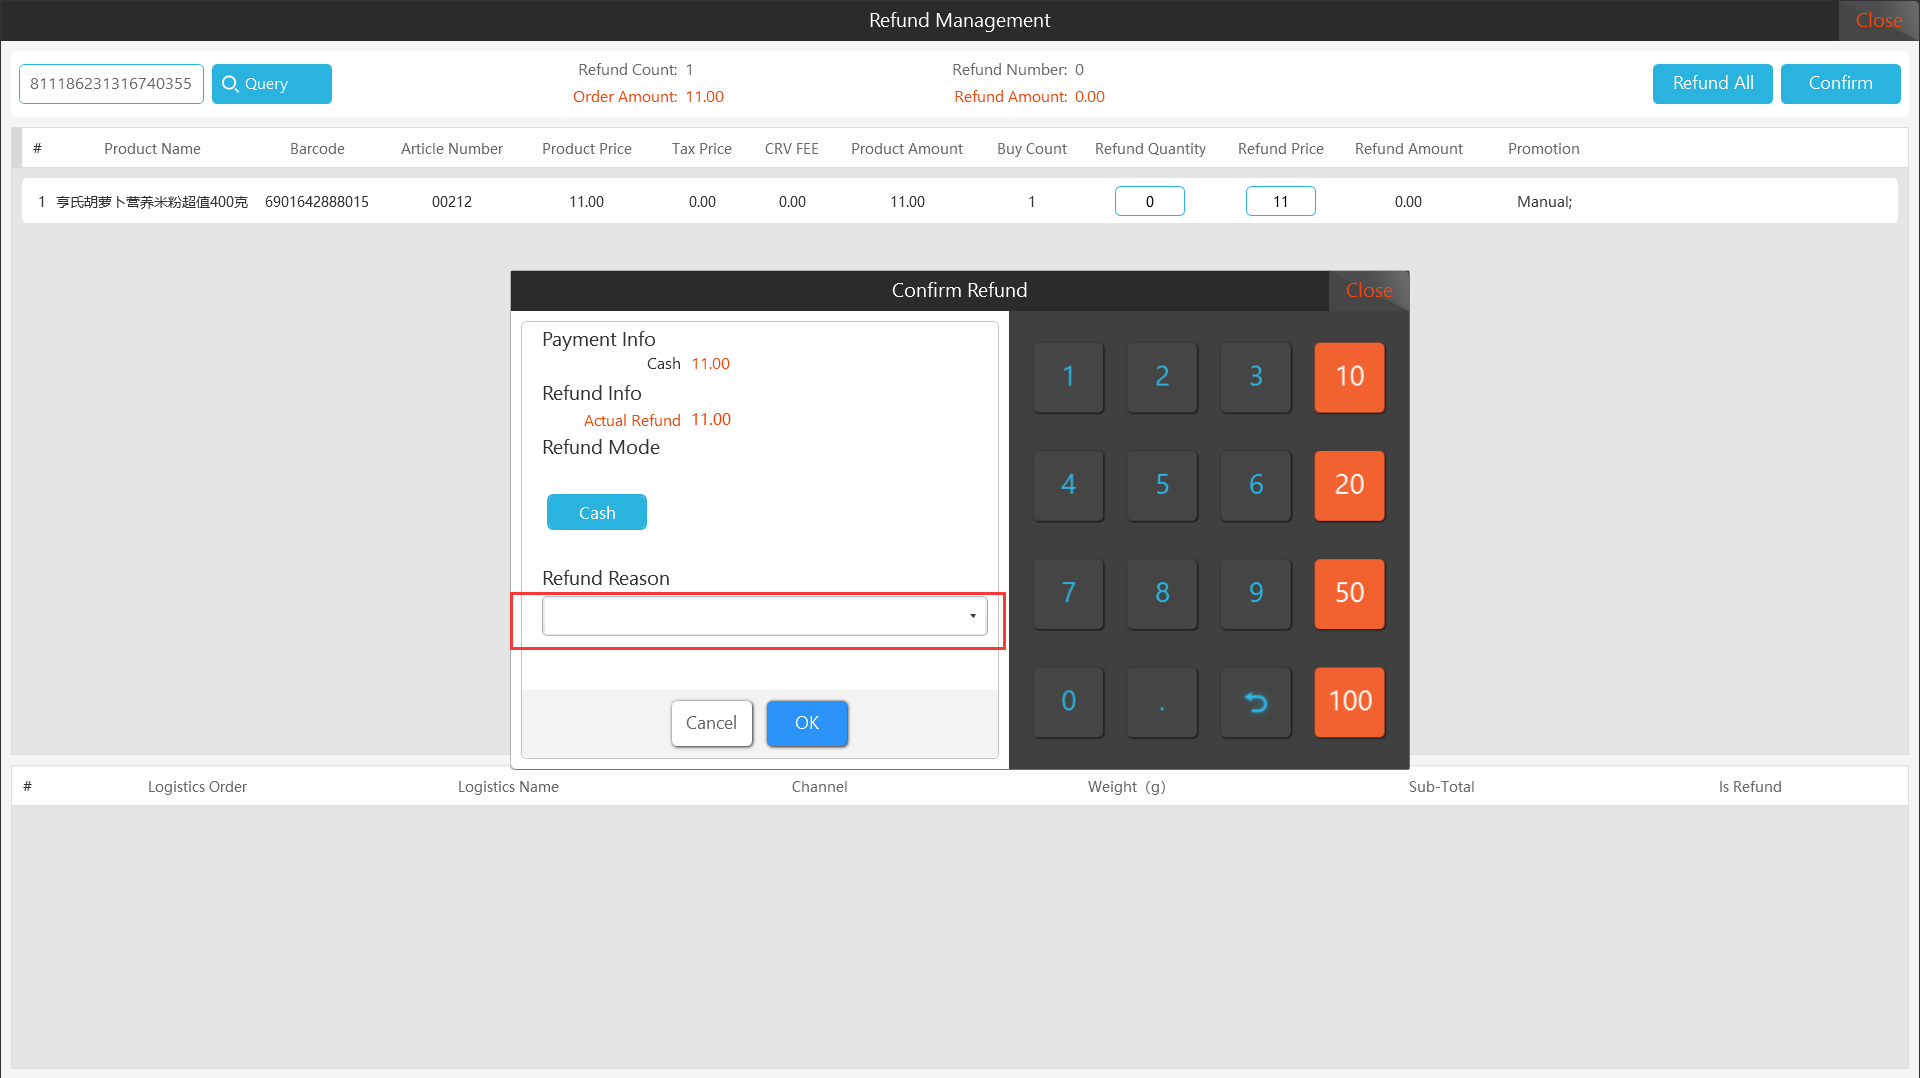
8.1 Partial refund
[Operating steps]
Step 1: Click "Refund" to pop up the refund management interface.
Step 2: Enter the order number and click "Query" to display the order information.
Enter "refund quantity",enter "refund price", the system automatically calculates the refund amount according to the tax rate when placing the order, and finally calculates the total amount of the refund based on the refund quantity.
Notes;You can enter decimals for weighted goods. The display of the decimal format on the client is consistent with the display format of the number of weighed goods in the server background system settings.
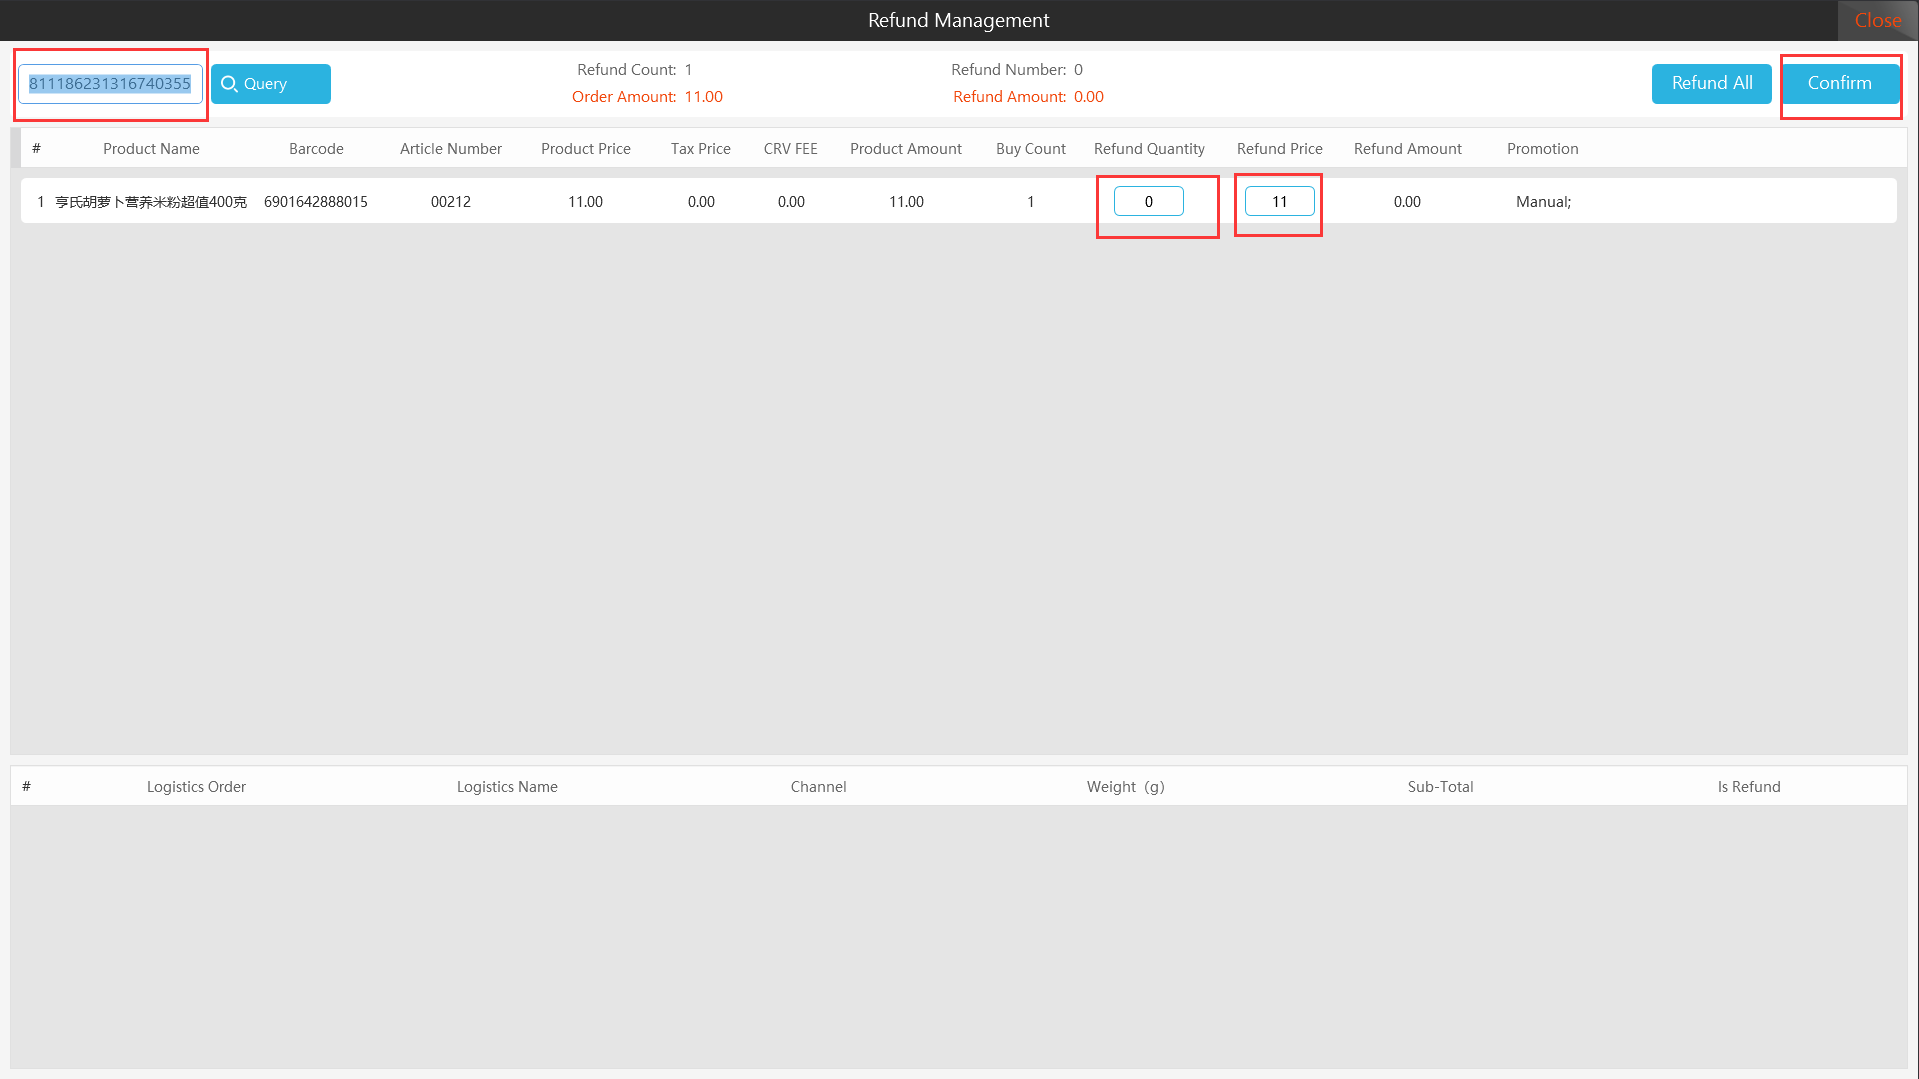
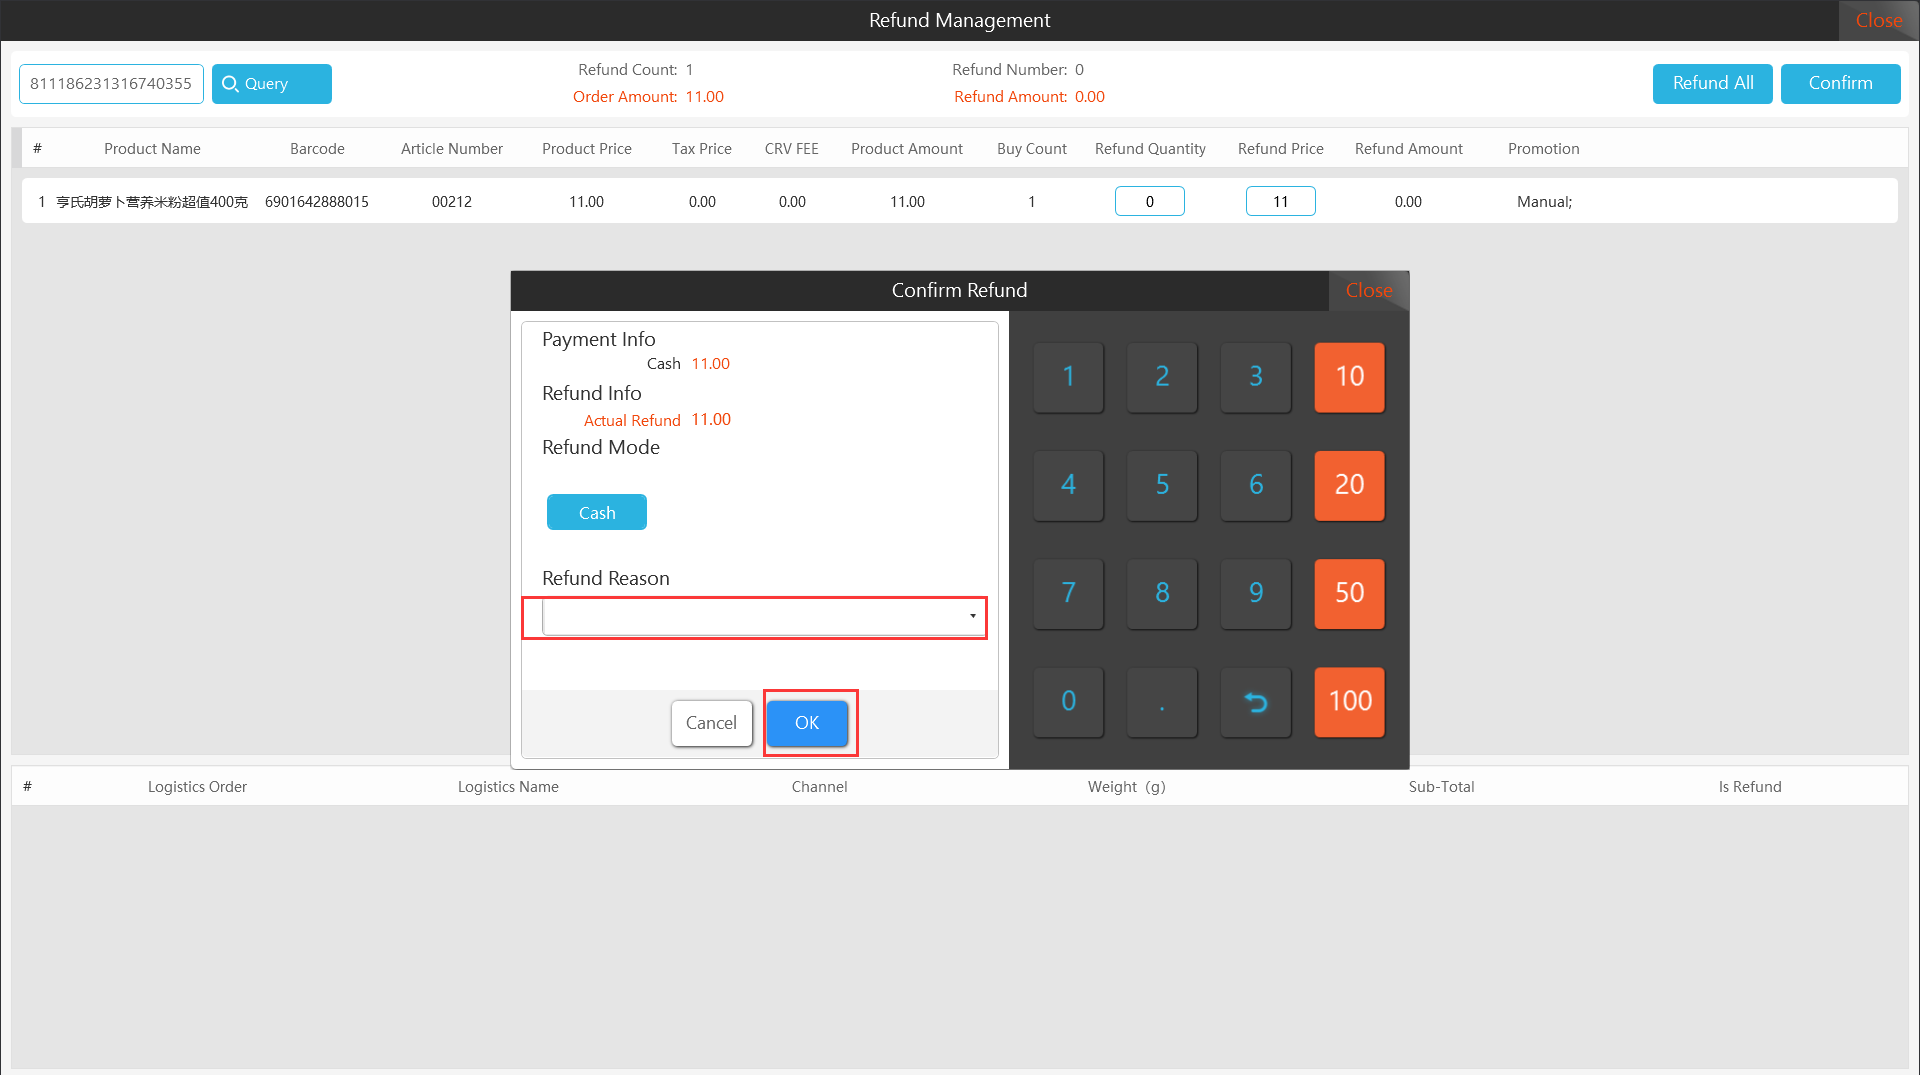
Step 3: Click "Confirm", and it will pop up refund reason interface and select related reason and click”OK” option.
Notes: For the configuration of the refund reason, please refer to Chapter 5. "Operation Management" 5.3.2 "Refund Reason" of the "Operation Manual for Apos V4.5.2l"
8.2 Refund all
[Operating steps]
Step 1: Click "Refund" to pop up the refund management interface.
Step 2: Click "Refund All", the total refund amount will be automatically calculated as the total amount paid, and the confirmation refund interface will pop up.
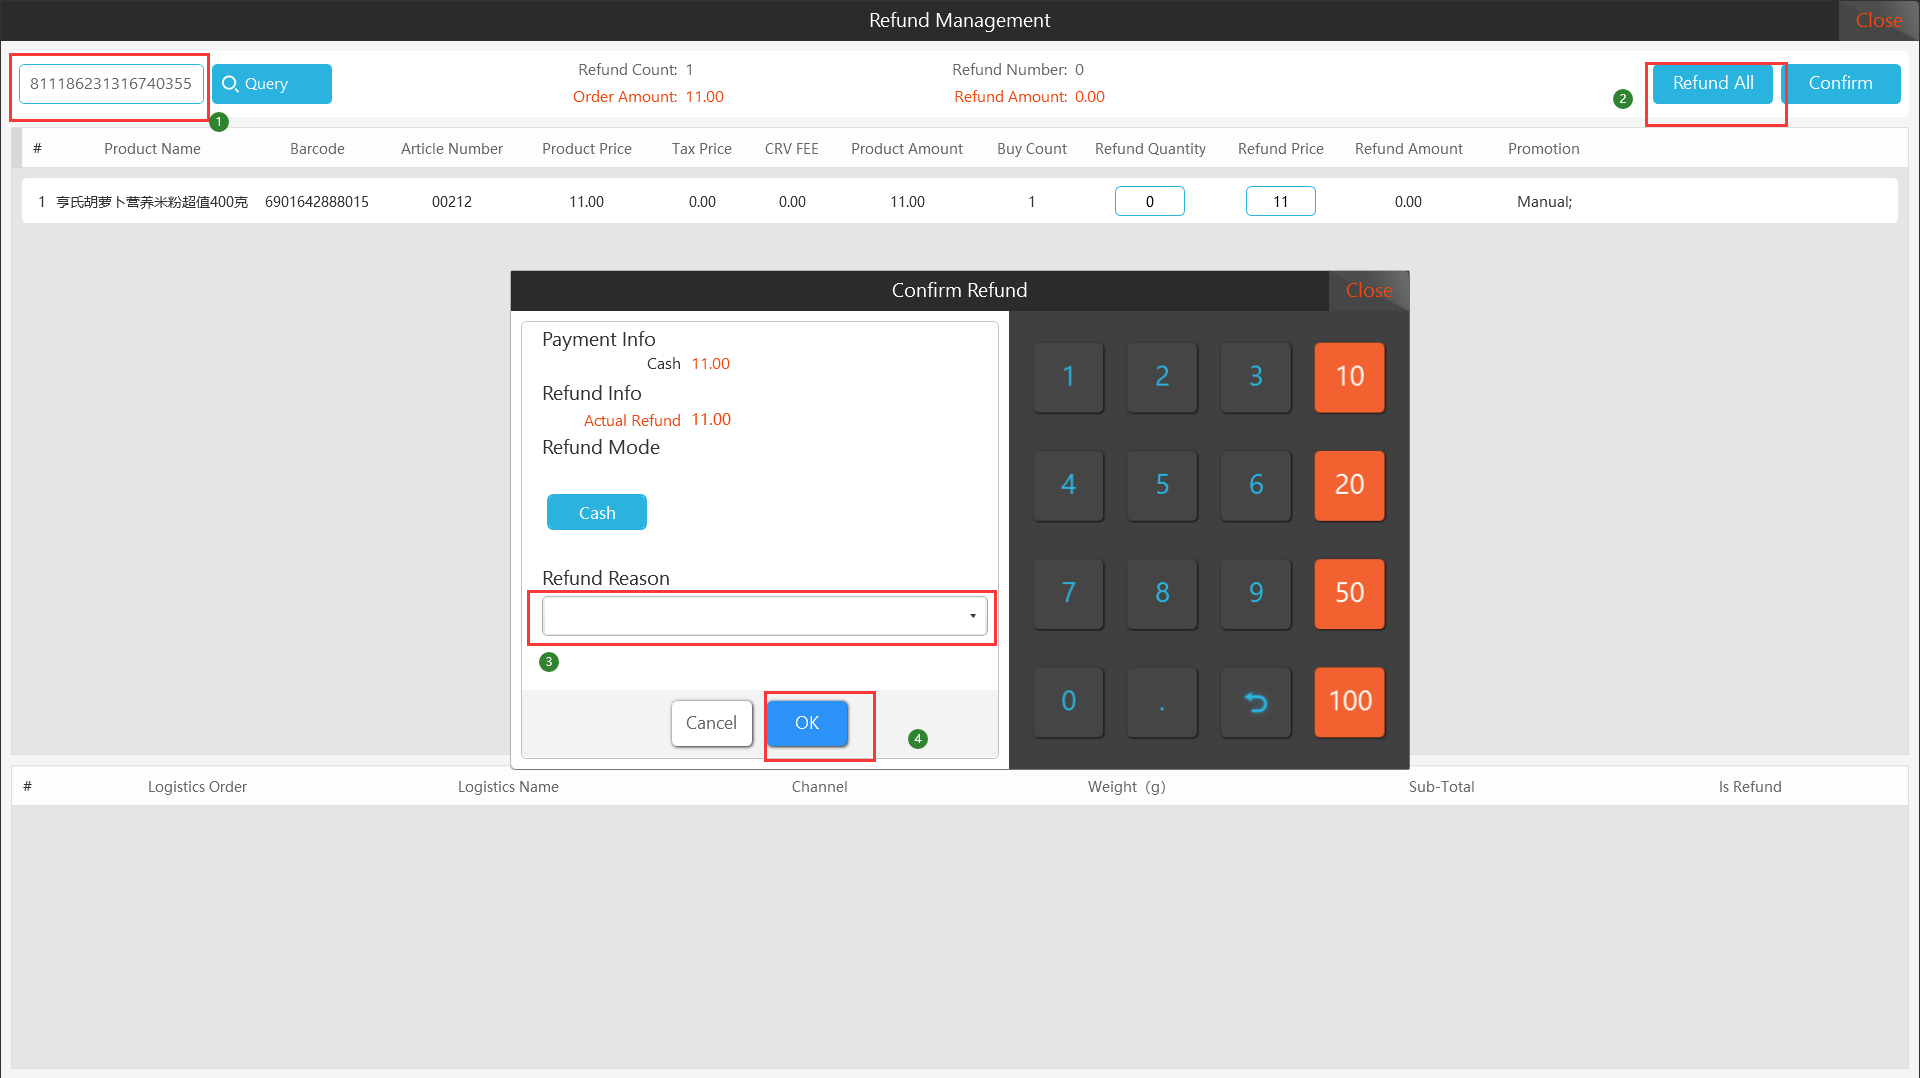
Step 2: Click "Confirm", the confirmation refund interface pops up, select the reason for the refund, and finally click "OK".
IX. Custom
The "Digital Clearance" list displays all BC sale orders shipped from the Apos terminal and provides a payer information supplement recording function. When the system detects that there is a lack of payer information for BC sale orders, a red icon will appear on the "Custom" icon on the cashier page. The notes message reminder disappears when the information is completed.
9.1 Cross-border order inquiry
"Digital Clearance" list supports querying orders according to the query conditions listed on the page.
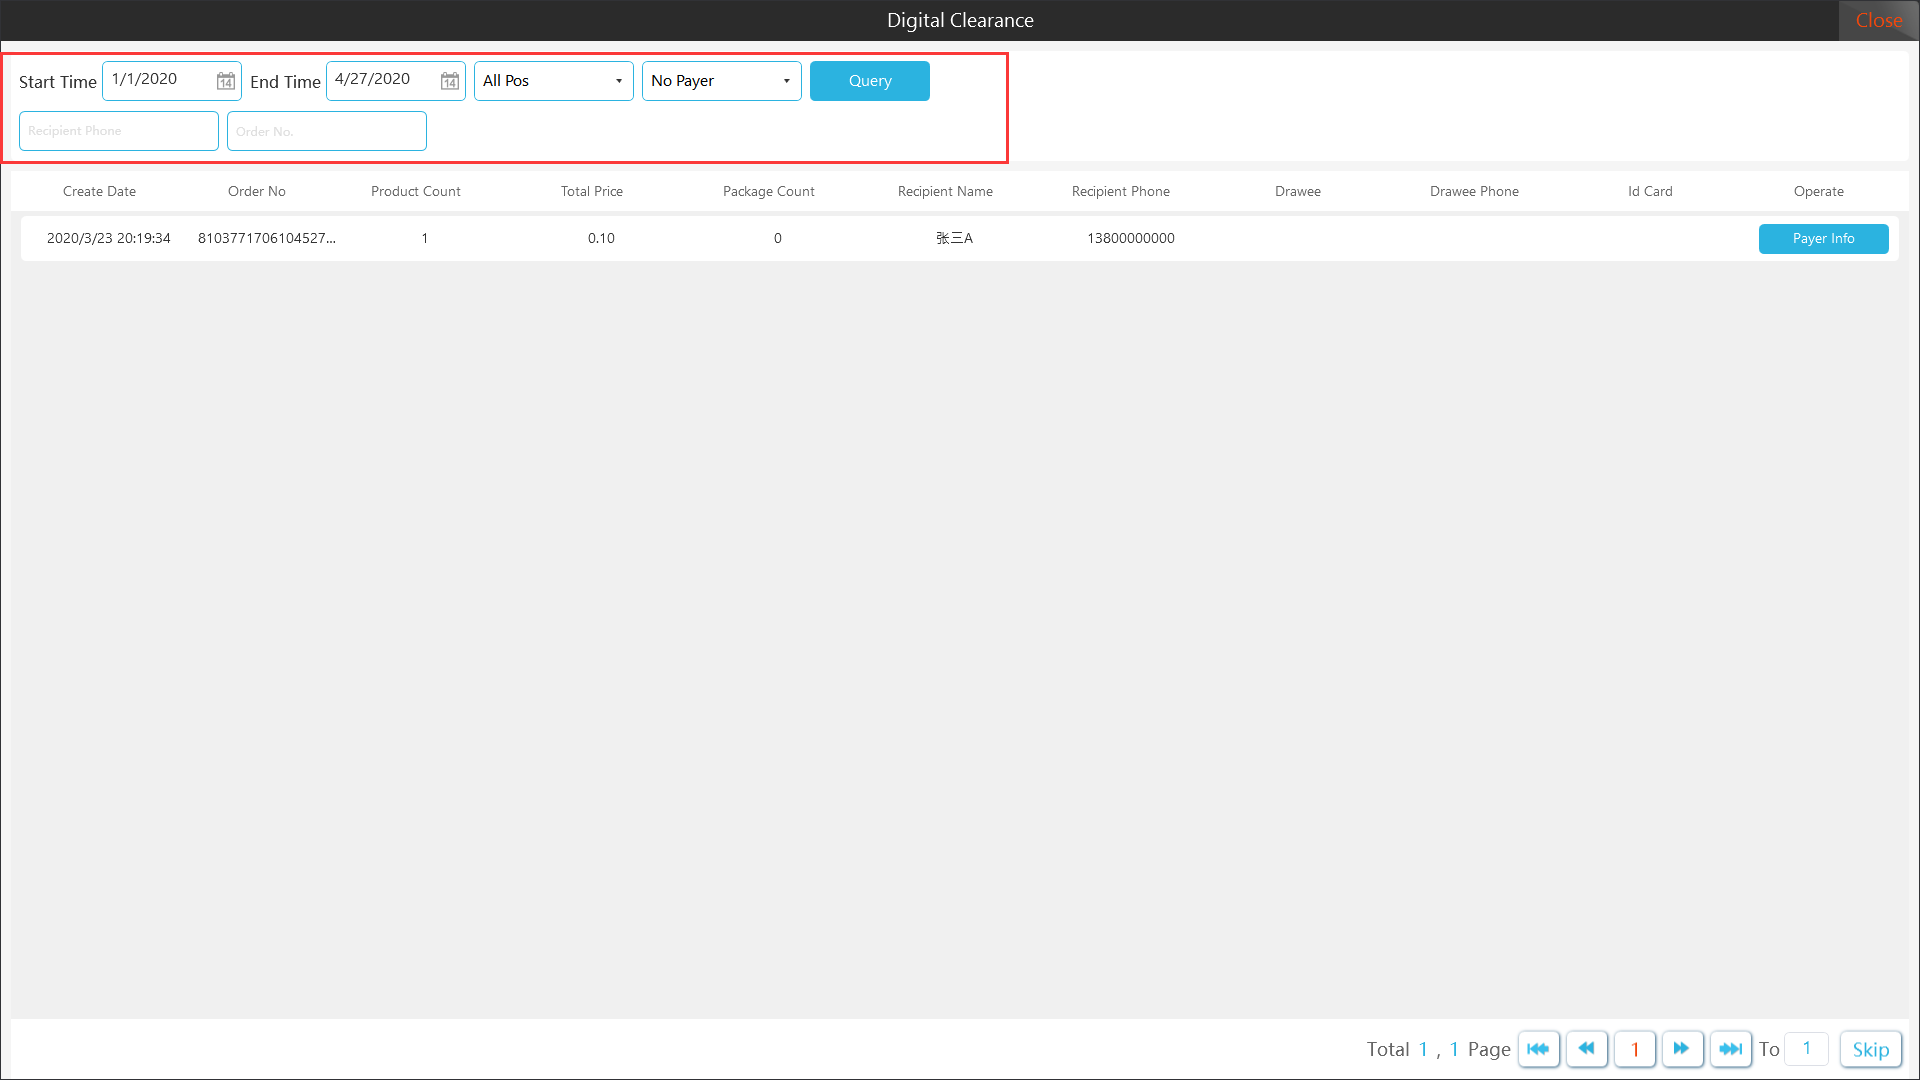
9.2 Supplemental identification information
For BC cross-border orders with incomplete payer information, the Apos client provides a supplementary information recording function to complete customs clearance.
[Operating steps]
Step 1: Find the order that needs re-filling in identification information, click "payer info", pop up the identity information interface, enter the corresponding information, click "OK", the system completes the information re-filing in after automatic verification.
Notes: The re-filled in info must be the real information of the payer of the order, otherwise the verification will fail and the customs clearance will not be possible.
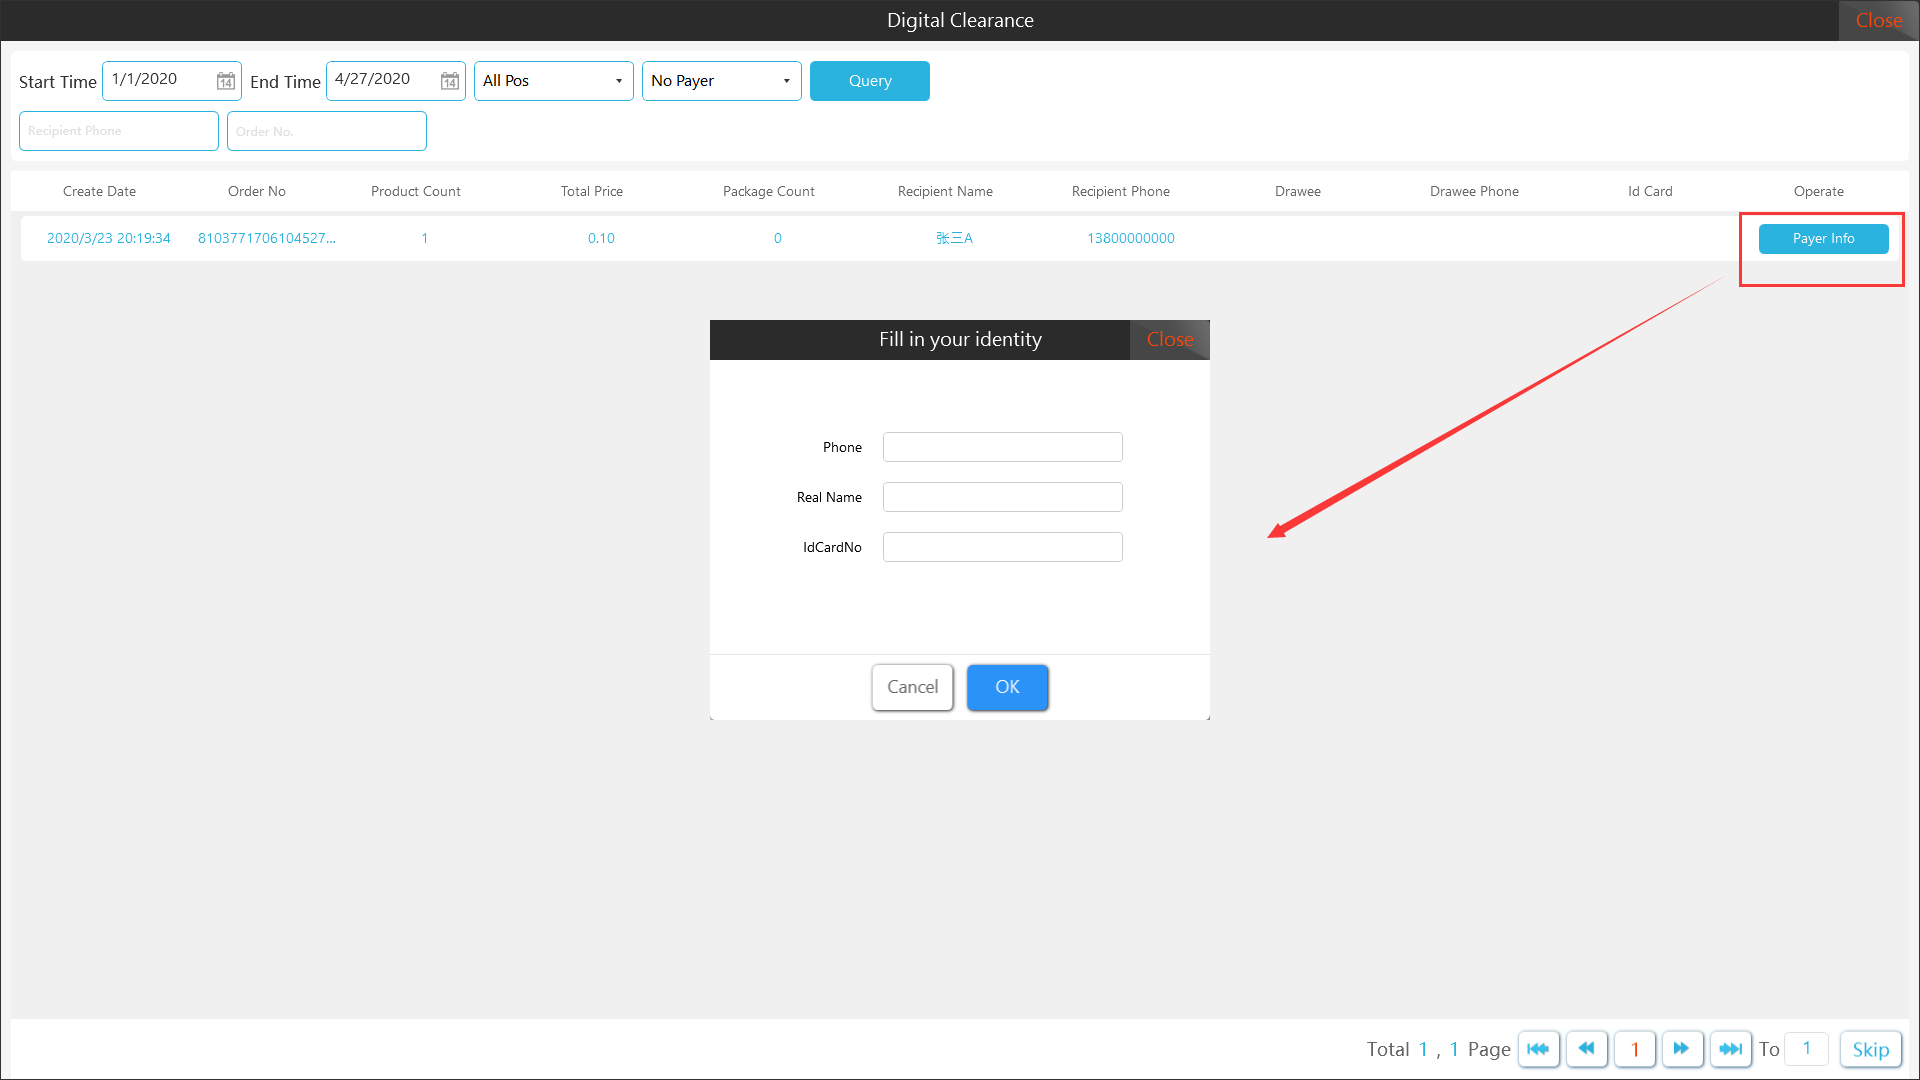
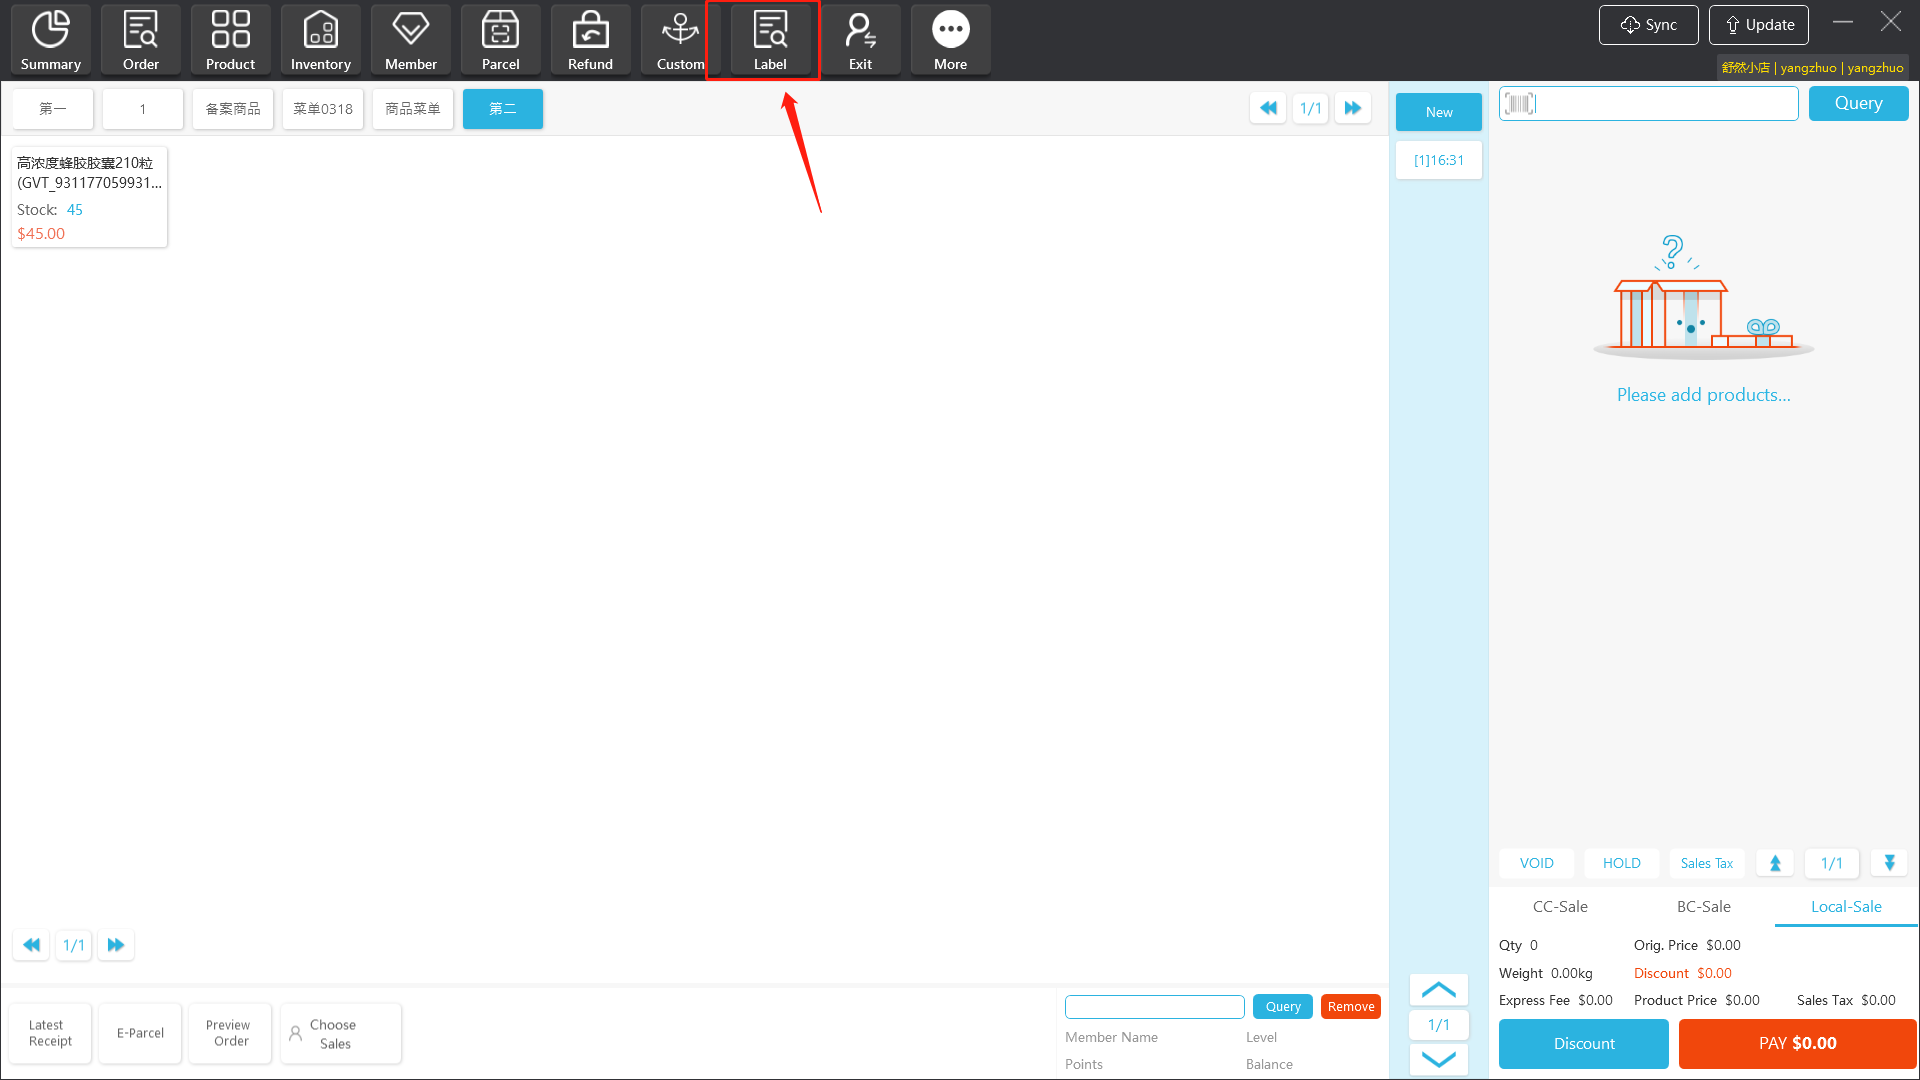
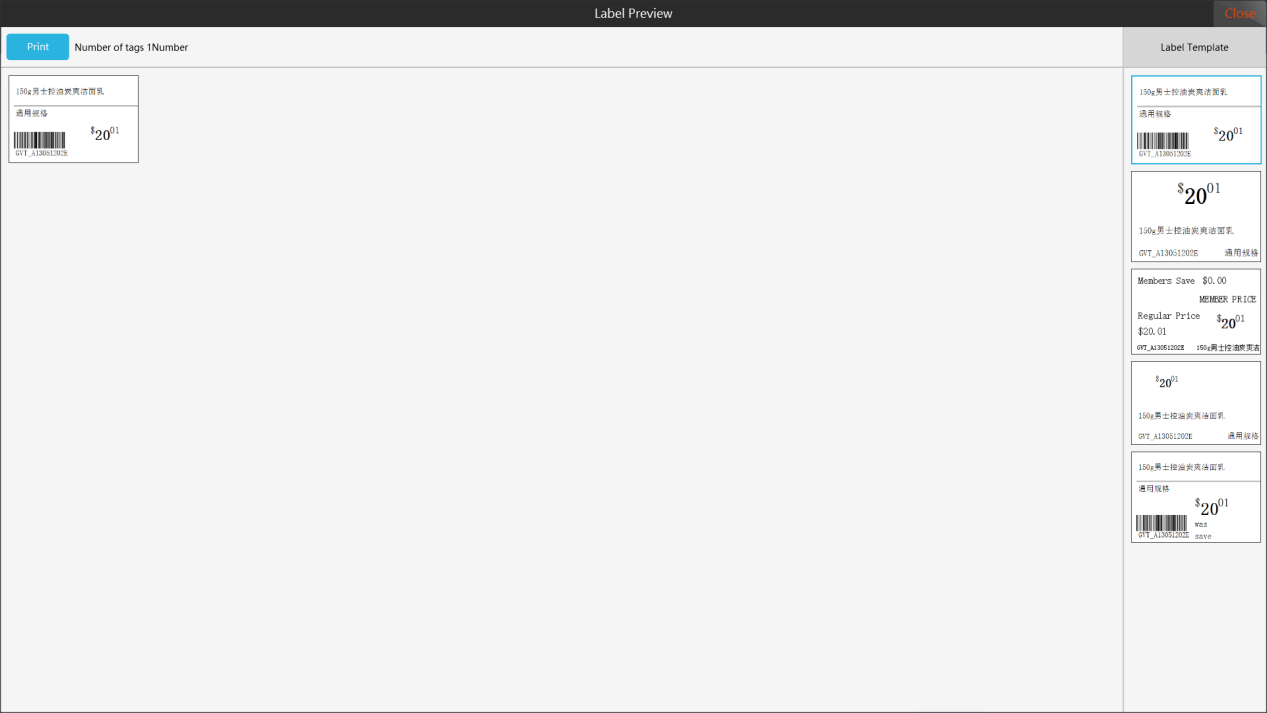
X. Price label
The Apos client provides the function of printing the price labels of the products, and can directly print the basic and member sales price labels of the products in the client.
10.1 Print single product price label
[Operating steps]
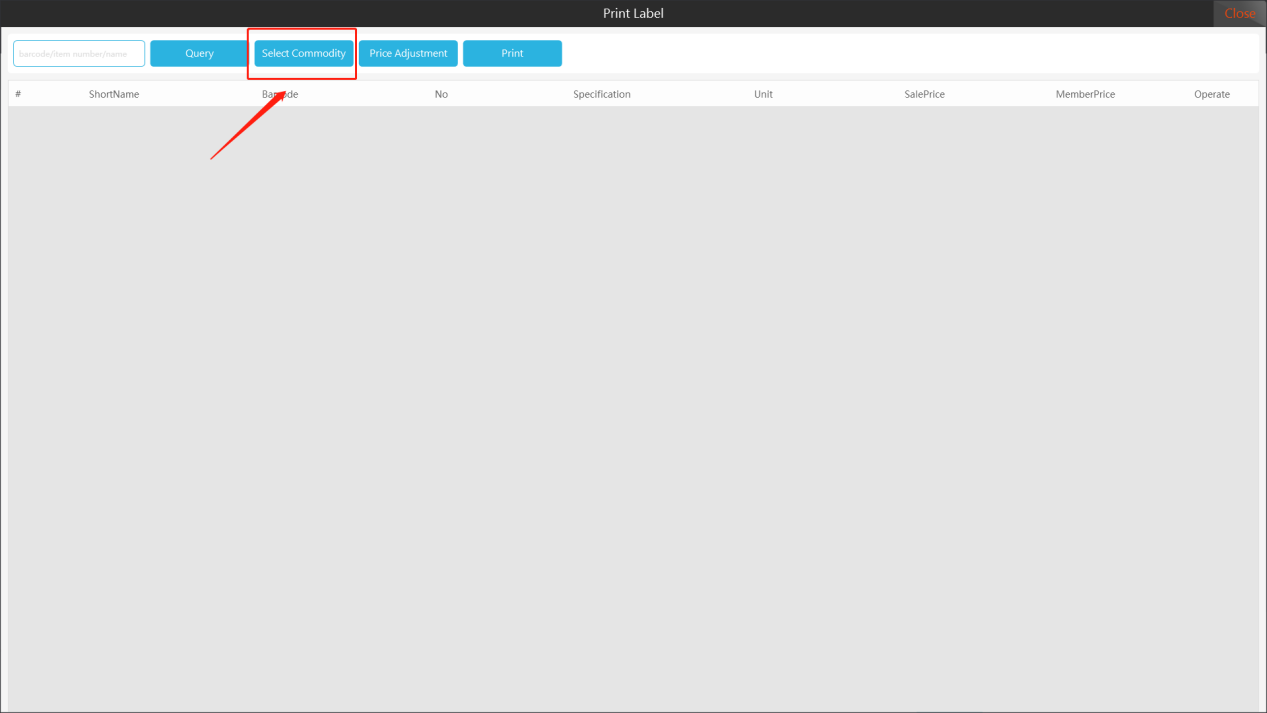
Step 1; Click on the "Price Label" to pop up the label printing interface.

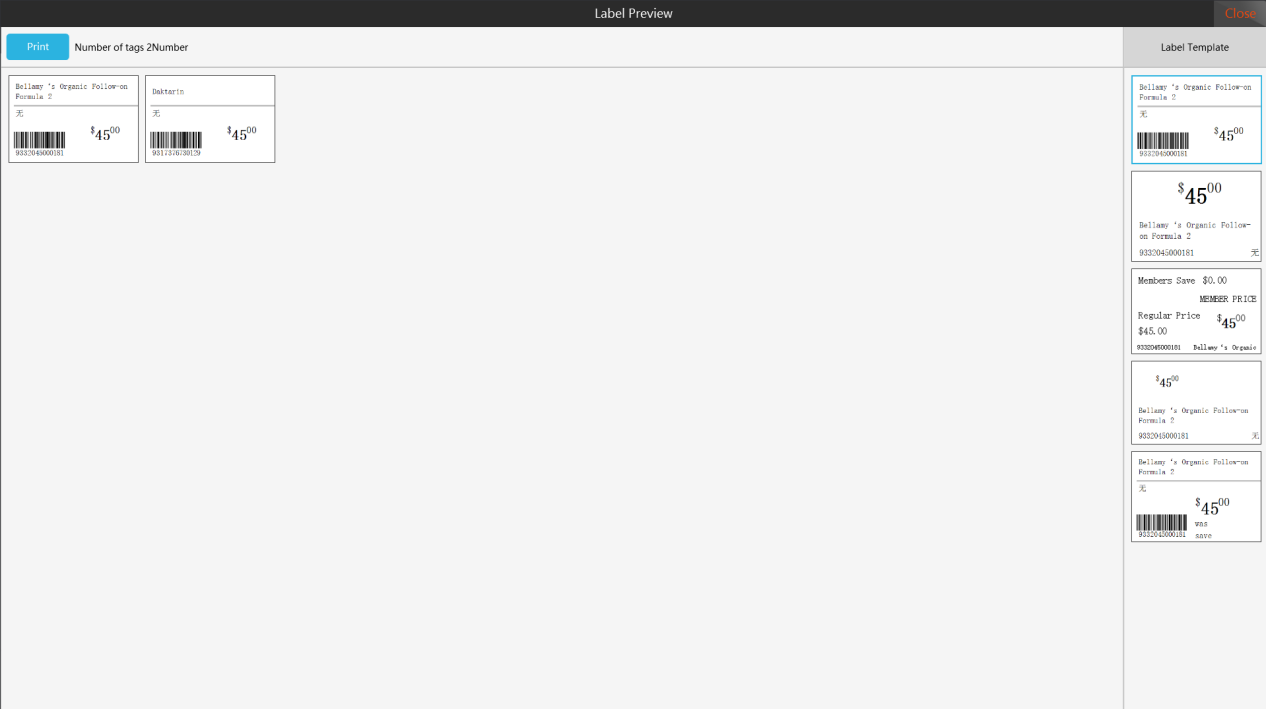
Step 2; Enter the product barcode, item number or name, click "Query", click "Print" to enter the print price label preview interface, you can choose different price label templates to print the product sales price label.
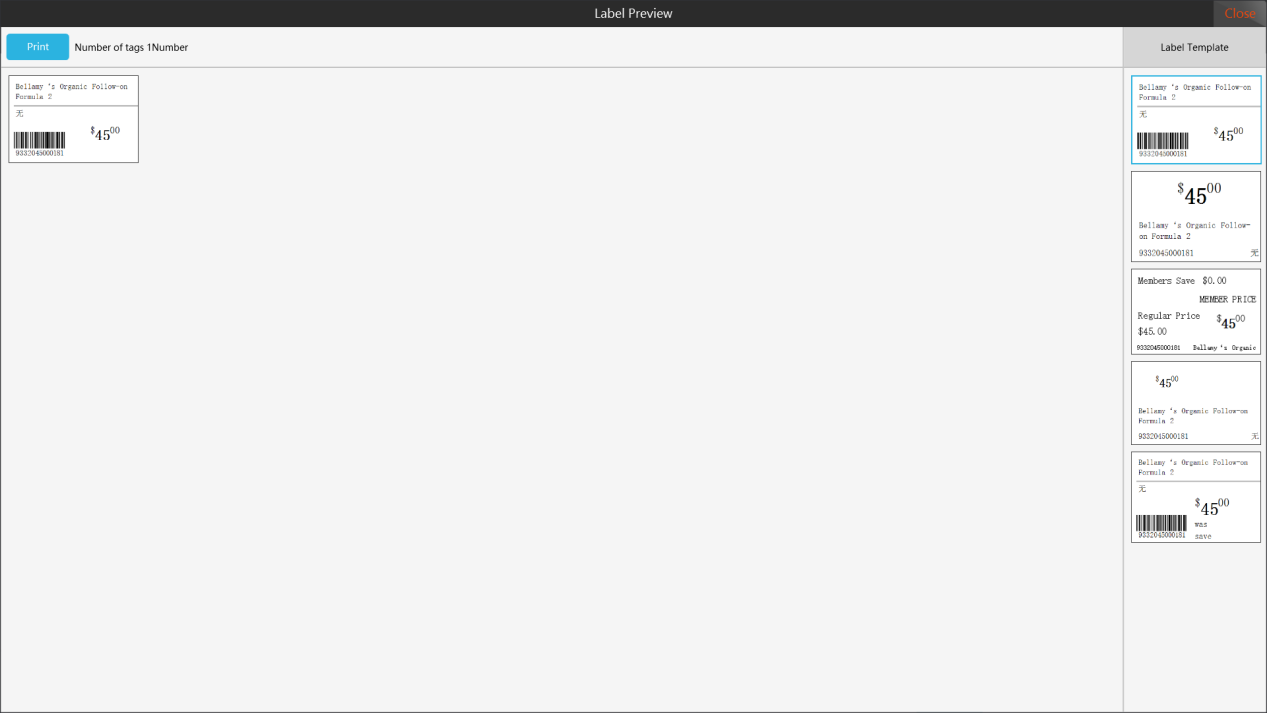
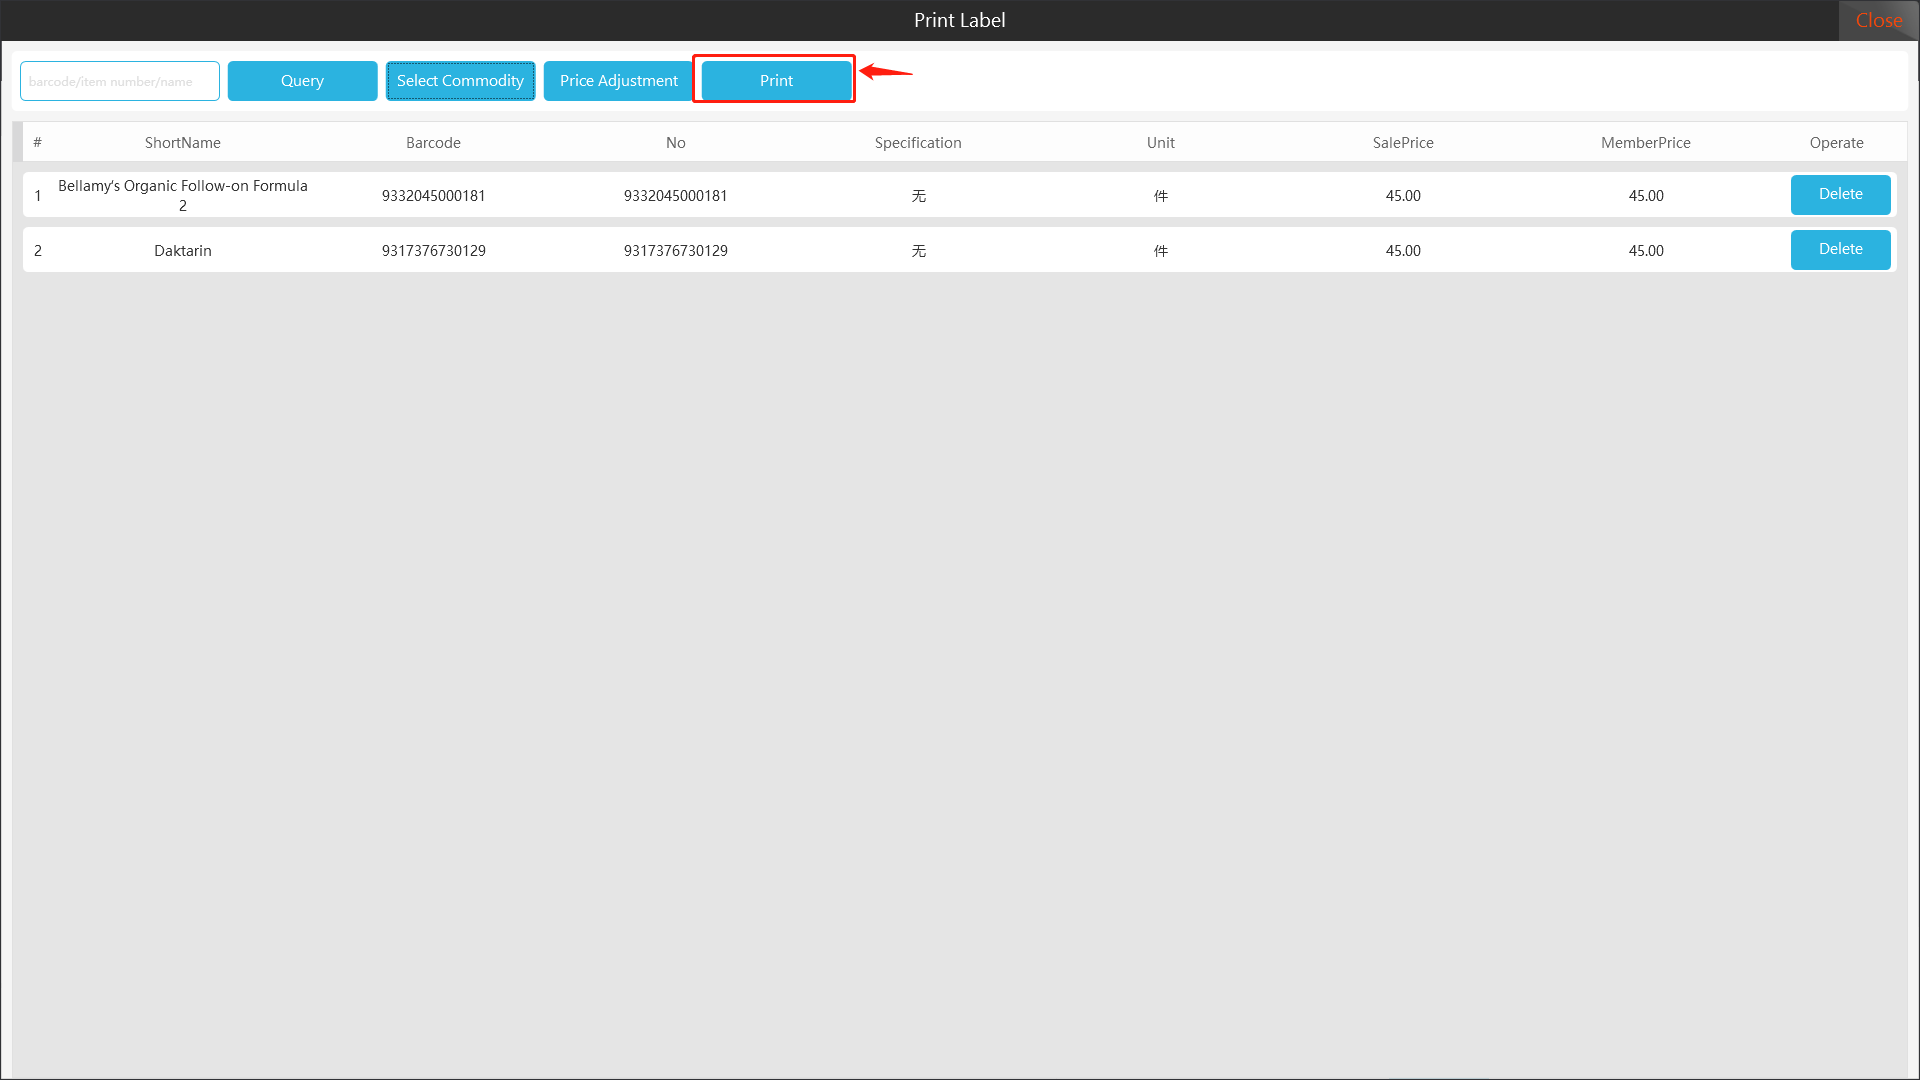
10.2 Batch printing price labels
[Operating steps]
Step 1; Click on the "Price Label" to pop up the label printing interface.
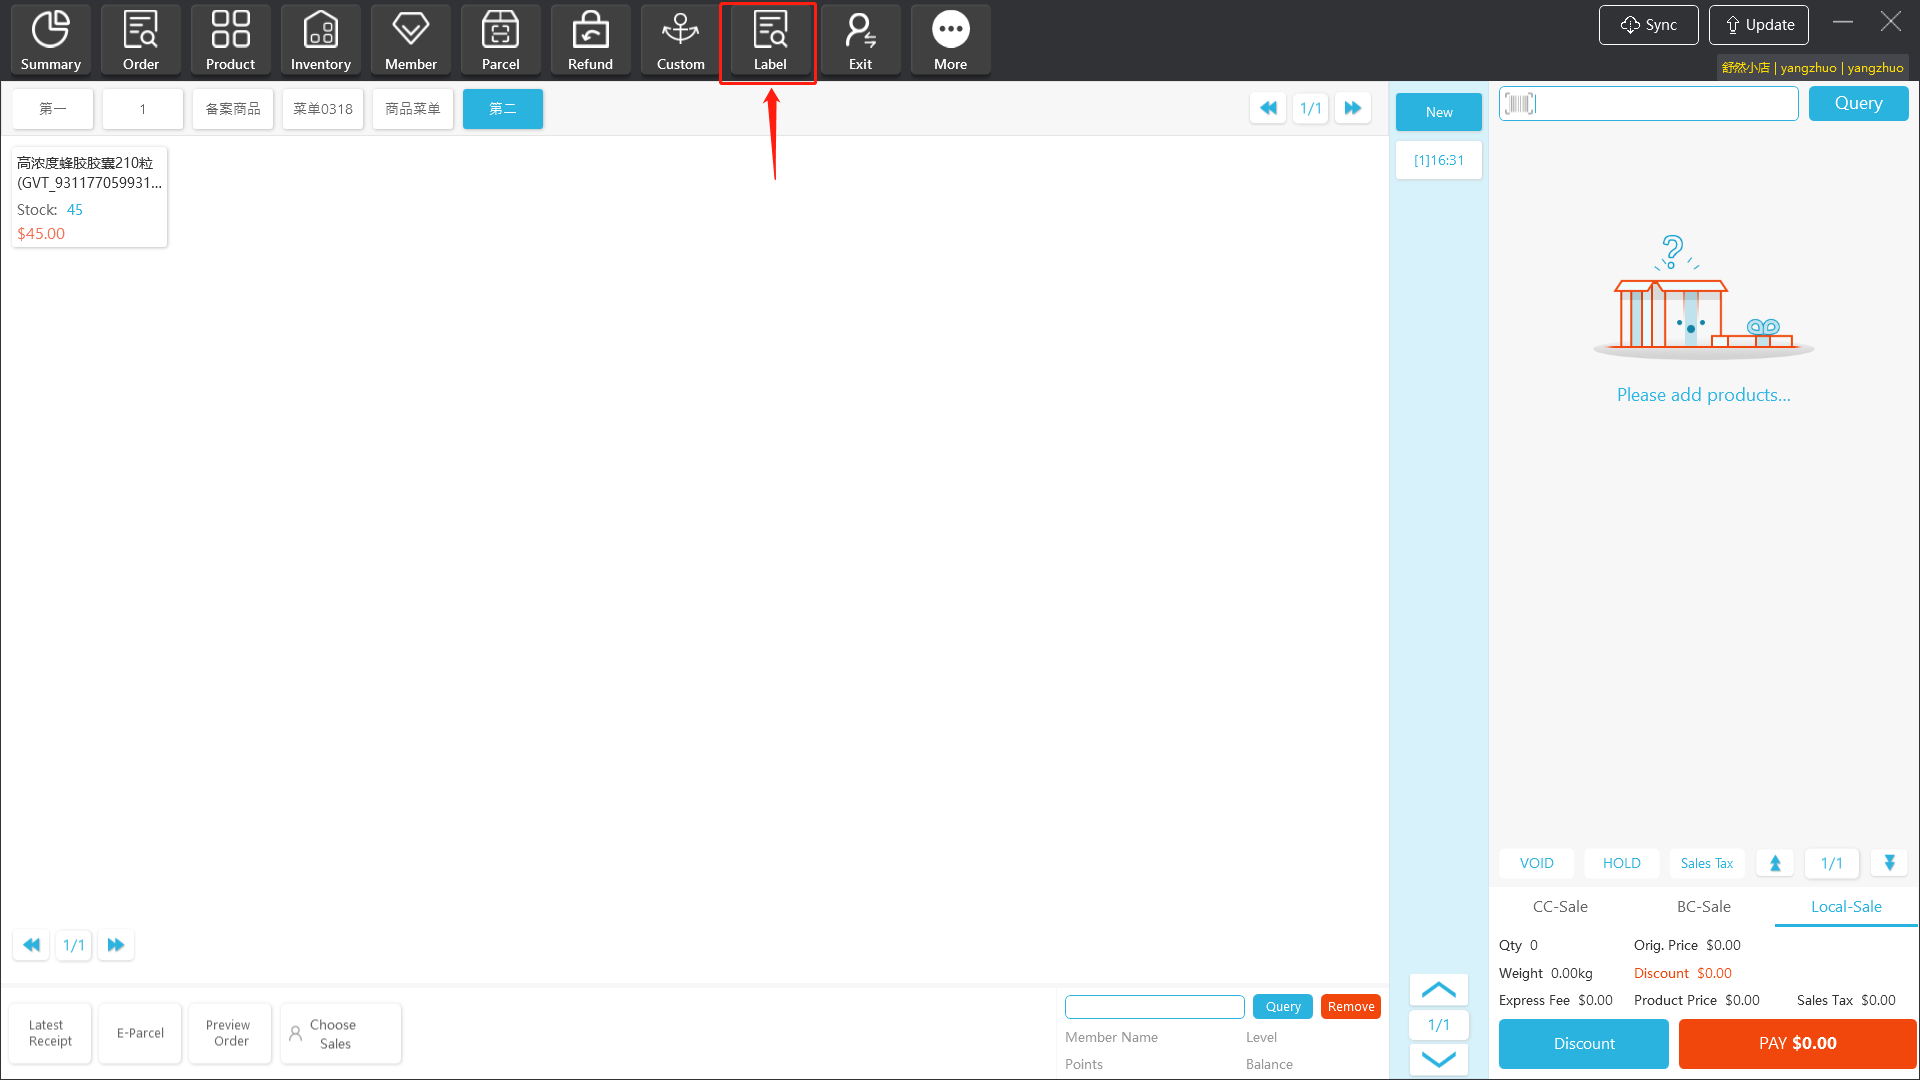
Step 2; Click "Select Commodity", and the interface for selecting product will pop up.
Step 3; Select the products that need to print the price label, and click "Batch Select".
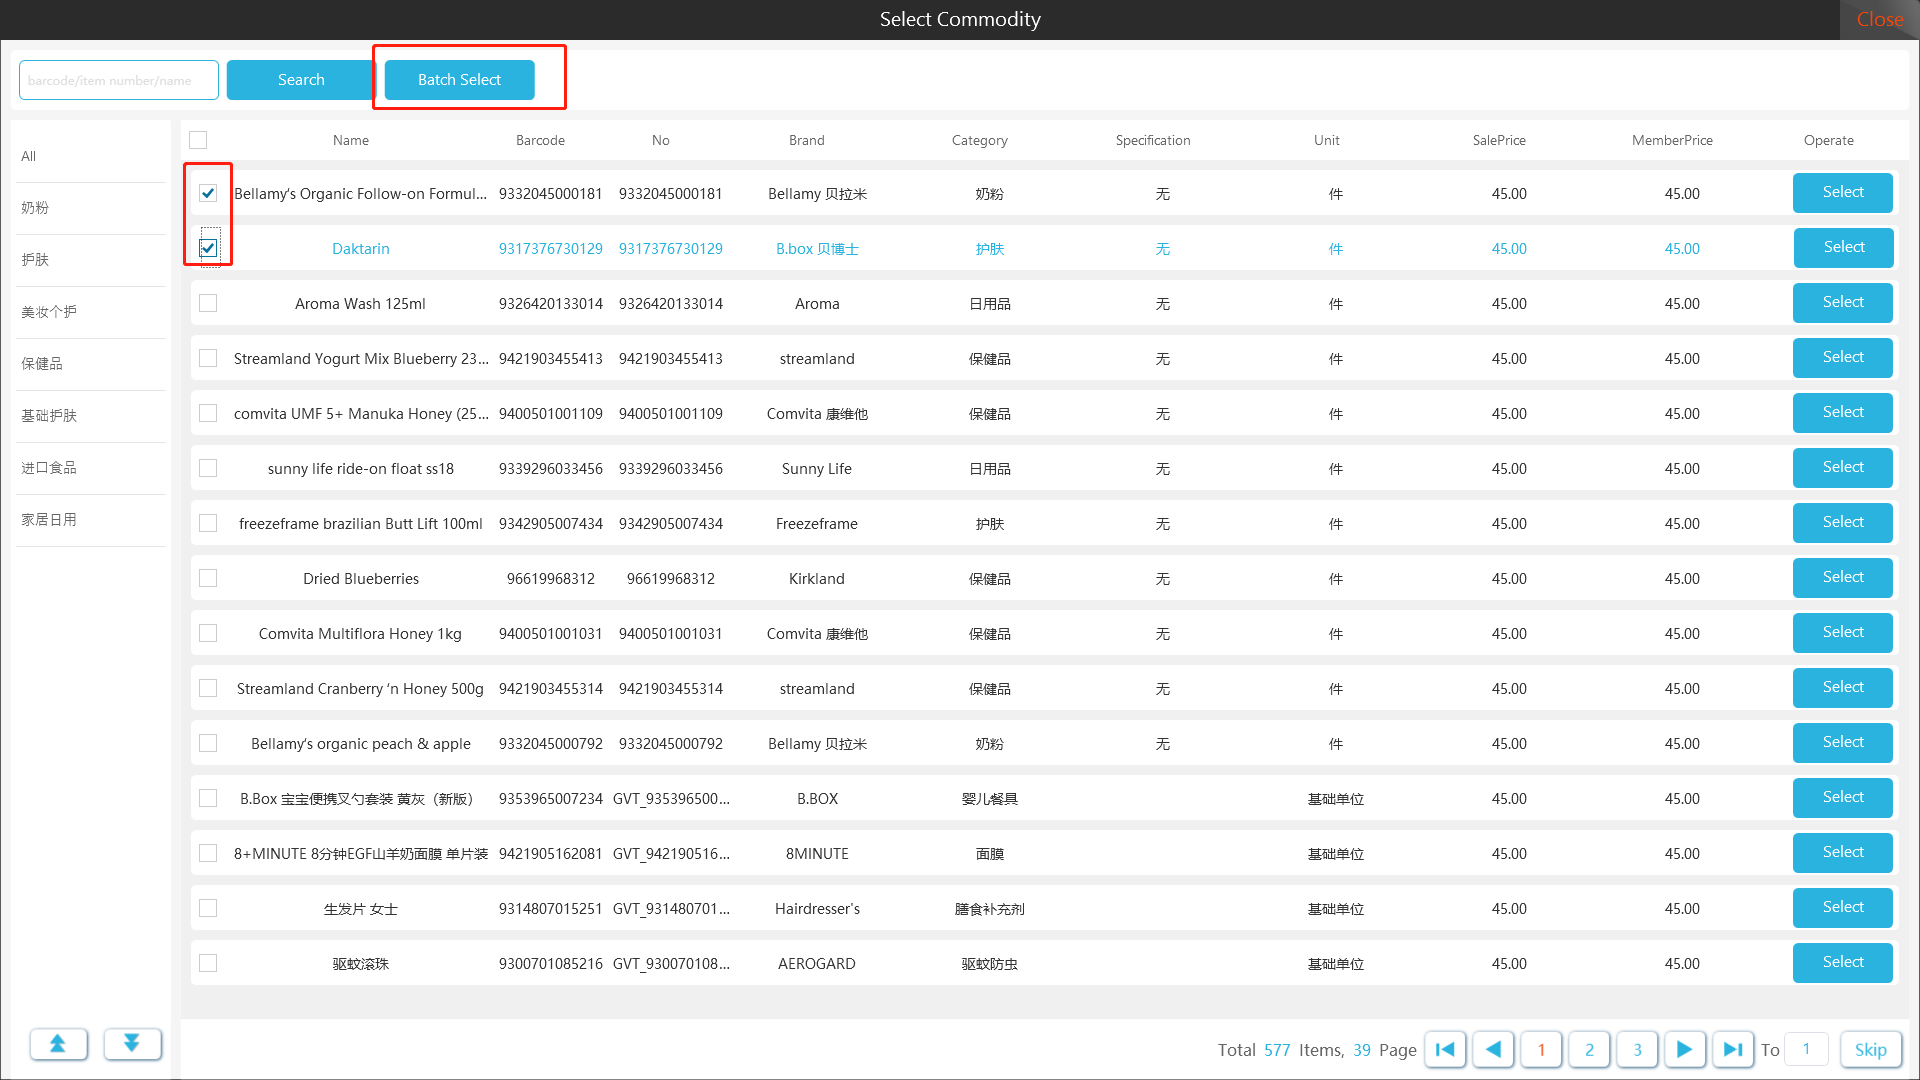
Step 4; Click "Print" to print the sales price of the goods; you can print the price labels in batches.
10.3 The client prints the price label and prints it according to the price adjustment list
Step 1: Click on the "Price Label" to pop up the label printing interface.
Step 2; Click “Select Price Adjustment Order”, the interface for selecting price adjustment order will pop up.

Step 3; Check the price adjustment order to be printed and click "Confirm Selection".
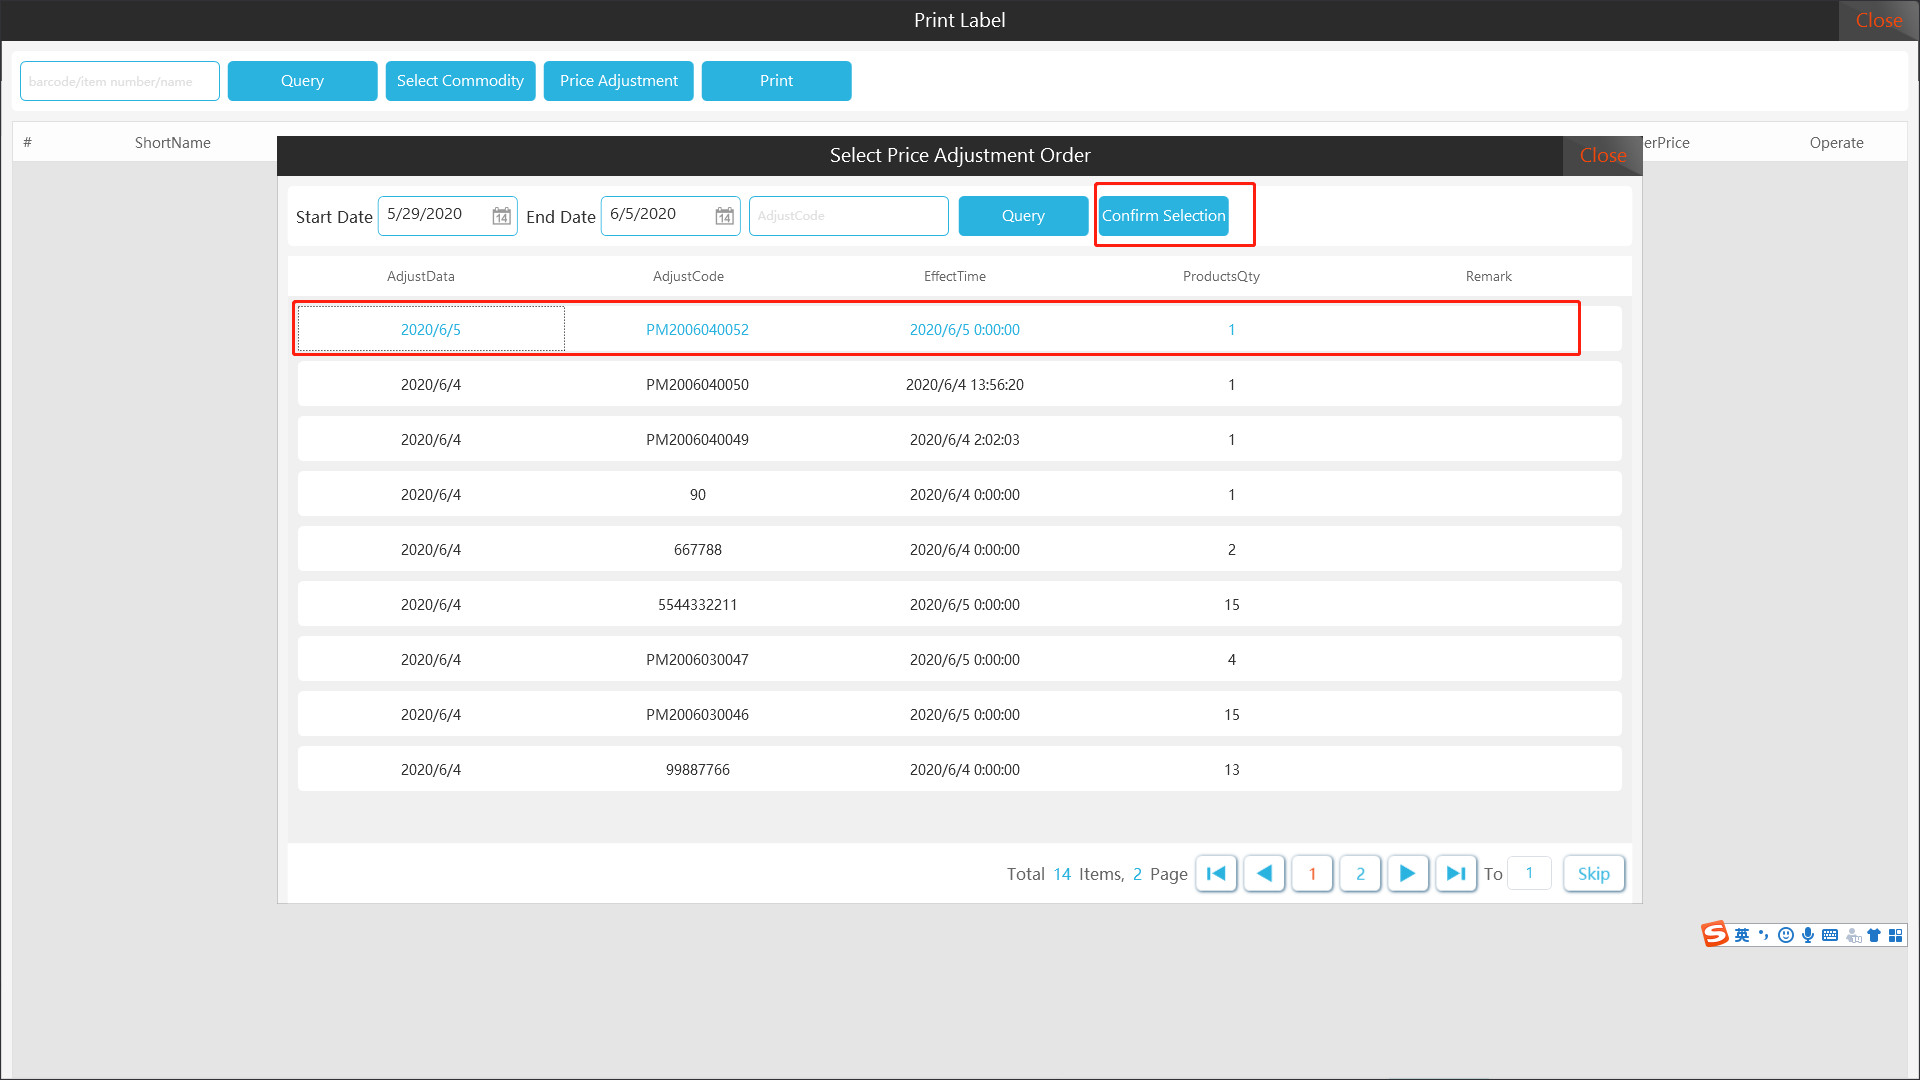
Step 4; Click "Print" to print the product price label in the price adjustment list.

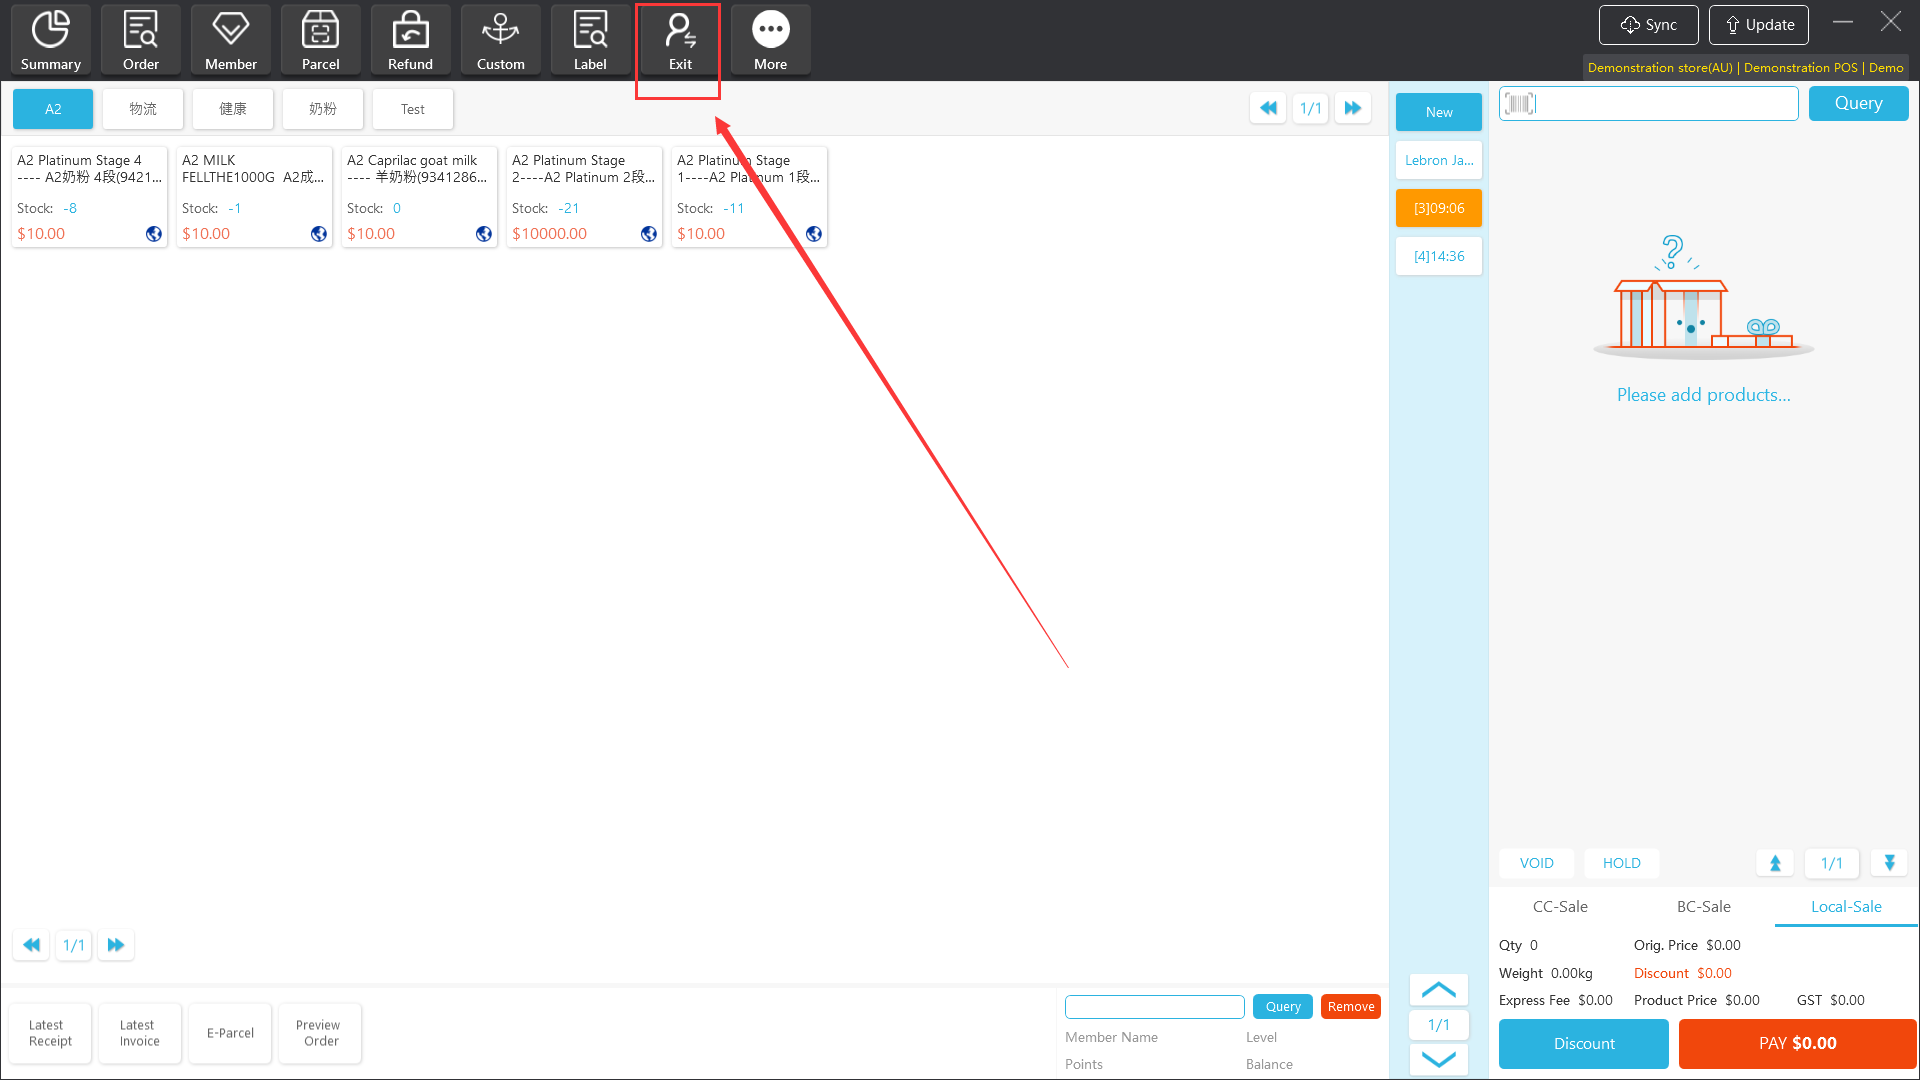
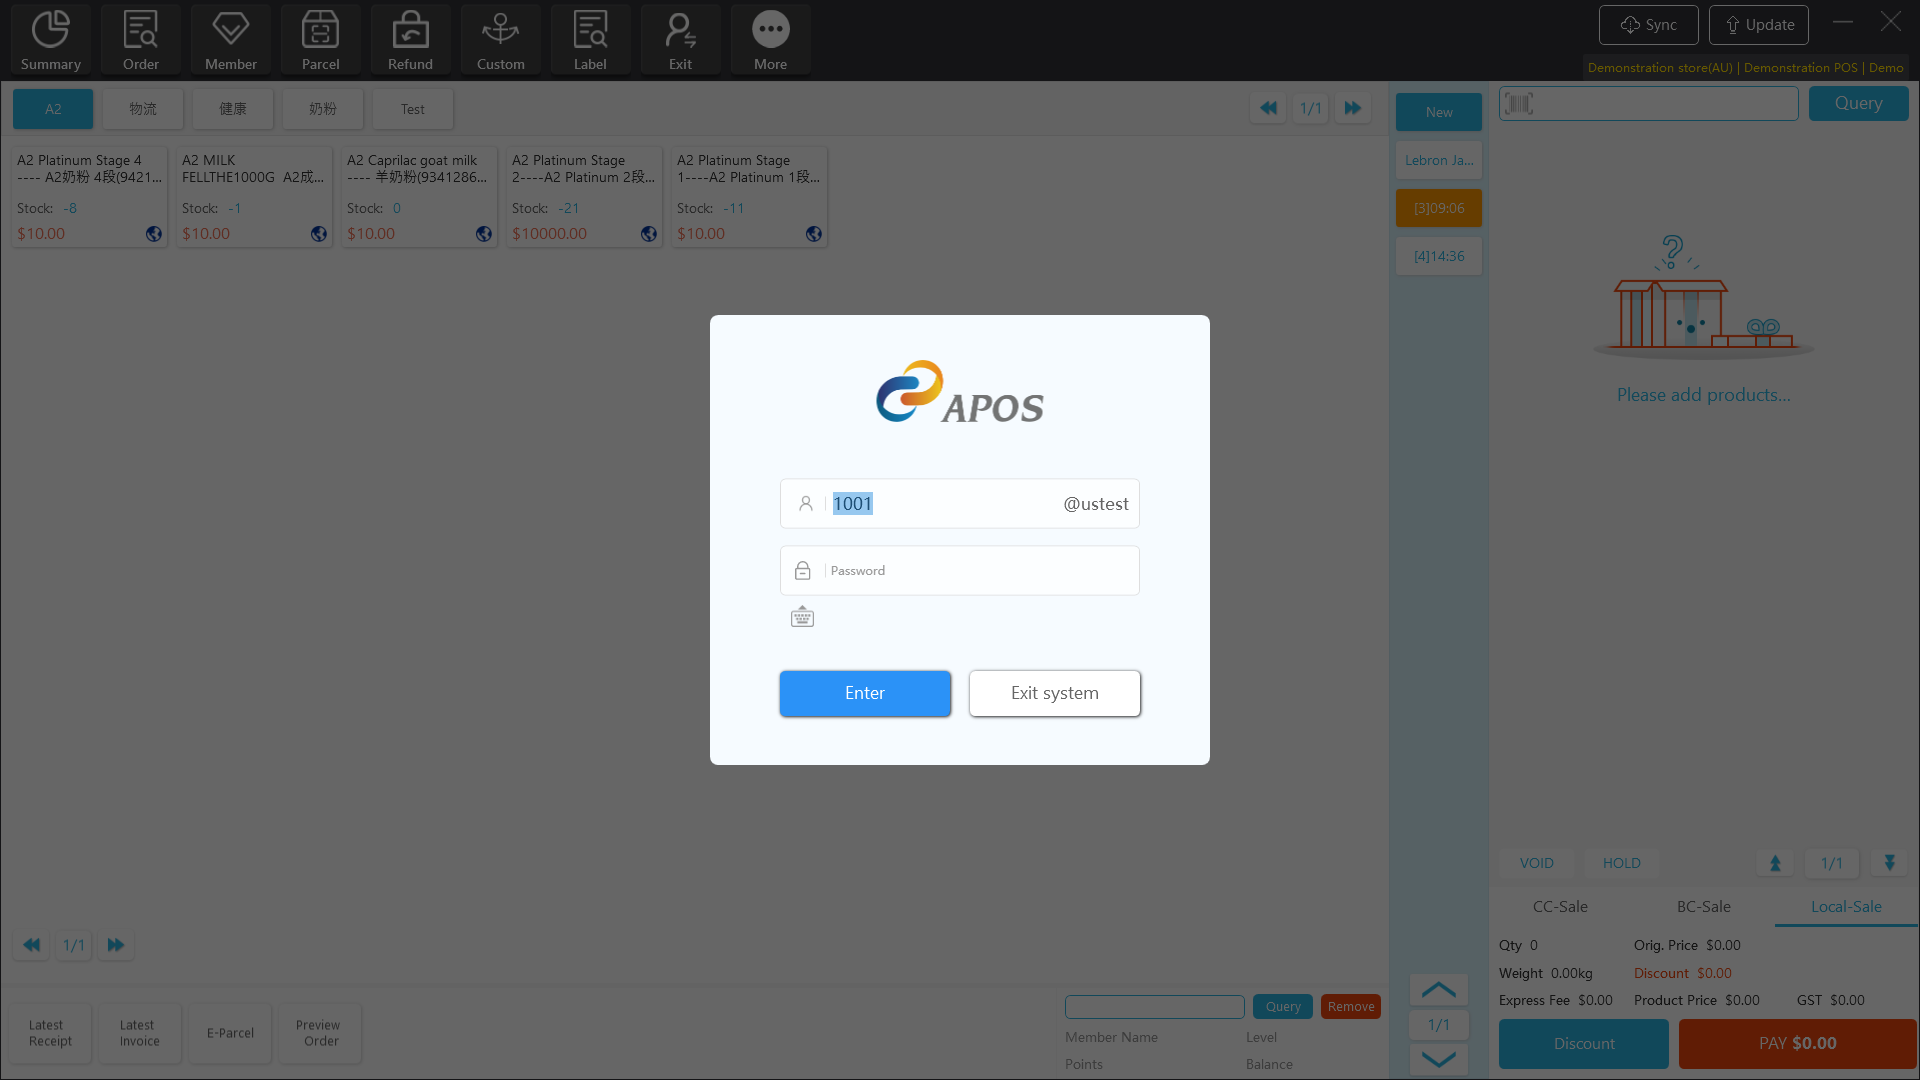
XI. Login Out
11.1 Logout/switch account
The Apos client supports the one-key logout function, and the cashier can quickly log out/ switch the current login account.
[Operating steps]
Step 1: Click “Exit” to log out of the current account and a login interface will pop up.
Step 2; Enter the account and password to log in, and click "Enter" to complete the login.
11.2 Authorization
The Apos sever background supports the allocation of different functional permissions according to different account roles. The functional permissions of the client can be assigned as follows.
For the method of assigning function permissions to account roles, please refer to Section 5.2 “Department Management” under Chapter 5 “Operation Management” in the “Operation Manual for Apos V4.5.2”.

The Apos client supports function authorization. The authorization is valid only when this time to use. The next time you use the unauthorized function, you still need authorization to use it.
[Operating steps]
Step 1: When the current account does not have permission to use a certain function, the system automatically pops up an authorization window, enter the account and password with the permission, and click "Enter" to use it.
11.3 Exit Client
In addition to the "X" button in the upper right corner of the cash register client, you can log out of the system, and the logout/authorization pop-up window can exit the client. When the client is restarted and logged in again, the client will sync the latest data in the background.
1; Click the "X" close button to close the client and exit the system.

- Exit the client directly in the logout/authorization window.

XII. More
12.1 Settings
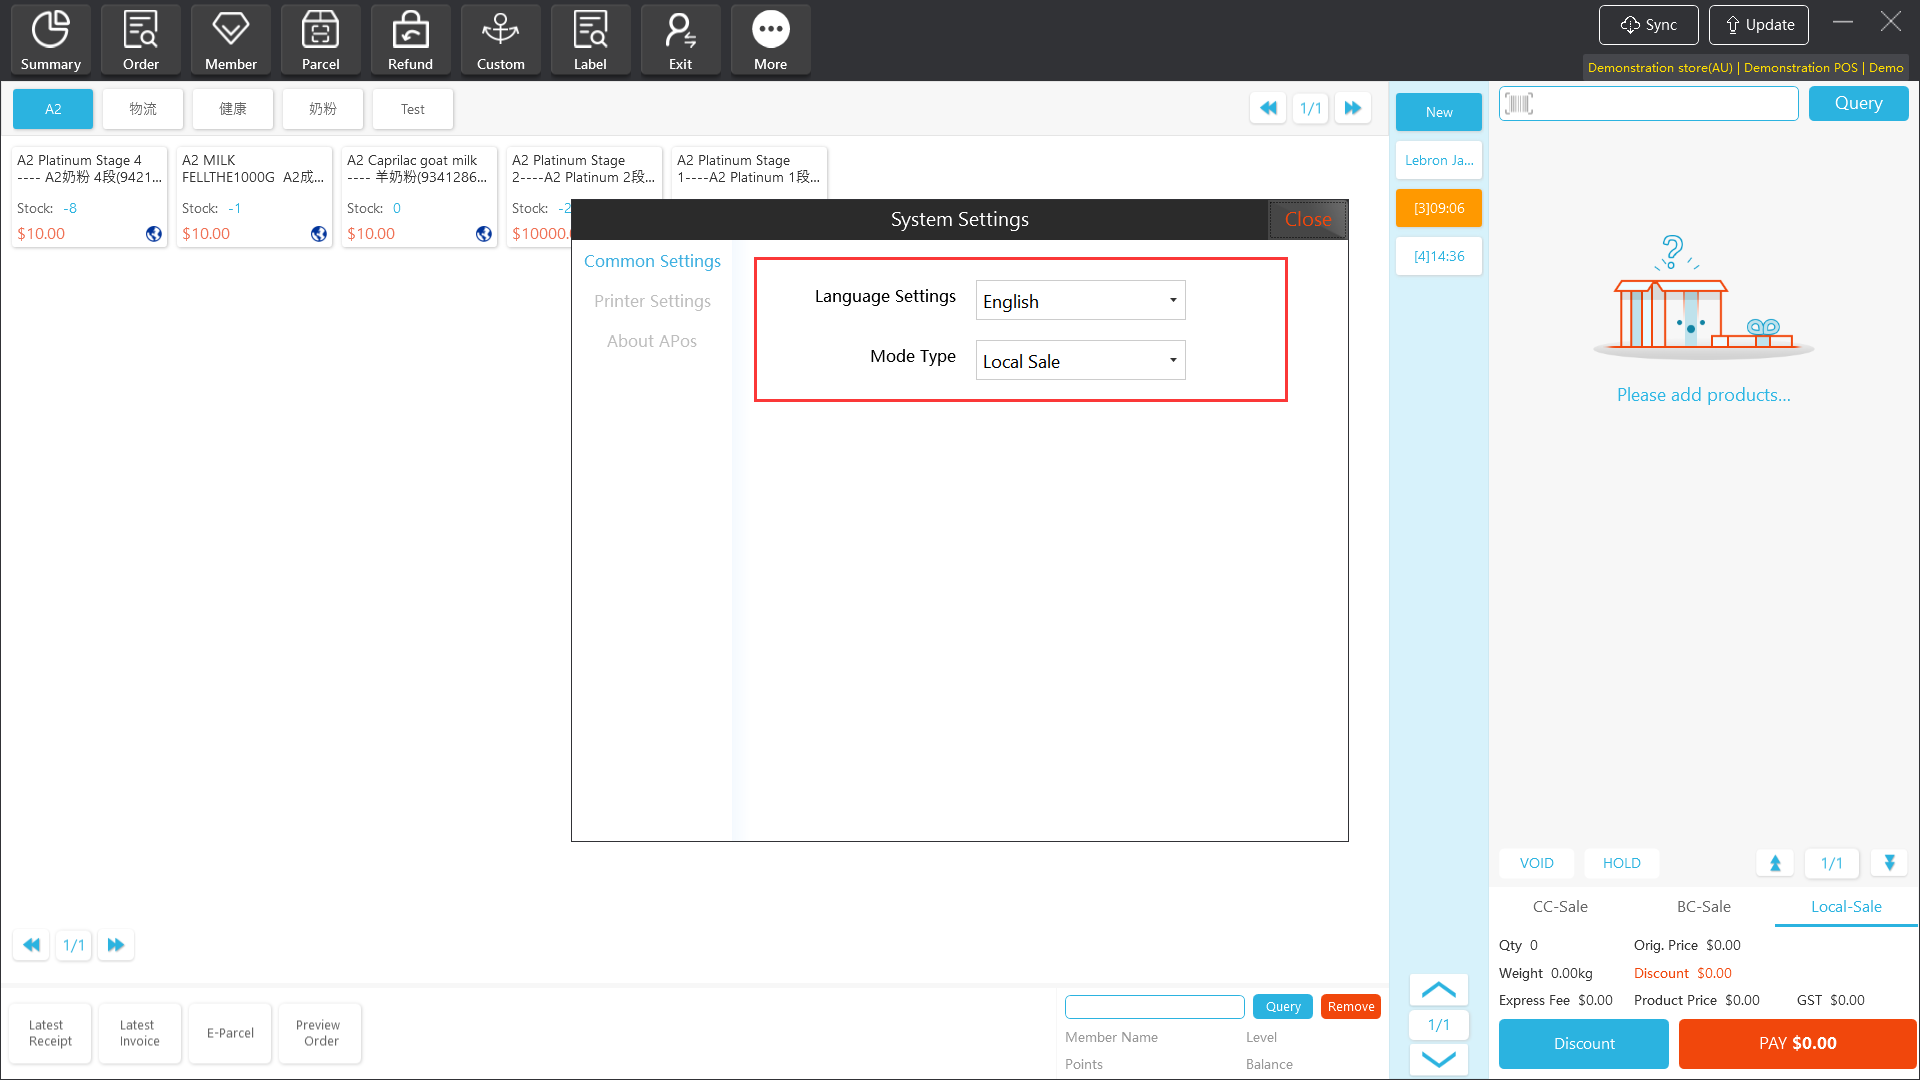
12.1.1 Common Settings
In the "Common Settings" of the client, the language displayed by the client and the default system mode type can be set.
Language setting: Support Chinese/English switching. After switching, the setting window will take effect. The system will display English by default. If the store address is in China, the system will automatically switch to Chinese display.
Default mode type: support to modify the default sales mode of the main interface of the client. After the modification, close the setting window to take effect, and the system default setting is "local sales".
12.1.2 Printer settings
The "Printer Settings" page provides the connection configuration of the Apos client and the printer. The system is connected to PDF printing by default. If you need to connect an external printing device, please install the driver of the printing device on the client first. Modify the connection to the corresponding printing device on this page. Close the setting window, and it will take effect.
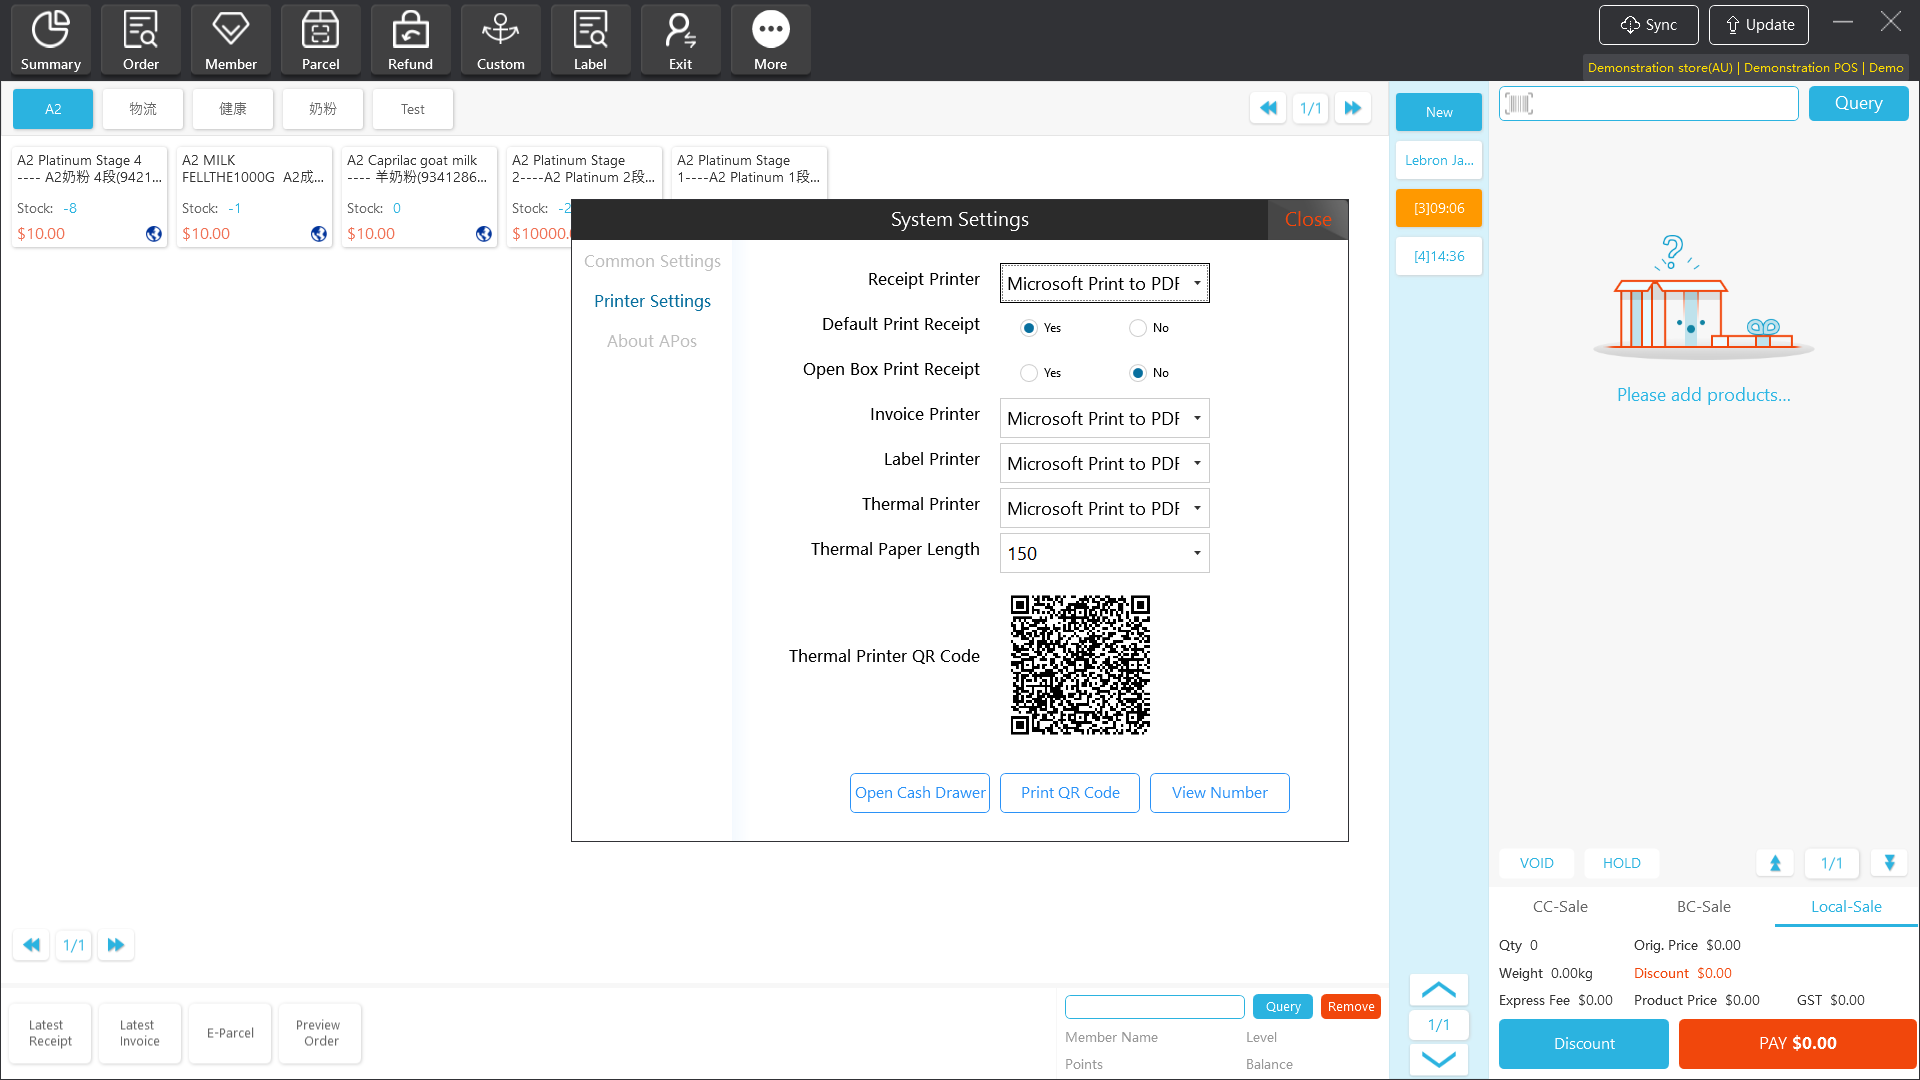
Receipt printer: connected to a device for printing receipts;
Default print receipt: set to "Yes", the system will automatically print the order receipt after settlement; set to "No", it will not be printed;
Open Box print receipt; set to "Yes", after clicking the "Open Cash Drawer" button, the receipt for opening the cash box for withdrawal will be automatically printed; set to "No", it will not be printed;
Invoice printer: connected to the device for printing invoices (only Australian merchants support the function of printing invoices);
Label printer: a printing device connected to print price labels;
Thermal printer: a printing device connected to print logistics bills;
Thermal paper length: set according to the length of the actual logistics bills, supporting 150mm / 180mm;
Thermal printer QR code: Provided to overseas shopping assistant after placing orders, click "Print Courier Bill", and then scan the QR code, the printing equipment connected to the Apos client will automatically print out the logistics bills.
[Operating steps]
Step 1: After placing an order on the mobile overseas shopping assistant, open "My parcel", check the packages that need to print the logistics bill, and click "Print bill".
Step 2: The mobile phone scans the "thermal printer QR code", the connected printer automatically prints.
Open the cash drawer: control the cash box connected to the client.
Print QR code: print out the "thermal machine QR code".
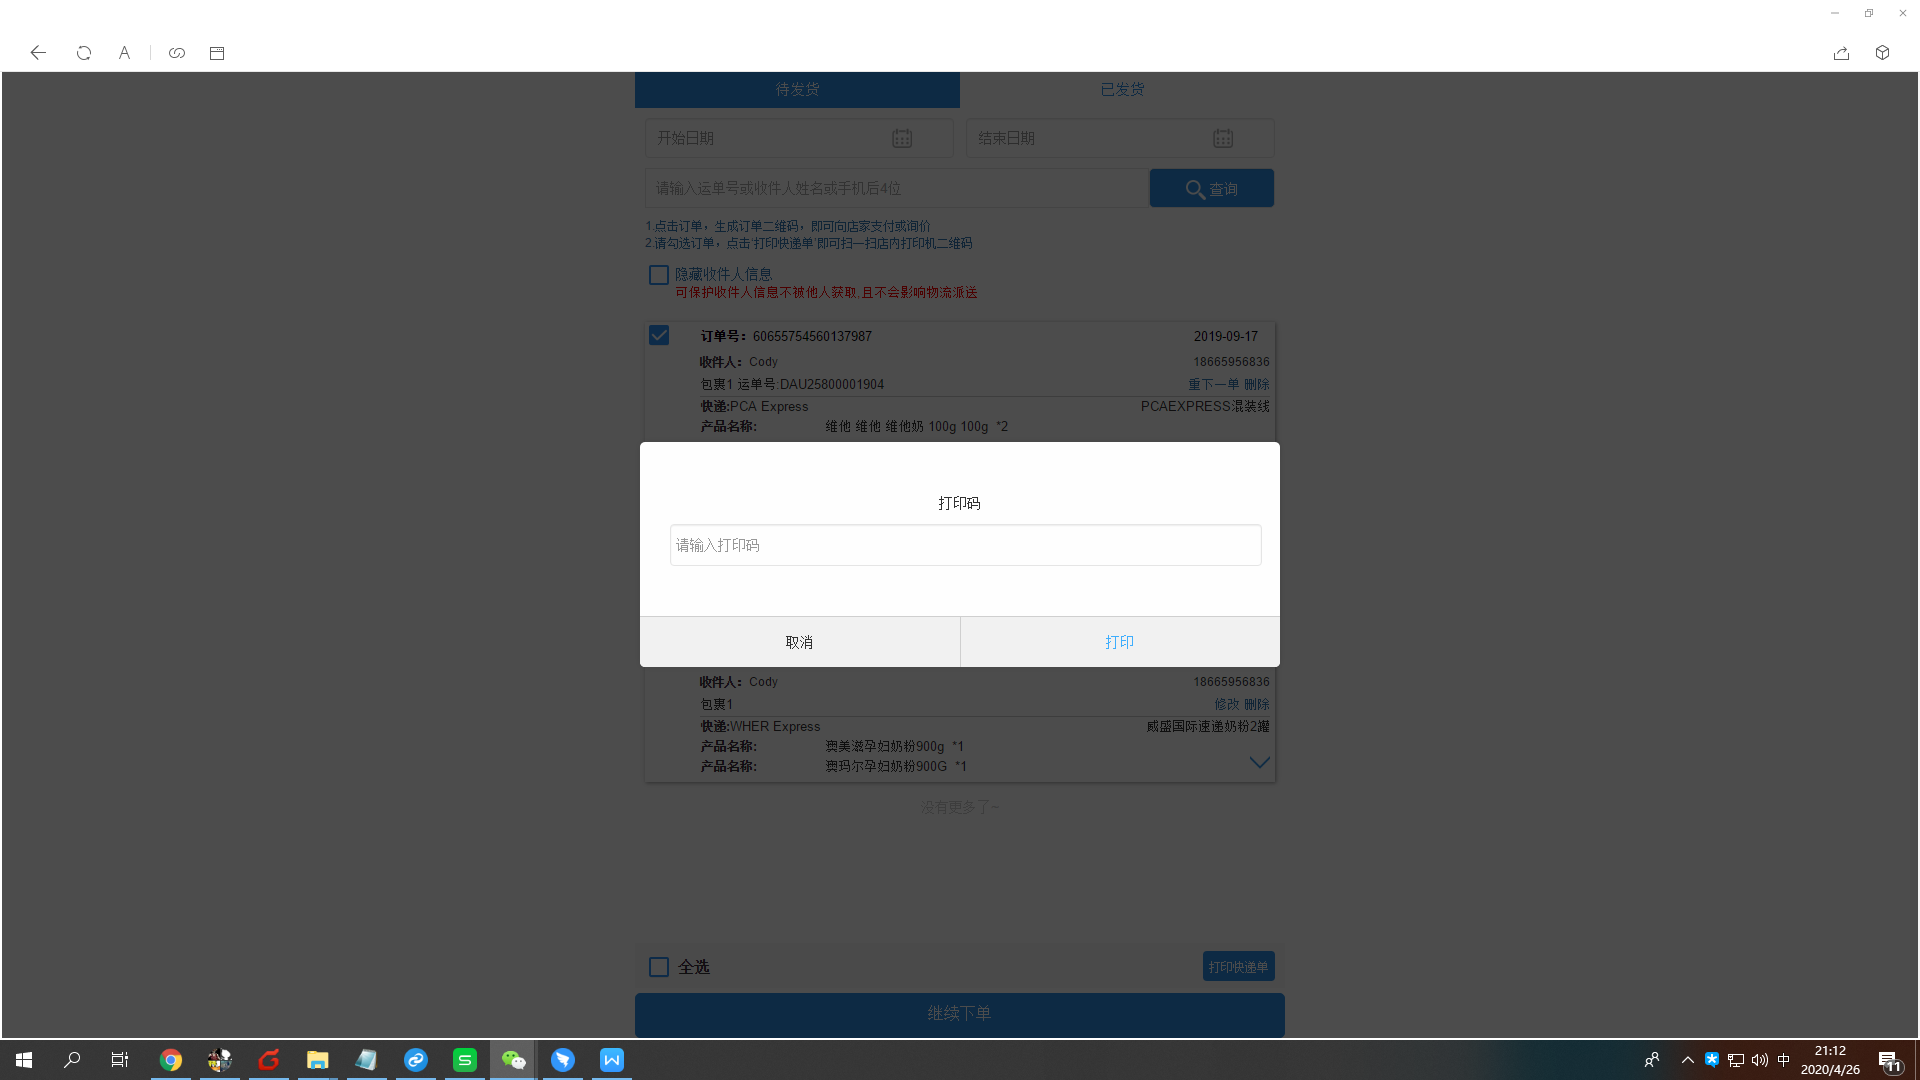
View number: convert the QR code of the thermal printer into a number, and provide it to the PC to log in to the Overseas shopping Assistant to print the logistics bills.
[Operating steps]
Step 1: After placing an order on the PC-side Overseas shopping assistant, open "My parcel", check the package that needs to print the logistics bill, and click "Print bill".
Step 2: Output the number of the QR code viewed in the pop-up window to complete printing.
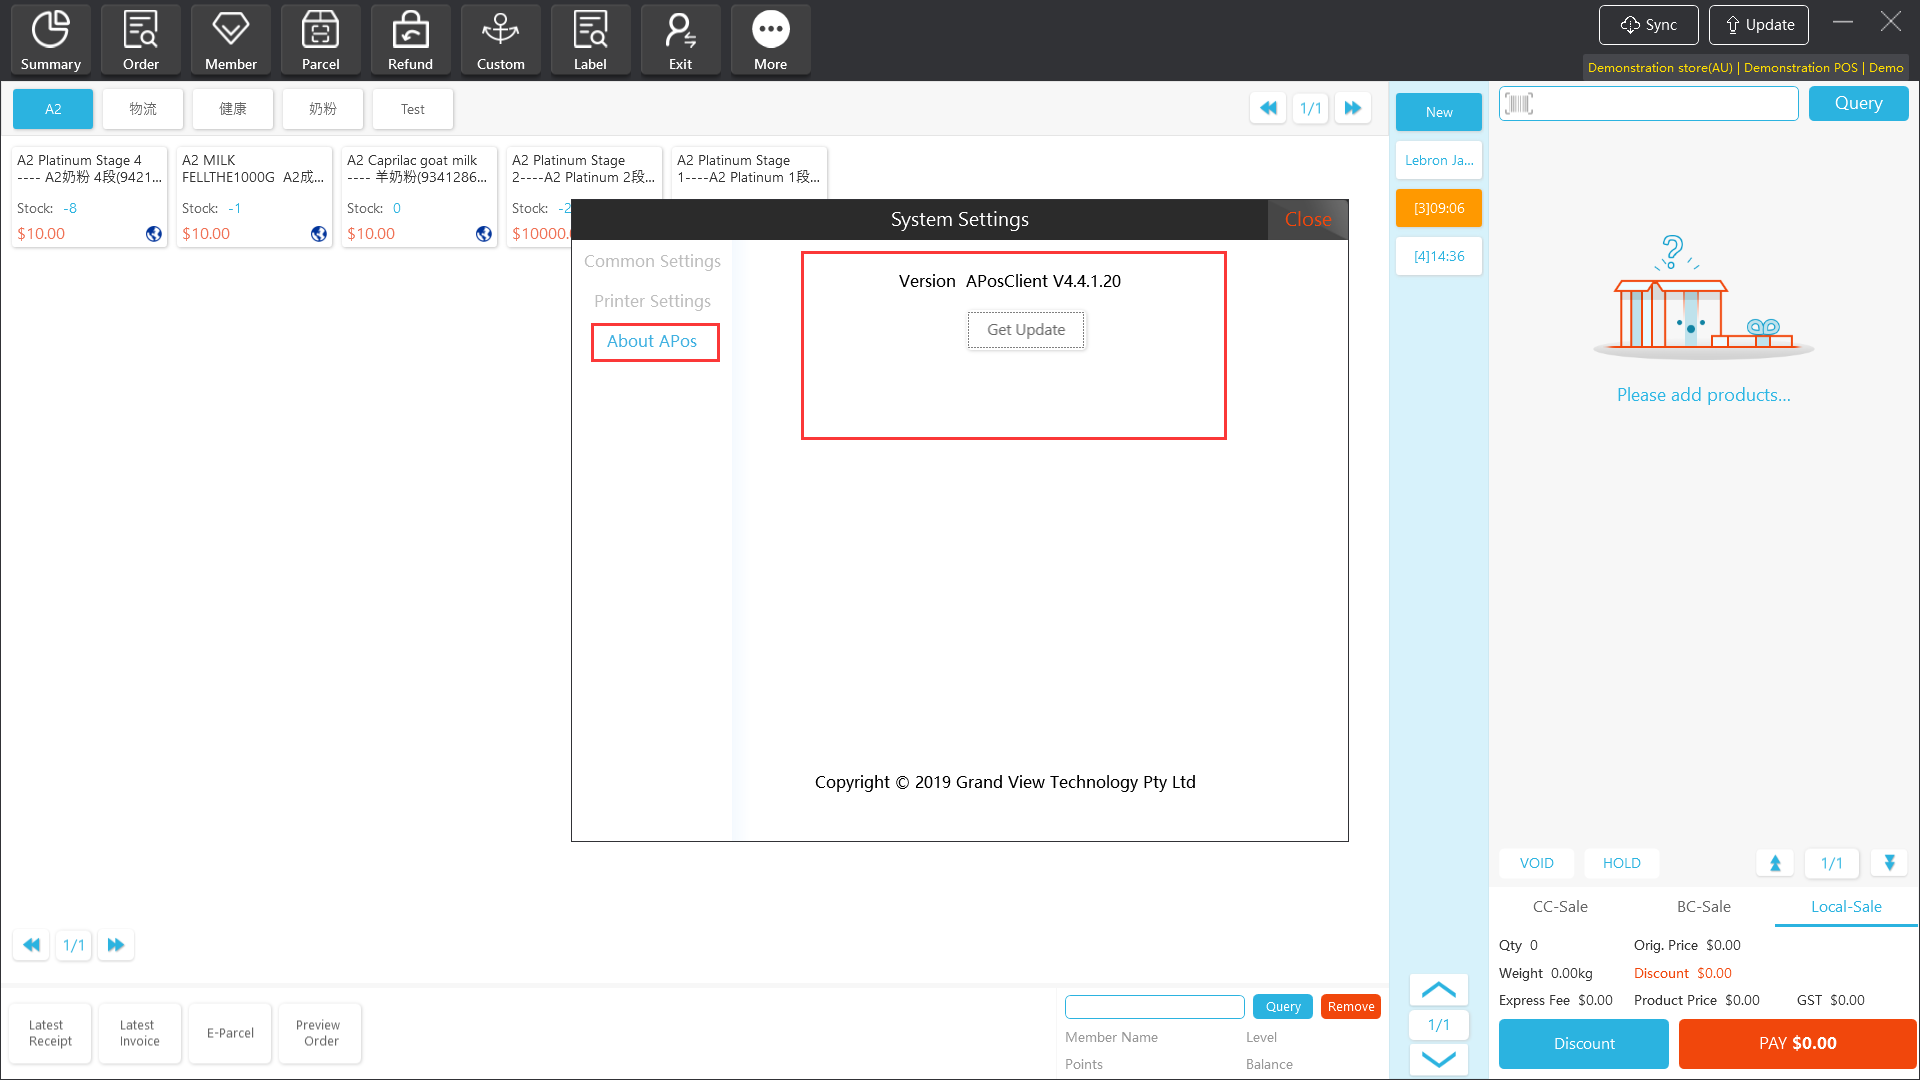
12.1.3 About Apos
"About Apos" page can view the current system version.
"Get updates" can detect whether is the latest client version issued.
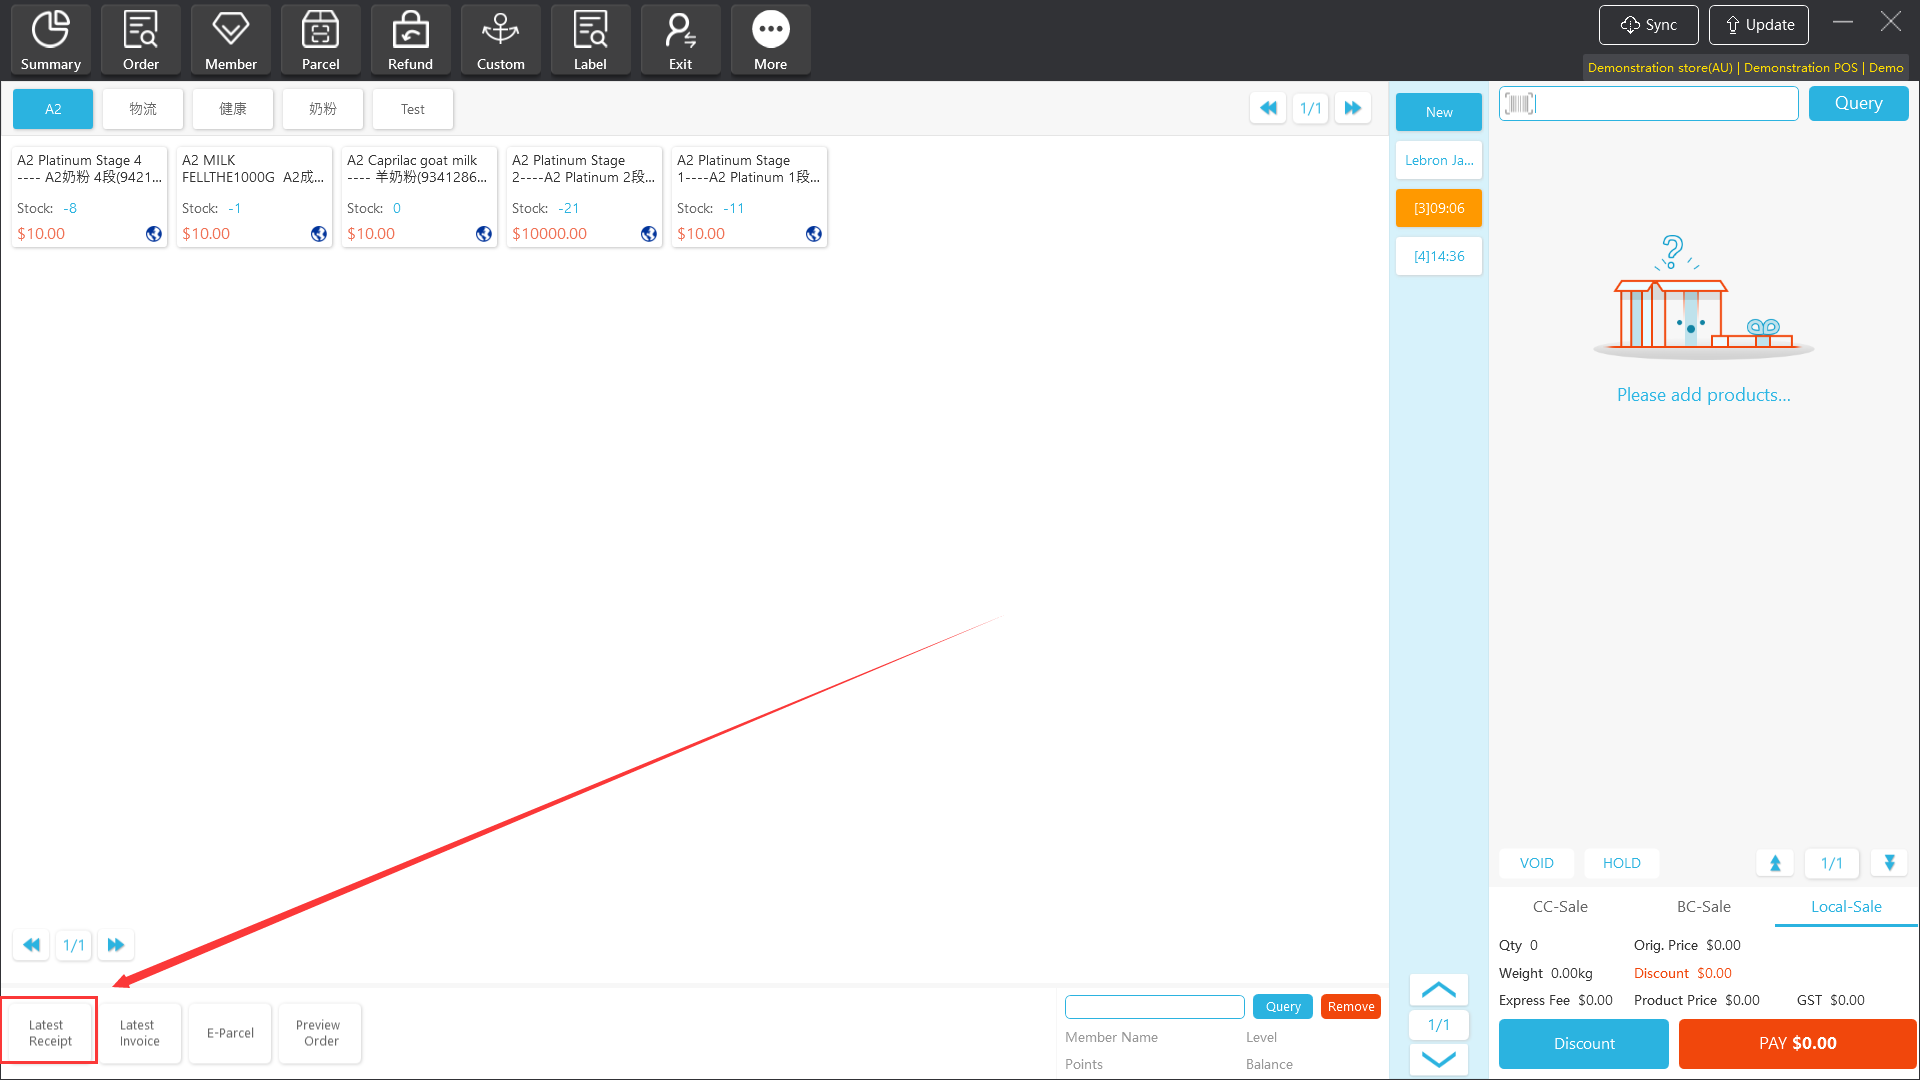
XIII. Latest Receipt
The Apos client provides a quick one-click re-print latest receipt function.
[Operating steps]
Step 1: Click "latest Receipt" to reprint the last receipt of the checkout order.
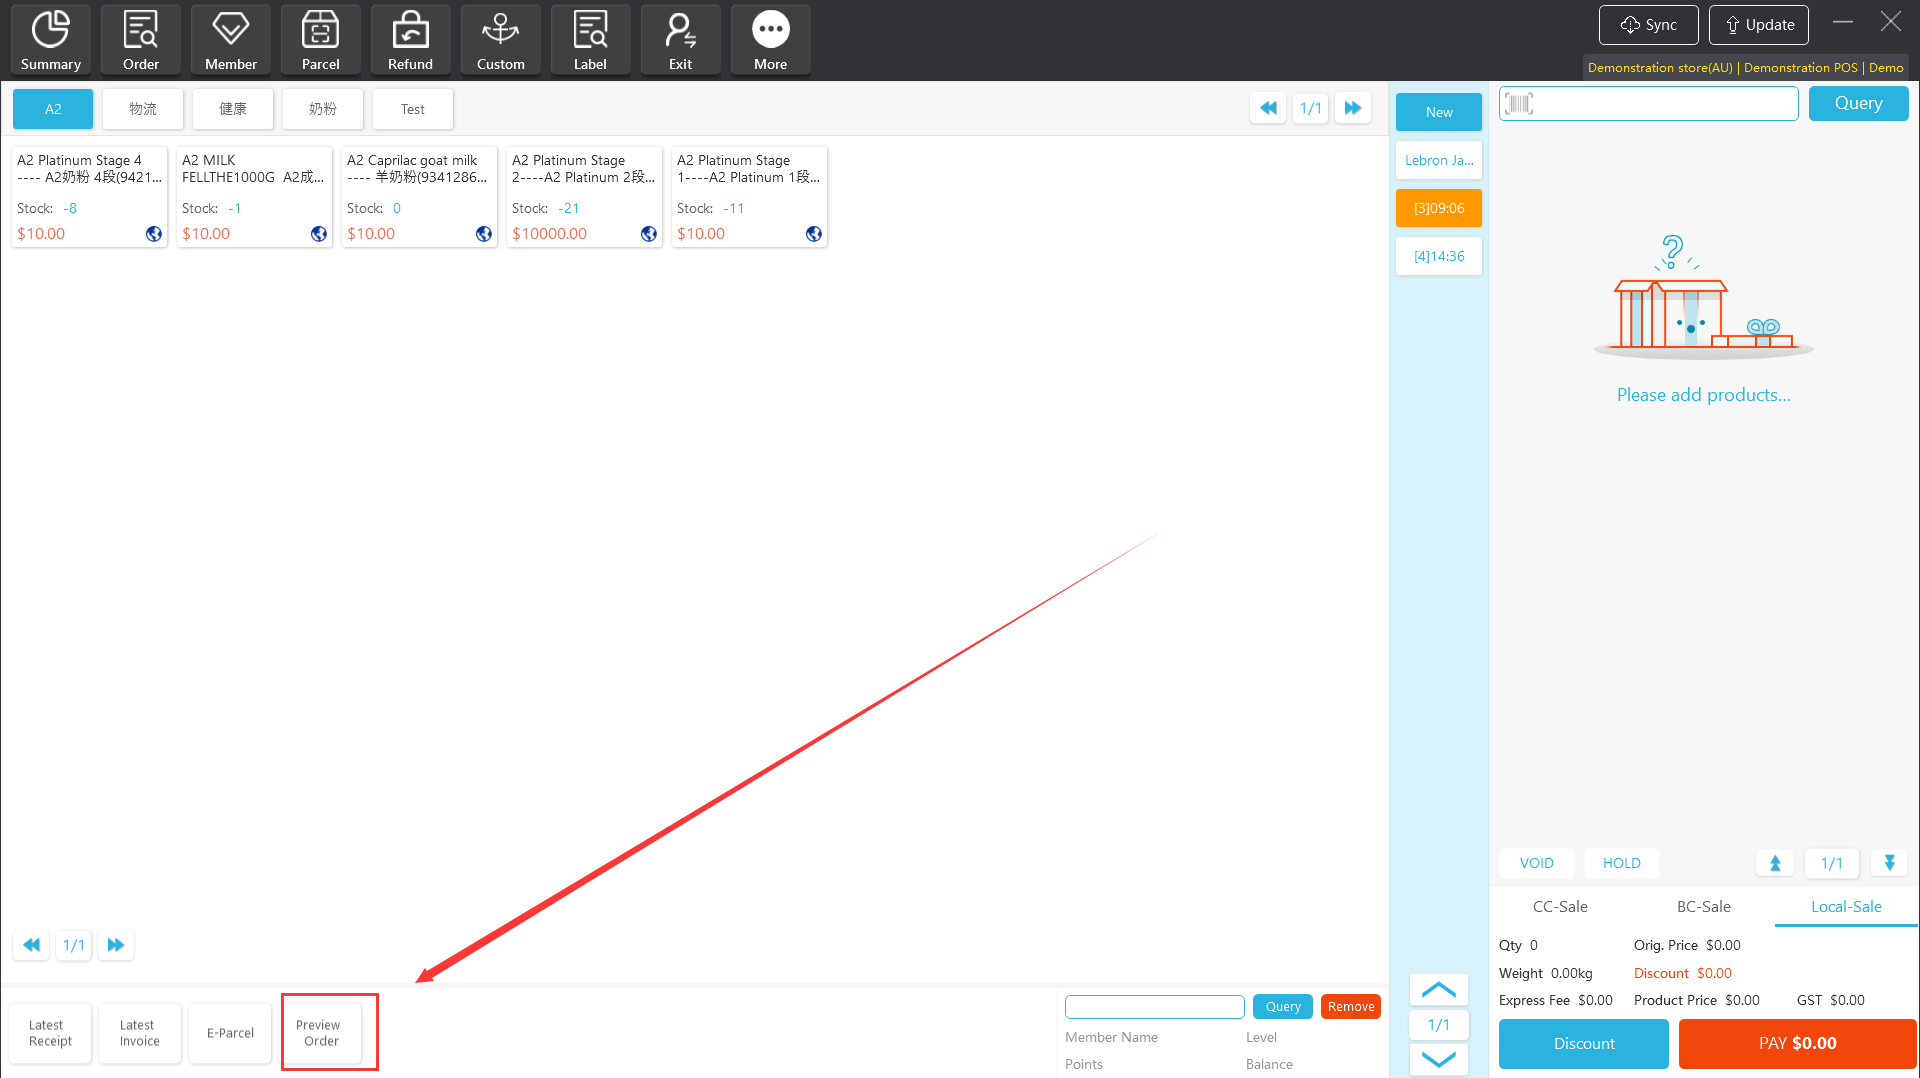
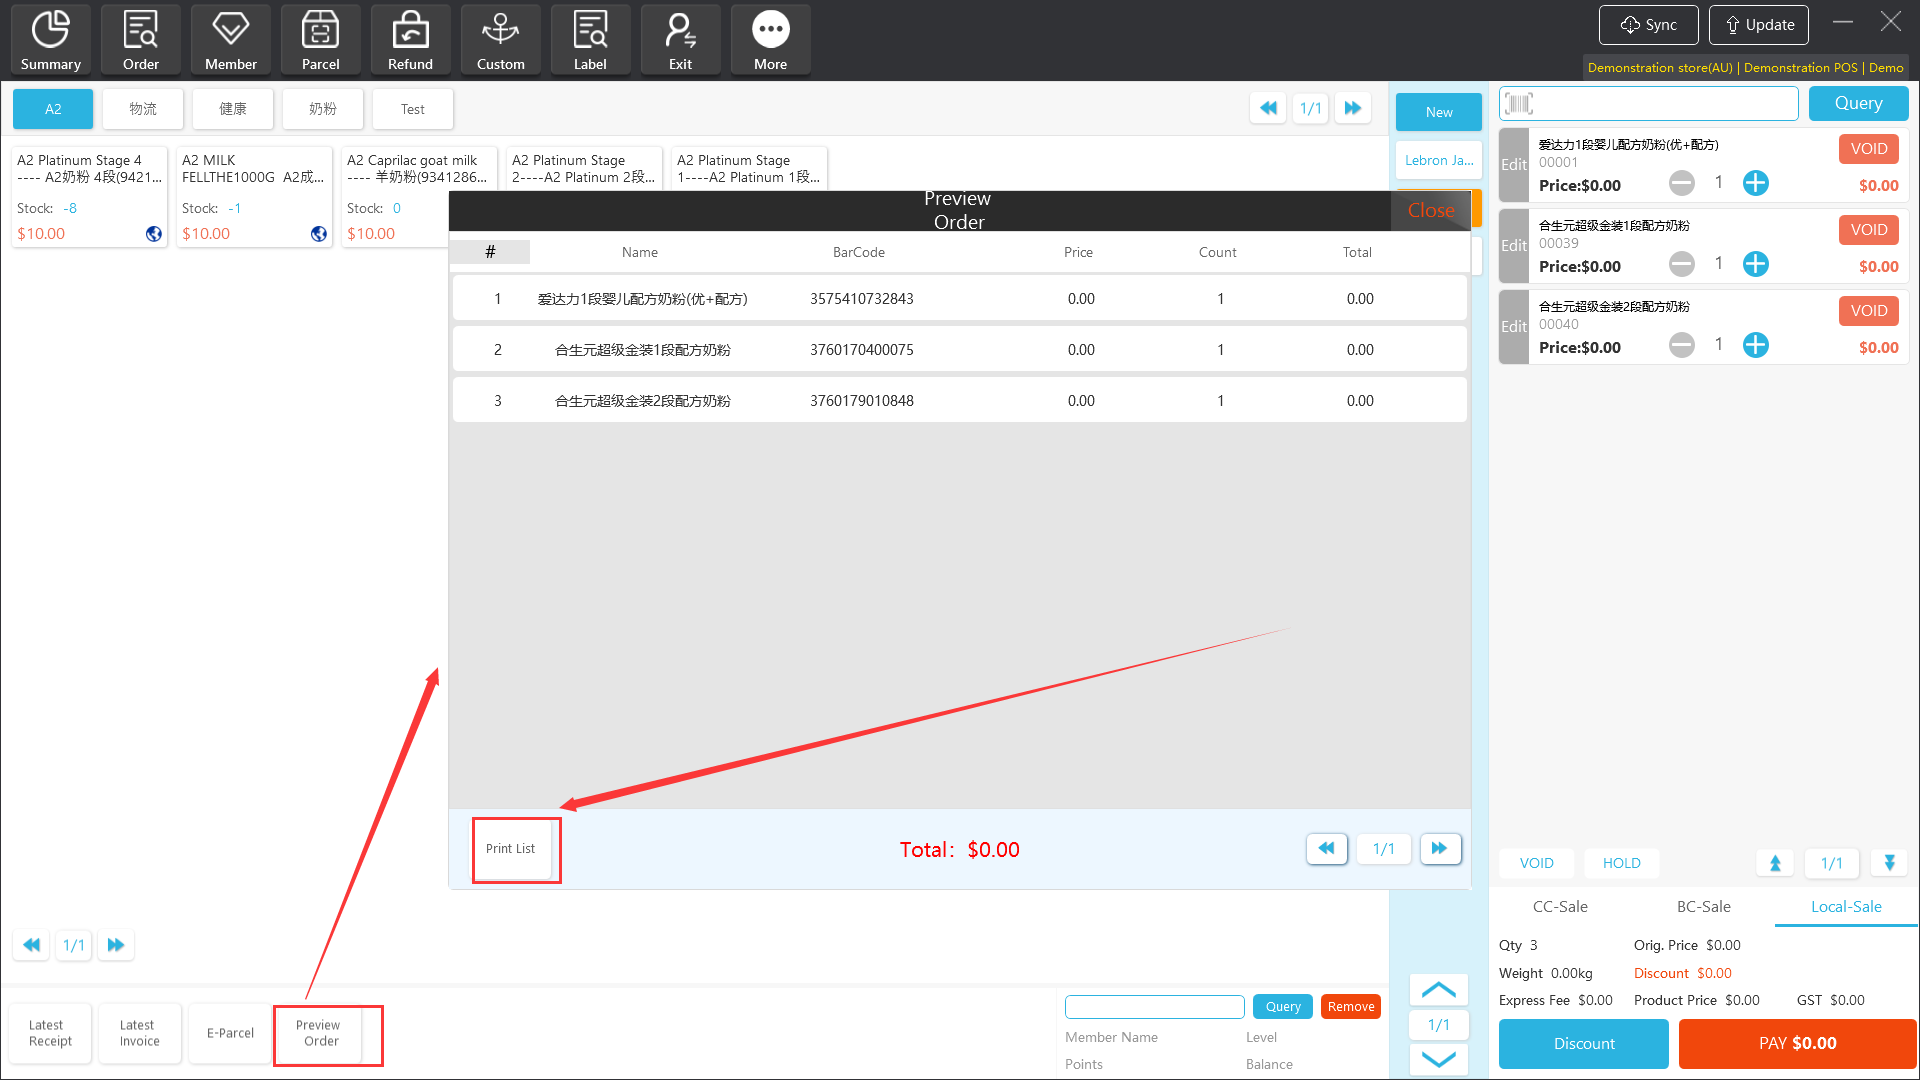
XIV. Preview Order
Apos client provides order preview and pre-print receipt function.
[Operating steps]
Step 1: Click "Preview Order", the order preview interface will pop up. If the cashier client is a dual-screen machine, the main and secondary screens will be displayed.
Step 2: Click "Print list" to print out the preview receipt.
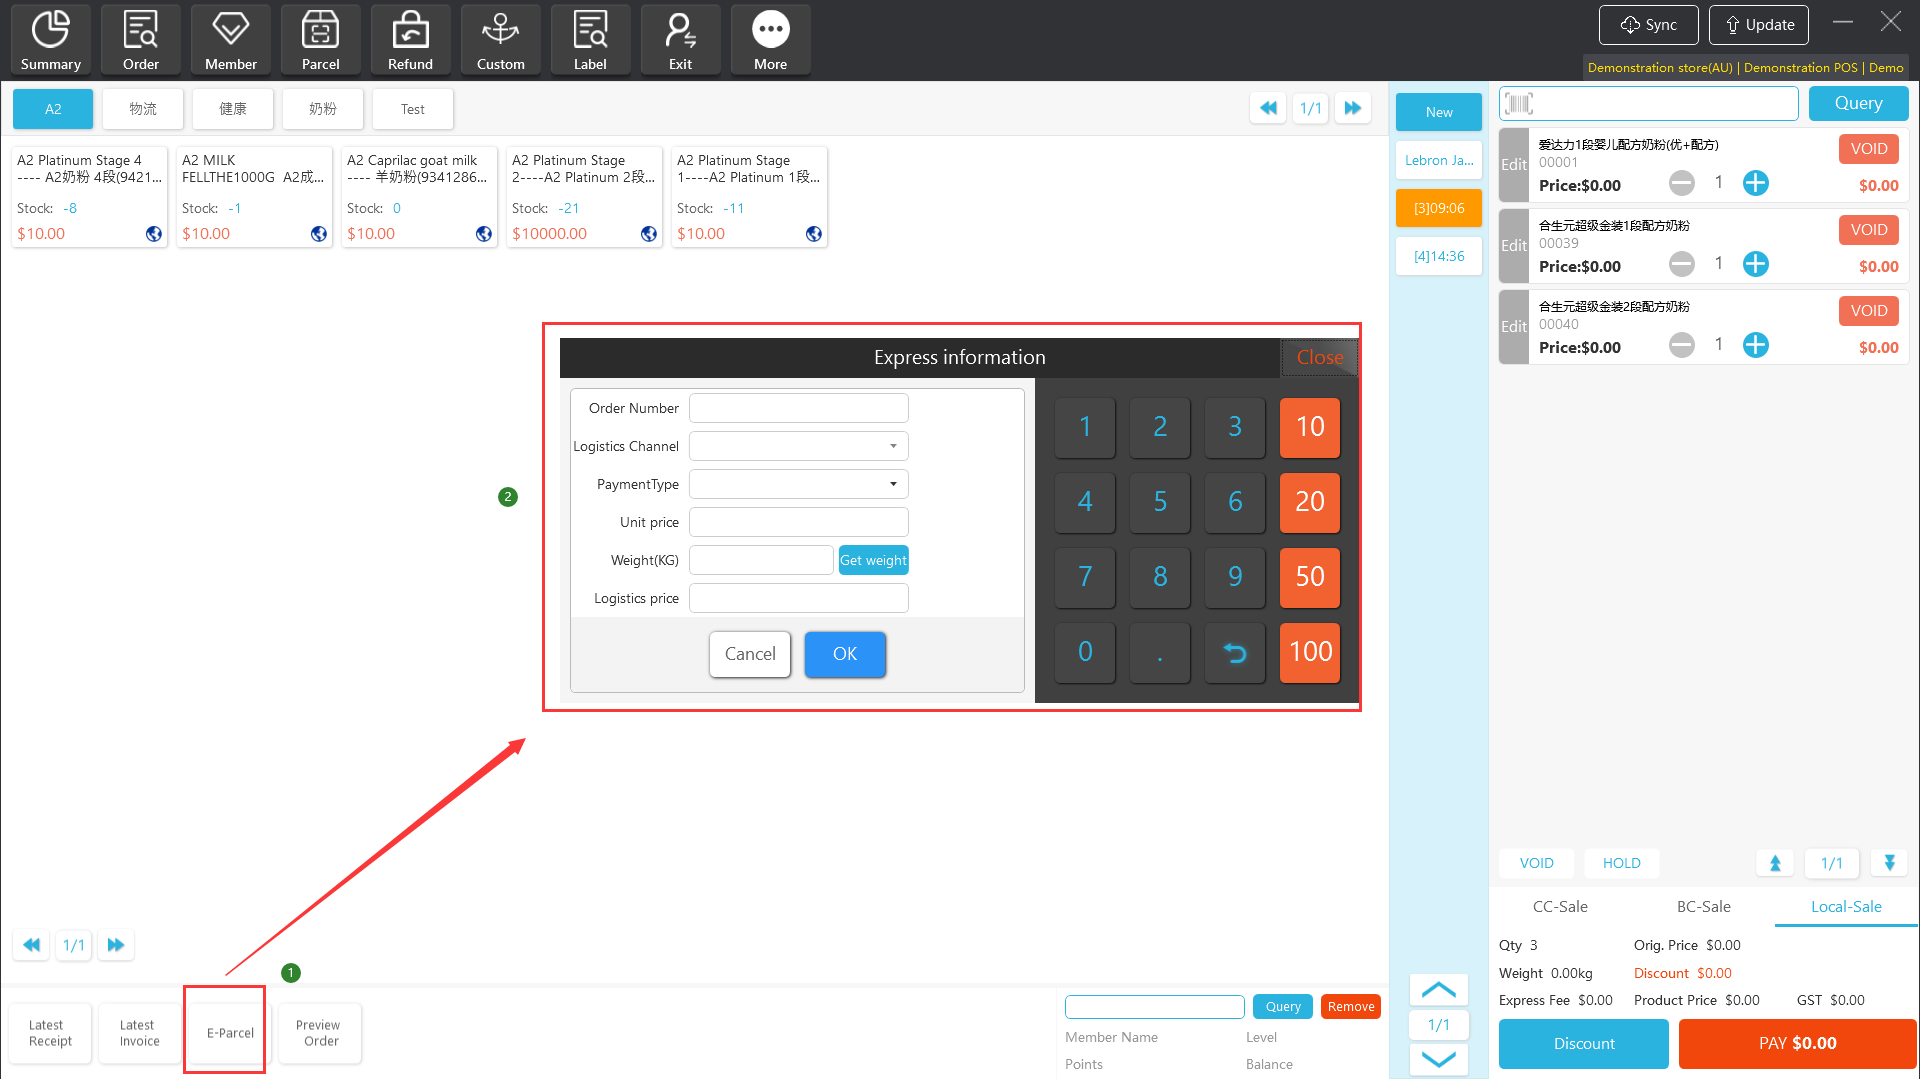
XV. E-Parcel
For orders placed by Overseas Shopping Assistant, Apos stores can provide special logistics shipments and charges.
Usage case: After the customer places an order with the Overseas Shopping assistant, he/she purchases settlement products at store A, sends goods to store B, and settles logistics costs.
[Operating steps]
Step1: Click "E-Parcel" to pop up the express delivery information interface.
Step 2: Scan/Enter the parcel logistics tracking ID of the overseas shopping assistant to place an order, the system automatically reads the logistics channel/charging method/ logistics unit price (the logistics channel / charging method / logistics unit price of the store needs to be configured in the background management, refer to " Chapter 9 " Logistics Management" of Operation Manual for Apos V4.5.2), enter the weight of the package, the system automatically calculates the total logistics price, click "OK" to generate a logistics fee in the shopping cart.
XVI.Promotions
The "Promotions" function of the Apos client supports discounts on the entire order manually or through a discount code.
Notes: 1. This is a discount for the entire order. Whether the products that have participated in other promotional activities are still discounted for the entire order, you need to configure "whether to support discounts or discounts" in the corresponding event details of the "marketing activities" in the management background "; The current version of the" Price-Break "campaign and the" Redemption "campaign do not support additional discounts.
- Commodities that have manually modified the selling price of commodities will no longer enjoy the discount of the entire order.
[Operating steps]
Step 1: Click "Promotions", a discount information interface pops up.
Step 2: Discount rate: You can enter the discount rate to discount the entire order, and the system automatically calculates the settlement amount.
Final payment: It can be settled by directly entering the received-amount amount, and the system automatically calculates the discount rate.
Coupon code: You can enter the discount code to discount the entire order; for the configuration of the discount code, please refer to 8.3 Coupon under Chapter 8 "Promotion Management" in the "Operation Manual for Apos v4.5.2".

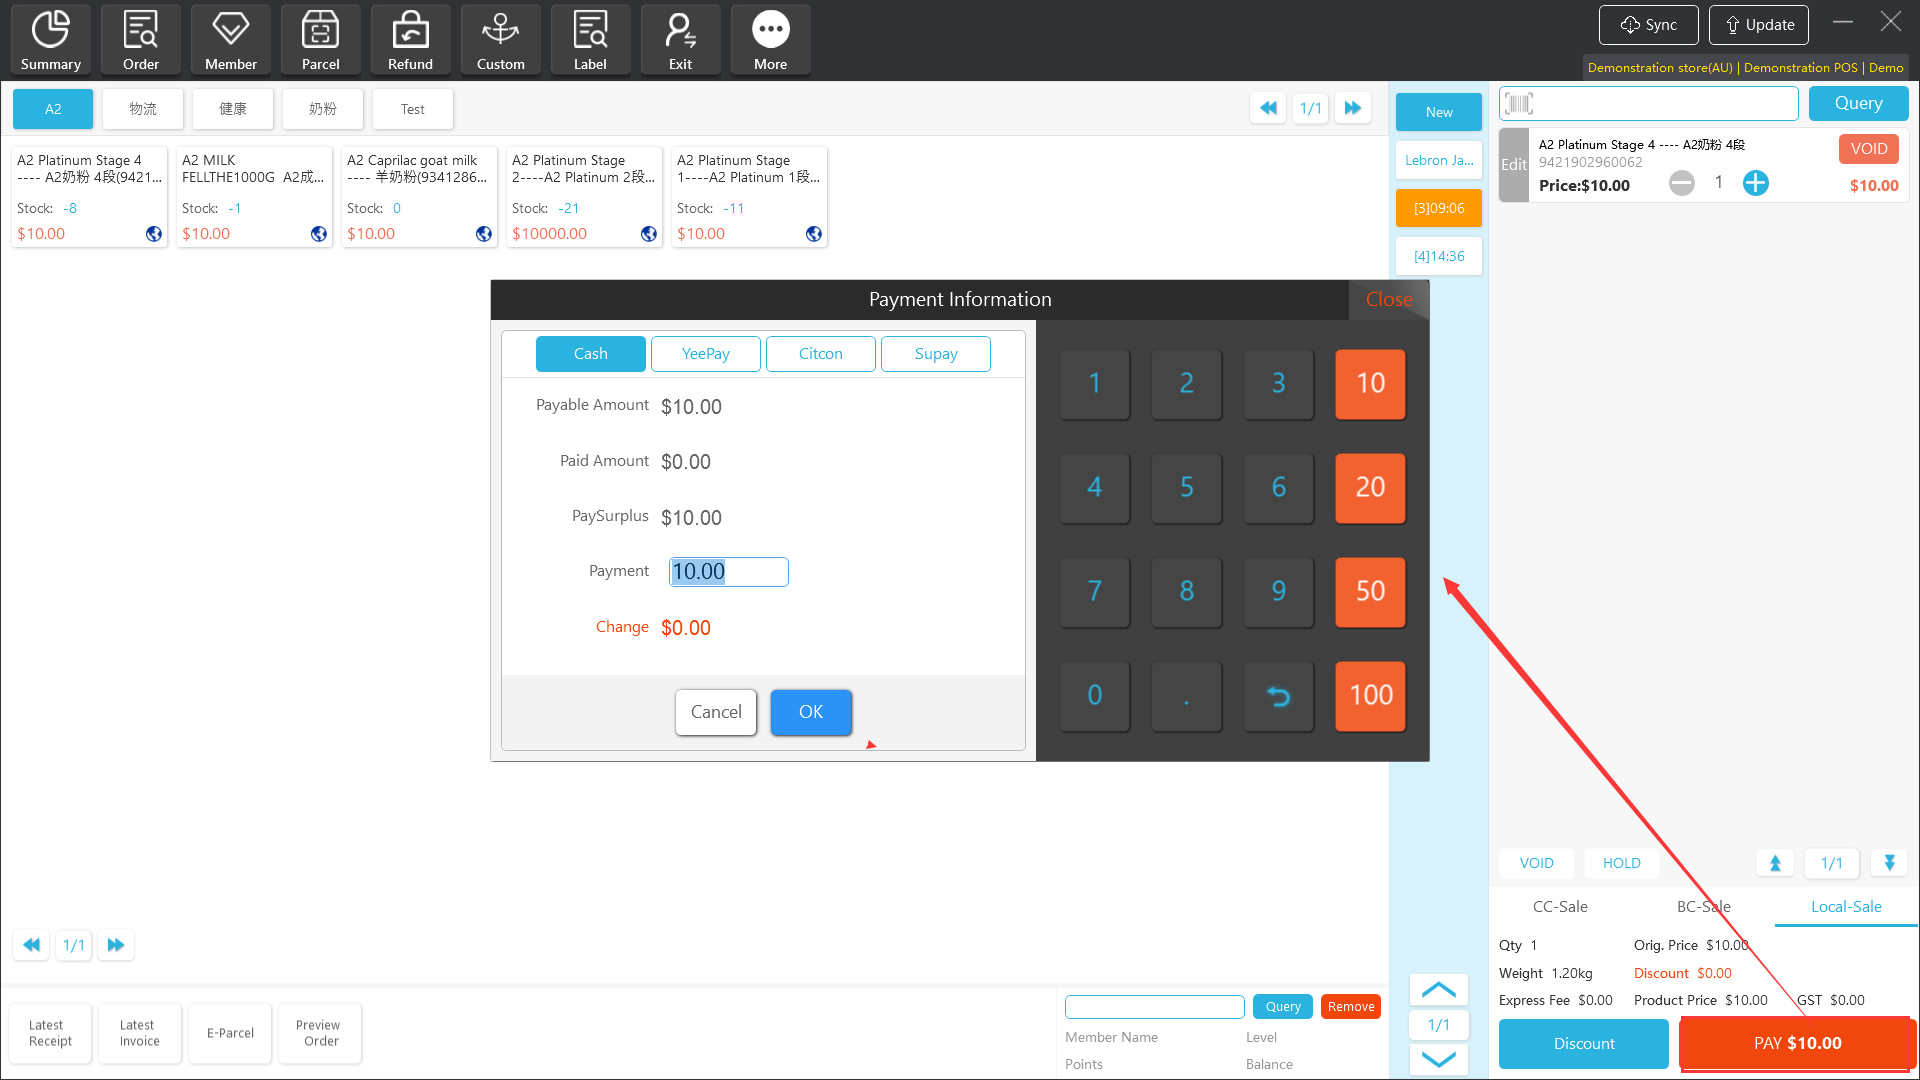
XVII. Settlement
When the Apos client order is settled, the system will match the corresponding payment method according to the sales type;
Local sales model: match all payment methods that support local sales/all payment methods configured in the background store.
CC/BC sales model: only match the background configuration to support export sales/all online payment methods.
For the payment method configuration of the store, please refer to "Payment Management" under "Store Management" in Chapter 7 "Operation Management" of the "Operation Manual for Apos V4.5.2".
[Operating steps]
Step 1: Click: "Pay", select the payment method, after payment, click "OK" to complete the payment.
Notes: For third-party scan code payment, after the payment is completed by the customer, the system will automatically close the settlement window after receiving the payment result.

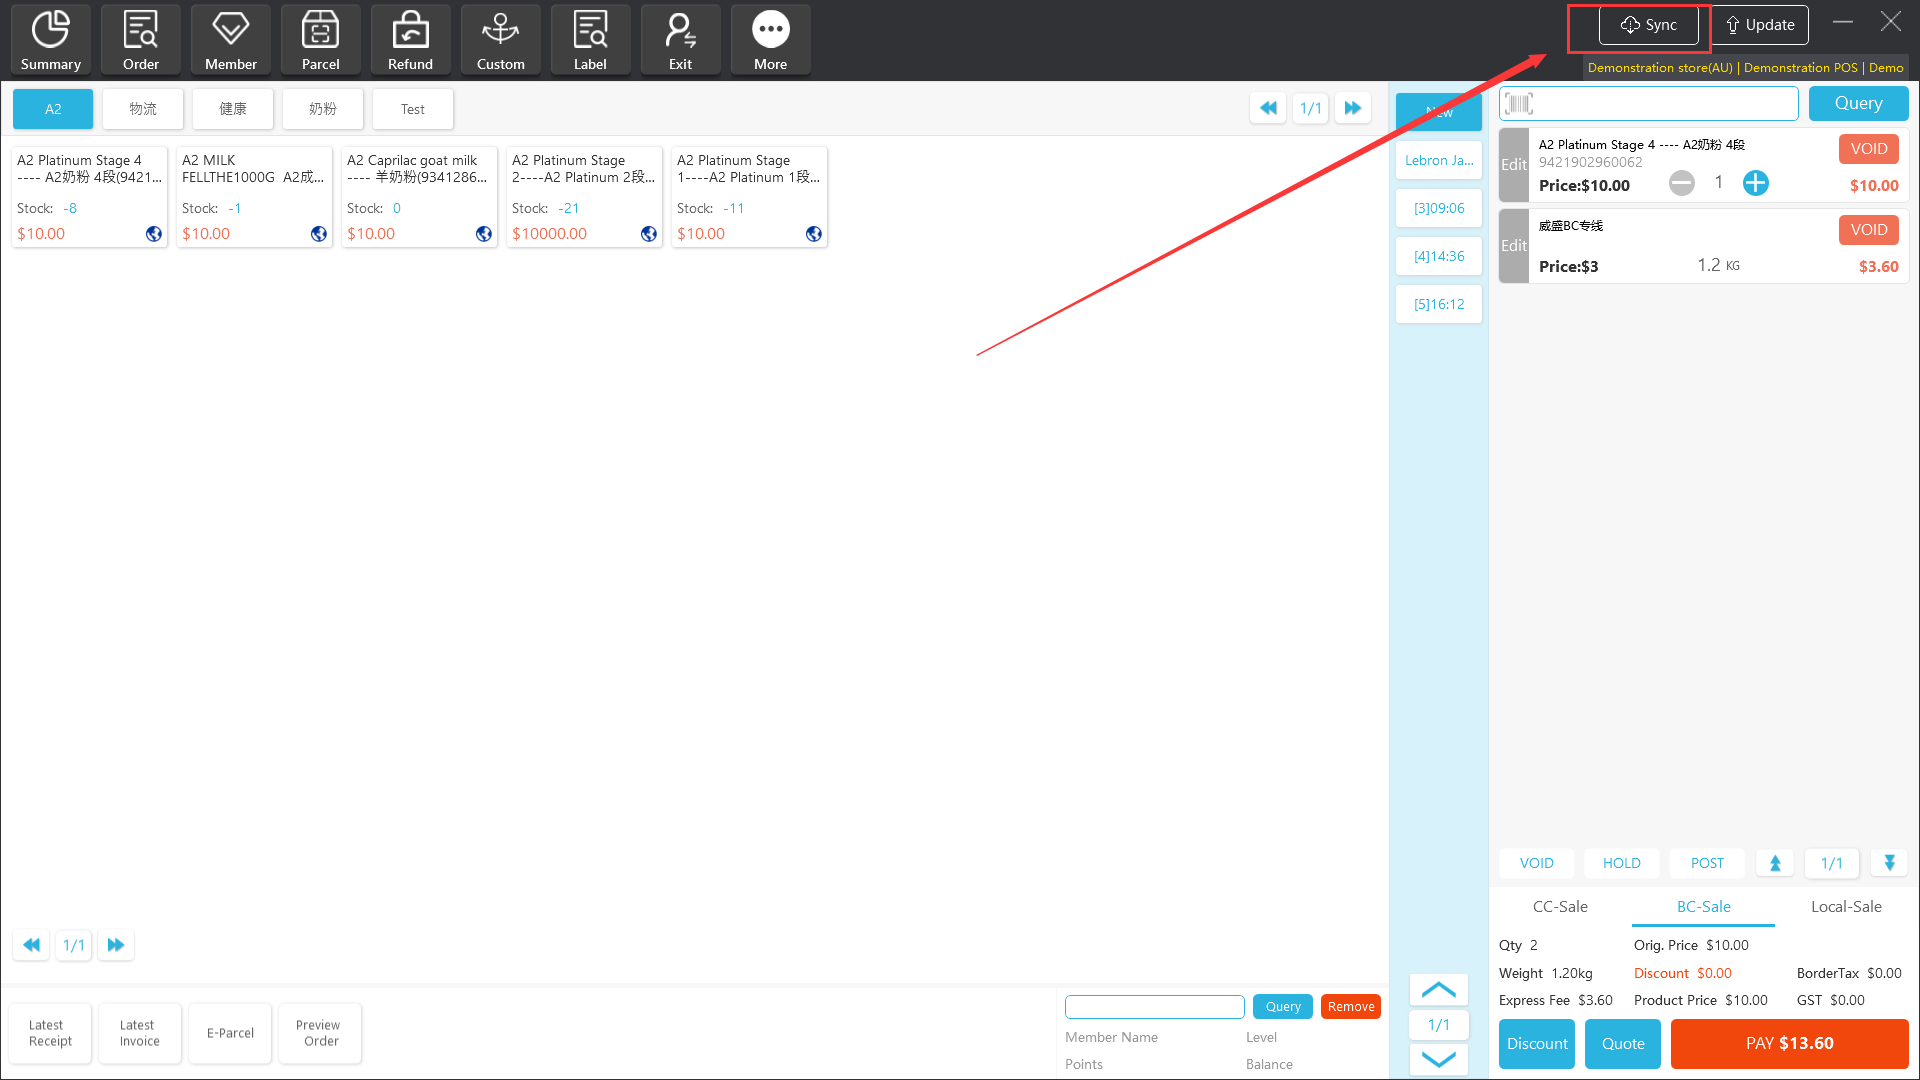
XVIII Data Sync
When man-made data or configuration changes in the management sever background, the Apos client needs to click "Data Sync" to obtain the latest data or configuration.
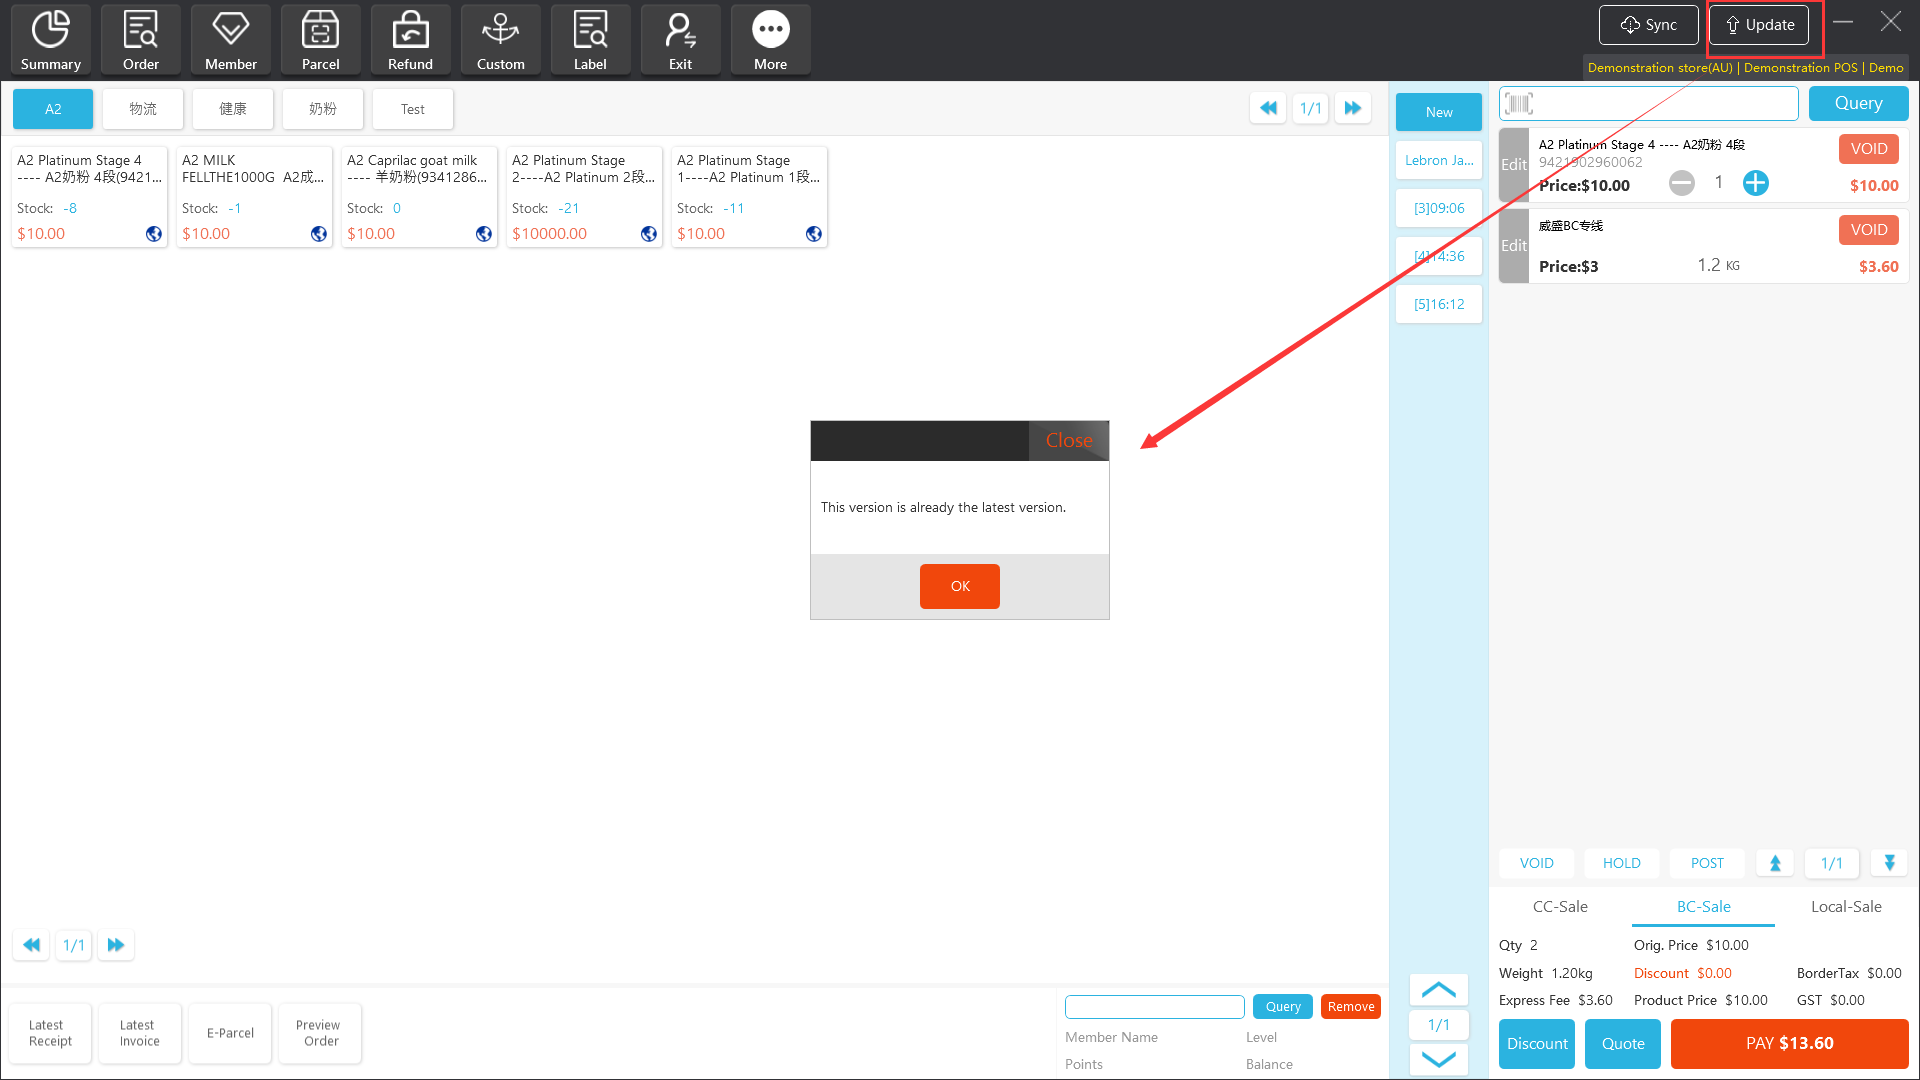
XIX Update
When a new Apos client software version is released, click on the "Update" option, the system will automatically detect the latest version and can update it with one click.
Notes: 1. The “Update” function has the authority to manage and control, and only the function with the authority obtain user can be operated. For the specific authority assignment, please refer to the “Operation Manual for Apos V4.5.2”
- If the upgrade method of the newly released cashier client version is forced upgrade, start the client, after logging in to the account, the system will automatically pop up an update window, and the update can be used only after the update is completed.
XX Cross-border sales
The Apos system integrates multiple logistics services and push customs clearance services to support cross-border BC/CC sales.
At the same time, it provides the "Overseas Shopping Assistant" public account service to meet the orders of stores and online cross-border sales.
Notes;BC/CC sales of domestic commercial tenants can only sell dropshipping products.BC/CC sales of overseas commercial tenants can sell dropshipping products separately,cross-border products can also be sold separately.Can also combine dropshipping products and cross-border products sales.
Local products don’t support CC/BC sales.
20.1 BC Sale
For BC direct sales orders, the system will automatically calculate and collect the cross-border comprehensive tax.
[Operating steps]
Step 1: After the product is added to the shopping cart, select "BC-sale" and click "Send".

Step 2: Fill in the sender and receiver information and select the logistics company (logistics channels and prices are configured in the management background "logistics management"), click "OK".

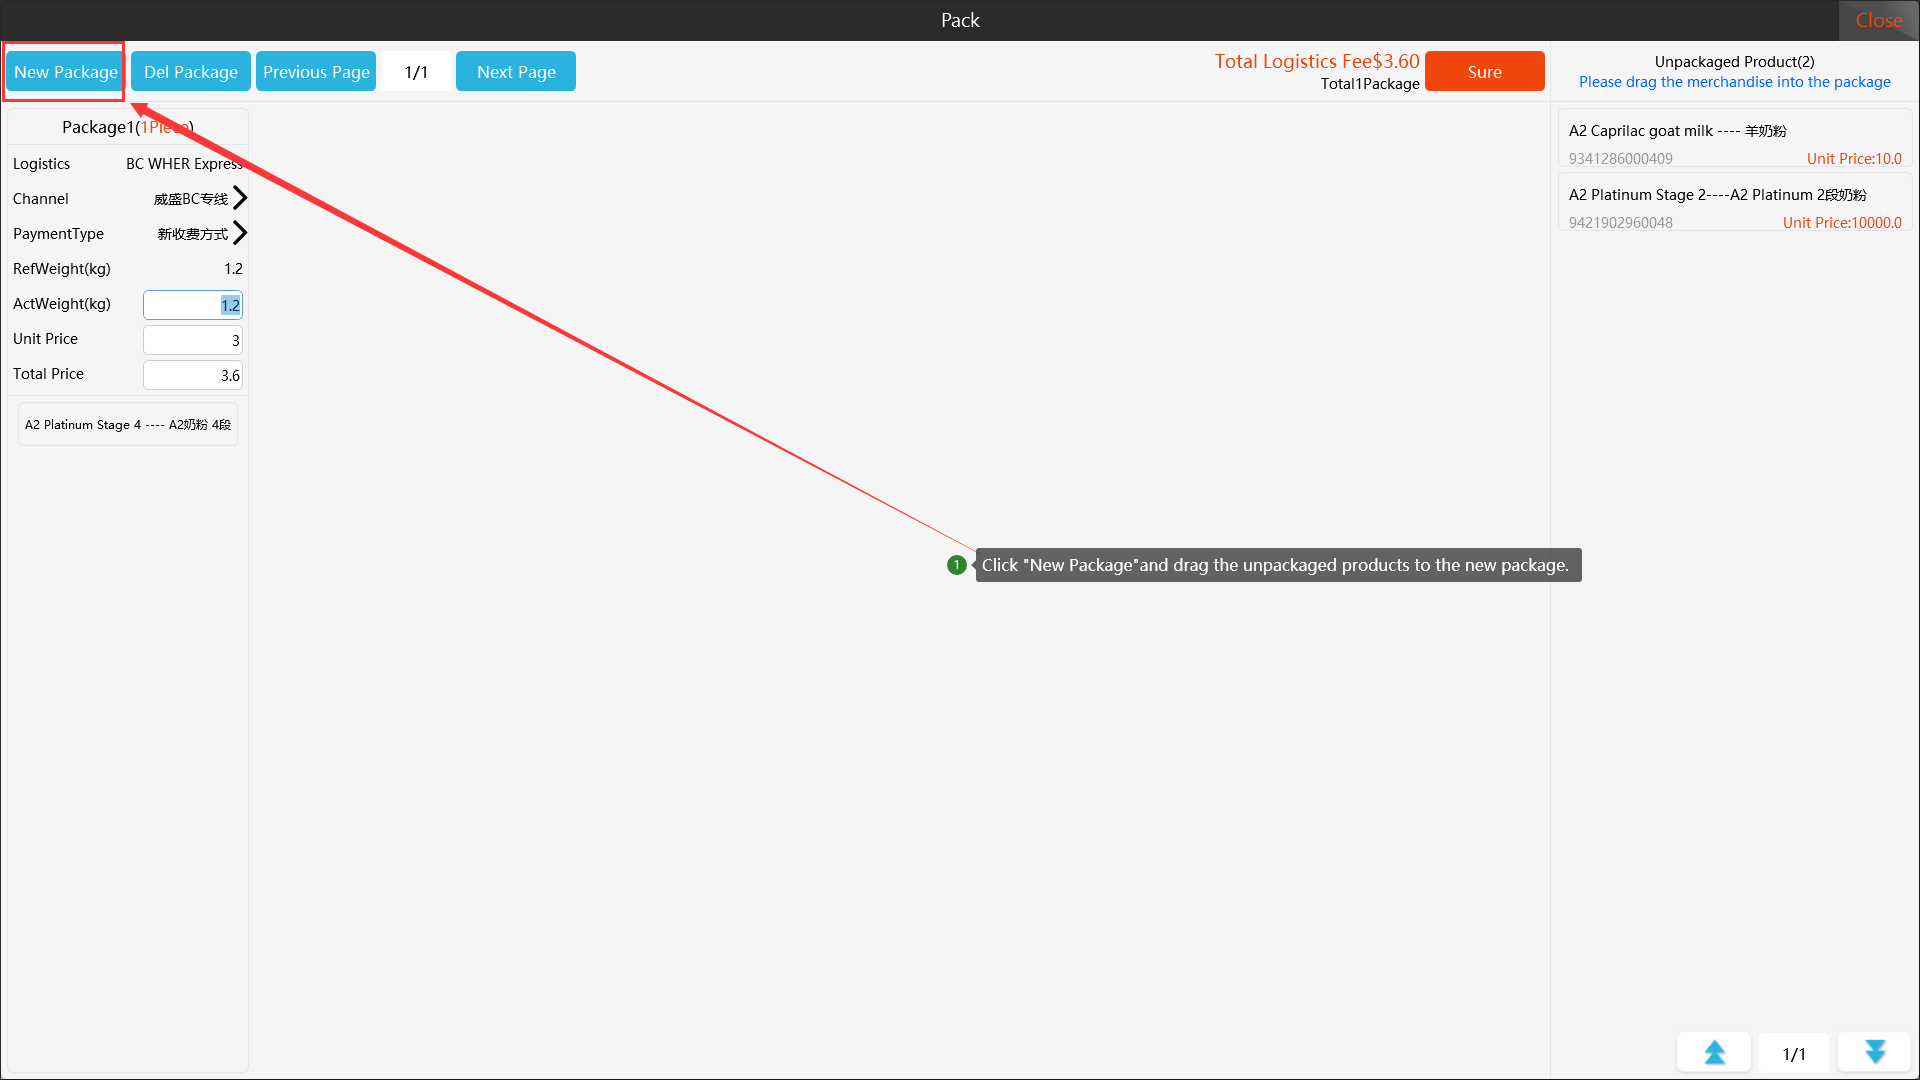
Step 3: The system automatically divides the goods into different packages according to the packing rules (for the configuration of the packing rules, please refer to the "Packing Rules" under "Logistics Management" in the management background). "Add package" to complete the box.


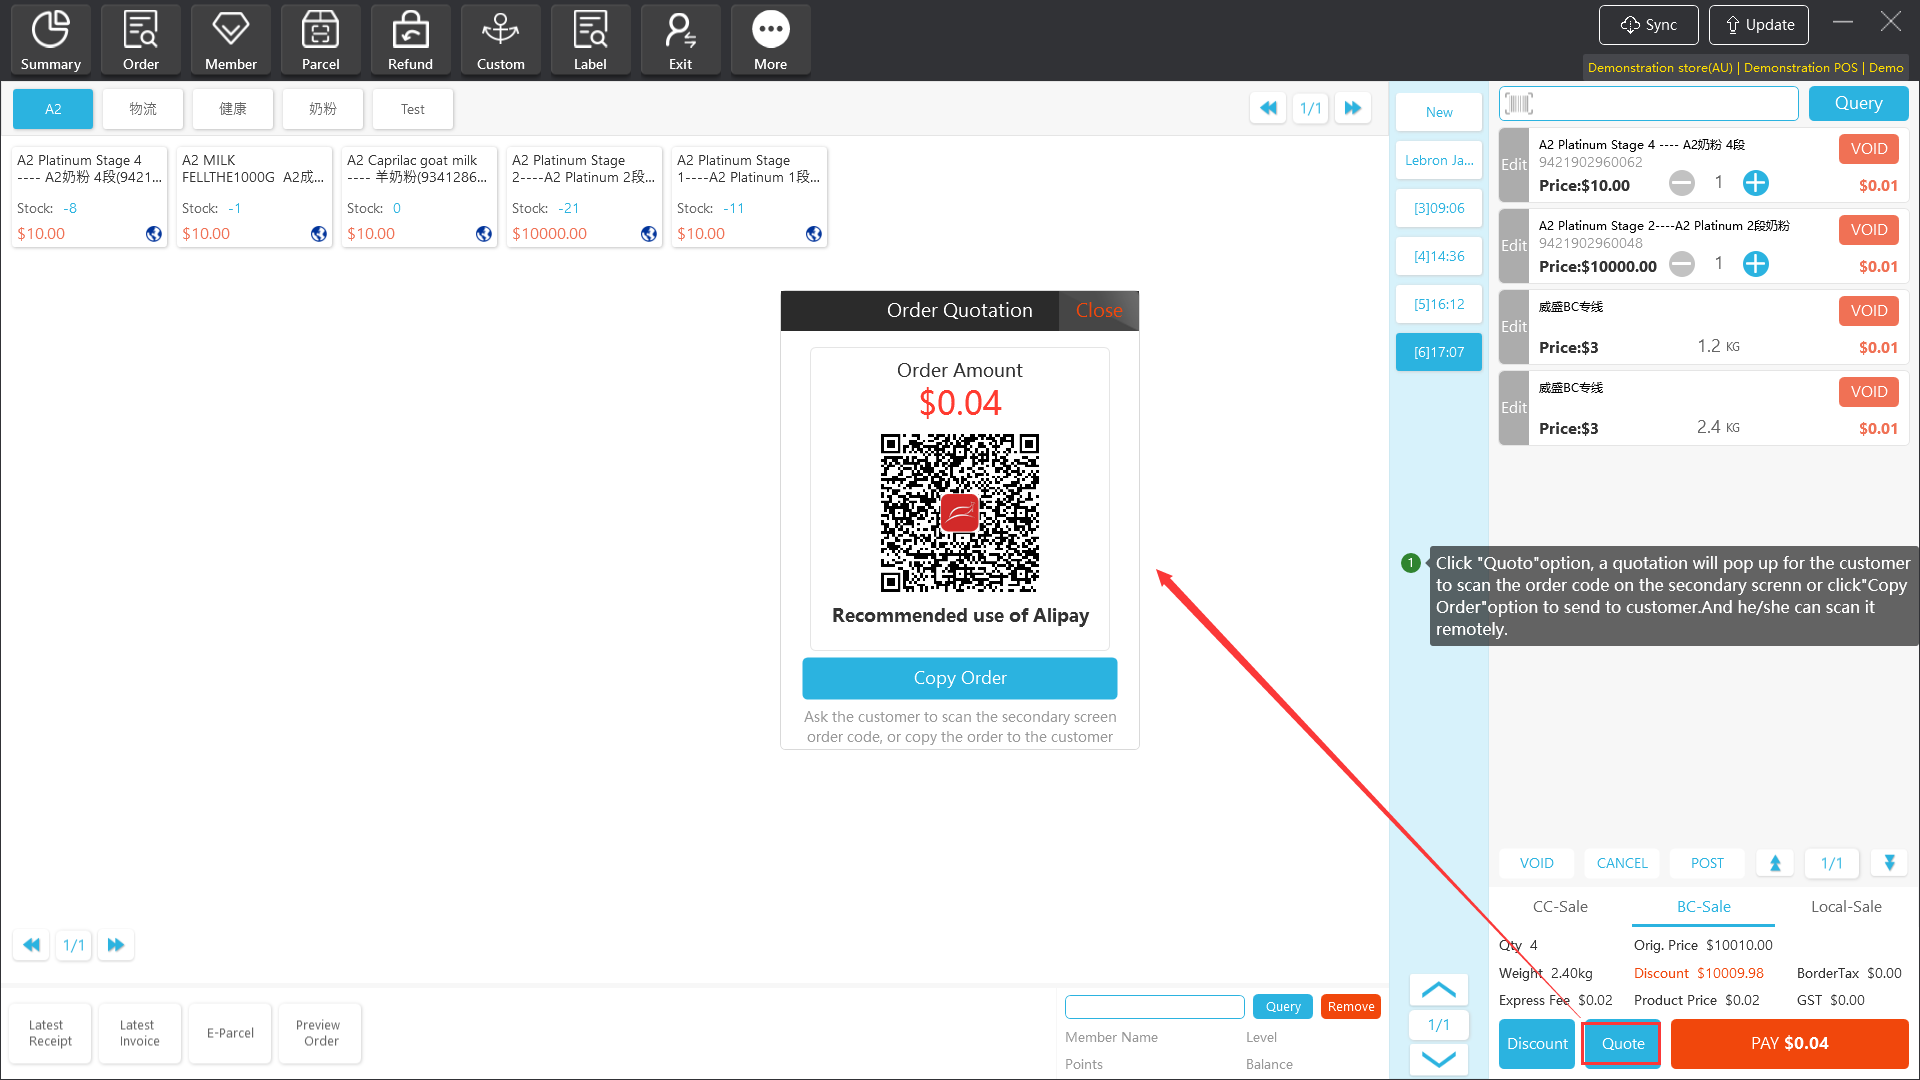
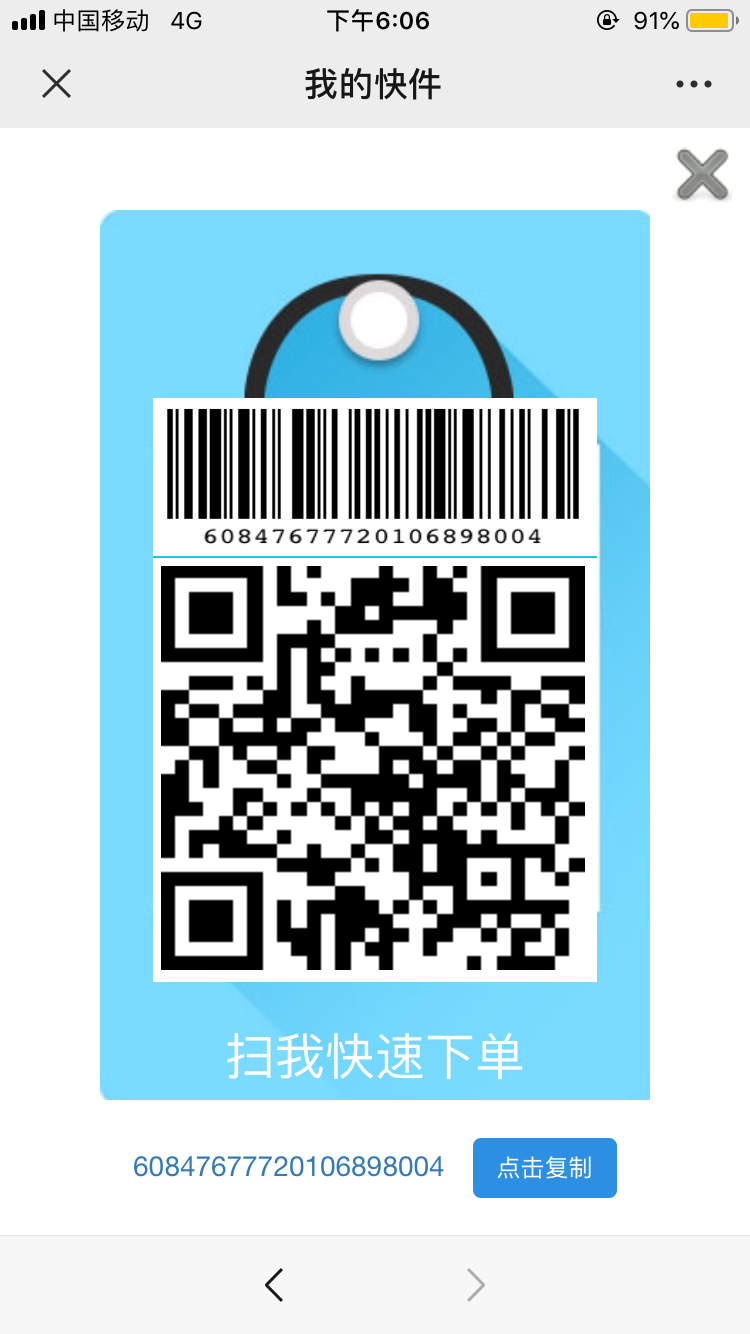
Step 4: Click ‘Quotation’, the QR code of the order will be displayed on the main and secondary screens, the QR code of the quotation can also be copied and sent to the customer, and the customer can scan and pay on the remote mobile terminal,
Notes: When using "copy" quotation, the order will be automatically suspended as a yellow pending order.
Step 5: The customer uses Alipay to scan the QR code of the quotation.
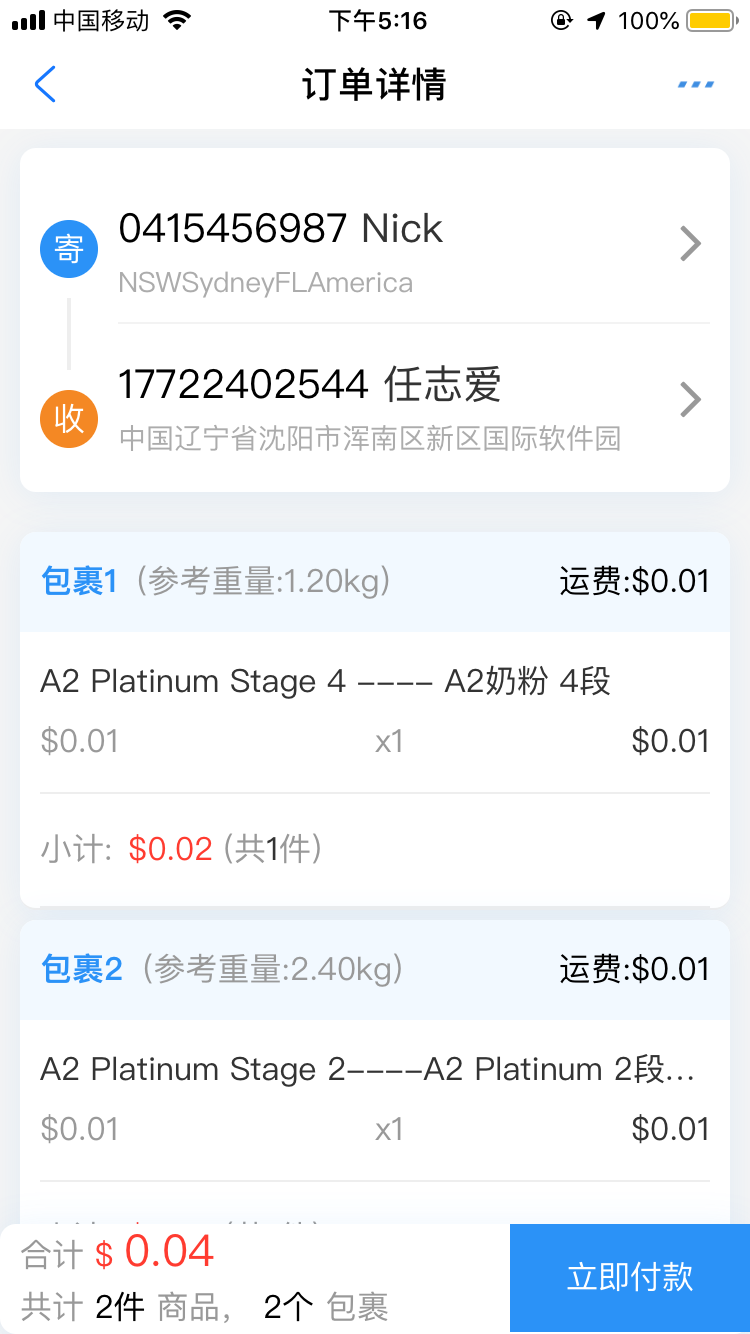
Step 6: Copy the order to the customer.
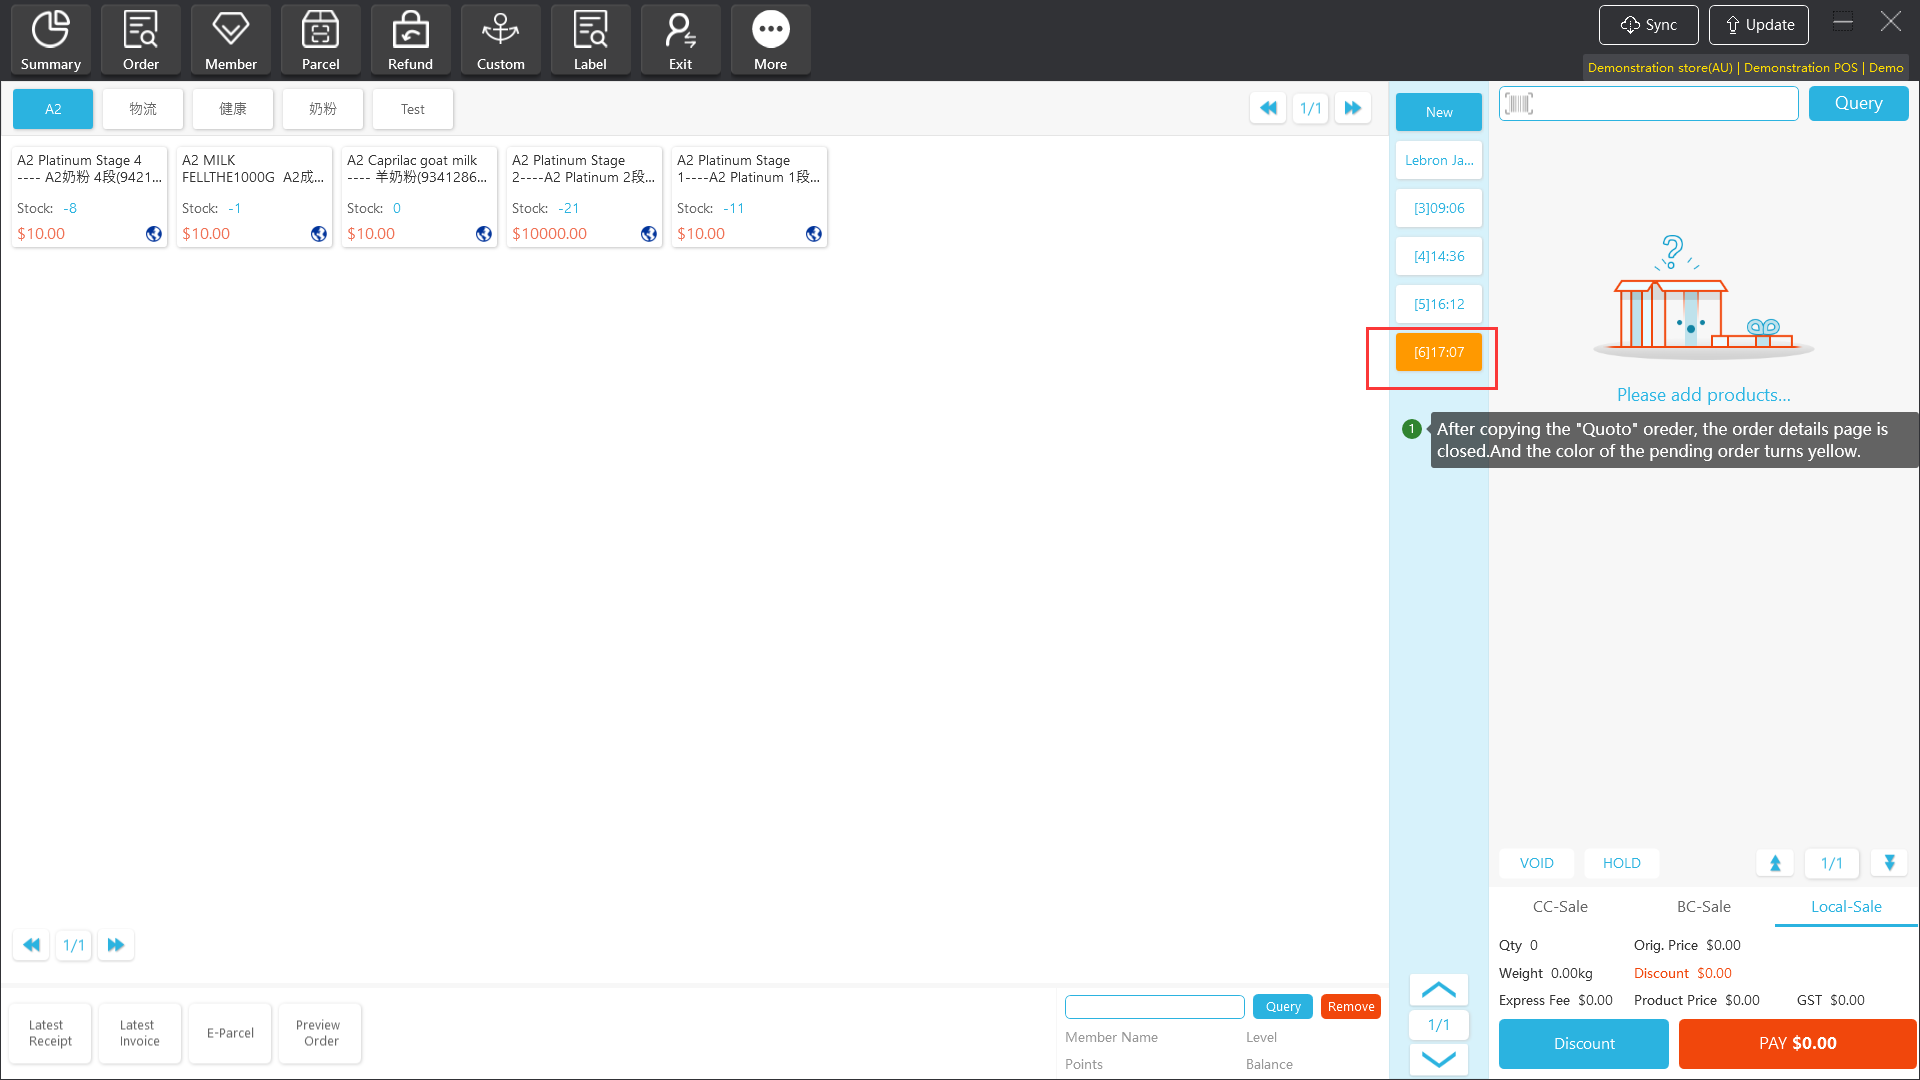
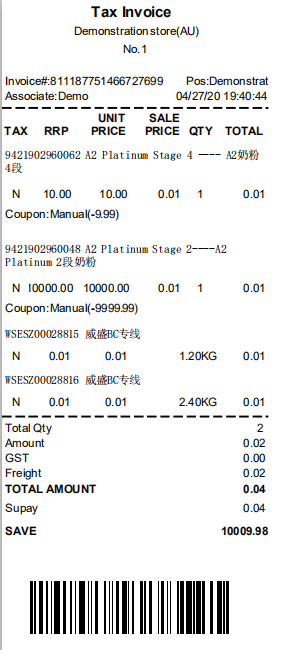
Step 7: The color of the pending order changes to green after payment successfully by the customer.
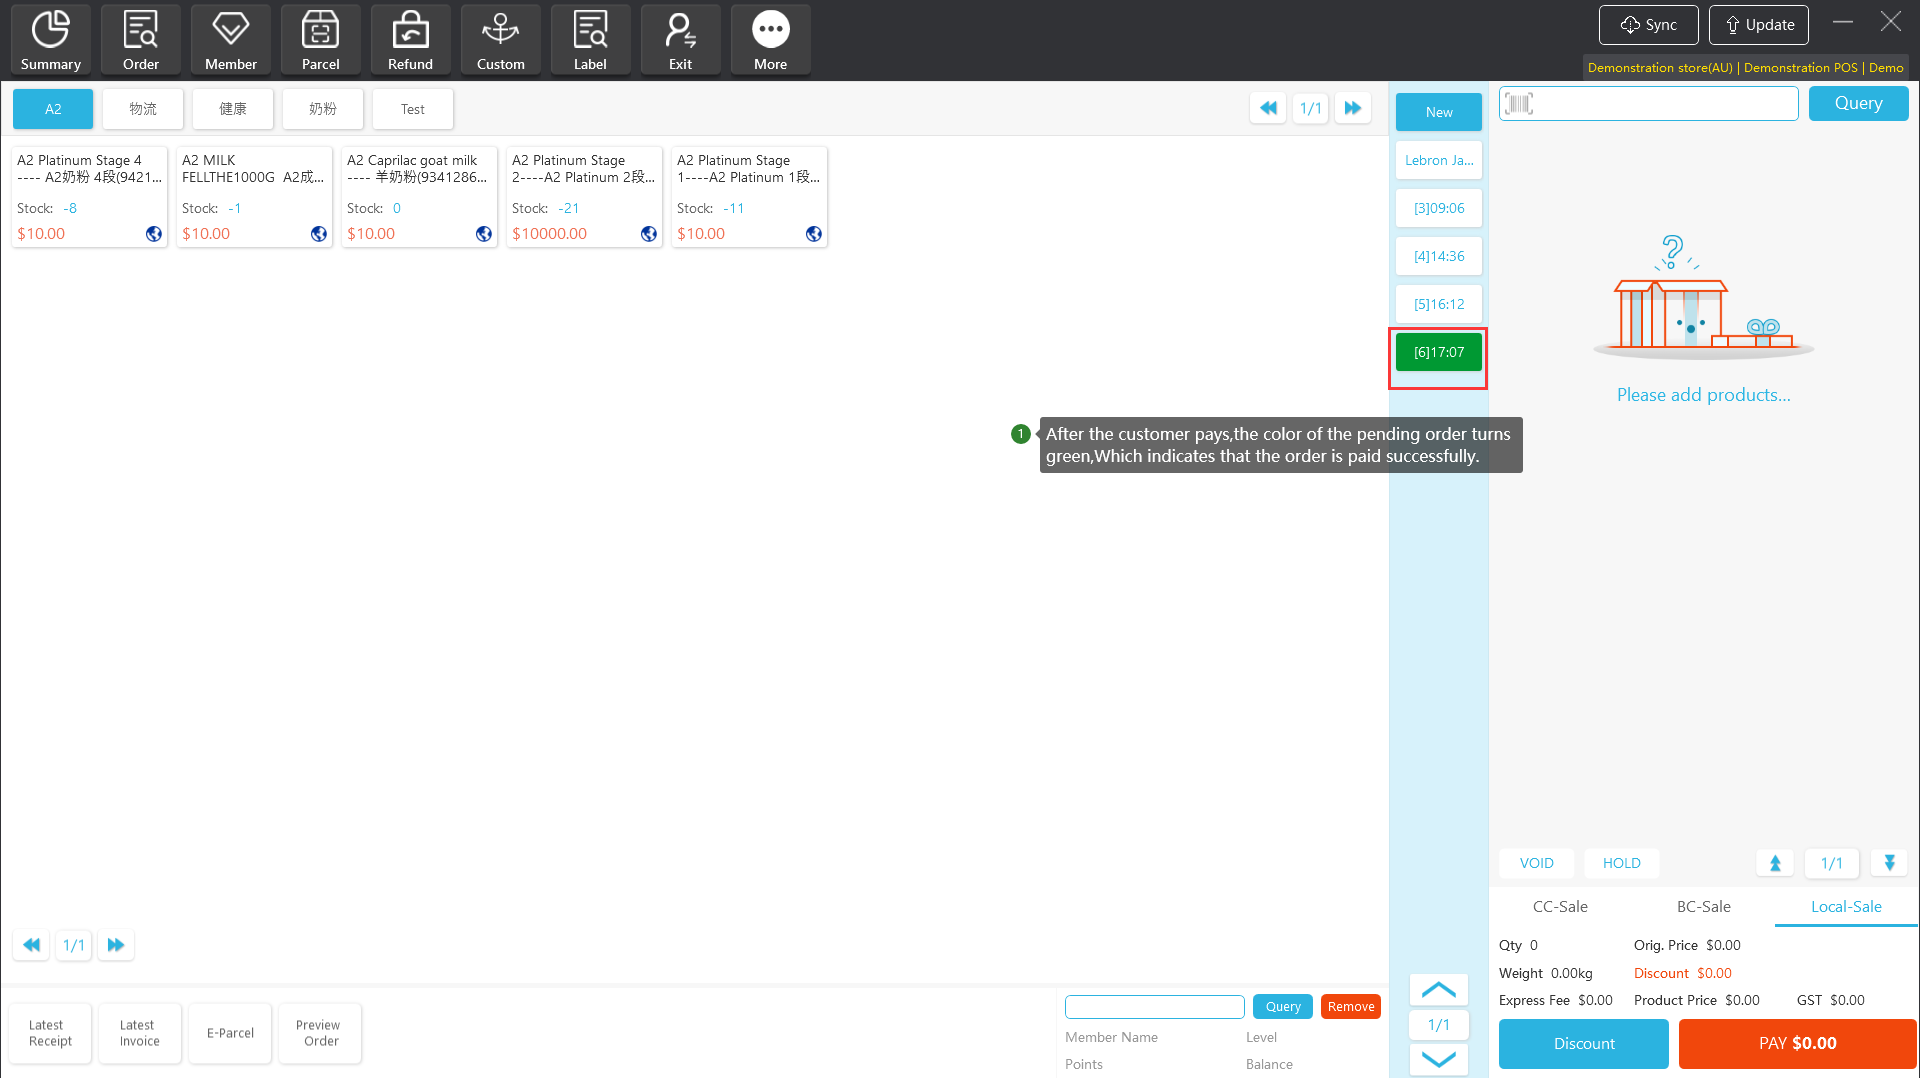
Step 8: After selecting the pending order, click ‘Complete Order’ to print the logistics bill and receipt.
20.2 CC Sale
Cross-border orders for CC postal will automatically calculate and collect the postal tax.
The procedure for placing a CC cross-border order is the same as that for a BC-sale. The difference is that you need to select the CC-sales model when placing an order.
20.3 Overseas Shopping Assistant Operation
The "Overseas Shopping Assistant" WeChat OA provides non-store customers online order placement services. Customers can place orders at the Overseas Shopping Assistant. After receiving the customer's order QR code, the store can directly scan the code to place orders, settle and shipment.
[Operating steps]
Step 1: WeChat or Alipay main query page to search "Astraea Overseas Shopping Assistant" and click "I want to delivery products".
Step 2: Enter the recipient and sender information, select the logistics, select the mailed goods, and click "Confirm Submit" after the operation is completed.

Step 3: The system will automatically complete the packing and put the goods into the package. (you can also modify the package manually)
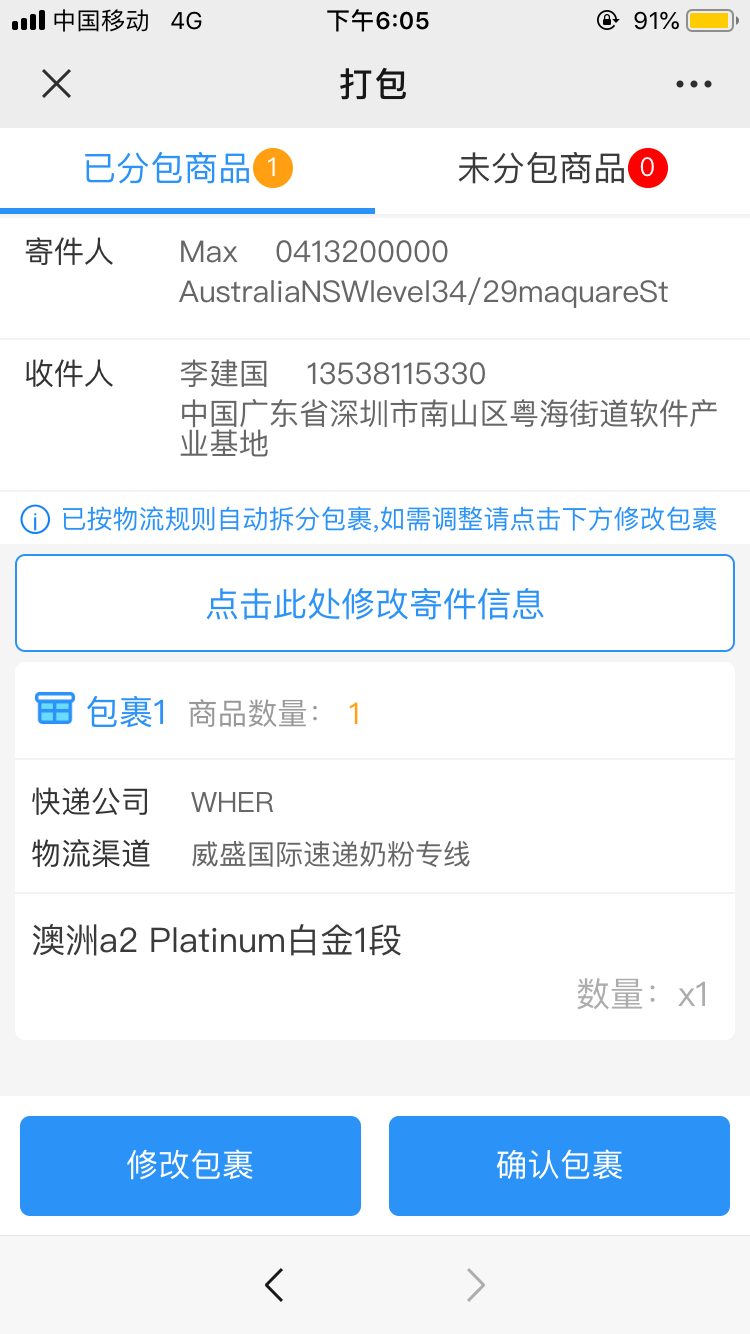
Step 4: After the packaging is completed, the order to be shipped is displayed on the My Courier page.
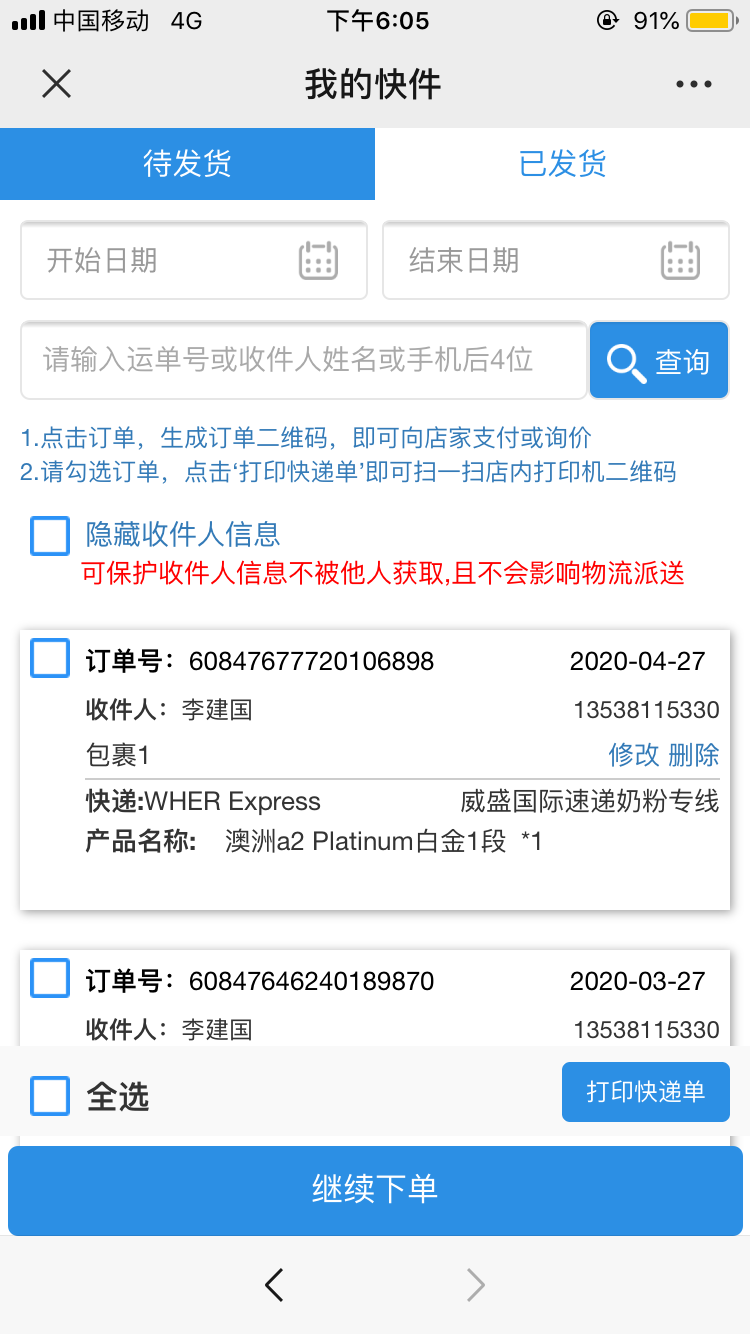
Step 5: Click on the order number to display the QR code of the order.
Step 6: The client scans the code using a code scanner or manually enters the order number to generate the corresponding order.
Step 7: After the order is settled, the order is displayed on the My Courier page.
XXI Offline Operation For Client
The Apos client supports the basic cashier function without a network. After connecting to the network, relevant data will be automatically uploaded to the background of the synchronization service.
Notes: 1. The newly installed client must log in successfully in the operation of a network, otherwise it cannot log in offline.
- Suddenly the network is disconnected when the client is logged in. You need to close the program and restart and log in to use it offline.
Features supported offline include:
Local sales order; get product price and inventory.
Calculate local sales tax based on local sales tax rate.
Support offline payment methods such as cash, bank cards, and Table card.
Support order inquiry:
Member order: query member information.
Support placing orders at member prices.
Support members to earn points after paying order.
Promotional activities: support sales of package activities
Support exclusive sales.
Others: Support the settlement and printing receipt of today's performance.
Support the calculation of employee commissions.
Special notes:
Cross-border sales are not supported in offline model.
Online third-party payment is not supported in offline model.
Member top up, pick up and time-card consumption are not supported in offline model.
Except for the promotional activities supported above, other promotional activities are not supported.
Order return is not supported in offline model.
Reconciliation is not supported in offline state.
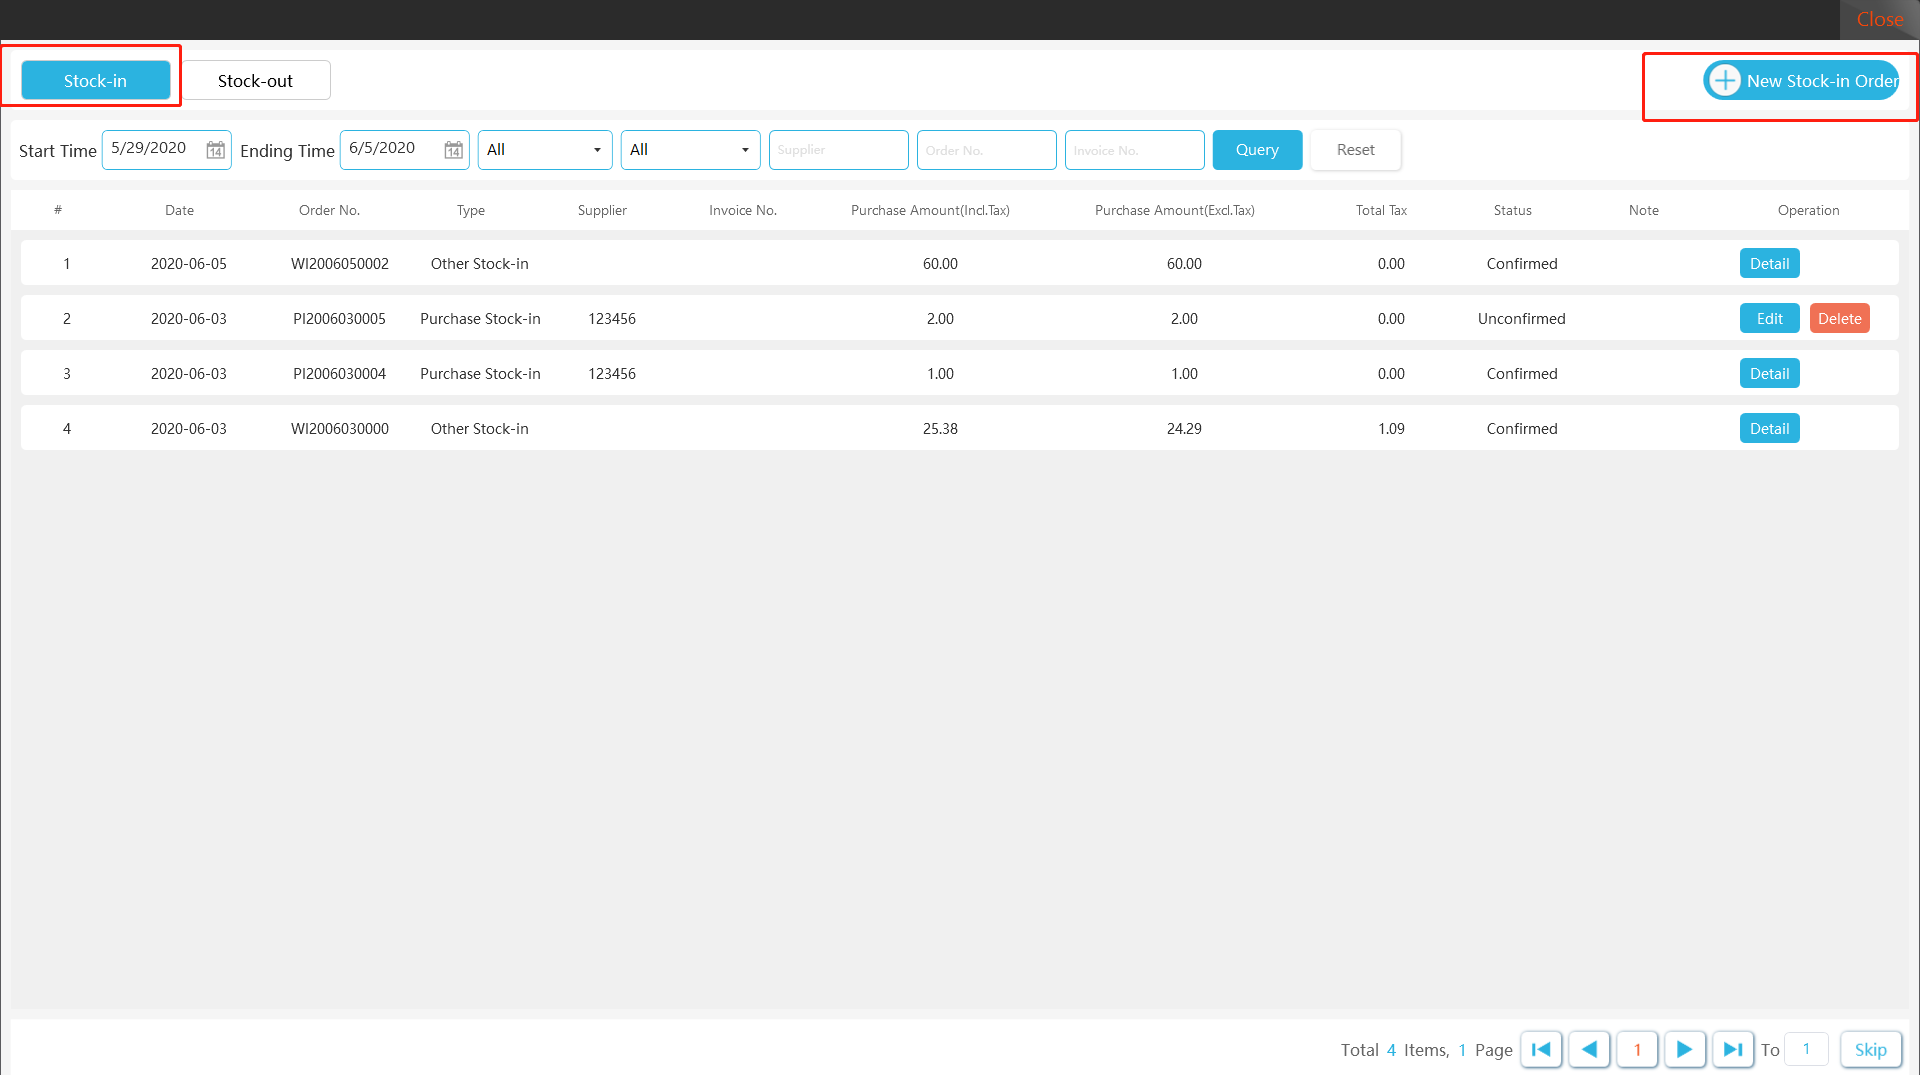
XXII Inventory
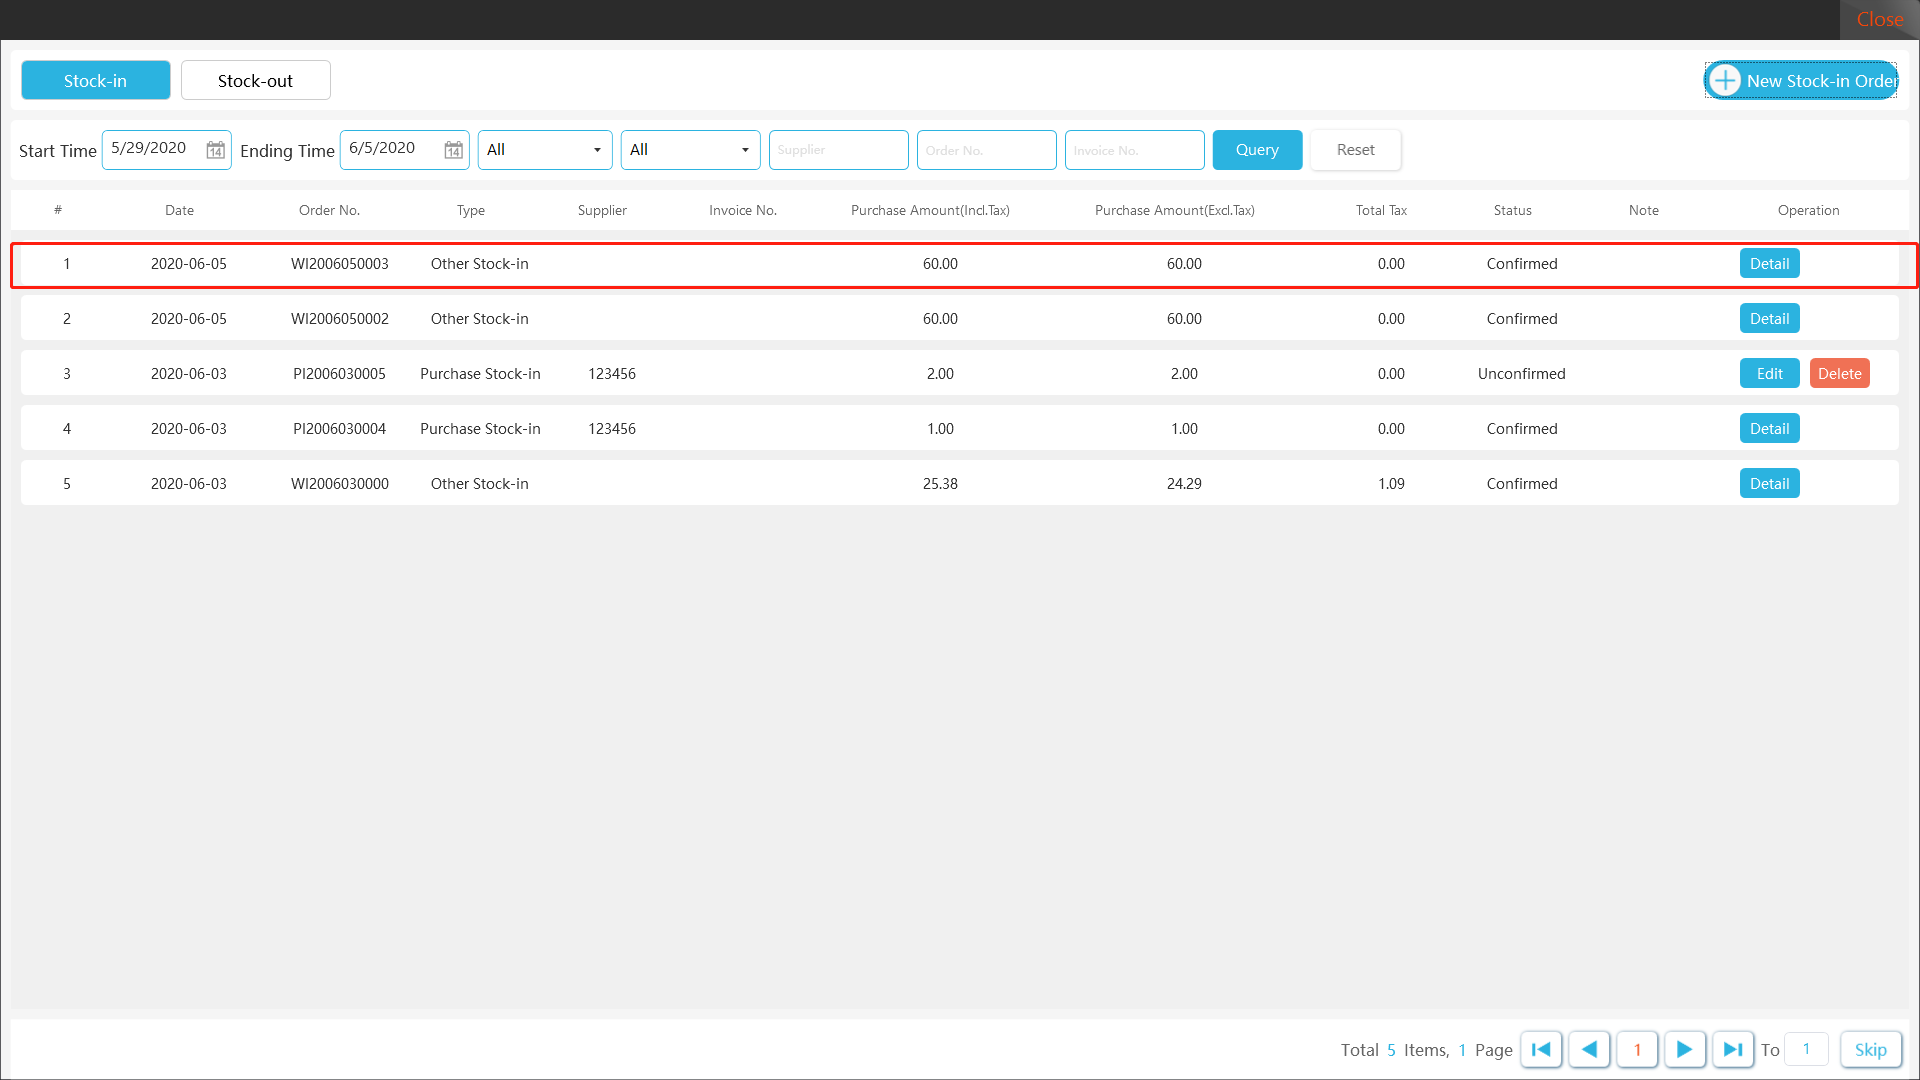
22.1 Stock-In
The client can carry out stock-in operations, support store PO/allocation/other stock-in mode.
[Operating steps]
Step 1; Click "Inventory" to pop up the inventory management interface.
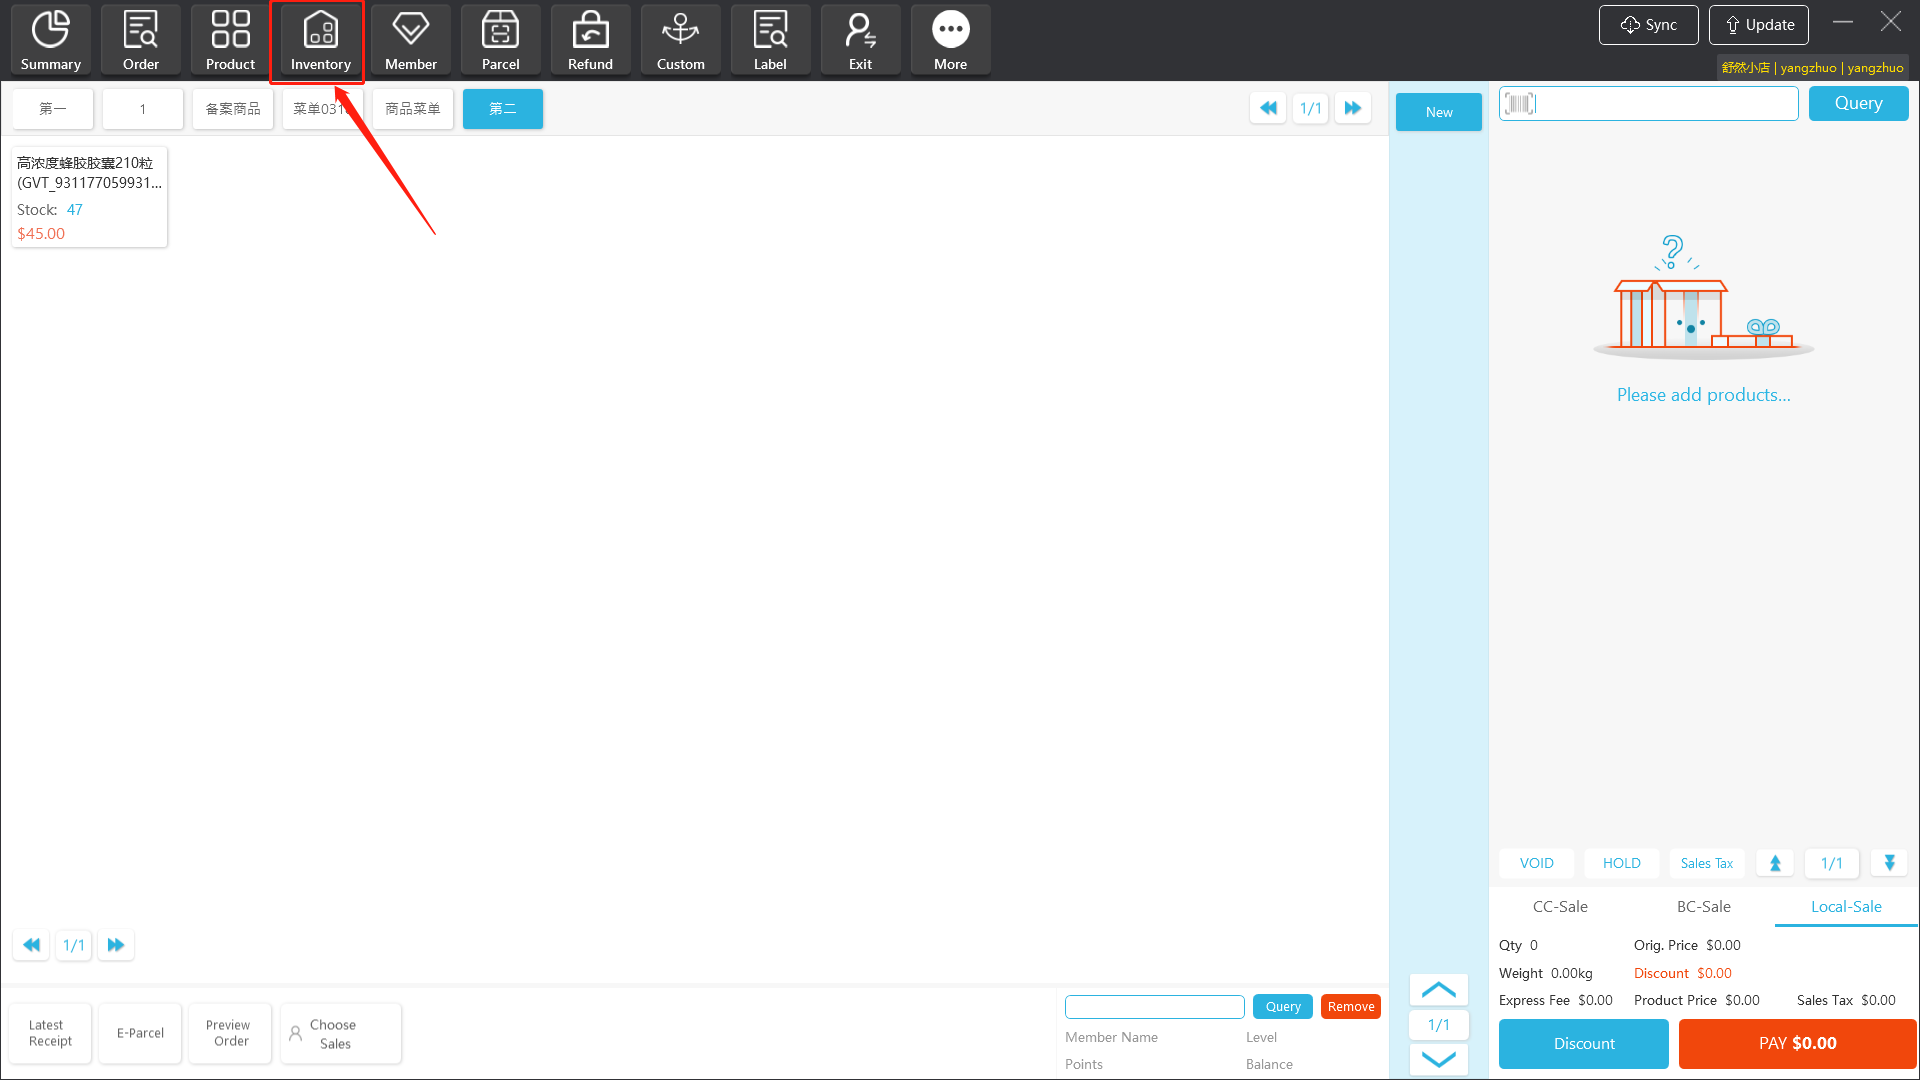
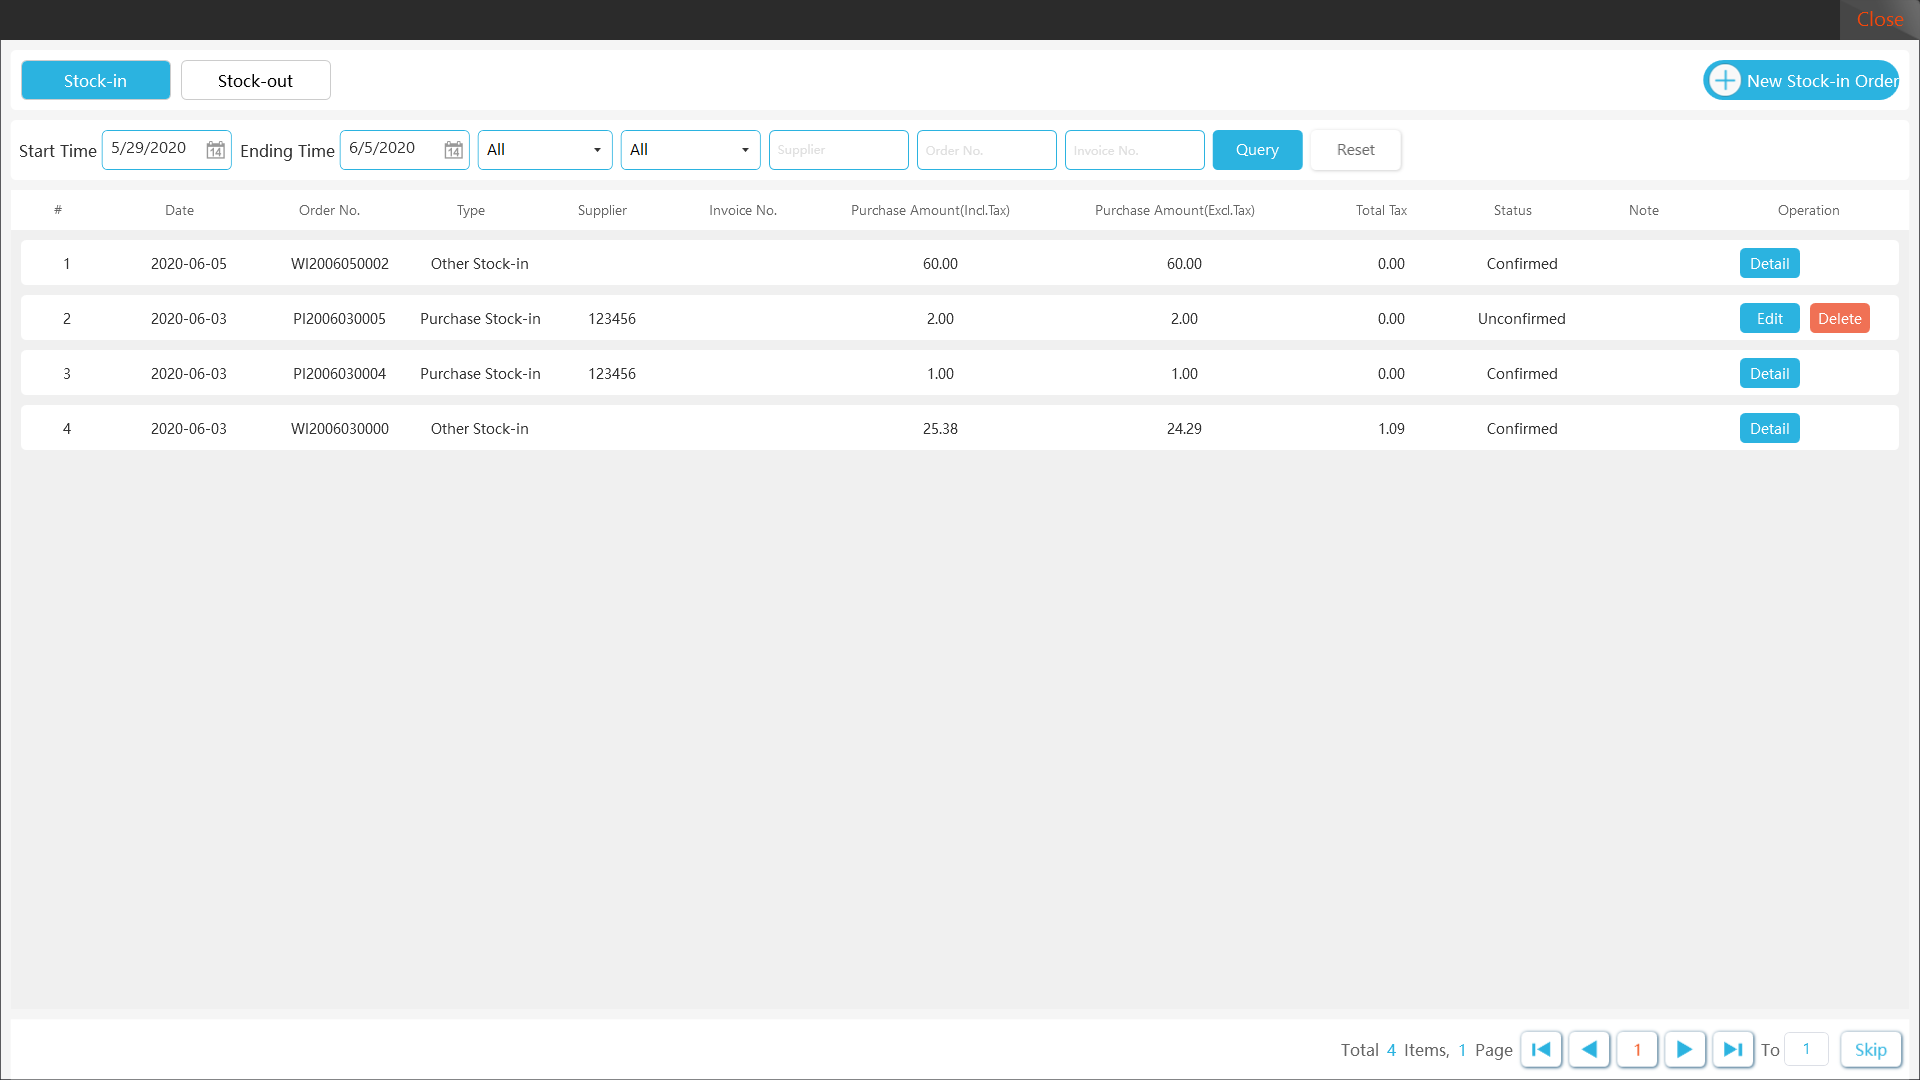
Step 2: Click on "New Stock-in order".
Step 3: Choose ”Other” stock-in type.
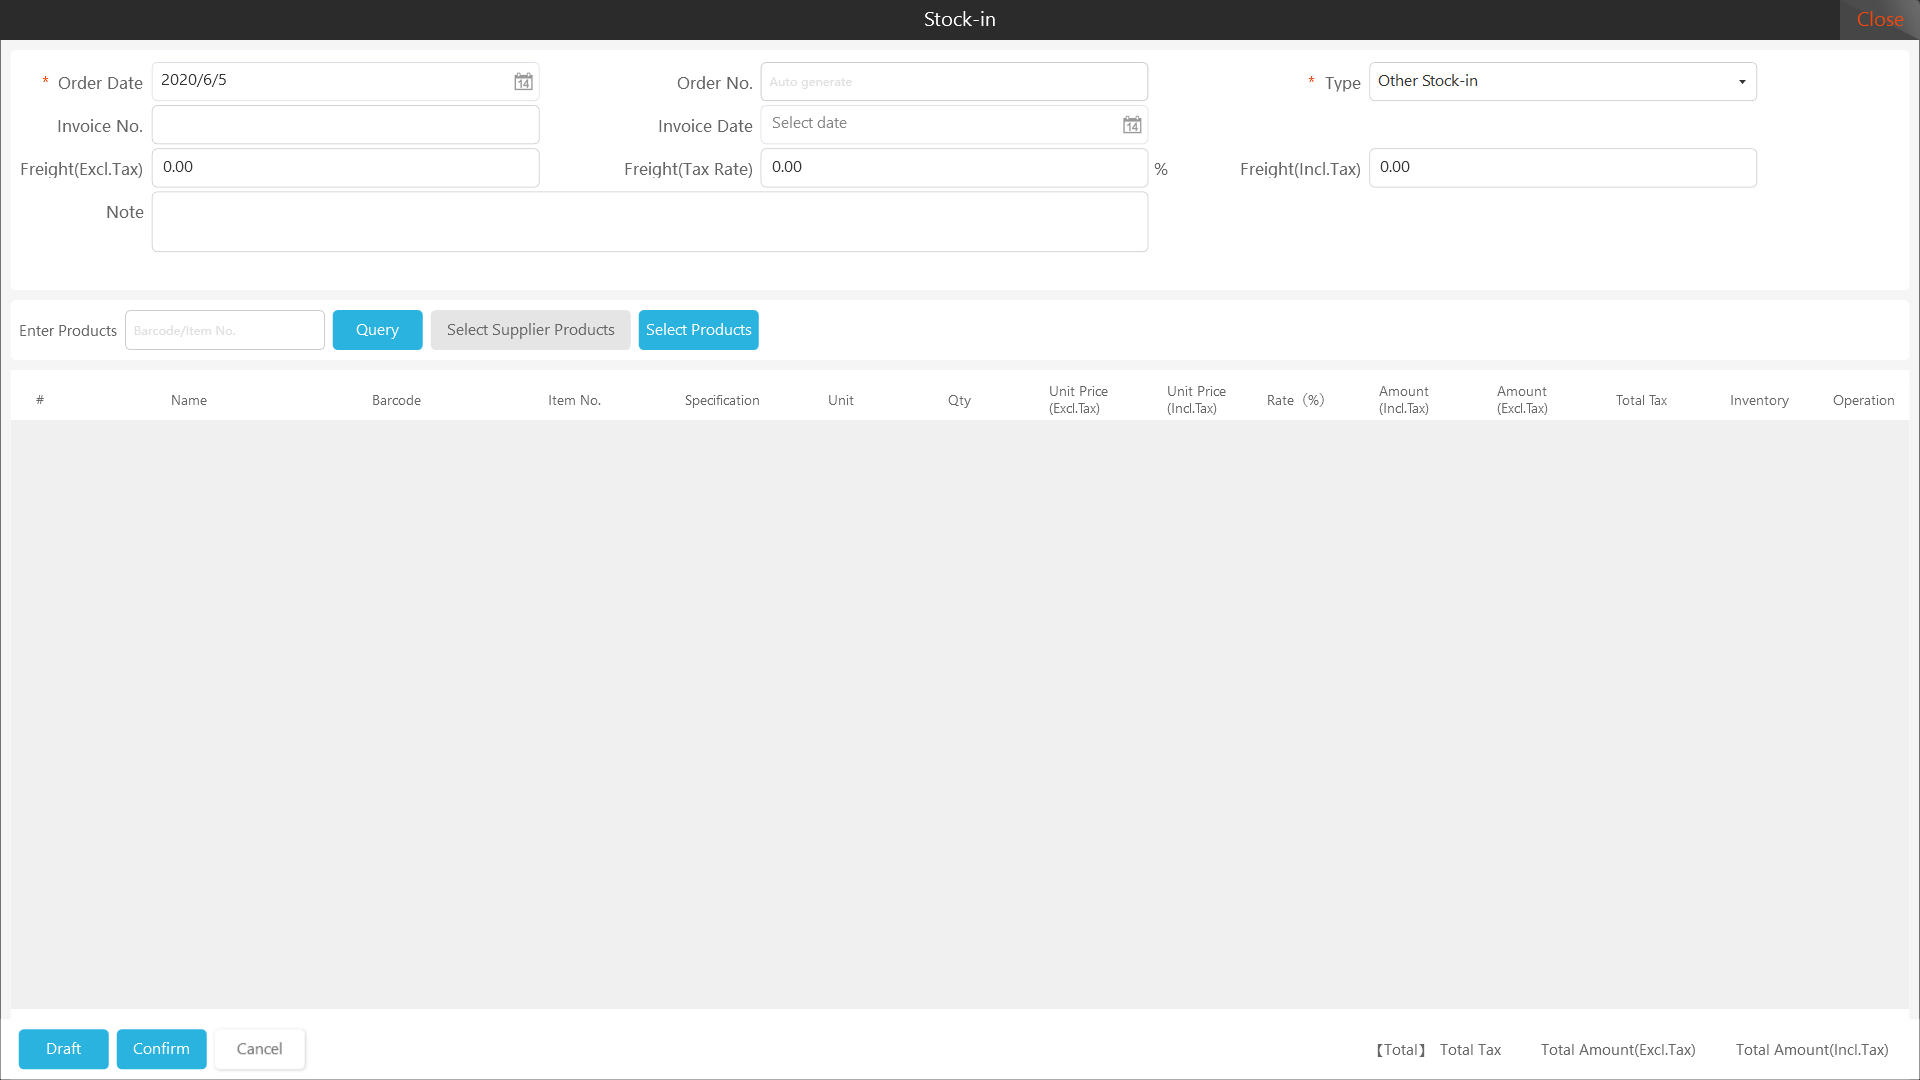
Step 4: Click the "Select Commodity" button to add the product.
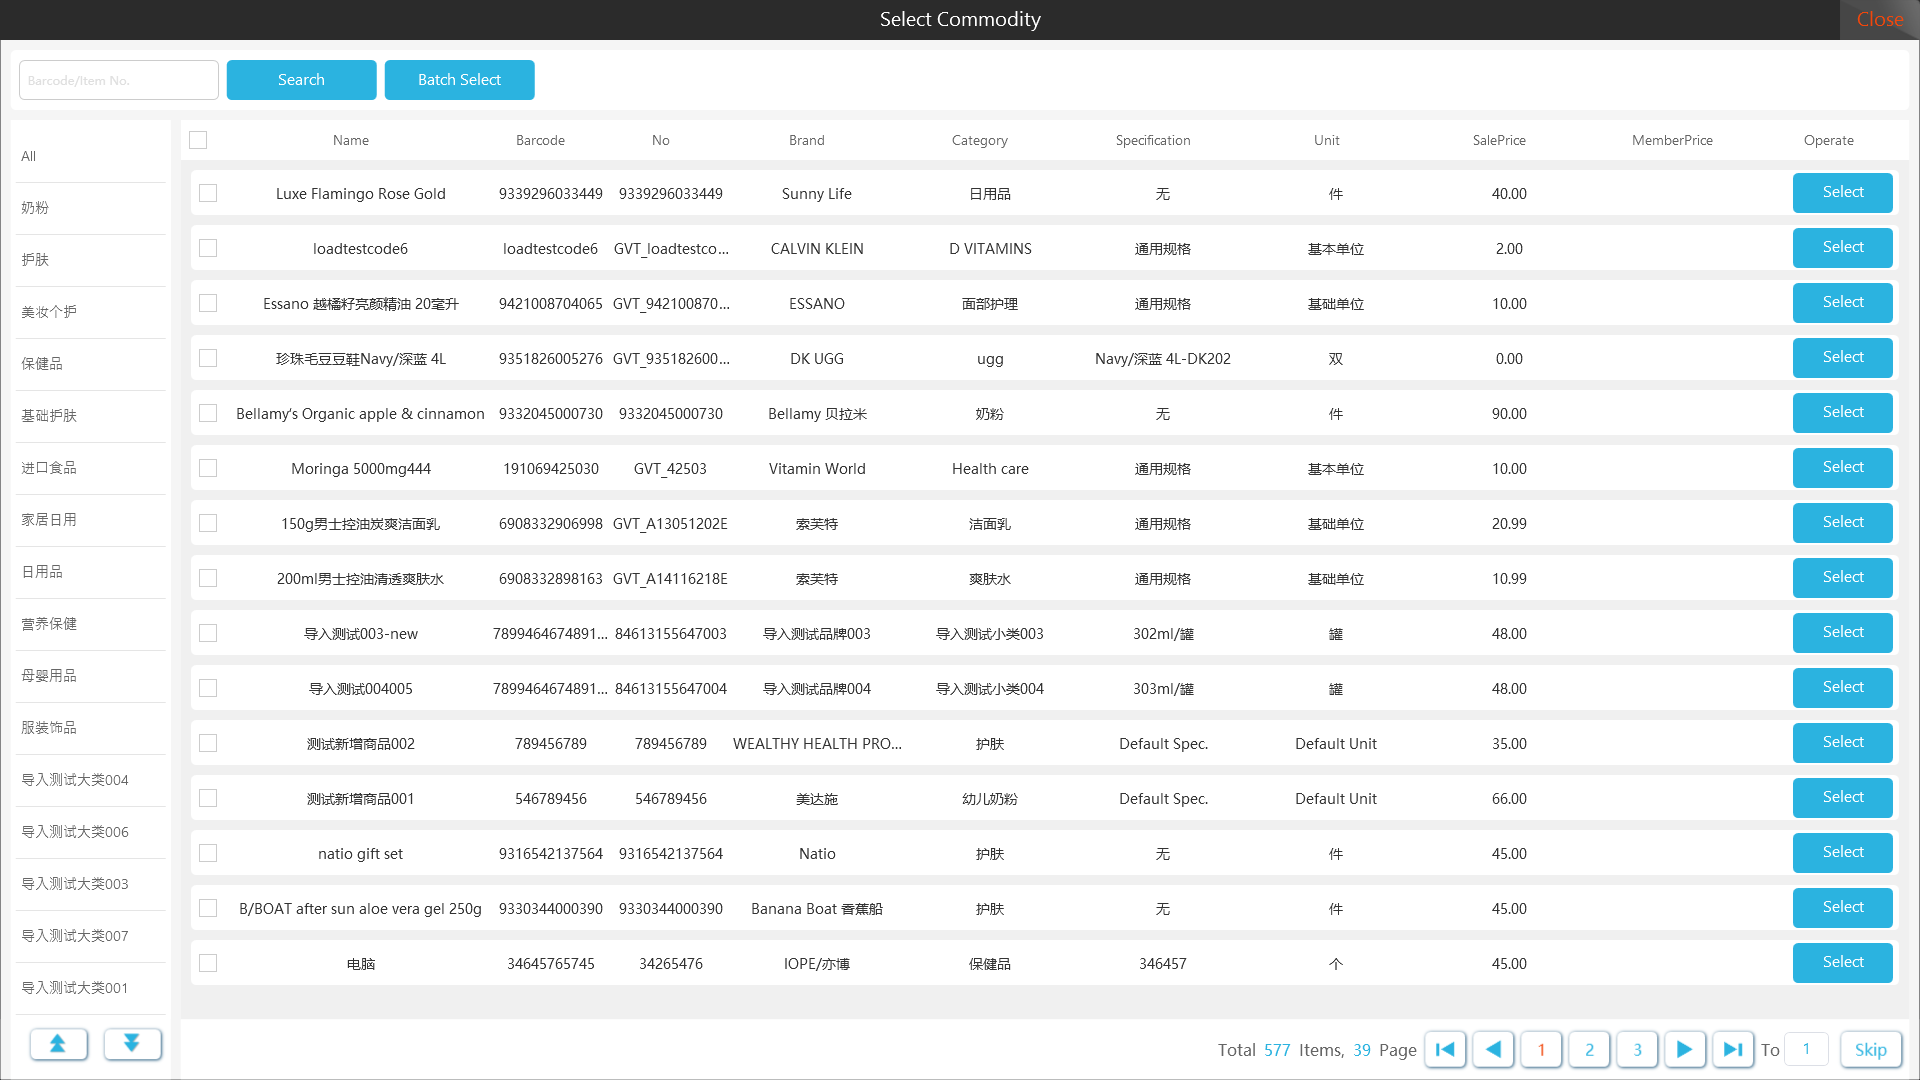
Step 5: Enter the products quantity, click the ”confirm” button.
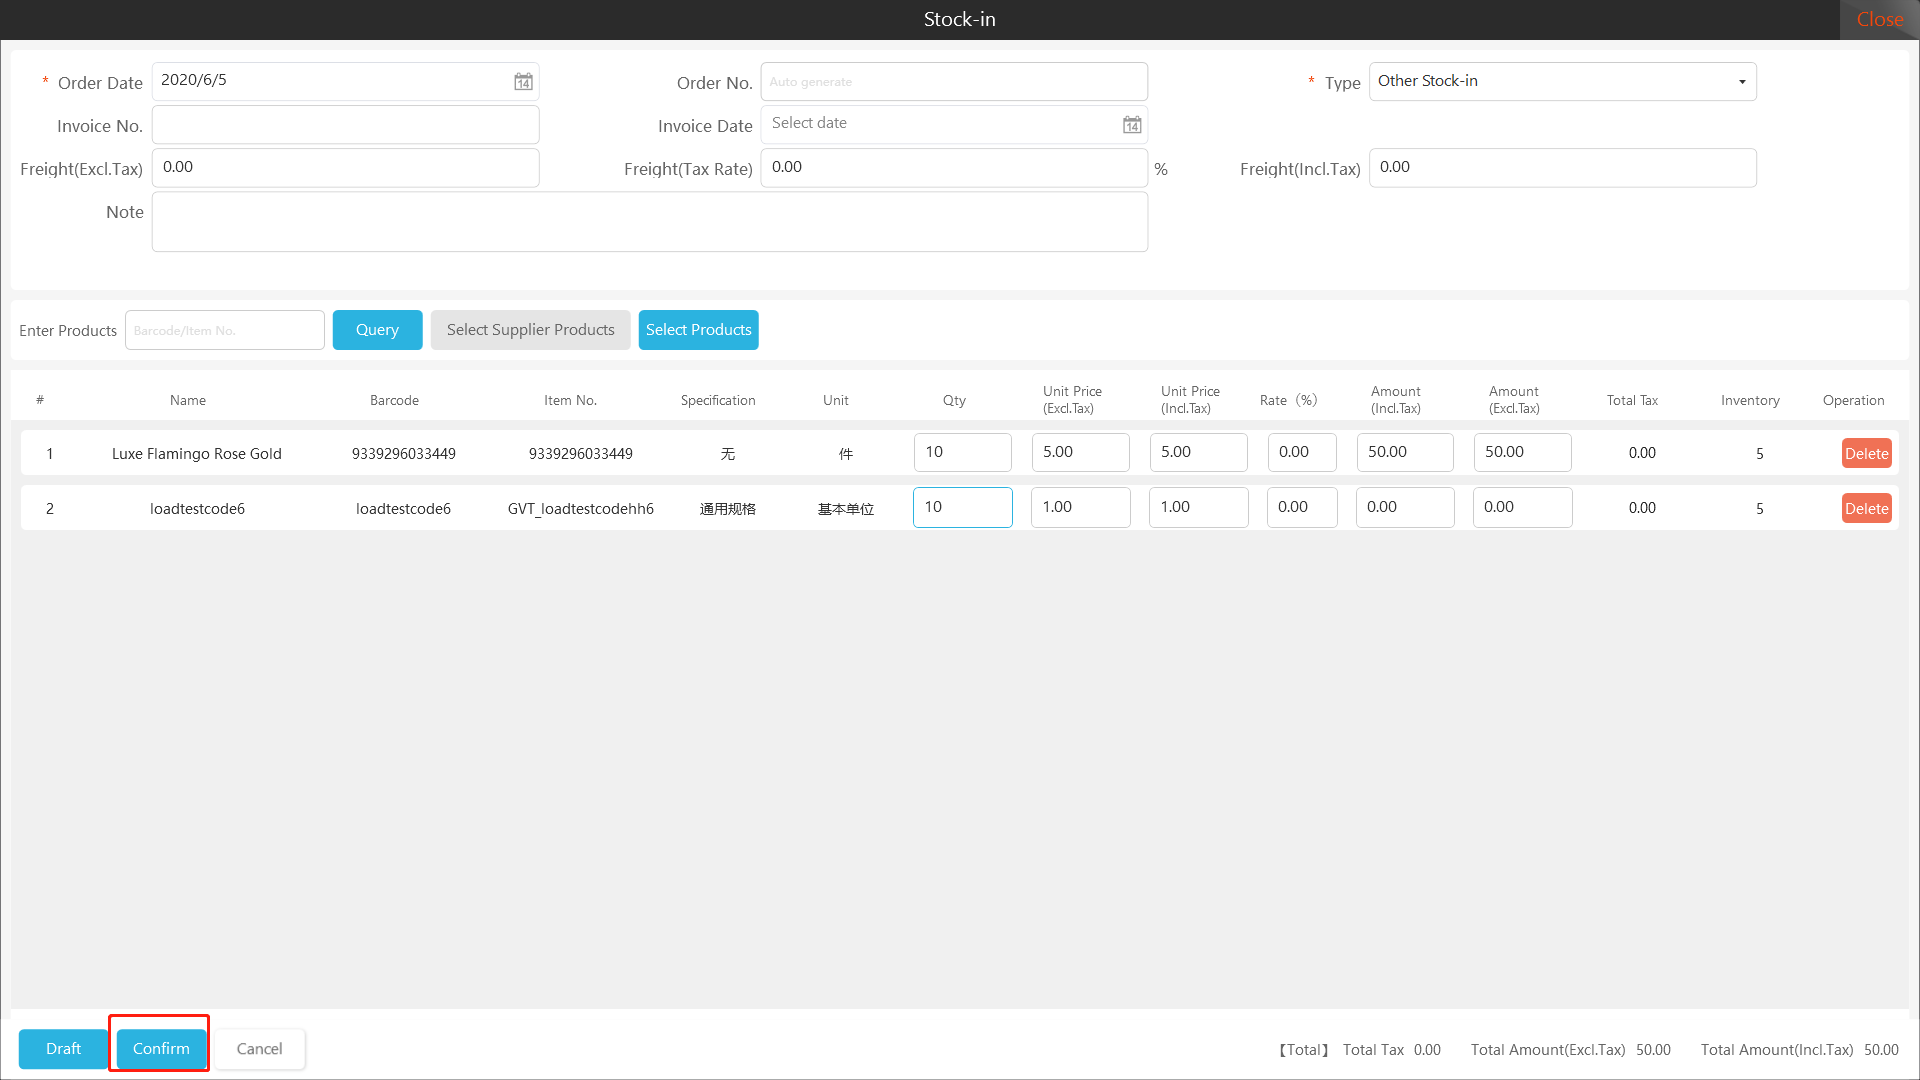
Step 6: View the list of stock-in orders and you can find this data.
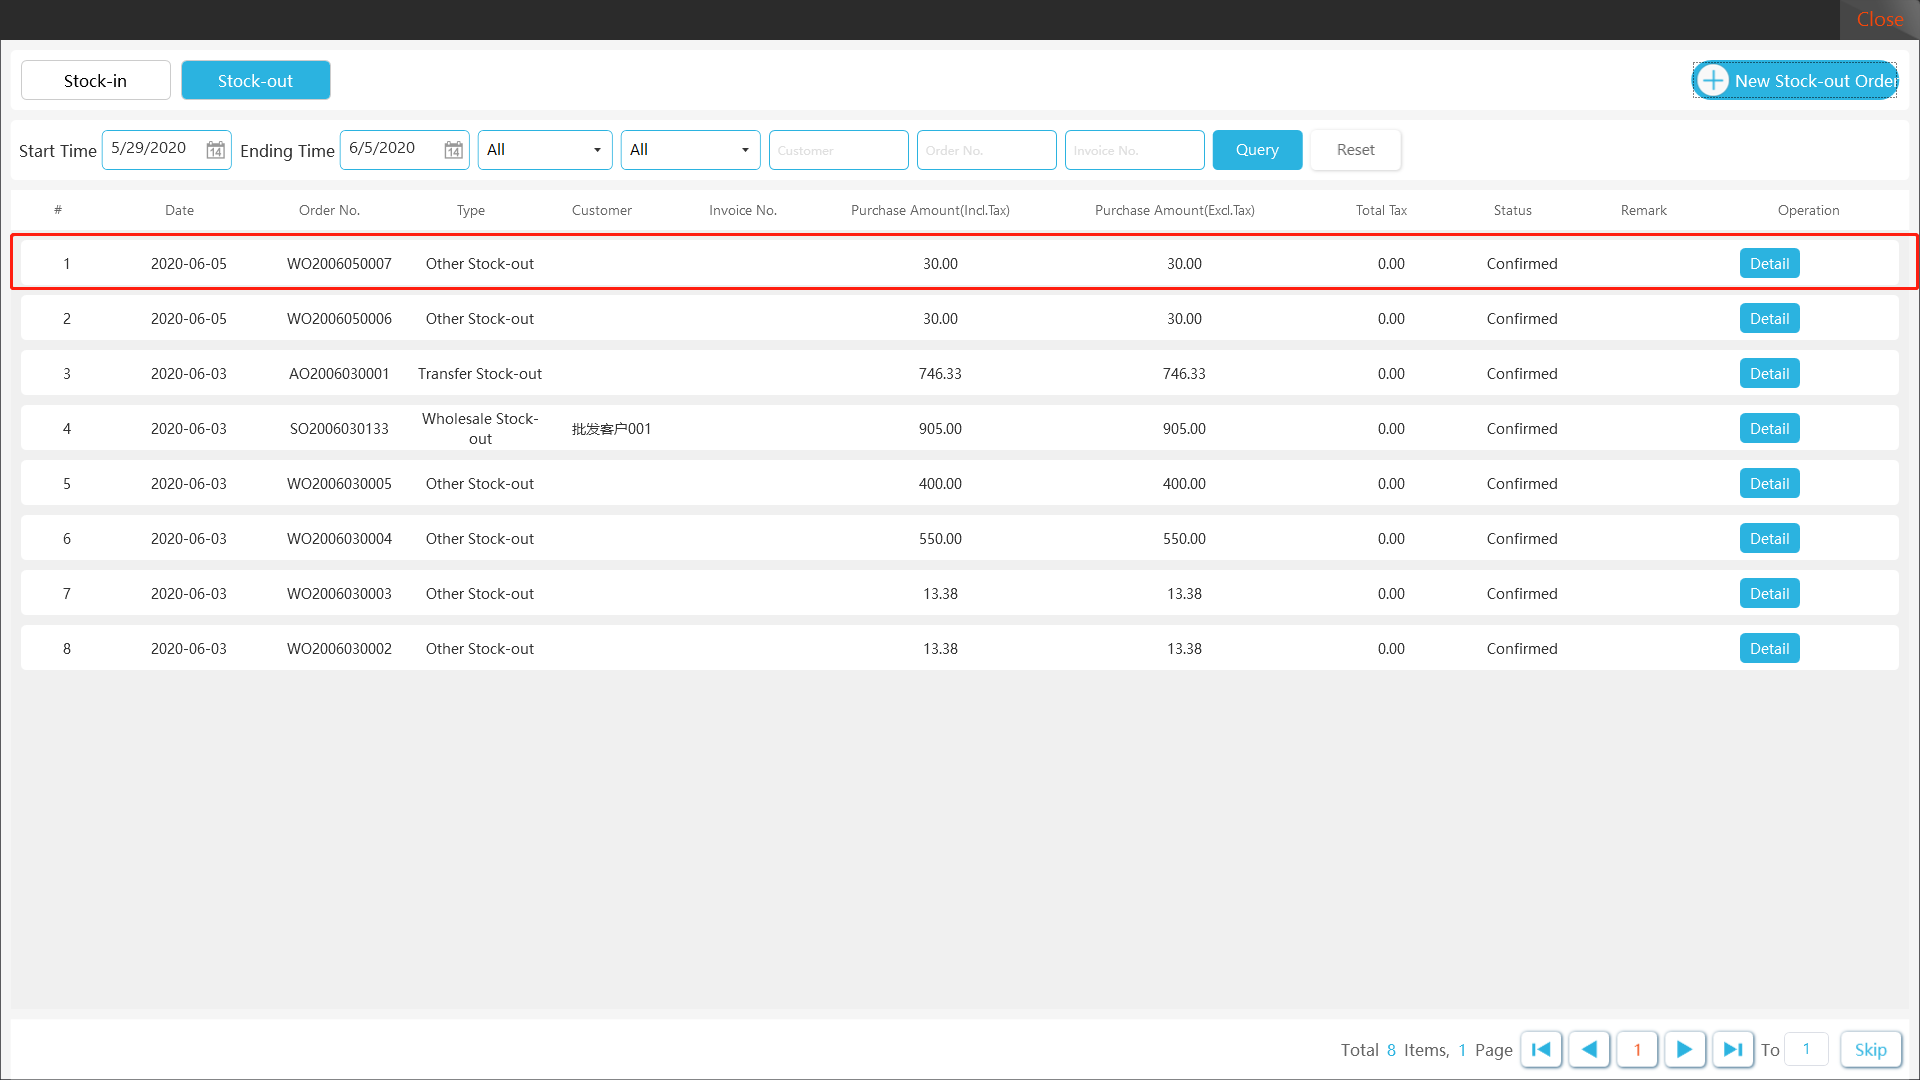
22.2 Stock-Out
The client can carry out the stock-out operation, support store wholesale stock-in /other stock-out/allocation stock-out mode.
[Operating steps]
Step 1: Click "Inventory" to pop up the inventory management interface.


Step 2: Click "Stock-out" mode.
Step 3; Choose ”other” stock-out type.

Step 4: Click the "Select Commodity" button to add the product.
Step 5: Enter the stock-out products quantity and click”confirm” option.
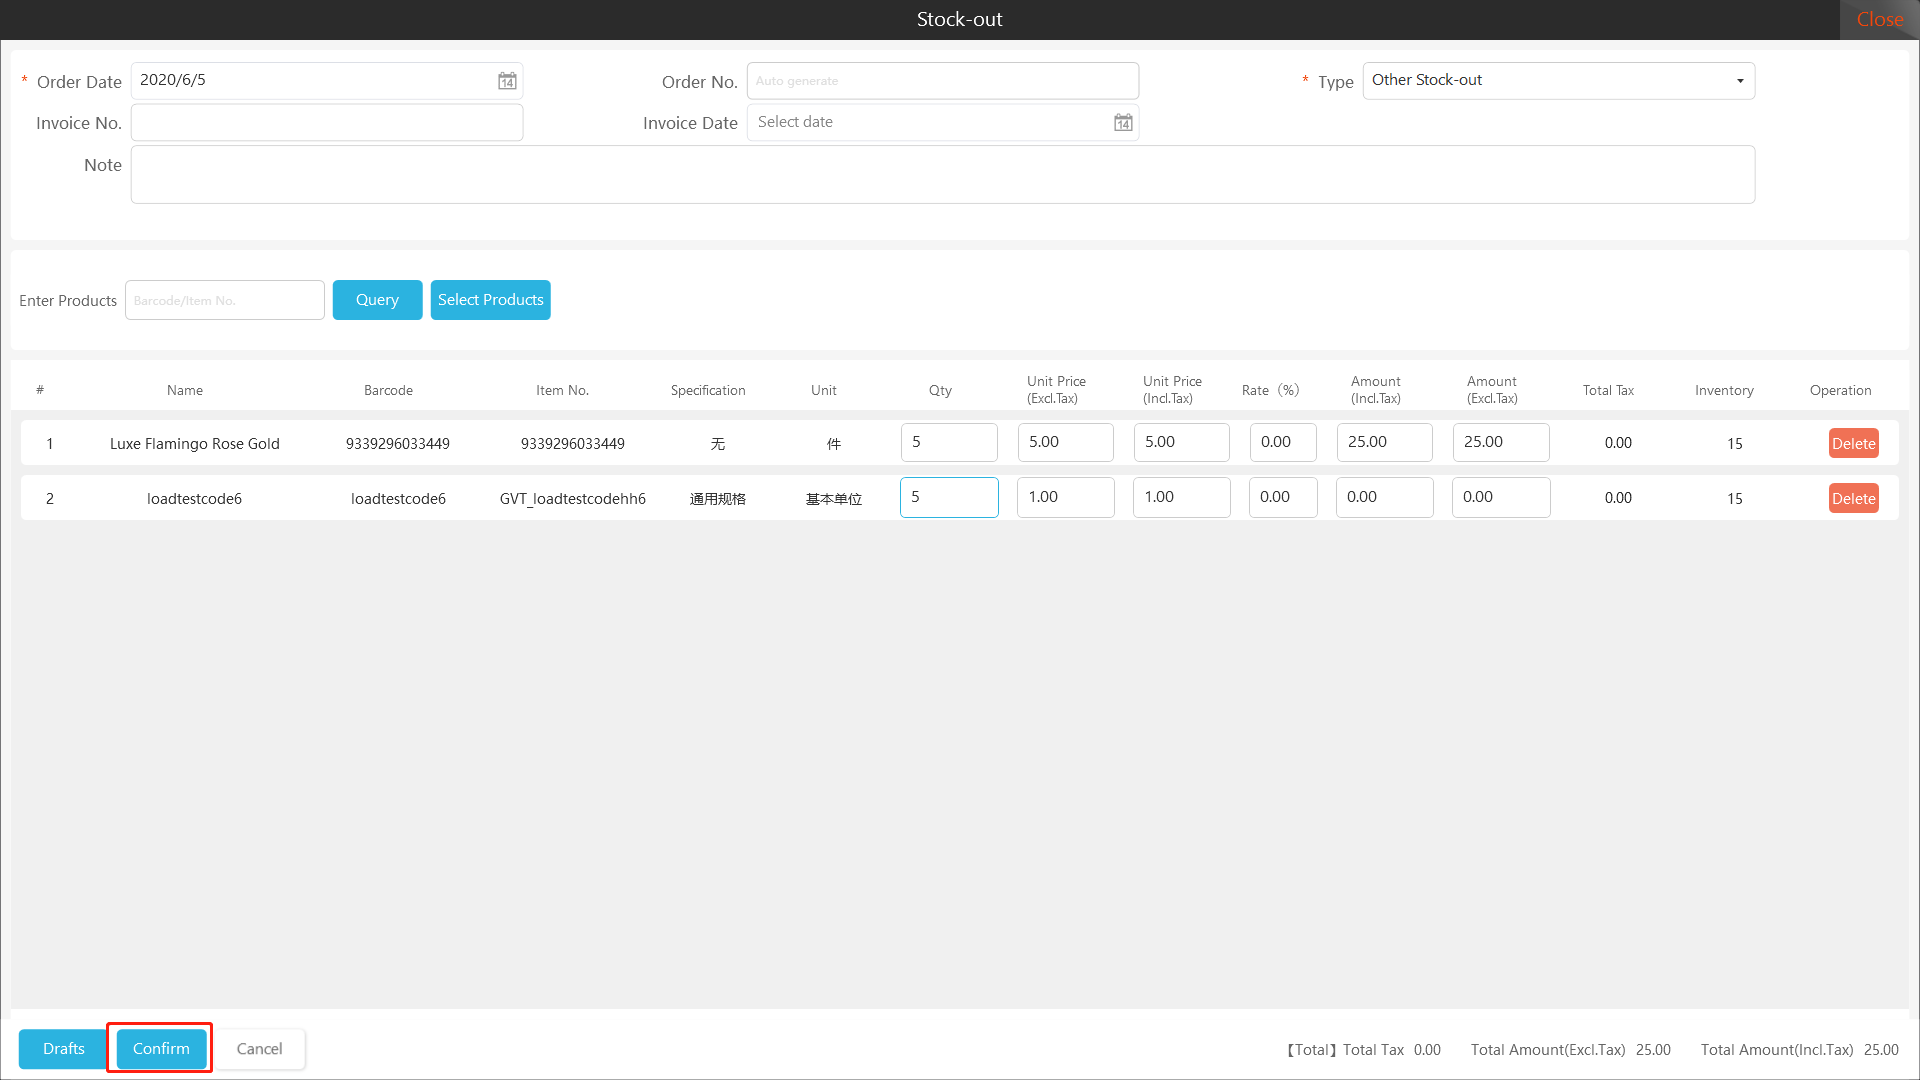
Step 6: View the list of stock-out orders and you can find this data.