
Operation Manual for Apos Portal
Version: V 4.5.2
Mustard Boat Technology
June 2020
Revision history
| Version | Date | Update records | Approved by | Modifier |
|---|---|---|---|---|
| V1.0 | 11/6/2019 | First draft | Xiong Chao | Xiong Chao |
| V1.1 | 1/17/2020 | Update of the information about inventory, customers, promotion, logistics, sales / finance / stock / member / reports and other modules. | Xiong Chao | Chen Xingyi / Yang Zhuo / Wang Guoqun |
| V1.2 | 2/25/2020 | Update of the information about commission setting, setting, price change reason, today performance, reconciliation, promotion and other modules | Xiong Chao | Chen Xingyi / Yang Zhuo / Wang Guoqun |
| V4.2.1 | 3/4/2020 | Replace English screenshot, revision template and version number | Xiong Chao | LiangZhiLv/Xiong Chao |
| V4.2.2 | 3/6/2020 | Update module information such as merchant registration, wholesale price, dropshipping price, price adjustment order, UPT report, price adjustment report, discount details report, product category sales summary report, product refund report, promotion management, logistics details and other module information | Xiong Chao | Chen Xingyi / Yang Zhuo / Wang Guoqun |
| V4.3.1 | 3/20/2020 | Update return order details, client main page menu display, payment reconciliation, open cash drawer log and small ticket printing, etc. | Chen Xingyi / Yang Zhuo / Wang Guoqun | |
| V4.3.2 | 4/7/2020 | Update store management, client operation logs,department management, cashier, secondary screen advertising, dropshipping .sacking platform,etc. | Chen Xingyi / Yang Zhuo / Wang Guoqun/WangTao | |
| V4.4.1 | 4/21/2020 | Update address book management, data authority,product tags,display of the same product,Dropshipping logistics,place domestic dropshipping products order,shipping and other functions. | Chen Xingyi / Yang Zhuo / Wang Guoqun/WangTao | |
| V4.4.2 | 4/30/2020 | Update combine dropshipping products and cross-border products sales,product data import interaction,import data restrictions and other functions. | Chen Xingyi / Yang Zhuo /Wang Guoqun/Wang Tao | |
| V4.5.1 | 2020/5/20 | Update the function that members can use points to pay on the client, weighted goods support the input of decimals, and merge similar report functions. | Chen Xingyi / Yang Zhuo / Wang Guoqun | |
| V4.5.2 | 2020/6/8 | add sales analysis, optimize order details, return order details, optimize product query conditions in product labels, optimize membership levels,import member info data, etc. | Chen Xingyi / Yang Zhuo / Wang Guoqun |
I. Products
1.1 Creation of products in batches at the server
If you want to create products in batches, you can select one of the following three methods:
Method I: Commodity library import
[Operating steps]
Step 1: Log in the Apos server. Click "Products", "Product Information", and "Commodity library import” options successively;

Step 2: Click and select the products you want to add from the GVT product library;
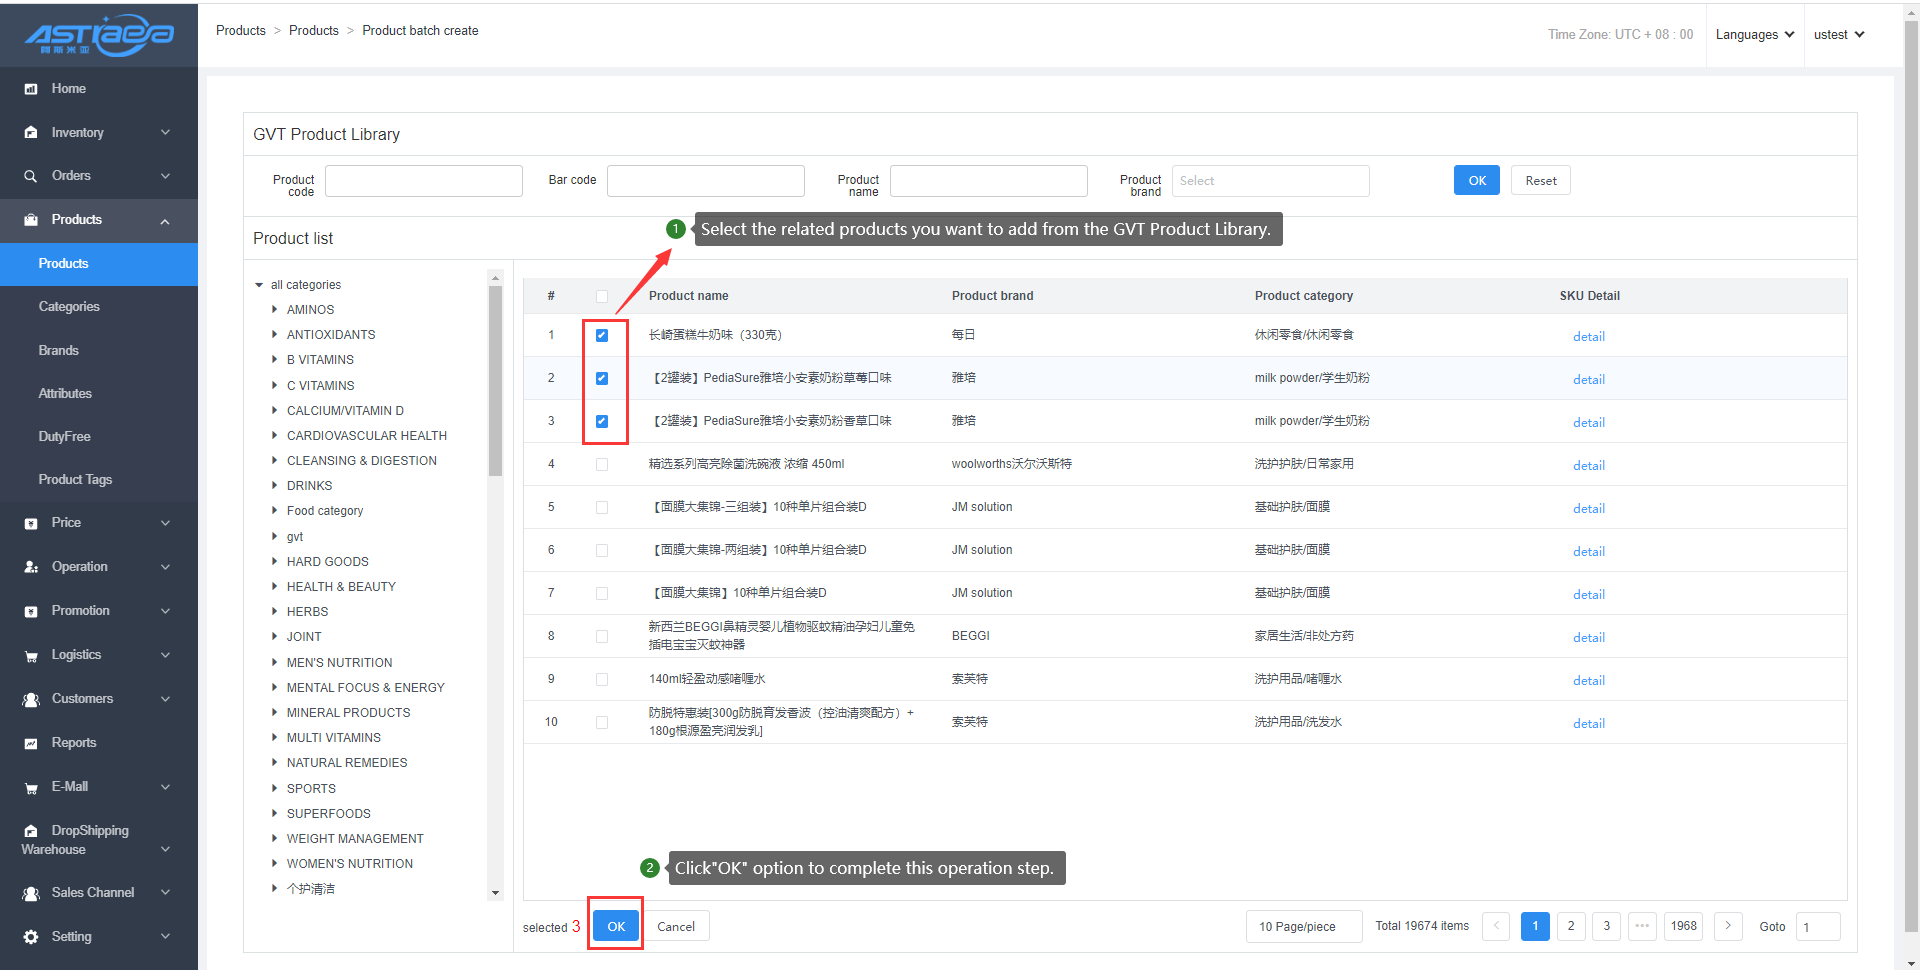
Step 3: After successful import, click the “Edit” option to modify the basic information of the product;

Step 4: Newly added products will be automatically synchronized to the list of "Basic Sales Price”;
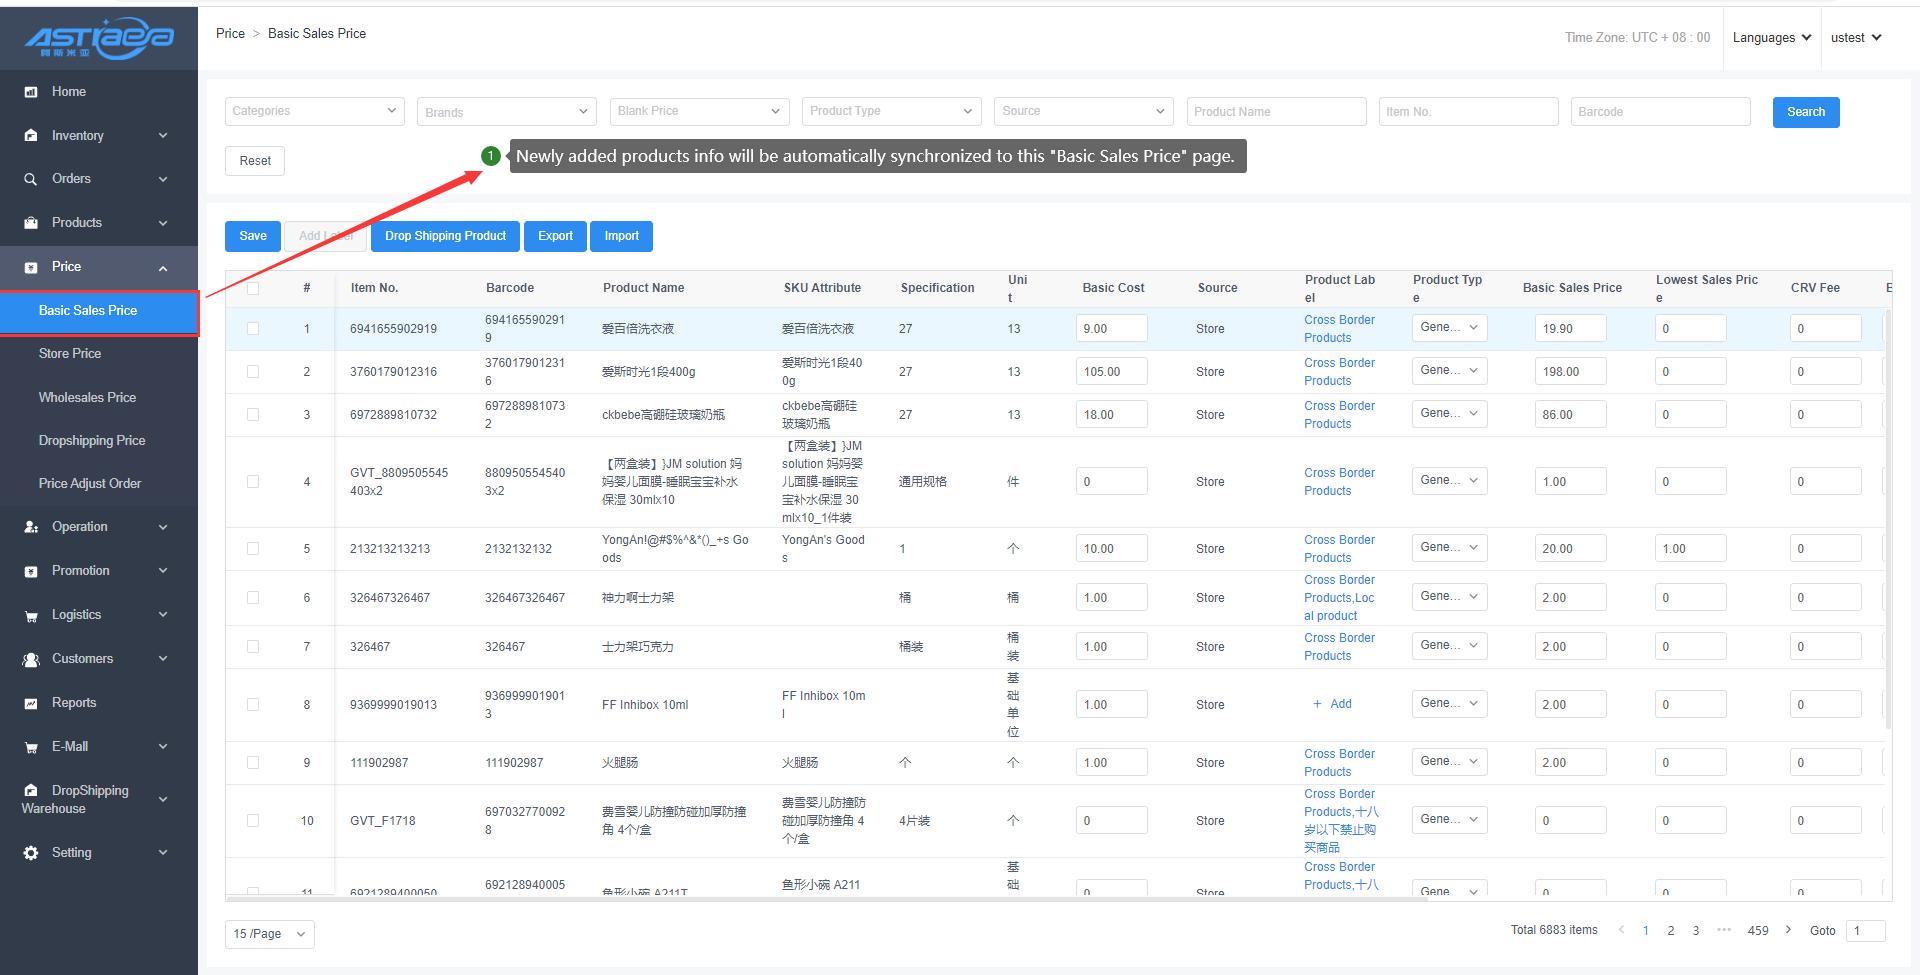
Step 5: You can directly generate the settings by editing the related price and then clicking the “Save” option, or, you can also export the table of all product price information, modify the related parameters, and then click the “Import” option to upload the modified price Excel file;

Step 6: The product with new price will be automatically synchronized to all stores under the commercial tenant, namely "Store Price". Such price is deemed as the "Basic Price” by default;
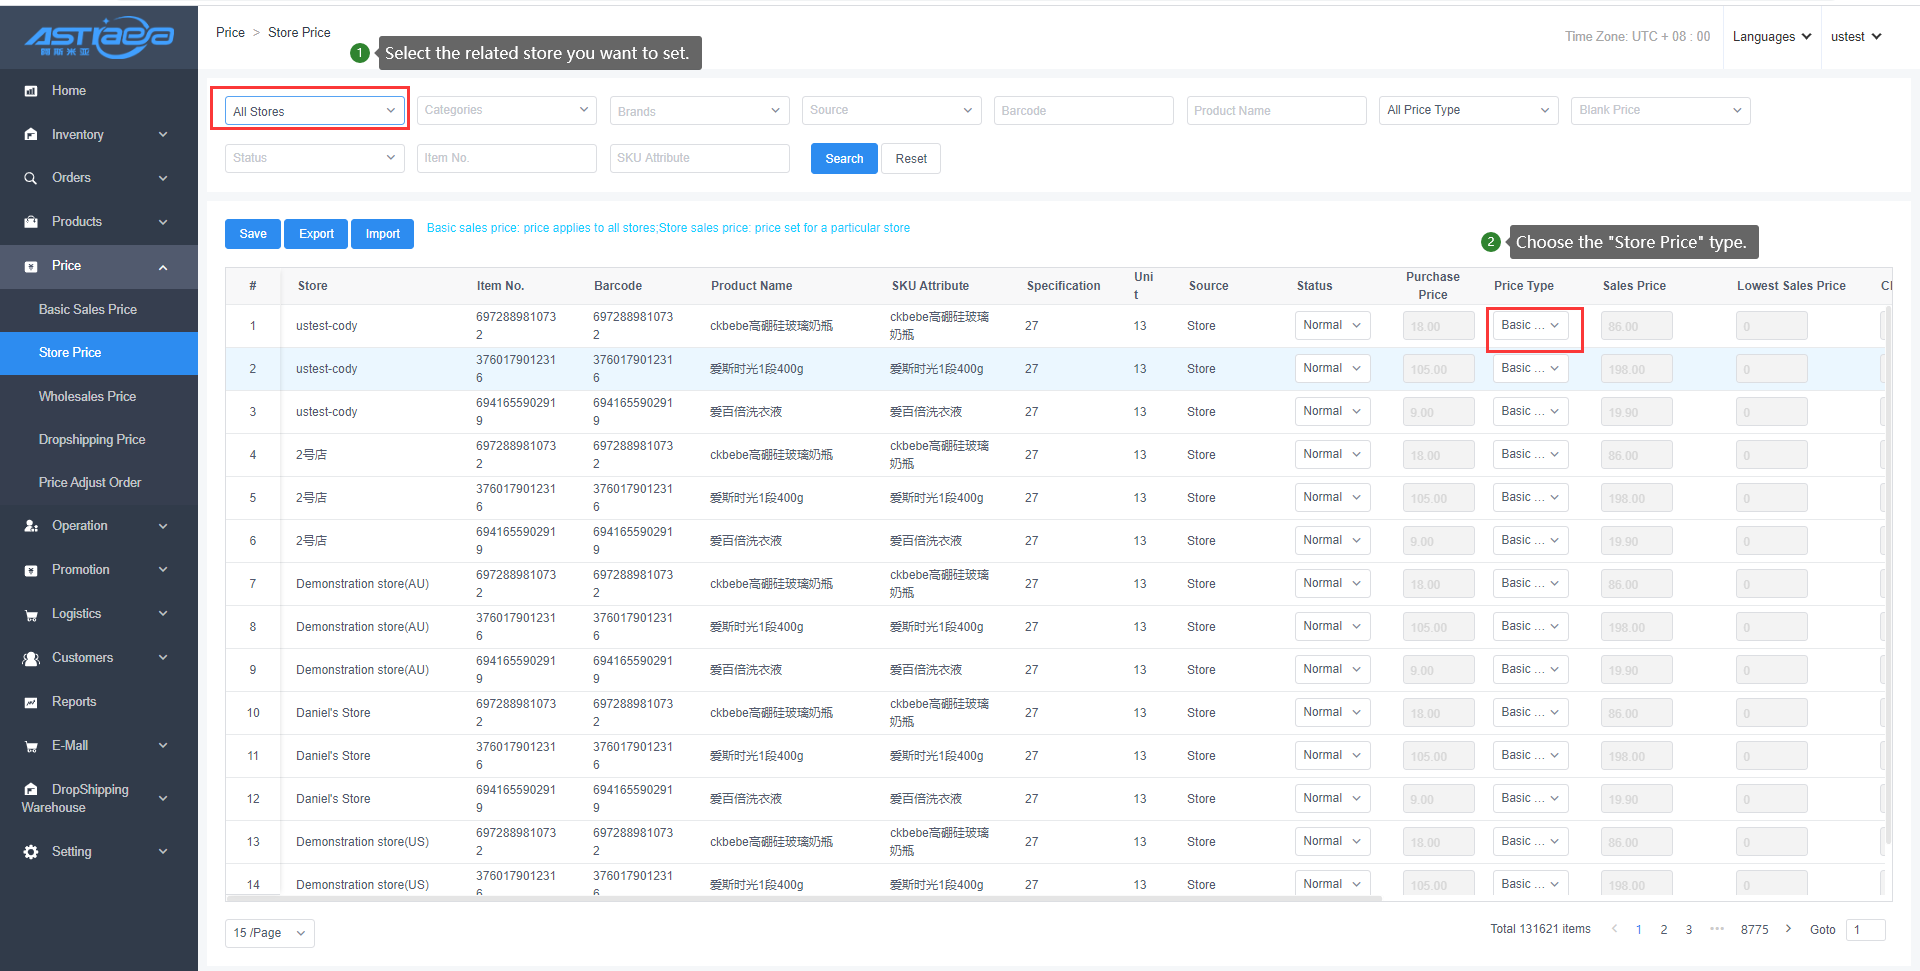
Step 7: All stores may also set respective sales status and price (without affecting the basic price)
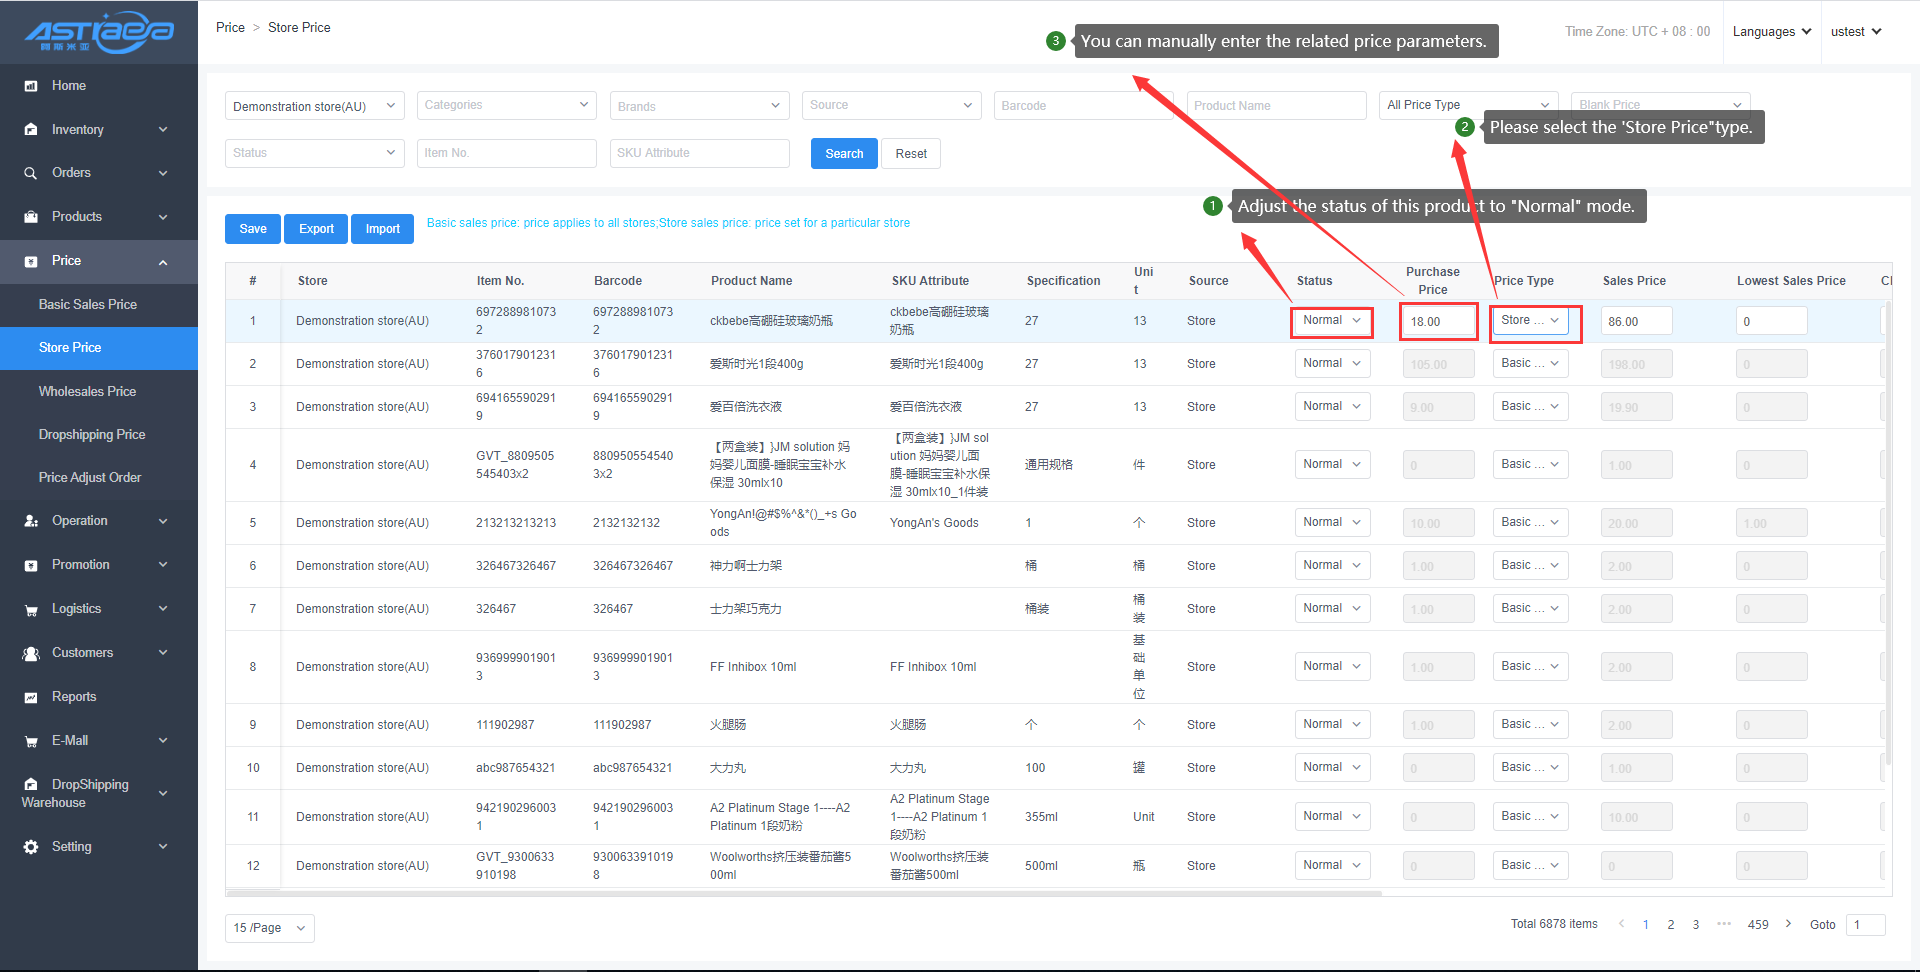
Set the sales status, namely "normal", "pre-eliminated" and "eliminated".
Change of the price of the product to the store price:
Set manually, or import, modify and re-import in batches the store price;
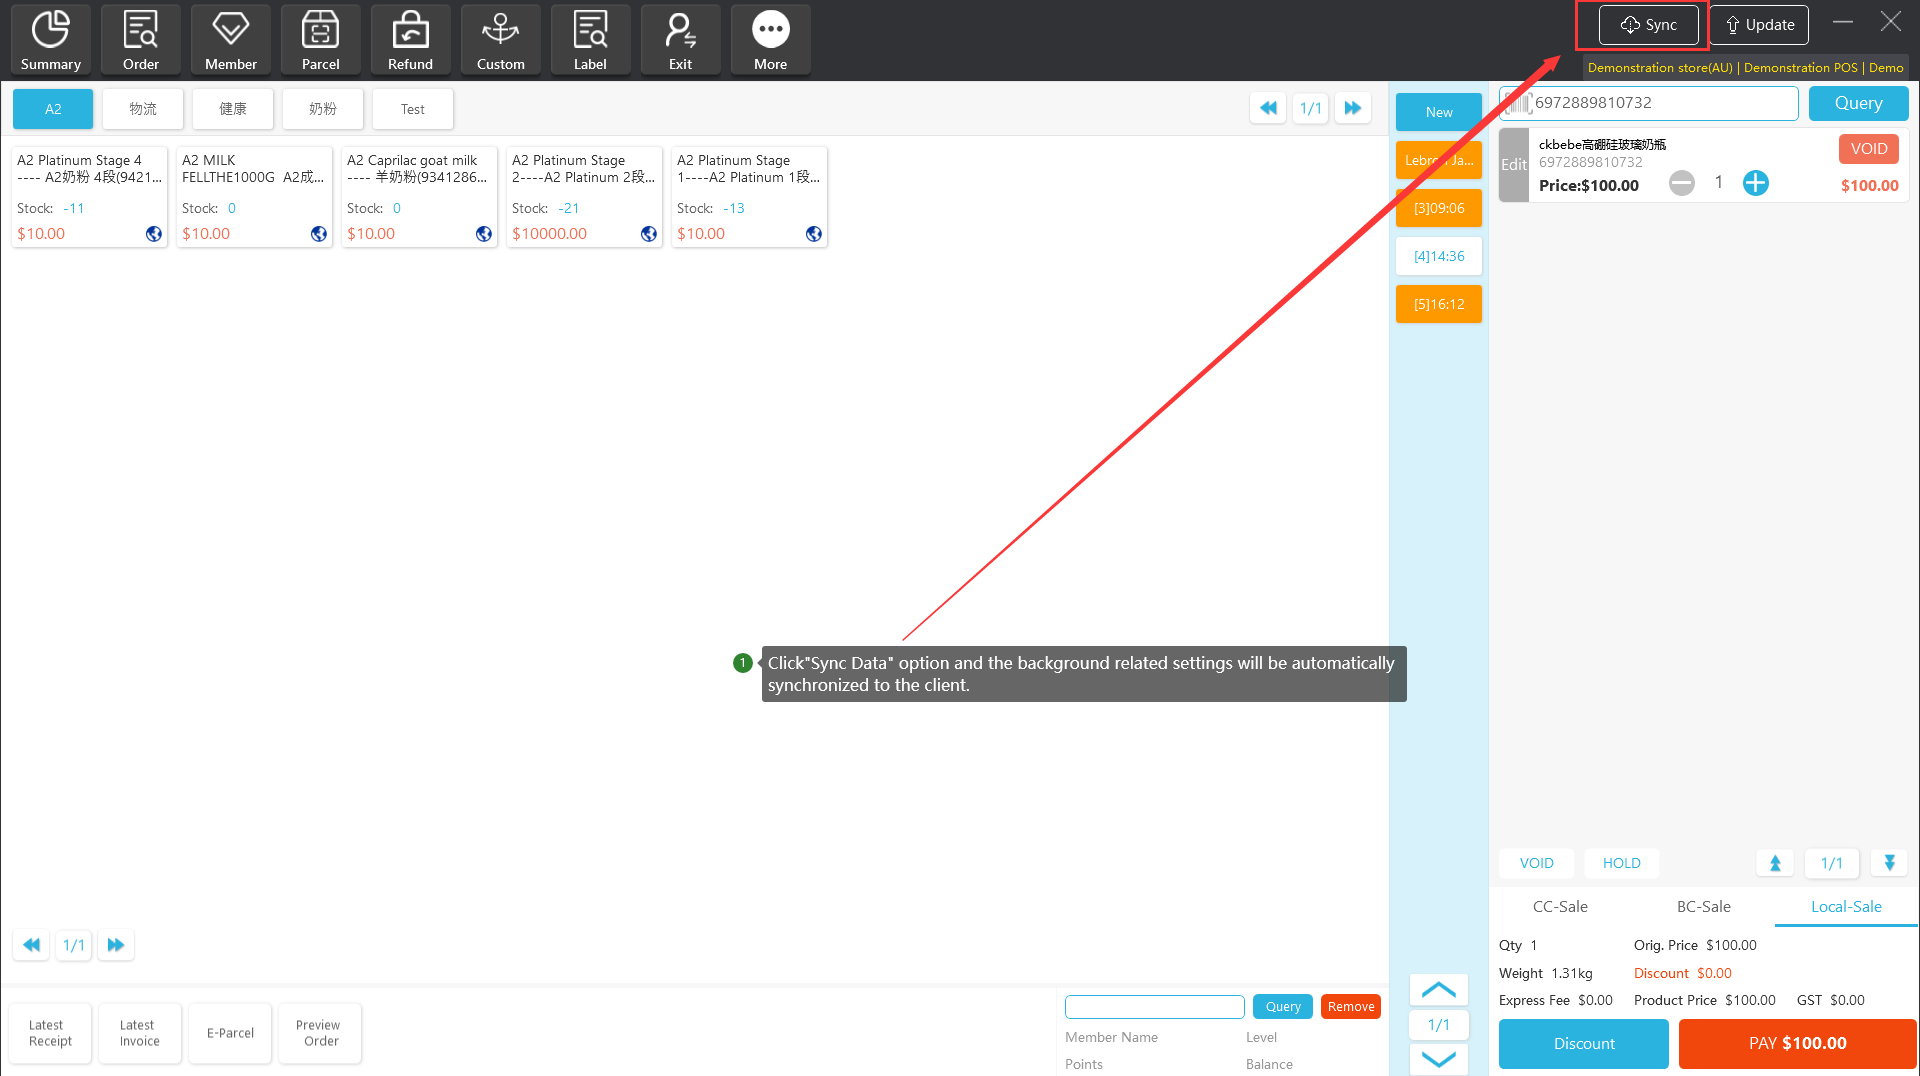
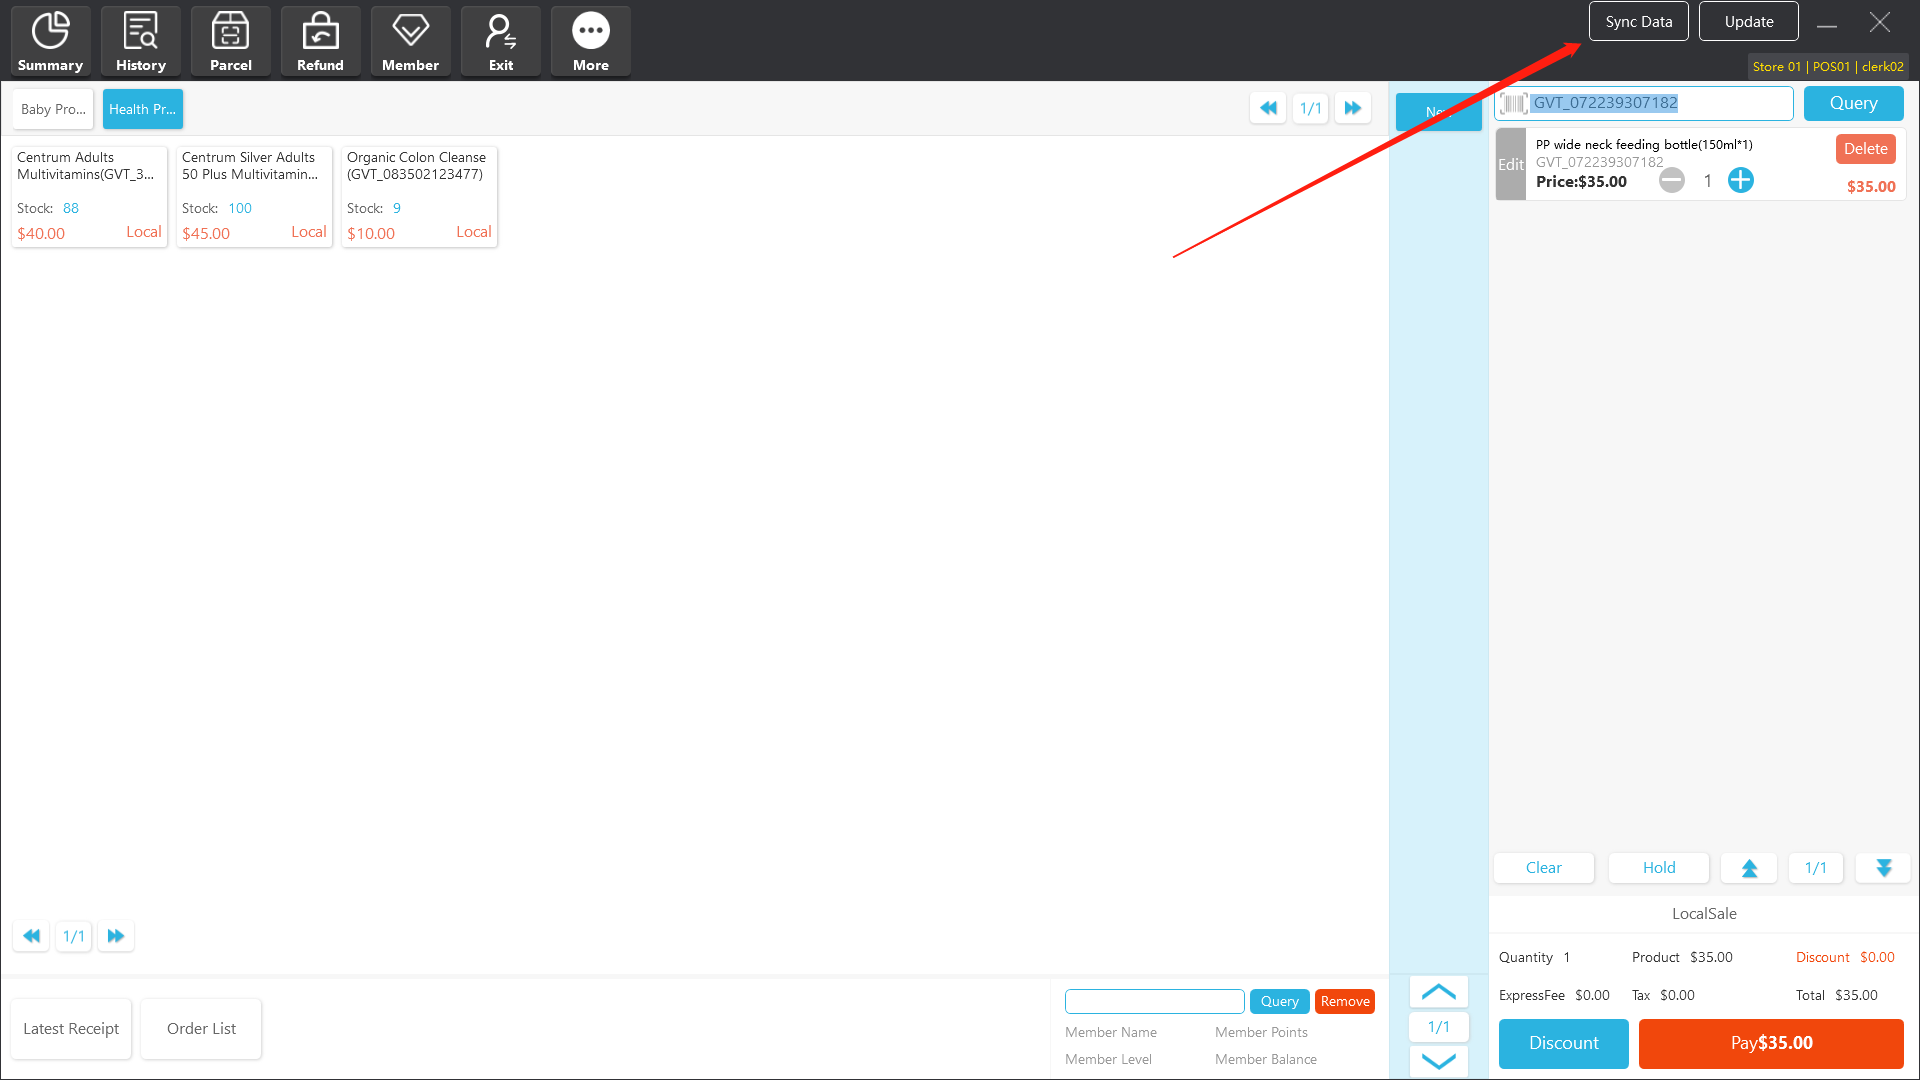
Step 8: Click the "Sync Data" option at the client. Then, the newly added products at the server are already available for query at the client.
Method II: Products -> Import Product -> Download Template
[Operating steps]
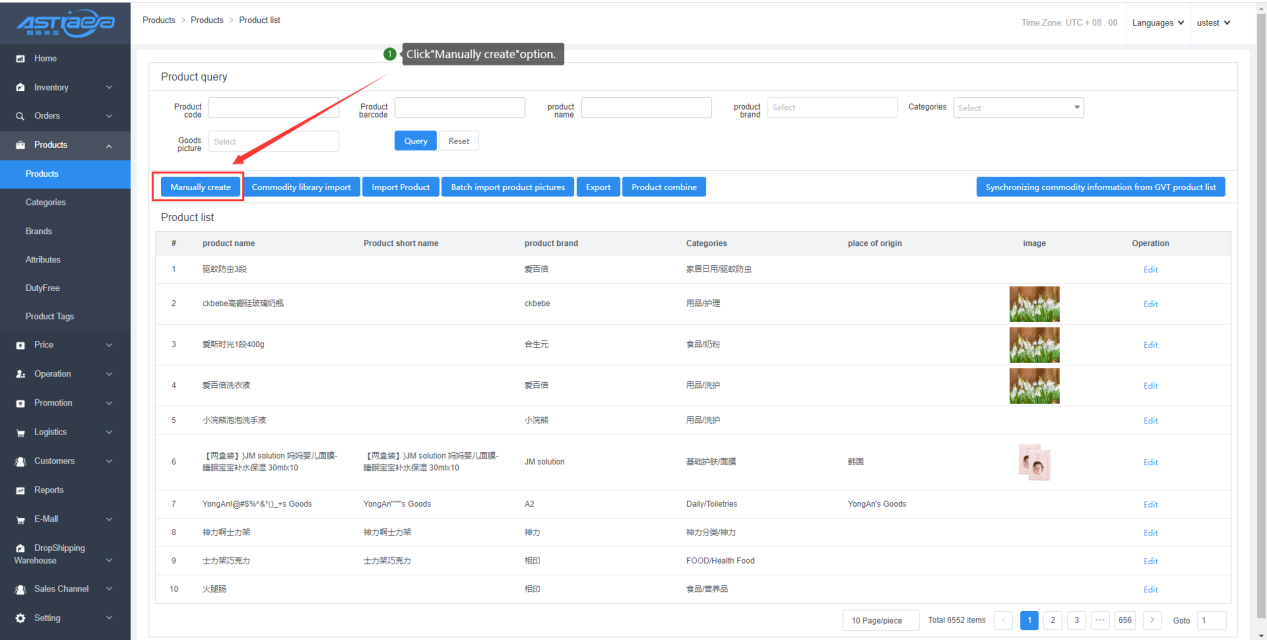
Step 1: Log in the Apos server. Click "Products”, "Product list", and "Import Product” options successively;
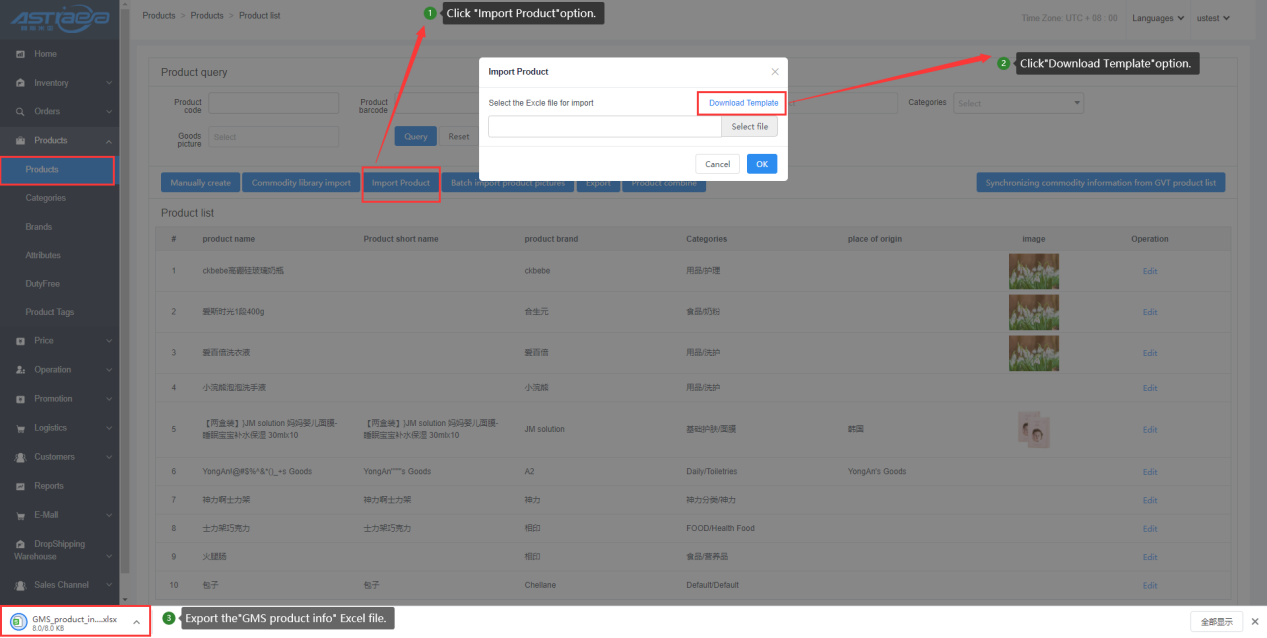
Step 2: Enter the product information according to the template prompt;
Step 3: Click "Download Template” option, choose the template file, and click "Open” option. Then, the product data will be automatically imported and synchronized to the list of "Sales Price";

Step 4: After editing the price of the product to the list of "Sales Price", click "Save” option. Then, the products with new price will be automatically synchronized to all stores under the commercial tenant;
Step 5: Click the "Sync Data" option at the client. Then, the products imported at the server are already available for query at the client.
Method III: System Management -> Import Data -> Import Product Info
Step 1: Log in the "Setting” -> “Import Data” page. Click "Import Data" option and select "Product Info”;
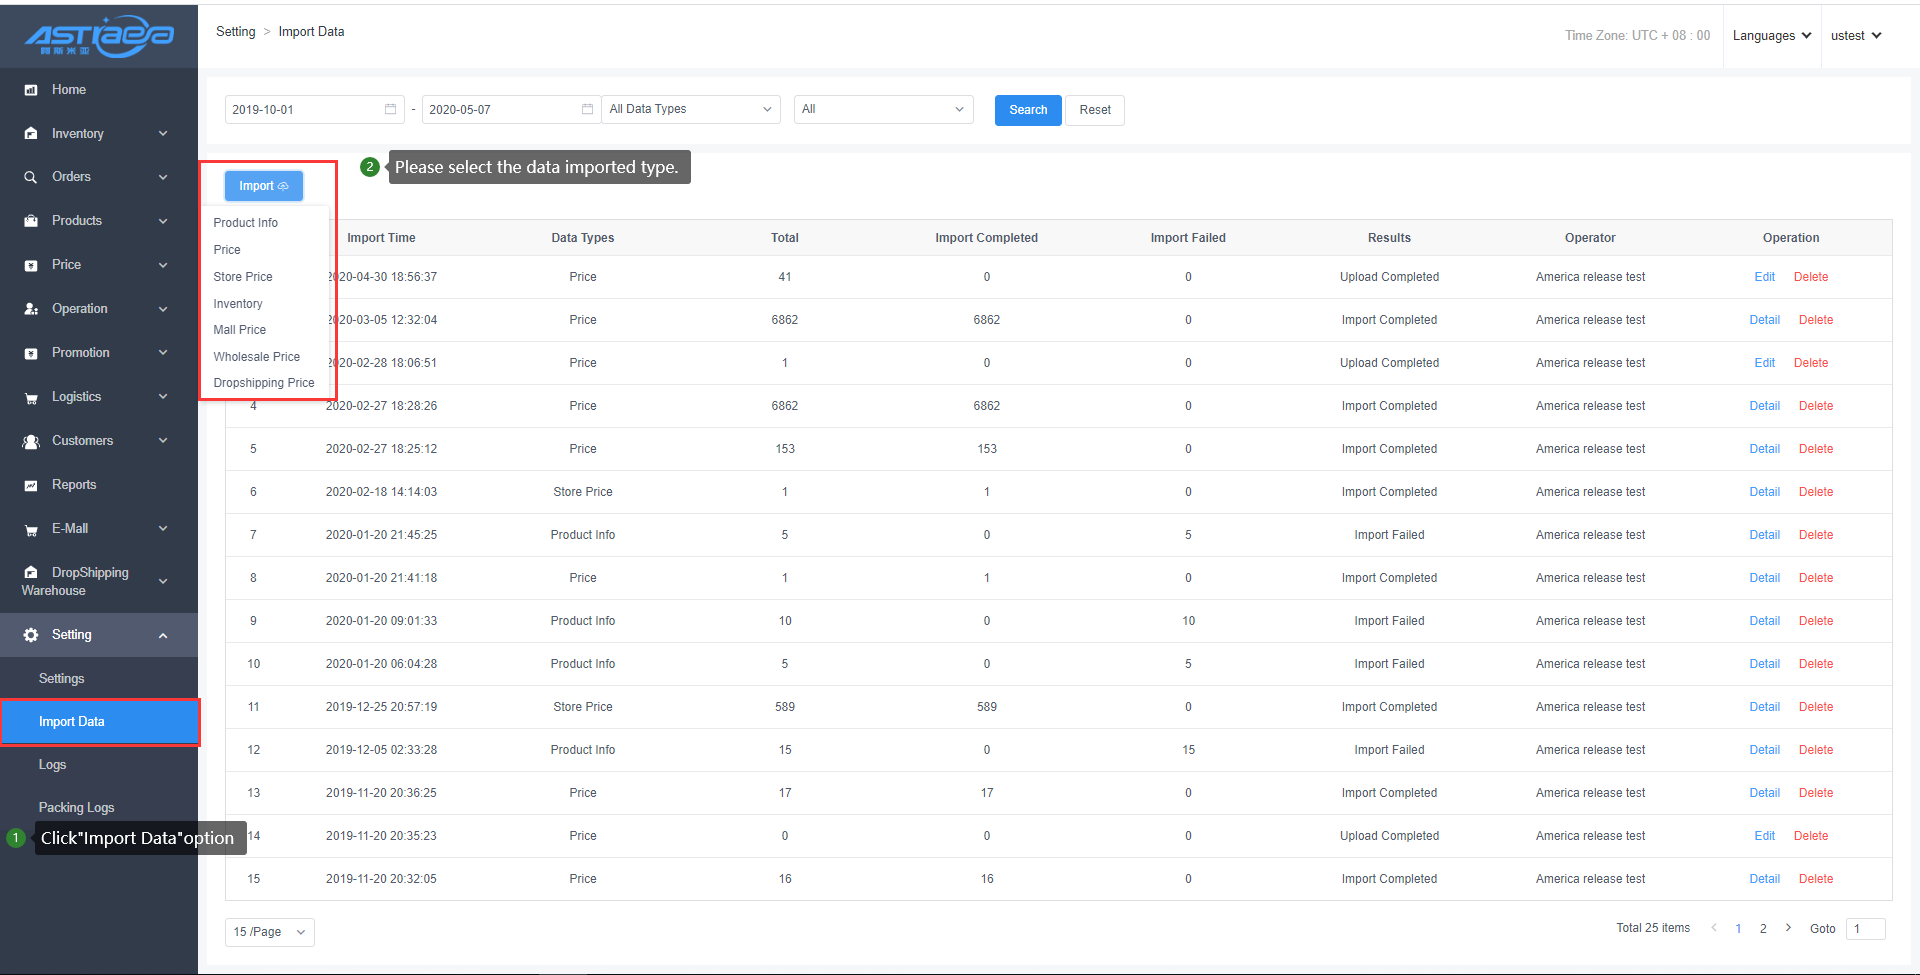
Step 2: Click "Download the Import Template” option. After editing the data according to the template prompt, click "Upload” option to upload the template file;
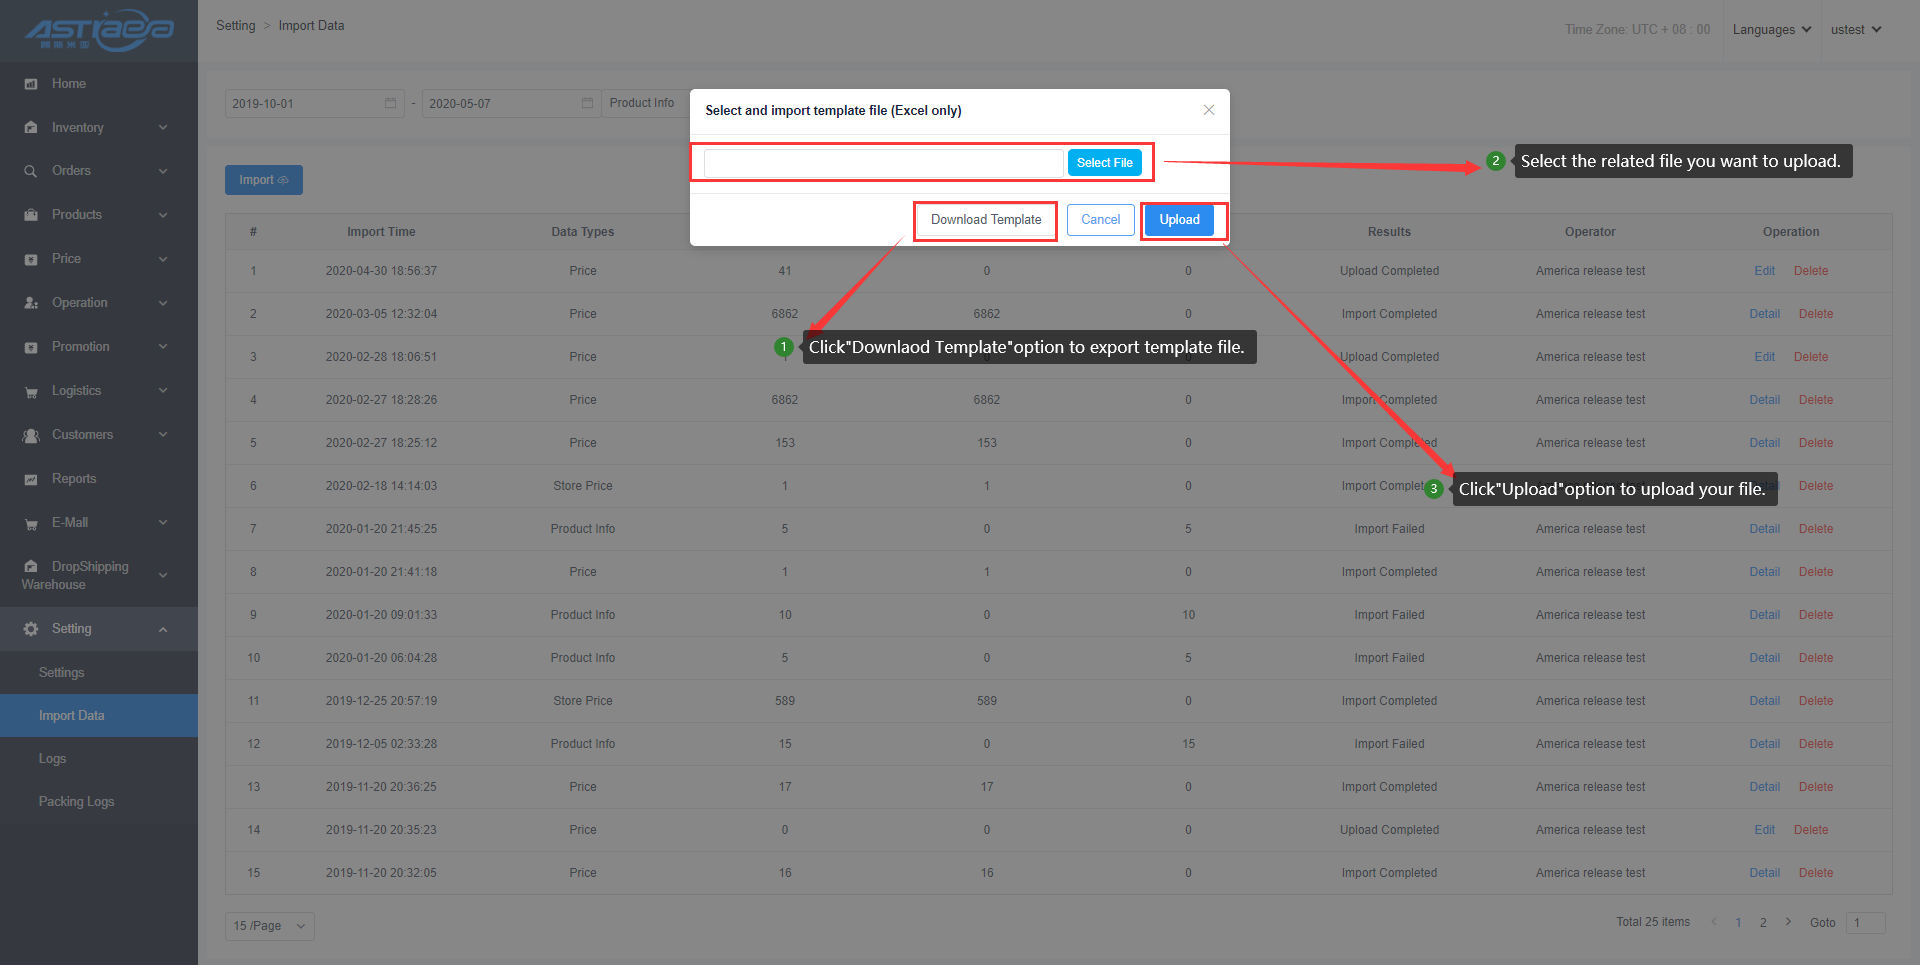
Step 3: The system will automatically analyze the product information, and give an error prompt in case of rejected data. After saving the corrected data (can be exported in batches, and imported in batches after correction), click "Confirm to import” option;
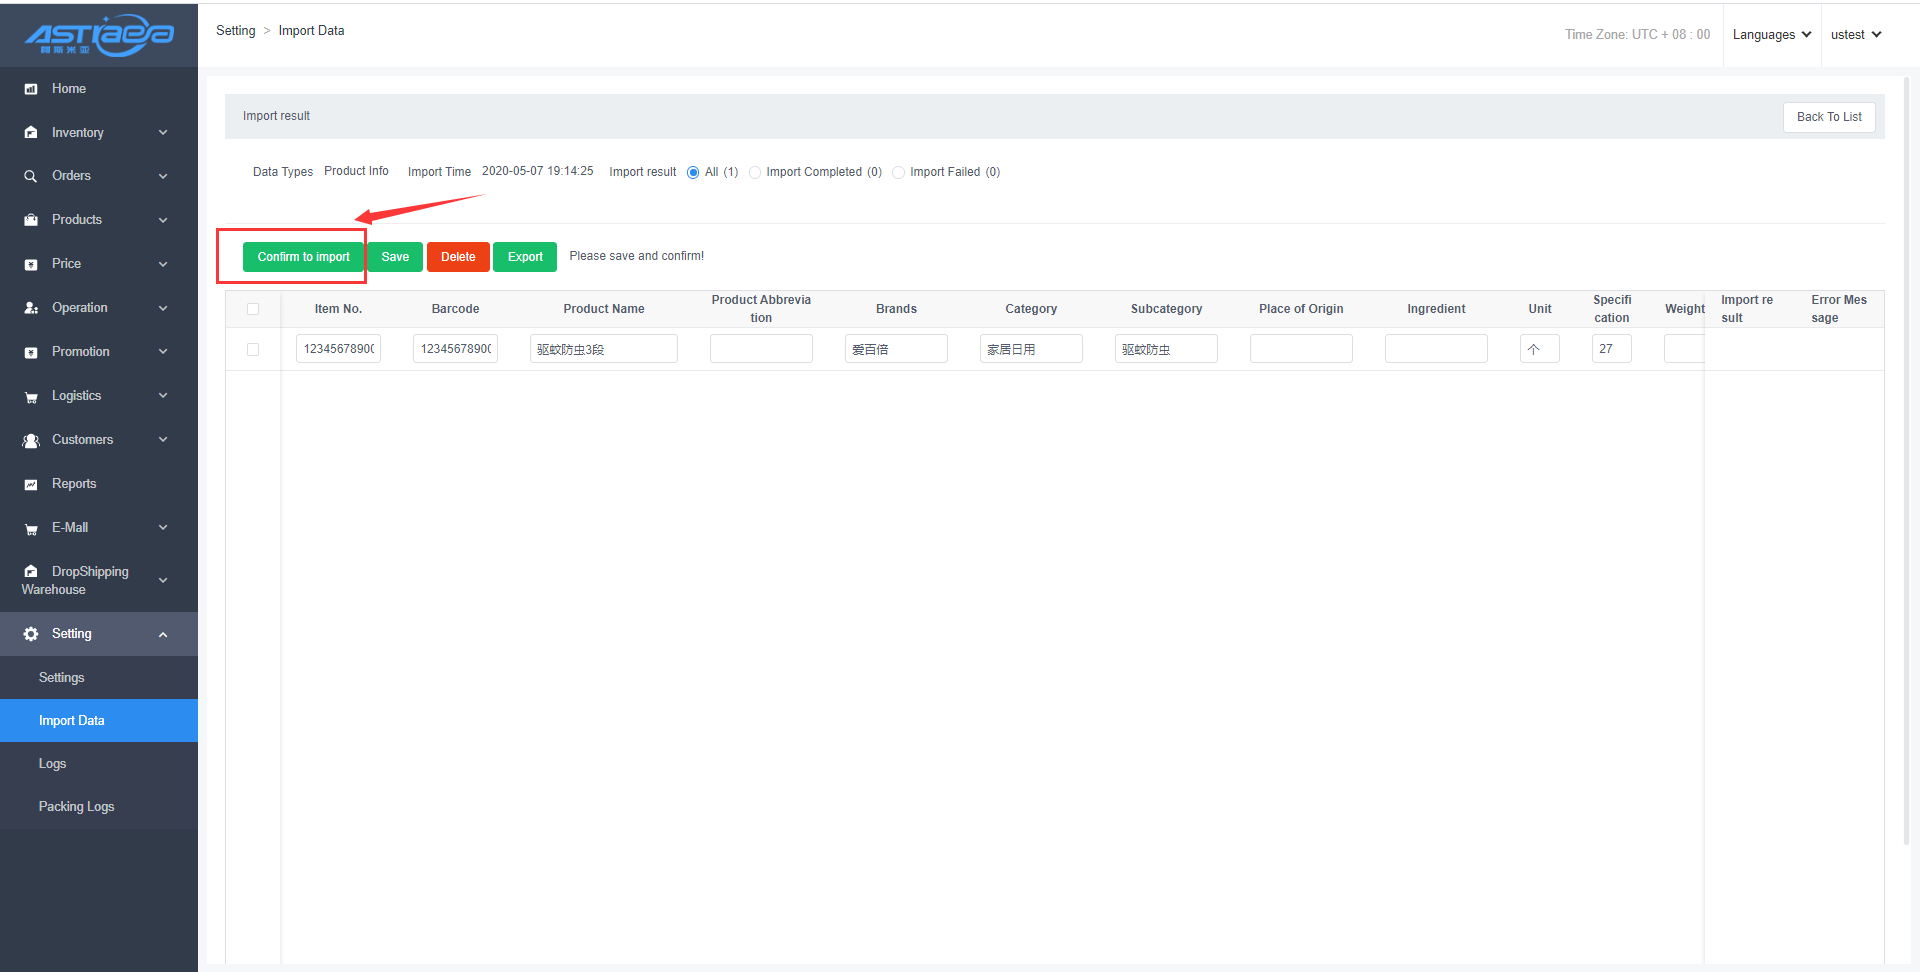
Step 4: The product information imported into “Product Info” will be automatically synchronized to the lists of "Product Information", "Sales Price", “Store Price";
Step 5: Click the "Sync Data" option at the client. Then, the products imported at the server are already available for query at the client.
1.2 Creation of individual products at server
Before adding a new product, click "Brands", "Categories" and "SKU Attribute" option to add the relevant information of the product.
There are two ways for creating single item.
Method I: Completely Add
[Operating steps]
Step 1: Log in the Apos server. Click "Products", "Product Information”, and "Manual create” options;
Step 2: At the "Product Information” page, complete the data in all required options following the prompt, and then click "Next step” option;

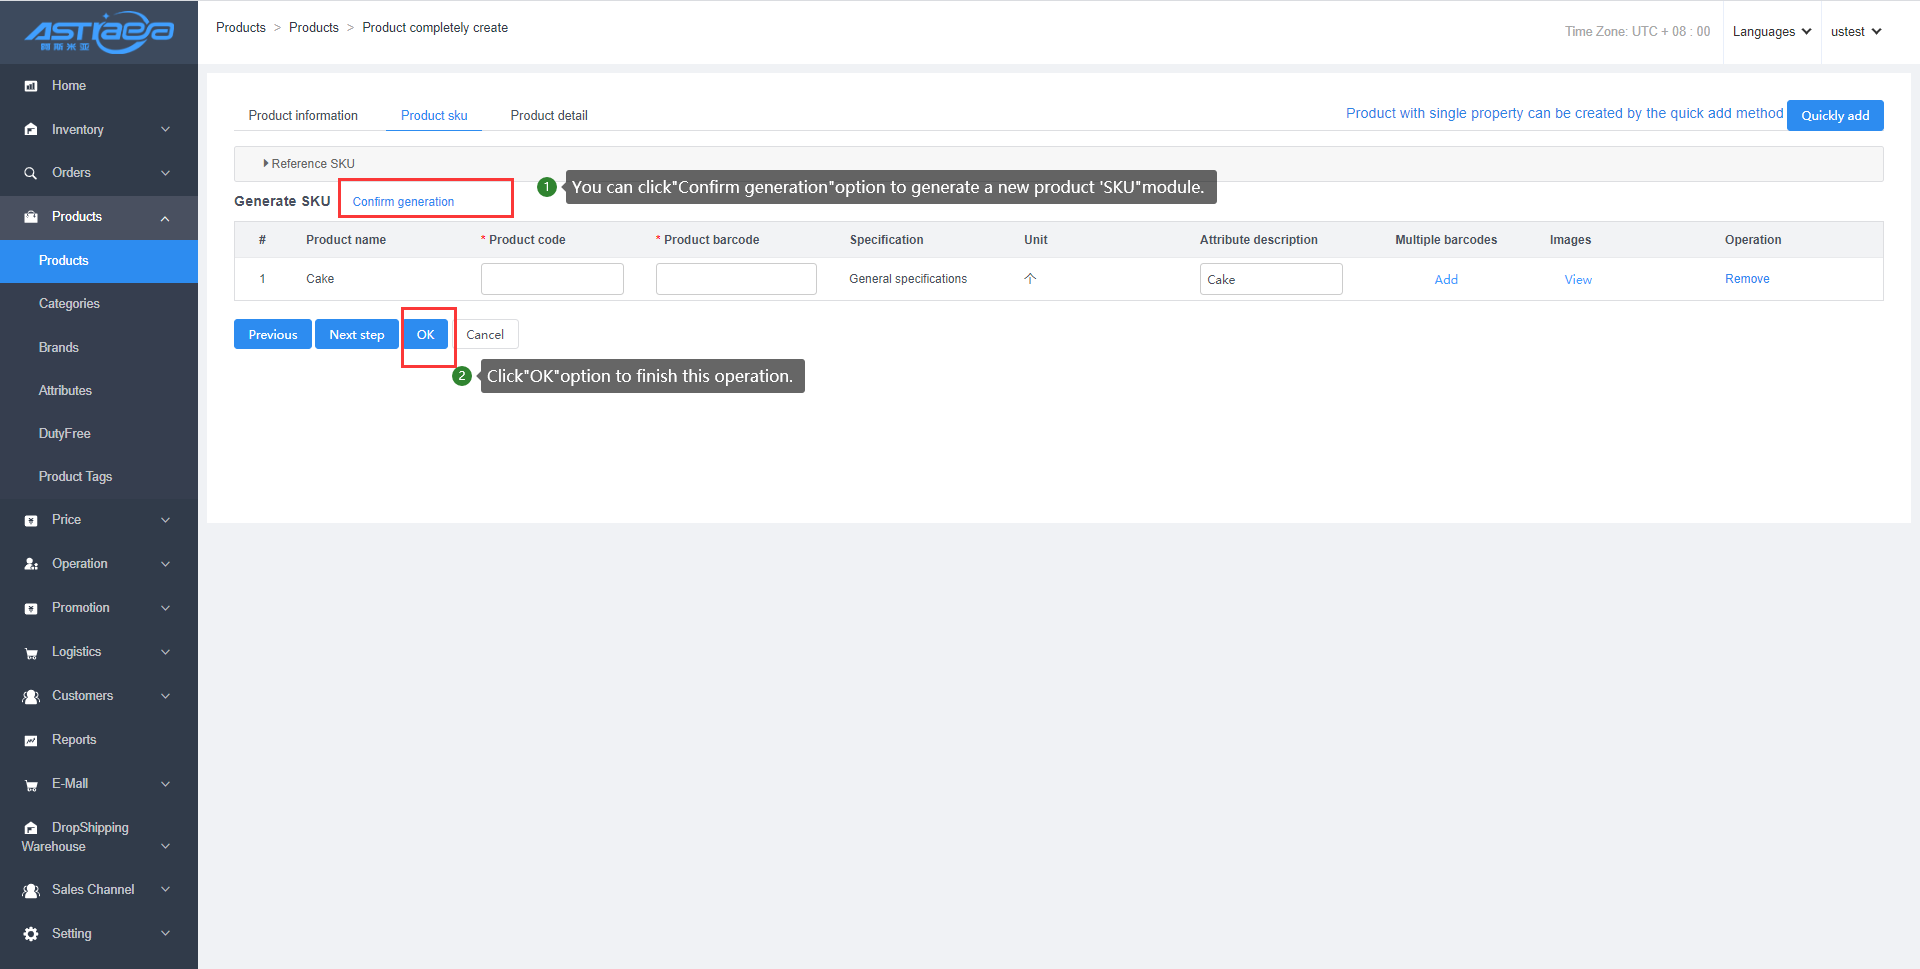
Step 3: Set the related property of the product. Then, “Generate SKU”, and after completing all data, click “Confirm generation” option;
Step 5: The product will be automatically synchronized to the list of "Sales Price”. After completing the data in "Sales Price" and "Store Price” options, click "Sync Data" option at the client. Then, the completely added products are already available for query at the client.
Method II: Quickly add
[Operating steps]
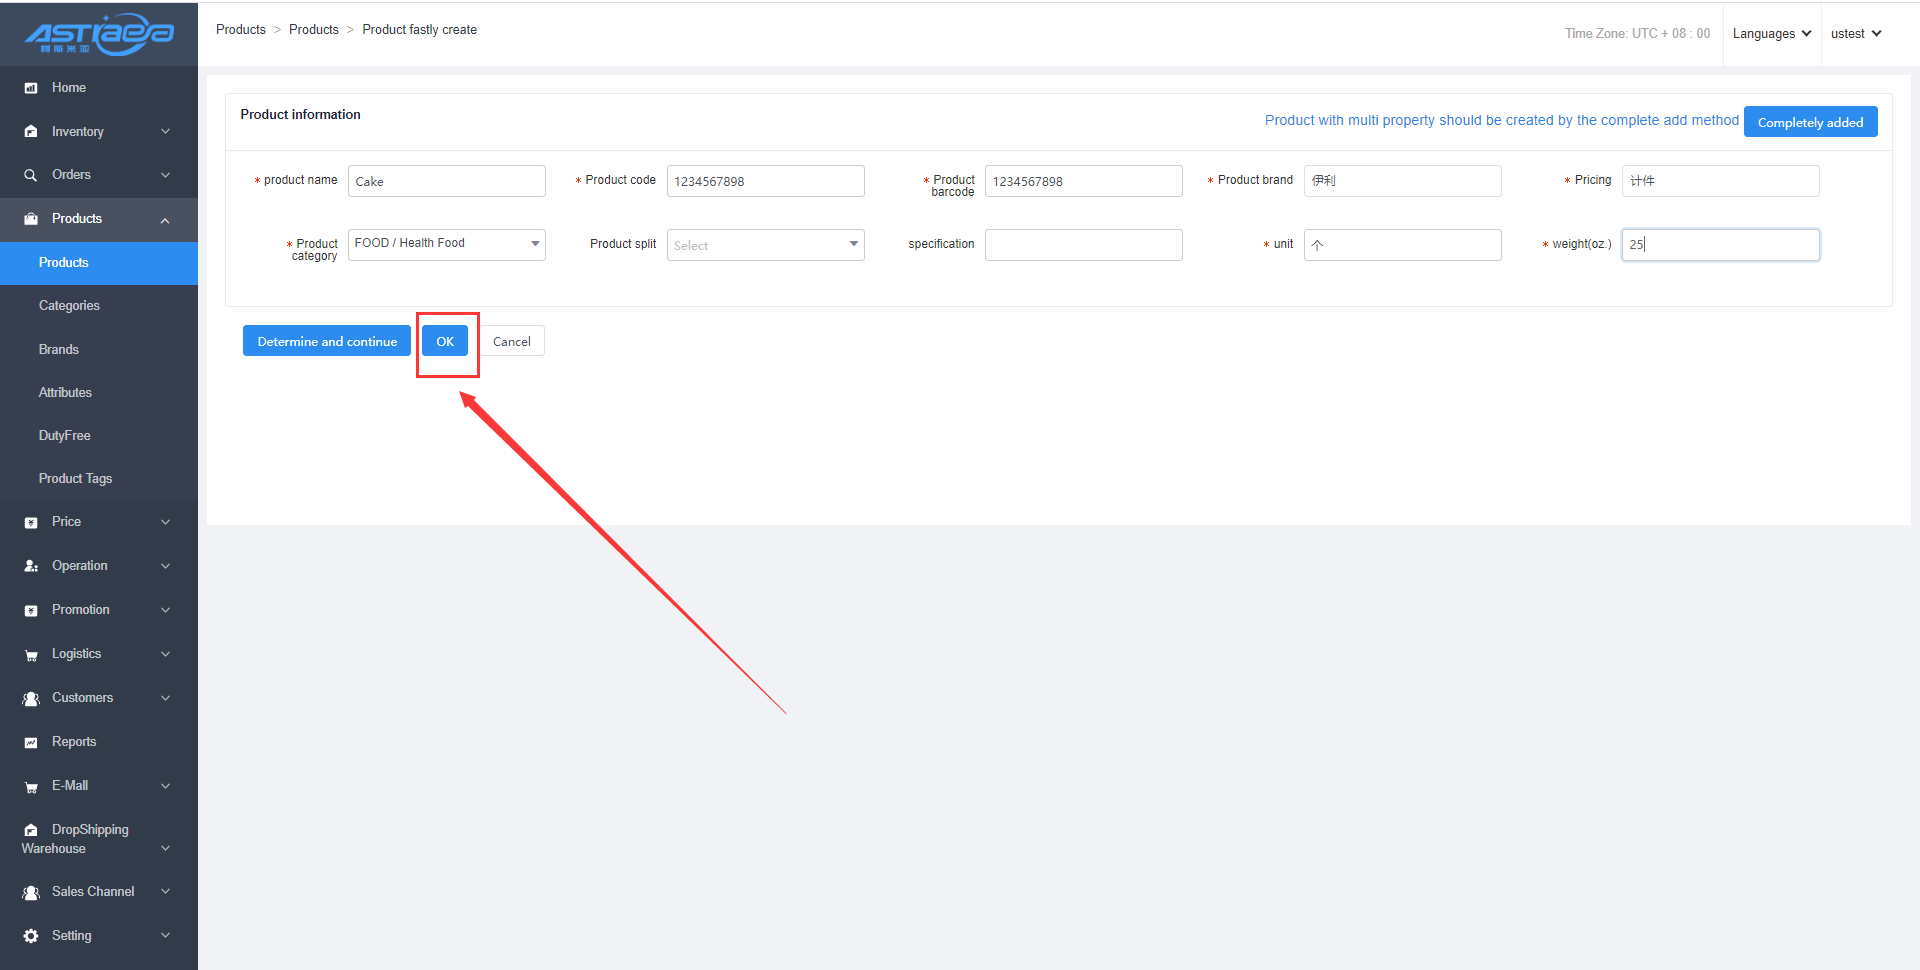
Step 1: Log in the Apos server. Click "Products", "Product Information”, and "Quickly add” options;

Step 2: After completing the product information following the prompt, click "OK" option to finish all operation steps.
Step 4: The product will be automatically synchronized to the list of "Sales Price”. After completing the data in "Sales Price" and "Store Price” options, click "Sync Data" option at the client. Then, the completely added products are already available for query at the client.
1.3 Management of duty free product
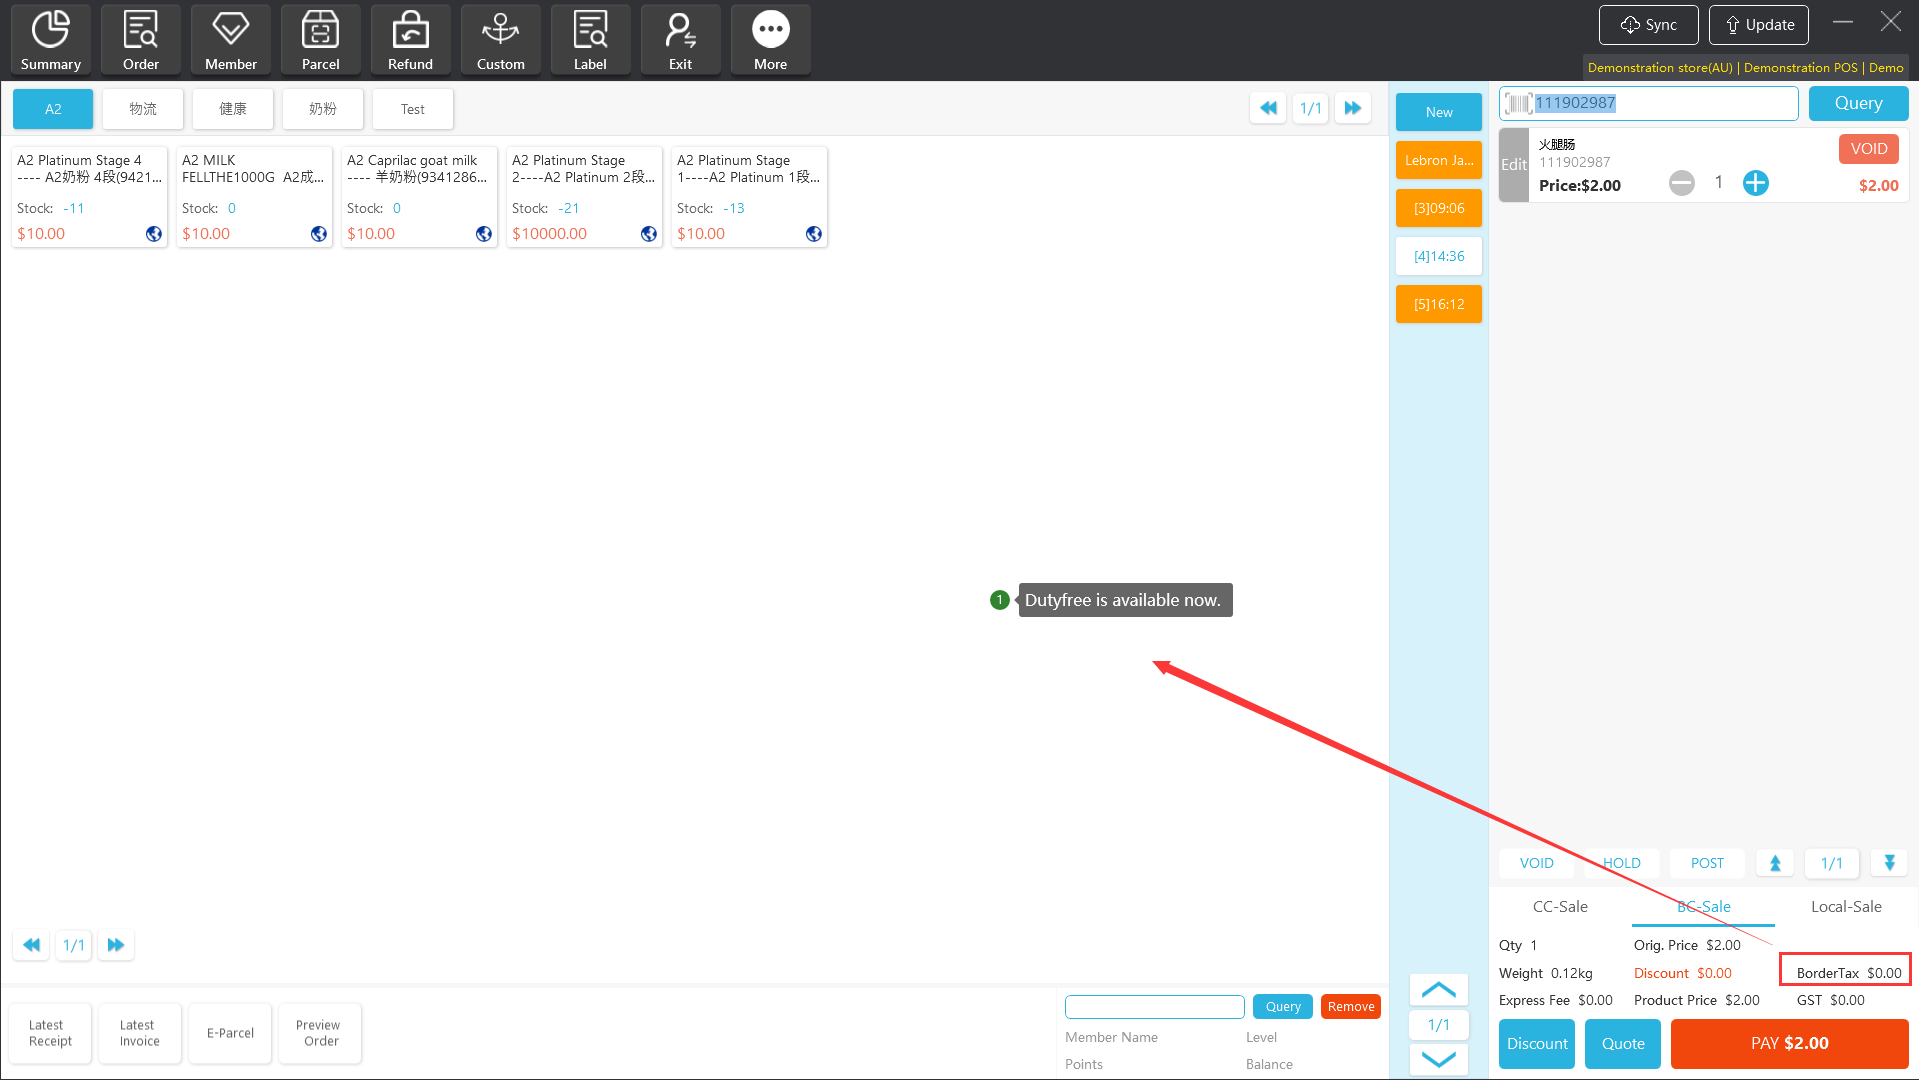
In case of some duty free product prior to sales, you may add the duty free products in the "Duty Free" option at the server.
[Operating steps]
Step 1: Log in the Apos server. Click "Products” —>"Duty Free”, and “Add” options.
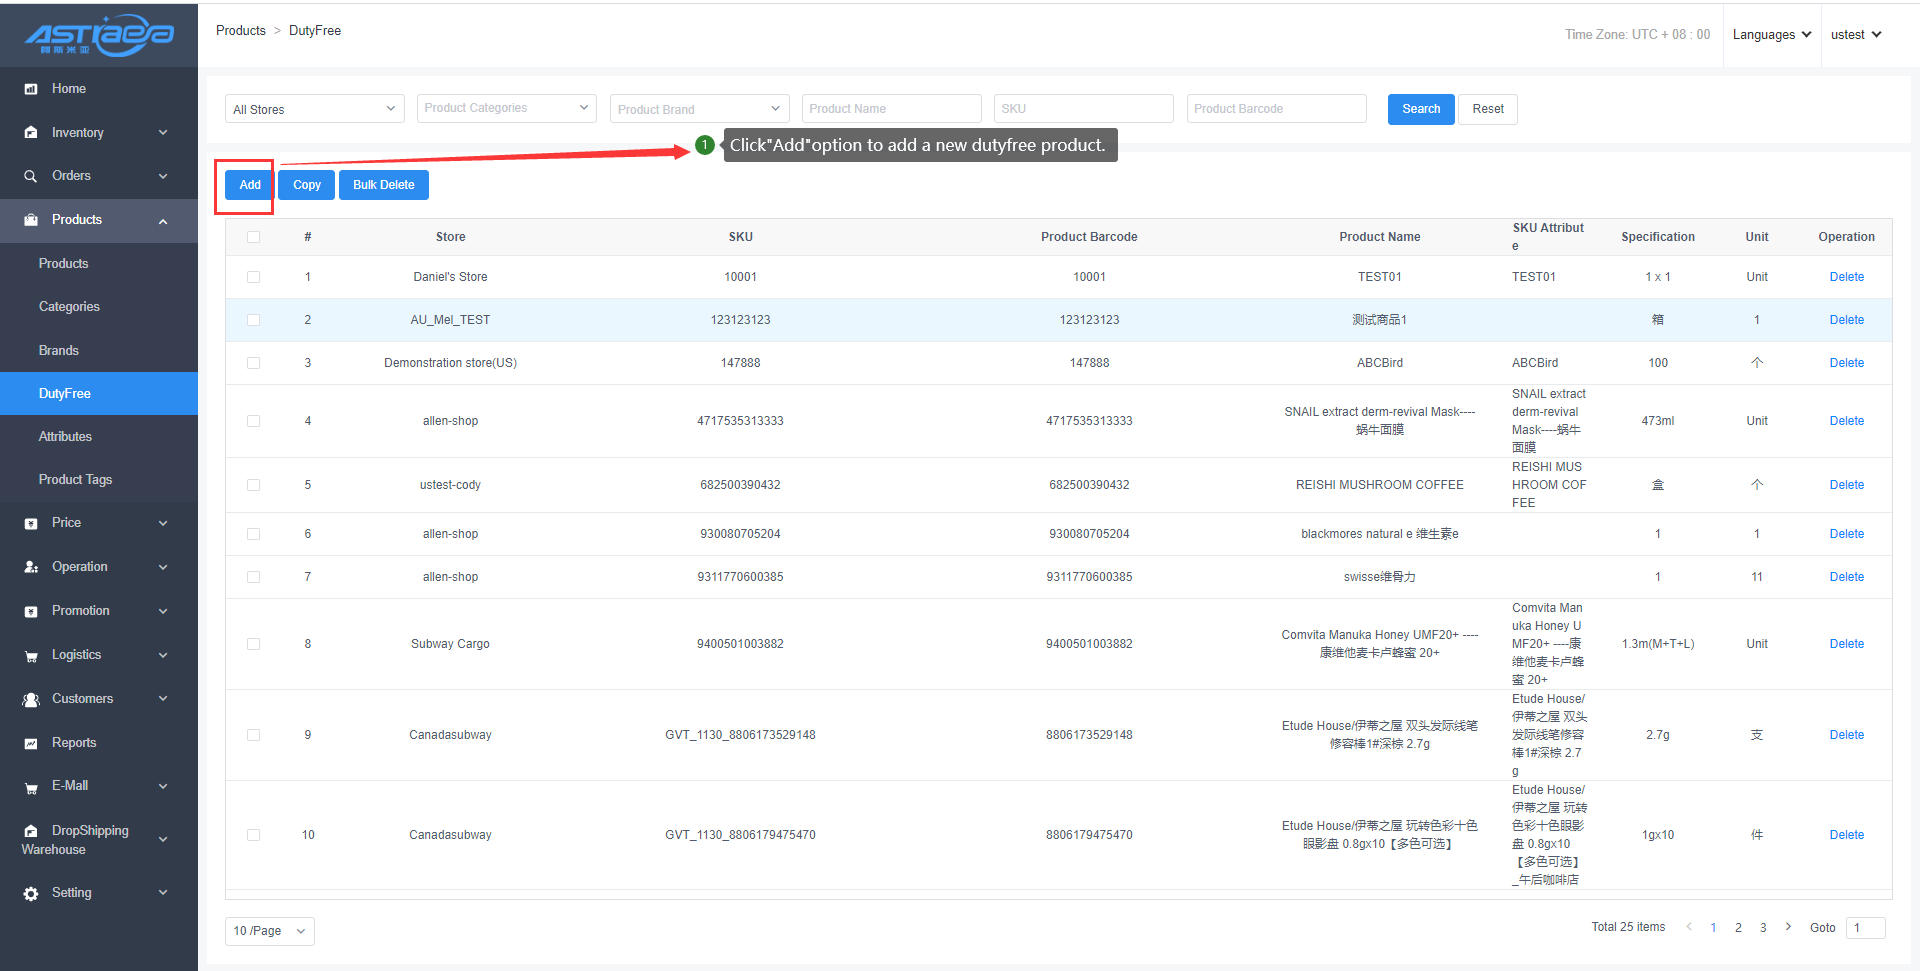
Step 2: Select the related store and click "Add Product" option.
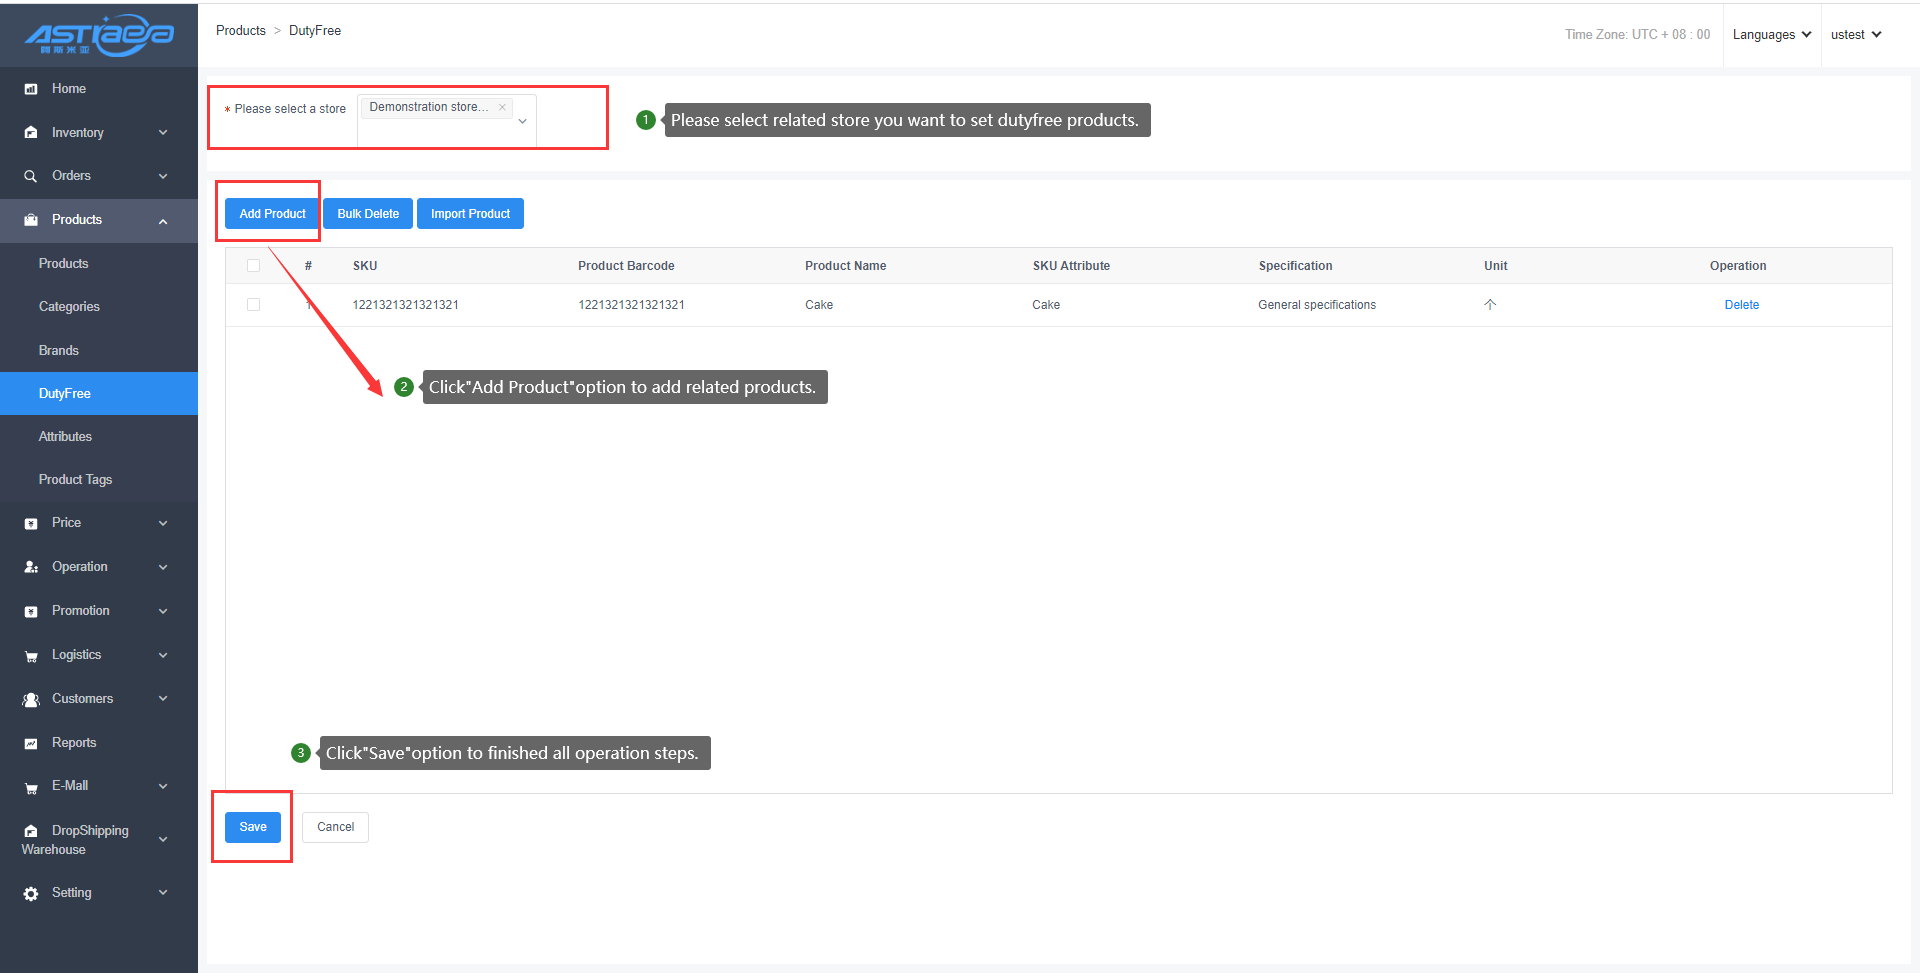
Step 3: Select the duty free products. Click “Confirm” option.

Step 4: After checking and confirming the data, click "Save” option.
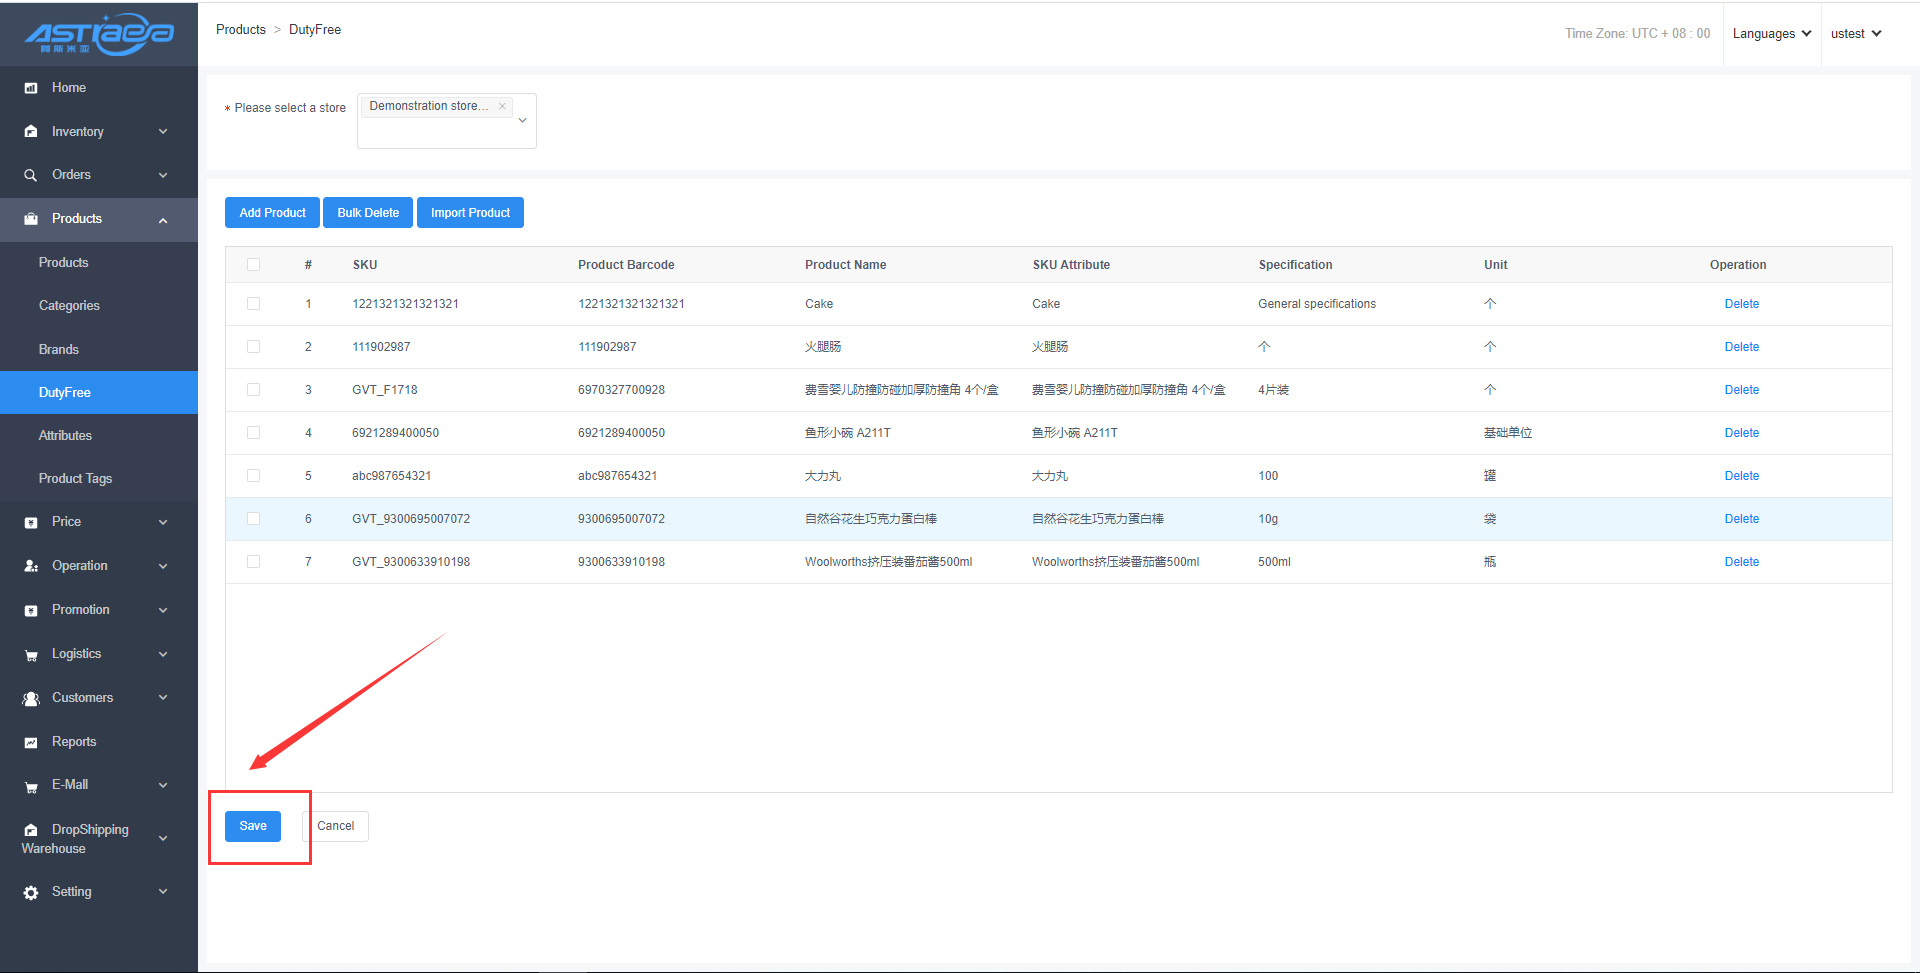
Step 5: Click "Sync Data" option at the client. Then, tax is free when selling the product.
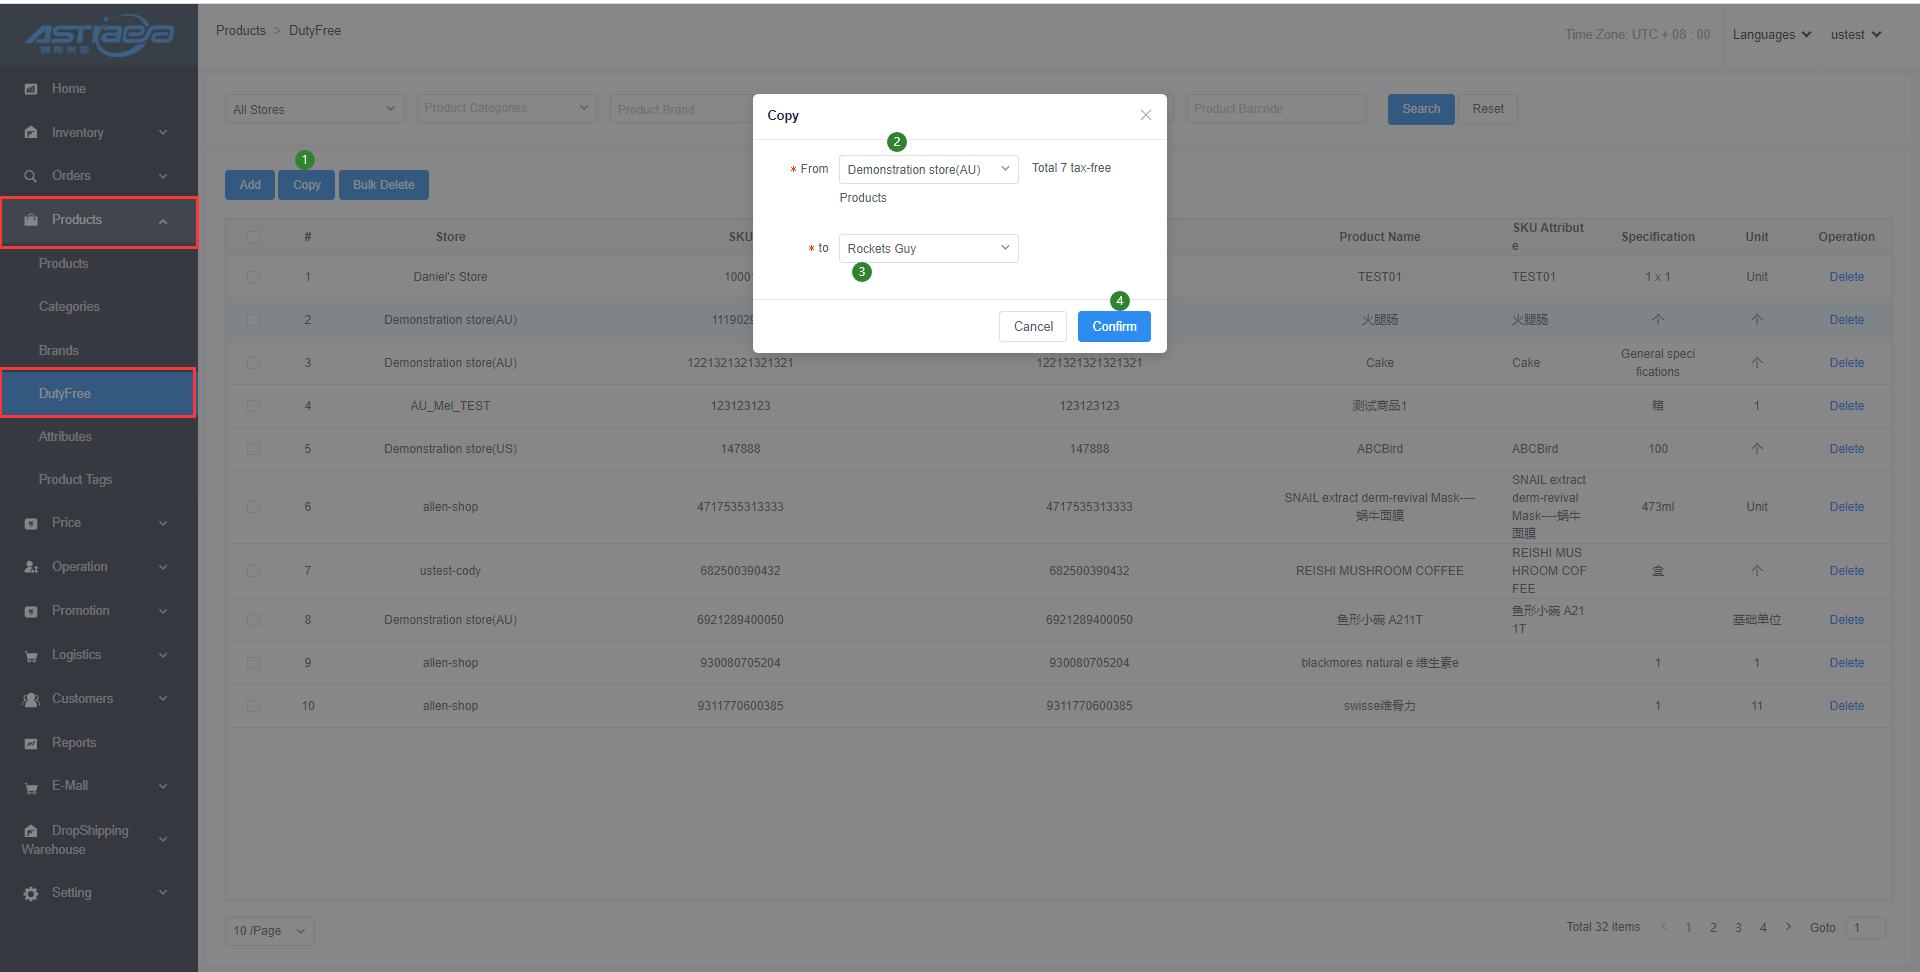
Step 6: At the server, you can also copy the duty free products from one store to another via the "Copy" option.
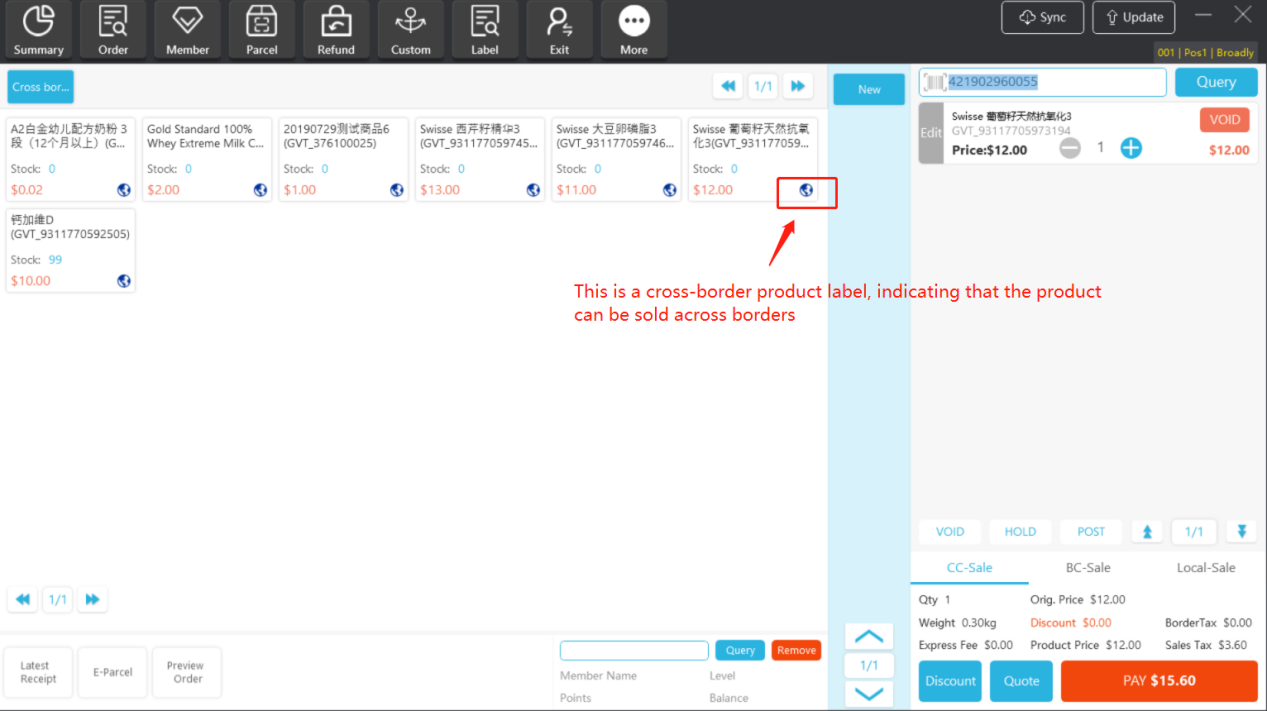
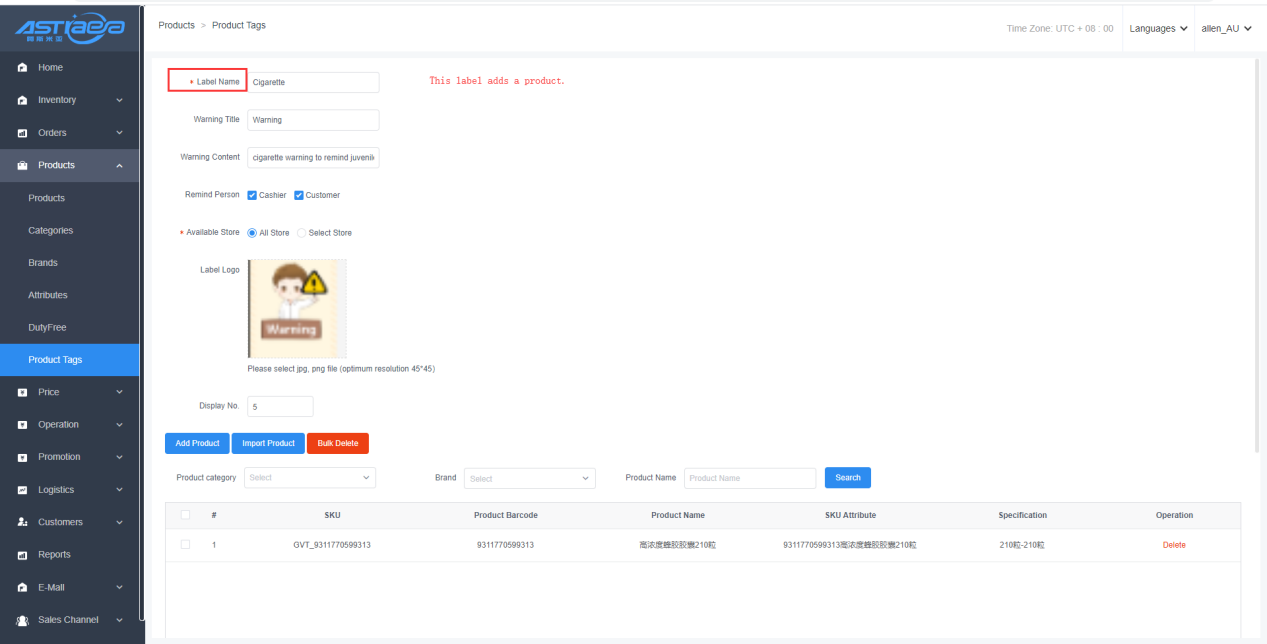
1.4 Product tags management
For special products, if you need to give a label warning when selling, first you can set the warning prompt on the background. After setting the label products, when the client sells, it will give a warning reminder to the customer or the staff (such as setting a cigarette warning to remind juvenile not to buy). After the overseas products are labeled with cross-border products (the cross-border products label is on the lower right side of the product in the shortcut menu of the client), it is convenient for the shop staff to place cross-border product orders. The system provides four kinds of initial labels in Chinese and English, namely “cross-border products”, “new products”, “best-selling products”, “slow-selling products”. The cross-border product label is used to identify whether the products in the store can be sold by CC / BC, and the self-built products of overseas merchant tenants automatically add the cross-border product label.
[Operating steps]
Step 1; Enter the Apos server, click “Products”-”Product Label”,click “Add”option.
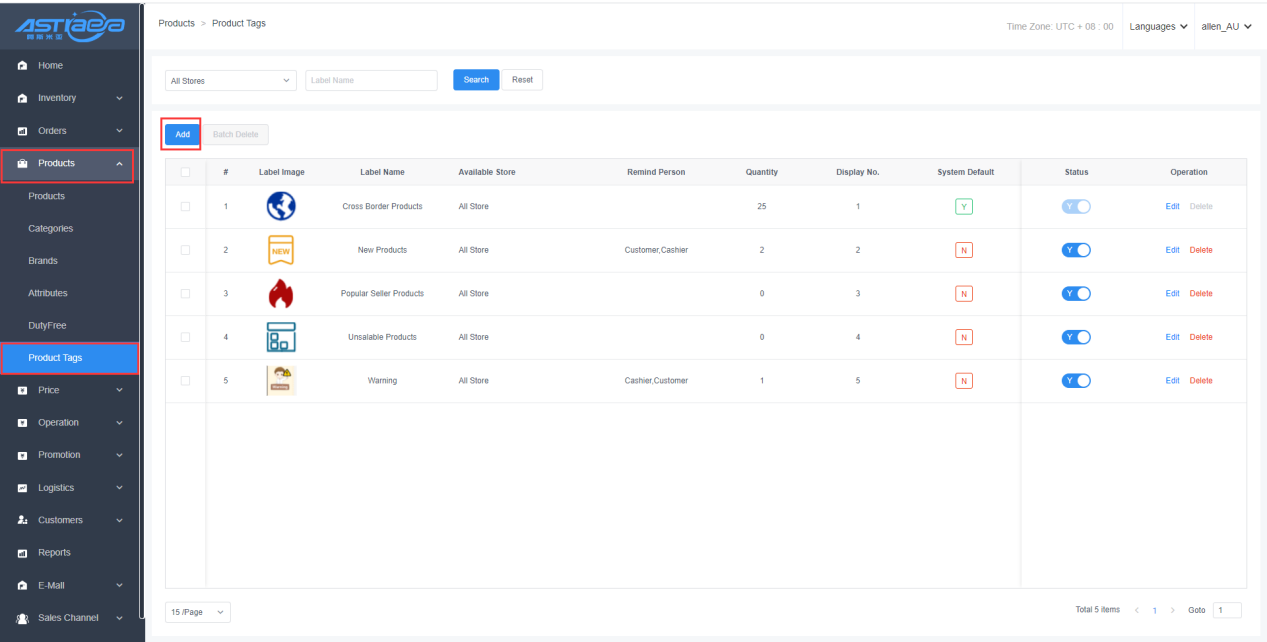
Step 2; Fill in the “label type”, label title, and “label content” you need; select the object of the prompt (If select the object of the prompt is staff ,will the prompt display on the main screen,if select the object of the prompt is customer,will the prompt display on the secondary screen, you can check all); Then select the applicable store.
Step 3; Click “Add Product”, select the product you want to set a label warning in the pop-up window, or you can import it in bulk through the file.

Step 4; After checking the confirmation information, click "Save" to complete the label product settings.
Step 5; Clicks on “Data Synchronization”on the client, and when the label product is sold, a corresponding prompt will pop up.
Step 6;The client can view the cross-border product label in the shortcut menu, and can determine whether the product can be sold across the border based on the label.
Tags rules;
1, Adding / deleting product tags is synchronized with adding / deleting tags for product prices. Adding / deleting products on the current page is equivalent to adding the tag to the corresponding product in the product price.
Step 1; Products tagged on the product label page.
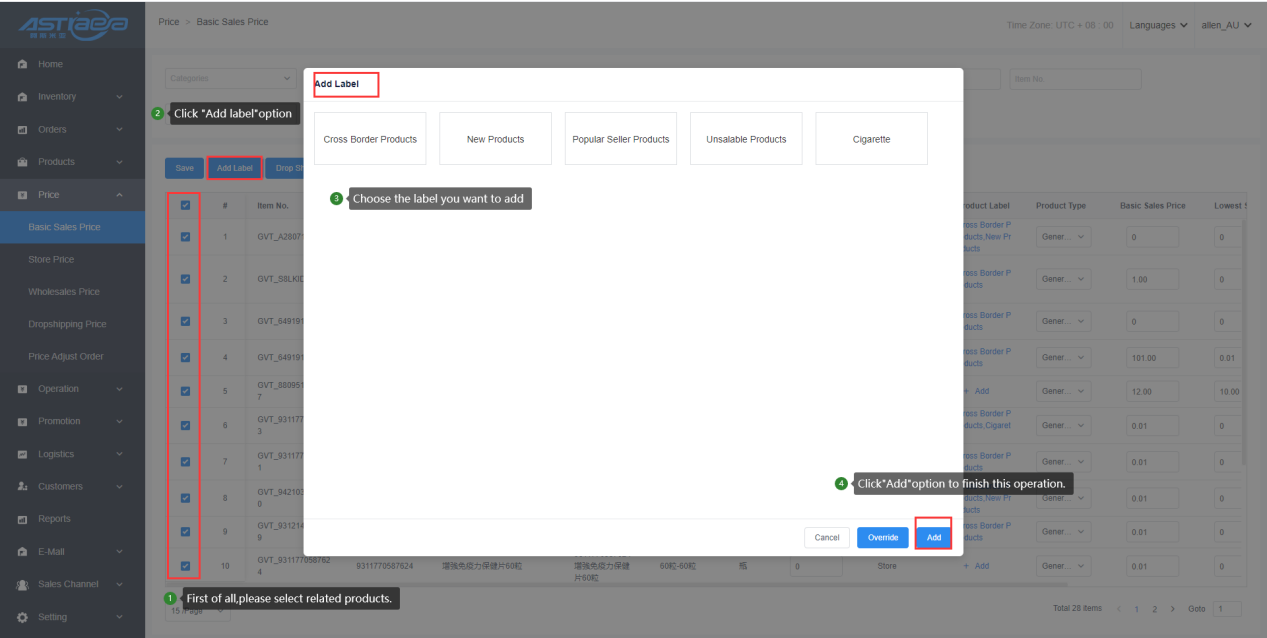
Step 2; Products on the basic sales price page will be added automatically and synchronously.
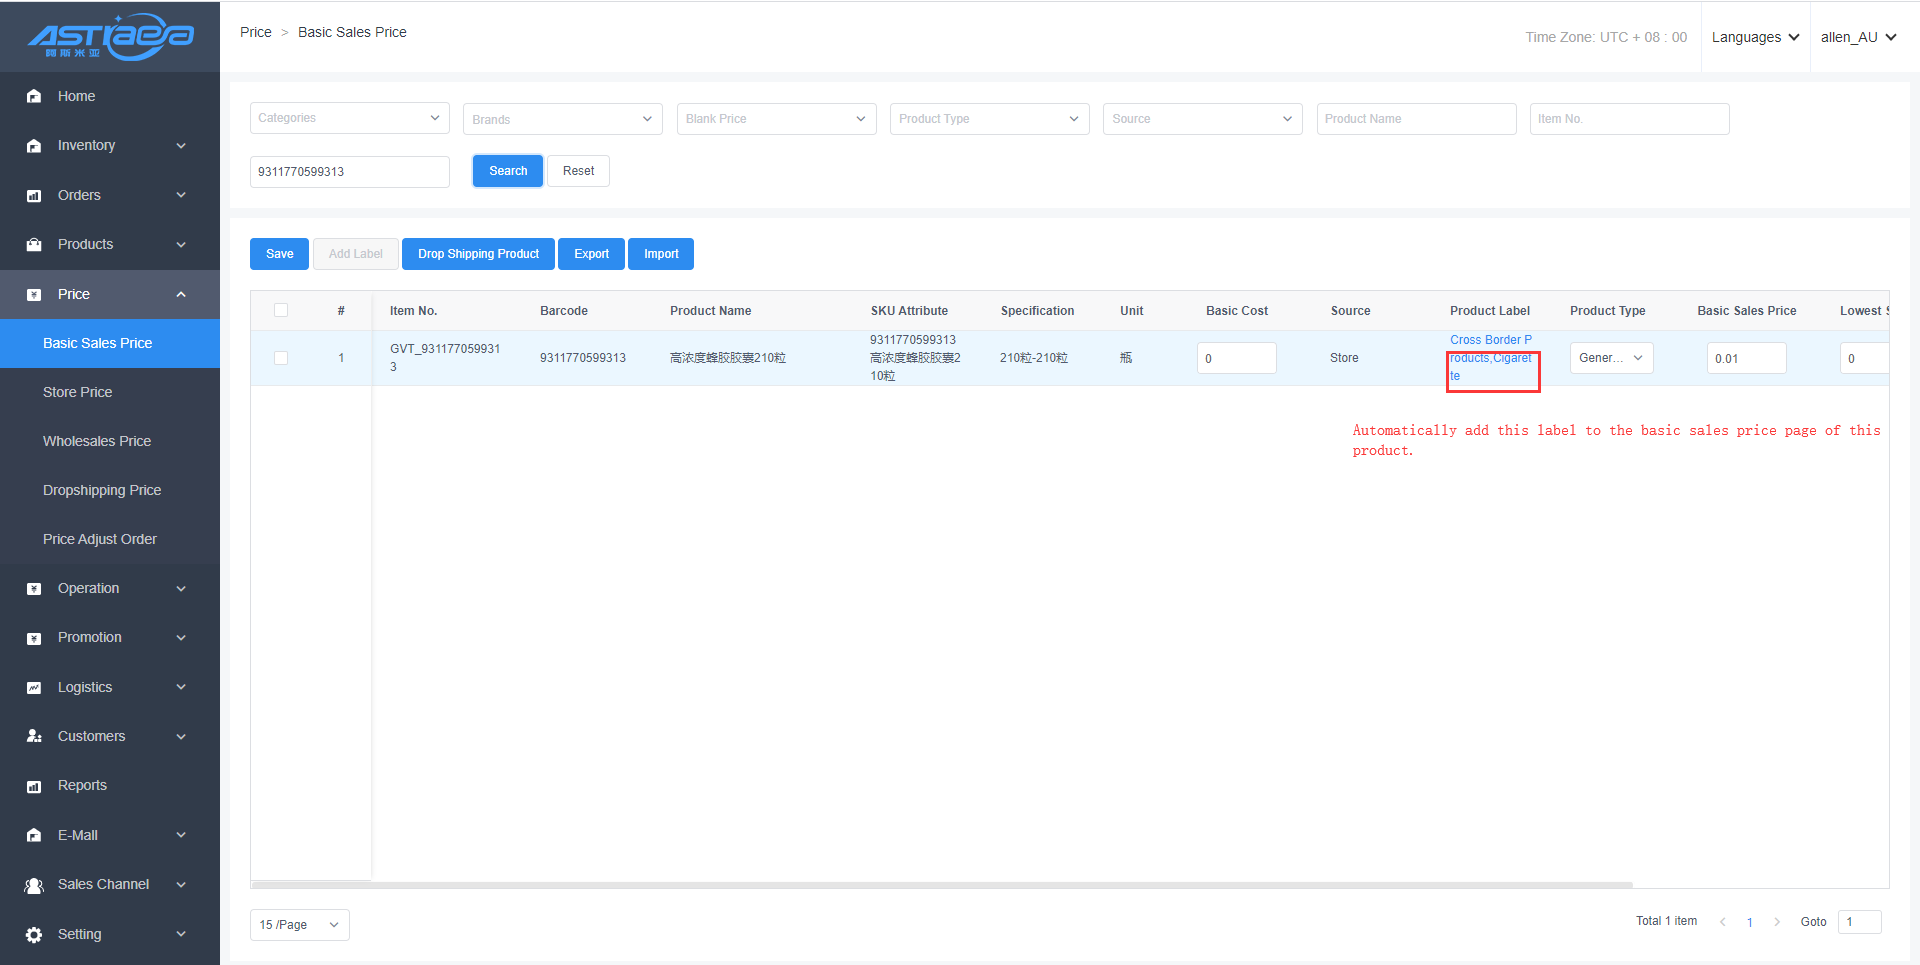
Step 3; Products on the basic sales price page also support bulk addition and deletion.
II. Price
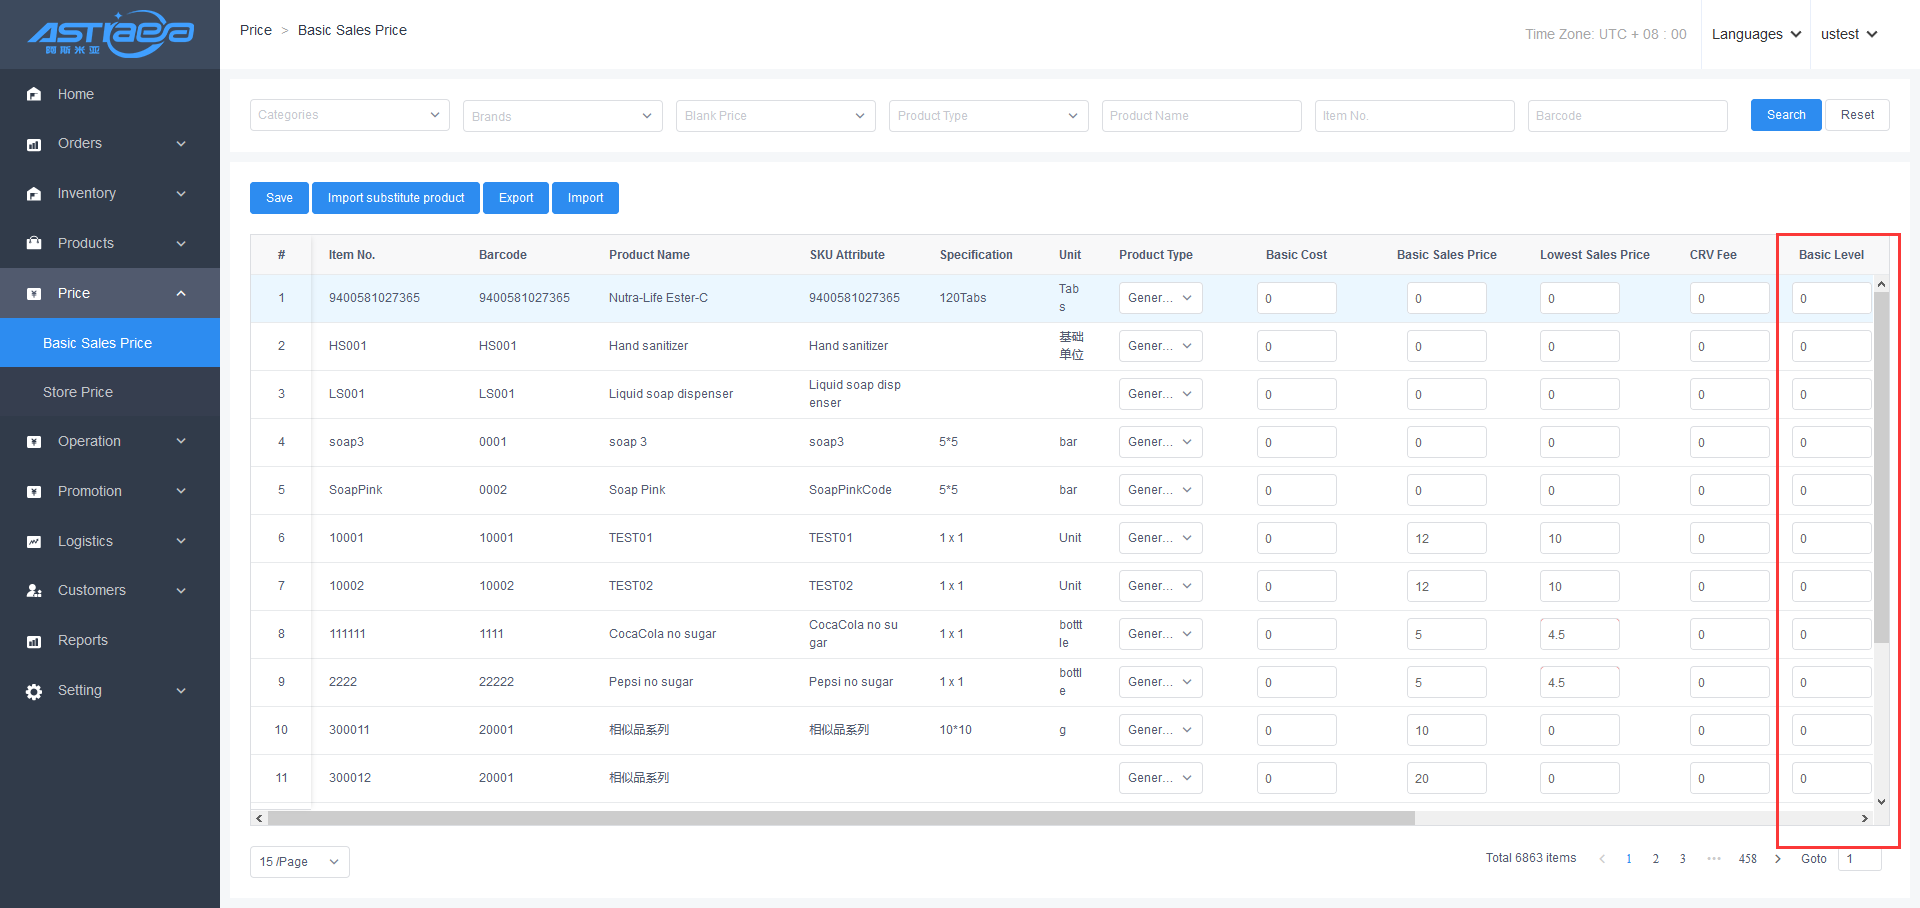
2.1 Product price
The sales price is set to manage the basic purchasing price, basic sales price, minimum sales price, packaging price, and member prices at various grades for products in all stores. Those basic prices will be synchronized to all stores. Stores may also set respective own sales price on the “Store Price” page.
[Operating steps]
Step 1; Log in the Apos server. Click "Price Management" and "Basic Sales Price" options to enter the list page.
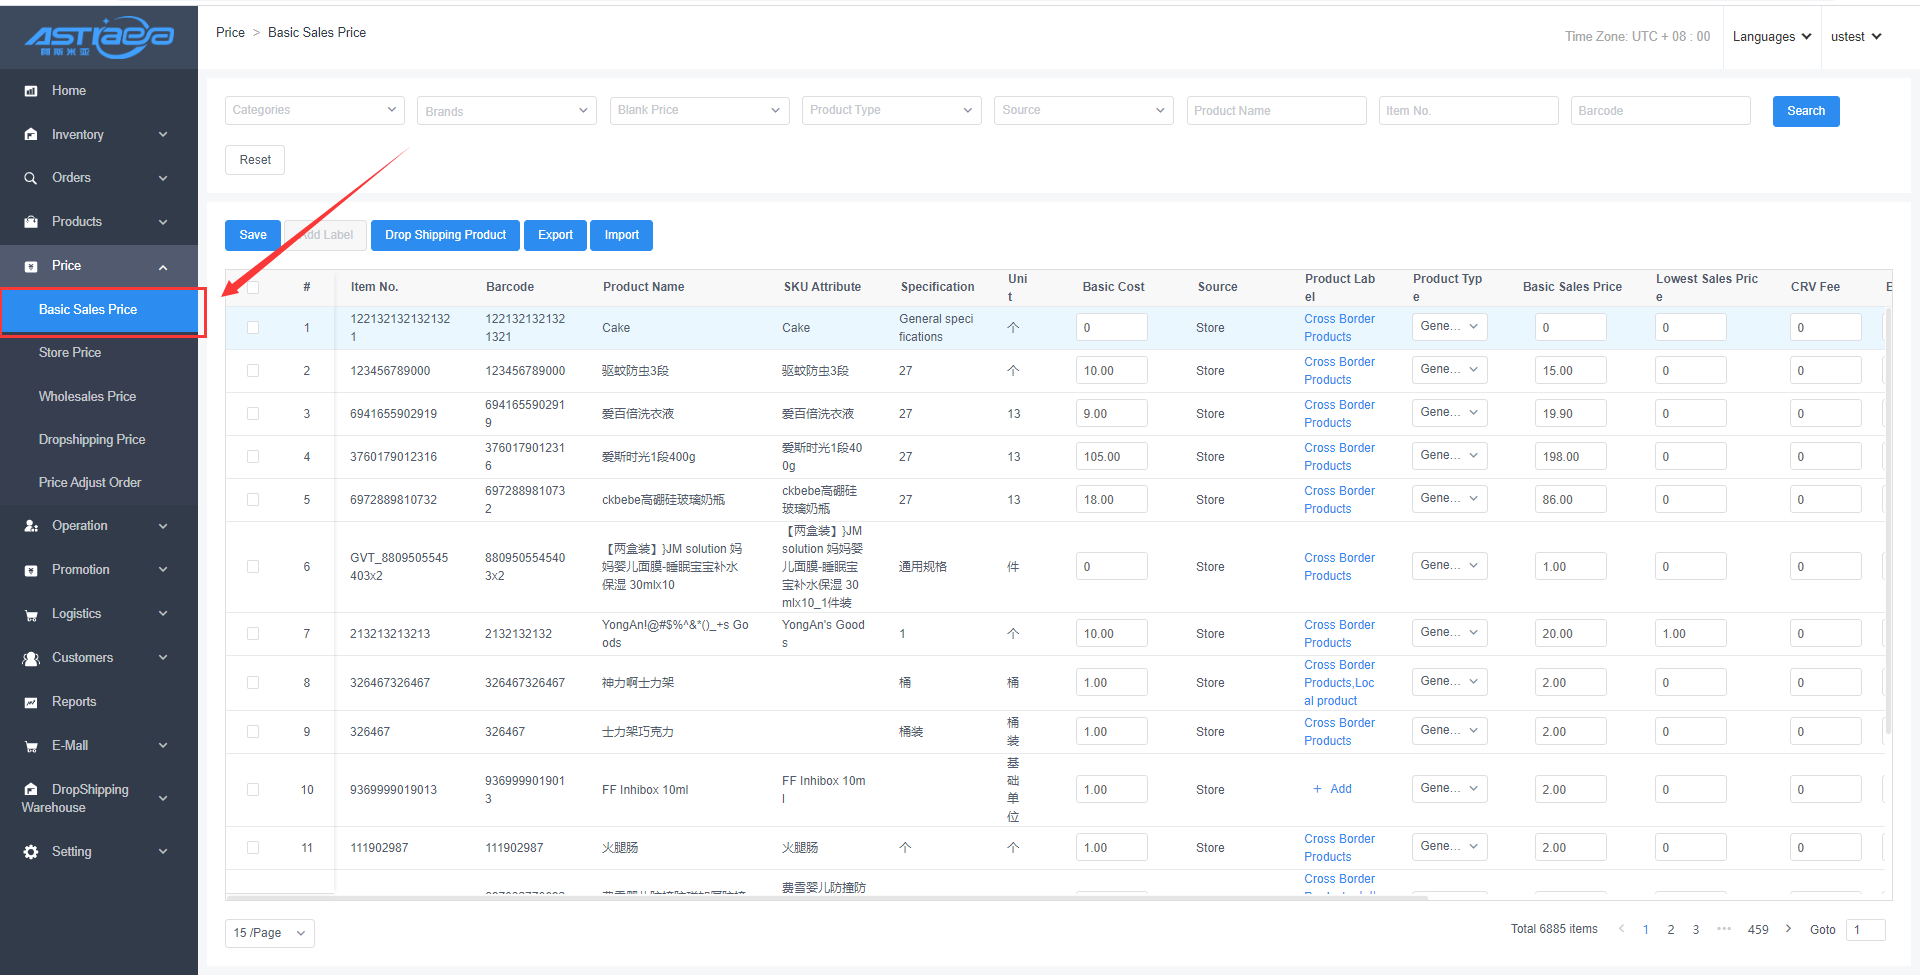
Step 2; (for newly added or imported products) you can directly set the price of the product on this page, and then click "Save” option. Then, the price of the product will automatically be synchronized to the list of “Store Price”.

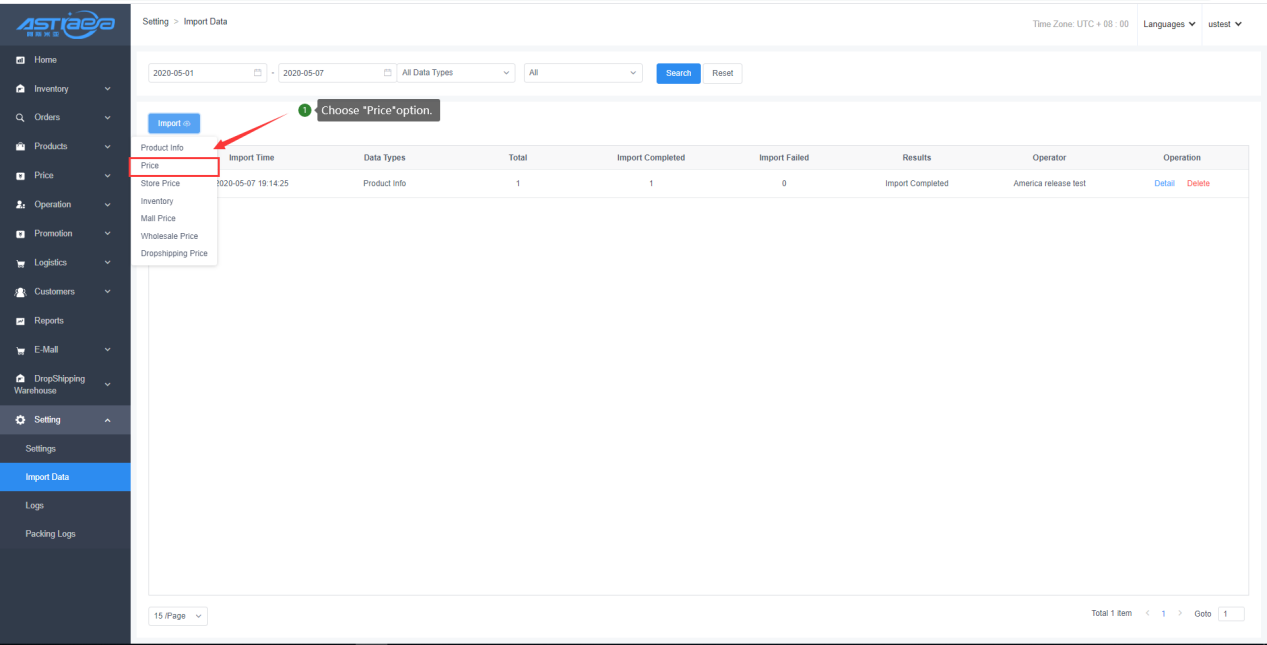
Step 3;You can also modify the prices in batches. Click "Export” option, and after modifying the price in the exported Excel file, click "Import” option. Then, the price will be automatically updated (you can also import it on "Setting” - "Import Data” - "Import Product Price” page). After the import is completed, the new product price will be automatically synchronized to the list of "Store Price".

Step 4; Click "Sync Data” option at the client, then you can obtain the sales price of the product.
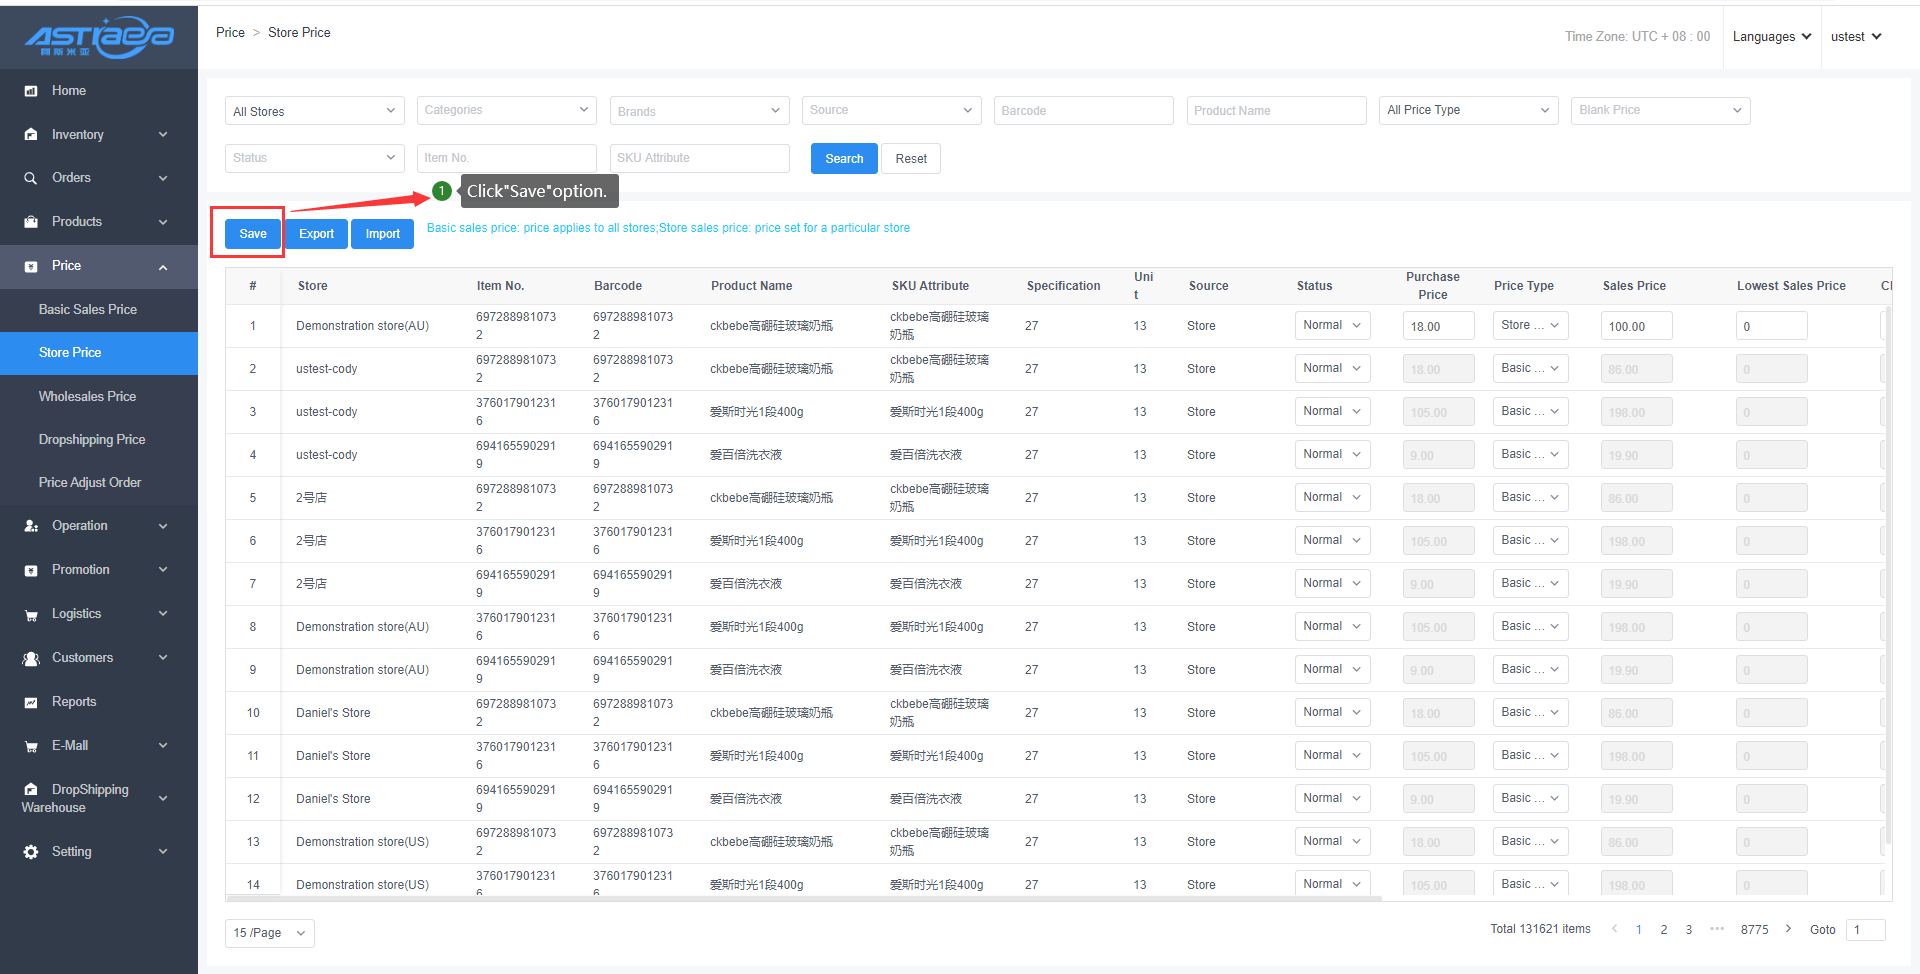
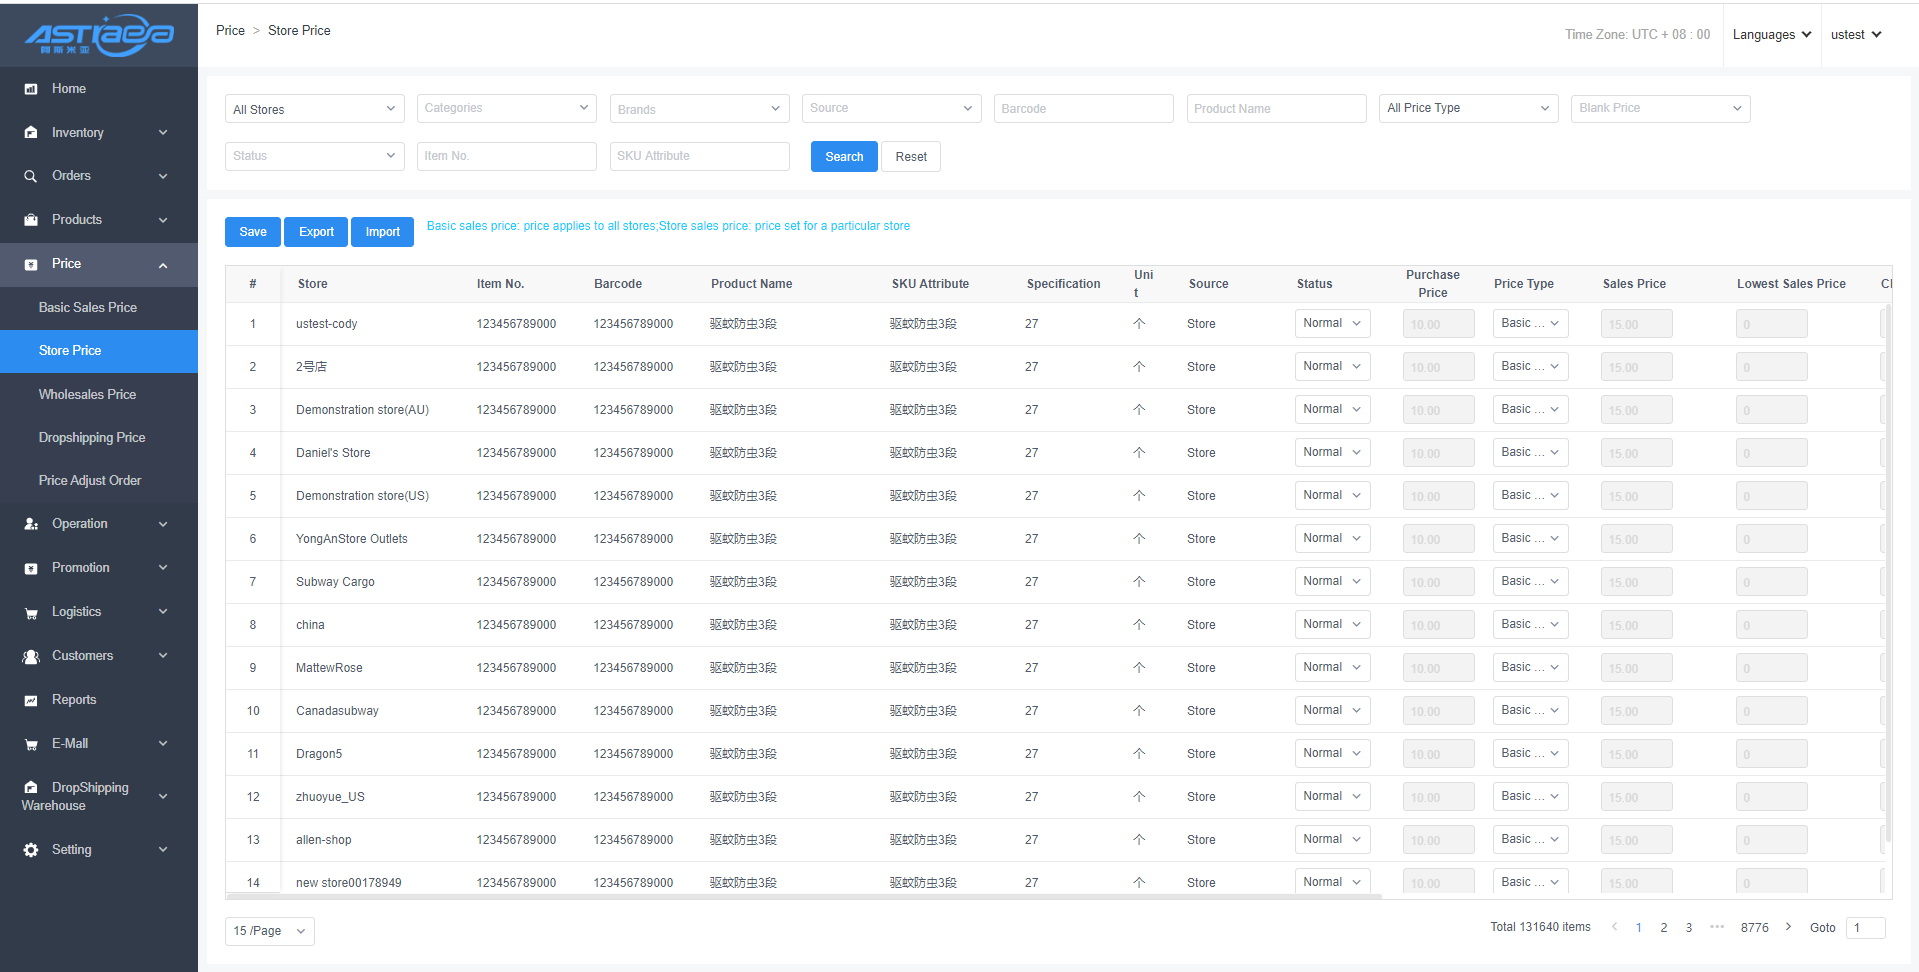
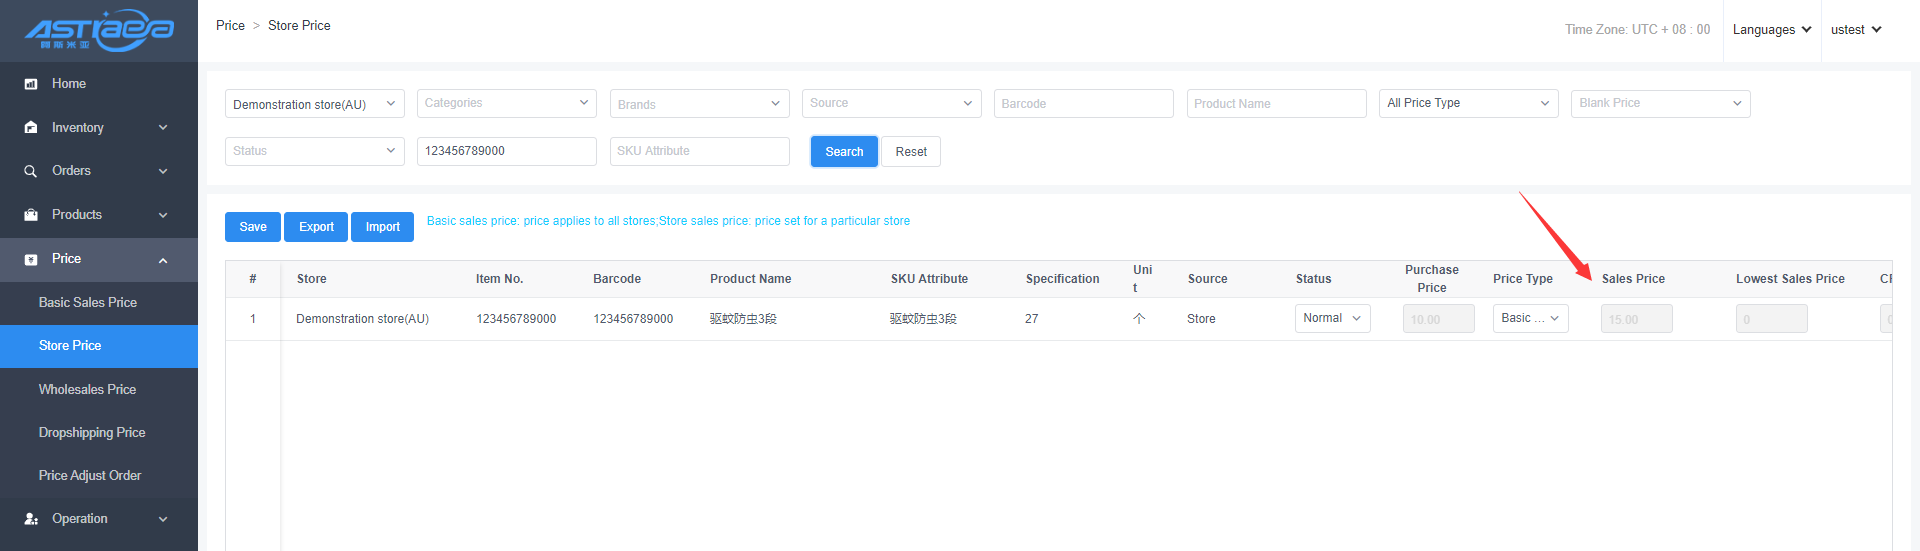
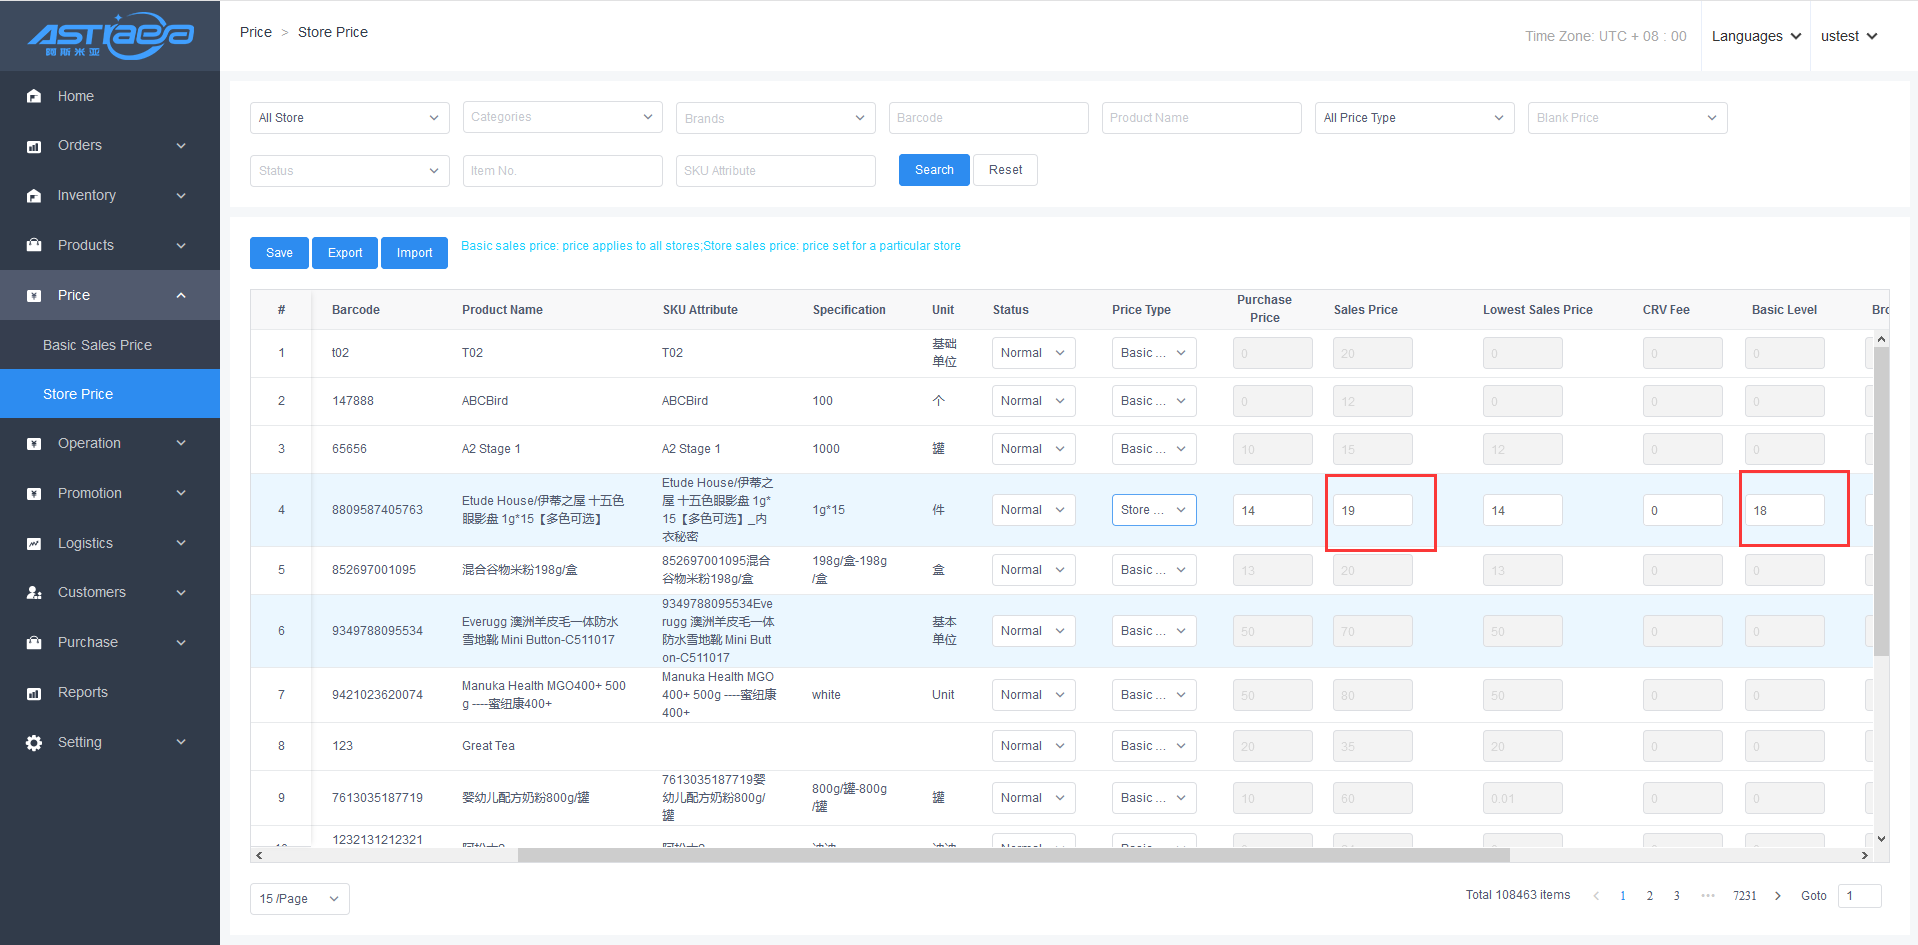
2.2 Store price
The store price is set to manage the sales status and price of the products in all stores. By default, all products are in “on sale” status and the price refers to the basic sales price set by the commercial tenant. The stores may set respective own prices by choosing the "Store Price” from "Price Type" drop-down list;
[Operating steps]
Step 1: Log in the Apos server. Click "Price Management" and "Store Price" options to enter the list page.
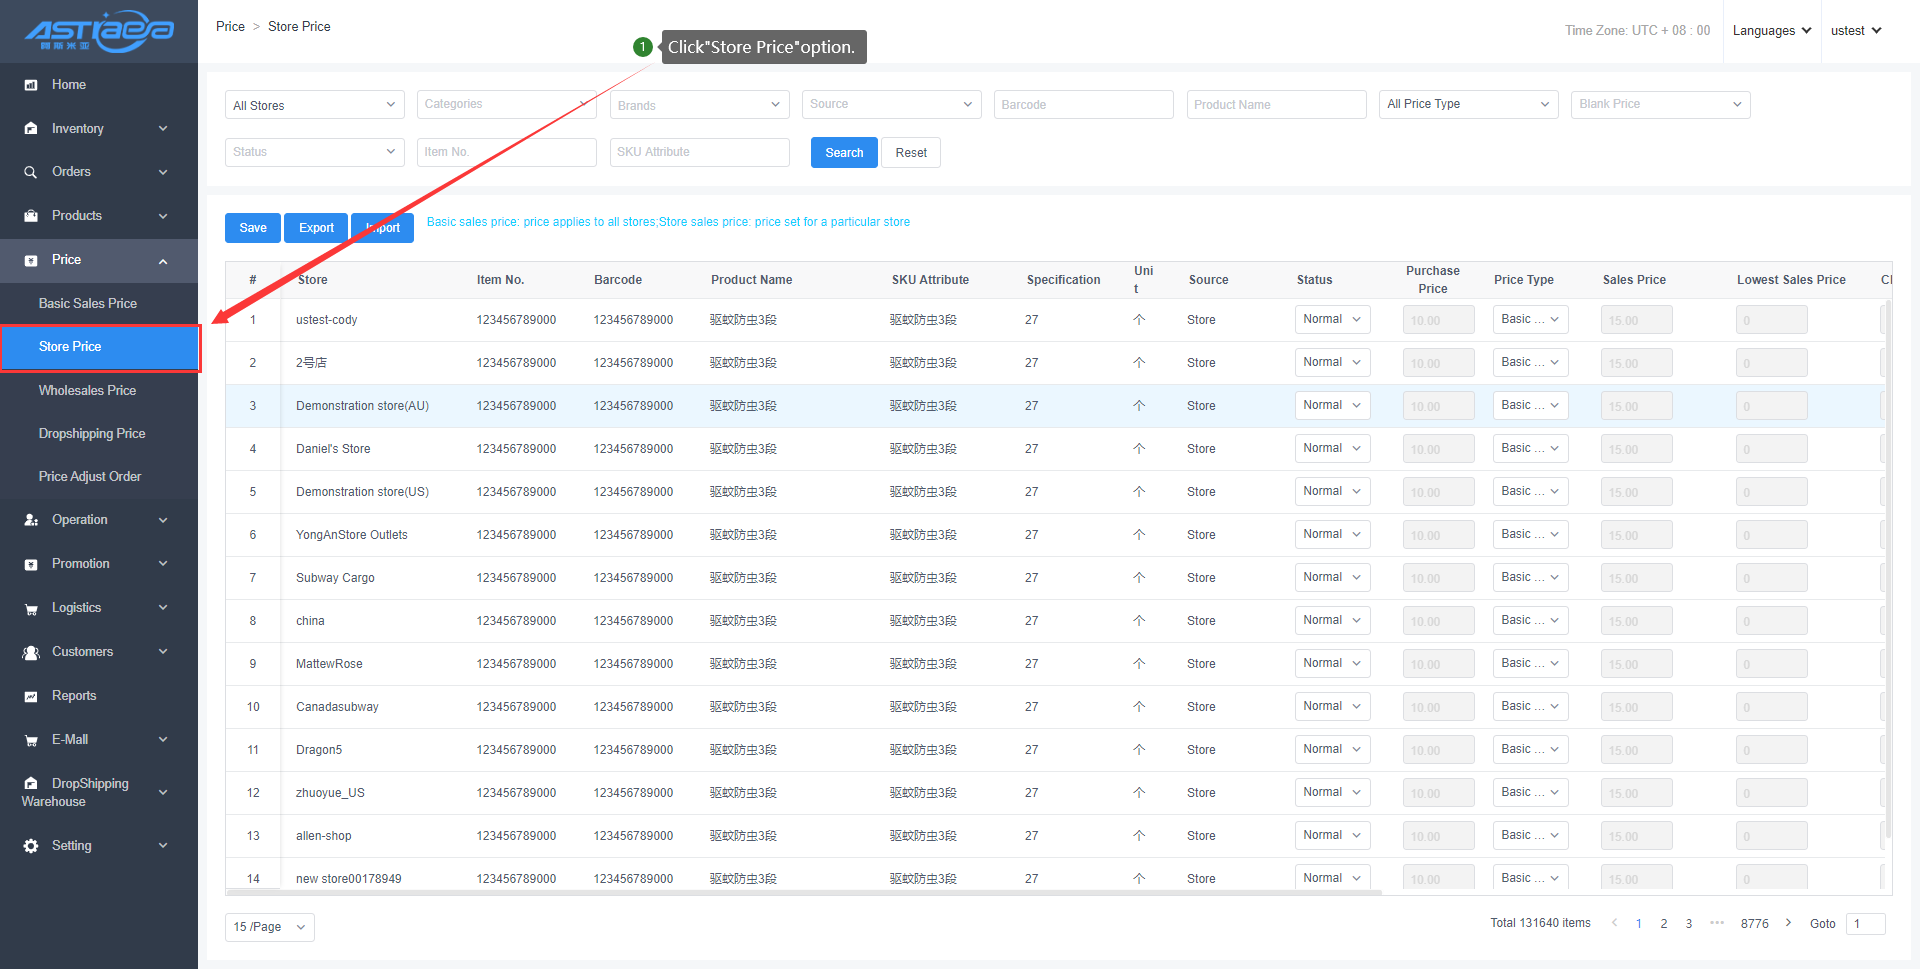
Step 2;(for products synchronized to the stores) you can directly modify the price of the products by choosing the "Store Price” under "Price Type" drop-down list and clicking "Save” option.
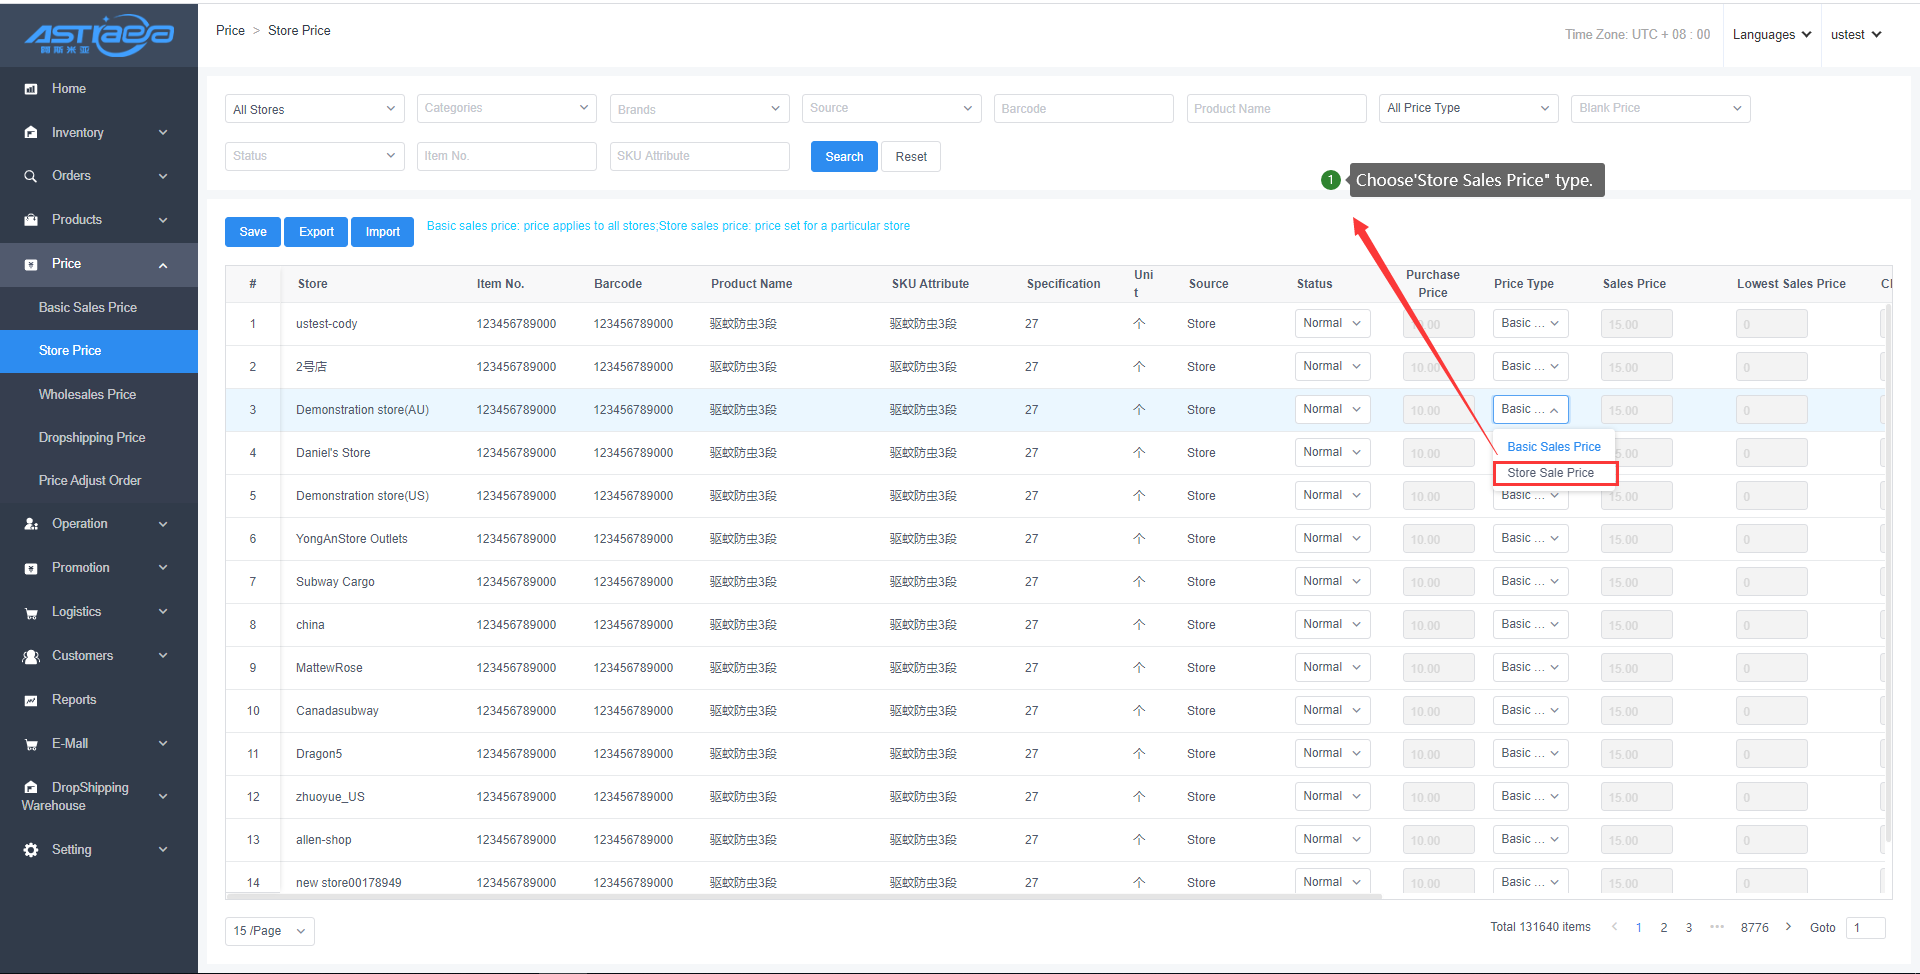
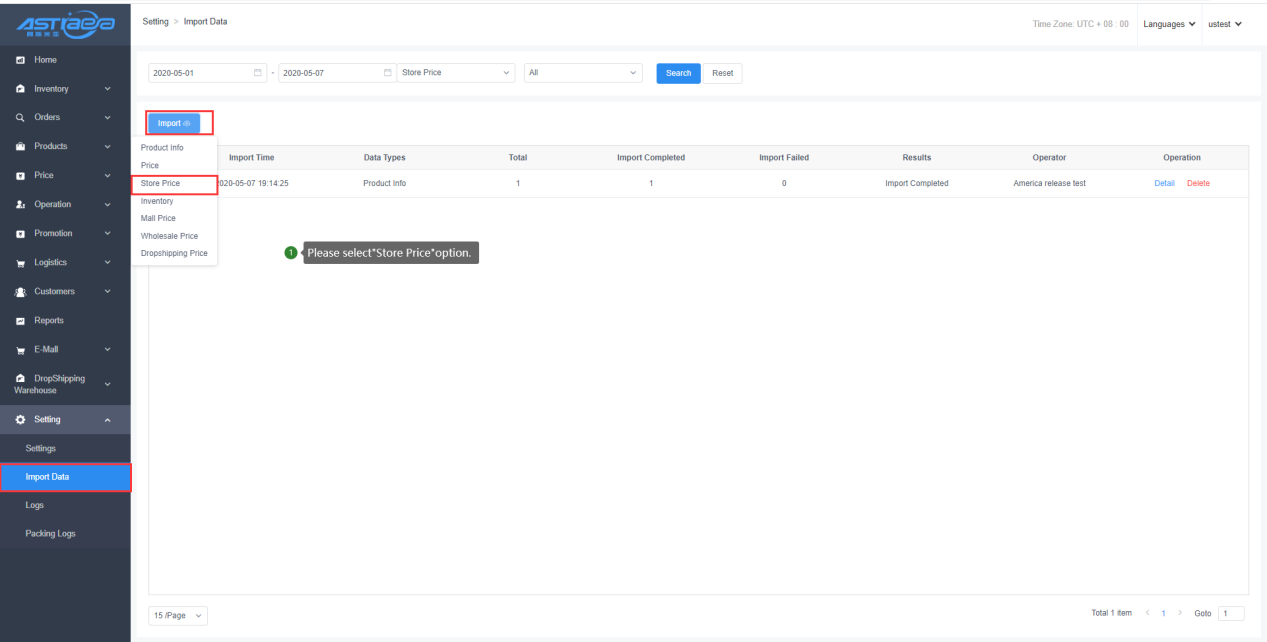
Step 3: You can also modify the prices in batches. Specifically, select the products in a store and click "Export” option. After modifying the prices in the export Excel file, click "Import" option to complete the batch modification of the store price. After importing, the price type will be automatically changed to “Store Price”.
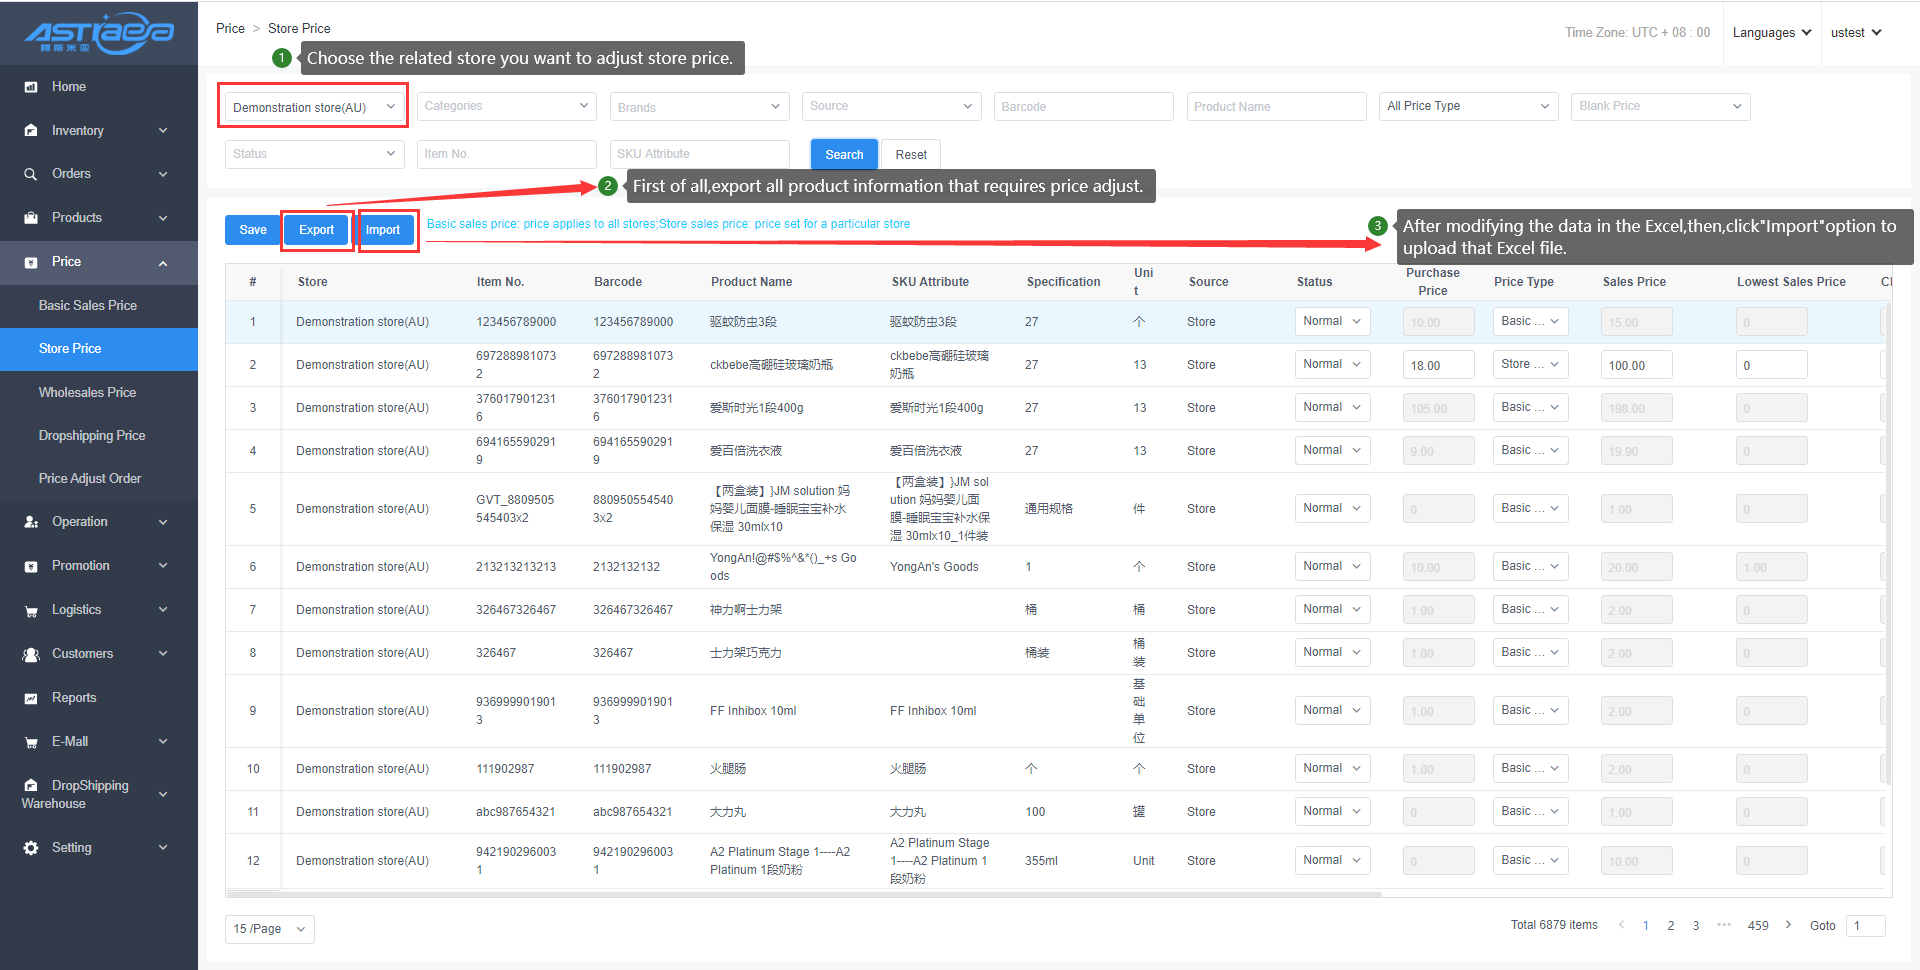
You can also import it on "Setting” - "Import Data” - "Import Store Price” page.
Step 4: Click "Sync Data” option at the client, then you can obtain the updated price of the product at the client.
2.3 Wholesale price
Modify the wholesale price, and then generate price adjustment orders and report records for adjusting the wholesale price of products.
[Operating steps]
Step 1; Log in the Apos server. Click "Price Management" and "Wholesale Price" options to enter the list page.
Step 2; Select the product of the corresponding store,modify the wholesale price and grade wholesale price of the product,and click”Save”option.
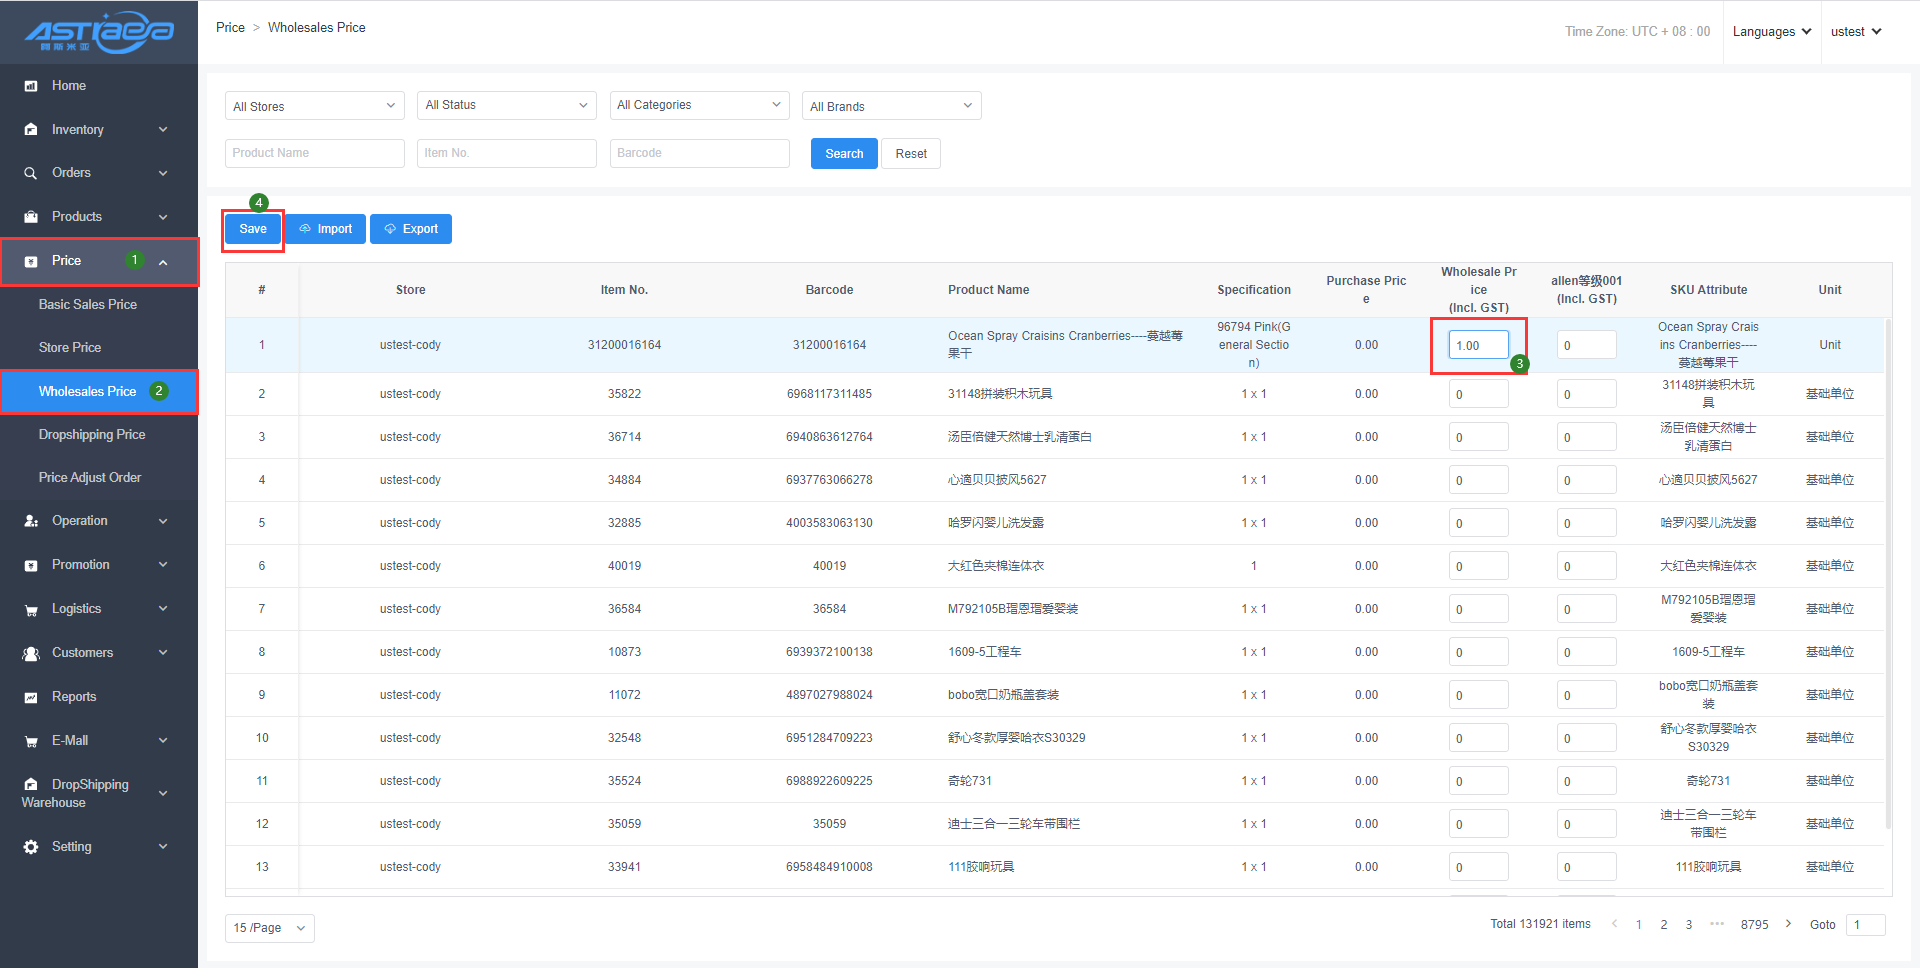
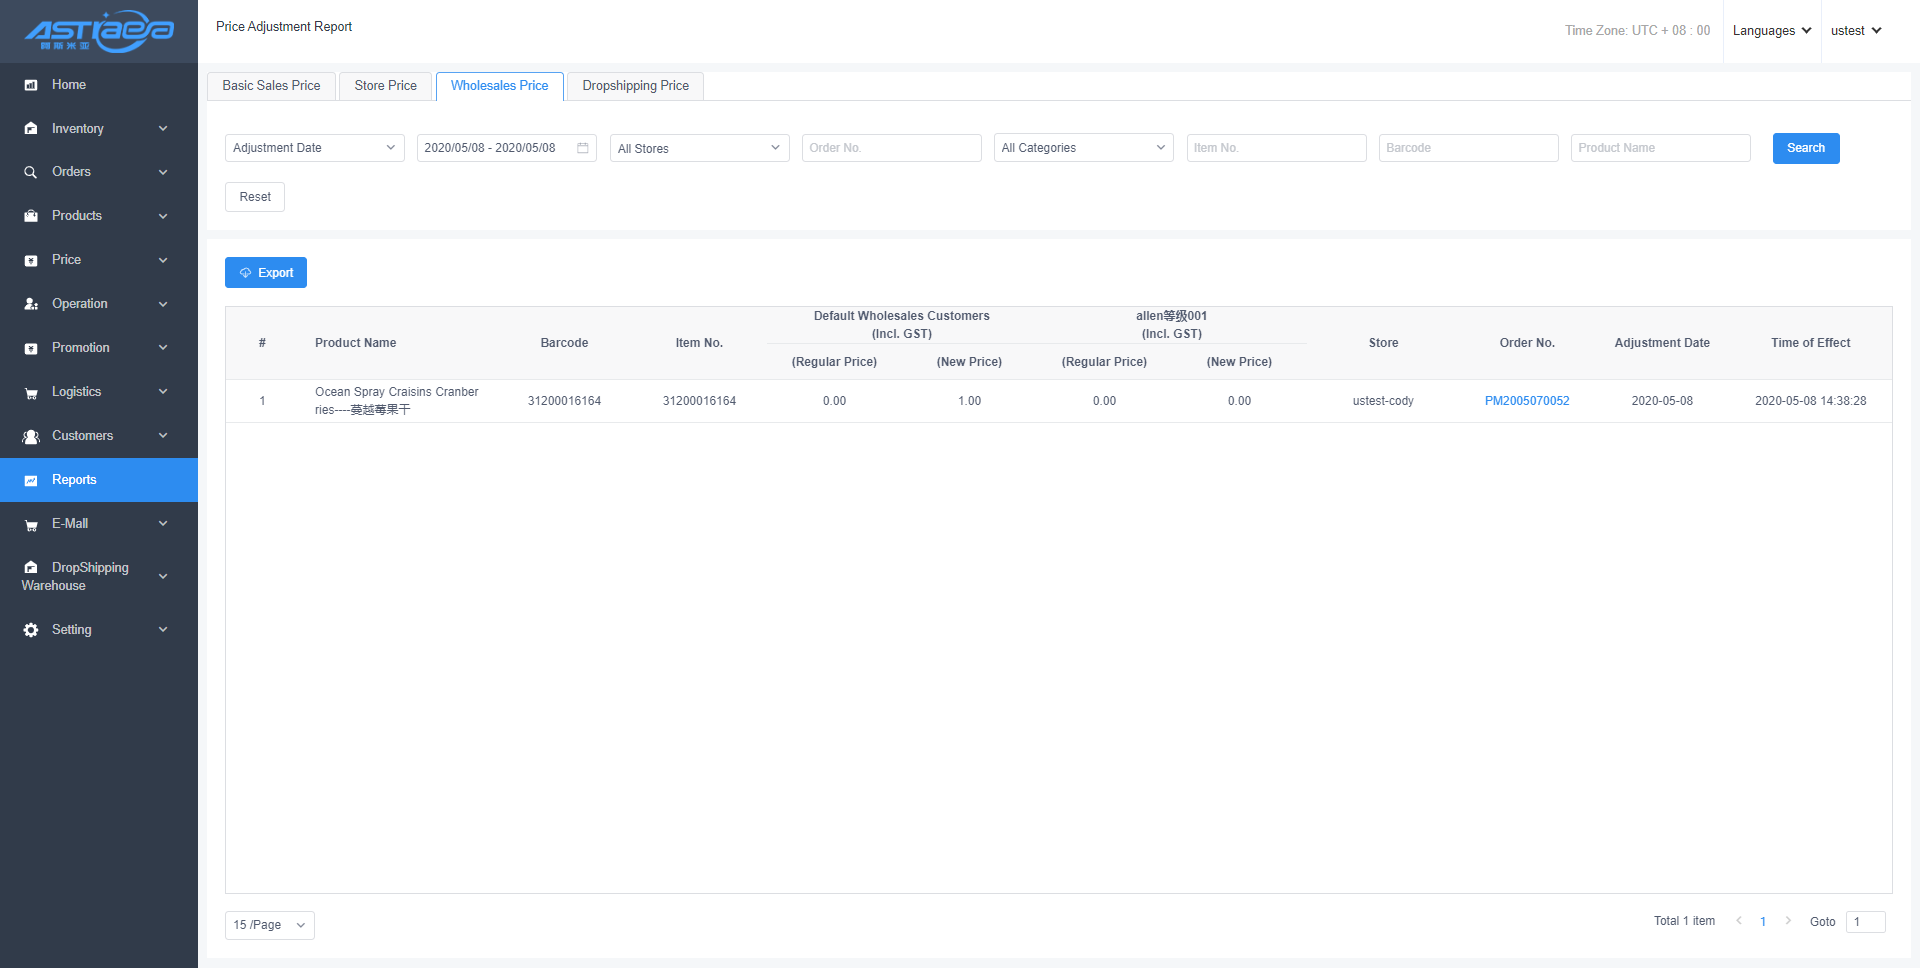
Step 3; Click the”Price adjustment”menu to view the price adjustment order generated by modifying the wholesale price.

Step 4; View the wholesale price report details in the price adjustment report.
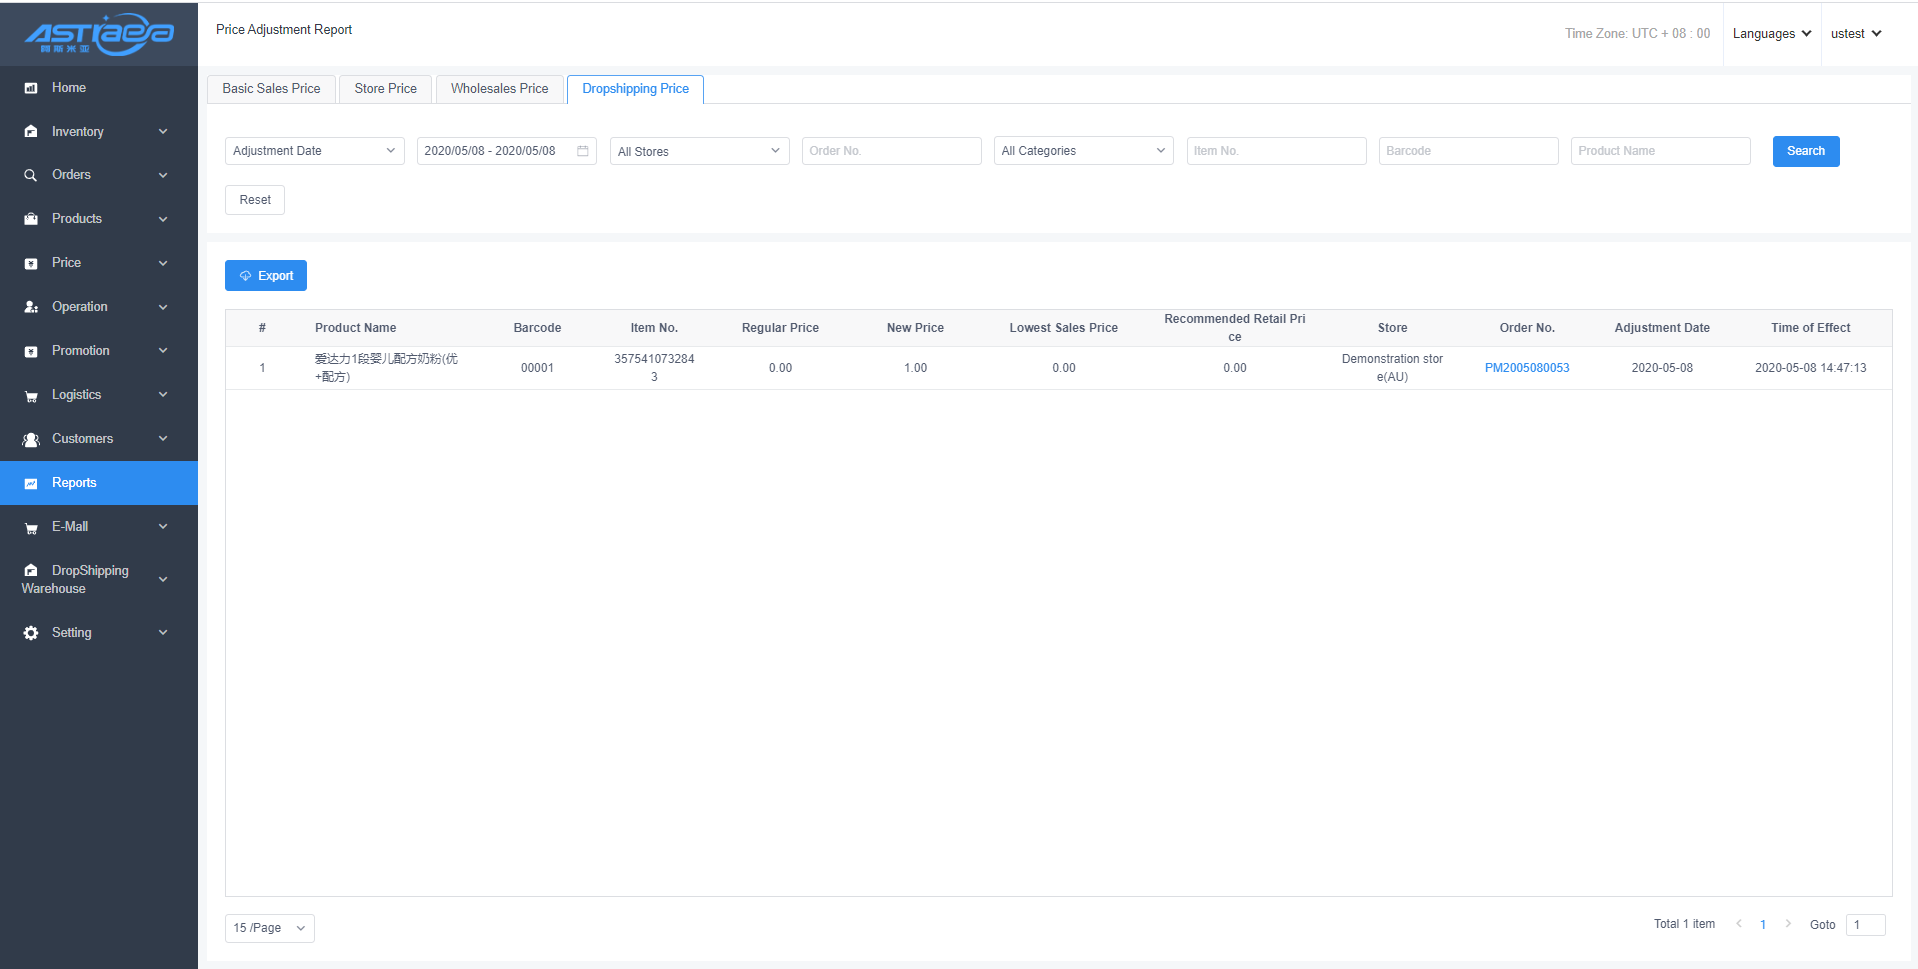
2.4 Dropshipping price
Modify the product dropshipping price, generate price adjustment orders and price adjustment report records.
[Operating steps]
Step 1;Log in the Apos server. Click "Price Management" and "Dropshipping Price" options to enter the list page.
Step 2; Select the product of the corresponding store,modify the dropshipping price of the product,and click”Save”option.
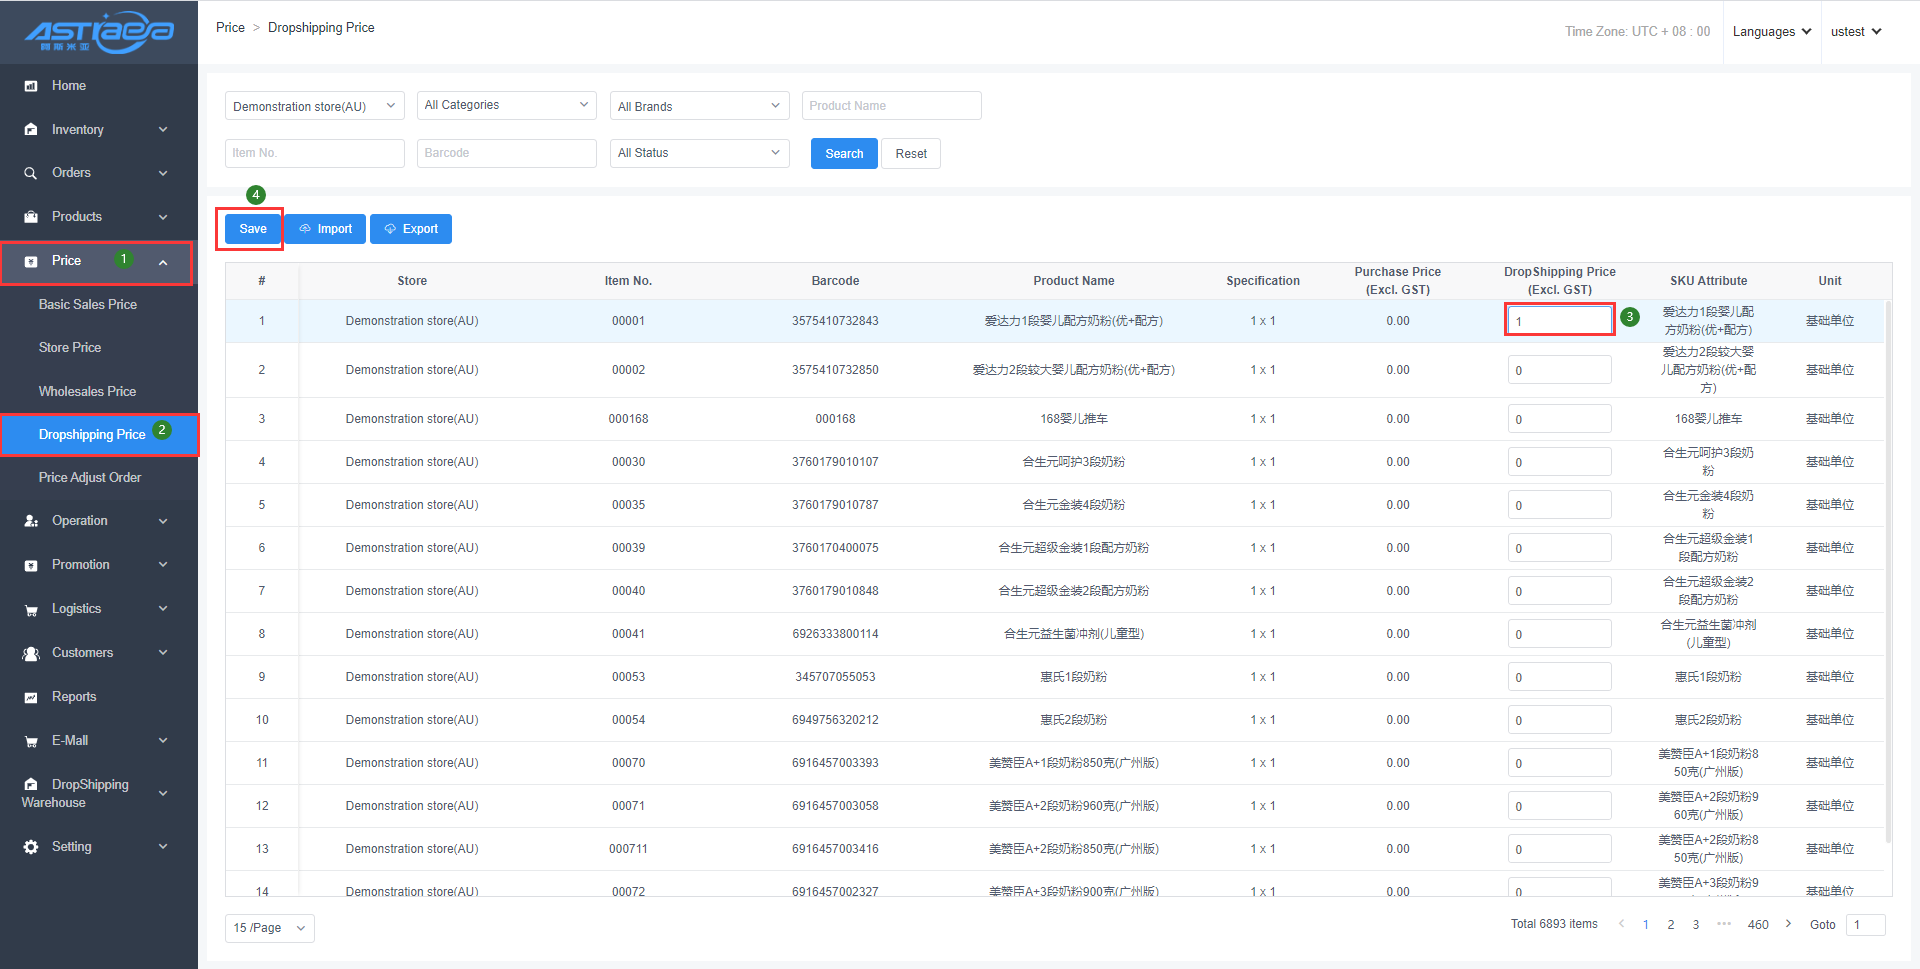
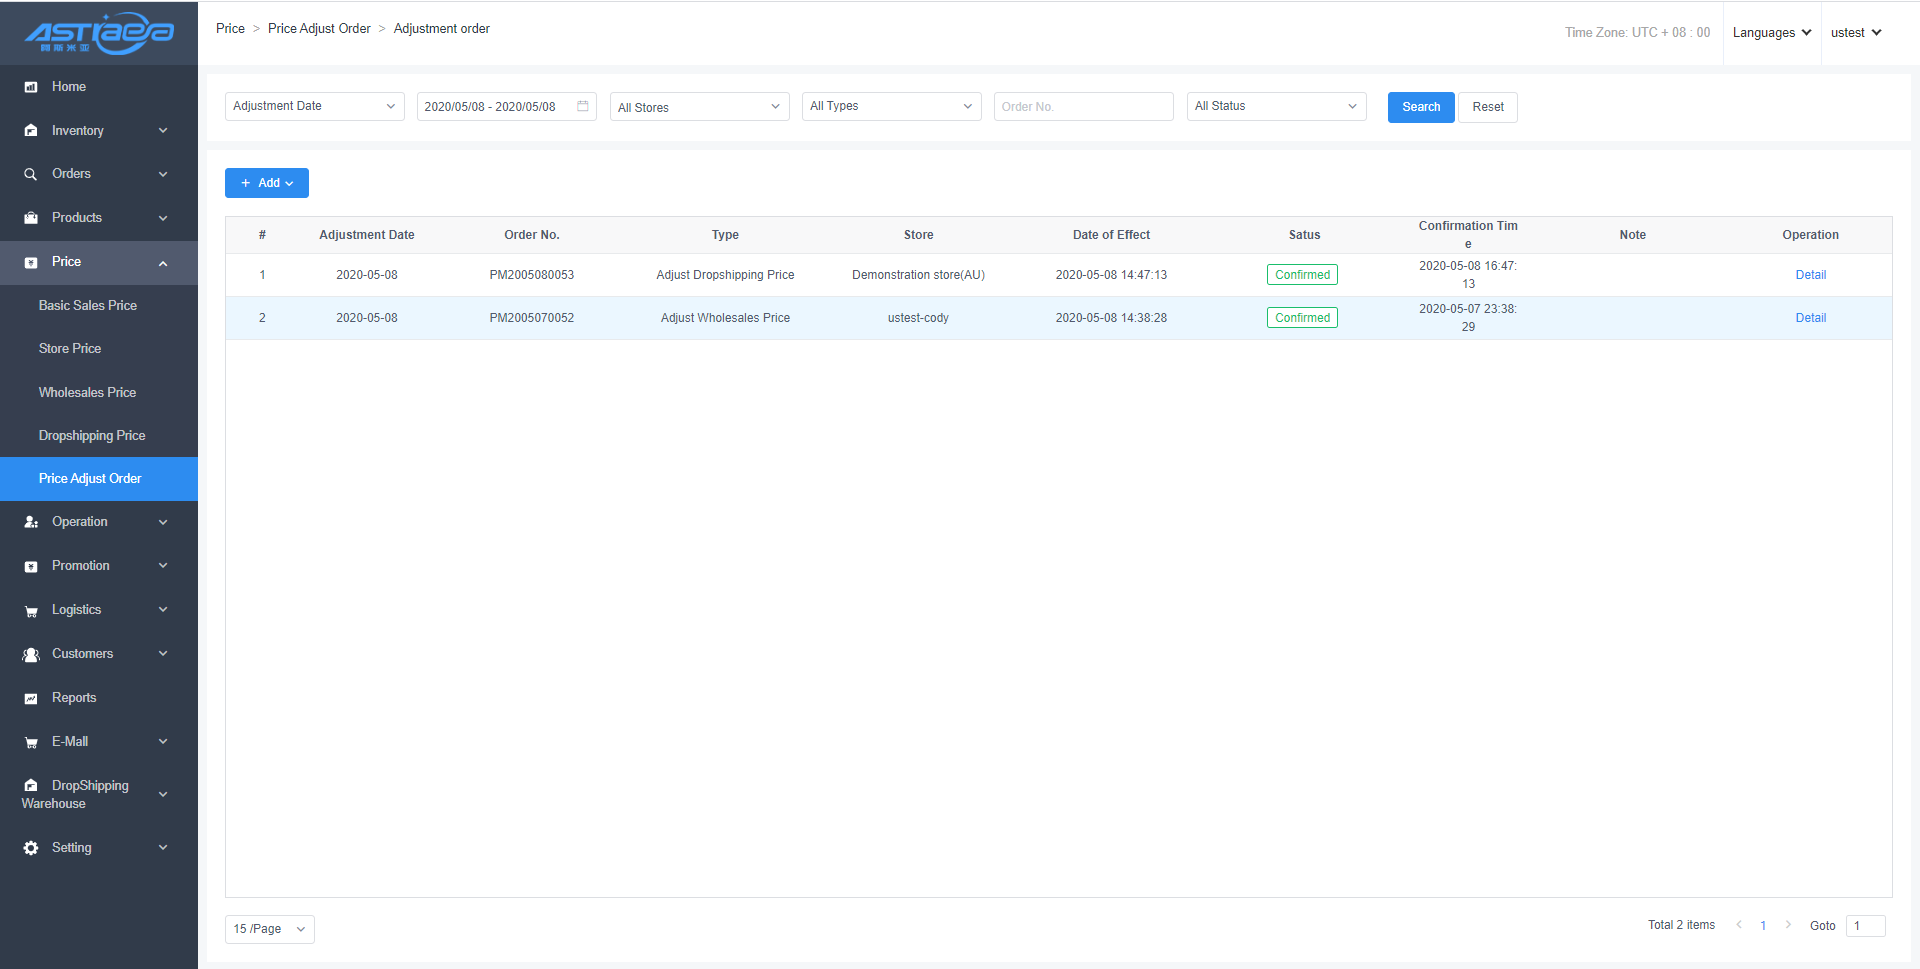
Step 3; Click the”Price adjustment”menu to view the price adjustment order generated by modifying the dropshipping price.
Step 4; View the dropshipping price report details in the price adjustment report.
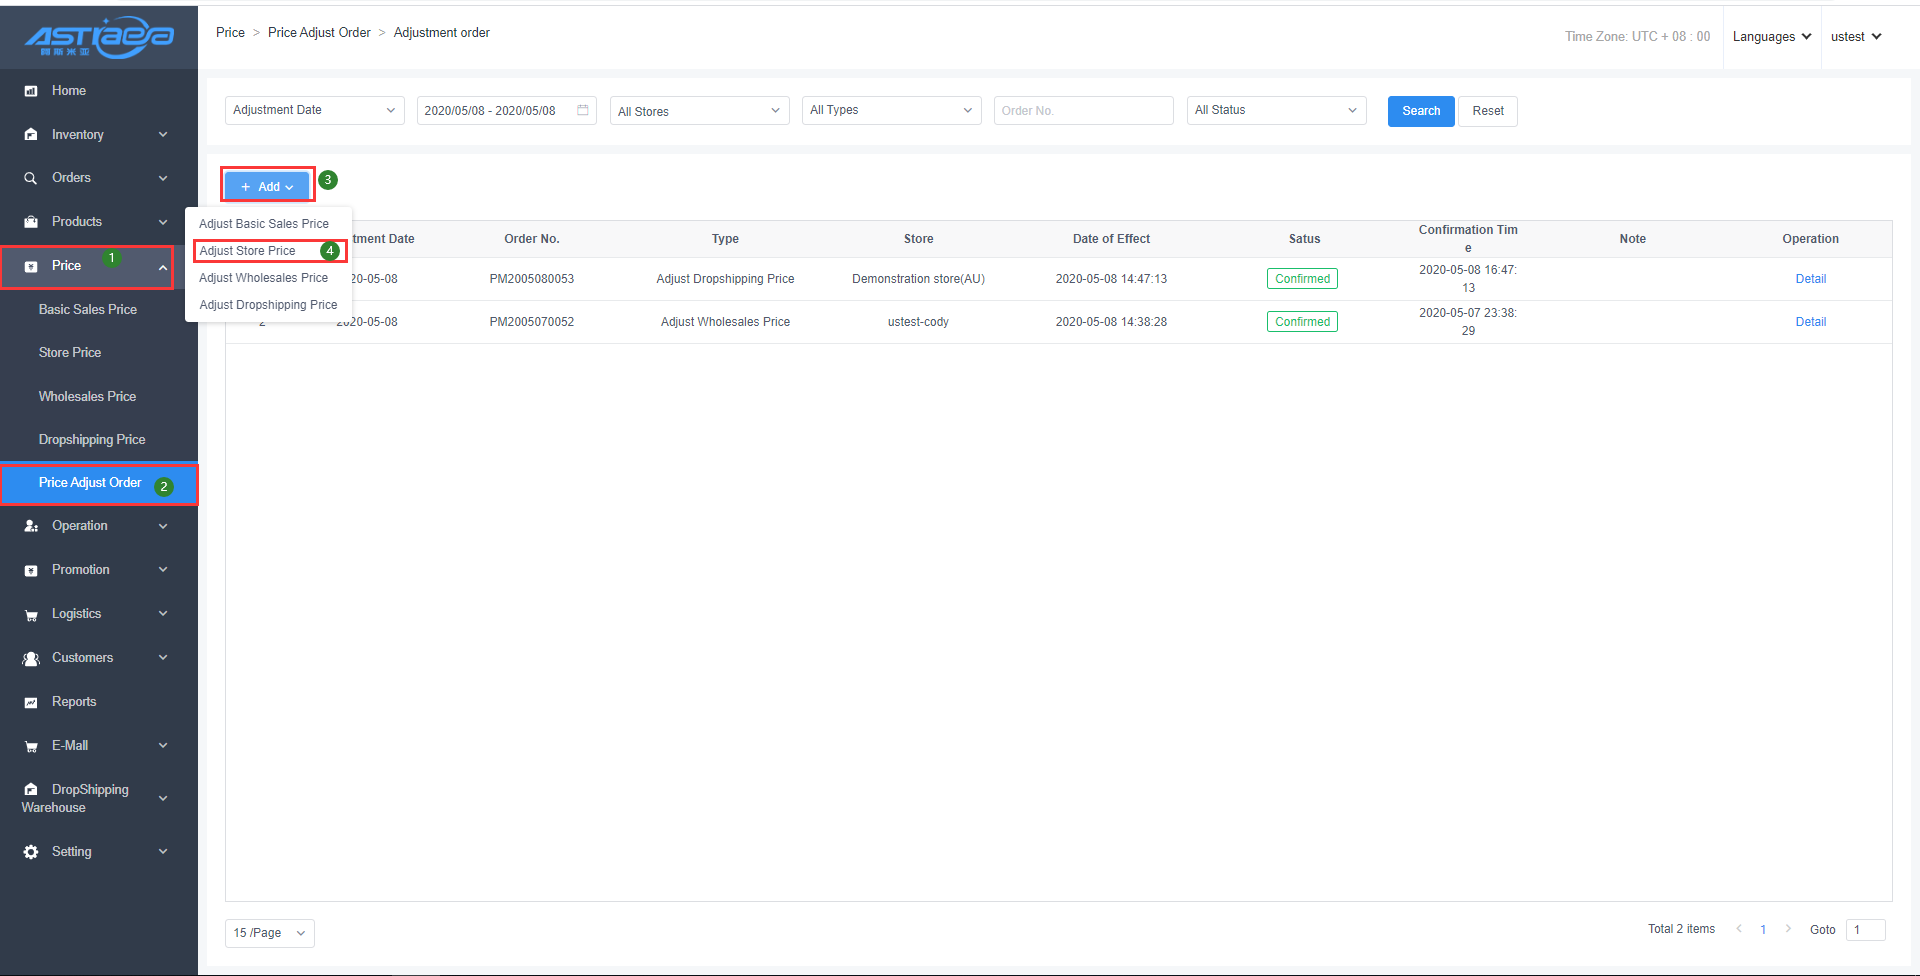
2.5 Price adjustment order
When the store's price adjustment mode is "simple" mode, you can directly modify the basic sales price, store price, wholesale price, and the dropshipping price to generate the corresponding price adjustment order.
When the store's price adjustment mode is the "standard" mode, the price of the basic sales price, store price, wholesale price, and dropshipping price can only be modified through the price adjustment order.
Add a new price adjustment order;
[Operating steps]
Step 1;Log in the Apos server. Click "Price Management" and " Price Adjustment" options to enter the list page.
Step 2;Click "Add" option and select the type of price adjustment (basic sales price, store price, wholesale price, dropshipping price)
Step 3; Click "Select Product"option, select the product you want to adjust the price, and click”Confirm”.
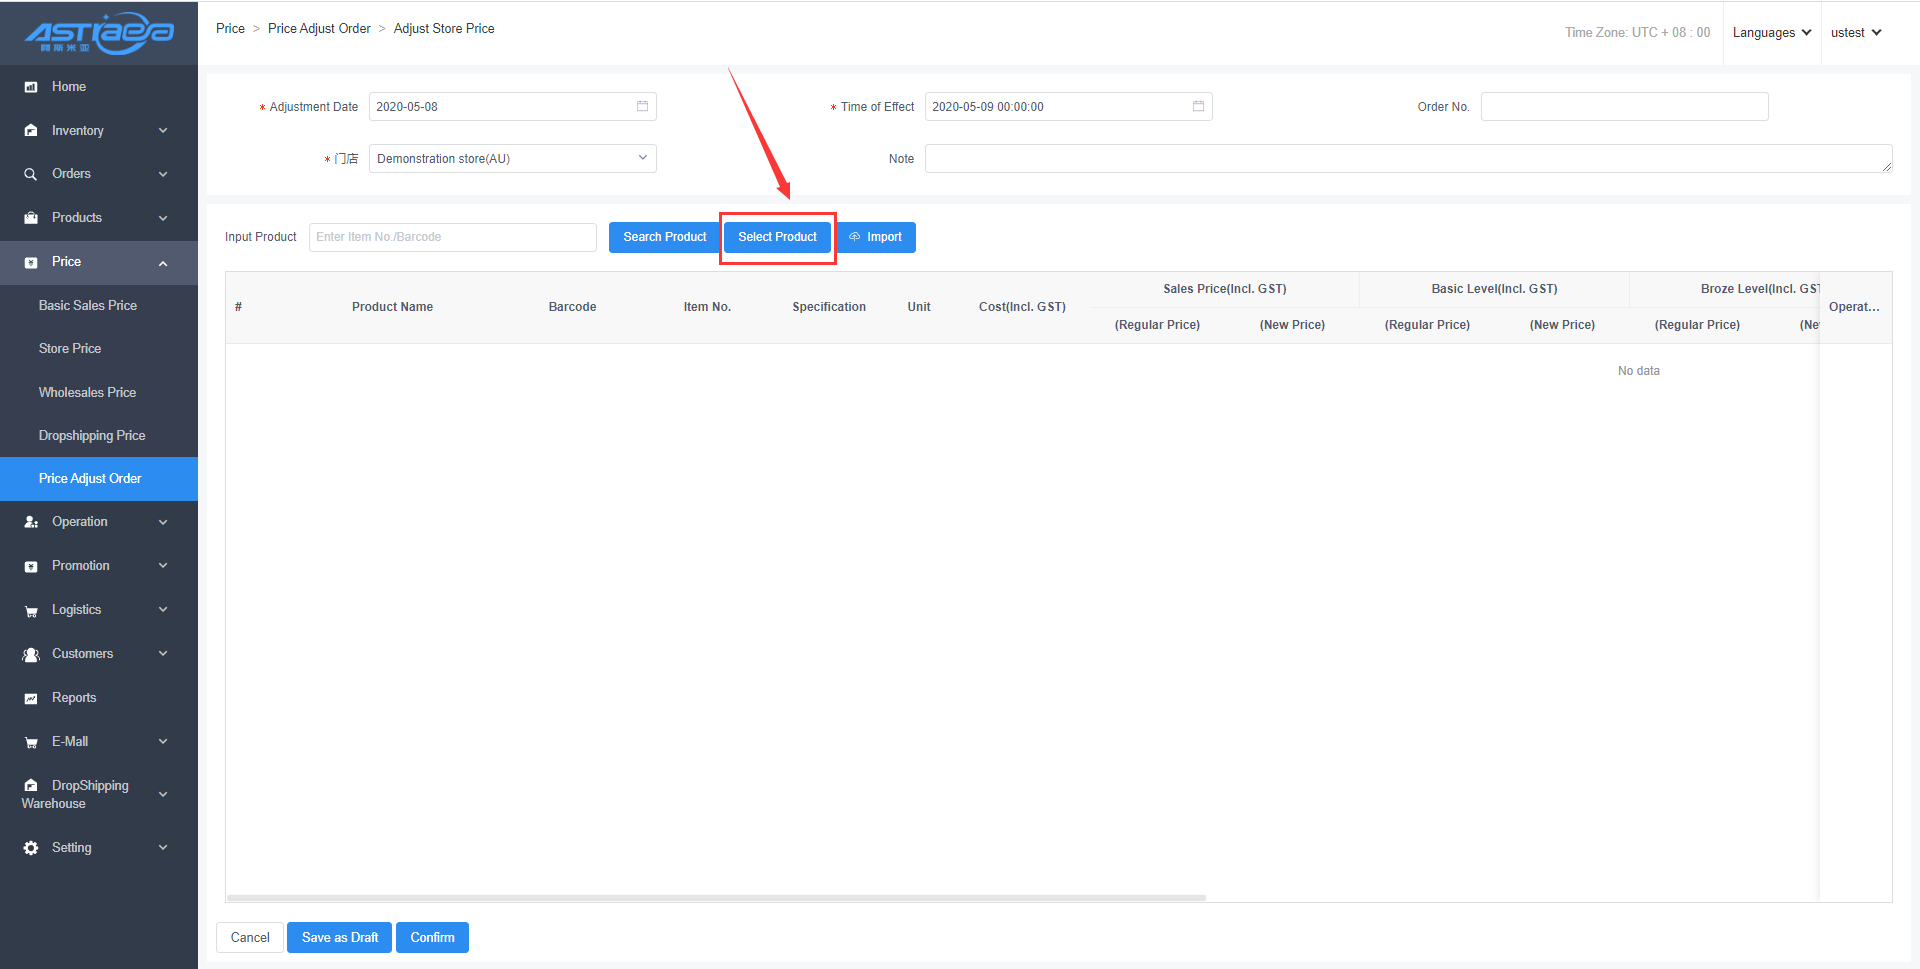

Step 4;Modify the product price, click "Confirm", the price adjustment is complete.

Step 5;Check the price of the product in the store price of the store (the price will automatically become the price after the price adjustment takes effect)
III. Inventory
3.1 Addition of purchase order at the Server
In large-sized business supermarkets or chain stores, generally, the procurement department is responsible for placing replenishment orders and the warehouse is responsible for stock-in and stock-out business. With regard to this, the replenishment order business is added and linked to the stock in/out by warehouse and payment/ to the suppliers.When importing commodities in the replenishment order, Stock-in/out order, and Stock-check order in the function module,only a maximum of 500 products can be imported at a time.
[Operating steps]
Step 1: Click the "Inventory” option, and "Replenishment" option.
Step 2: Click “Add”.
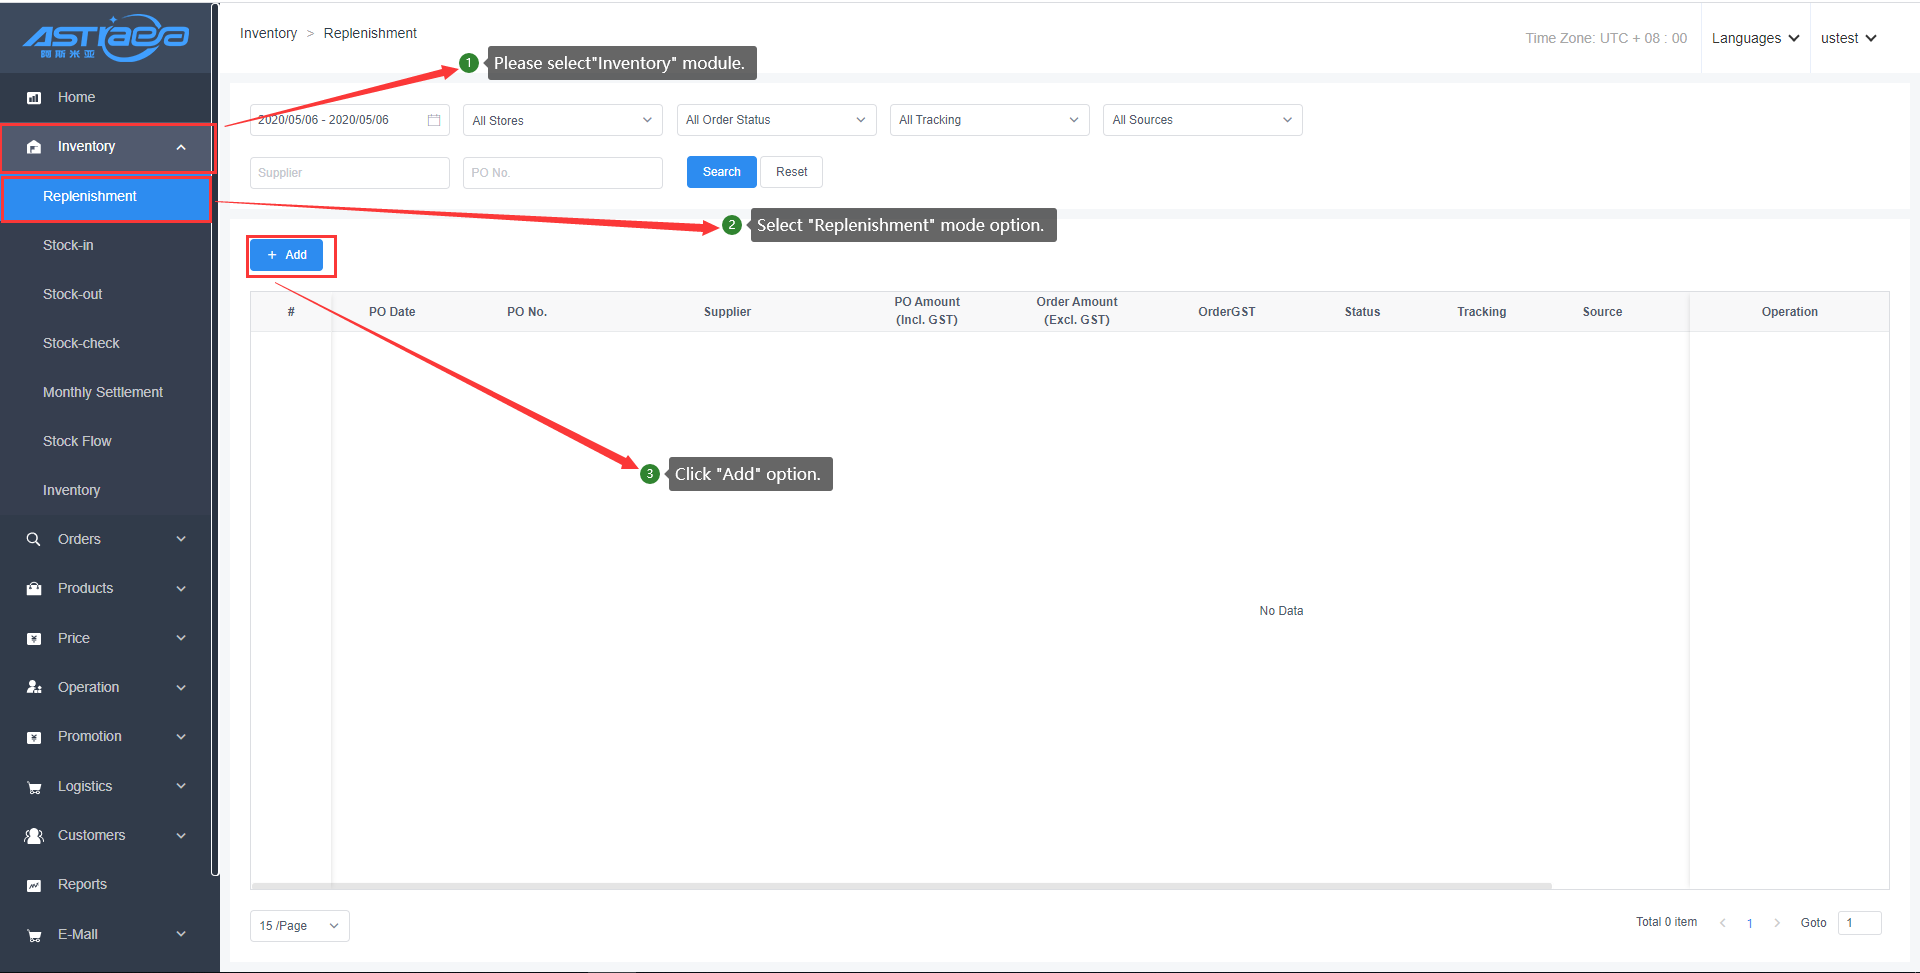
Step 3: Choose related supplier, related store and the product name (Method 1: Enter the item No. or barcode in the query box, and click "Search Product" to add the product; Method 2: Click "Select Supplier Product” option, and tick the product name; Method 3: Click "Select Product” option, and tick the product name; Method 4: Import the product), enter the product quantity, and click "Confirm" option to finish all operation steps.

3.2 Stock-in at the server
3.2.1 Add PO
[Operating steps]
Step 1: Click the "Inventory” option, and "Stock-in" option;
Step 2: Click "Add" option and select “PO”;
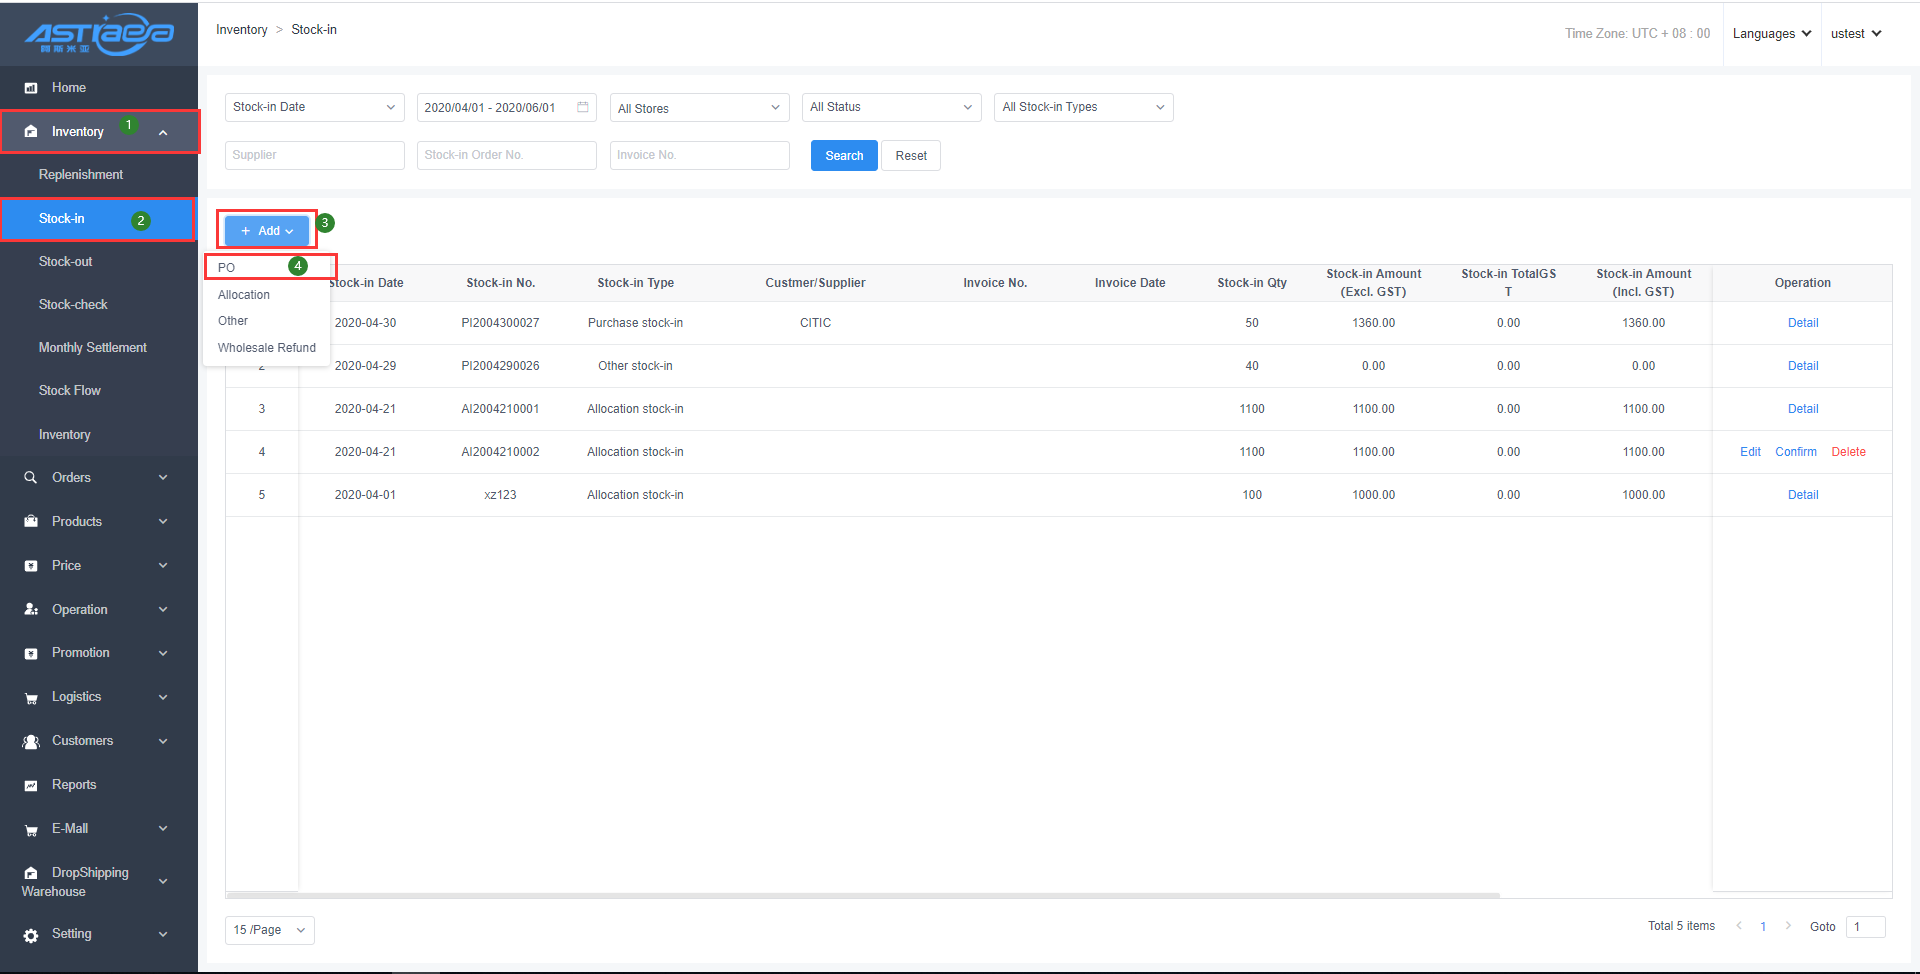
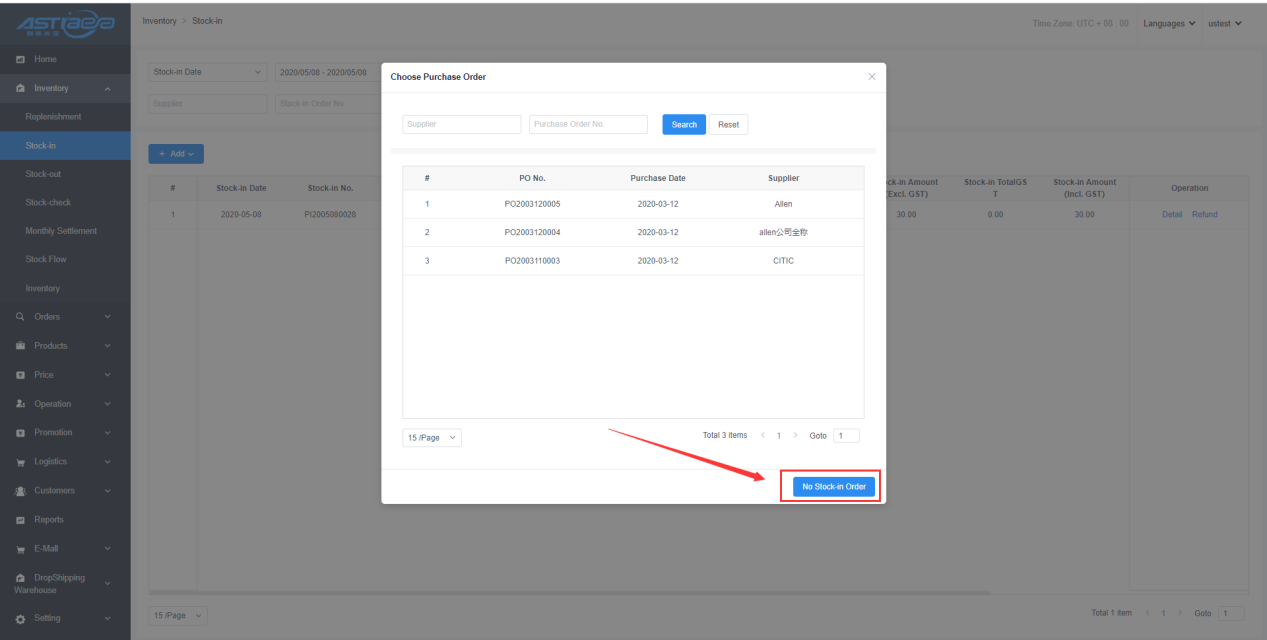
Step 3: Select the Lead Stock-in Order or No Stock-in Order; Lead Stock-in Order: Select the Lead Stock-in Order to enter the stock-in page. Select the stock-in date, and click "Confirm Stock-in” option to finish all operation steps successfully.
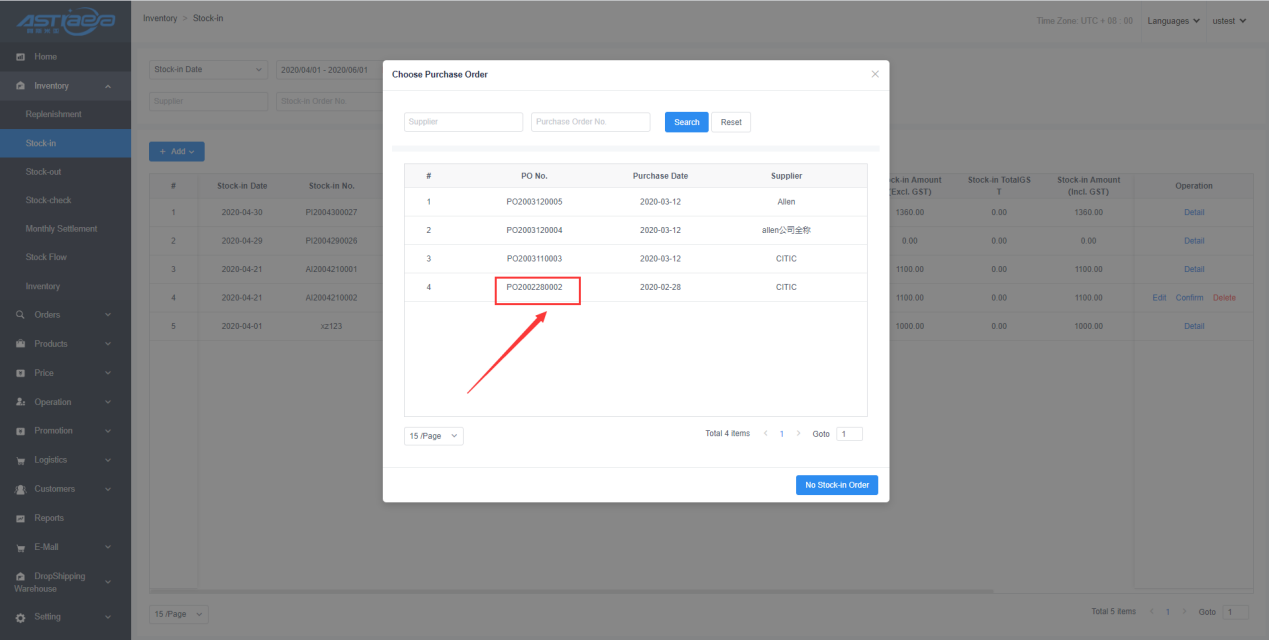
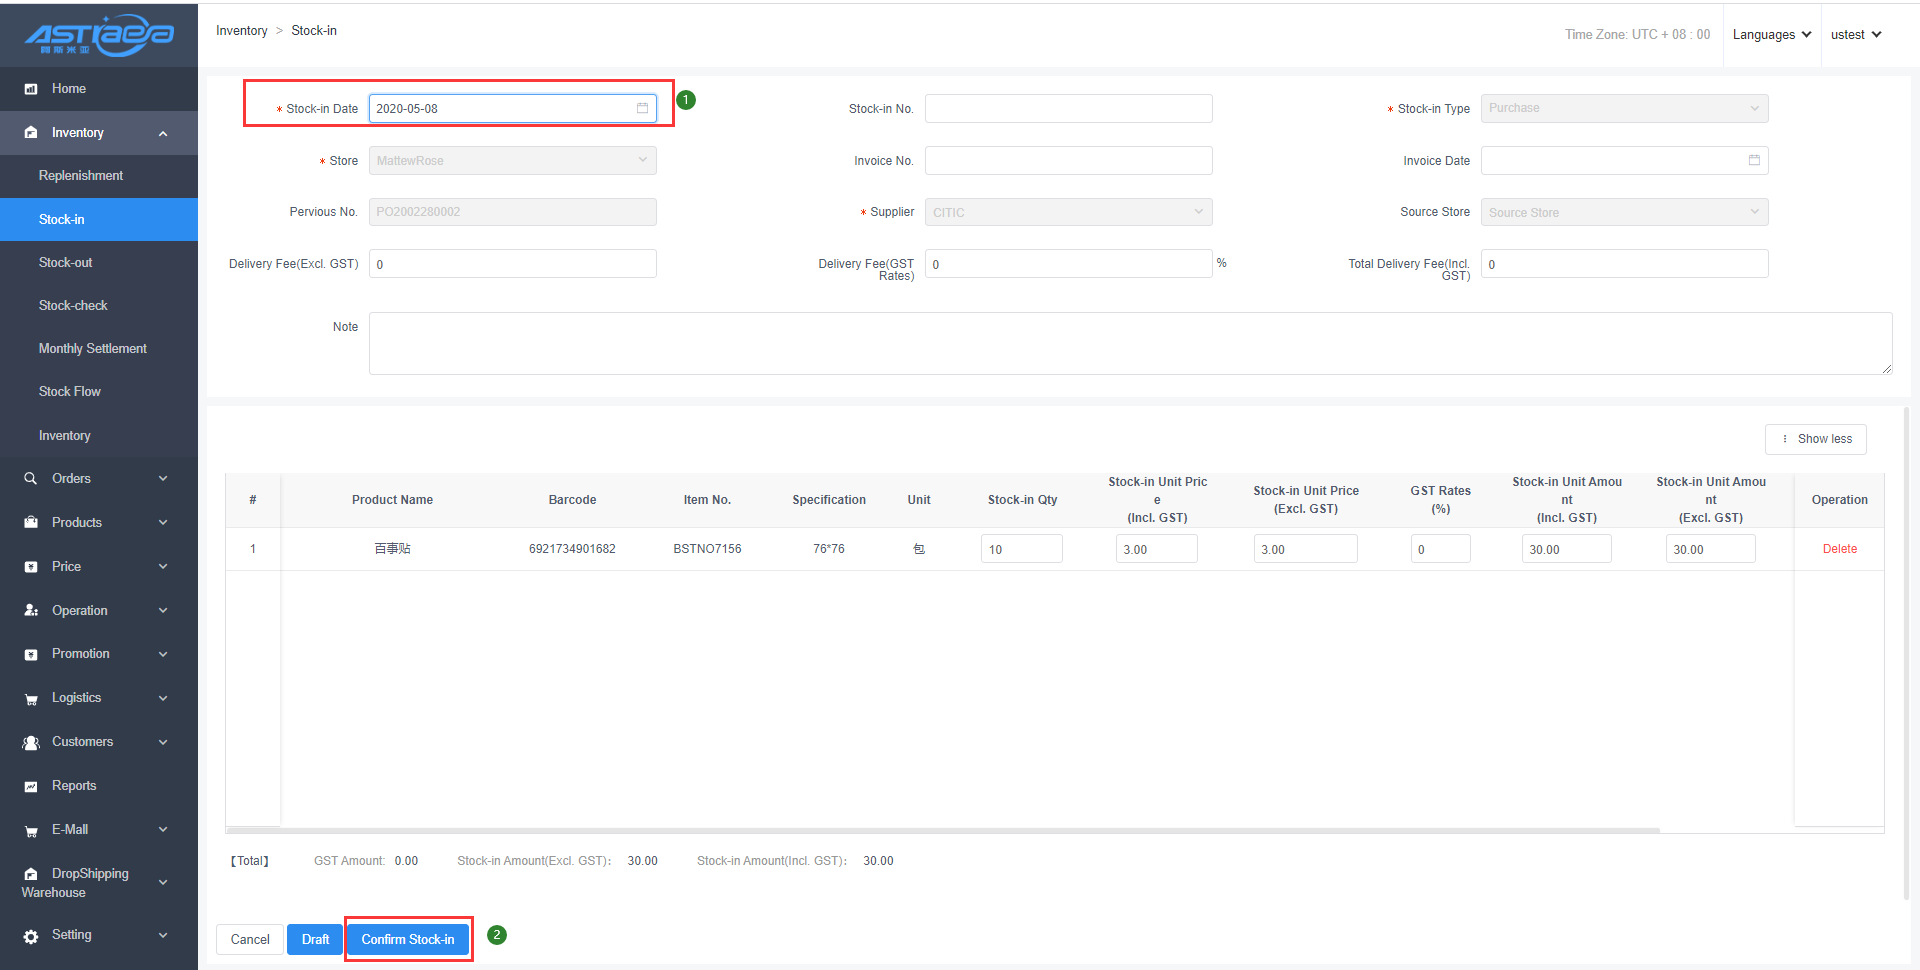
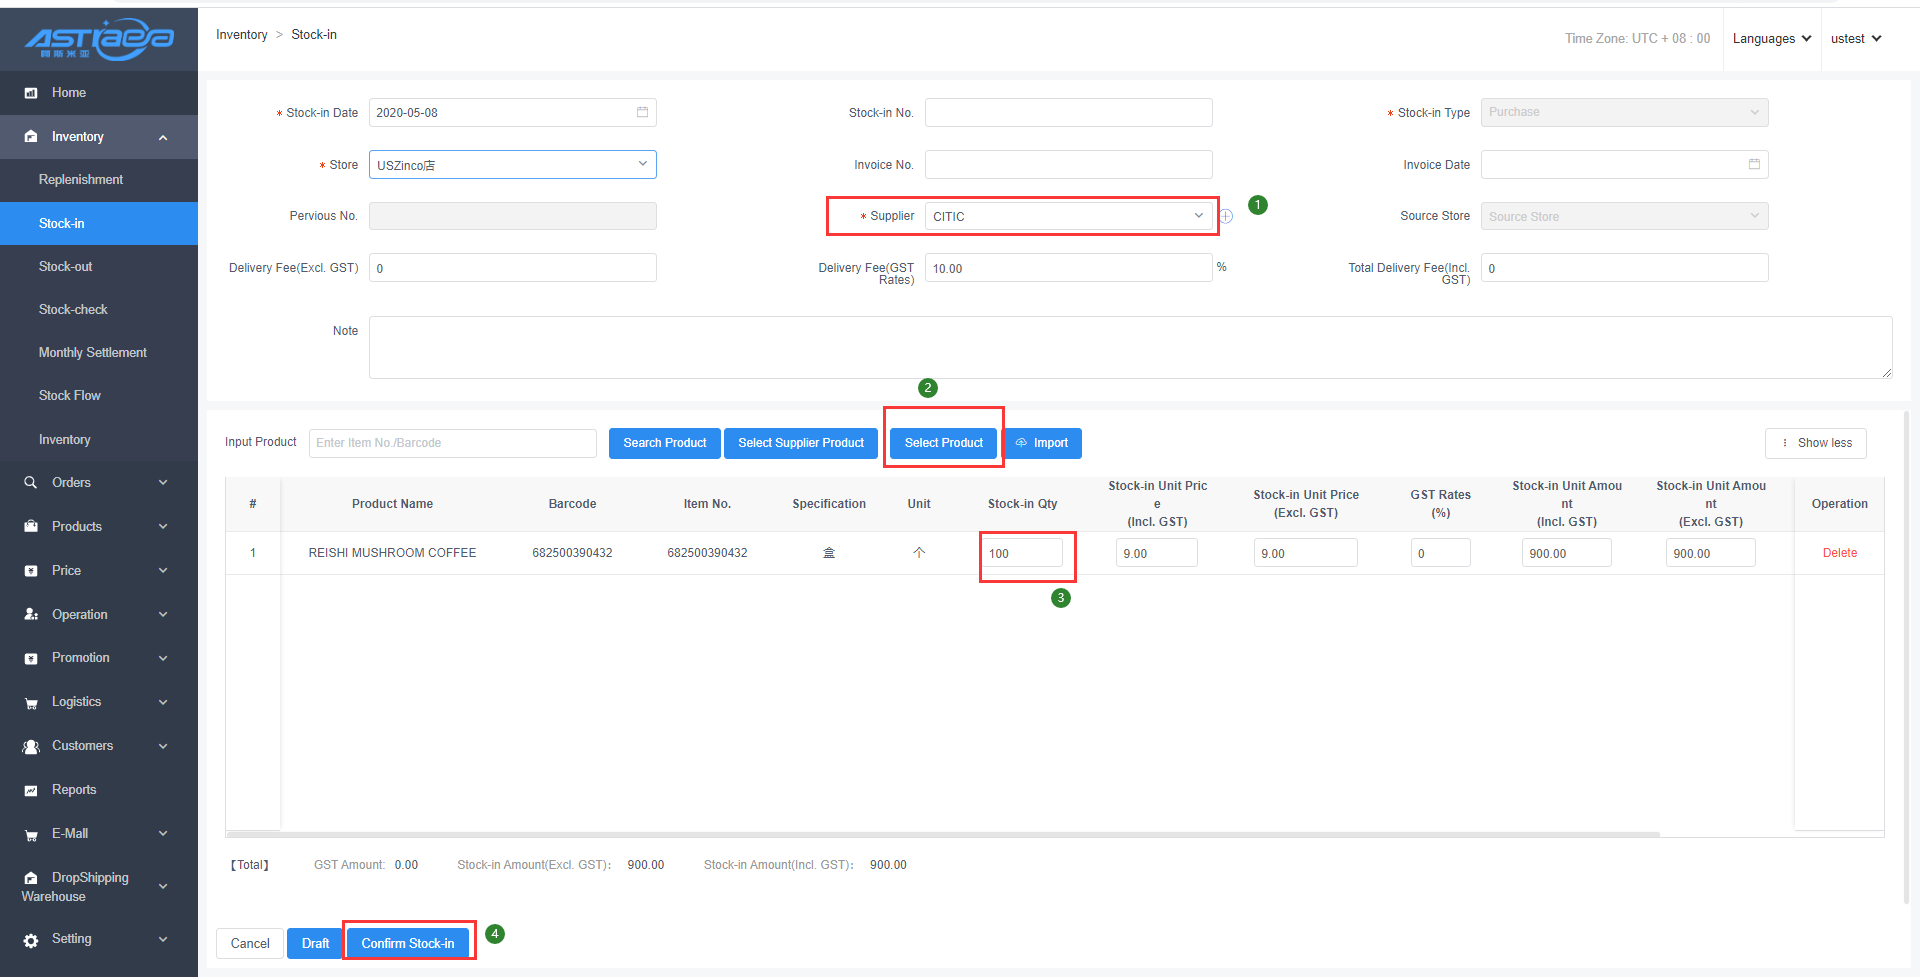
No Stock-in Order: Click the “No Stock-in Order” option to enter the stock-in page. Select the related supplier, and the stock-in product name (Method 1: Enter the item No. or barcode in the query box, and click "Search" to add the product; Method 2: Click "Select Supplier Product” option, and tick the product name; Method 3: Click "Select Product” option, and tick the product name; Method 4: Import the product), enter the product quantity, and click "Confirm Stock-in" option to finish all operation steps.
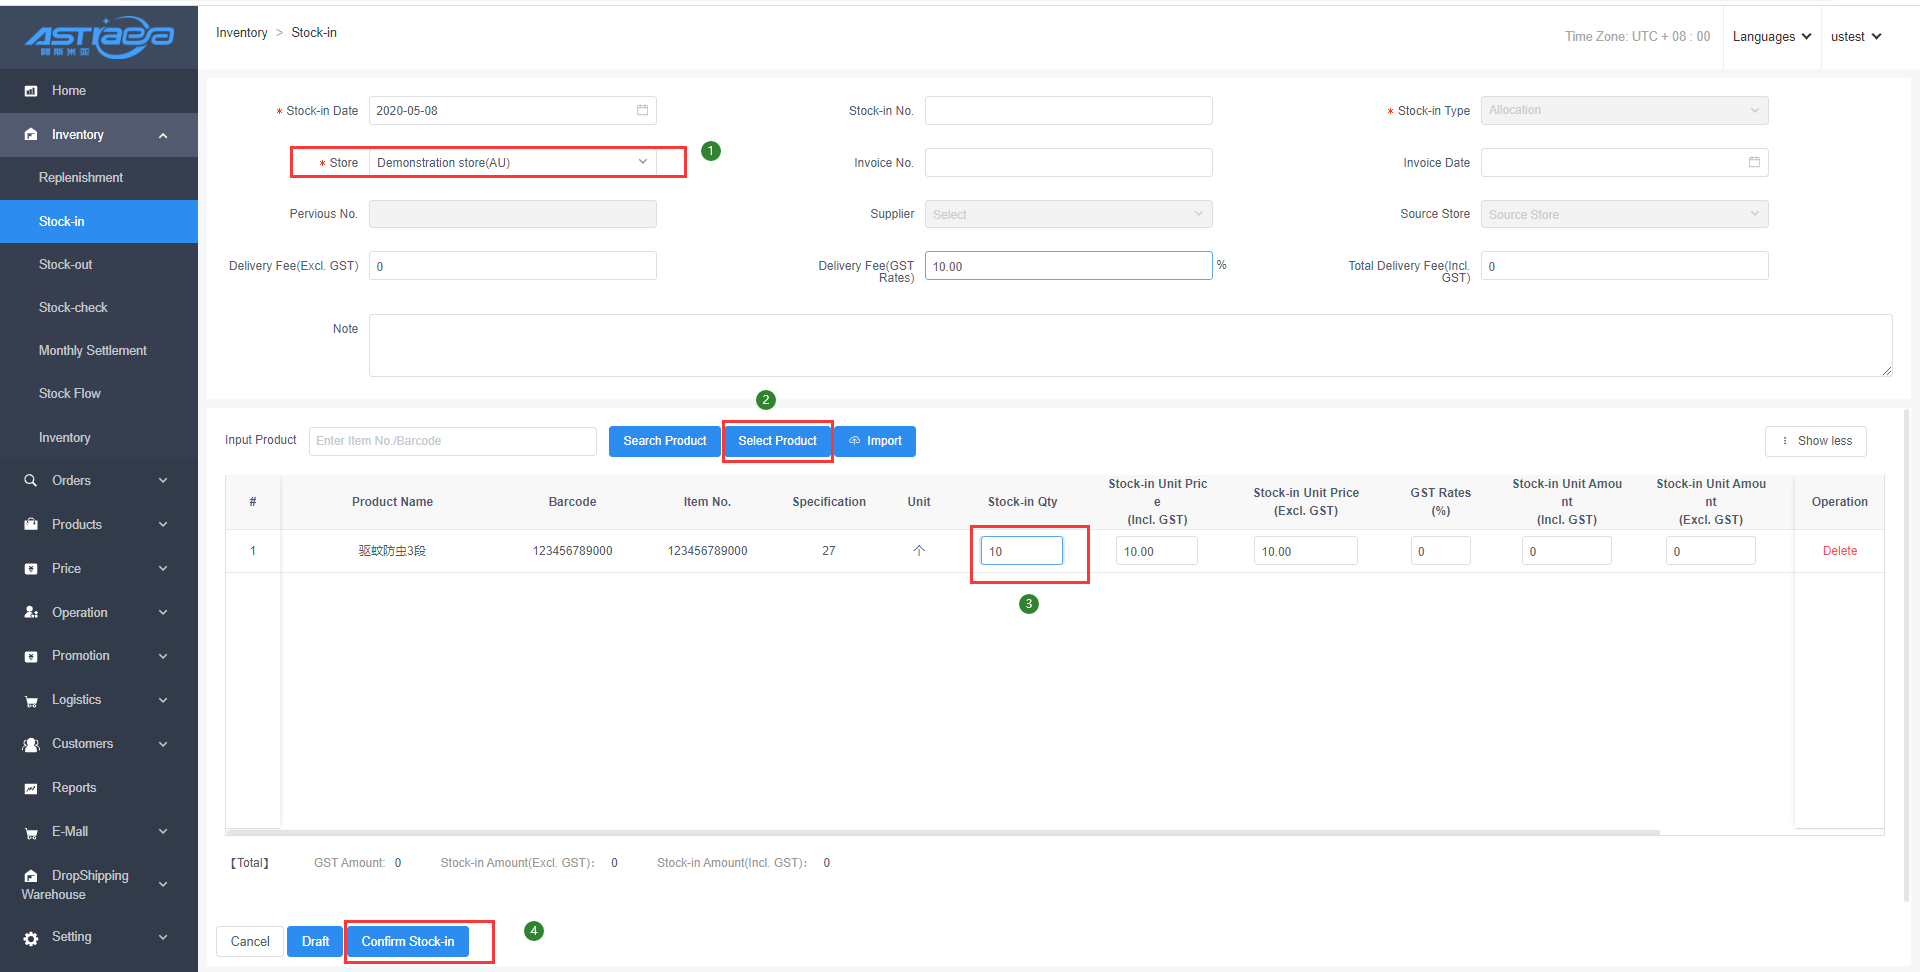
3.2.2 Add allocation
[Operating steps]
Step 1: Click the "Inventory” option, and "Stock-in" option;
Step 2: Click "Add" option and select "Allocation”;
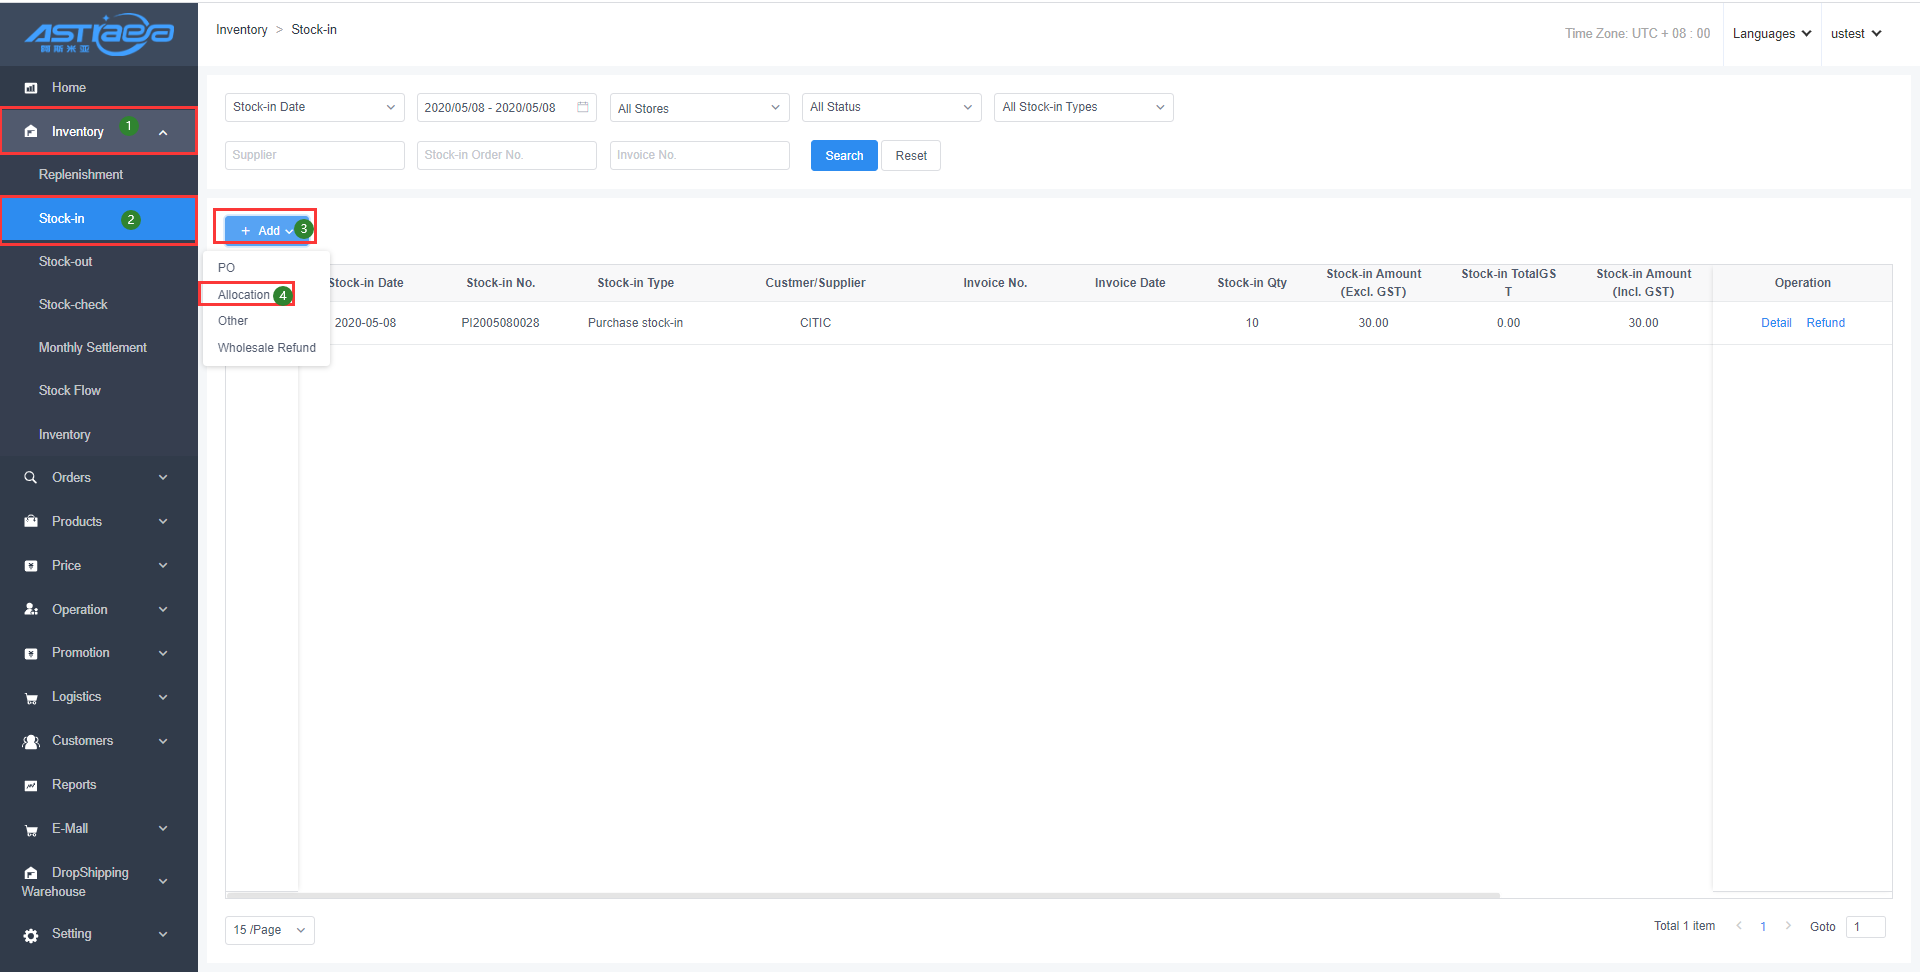
Step 3: Select the allocation product name and click "Confirm Stock-in" to finish all operation steps.
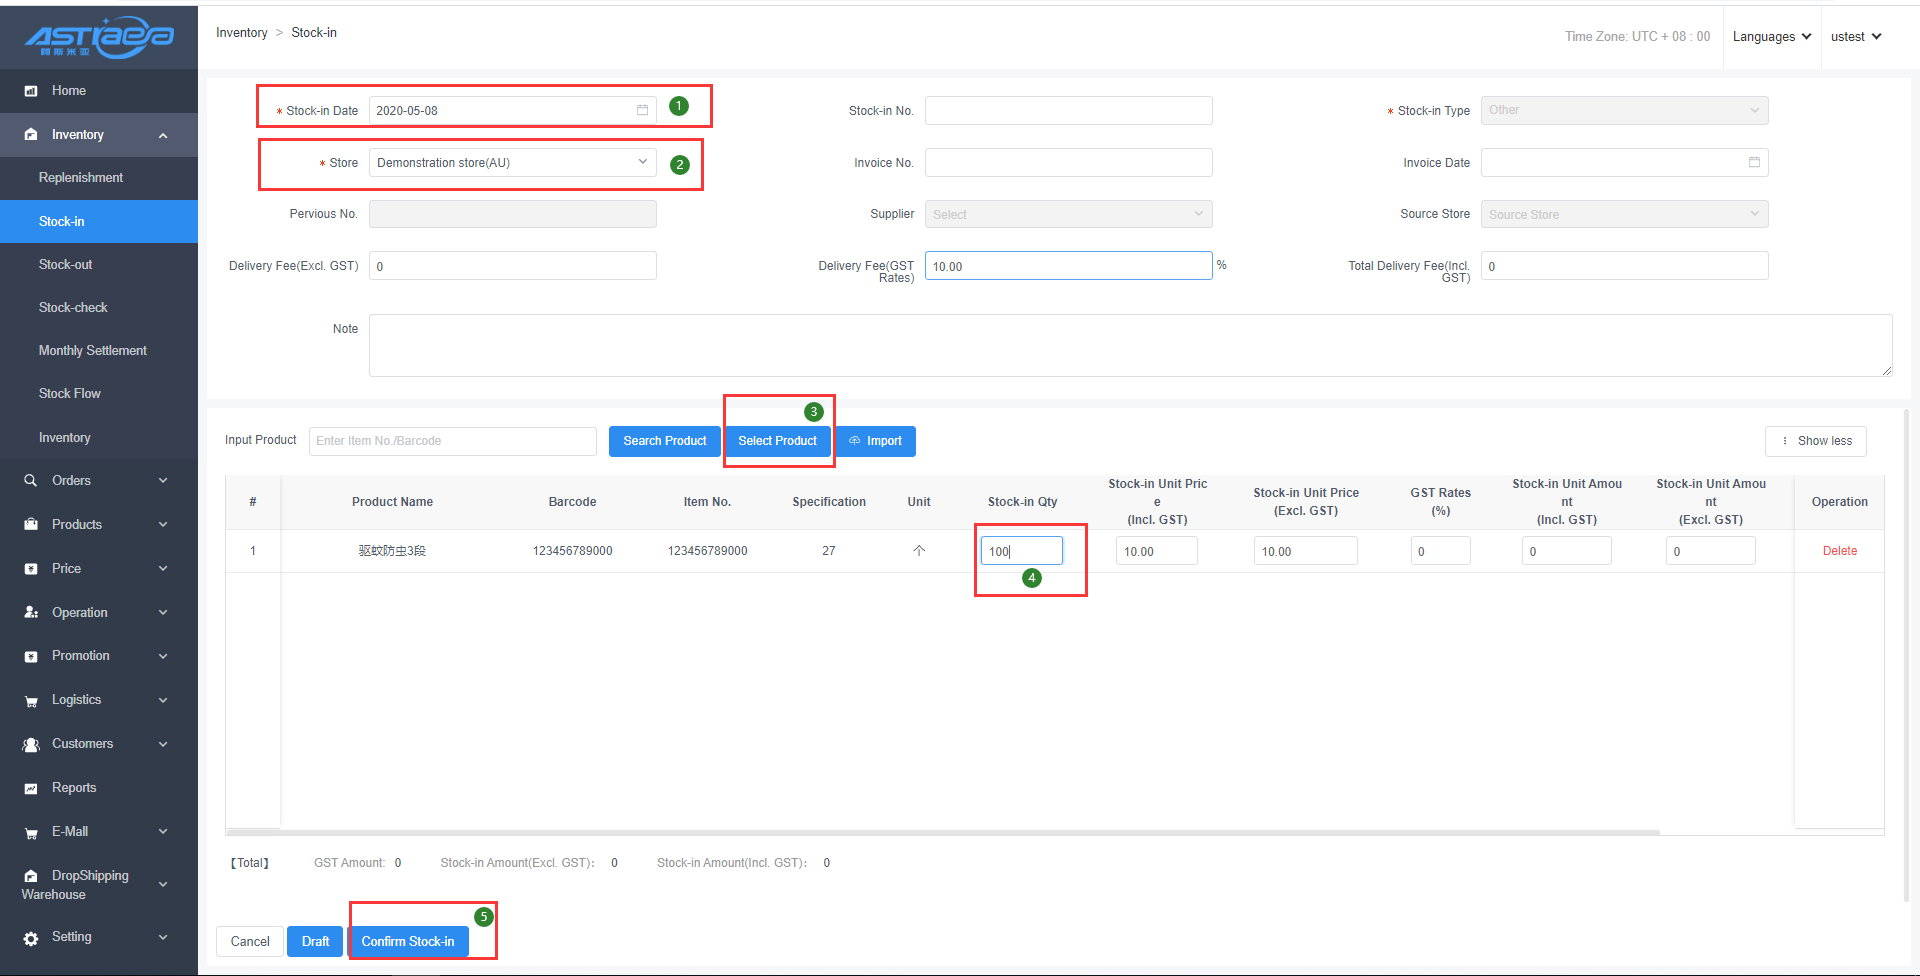
3.2.3 Add other
[Operating steps]
Step 1: Click the "Inventory” option, and "Stock-in" option;
Step 2: Click "Add" option and select "Other”;

Step 3: Select the stock-in date, related store, and the stock-in product name, enter the product quantity, and click "Confirm Stock-in" option to finish all operation steps.
3.2.4 Add wholesale refund
[Operating steps]
Step 1: Click the "Inventory” option, and "Stock-in" option;
Step 2: Click "Add" option and select “Wholesale Refund”;

Step 3: Select the Lead Wholesale Refund Order or No Stock-in Order;
Lead Wholesale Refund Order: Select and click the “Lead Wholesale Refund Order” option

Select the stock-in date and enter the stock-in quantity (less than or equal to the product quantity shown on the Lead Wholesale Refund Order)
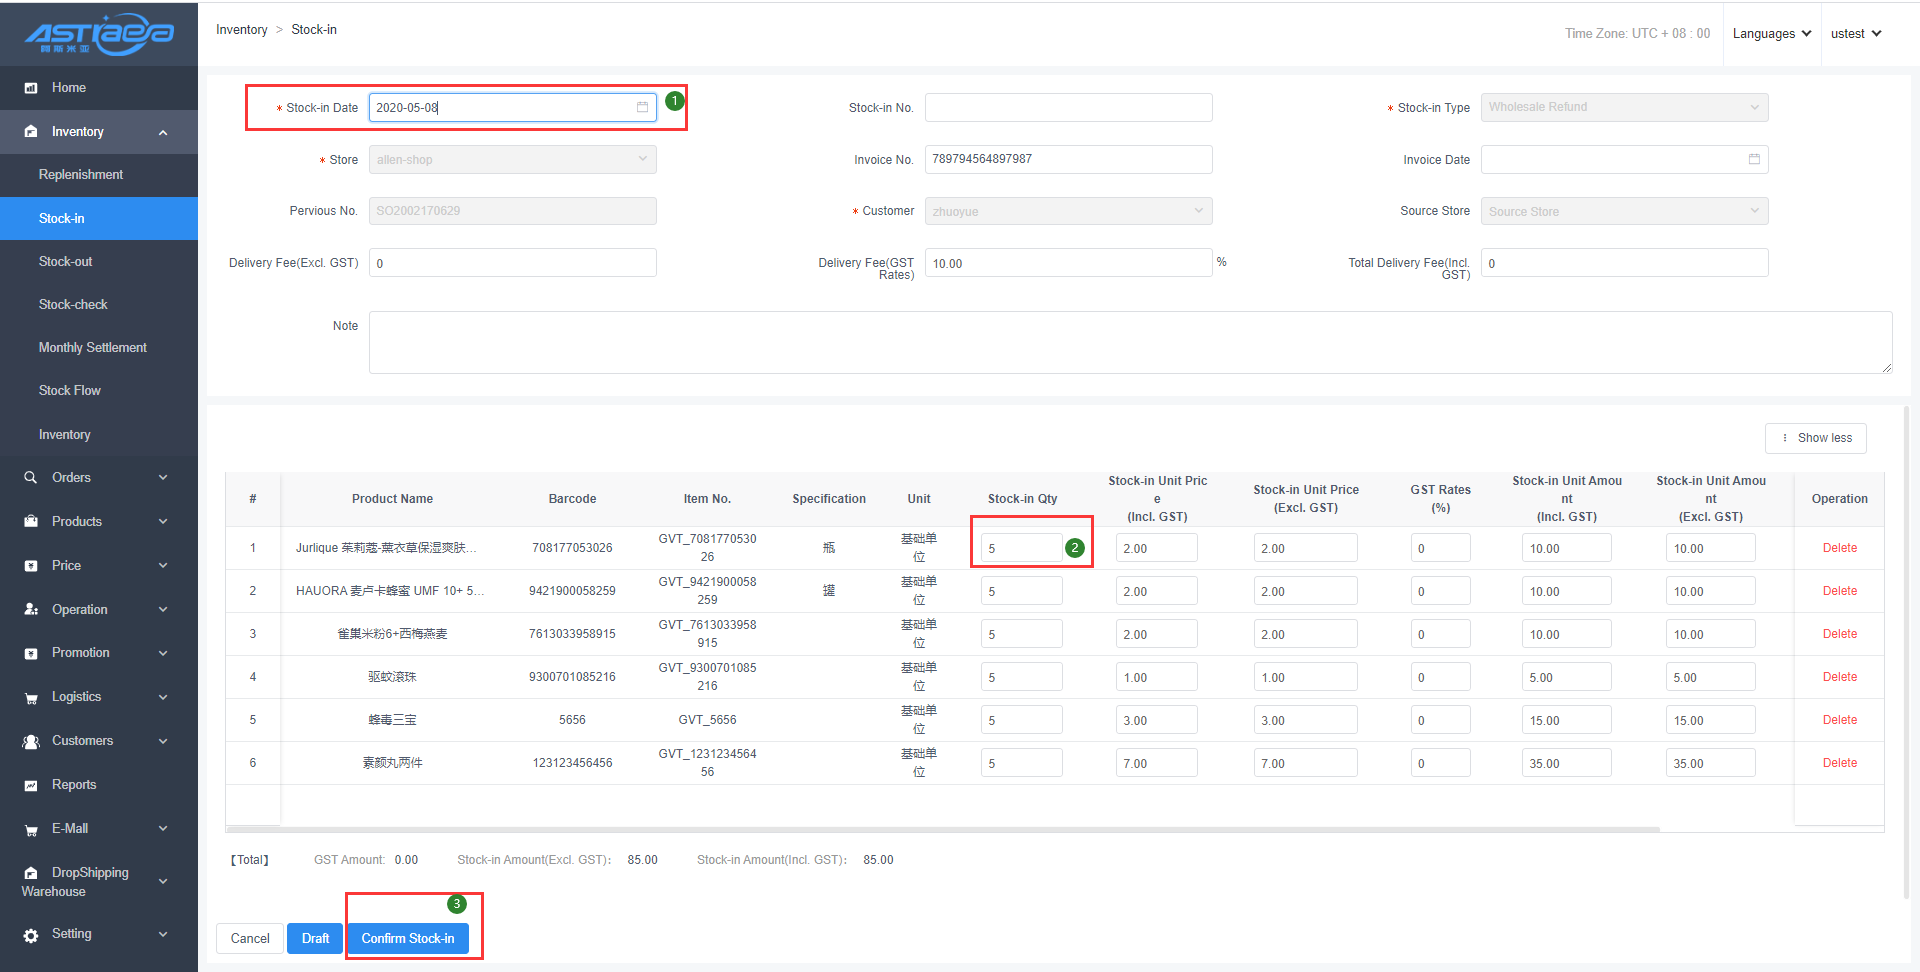
No Stock-in Order: Click “No Stock-in Order” option
Log in the stock-in page, select related store, related supplier and the stock-in product name, enter the product quantity, and click "Confirm Stock-in" option to finish all operation steps.
3.3 Stock-out at the server
3.3.1 Wholesale stock-out
[Operating steps]
Step 1: Click the "Inventory” option, and "Stock-out" option;
Step 2: Click "Add" option and select “Wholesale Stock-out”;

Step 3: Select the stock-out date, related store, invoice No., customer, and the stock-out product name, enter the stock-out quantity, and click "Confirm Stock-out" option to finish all operation steps.
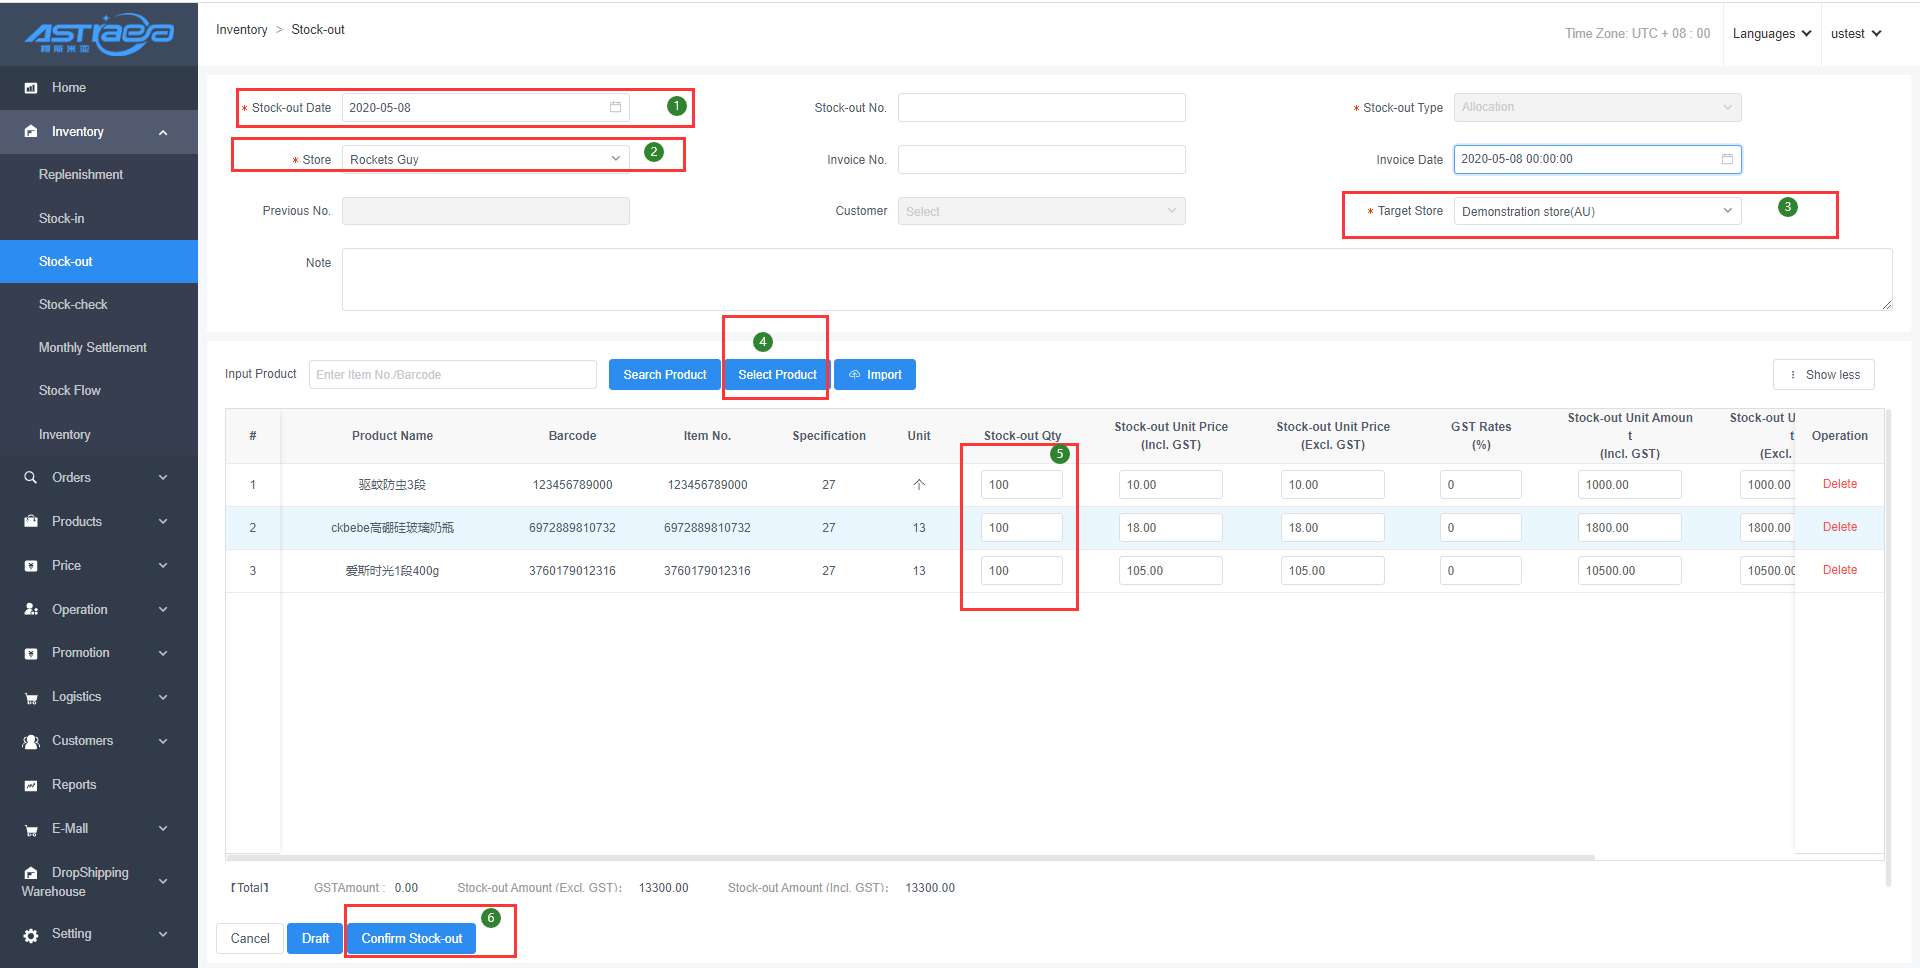
3.3.2 Allocation
[Operating steps]
Step 1: Click the "Inventory” option, and "Stock-out" option;
Step 2: Click "Add" option and select "Allocation”;
Step 3: Select the stock-out date, related store, target store, and the stock-out product name, enter the stock-out quantity, and click "Confirm Stock-out" option to finish all operation steps.
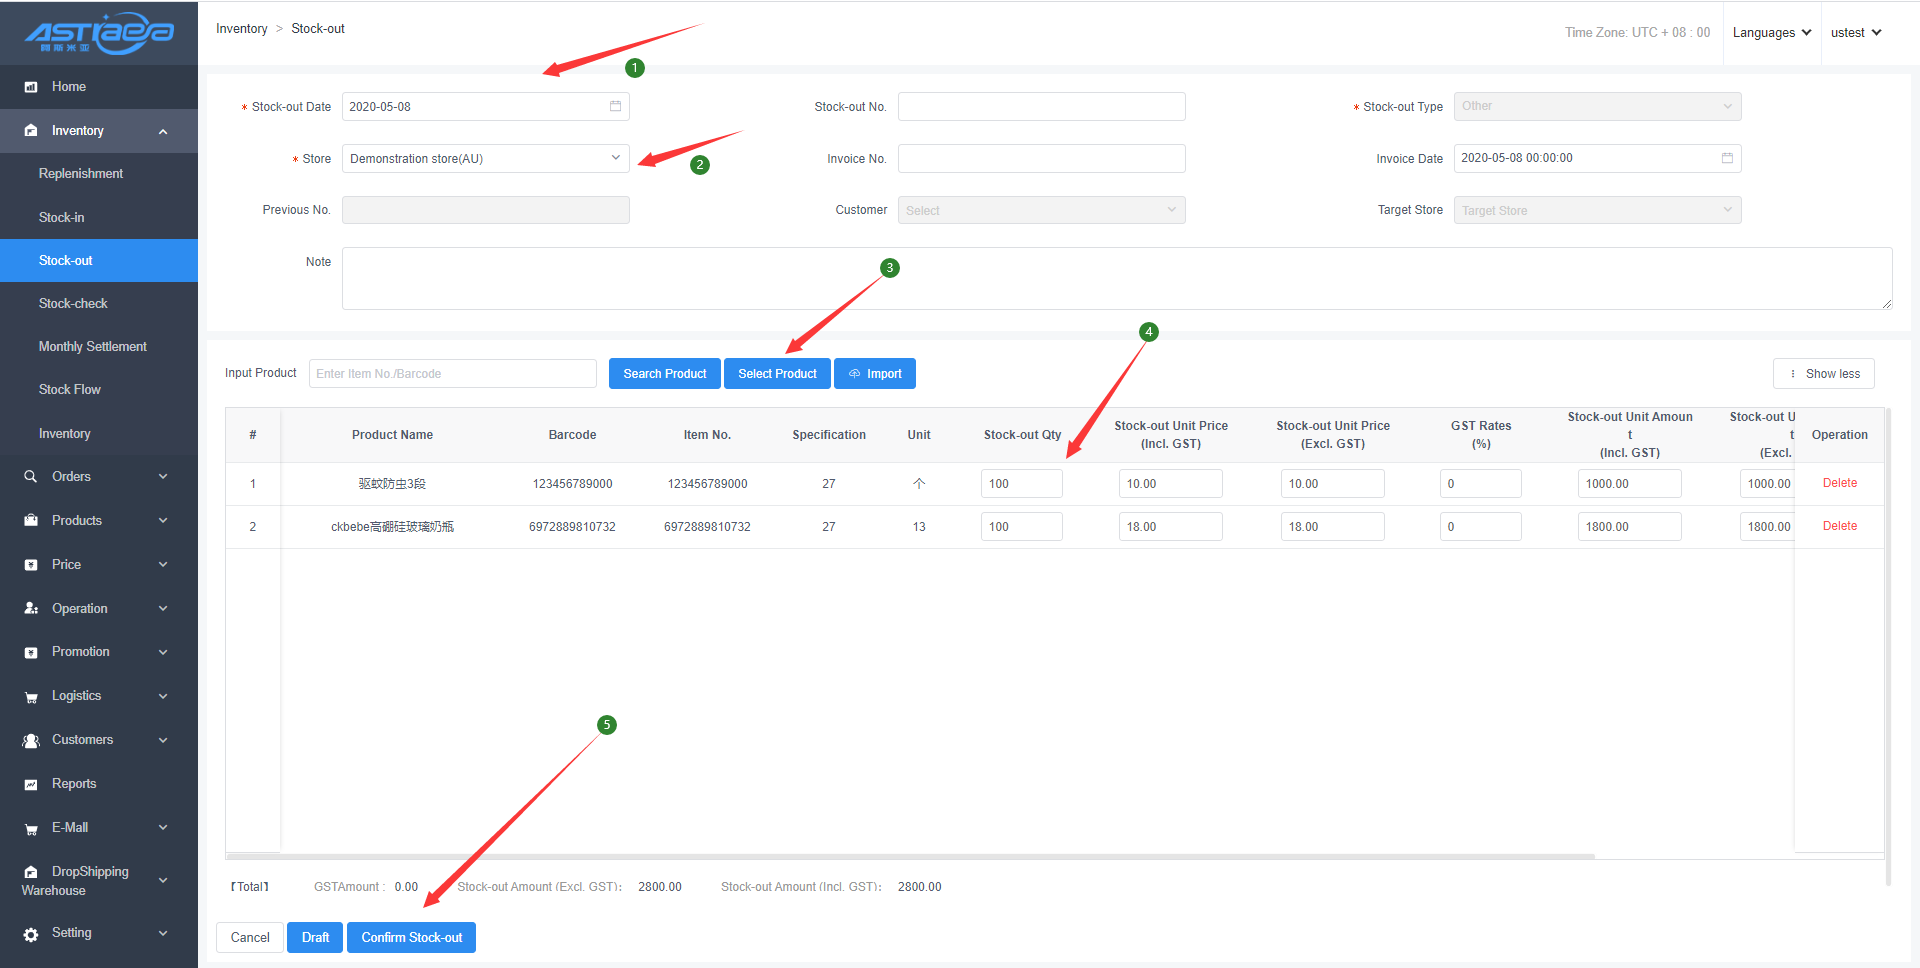
3.3.3 Other
[Operating steps]
Step 1: Click the "Inventory” option, and "Stock-out" option;
Step 2: Click "Add" option and select "Other”;
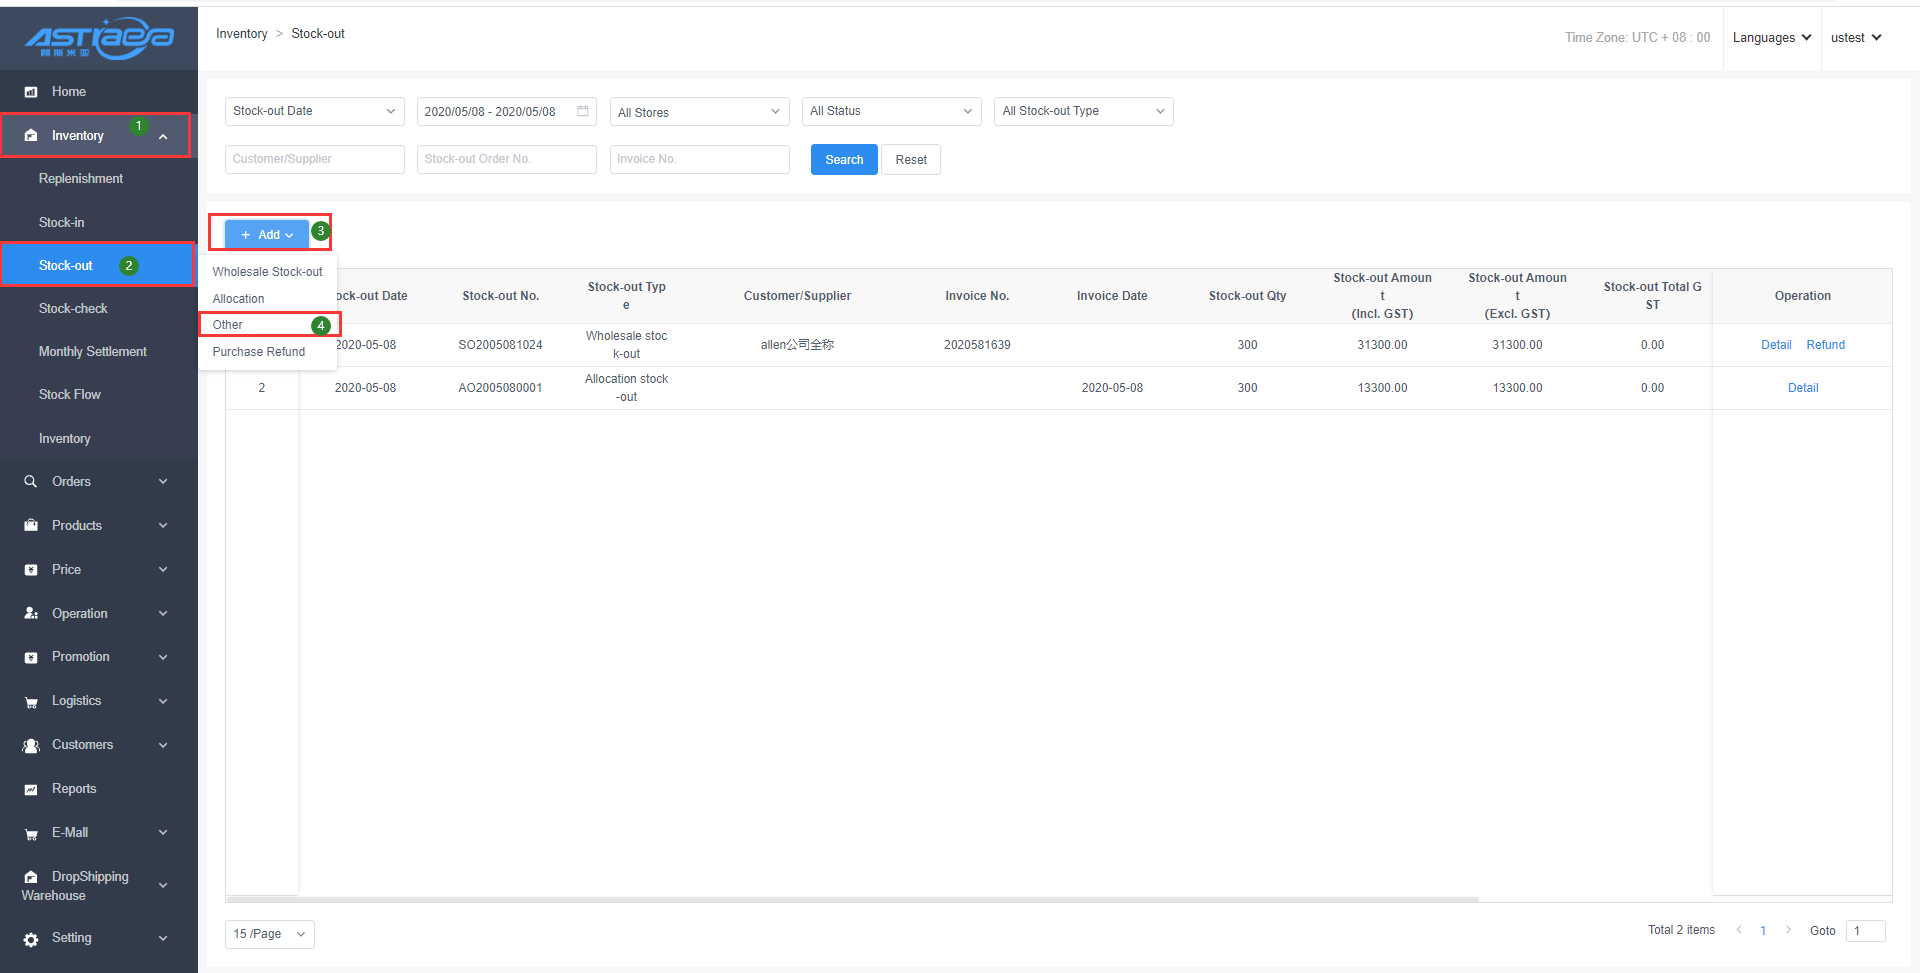
Step 3: Select the stock-out date, related store, and the stock-out product name, enter the stock-out quantity, and click "Confirm Stock-out" option to finish all operation steps.
3.3.4 Refund
[Operating steps]
Step 1: Click the "Inventory” option, and "Stock-out" option;
Step 2: Click "Add" option and select “Purchase Refund”.

Step 3: Select the Lead Purchase Refund Order or No Stock-out Order;
Lead Purchase Refund Order: Select and click the selected “Lead Purchase Refund Order” option.
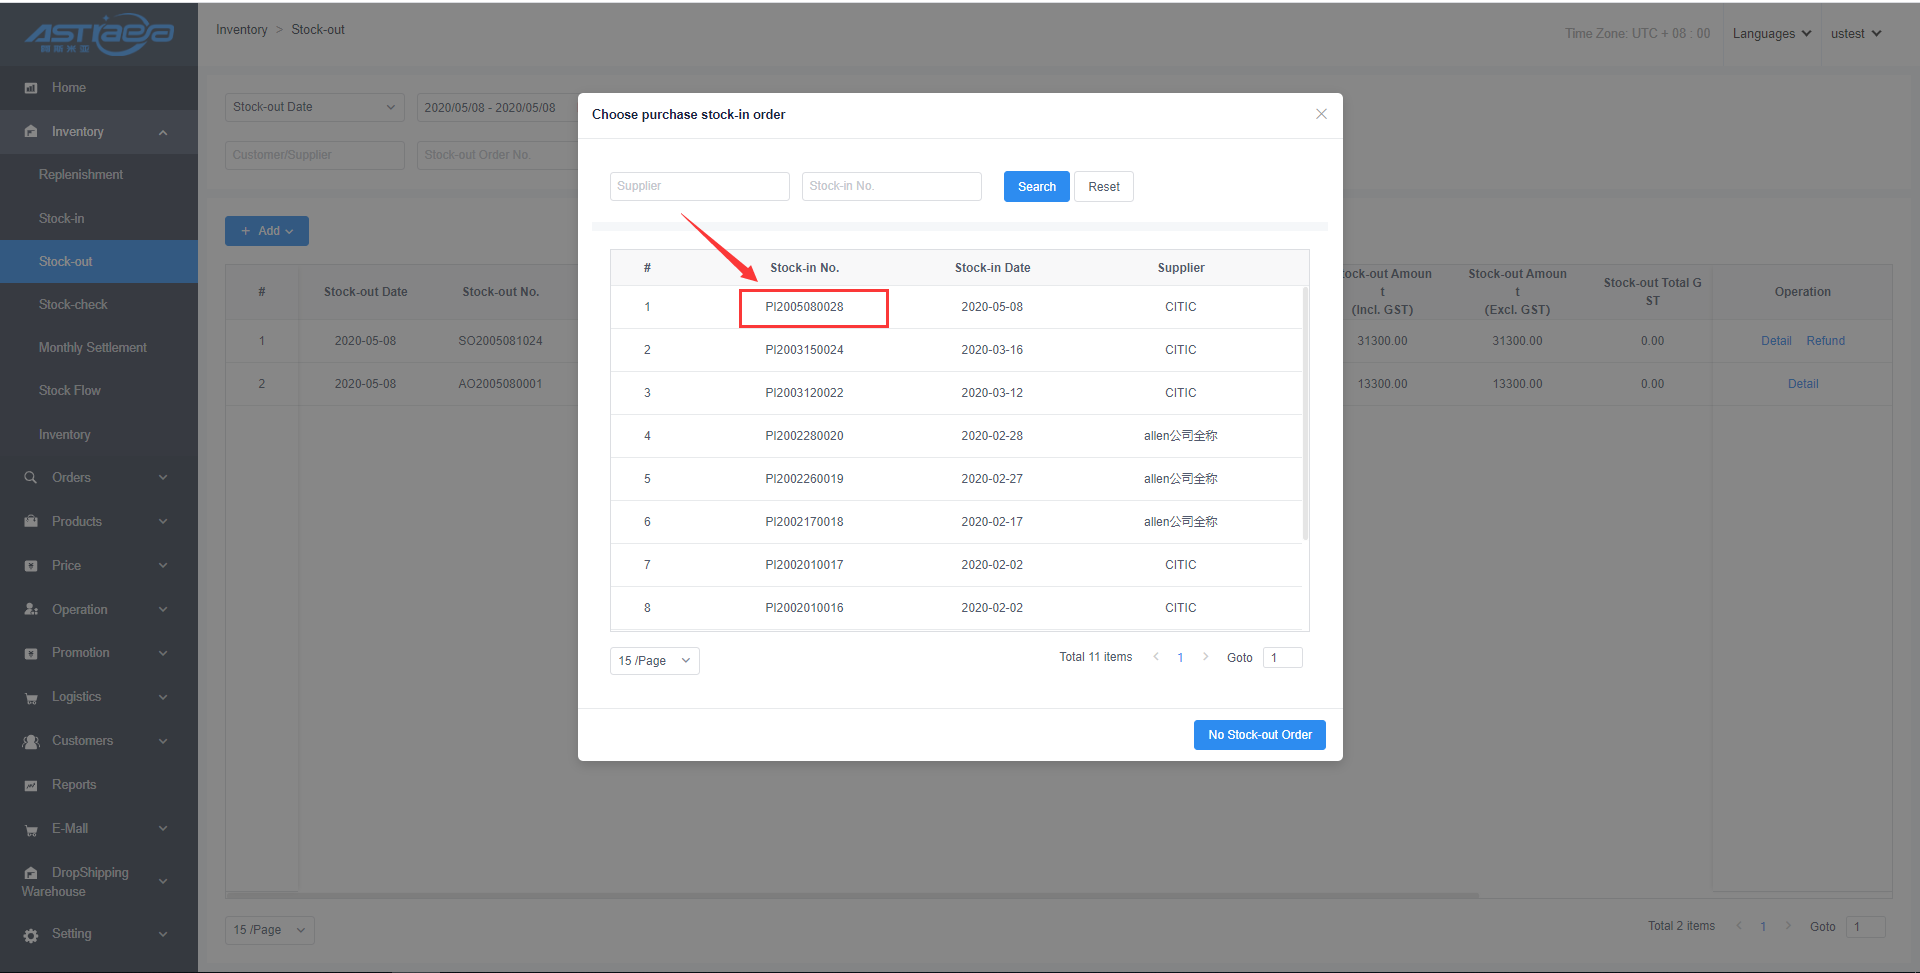
Select the stock-out date and enter the stock-out quantity (less than or equal to the product quantity shown on the Lead Purchase Refund Order), and click "Confirm Stock-out" option to finish all operation steps.
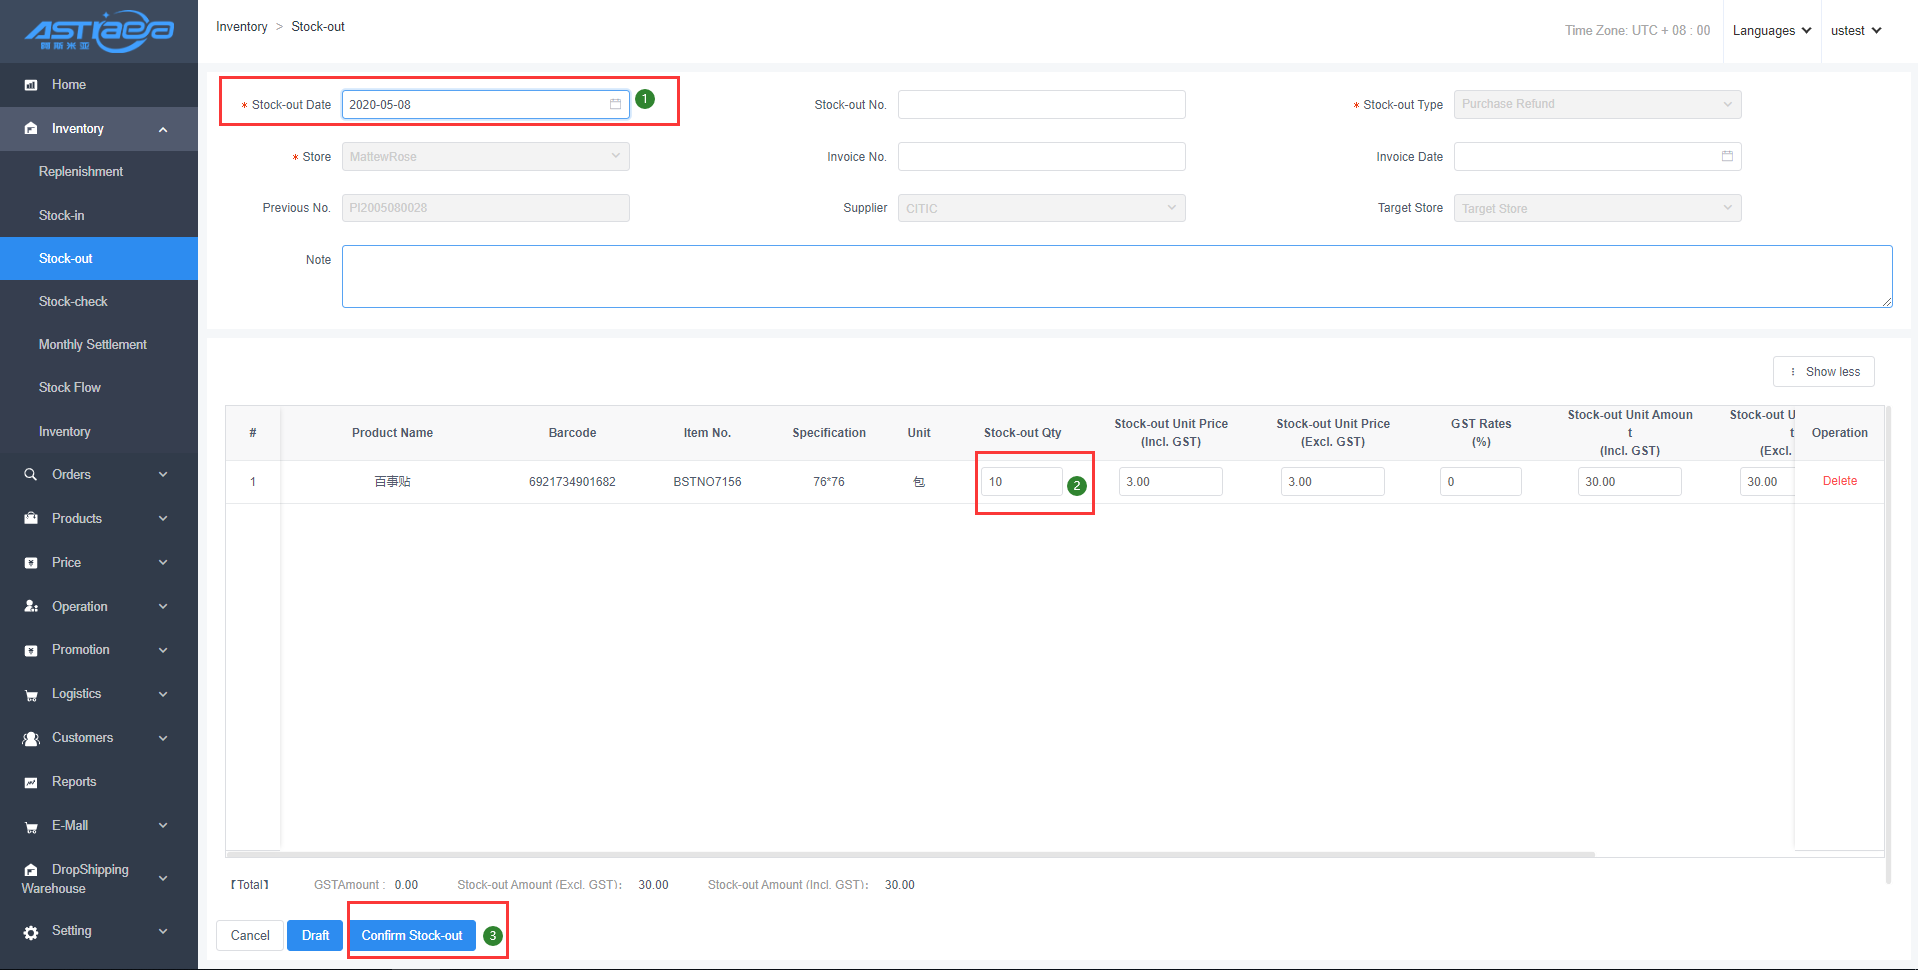
No Stock-out Order: Click “No Stock-in Order” option

Select the stock-out date, related store, related supplier, and the product name, enter the stock-out quantity, and click "Confirm Stock-out" option to finish all operation steps.

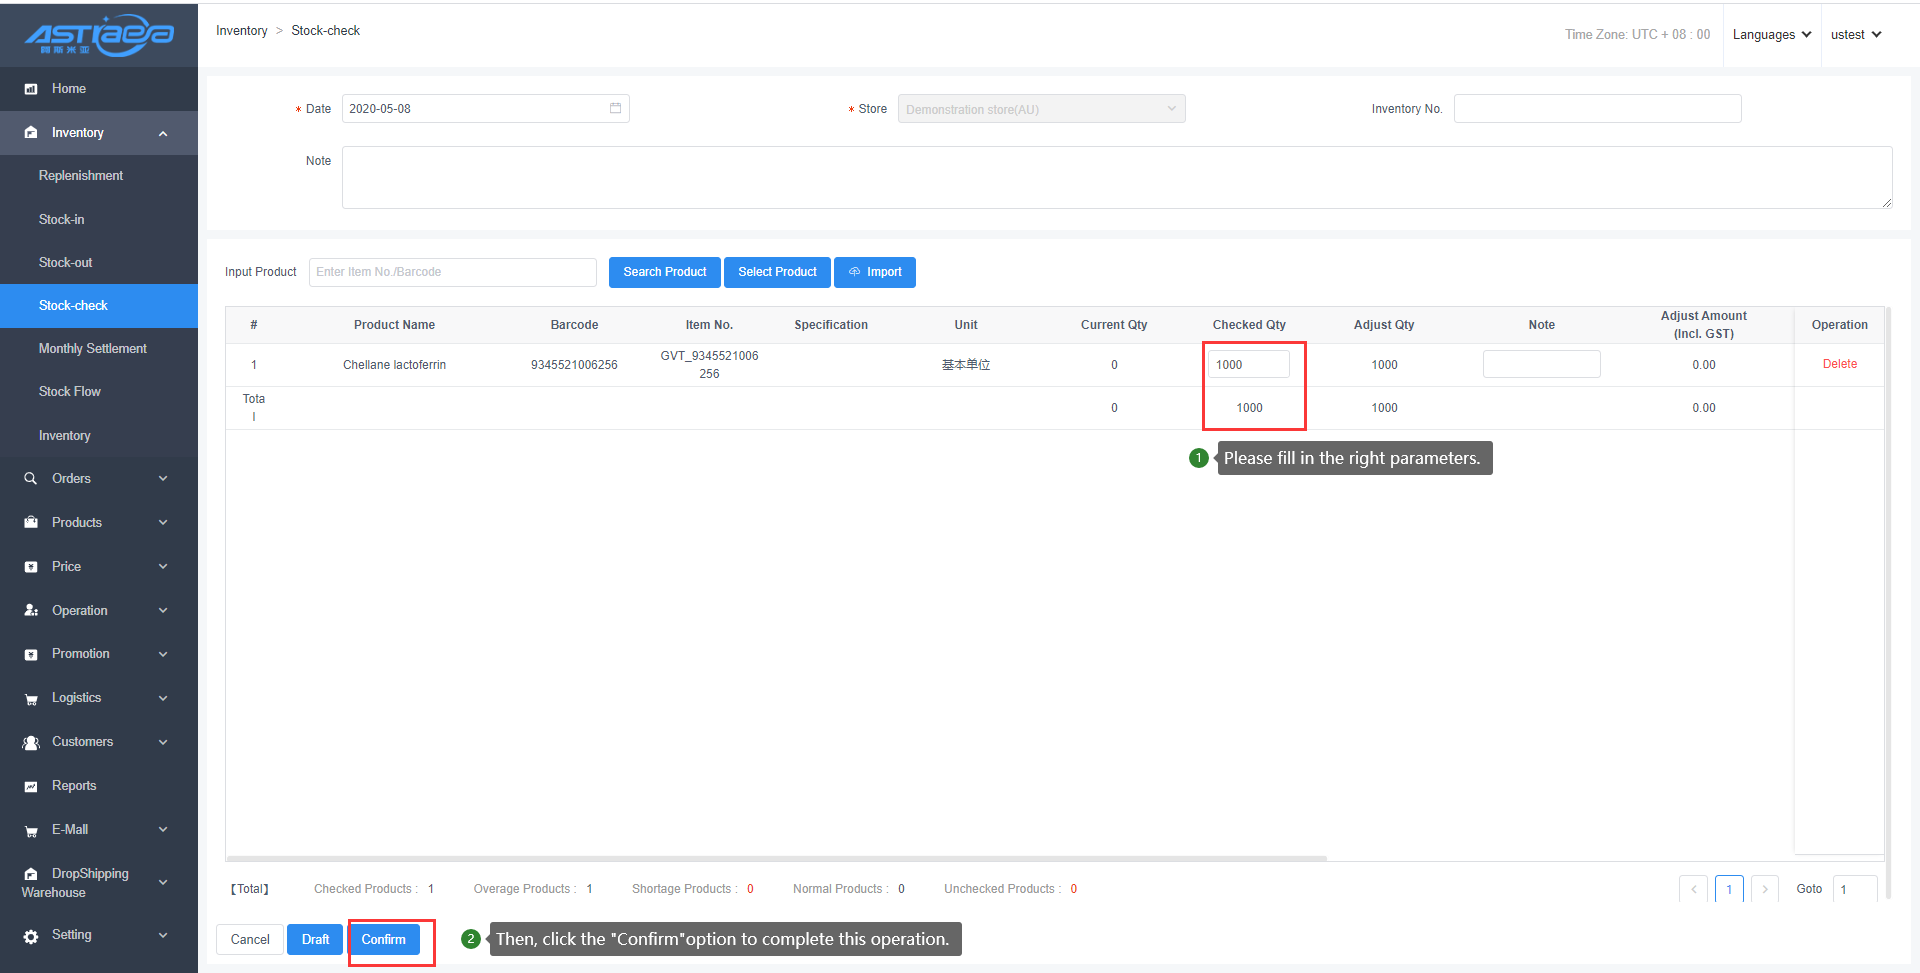
3.4 Stock-check order at the server
3.4.1 Add the stock-check order of all products
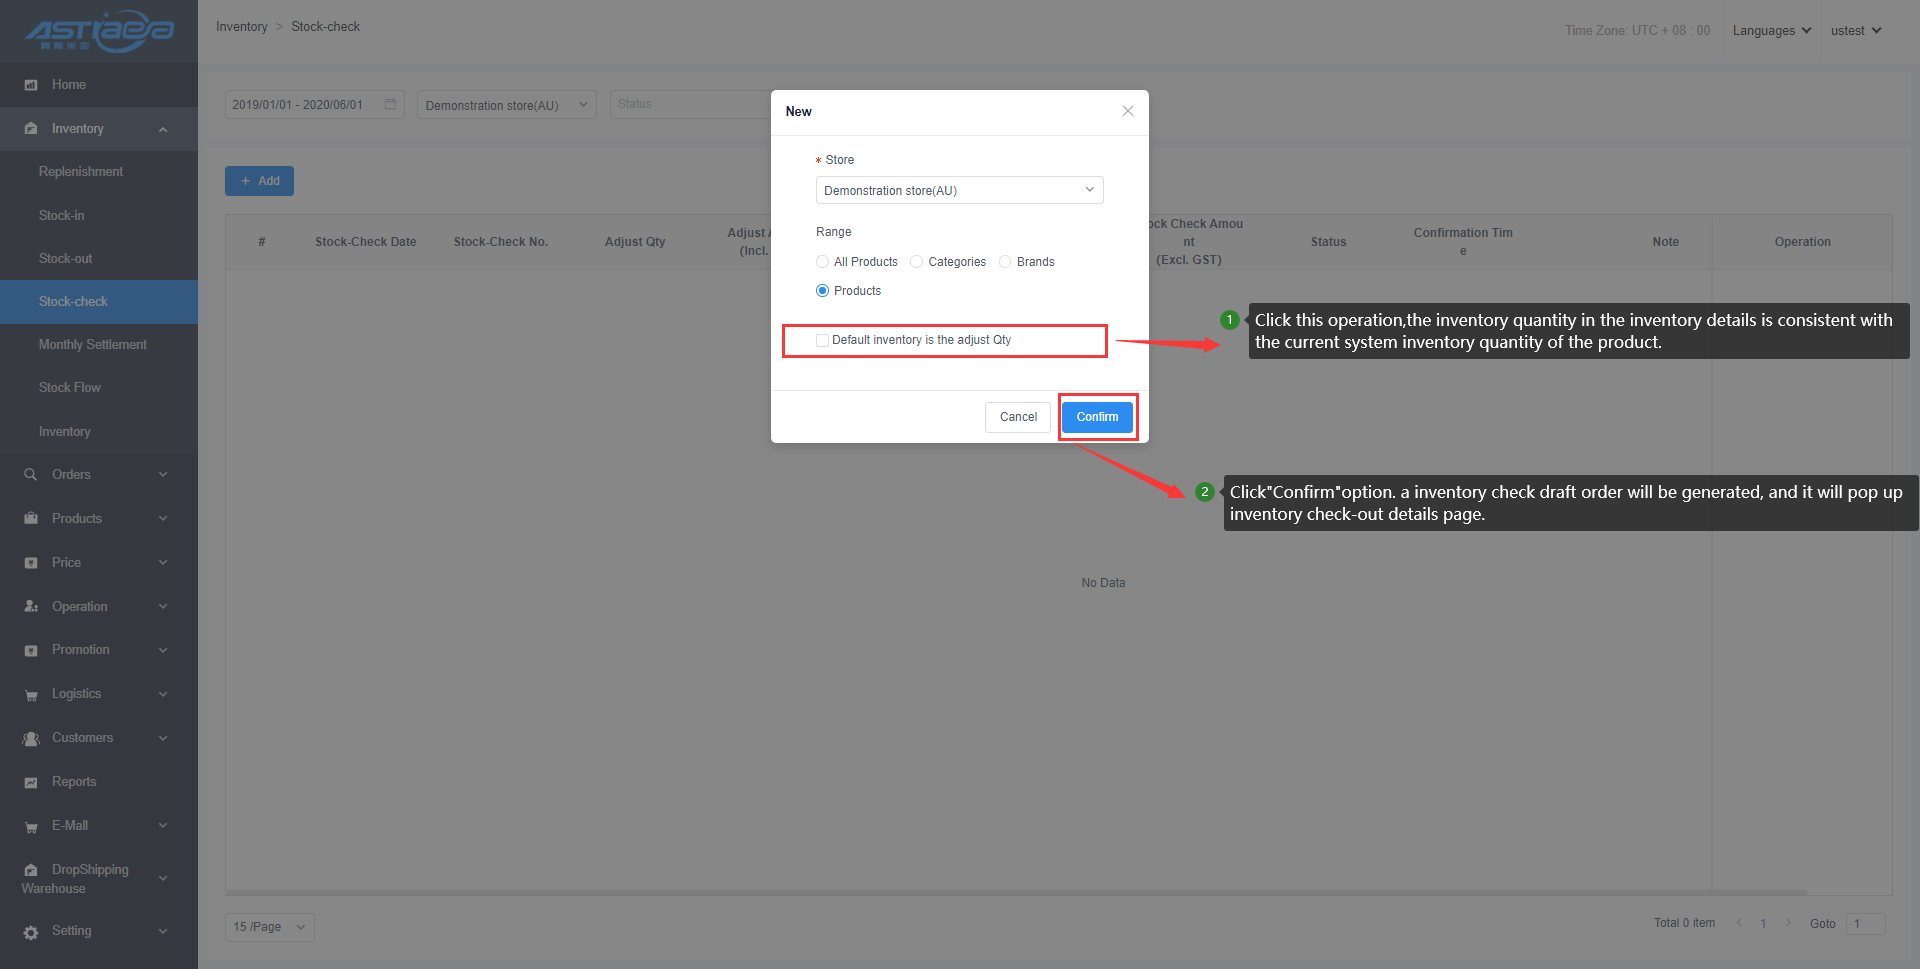
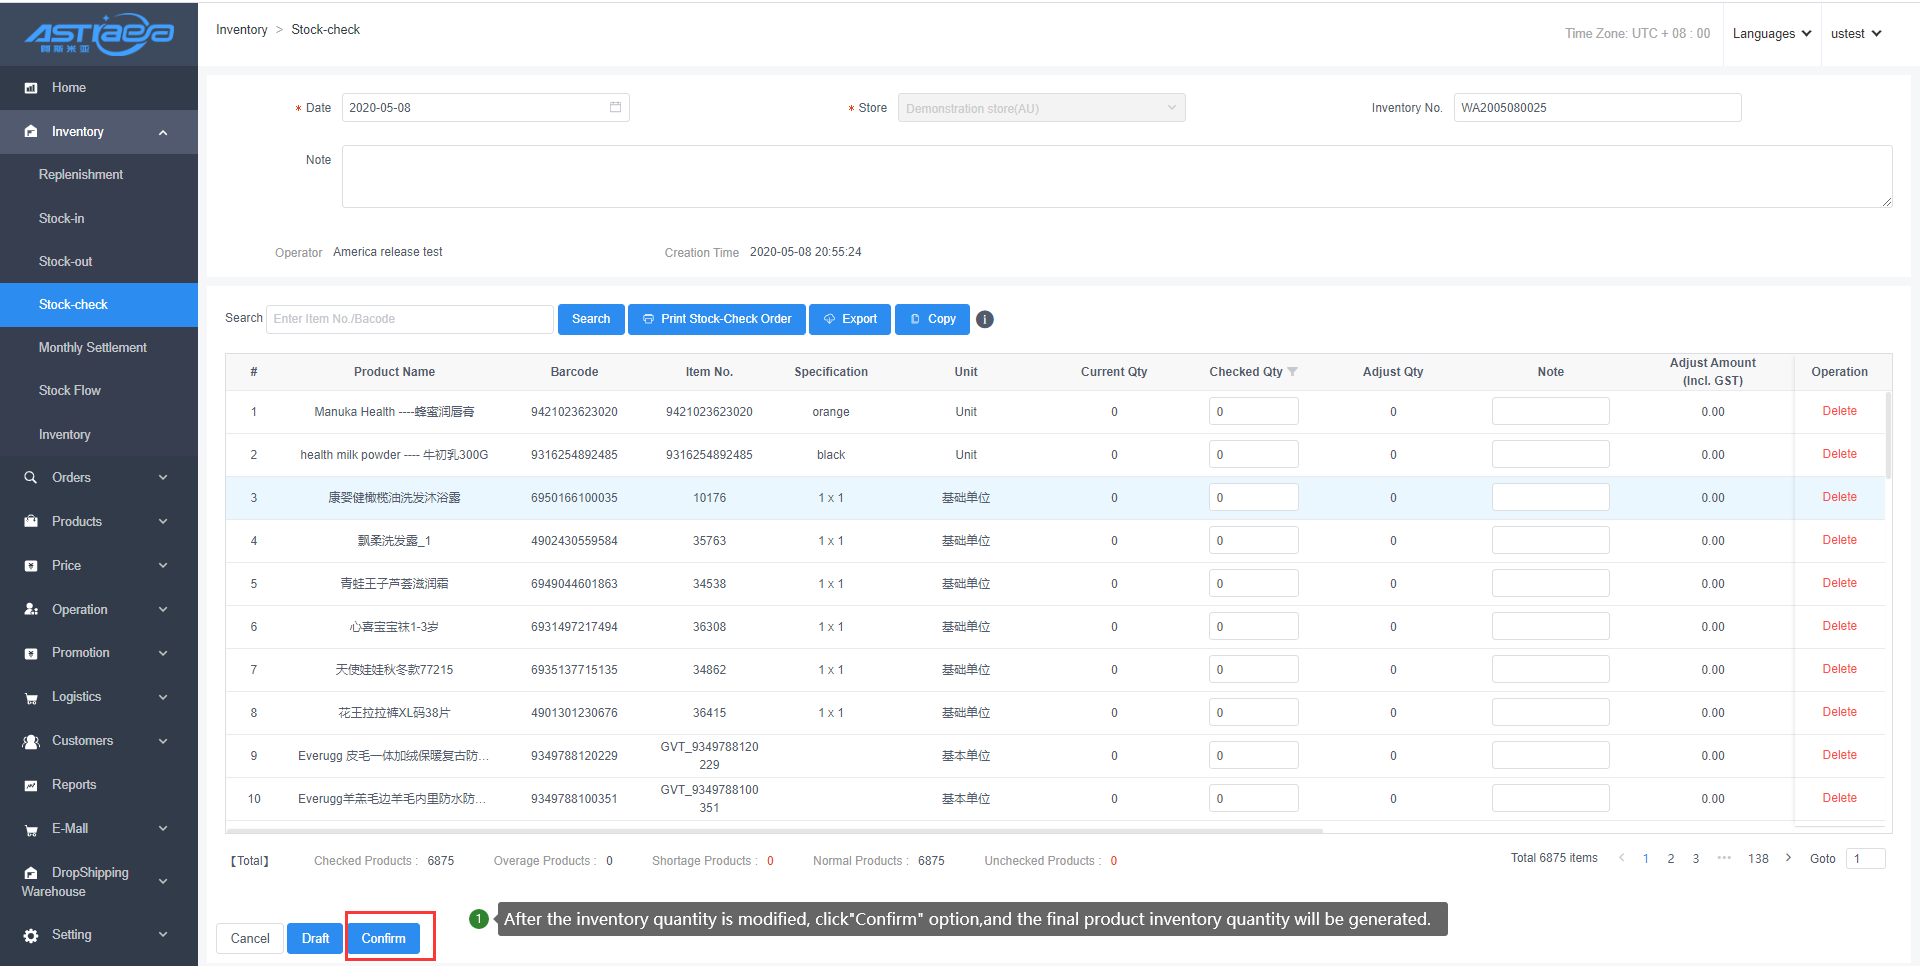
Step 1: Log in the “Inventory -> Stock-check” page, click "Add”.
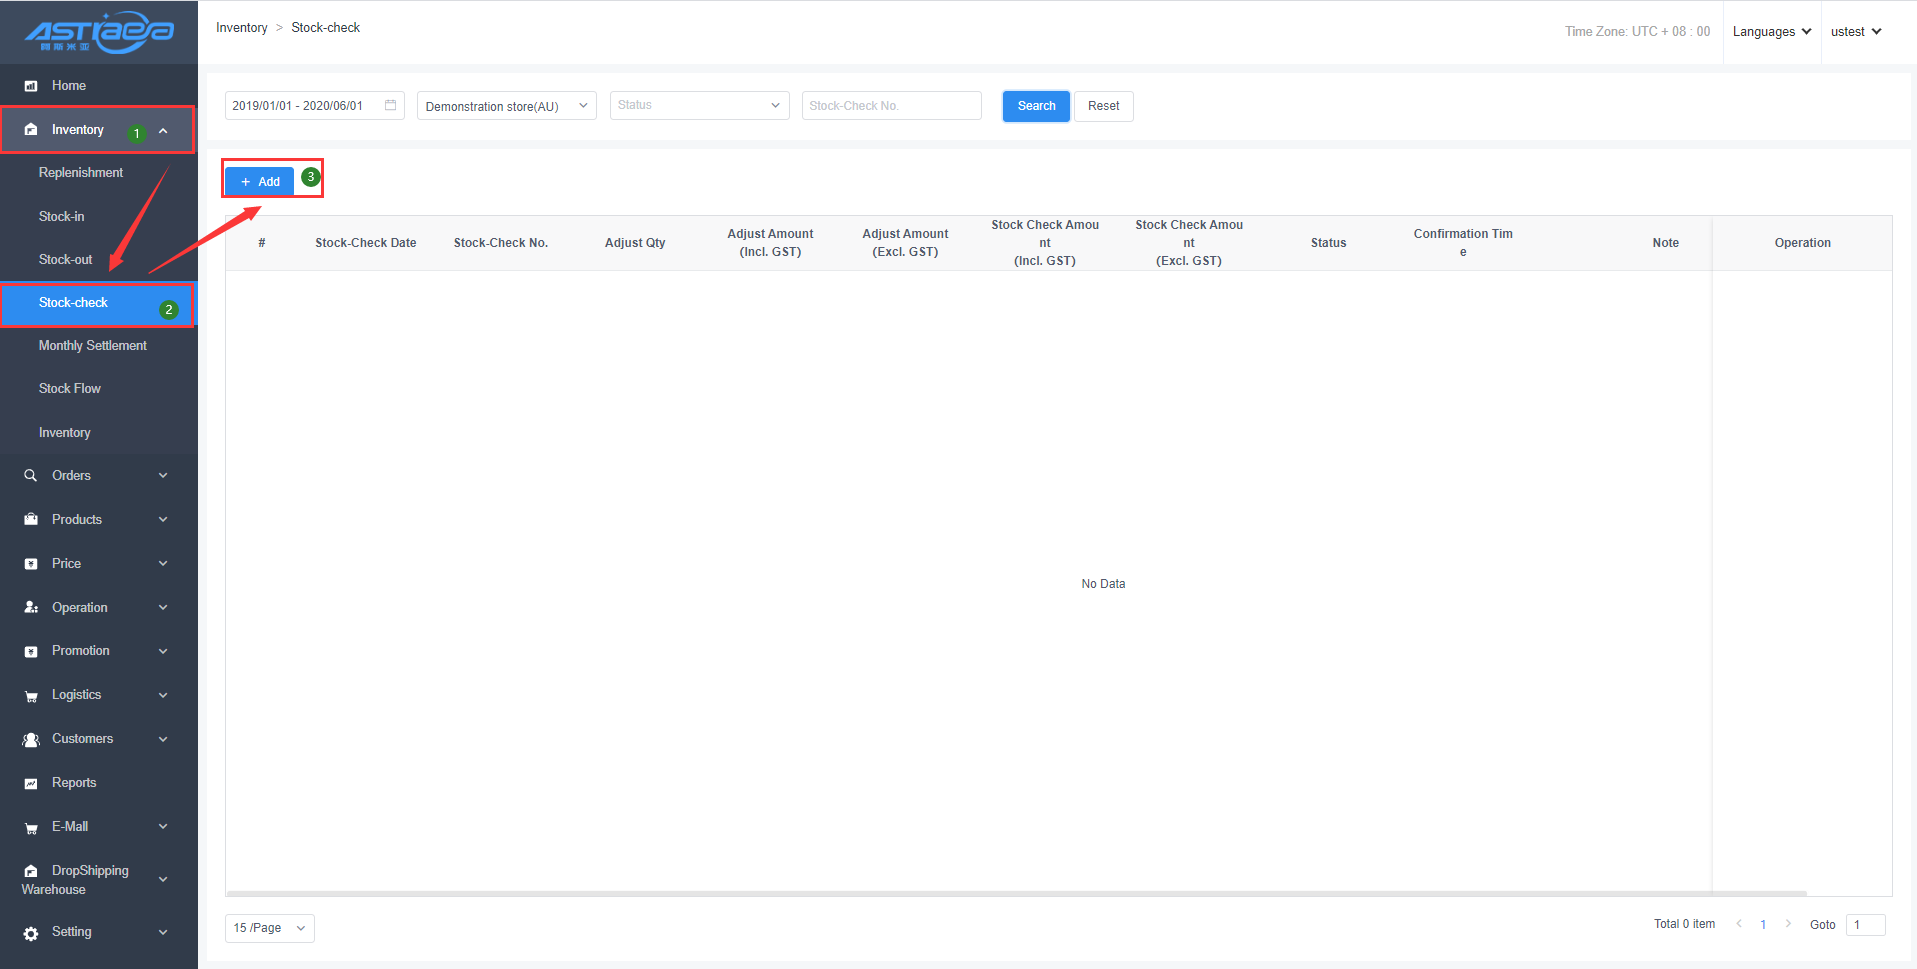
Step 2: Select the related store, select ‘All Products’ under ‘Range’ option, and click “Confirm” option.
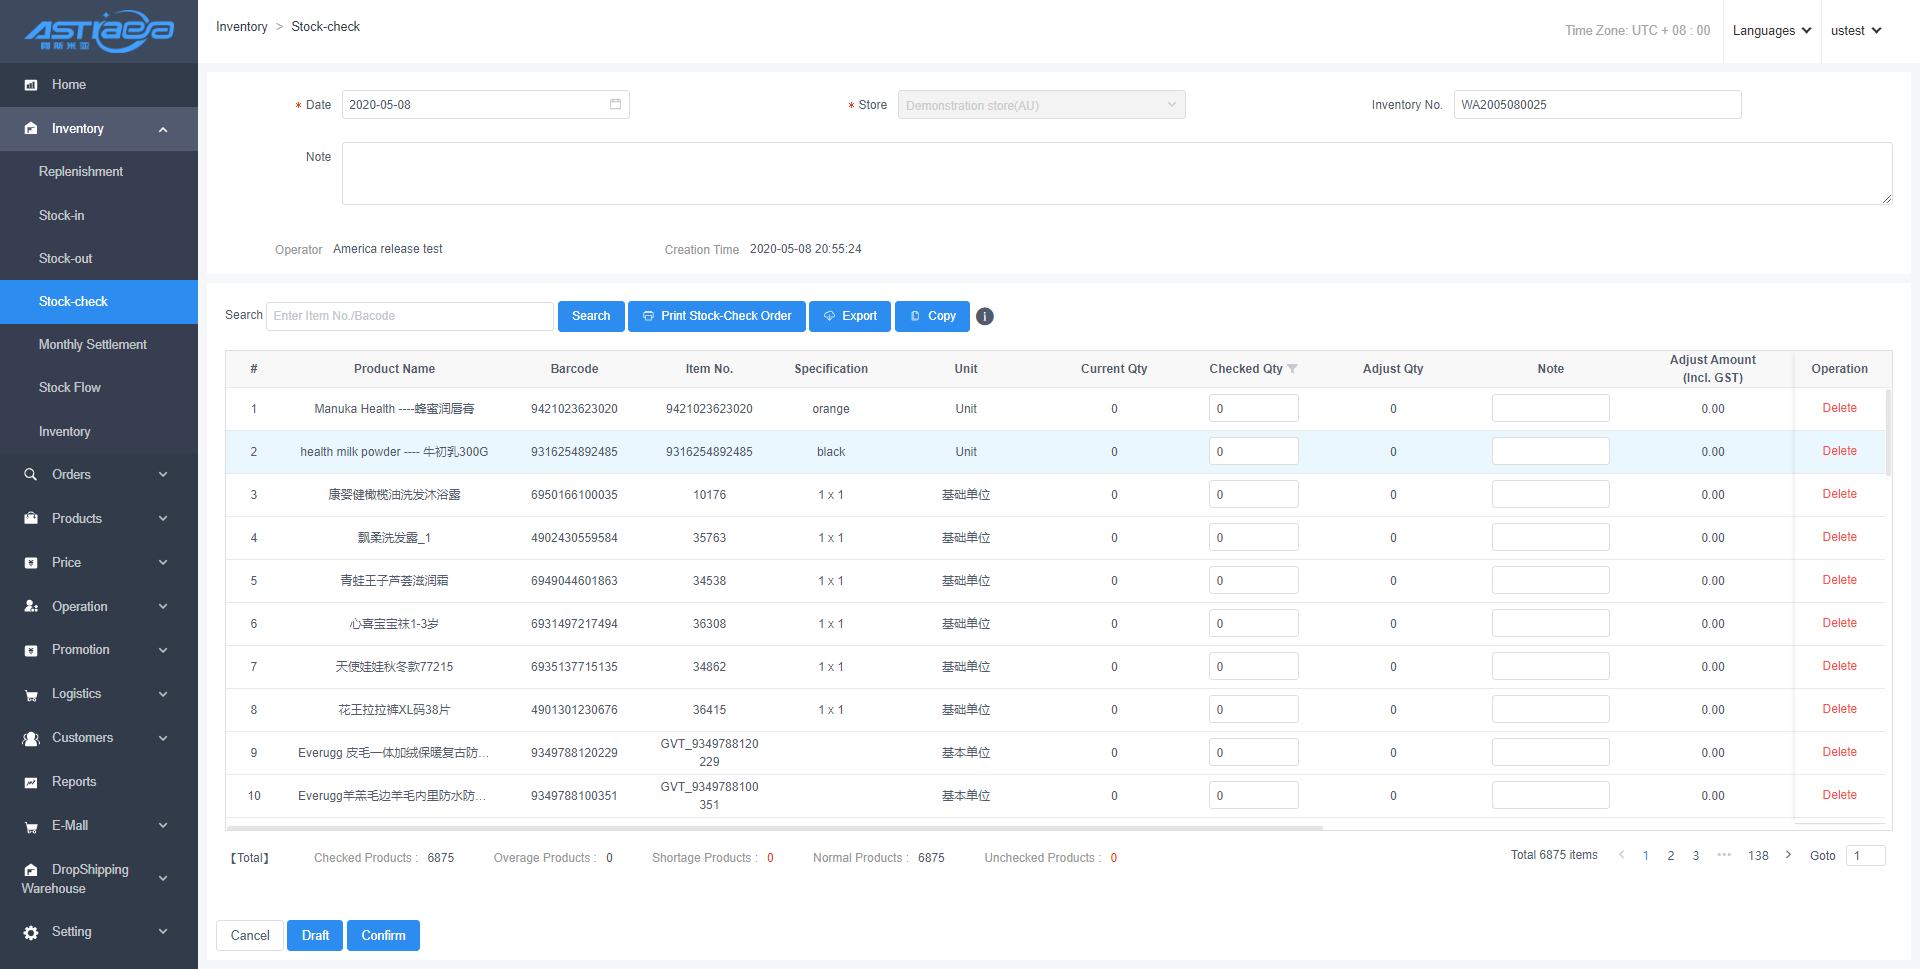
Step 3: After the checked quantity is modified, click "Confirm" option to finish all operation steps.

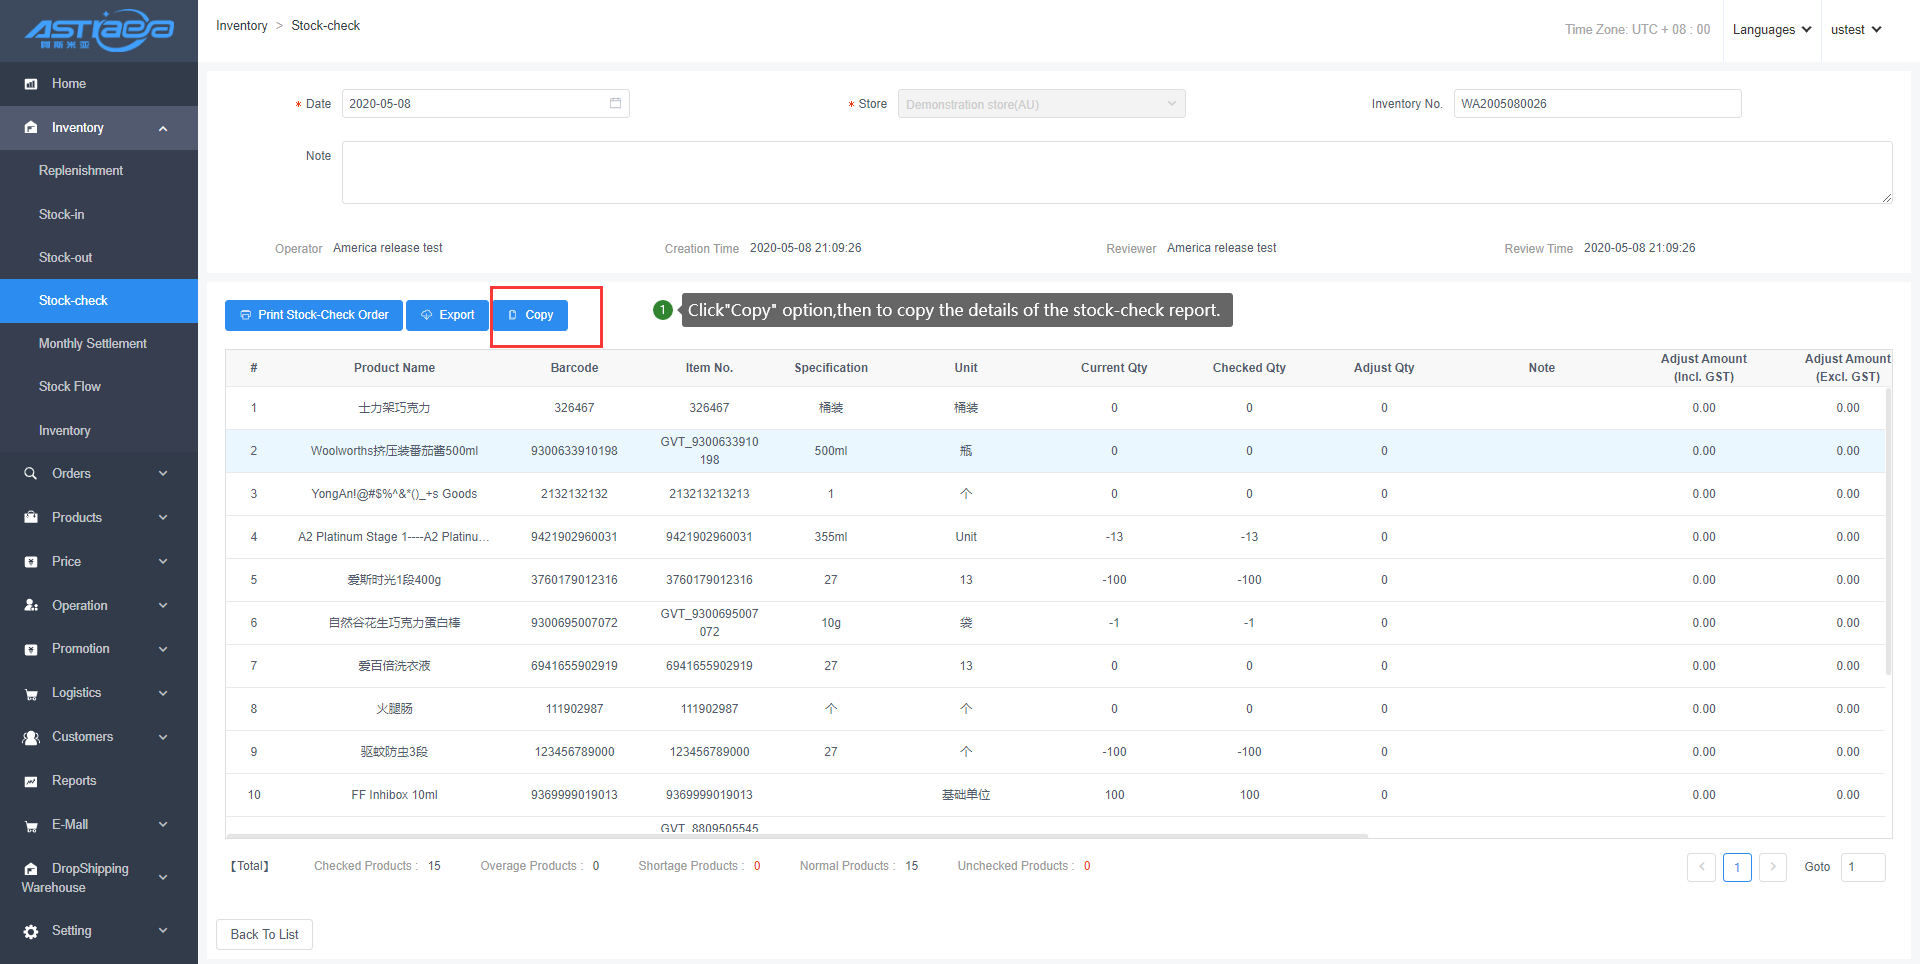
3.4.2 Copy the stock-check order of all products
Step 1: Log in the “Inventory” -> Stock-check” page, click "Detail” option to enter the details page of the stock-check order you want to copy
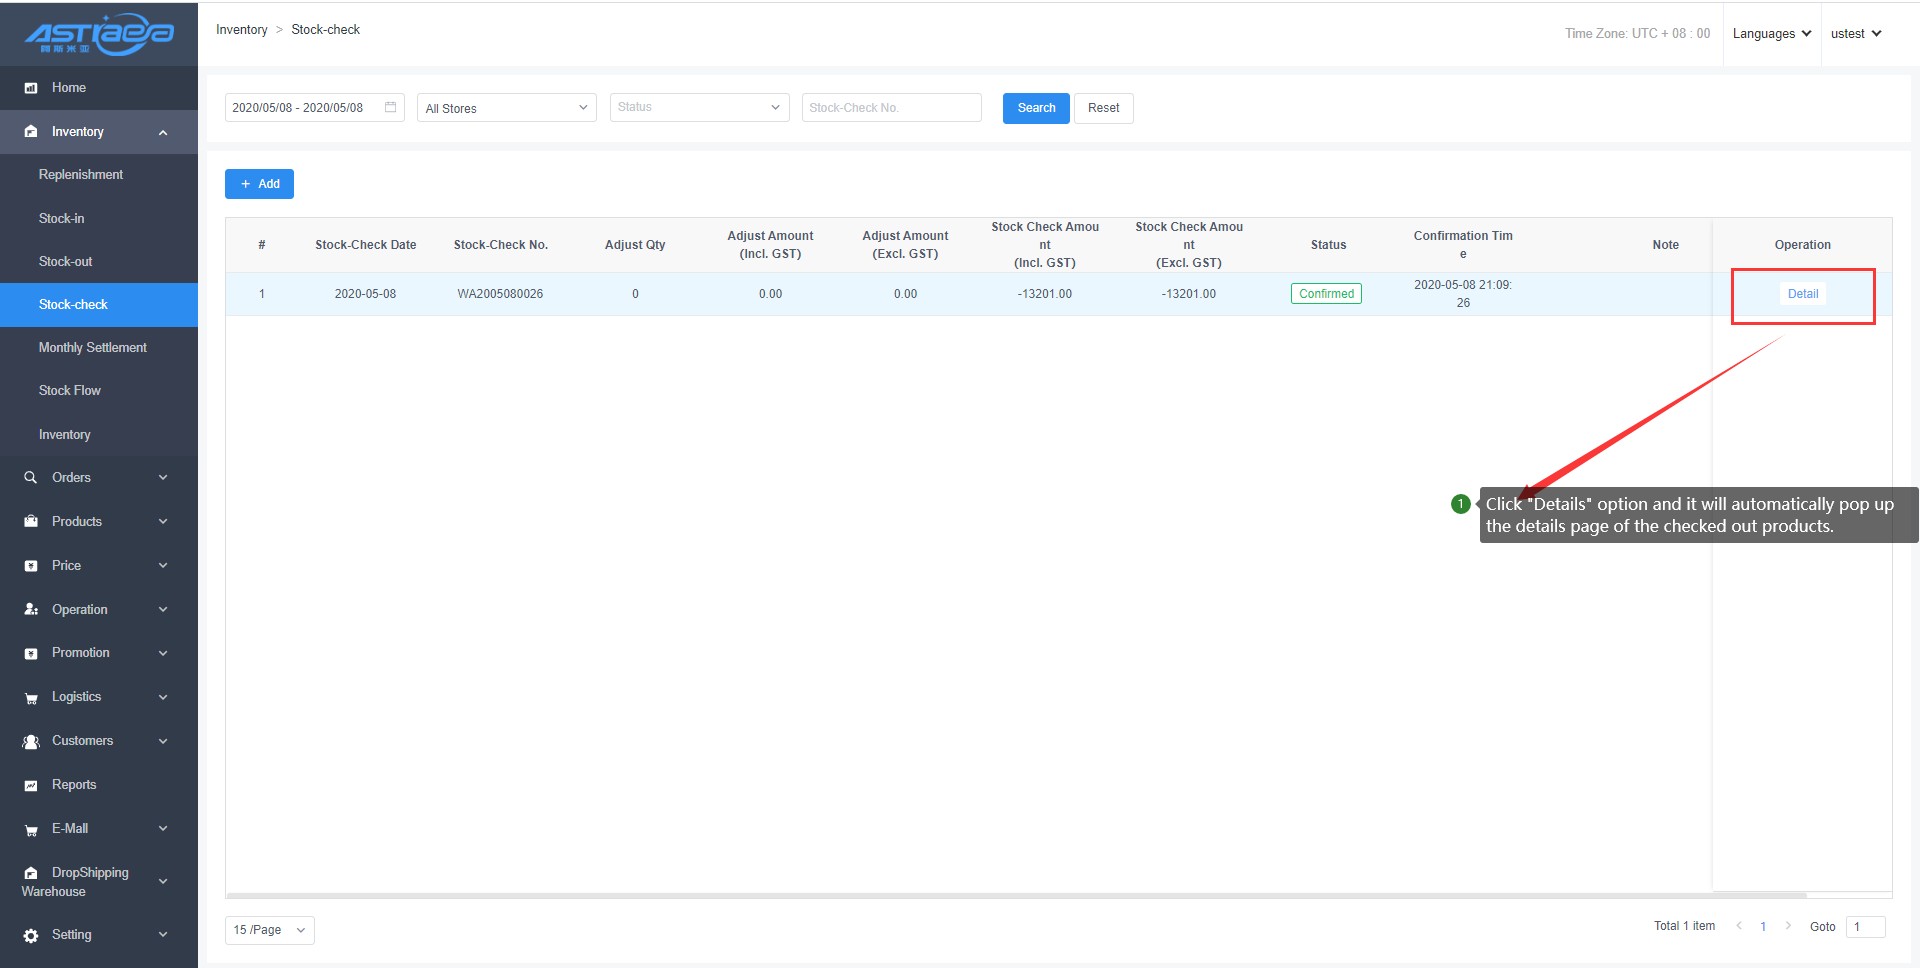
Step 2: Click "Copy" option to copy the stock-check order.
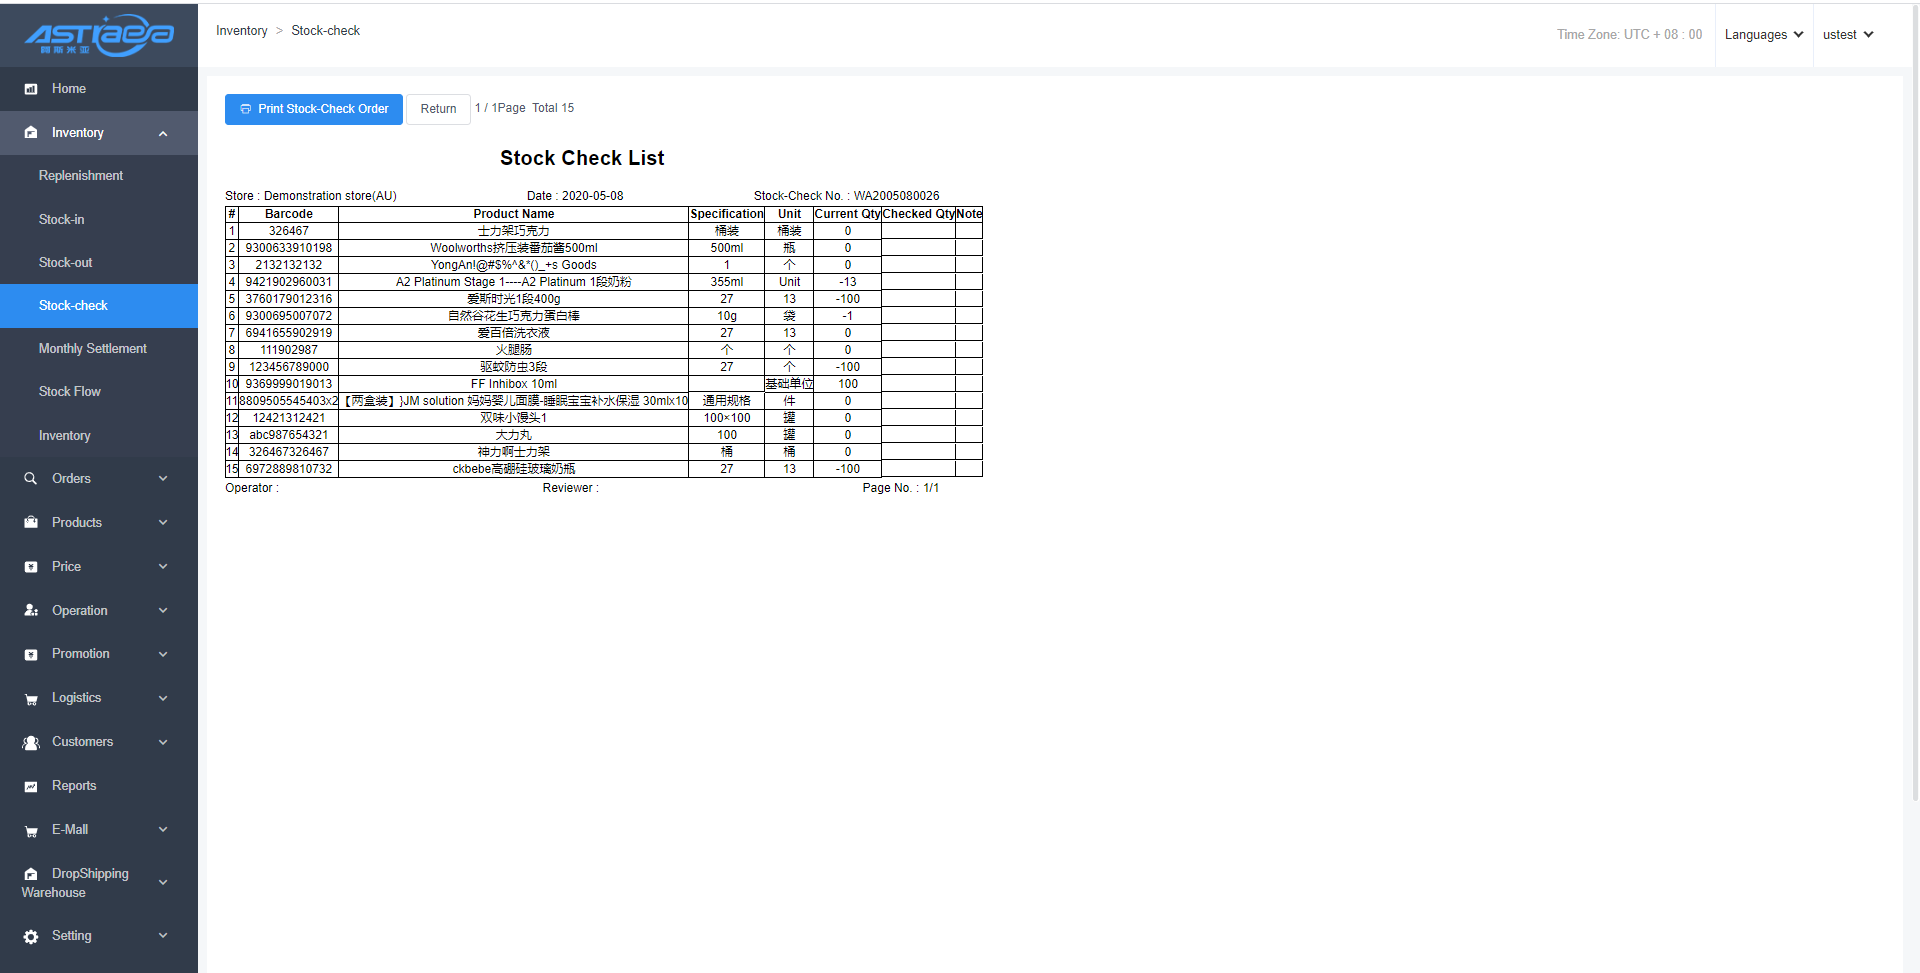
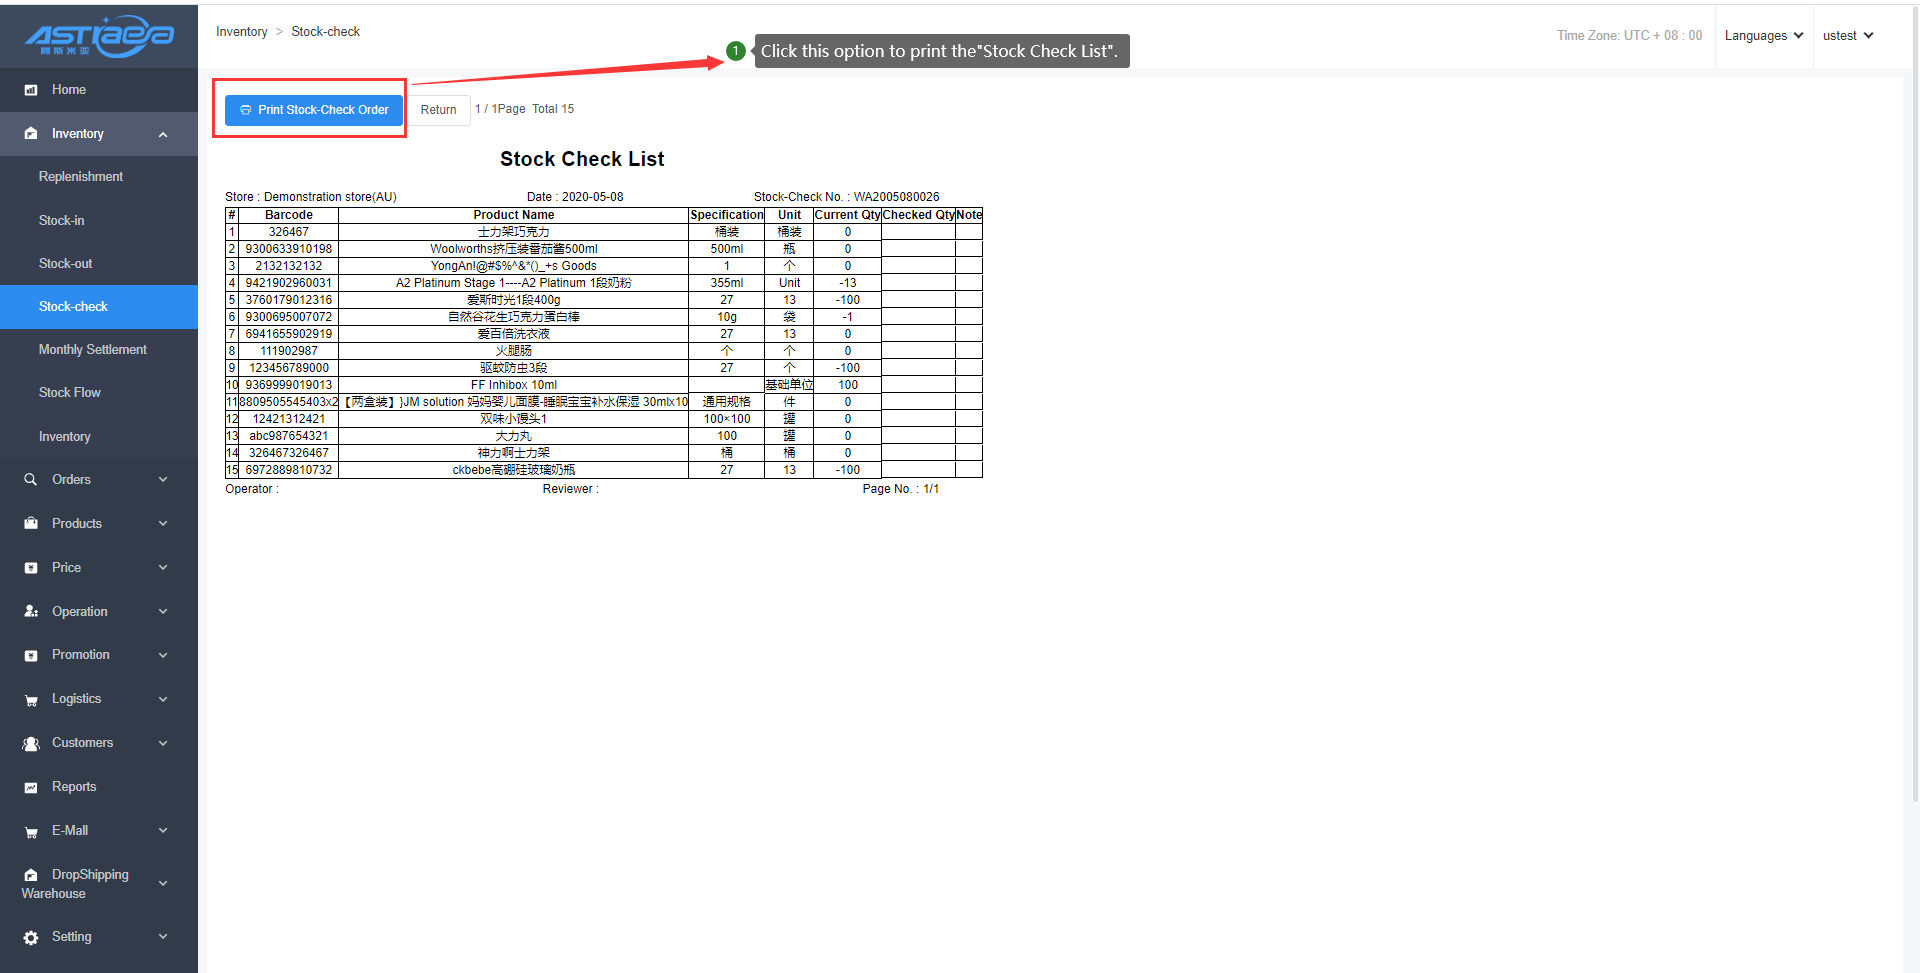
3.4.3 Print stock-check order of all products
Step 1; On the details page of the stock-check order, click "Print Stock-Check Order" option to enter the “Preview” interface.
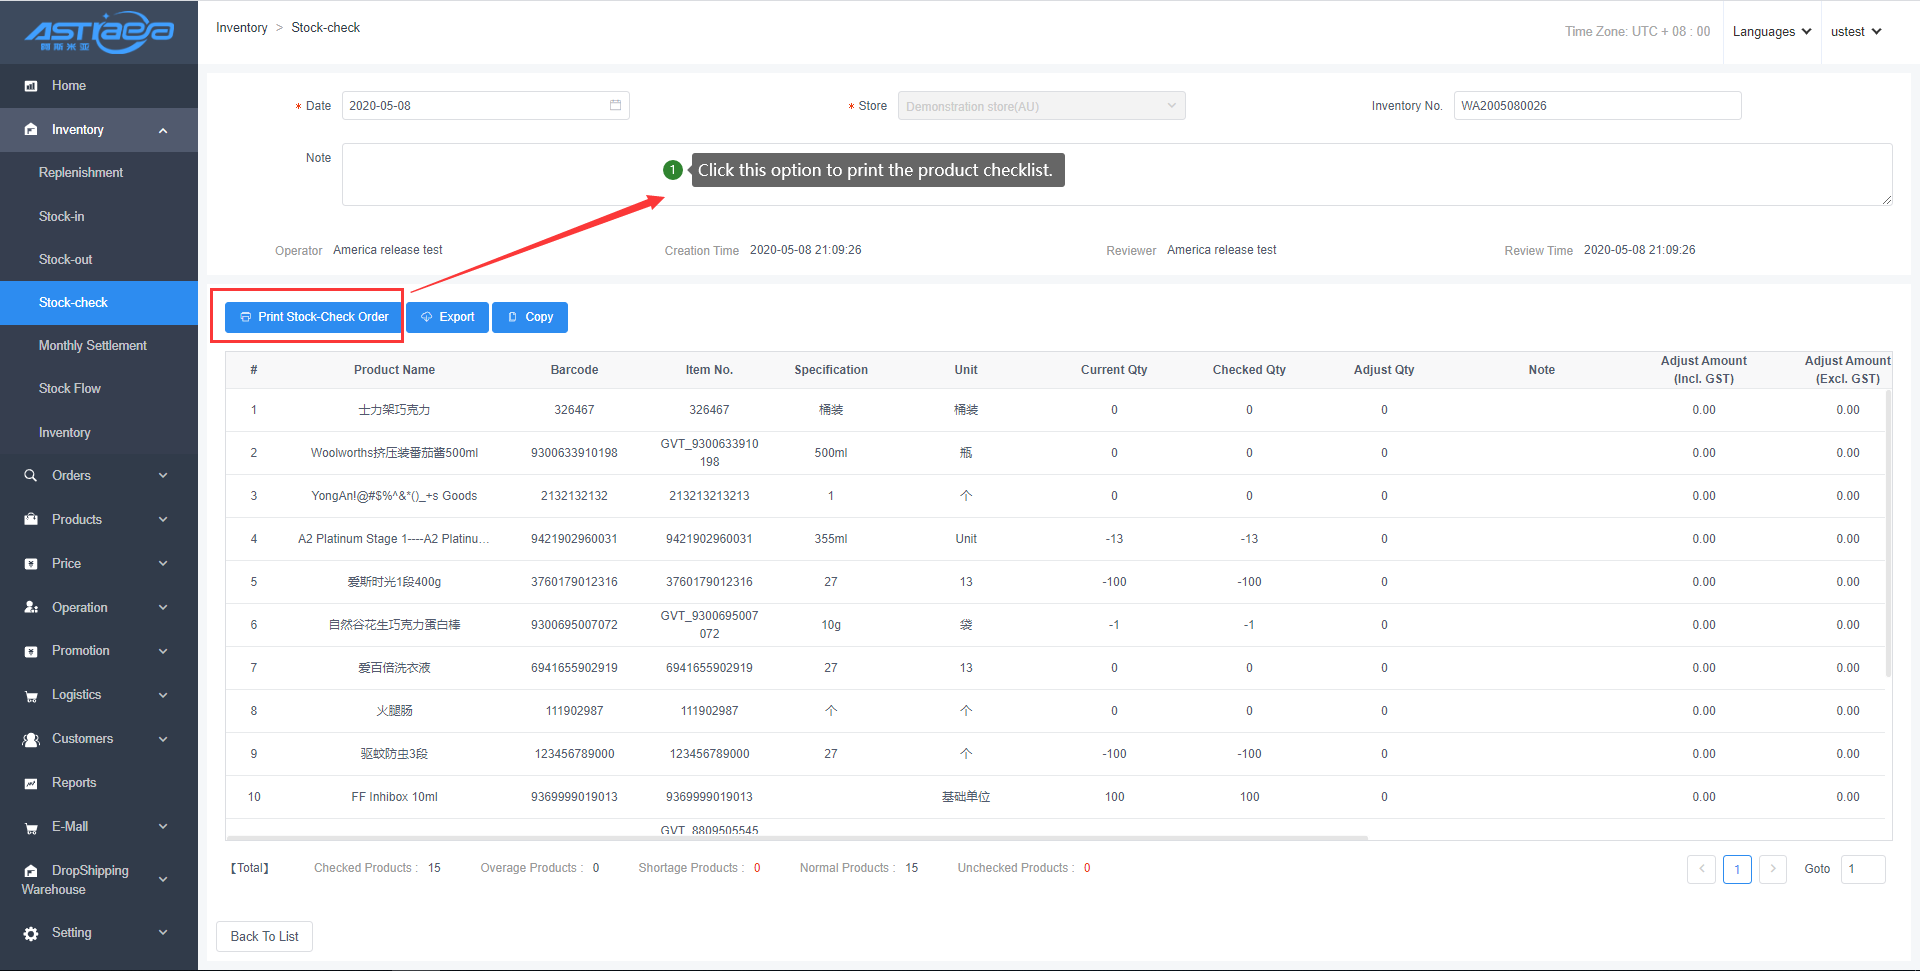
Step 2: Click "Print Stock-Check Order" option.
3.4.4 Select the product status on stock-check order of all products
Step 1: On the details page of the stock-check order, click the funnel-shaped icon at the right of the “Checked Qty” option for screening.

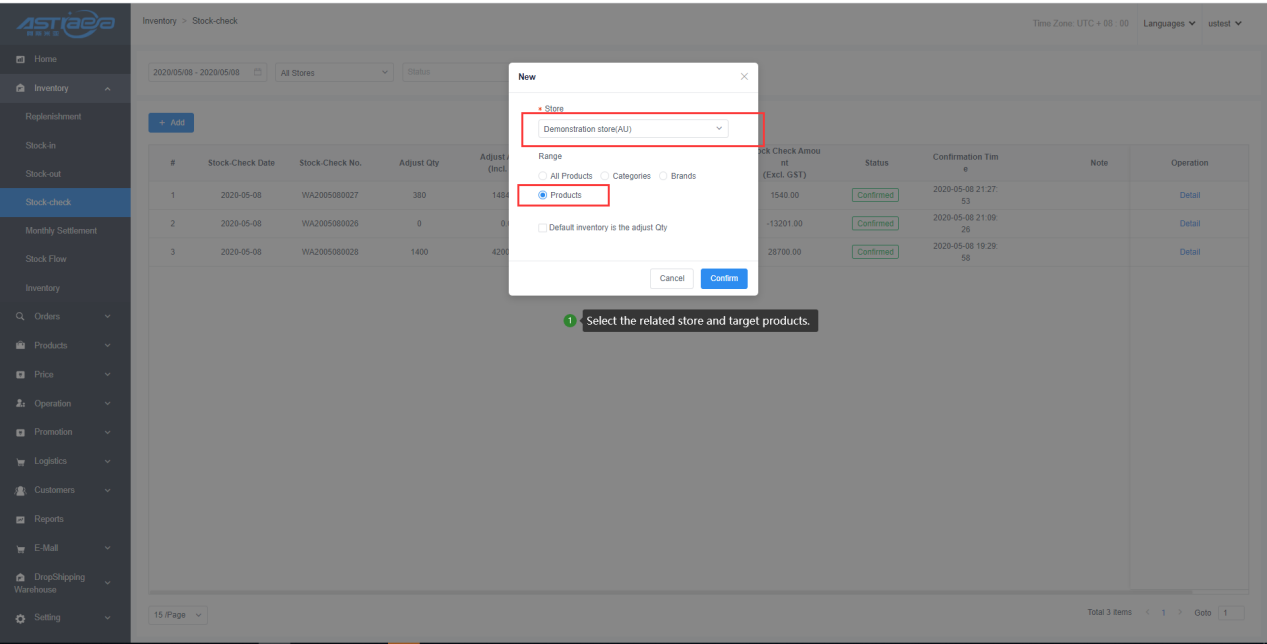
3.4.5 Add the stock-check of designated products
Step 1: Select the related store, select designated products under ‘Range’ option, and click “Confirm” option.
Step 2: Add the stock-check products on the ‘Stock-check’ interface.
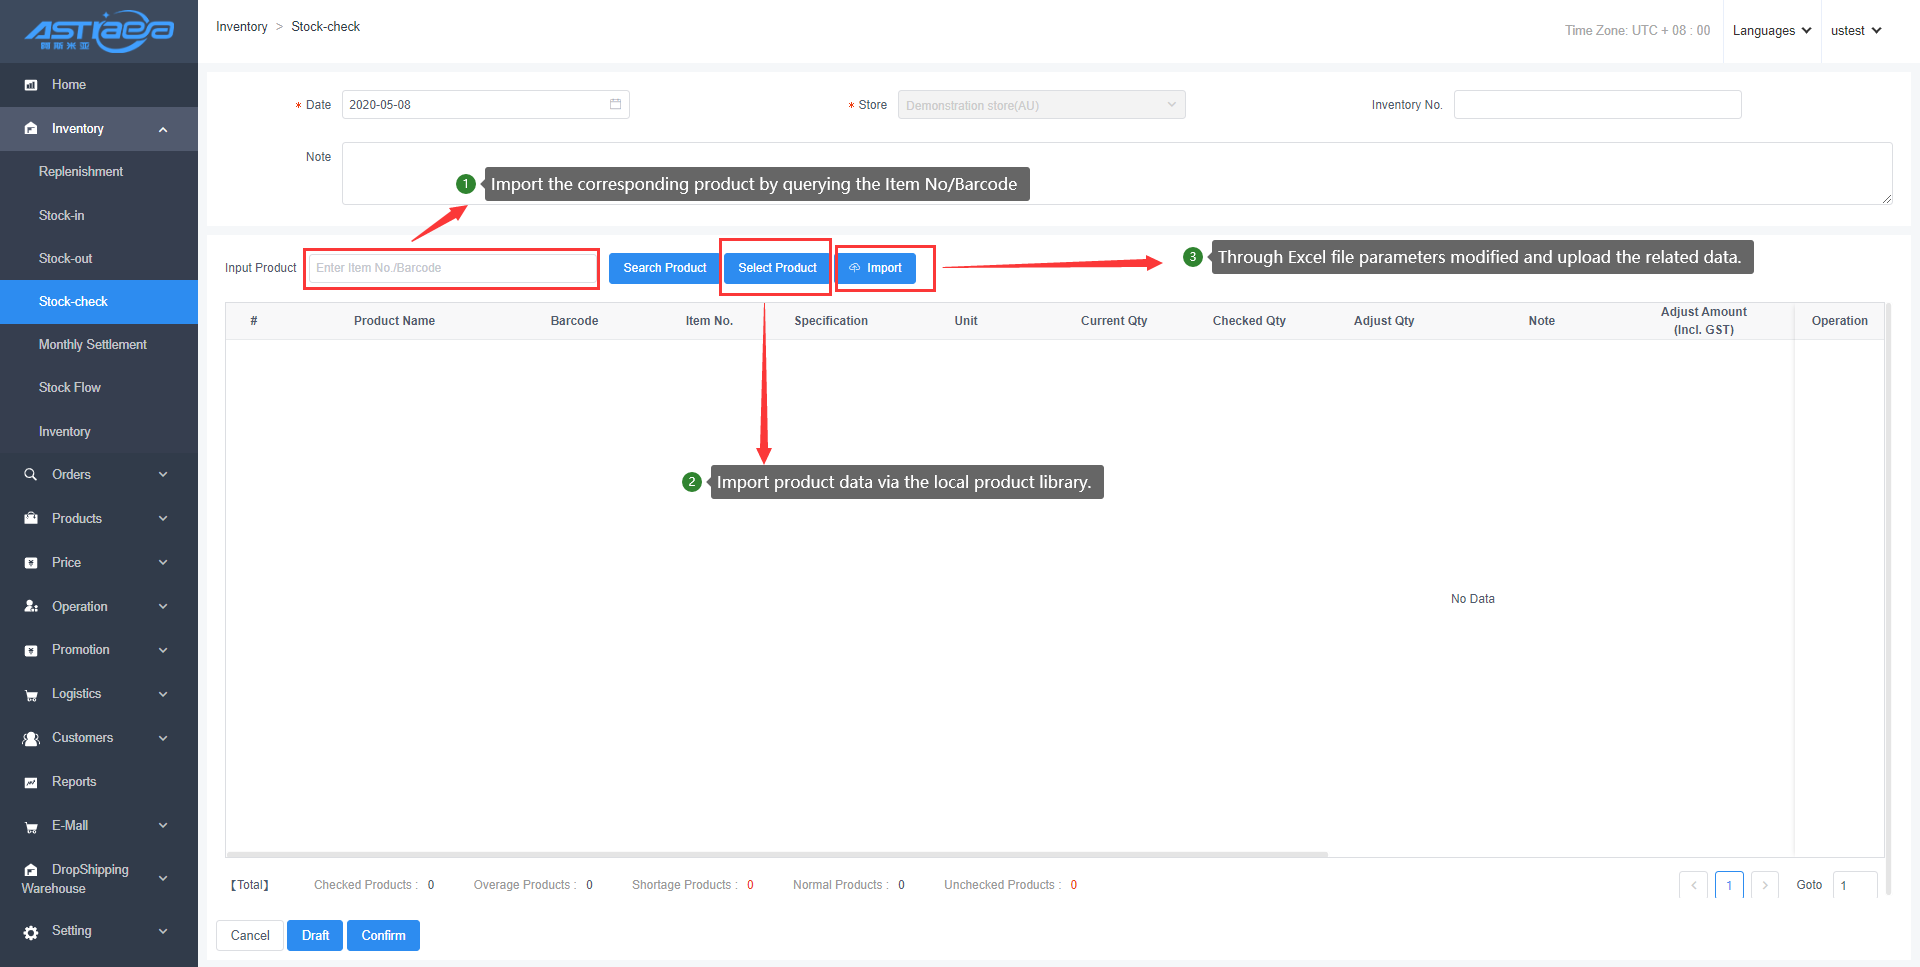
Step 3: After the stock-check is finished and the checked quantity is entered, click "Confirm" option to finish all operation steps.
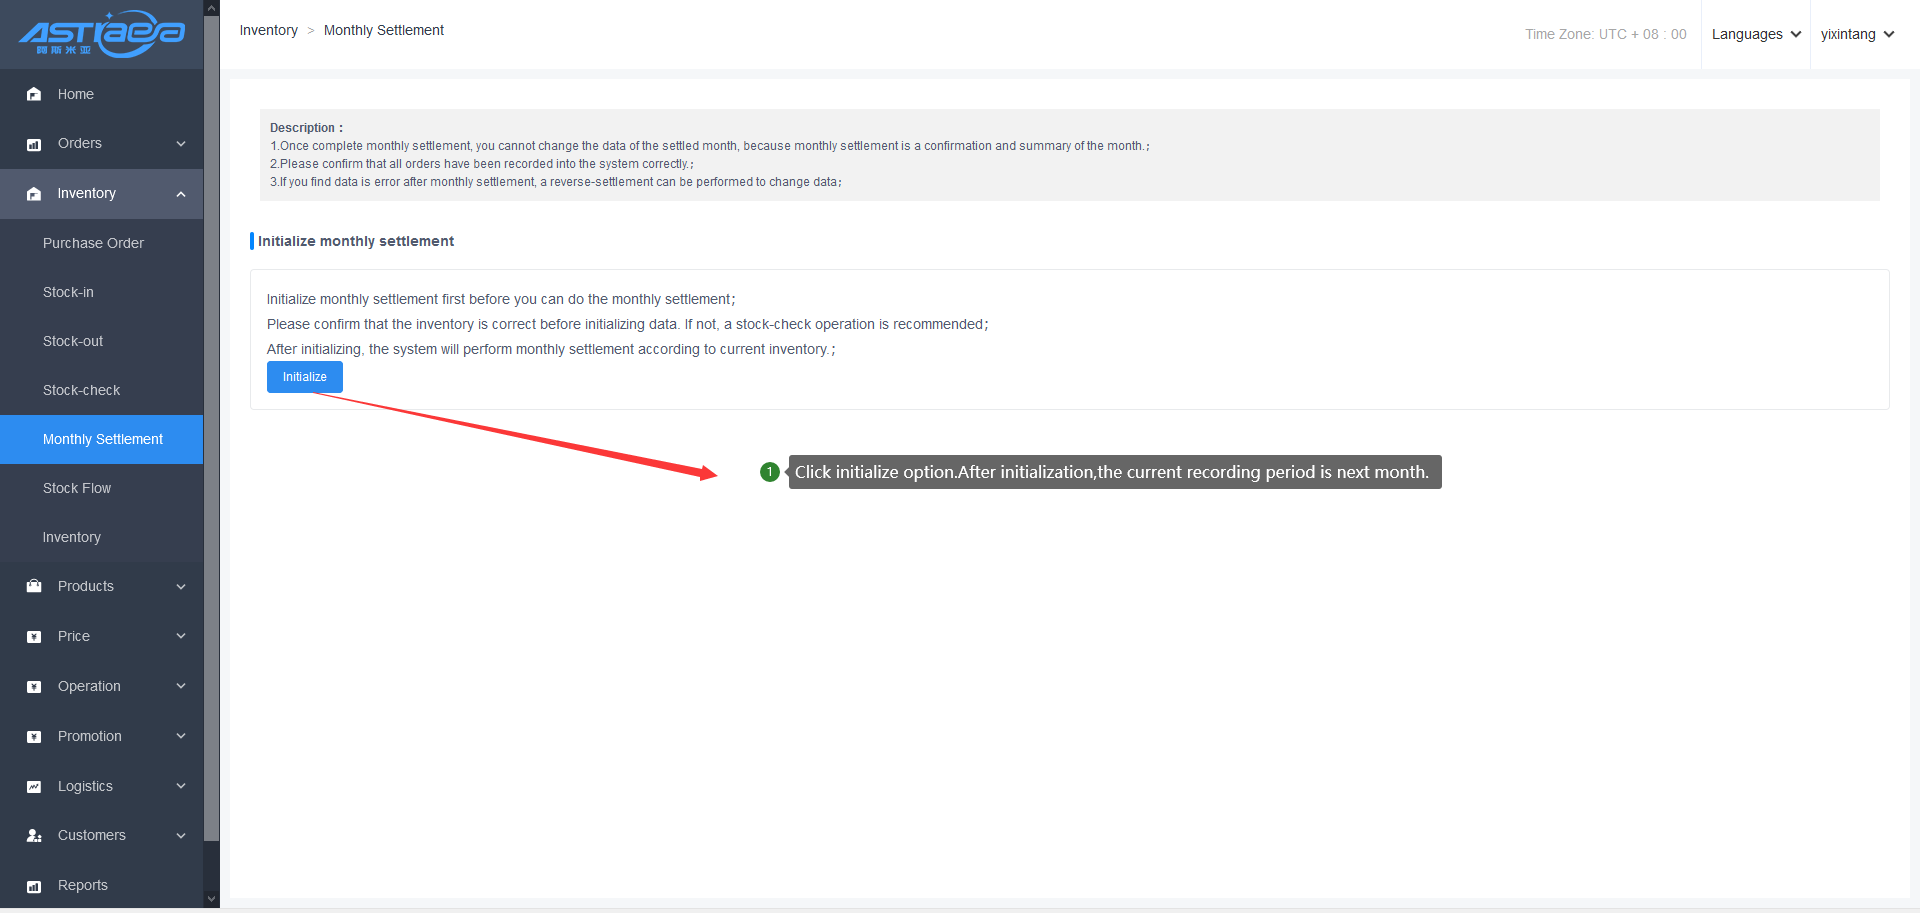
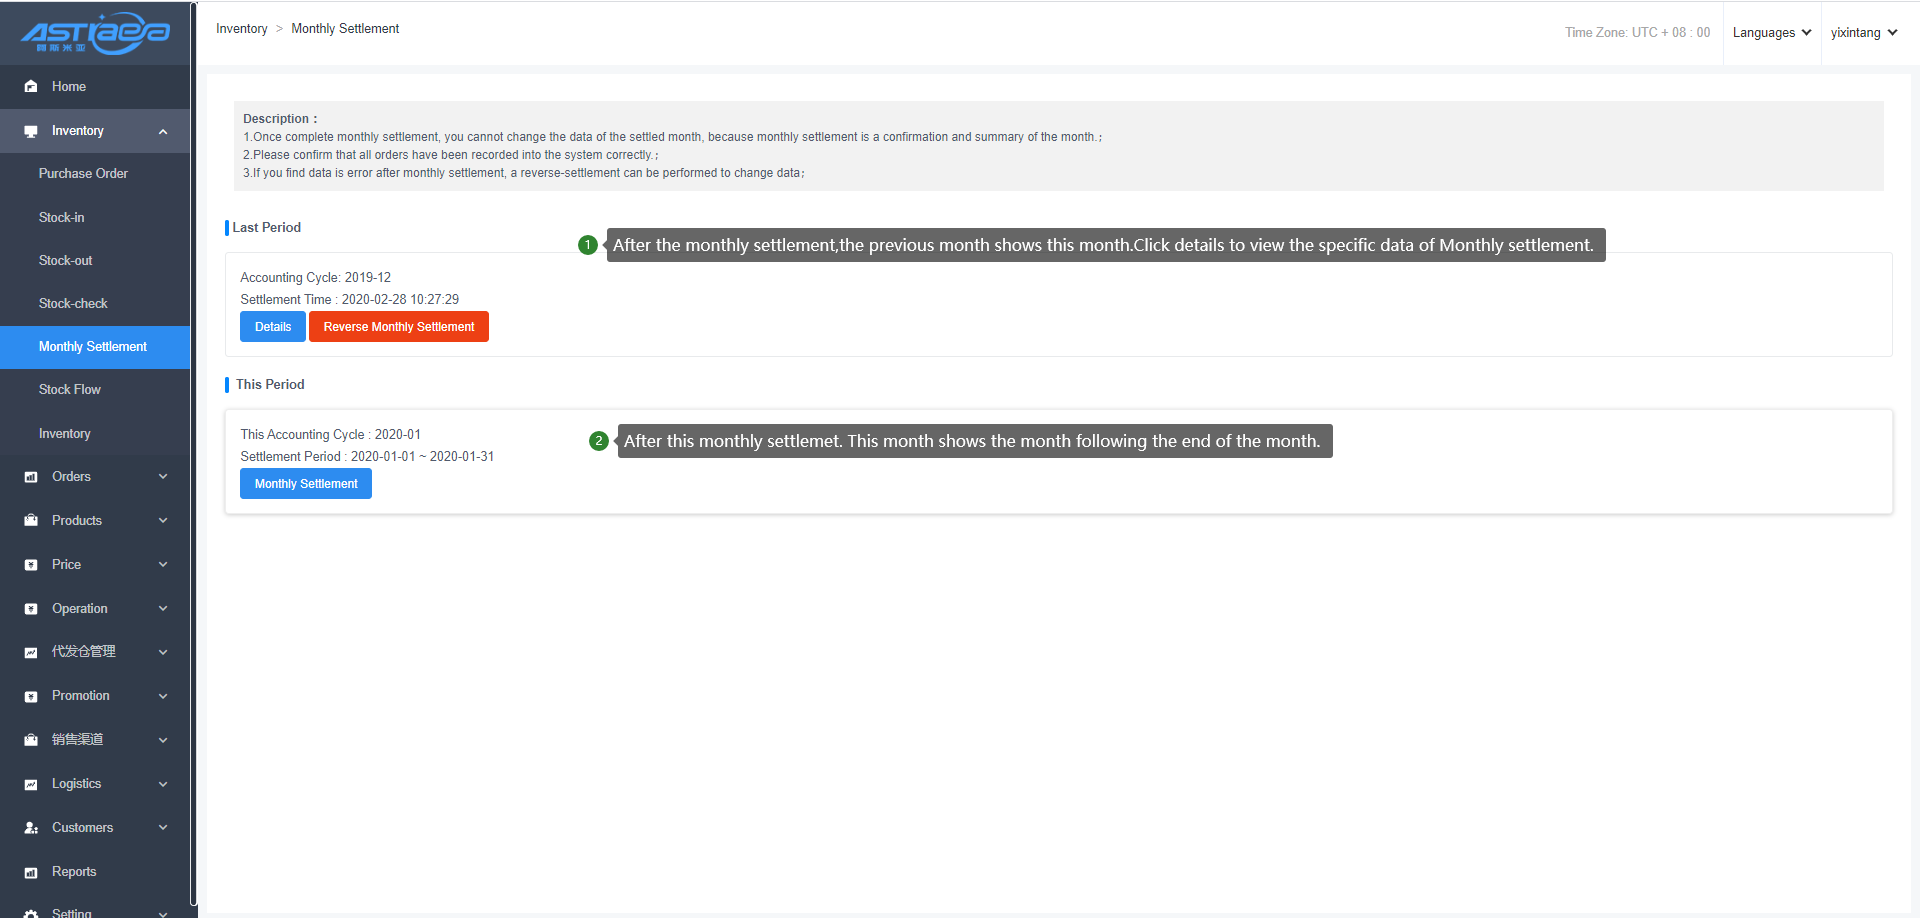
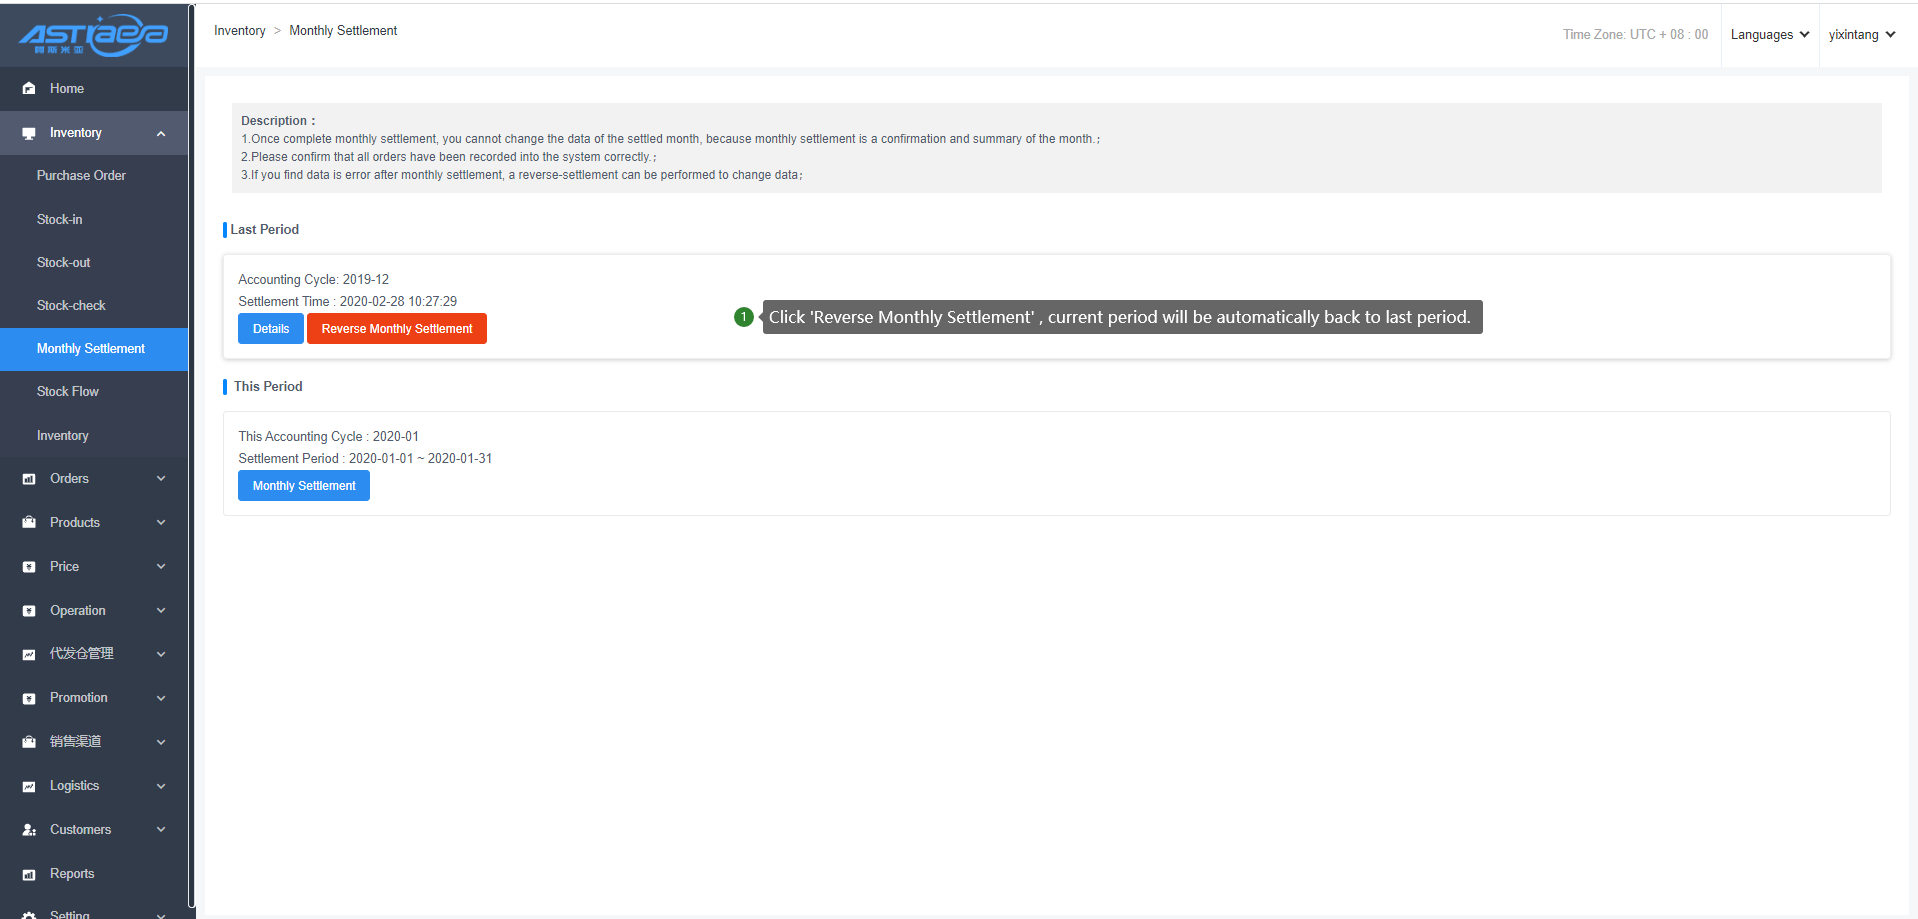
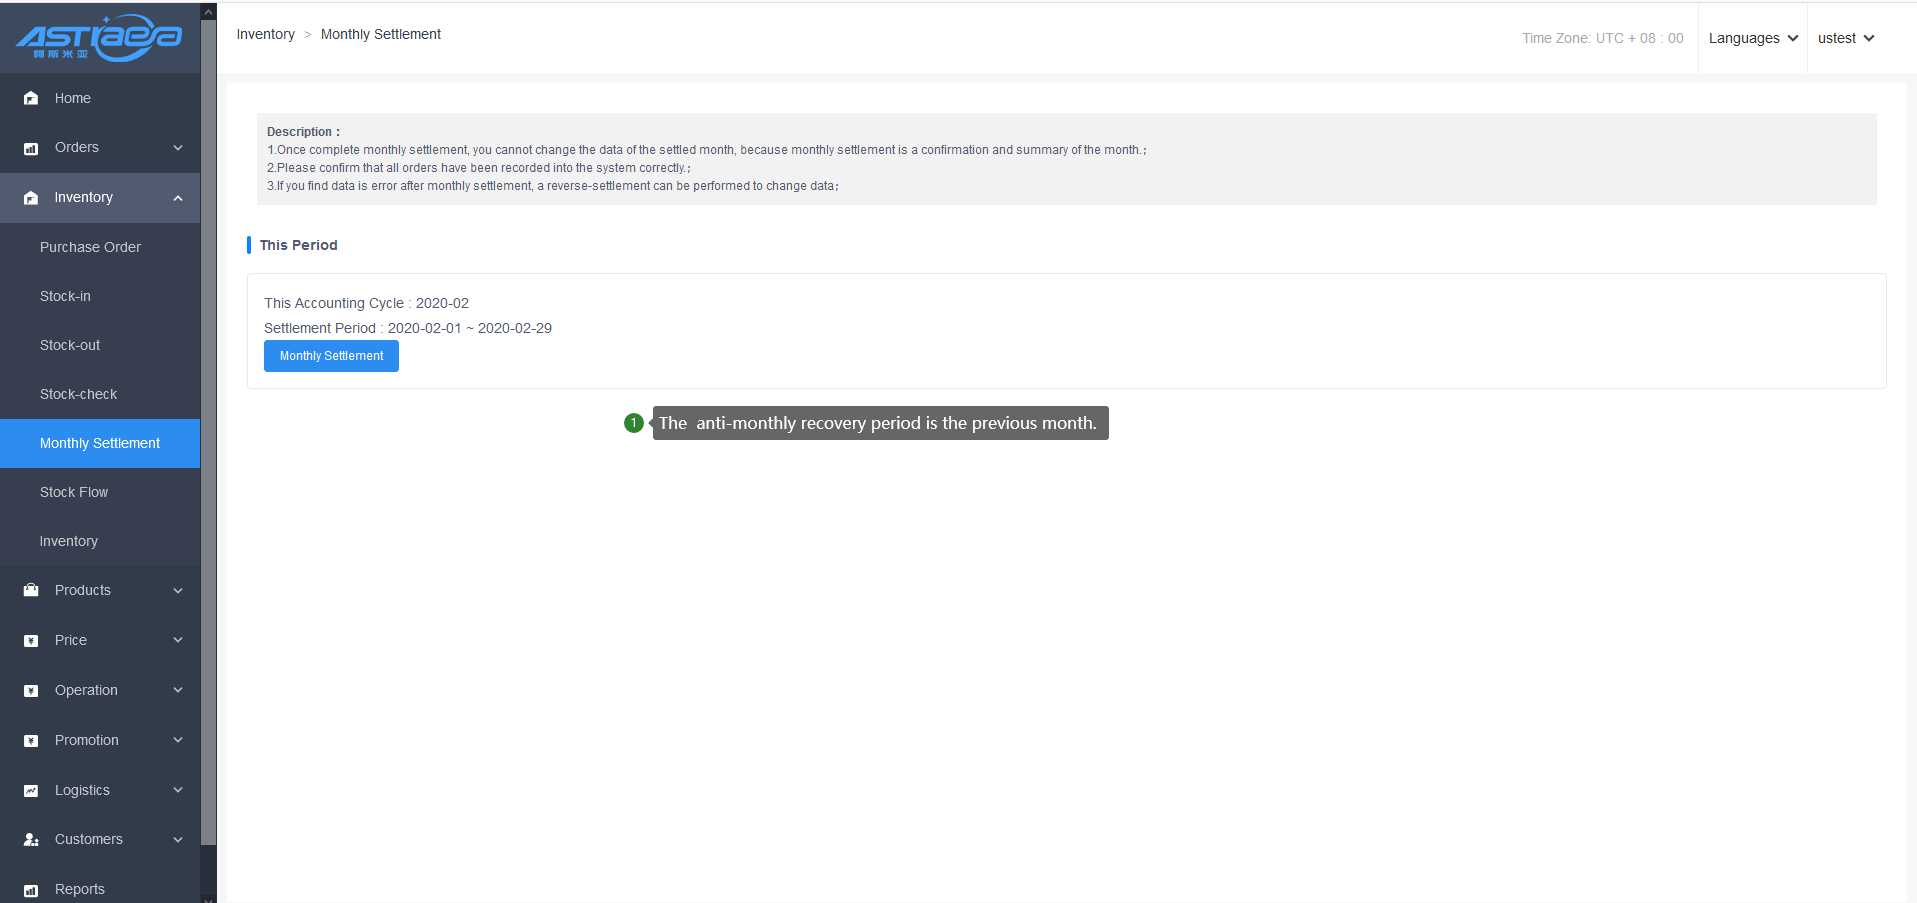
3.5 Monthly settlement
In order to do the monthly settlement, you need to initialize the monthly settlement first. The system only displays the data of initialized monthly settlement.
Initialization allows saving of the current inventory, and subsequent monthly settlement allows calculation of initial balance and unused balance based on this.
The information of the previous period is only displayed once data are displayed. The information without monthly settlement will not be displayed after initialization.
Prior to the reverse monthly settlement, the system will give a prompt that "Confirm the data of reverse monthly settlement xxxx-xx". The reverse monthly settlement is only applicable to the last settled month. The reverse monthly settlement can be repeated for several times until the reverse monthly settlement of all monthly statement data are finished.
Prior to the reverse monthly settlement, the current accounting period is automatically adjusted to the following month after the last settled month.
At the time of monthly settlement, the system will give a prompt that "Confirm the data of reverse monthly settlement xxxx-xx, and the data of the current month cannot be modified after the monthly settlement". If the current period is less than the end period of the settlement range, the system will give a prompt that "Cannot perform settlement because the current month is not ended”.
The monthly settlement generates the data and settlement for all stock-in and stock-out business types at the beginning of the current month according to the products in the stores. The data at the beginning of the current month refer to the balance of the previous period.
Monthly settlement data are used for product procurement, sales and inventory report. For details of the report, please see [9.3.8 Product procurement, sales and inventory.](##_9.3.8 商品进销存)
3.5.1 Initialize monthly settlement

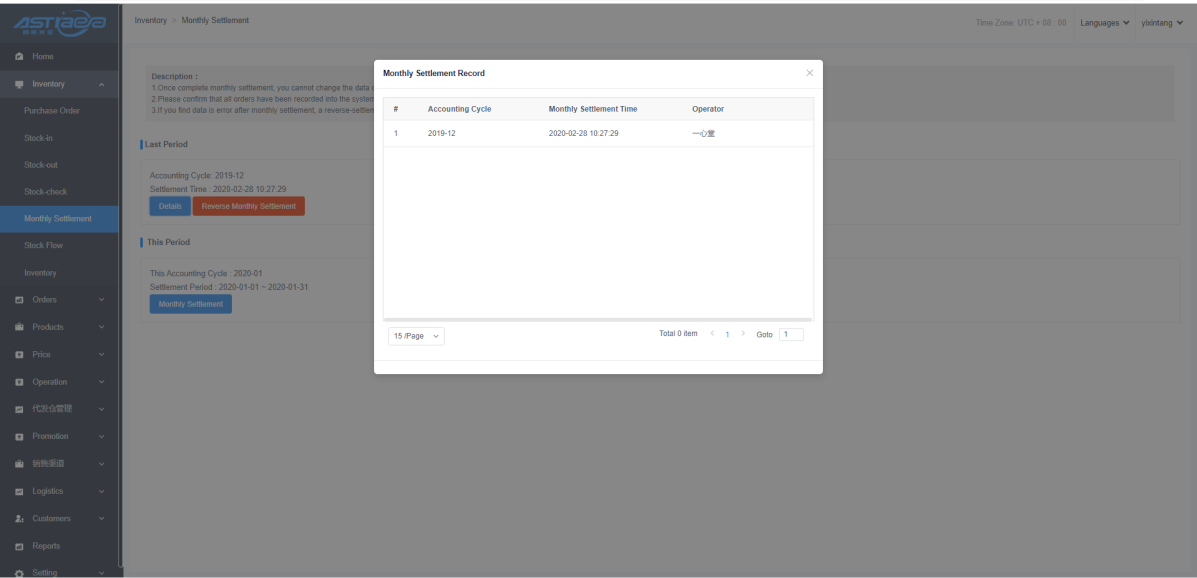
3.5.2 View the monthly settlement records after monthly settlement
- When confirming the stock-in and stock-out business documents, you need to determine whether the business time (stock-in date / stock-out date) on the current document has been monthly settled. If yes, the system will give a prompt that “Monthly settlement in the month for the business date has been performed, no data will be added”.

3.5.3 Reverse monthly settlement
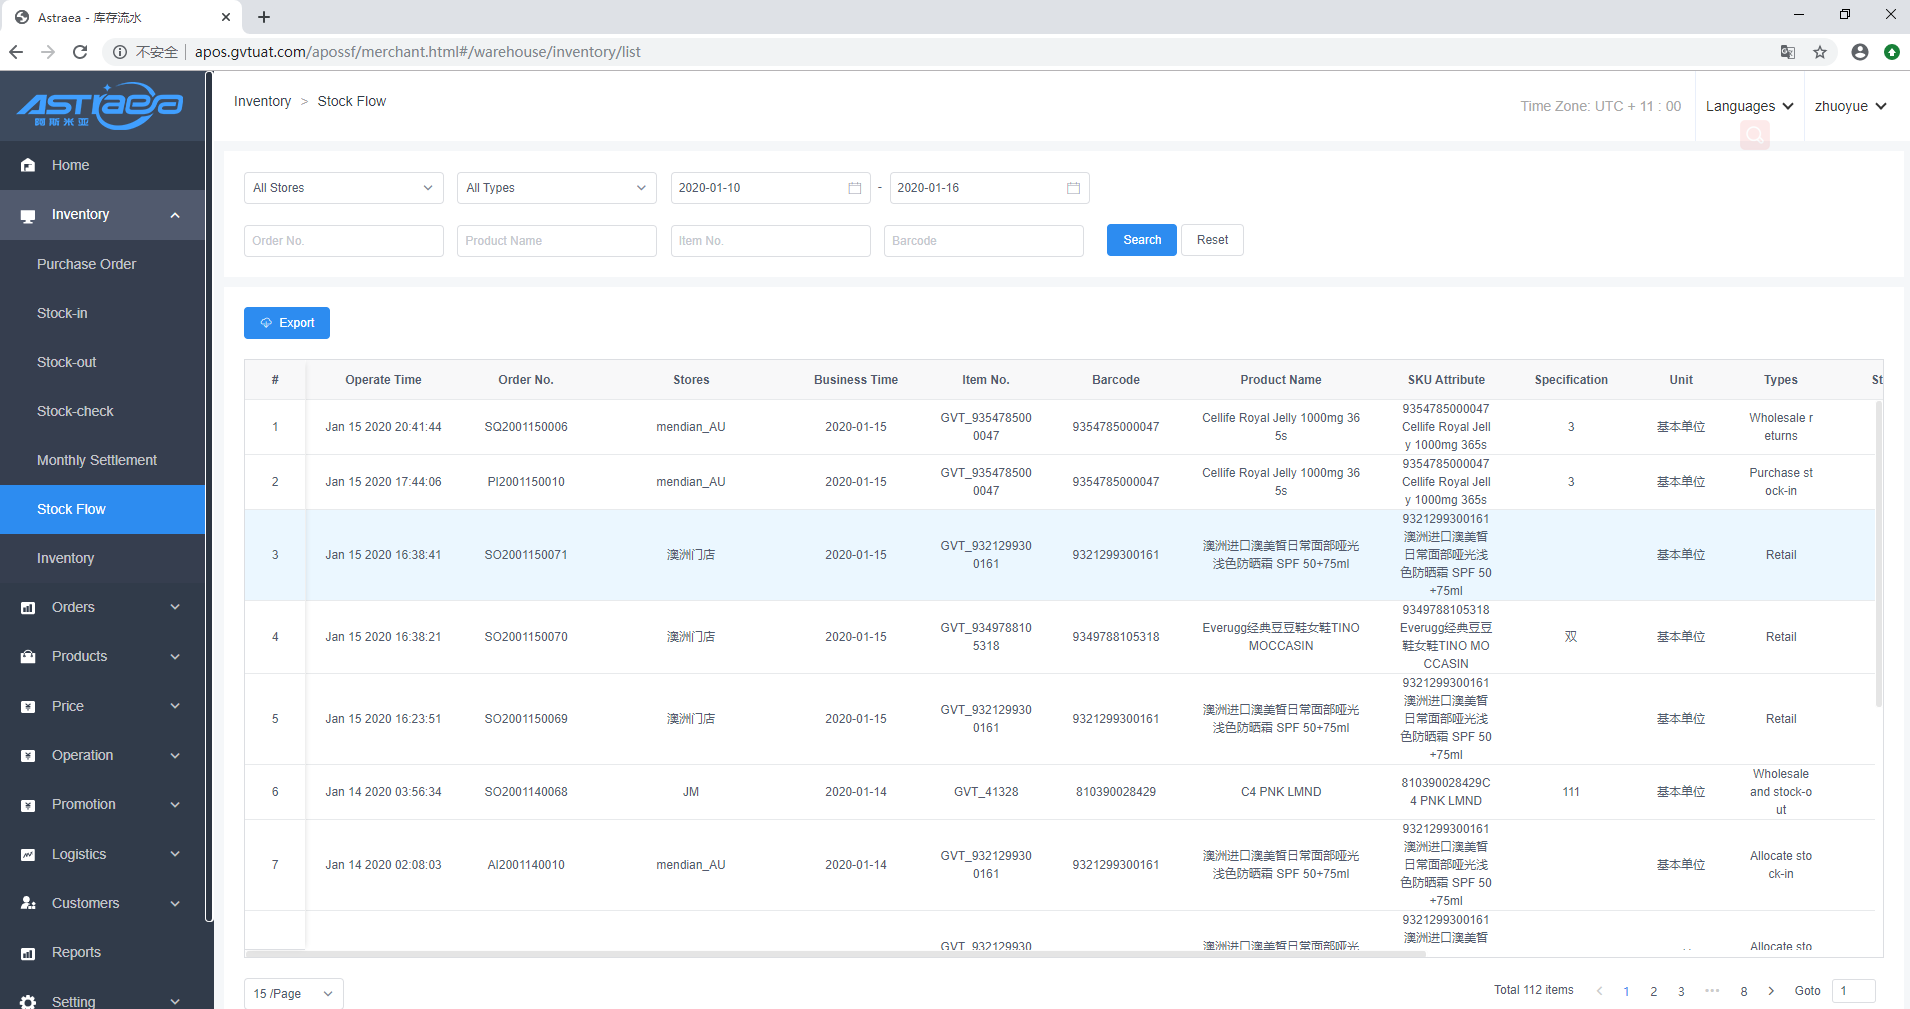
3.6 Query stock flow
Stock flow records the details of stock changes of all products, including sales stock-out, stock-in, stock-out, stock-check, product refund, etc.
3.7 Product stock
Product stock is set to record and manage the stock status and cost price of products in all stores. The system provides two stock modes, namely "simple mode" and "standard mode". The "standard mode" only allows change of stock and cost through stock-in and stock-out operations. The “simple mode" allows manual modification of stock and cost;
3.7.1 Simple inventory mode
[Operating steps]
Step 1: Log in Apos server, click "Operation” to enter "Stores", and click the store to be managed.

Step 2: You can customize and modify the store's inventory management mode, select "Simple" and click "Save”.
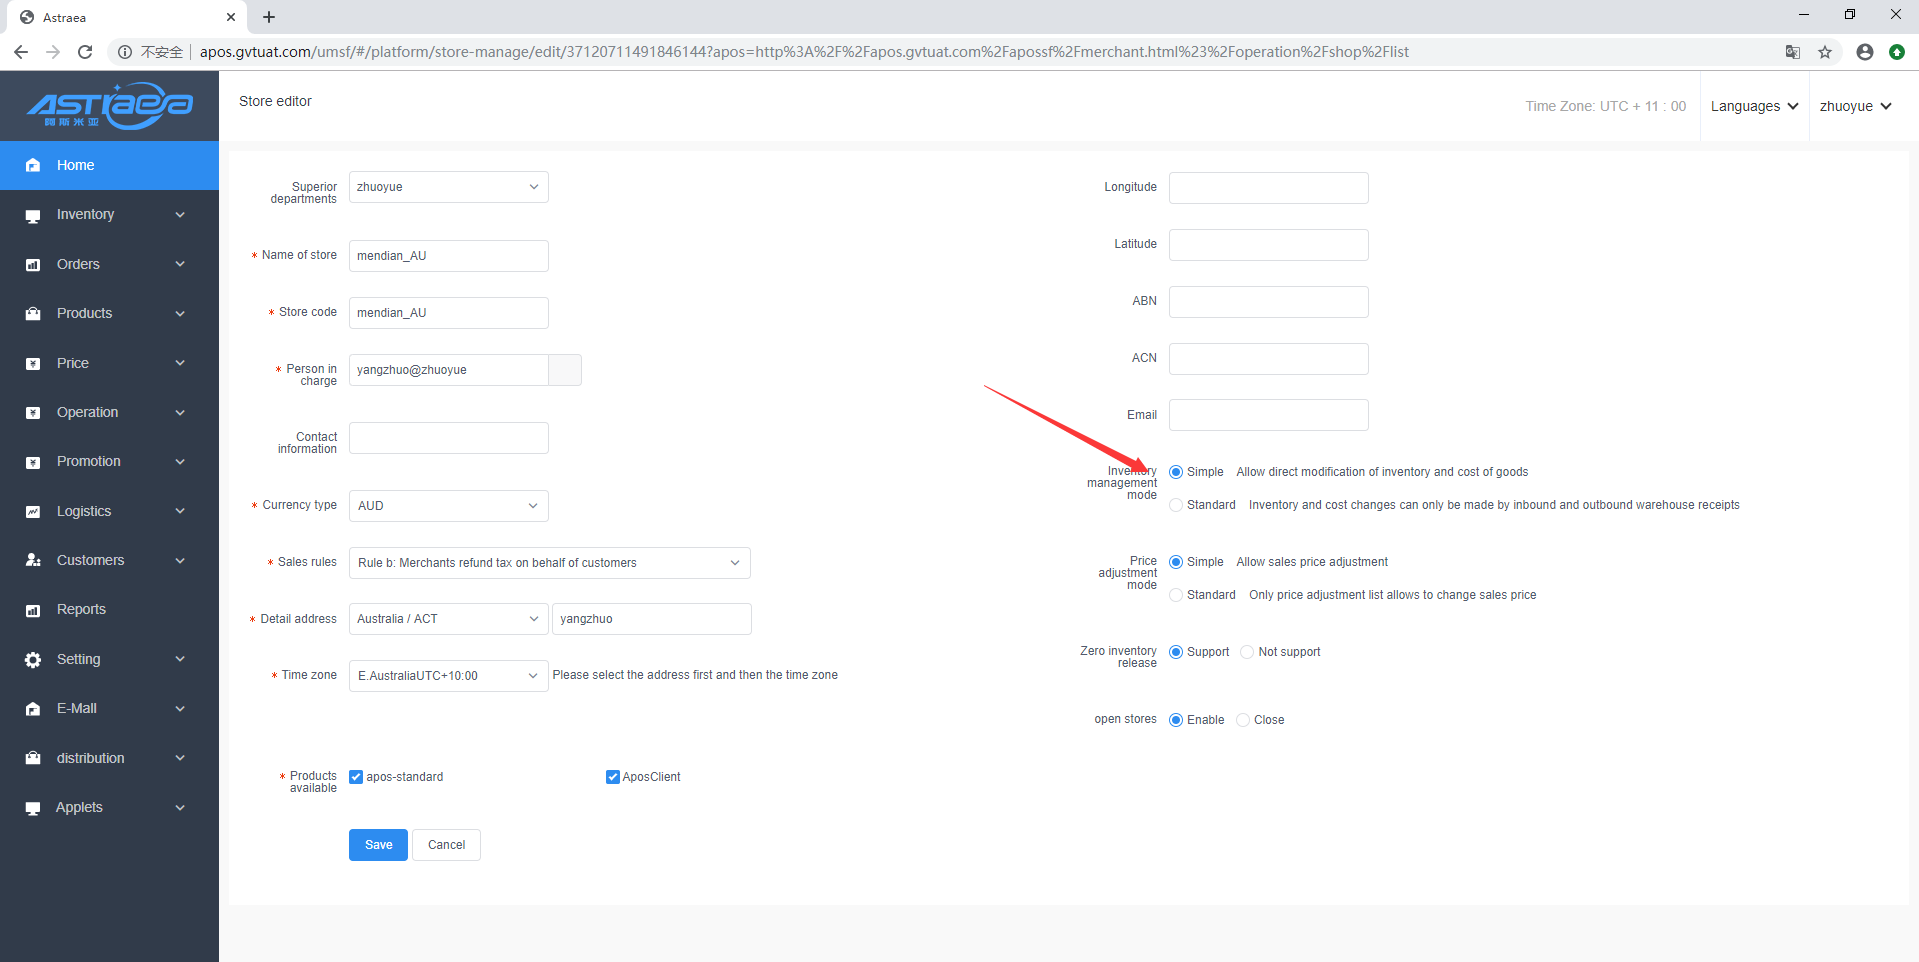
Step 3: Log in "Inventory"—> "Inventory", select the stores to be managed, and then you can directly modify the inventory quantity and cost of products in the stores; (you can also complete batch modification by exporting the file to be revised, revising the file and then importing the revised file)
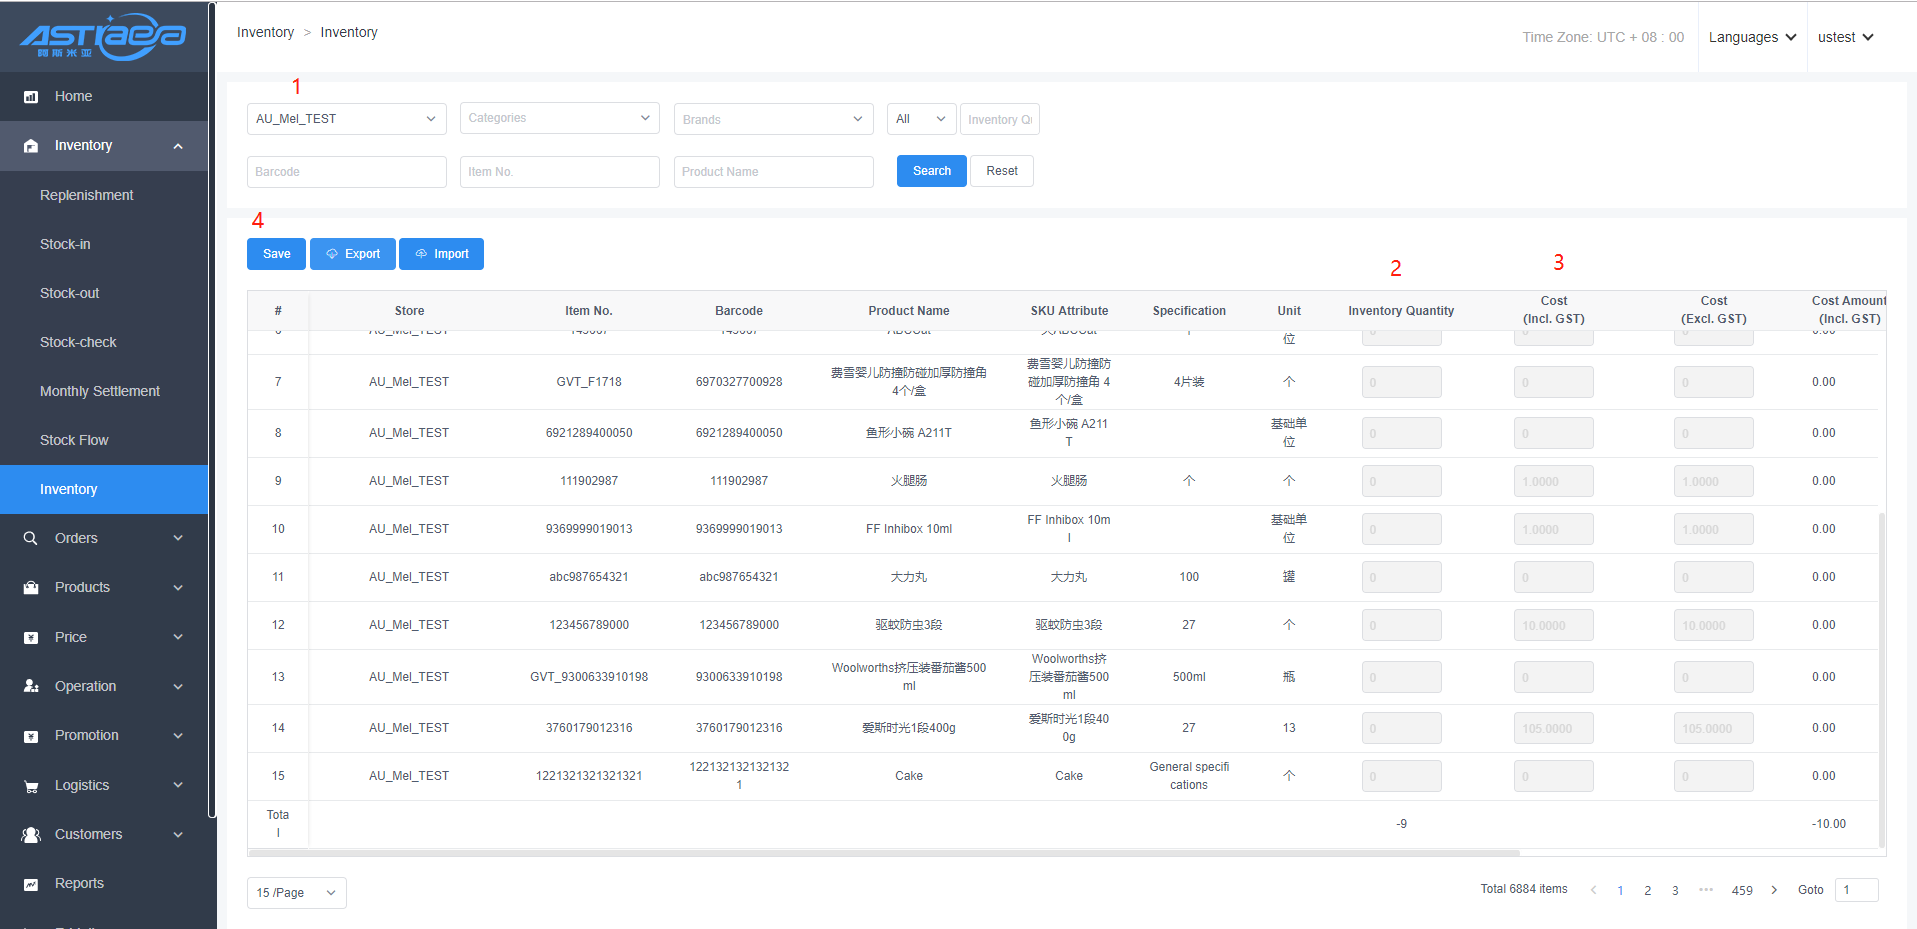
Step 4: Click "Sync Data” at the client, then you can obtain the latest inventory quantity and cost of the product.
3.7.2 Standard inventory mode
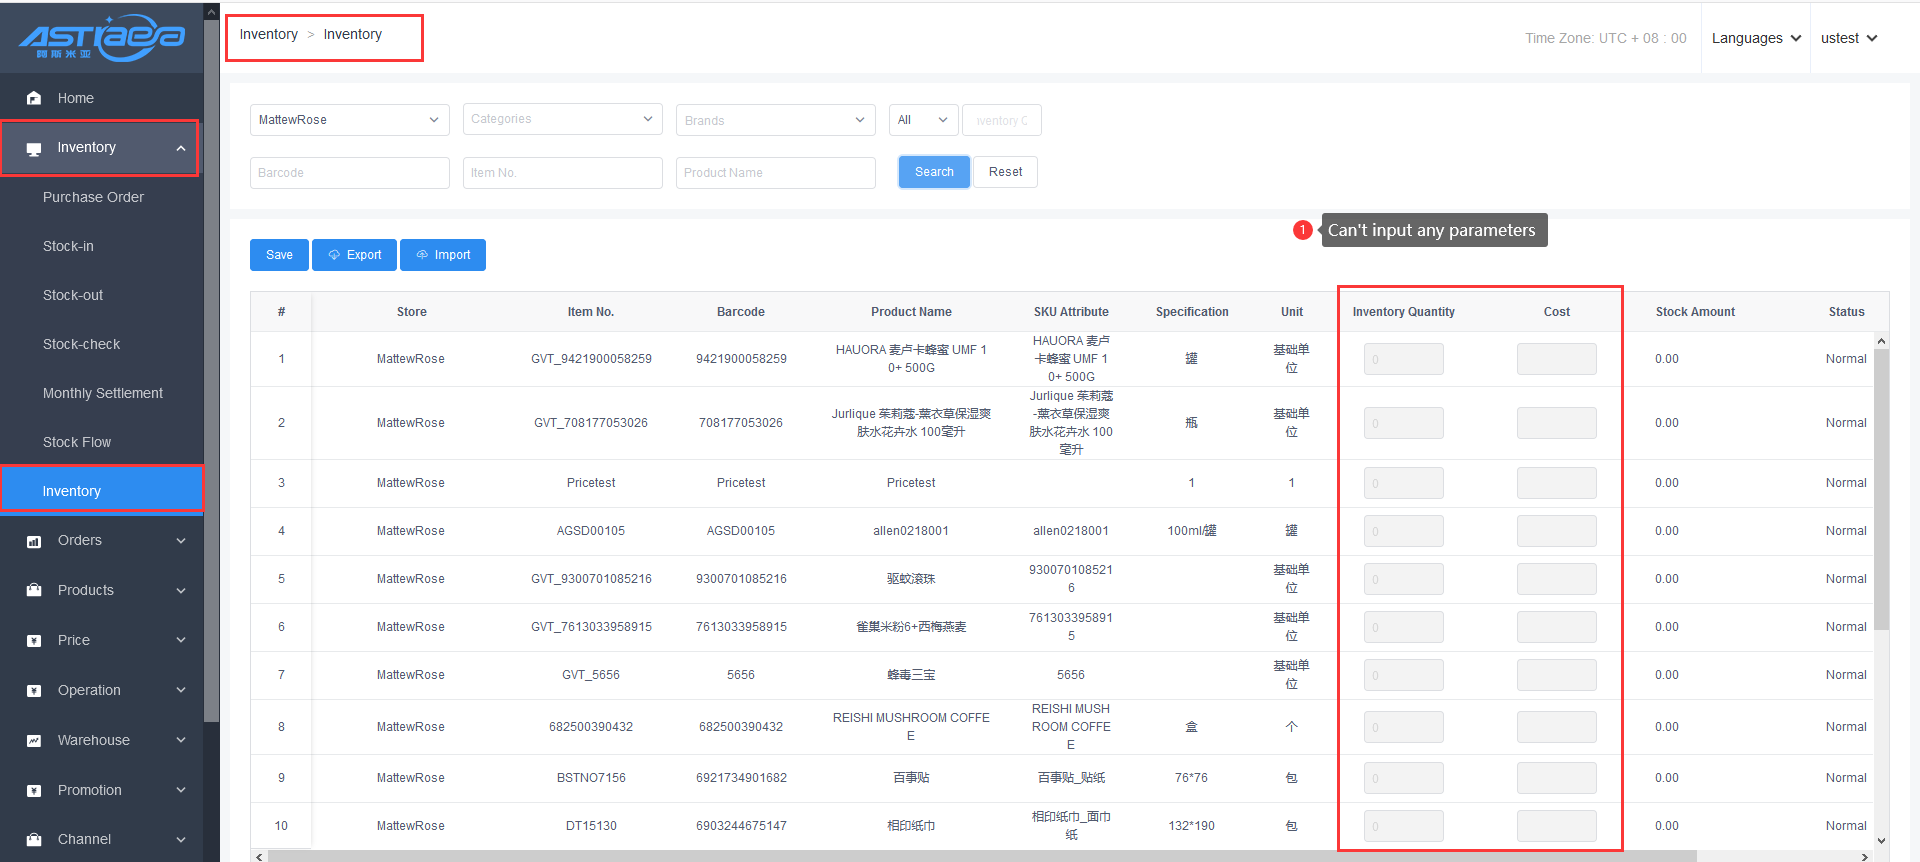
When the store inventory management mode set in "Stores" is "Standard", the inventory quantity and cost of products cannot be changed at will, but must be changed through the stock-in and stock-out operations.
IV. Order Management
4.1 Sales order
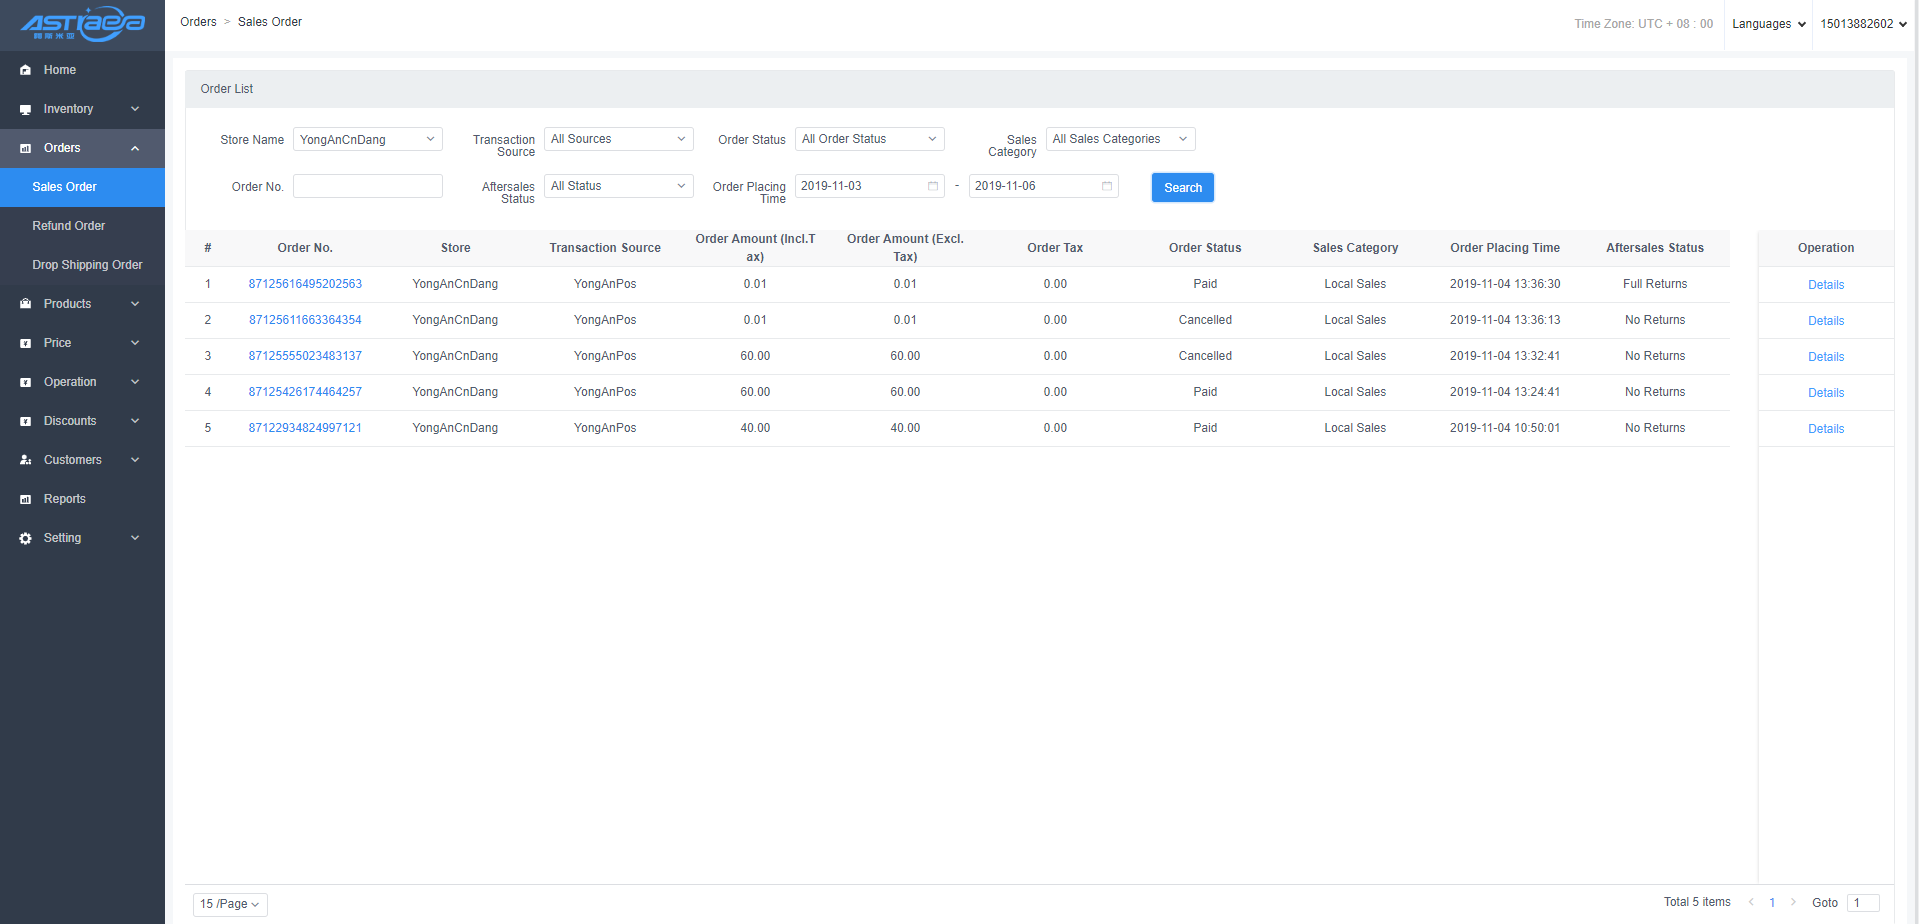
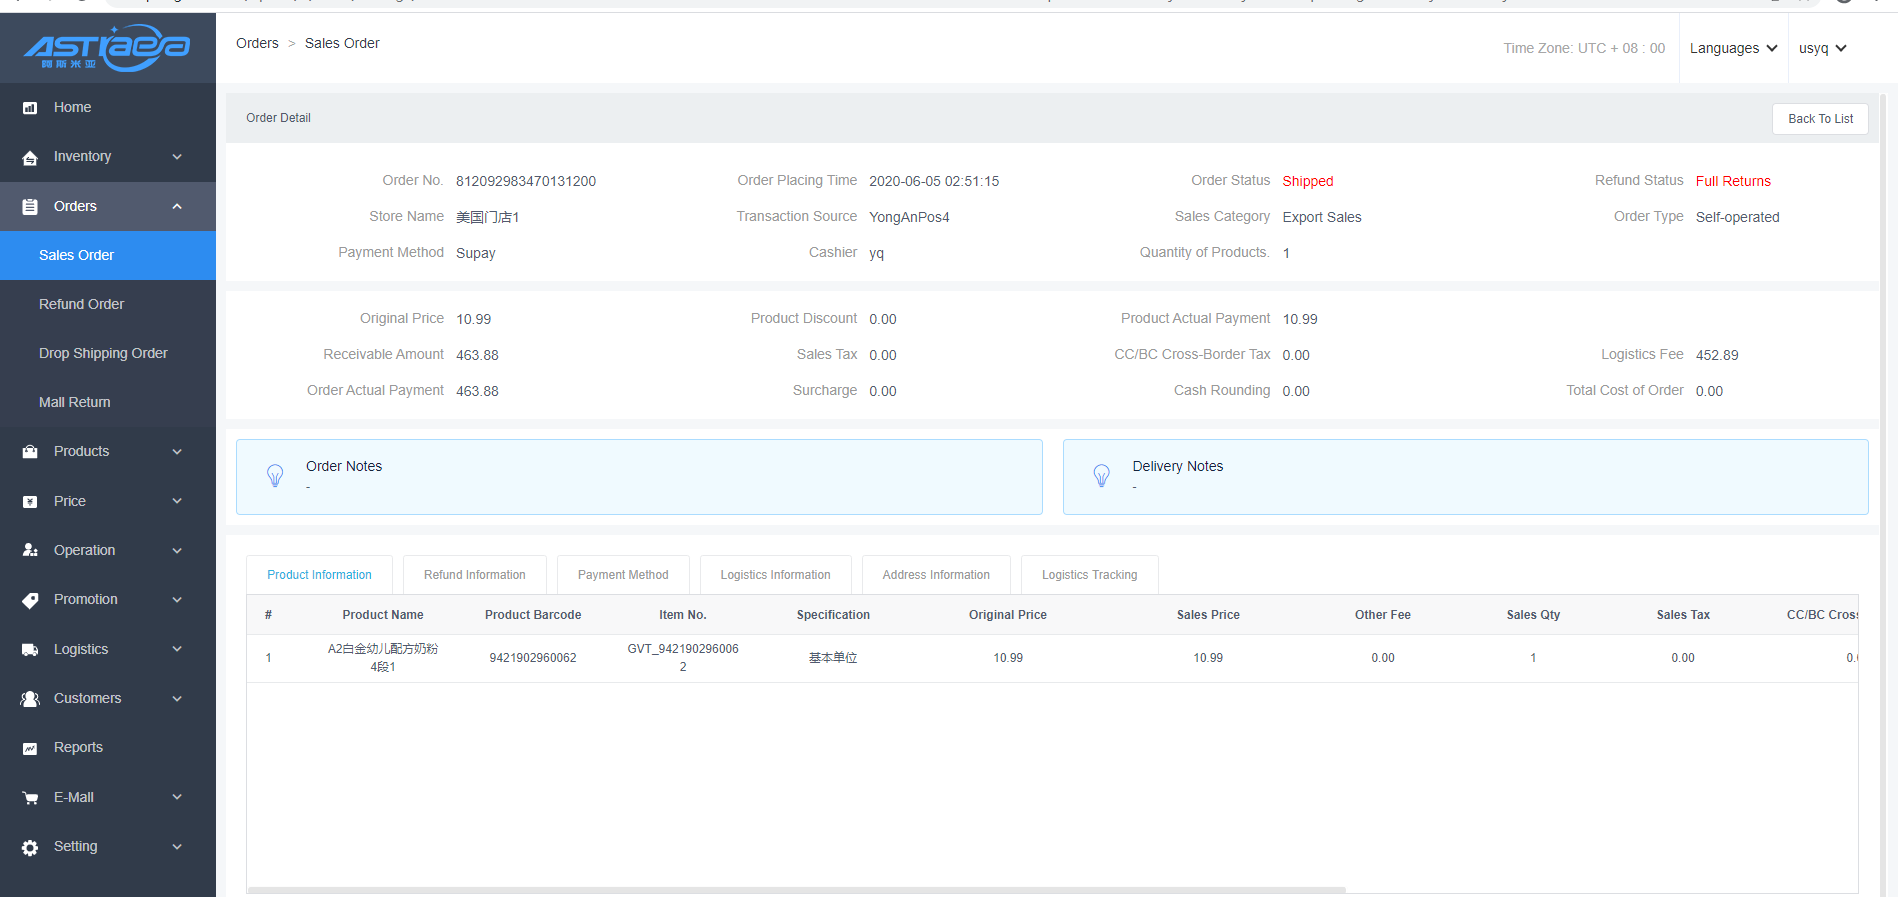
4.1.1 Overview of sales order
In the sales order module, we can query orders of all stores. The contents of the orders include: order No., store name, order amount, order status, sales category and order placing time, as shown in the figure.
4.1.2 Details of sales order
Click "Order Detail" to view all the information of the order, such as product information, aftersales information, payment method, address information and other order details.
4.2 Return order
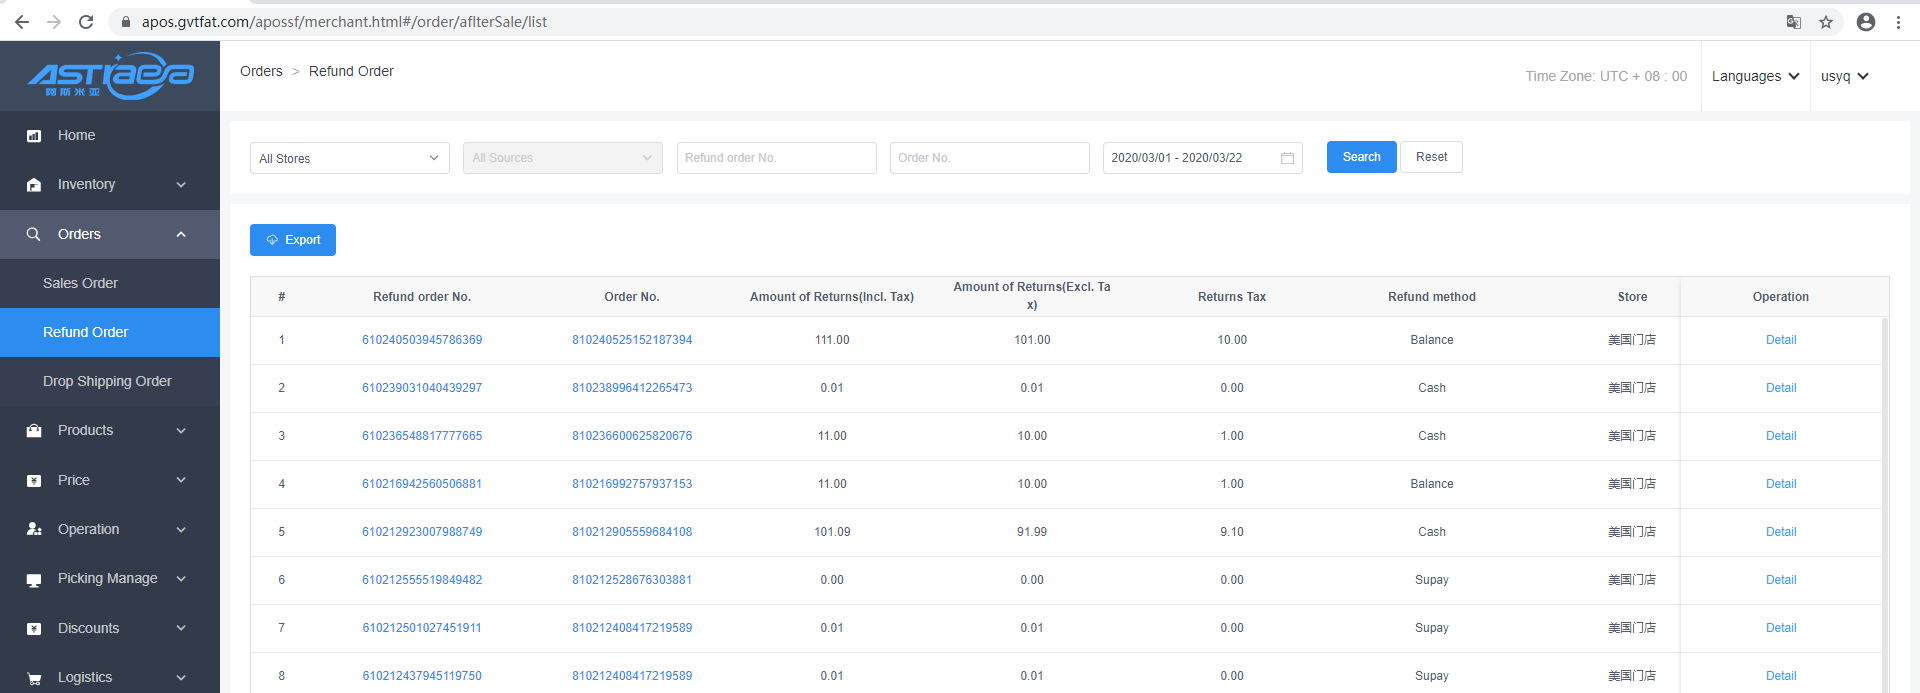
4.2.1 Overview of return order
Click "Return Order" to query all refunded orders. The contents of the order include: aftersales order No., order No., amount of returns, refund method, refund time and other information. You can also select return orders by store name and time, as shown in the figure:
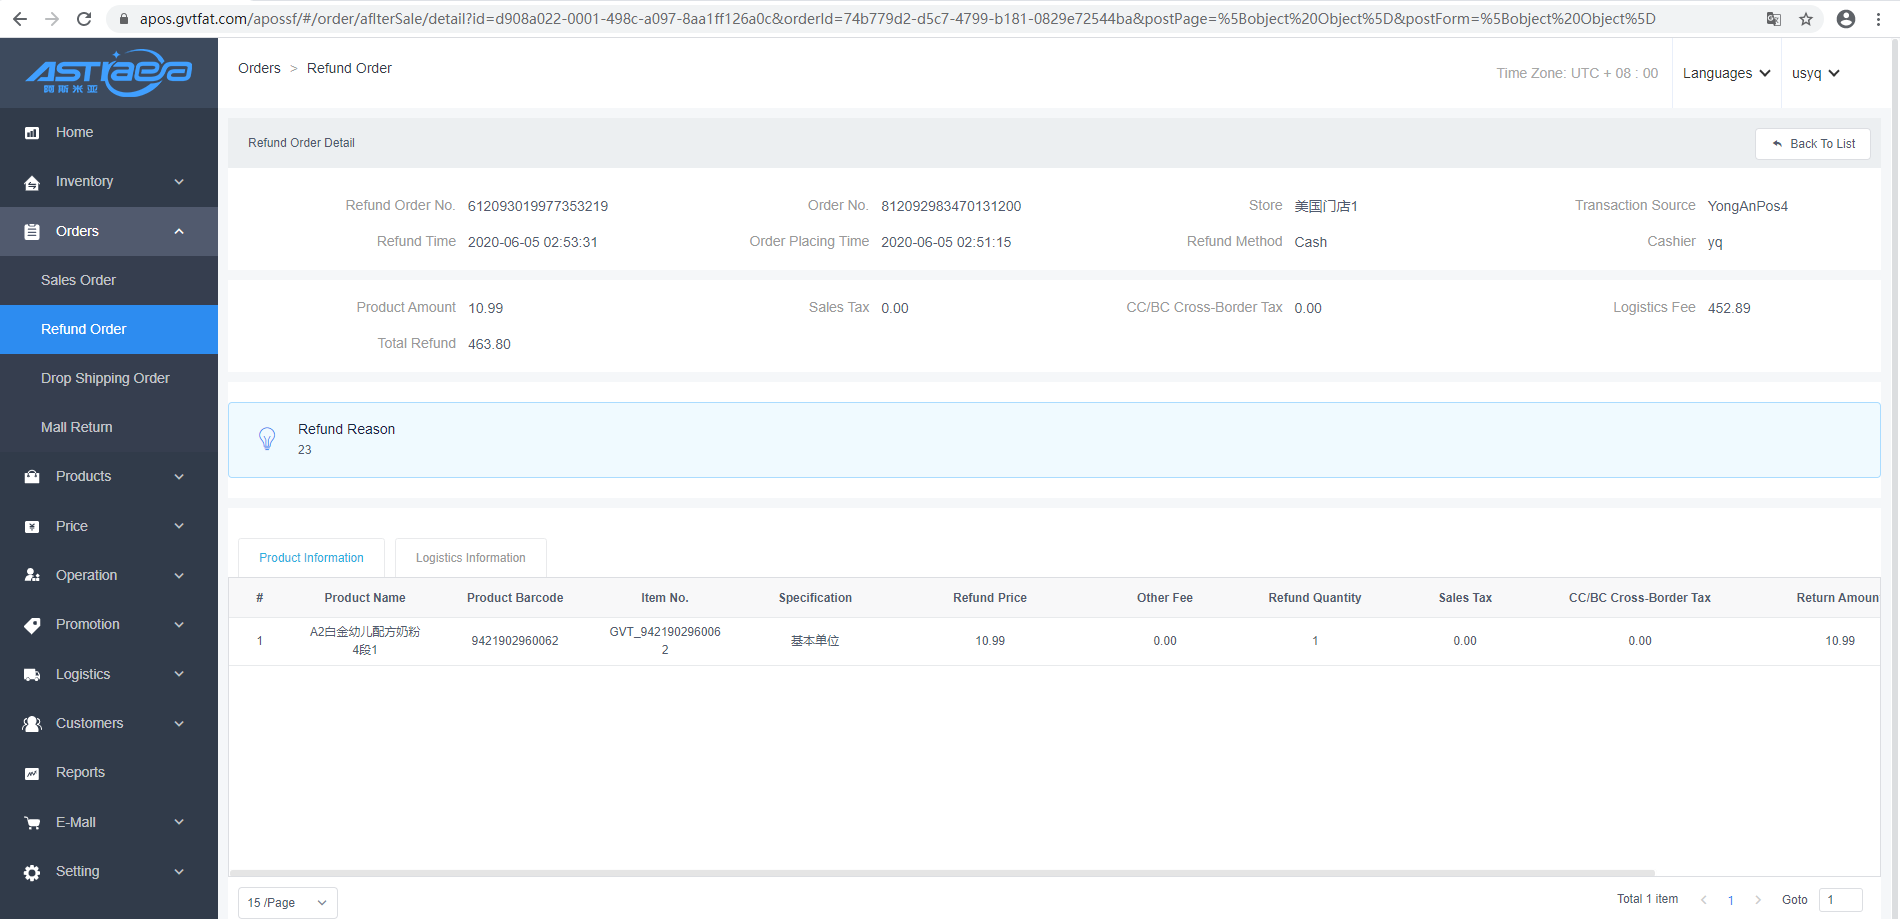
4.2.2 Details of return order
Click "Order Detail" to view all the information of the refund order, such as return orders such as product information, refund reason and other detail of refund order, as shown in the figure;
4.3 Drop shipping order
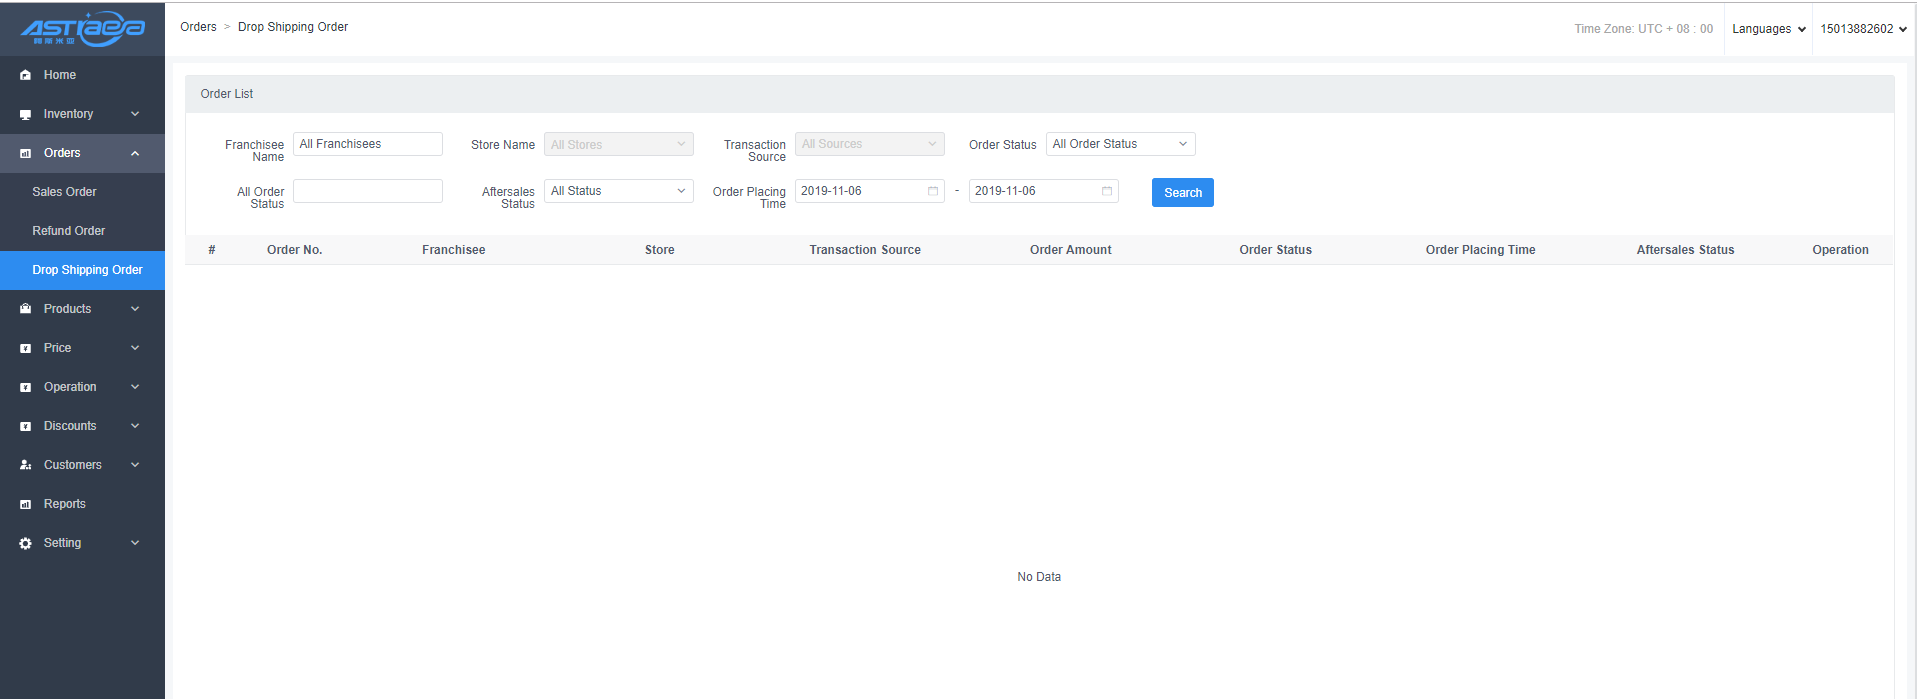
Bind commercial tenants with suppliers, import suppliers' products, maintain products, the store can drop shipping orders, POS generates orders, push these orders to the “EOS” platform which deliver products, without maintaining product inventory. The drop shipping orders from stores will be displayed in the drop shipping orders. The order information mainly includes: order No., franchisee, store, transaction source, order amount, order status, order placing time, operation and other information. As shown in the following figure:
V. Operation Management
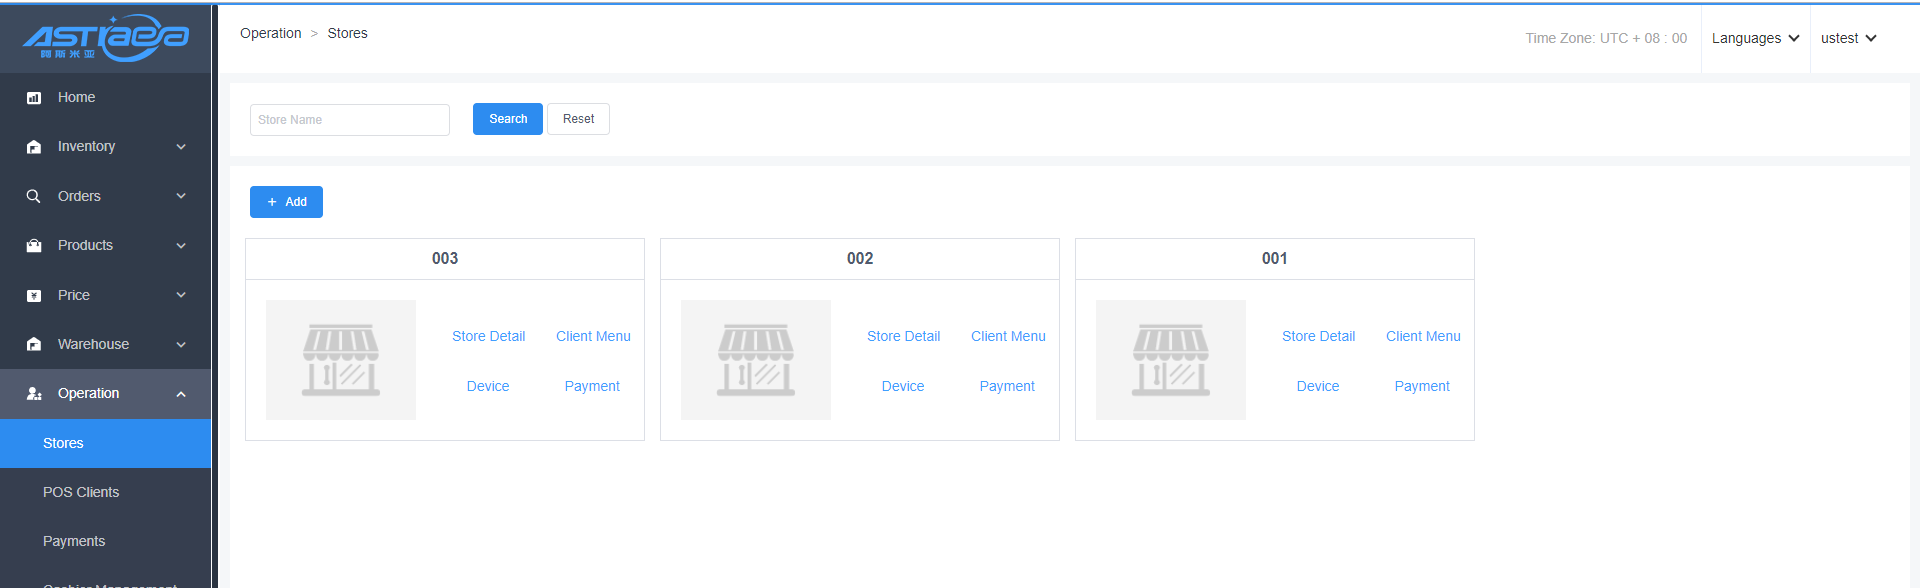
5.1 Store management
5.1.1 Display of all stores under the commercial tenant
Within the store management, you can see all the stores under the commercial tenant, and each store can set its own store configuration, client menu,device and payment methods. If you need to create a new store, you can click Add Store to add it.
5.1.2 New stores
- Within the store management, click the Add New Store button to add a new store.
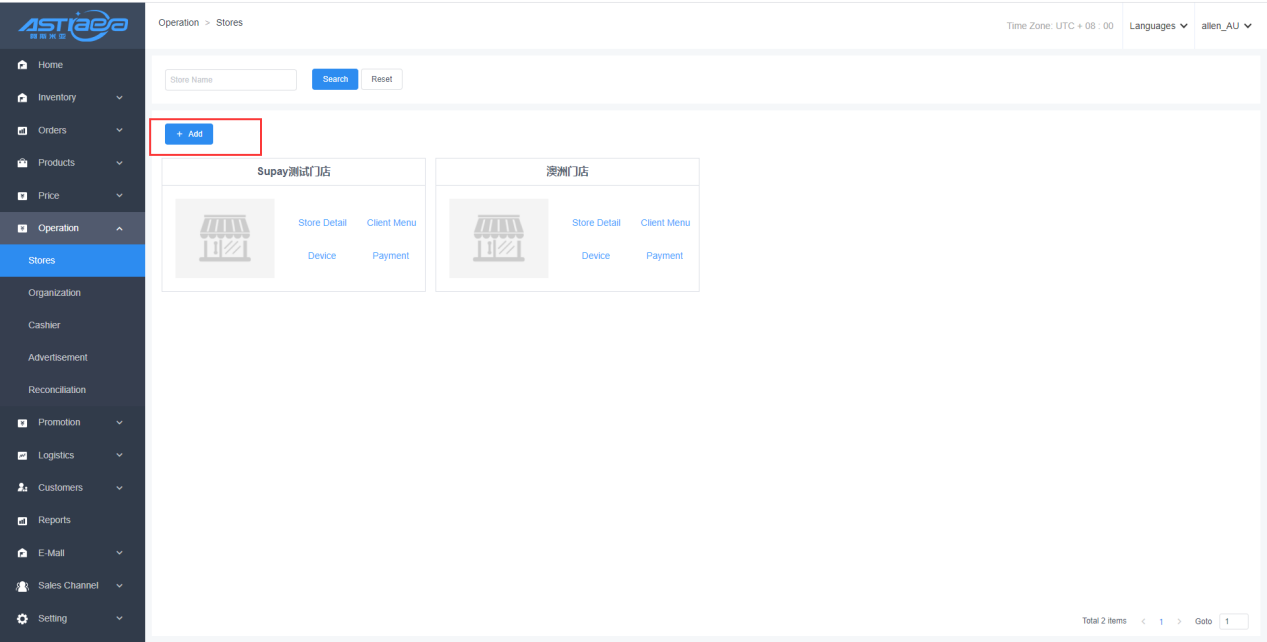
- The basic information of the store can be edited, and the business rule configuration defaults to the merchant's configuration.

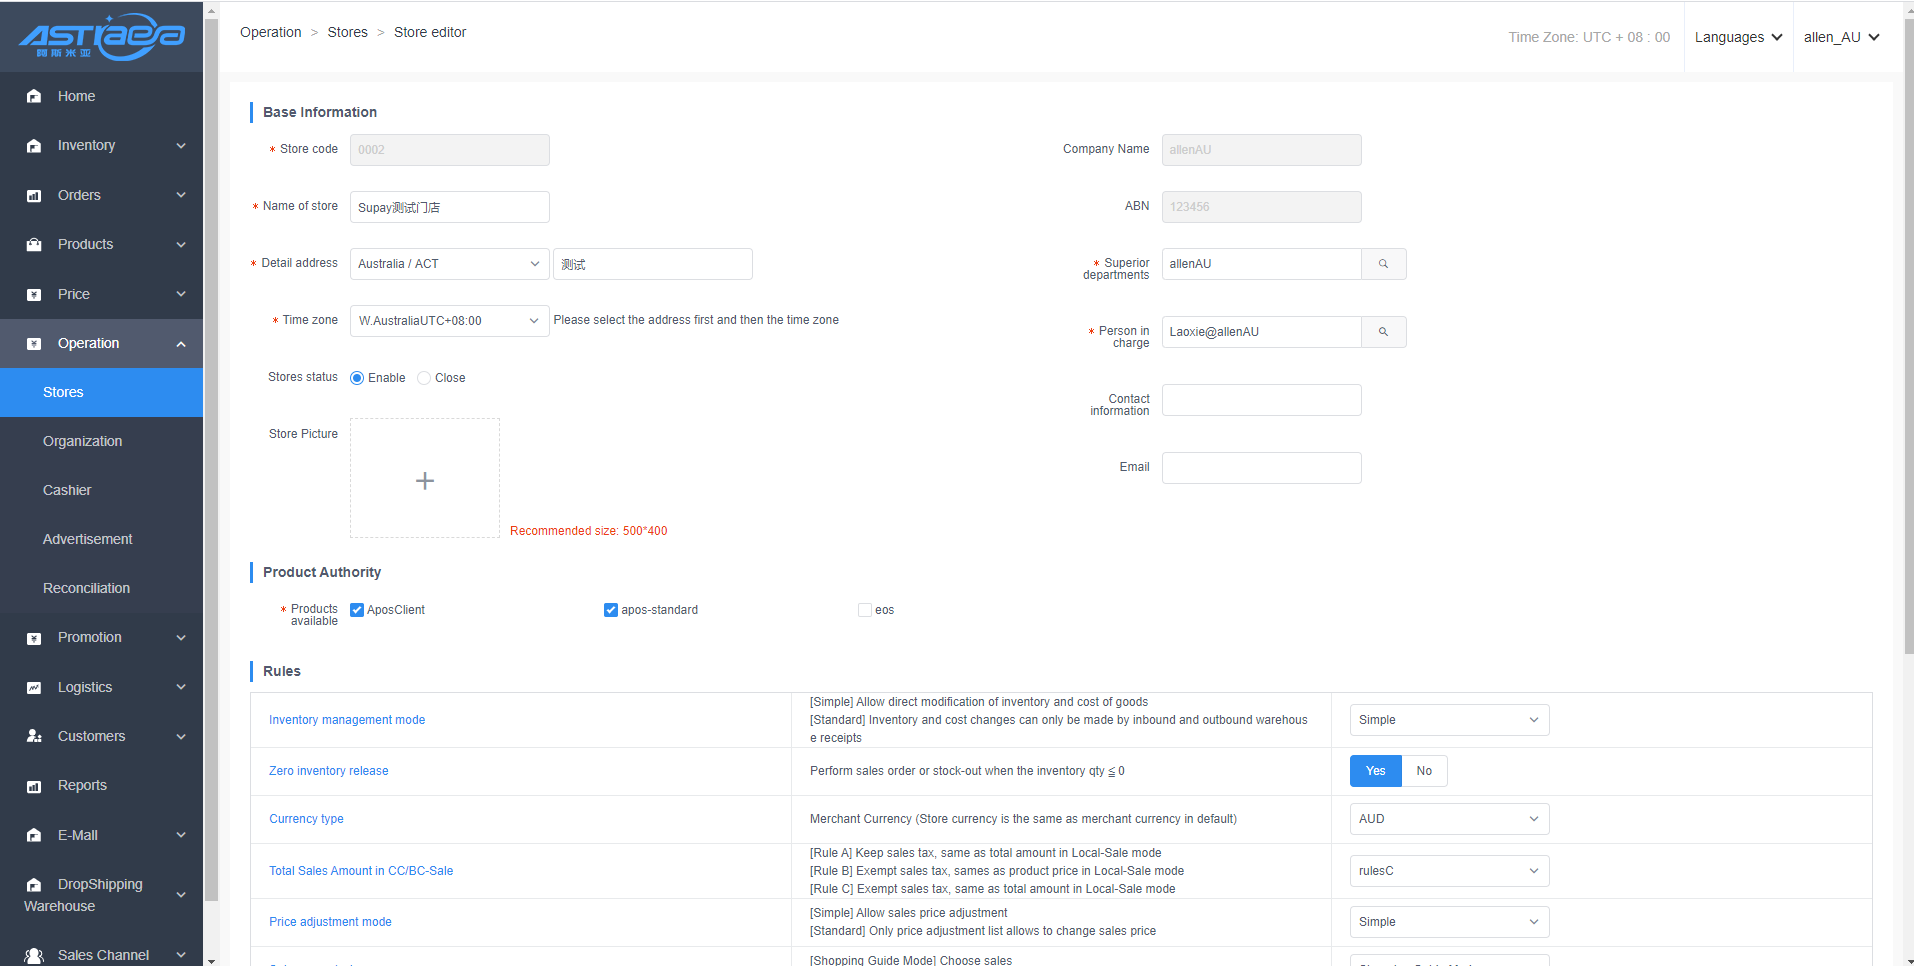
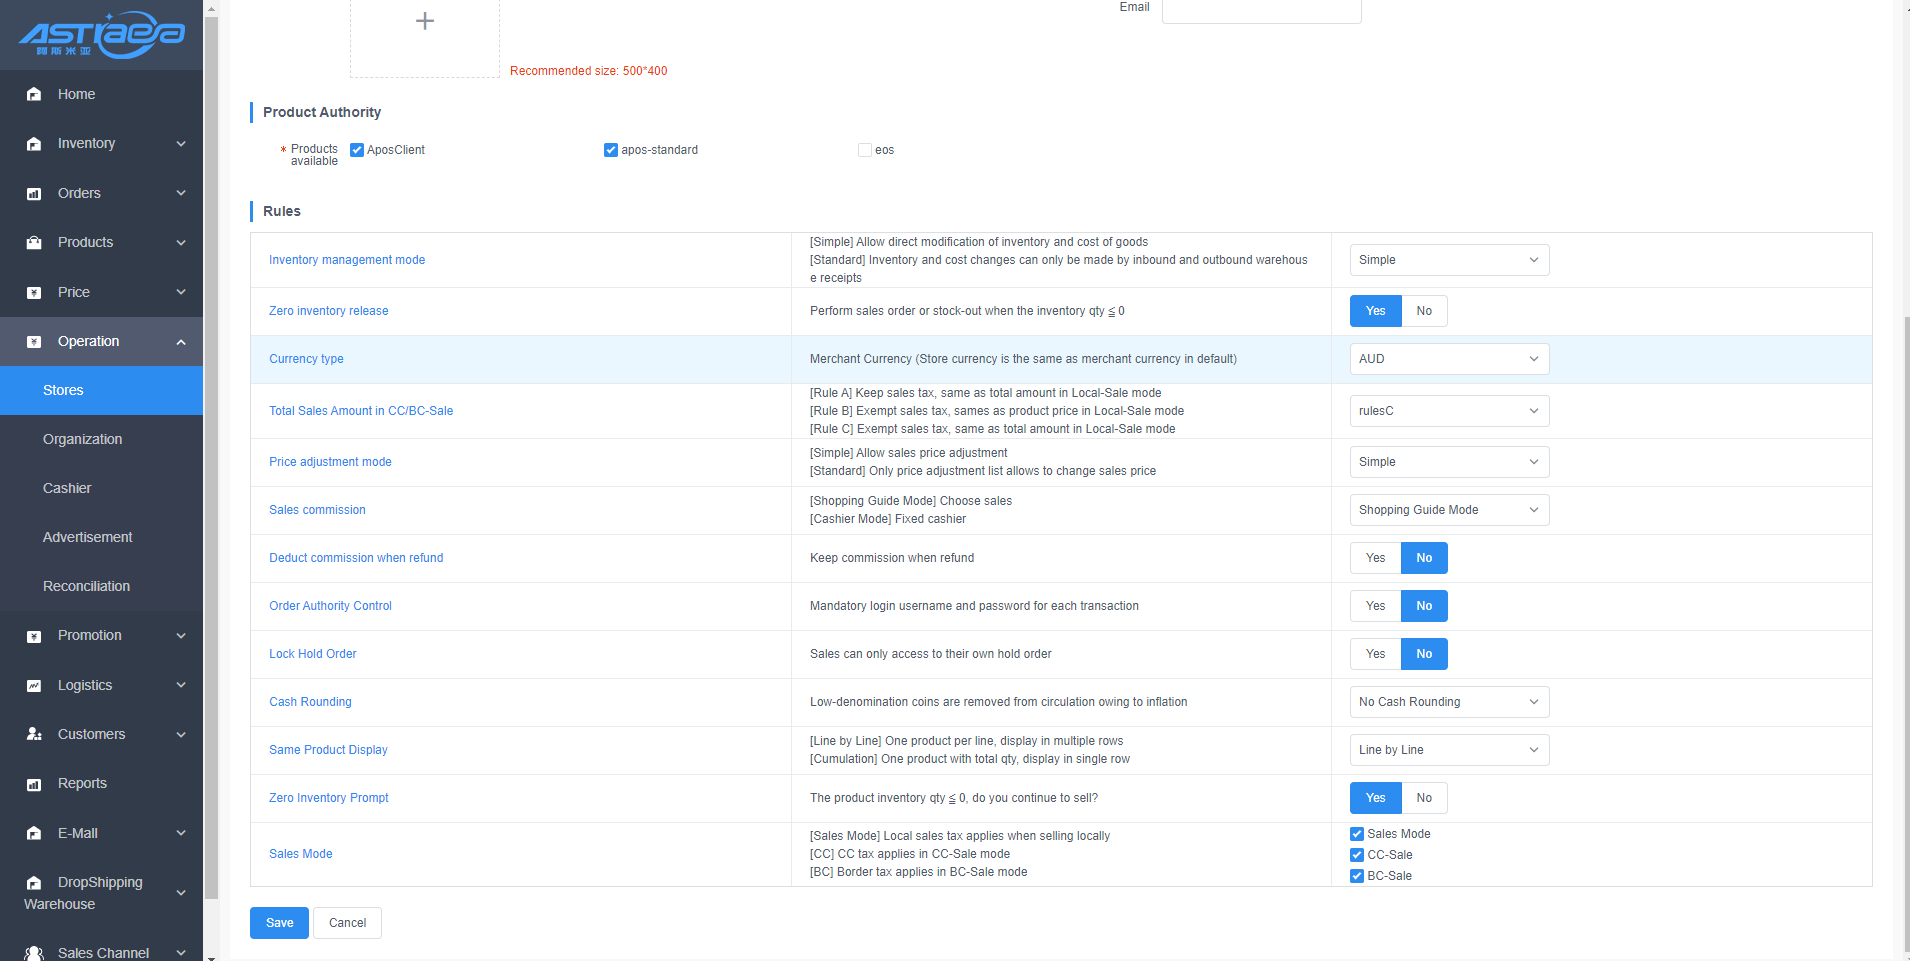
5.1.3 Store editing
Click the store name or store details button to view and edit the specific information of the store, such as store basic information, product permissions, business rules, etc. Business rules are store-level configurations. If the business rules are inconsistent with the merchant tenant, the business rules of the store are taken.
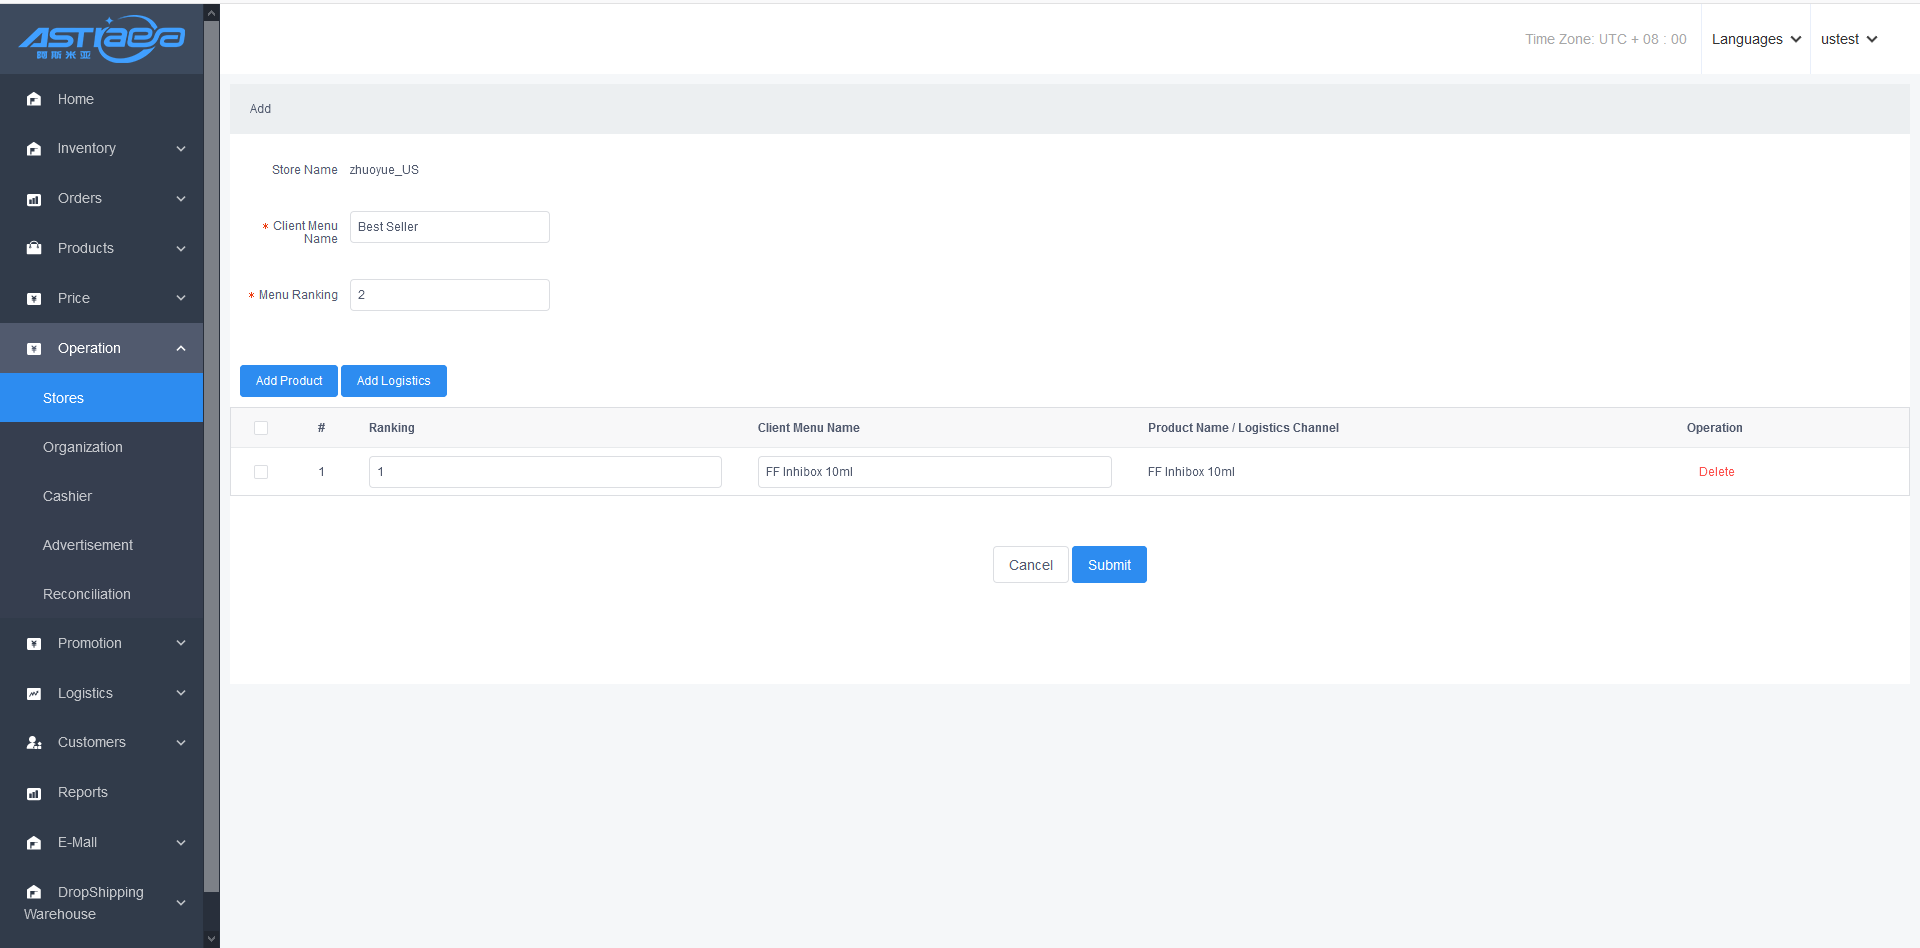
5.1.4 Client menu
In the client menu, you can configure the client menu for the client's goods and logistics, and in each client menu, you can add the corresponding goods and logistics. After the configuration, when the client sells the shortcut menu products, there is no need to search for the goods, you can go directly to the client menu to choose.
- Add shortcut menu
[Operating steps]
Step 1; Enter the server, click the "Store" menu, and click the "client Menu".

Step 2: Click "Add"
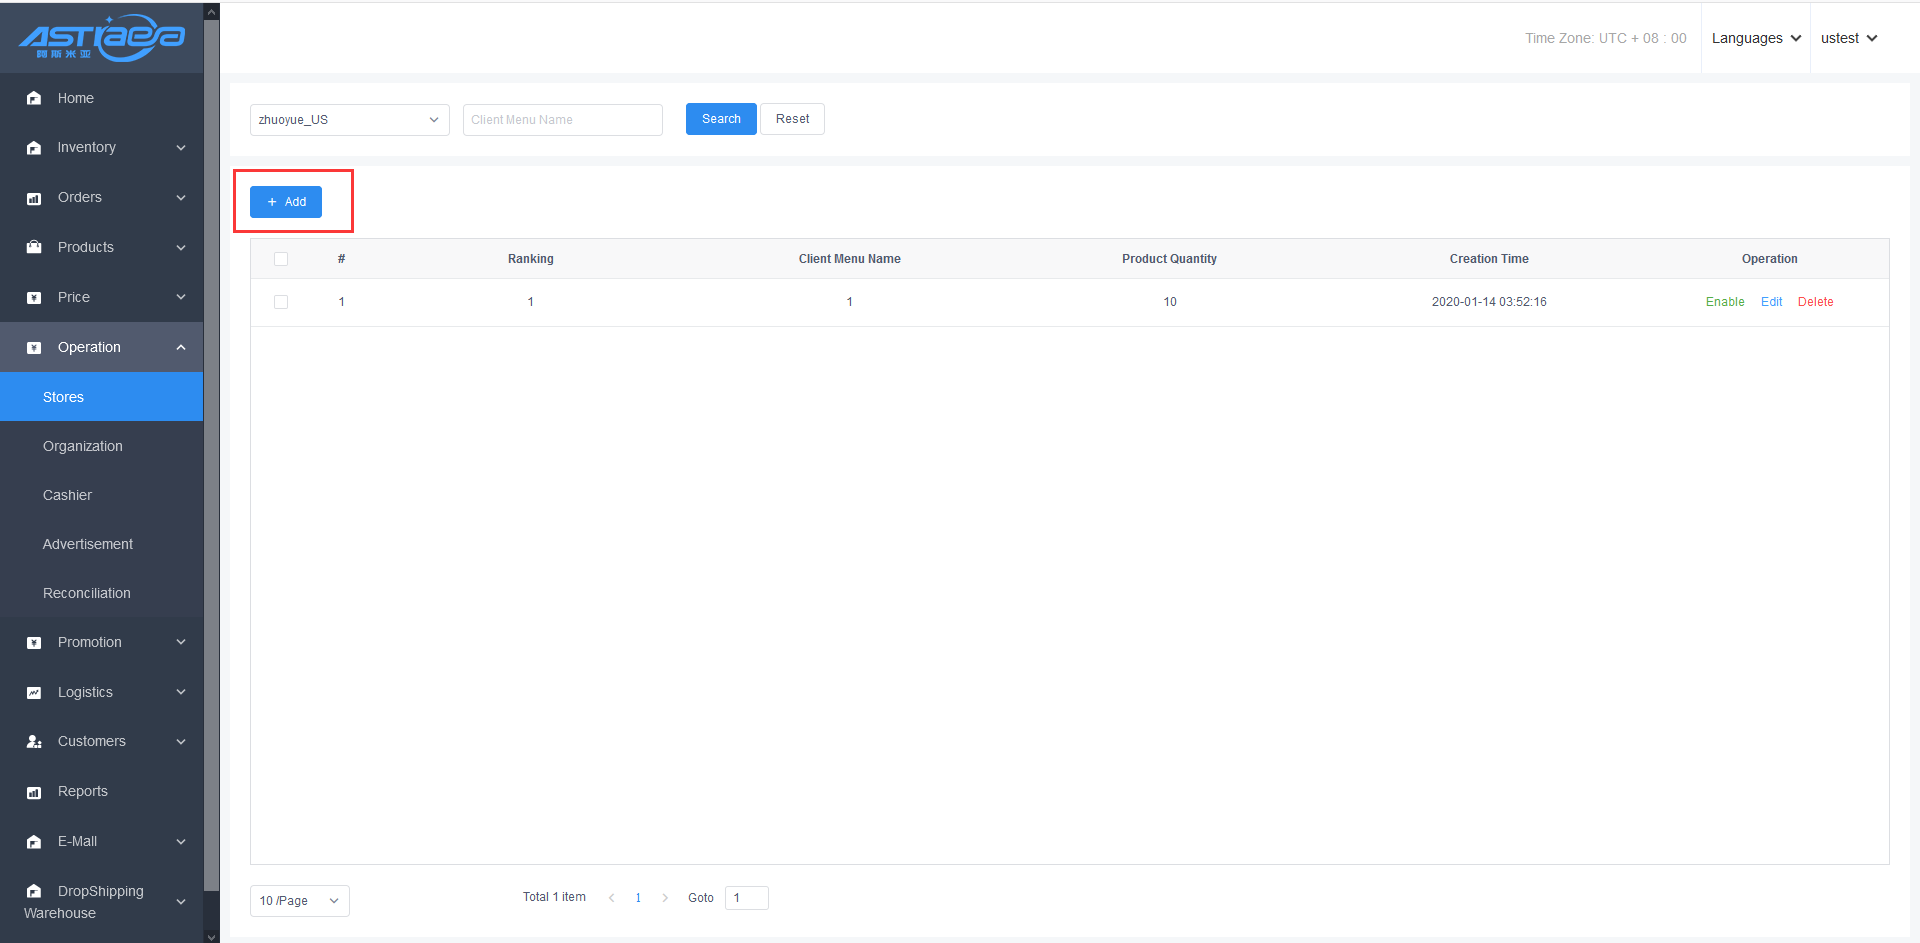
Step 3; Enter the name of the client menu, click the "Add Product" menu, check the corresponding product, and click Import; click "Add Logistics", check the corresponding logistics, and click "Import", the goods and logistics can be displayed on the shortcut menu page Click "Submit".
- Quick menu enable
Click "Enable"

- Client display shortcut menu
After the client clicks "Data Synchronization", the client can display the enabled client menu.
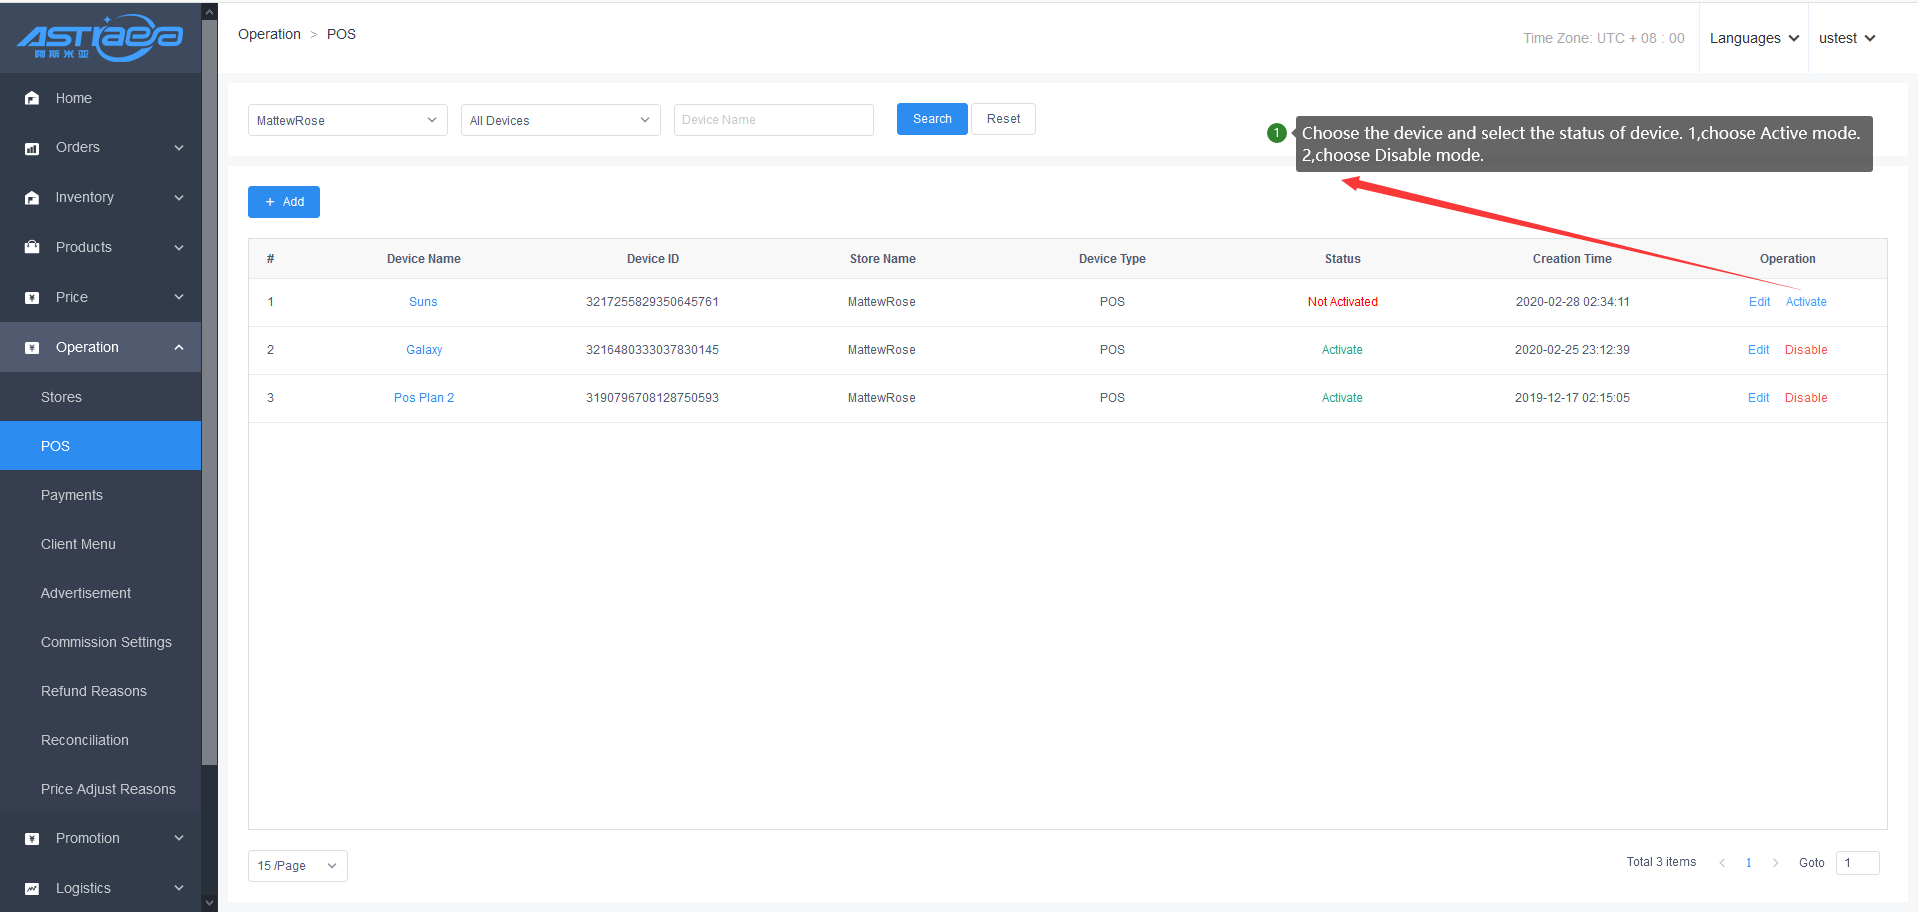
5.1.5 POS device
You can view POS devices of all stores under the “Device List” menu, and also add new devices or edit existing devices.
- Display of all POS devices
As shown in the figure;
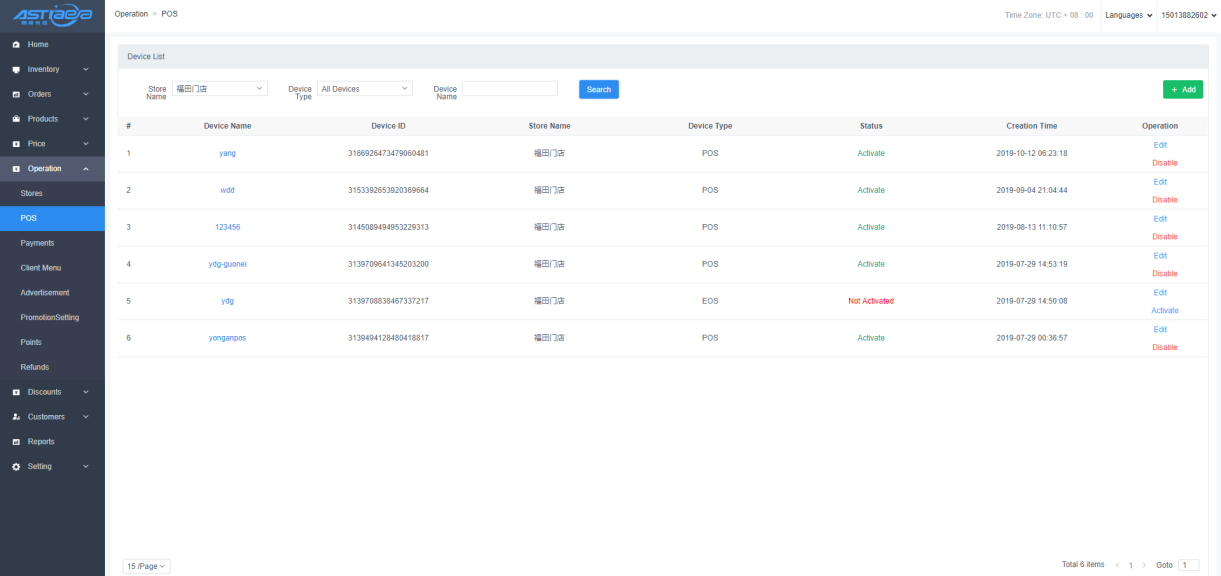
- Add new POS devices
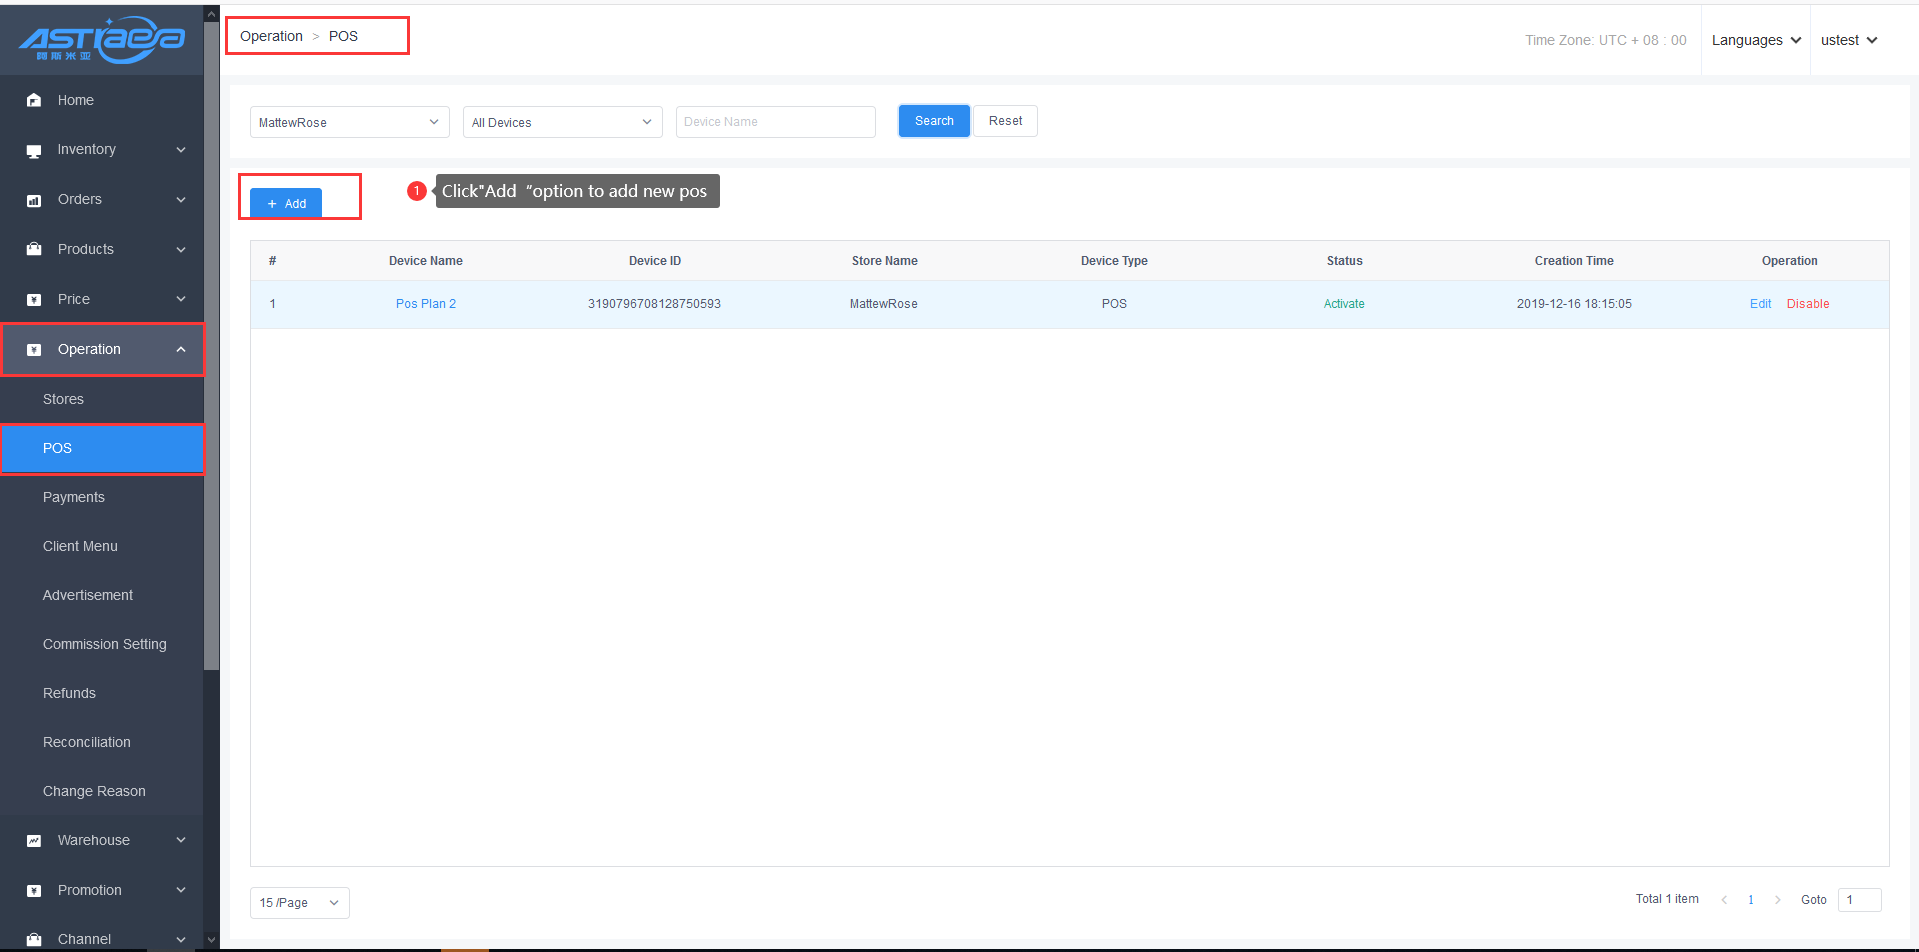
- Edit existing POS devices
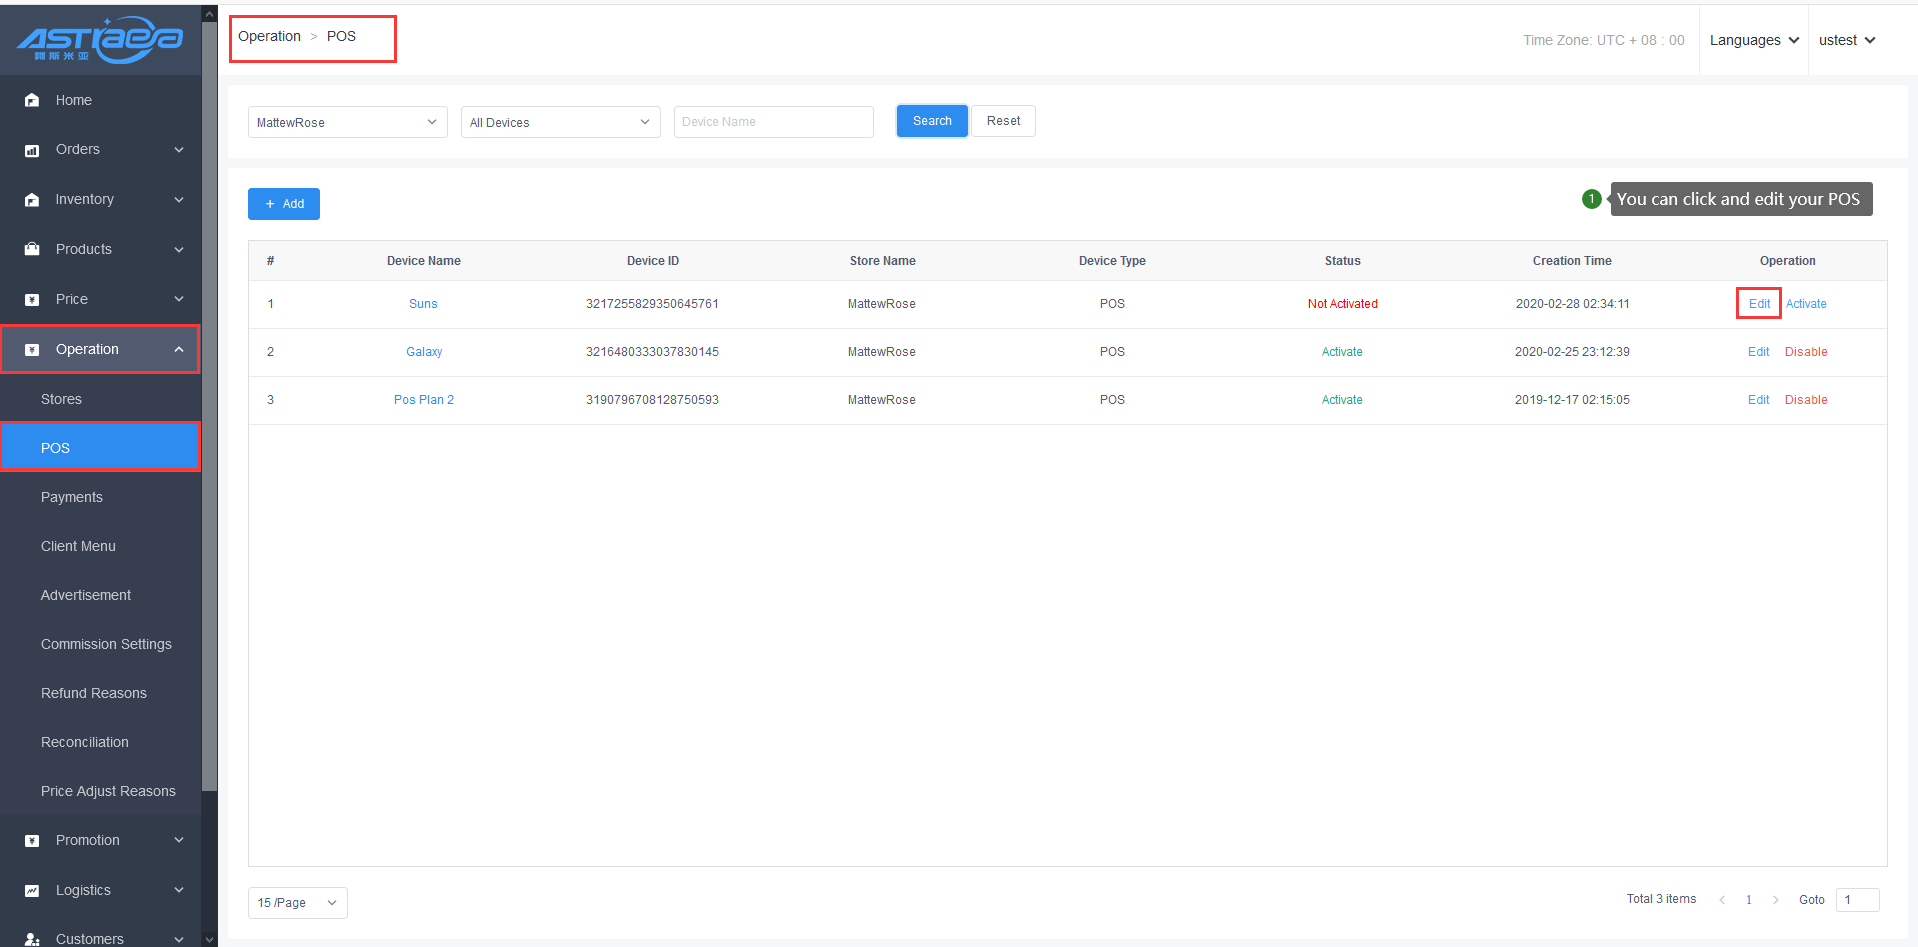
- Enable/disable POS device
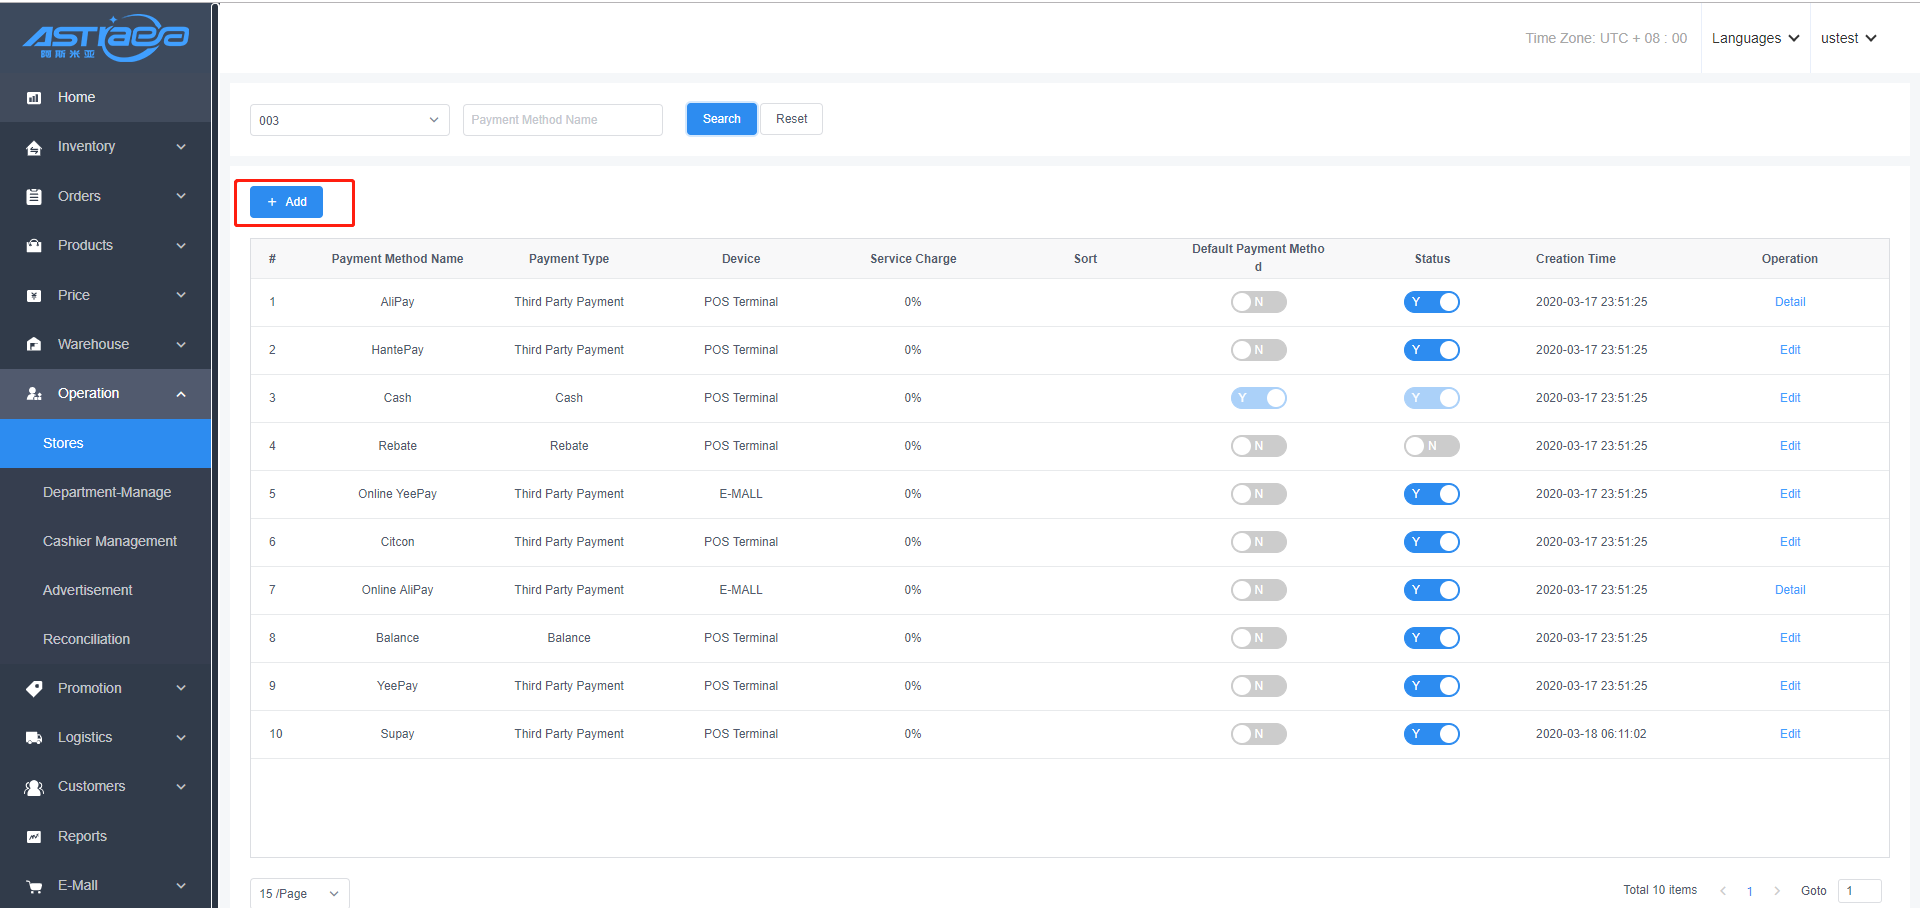
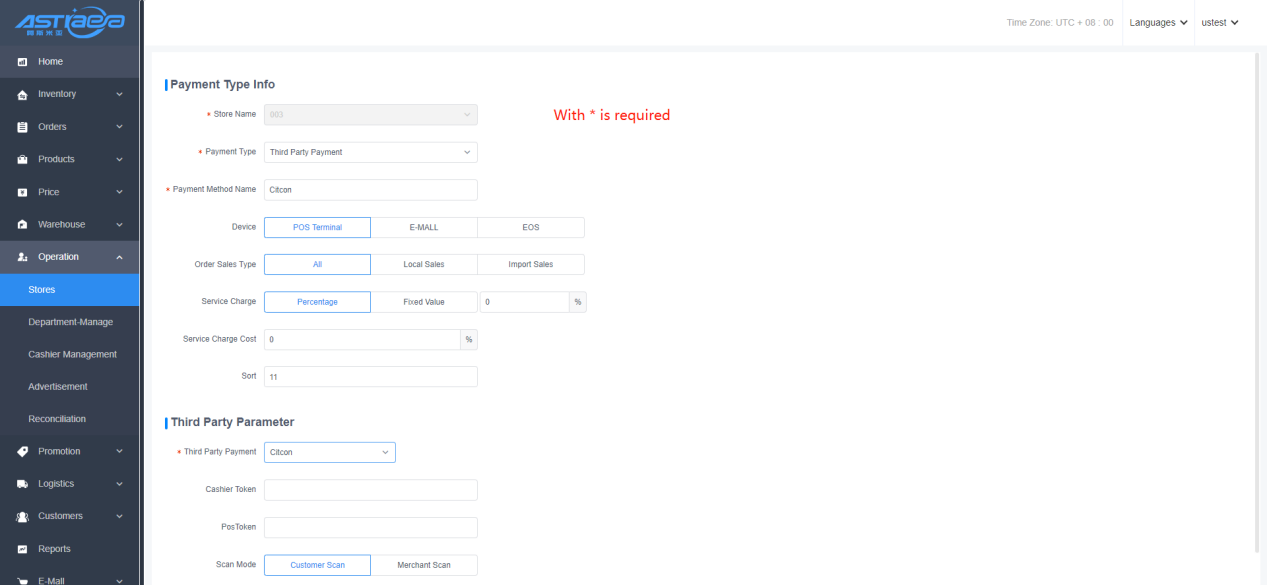
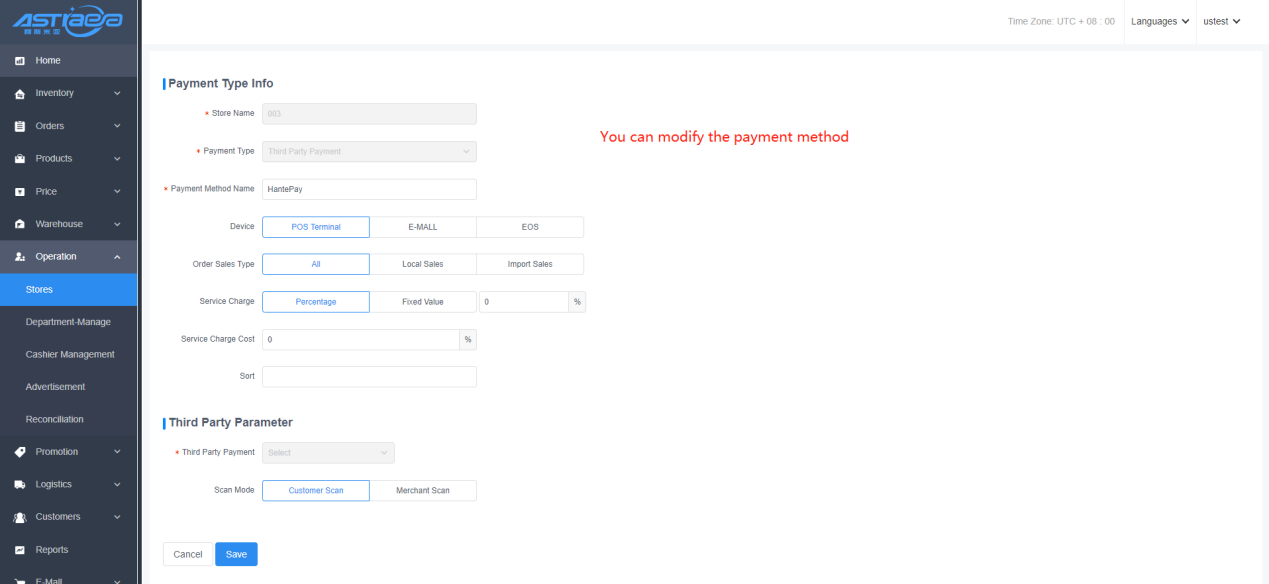
5.1.6 Payment method
You can view payment methods of all stores under the “Payment Method List” menu, such as cash, balance, third party payment, etc., You can directly see the default payment method, status, display serial number of the store on the page,and also add new payment methods, edit the existing payment methods, or enable and disable payment methods.New European 2Paynow (Alipay/WeChat) is supporting online shopping mall and POS, adding Alipay Dragonfly equipment to pay.
- Payment method display
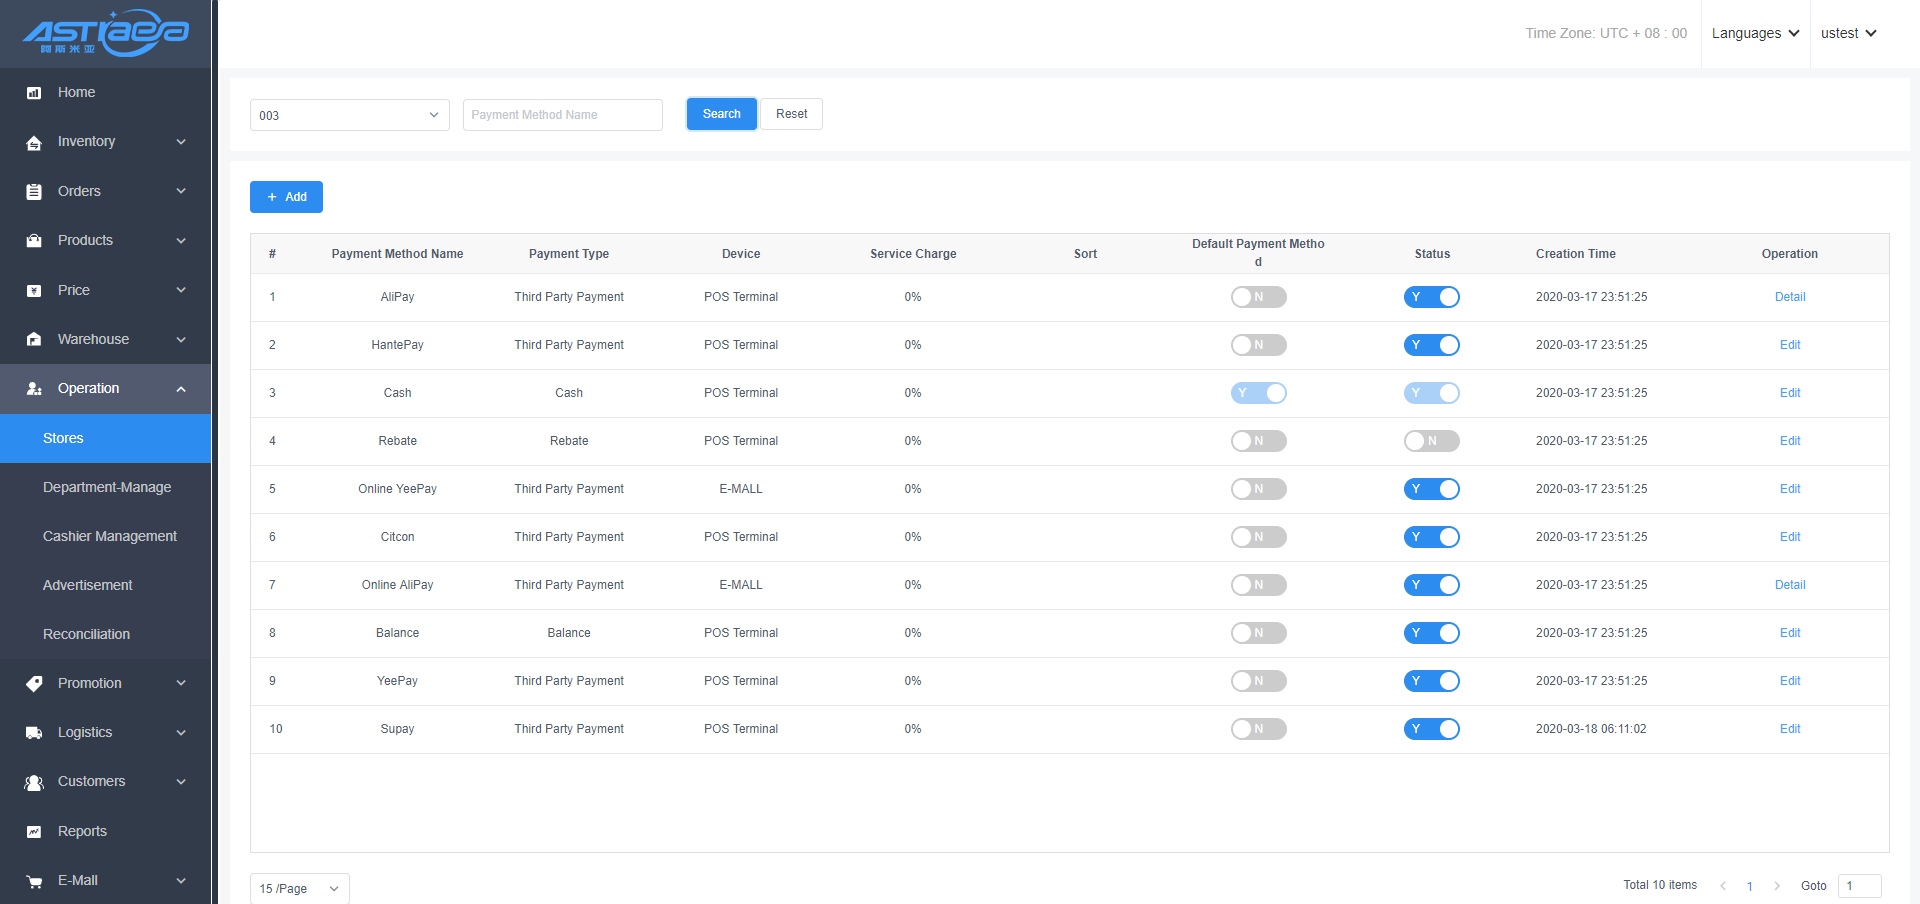
- Add new payment methods
These following three payment types: "Other", "Credit Card" and "Table Card” support multiple payment methods in the same store, such as WeChat Table Card and Alipay Table Card. The remaining payment types can support a new payment method only.
- Edit payments
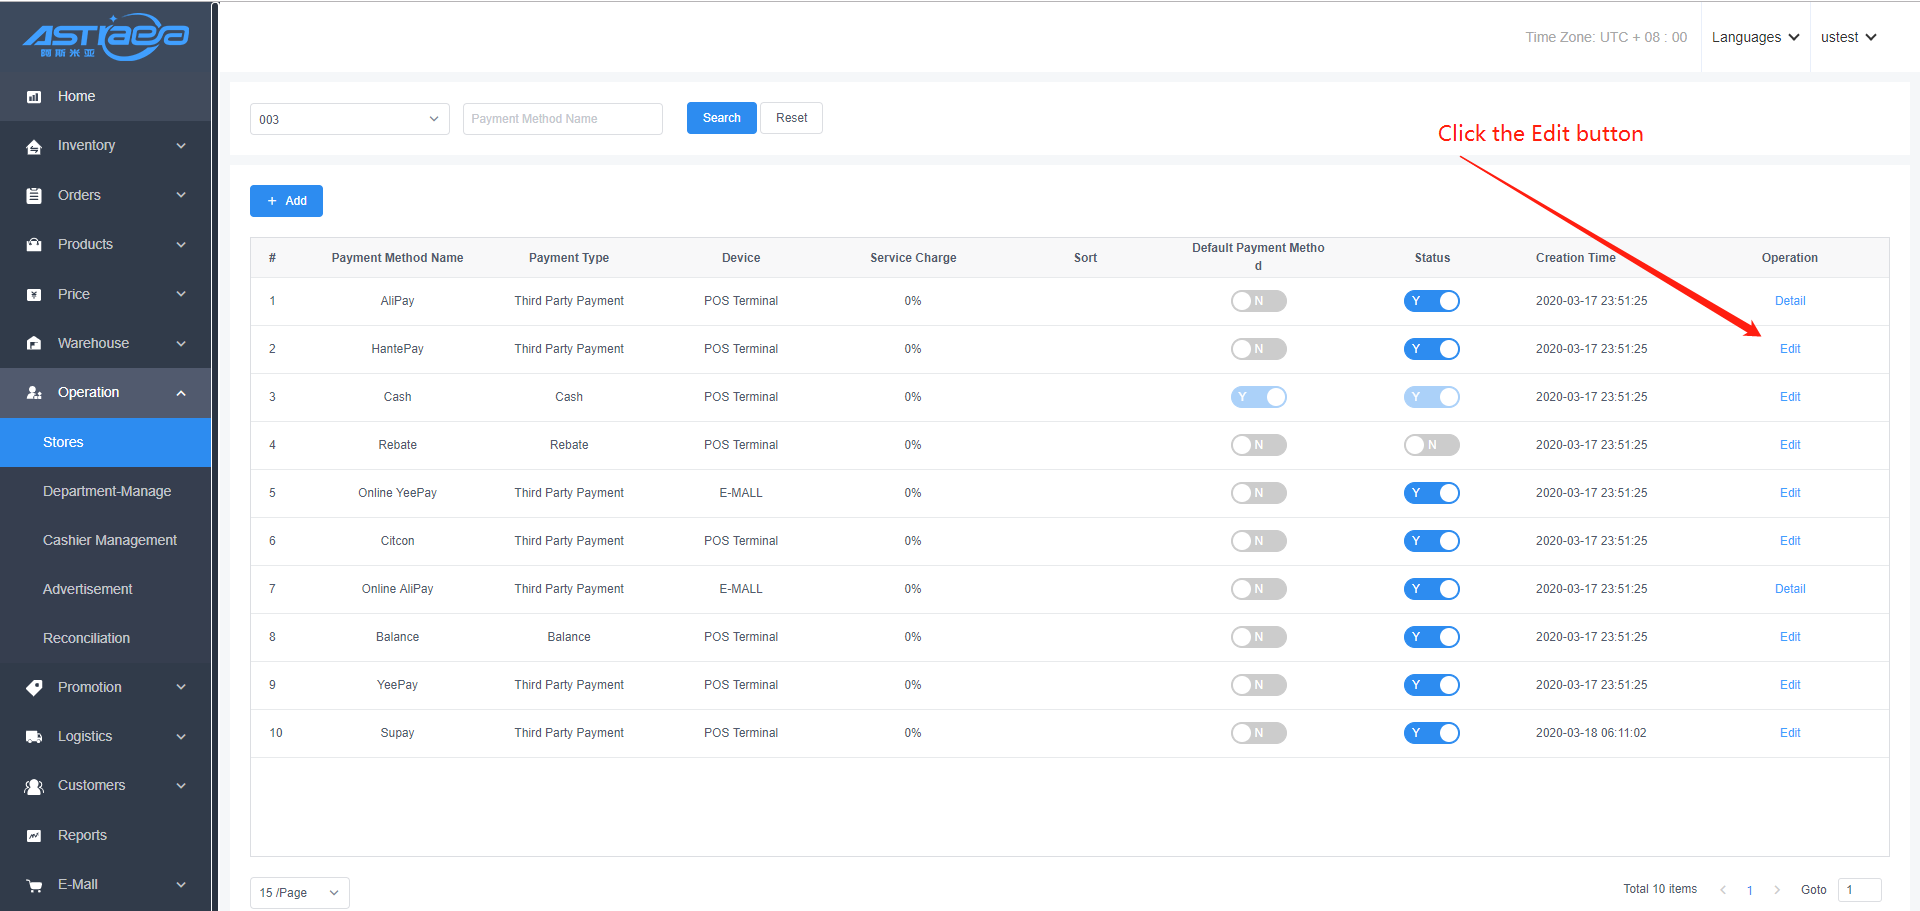
- Adjust status of payments**

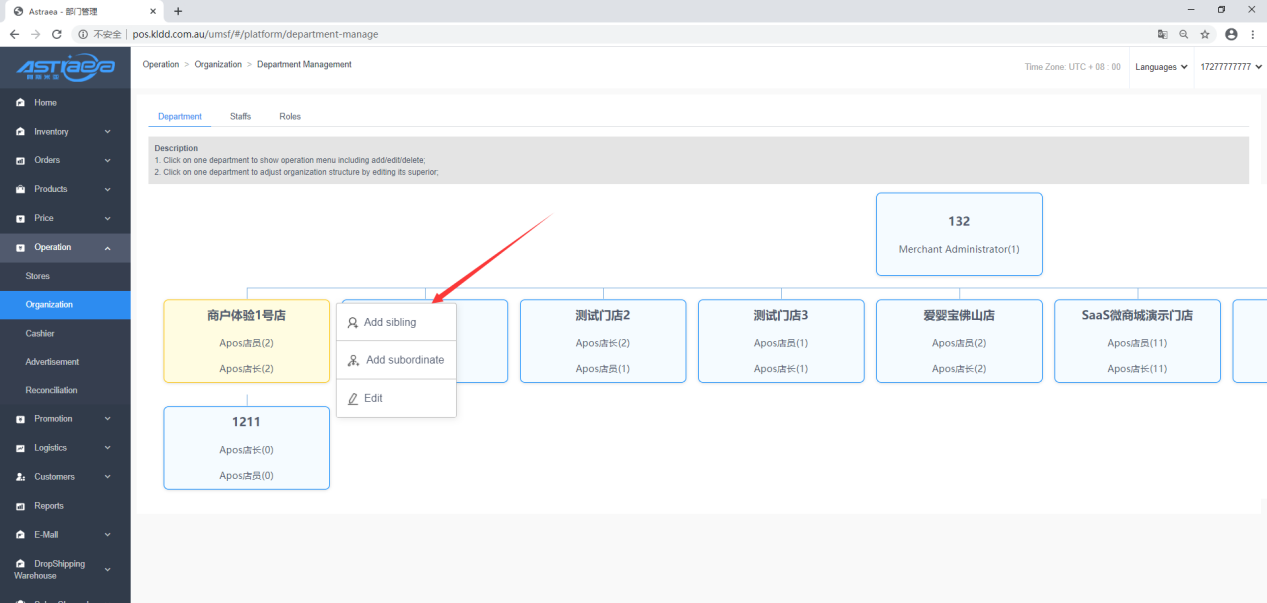
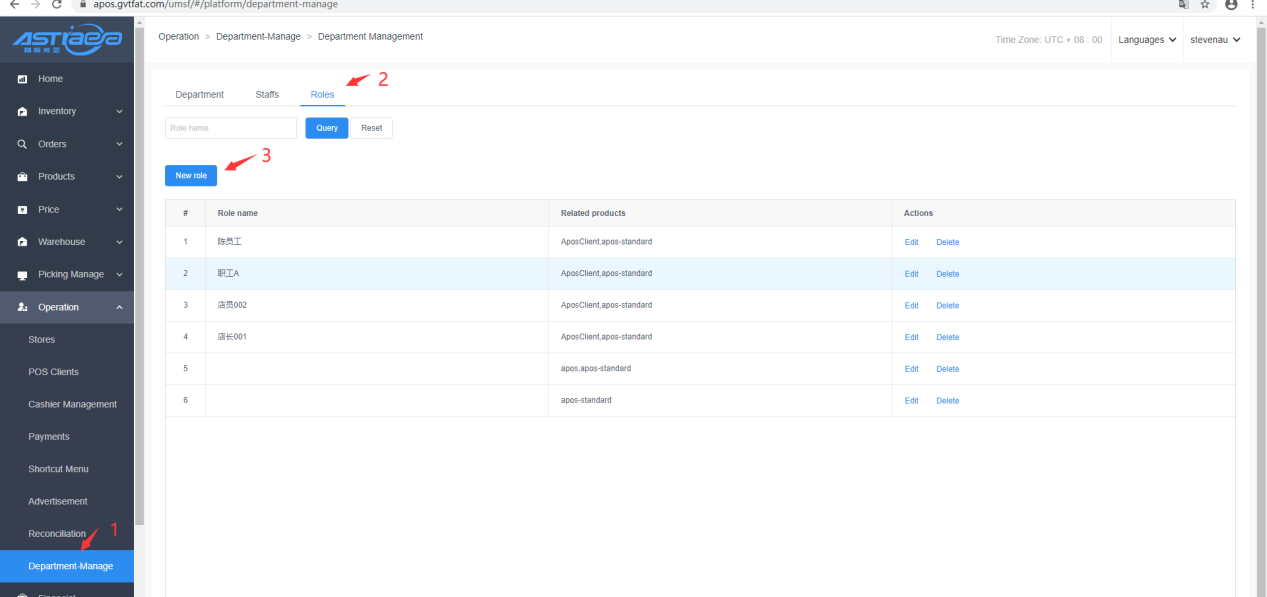
5.2 Department management
Department management includes three interfaces;
Department, employee, and role; the data displayed by the department is a tree structure, including the main body of the commercial tenant and subordinate departments and stores, and multiple levels can be established.
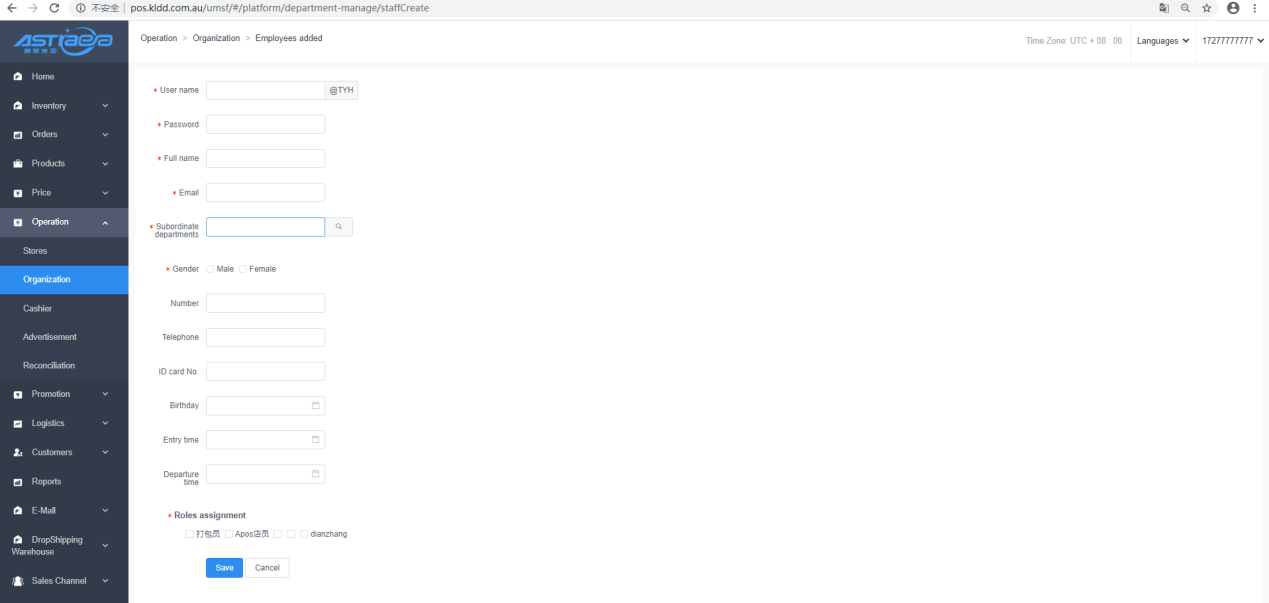
The employee displays the user data of related departments and stores, which can be added Edit and delete.
The role performs function and menu permission control, and the employees with the associated role log in to the background or client to obtain the corresponding permission.
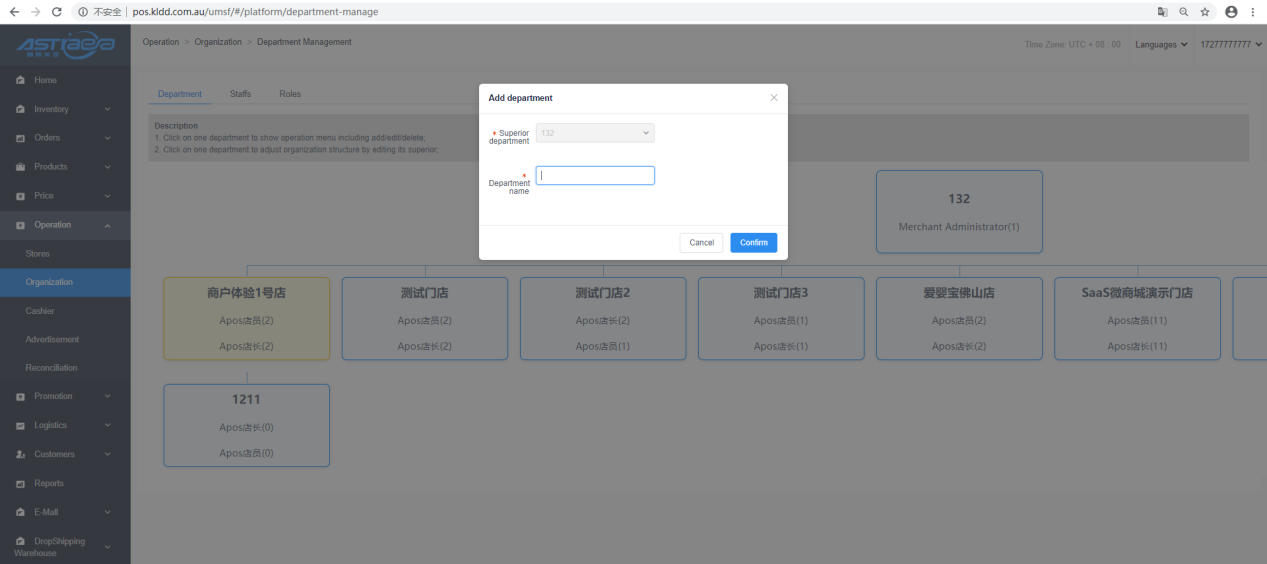
5.2.1 New department
You can add lower-level departments at the company name of the top-level root commercial tenant and view company details. You can also add departments at the same level and lower levels in departments and stores, and so on.
[Operating steps]
Step 1; Click on the node data, and click "Add Same Level" in the pop-up operation menu.
Step 2; Enter the department name and click "OK".
5.2.2 New employees
[Operating steps]
Step 1; Click on the menu "Employee", click "Add".
Step 2; Enter employee information (required items with *), specify the role of the employee, and click "Save".
Note; The subordinate department must select the store level; the role is associated with the corresponding authority.

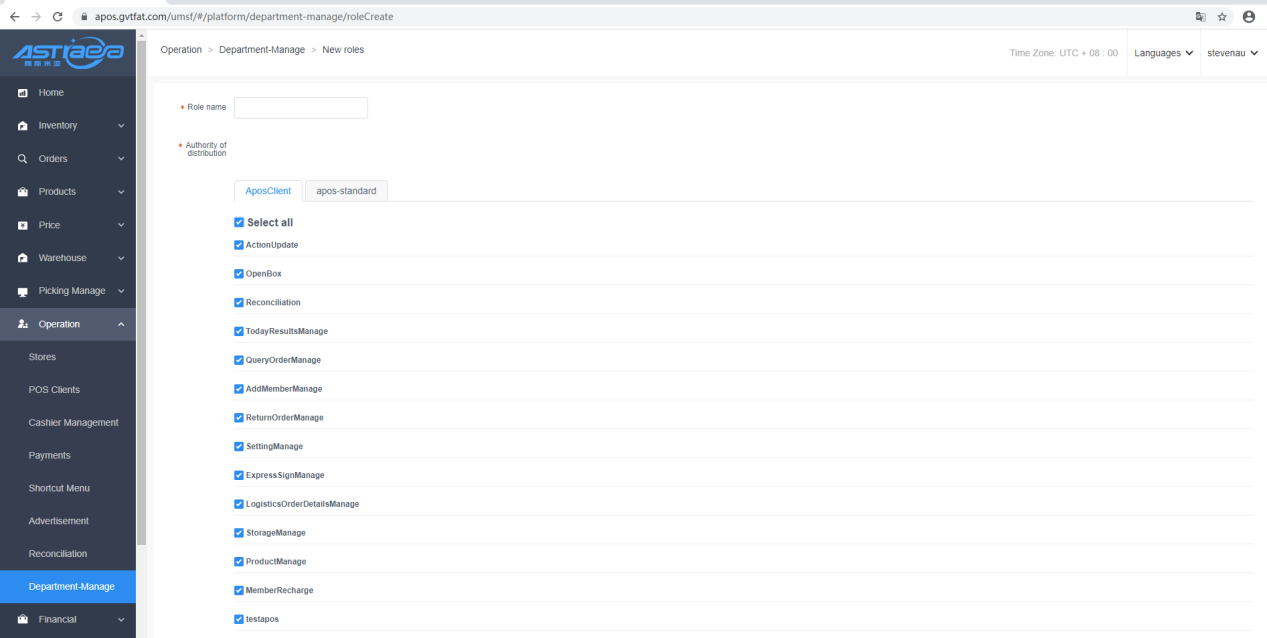
5.2.3 New role
[Operating steps]
Step 1; Click the menu "role", click "new", enter the corresponding information of the role.
Step 2; Select the function under the associated product to be the role authorization function.
Step 3; Click "Save".
5.3 Cashier
5.3.1 Commission settings
[Operating steps]
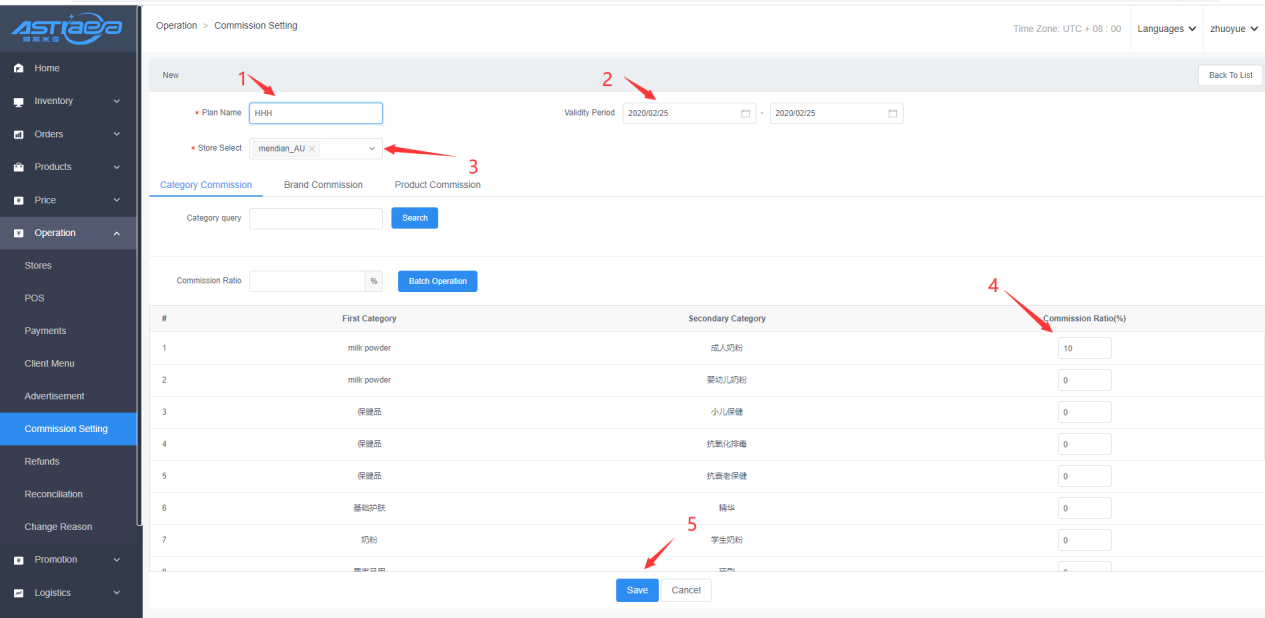
Step 1; Enter the server, click the "Operation" menu, click "Cashier", click "Sales Commission", click "New".
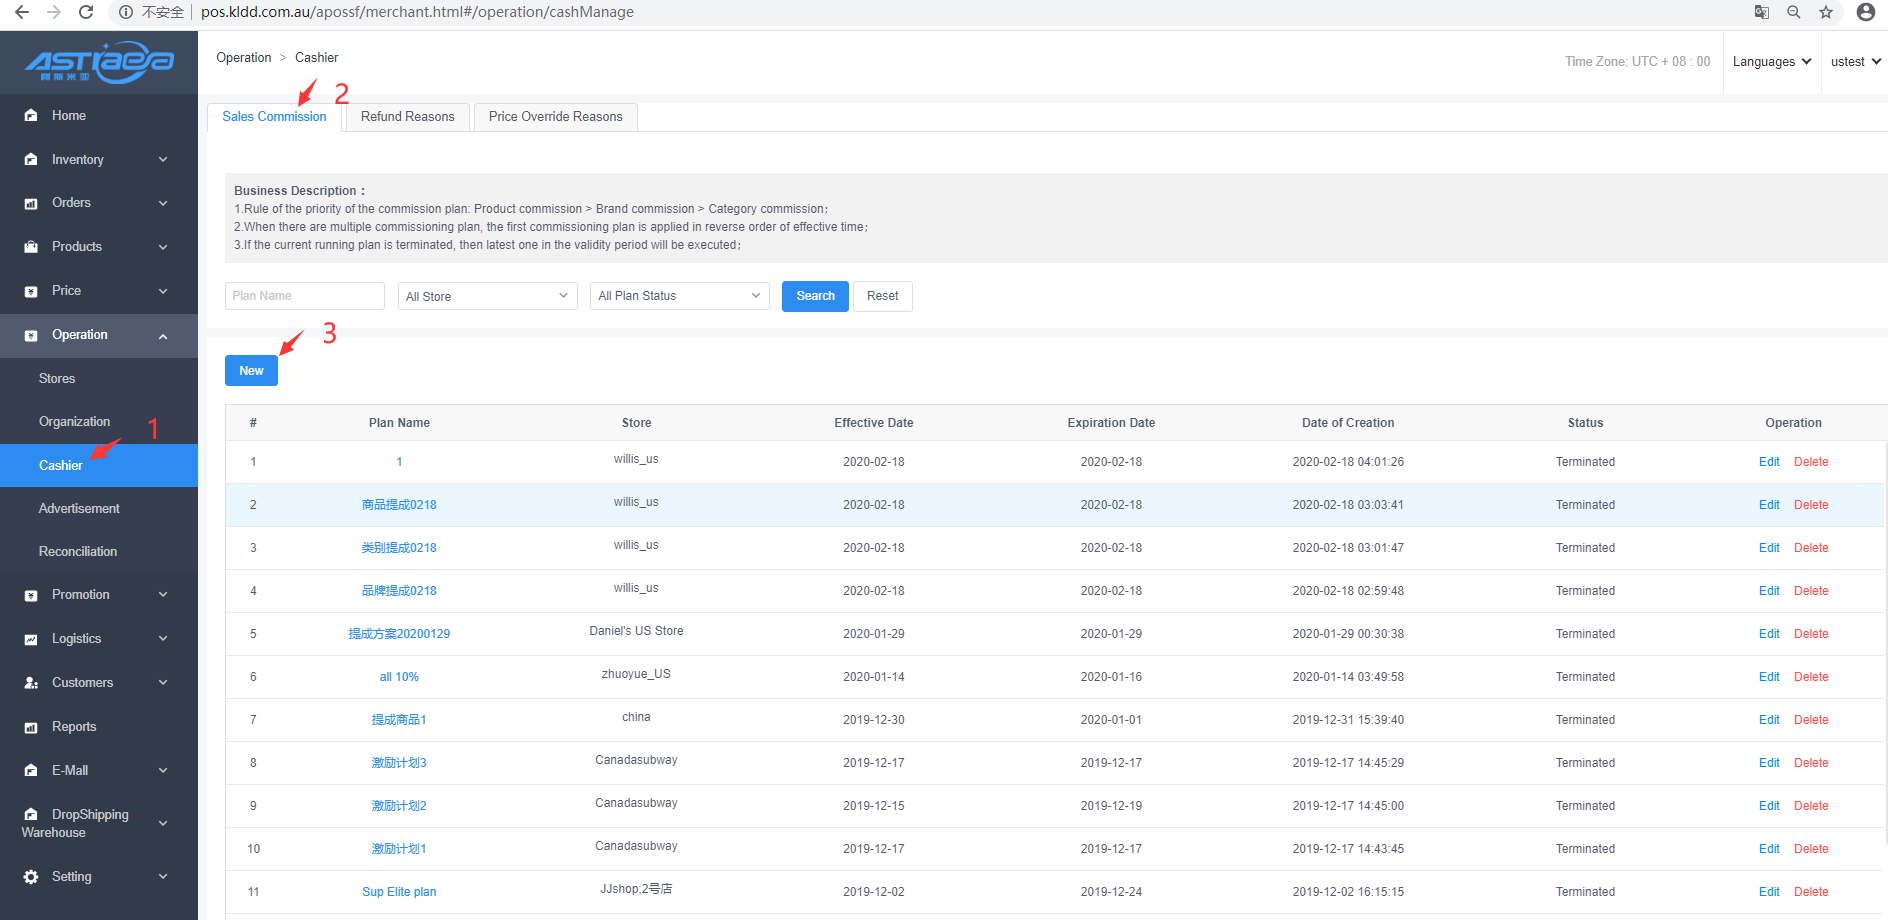
Step 2; Set plan name, validity period and applicable stores as instructed, select products participating in sales commission (add based on product category, product brand and product name) and then set commission ratio; or set a uniform commission ratio by batches and click "Save".
Step 3; Click "Sync Data” at the client, then you can obtain the commission information of the product.
Step 4; Where products participating in commission are sold at the client, click "Sales", select the account of sales and complete settlement, the commission record will be under the sales automatically.

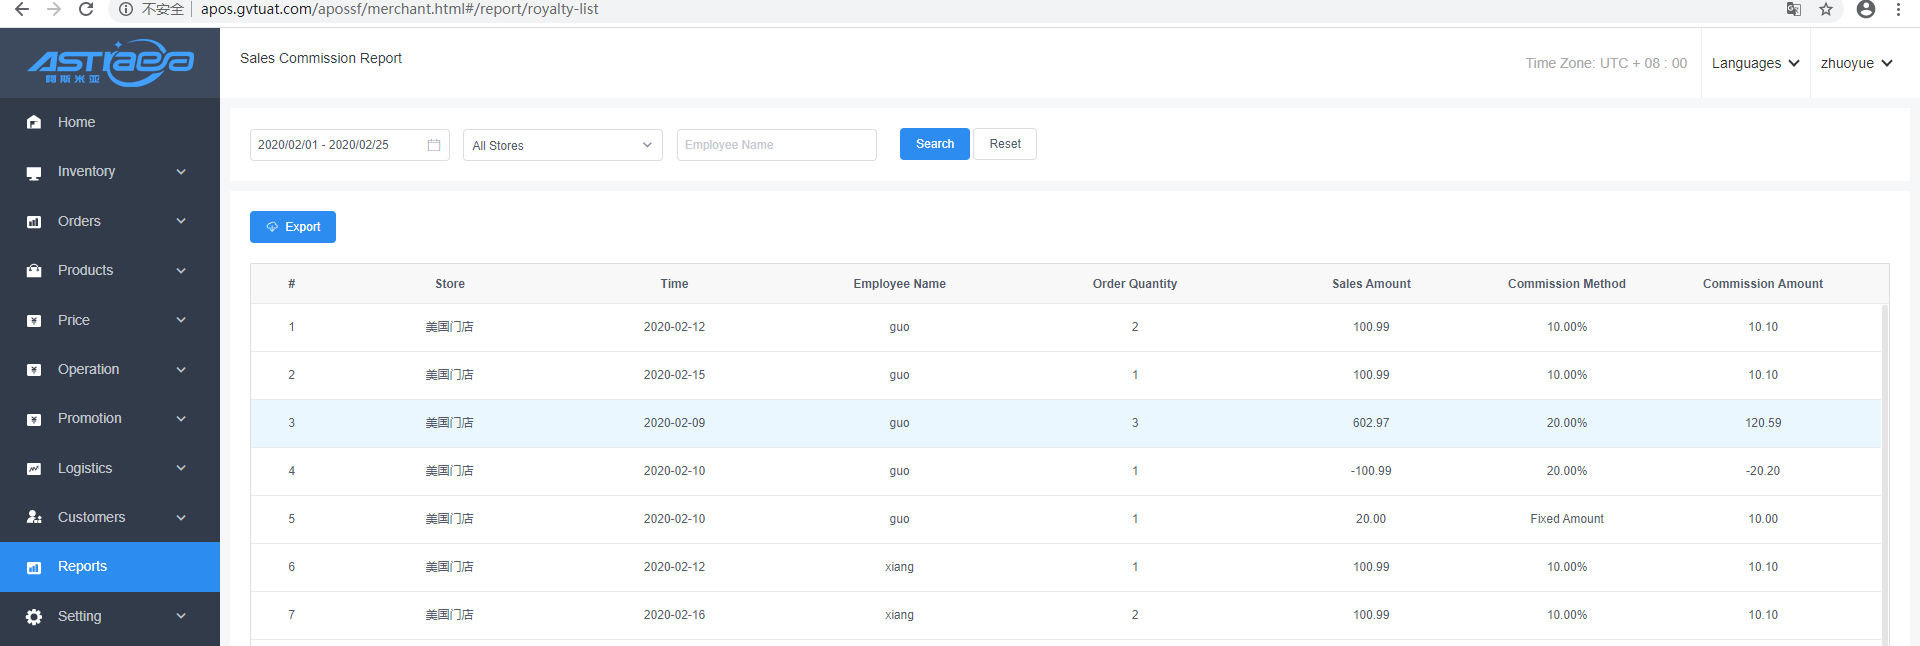
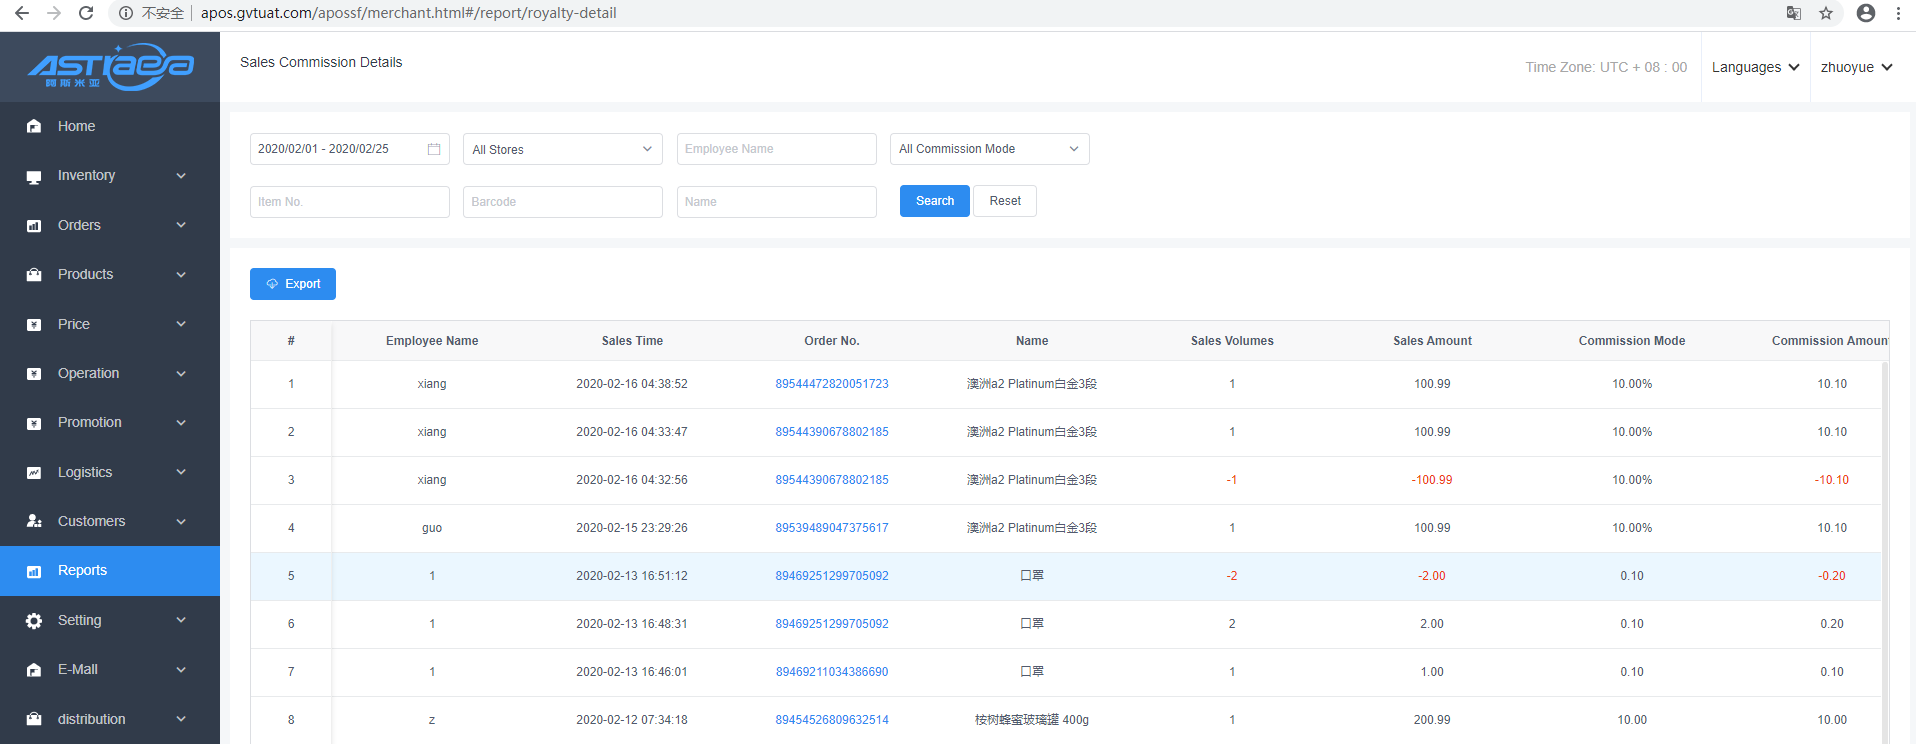
Step 5; The server can view employees’ commission summary and details in "Reports".
5.3.2 Refund reasons
The reason for returning menu is used to set the reason of customers during refunding. Customers can select the reason for returning in the background or enter your own reasons (the reasons will not be saved in background setting) for returning for orders at the client.
[Operating steps]
Step 1; Enter the server, click the "Operation " menu, click "Cashier", click "Refund Reasons", and click "Add".
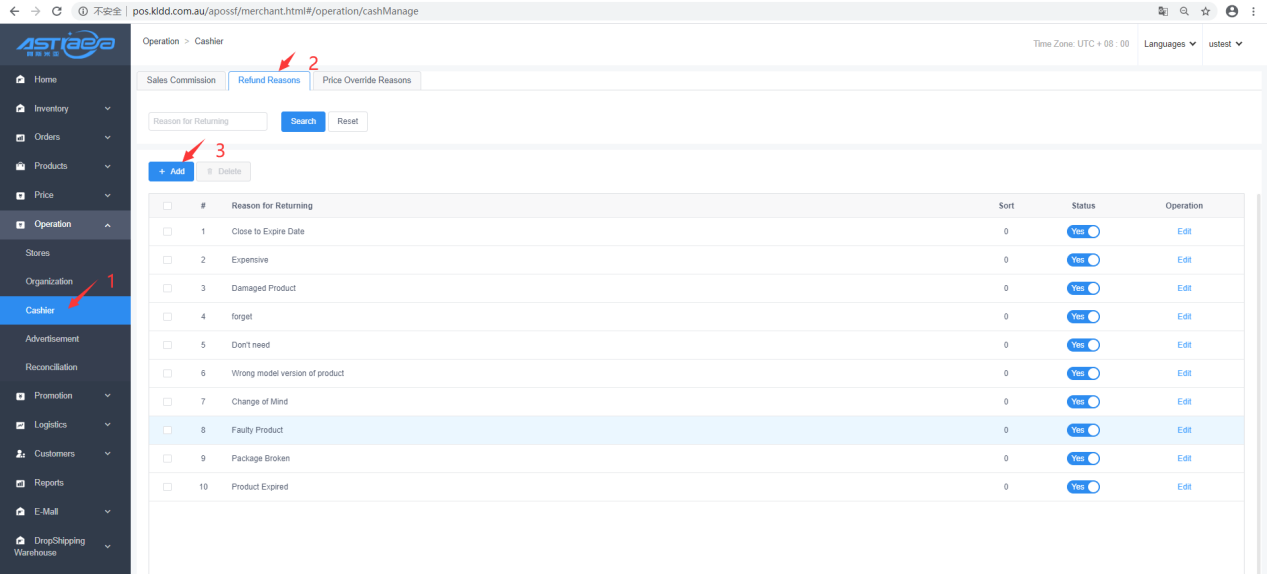
Step 2; Enter reasons to be set and click “OK”.

Step 3; Click "Sync Data" at the client, and then you can select the set reason when refunding again.
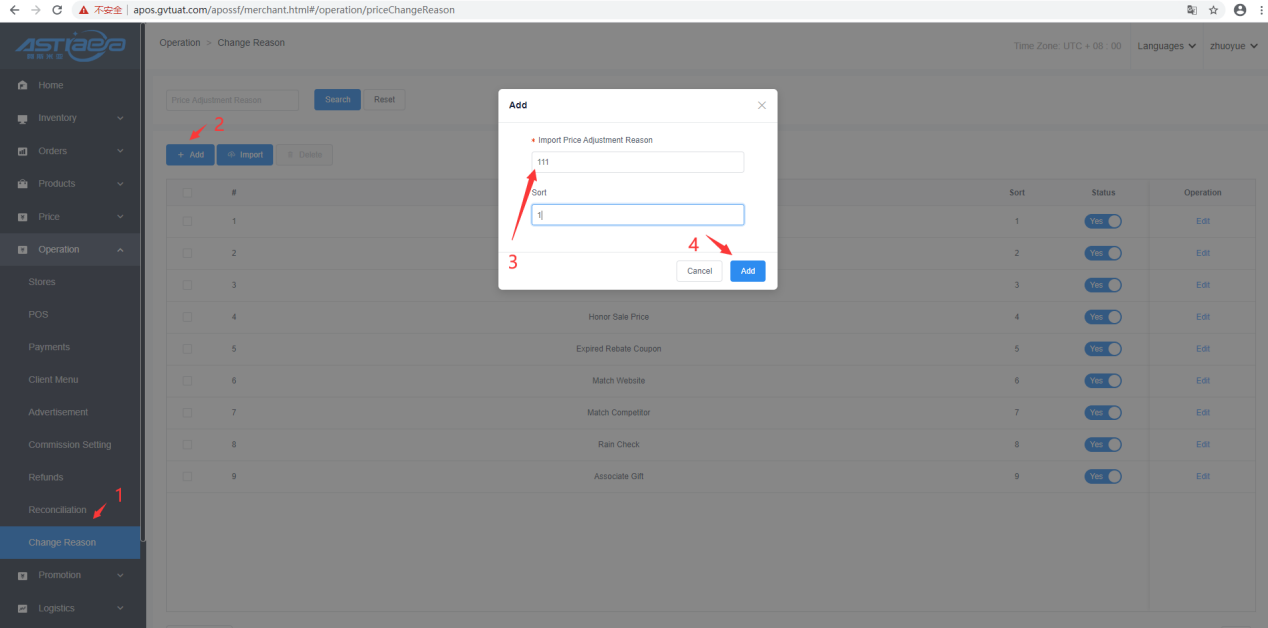
5.3.3 Price override reasons
Price override menu is used to set the price override reason (the system will display in default 9 reasons). When changing product price at the client, customers can select the price change reason configured in the background ("Others" are generated in default by the system, and the authorized person needs to authorize when customers selecting other reasons, but the cashier does not have the permission for price override).
[Operating steps]
Step 1;Enter the server, click the “Operation” menu, click “Cashier”, click “Price override Reasons”, click “Add” (customers can add other price override reasons than the 9 reasons generated by the system ).
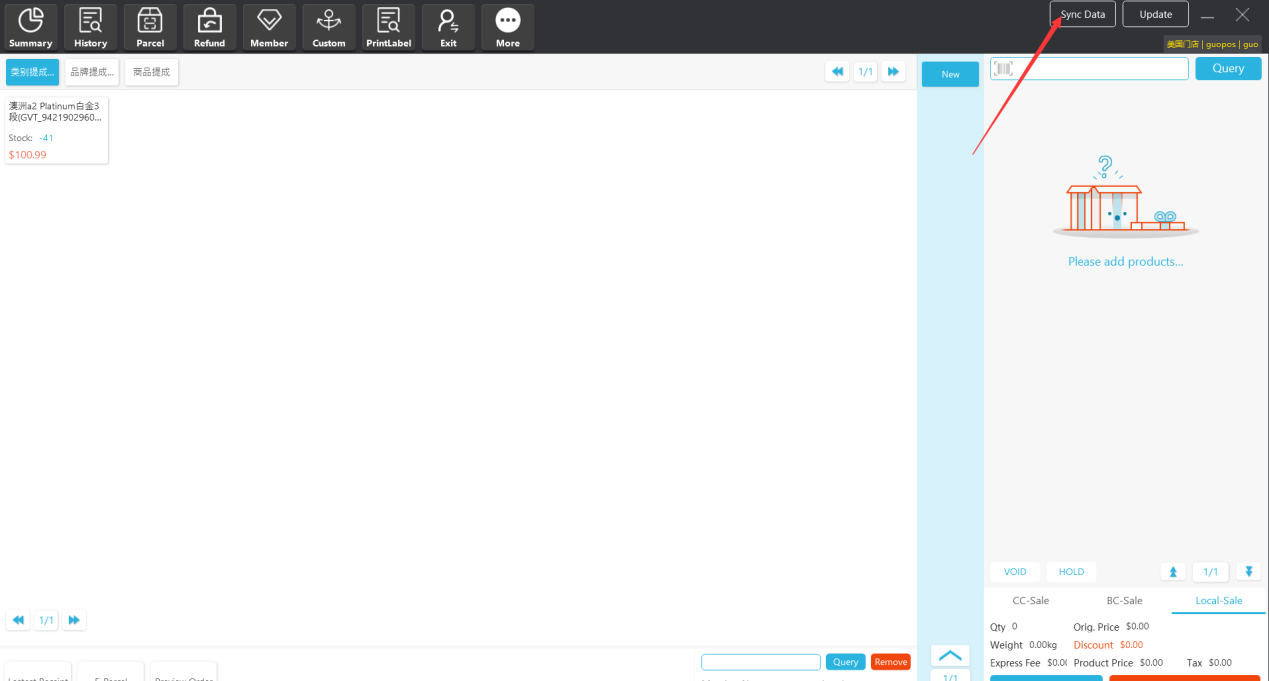
Step 2: Click "Sync Data" at the client.
Step 3: Select product and order, change product price.

Step 4: Select price change reason and click "OK".
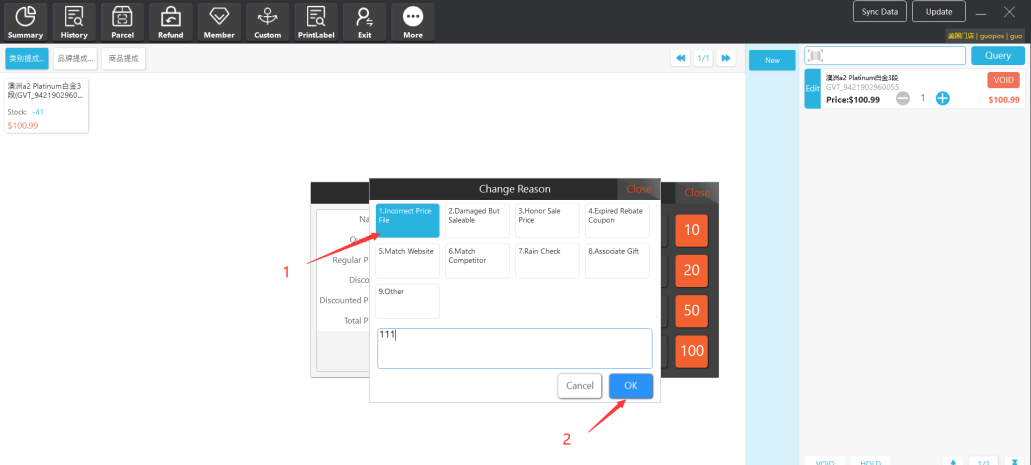
Step 5: Click Settlement, and amount of the product will be the amount changed when settling at the client; price will be changed successfully after settlement.
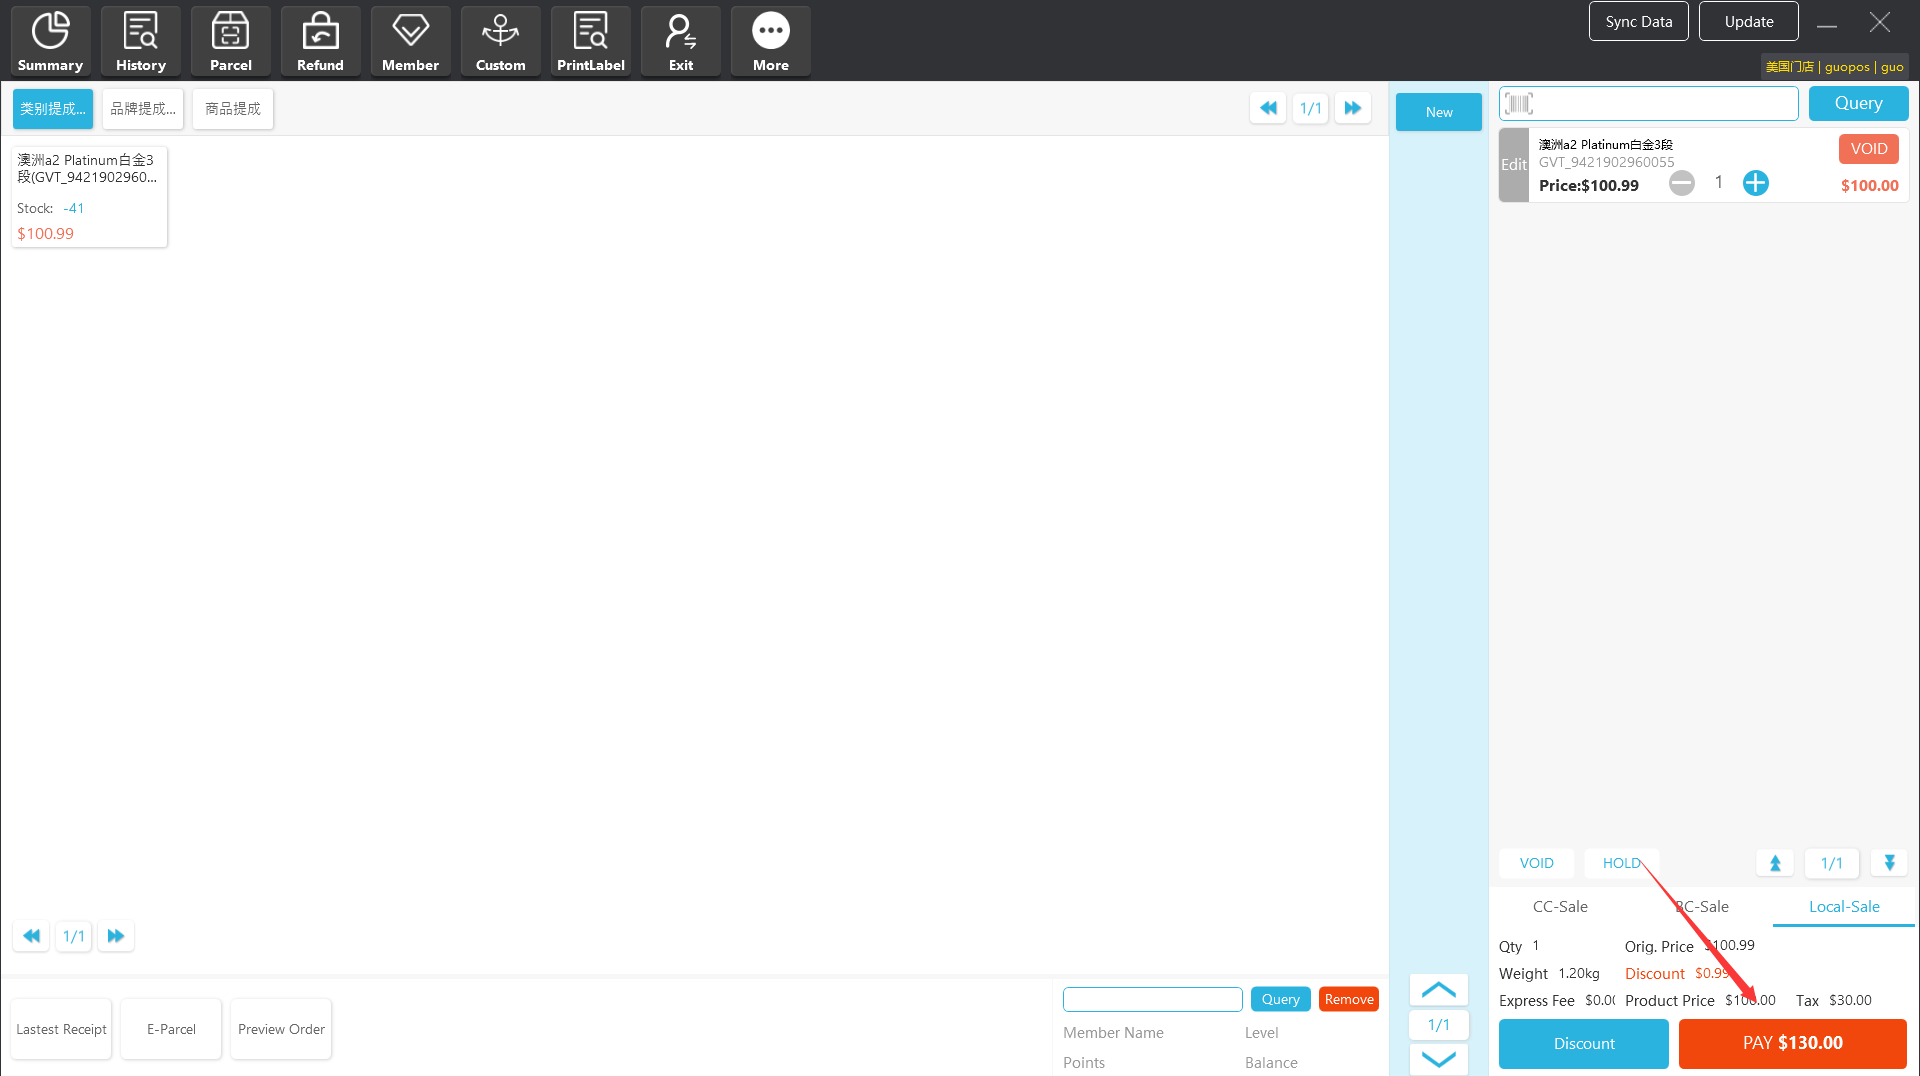
Step 6: Check Reports--Manual Discount Report, a new record for product price change will be generated, and the price change reason will be displayed.
A total (only the total quantity and total difference) will be provided for each store in the Manual Discount Report; total difference = (Unit Price – Sell Price) * Qty.

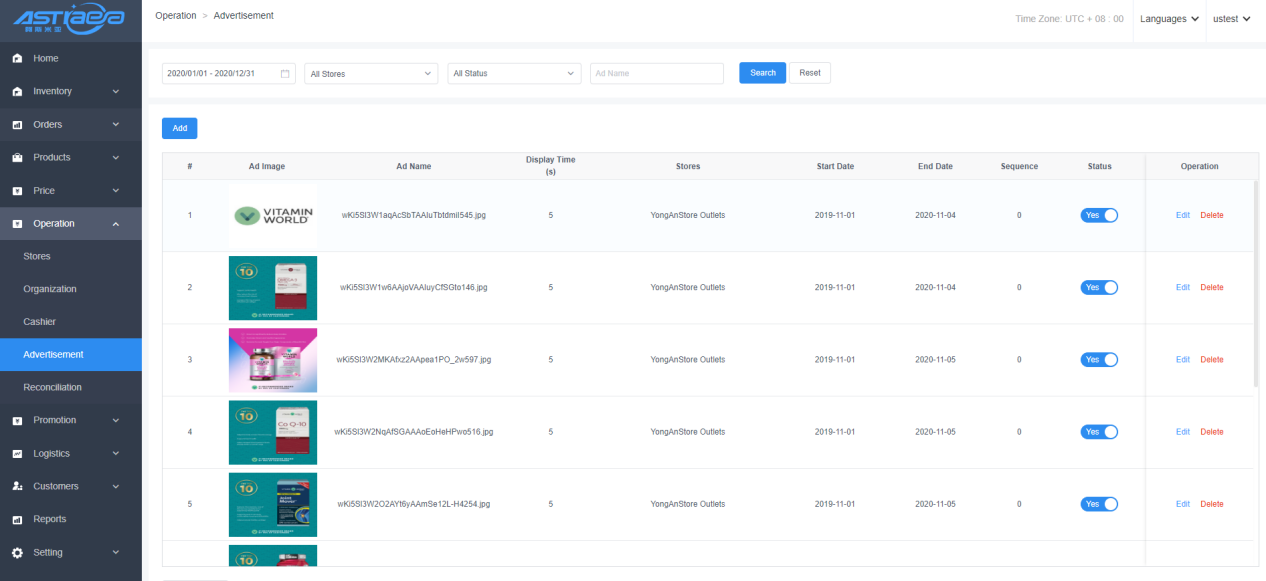
5.4 Advertisement on secondary screen
Rotation advertisement pictures can be set for the secondary screen at the client in the advertisement menu on the secondary screen. Preconditions for use of rotation pictures on secondary screen: dual-screen cash registers that support extension display shall be used.
5.4.1 Display advertisement on secondary screen
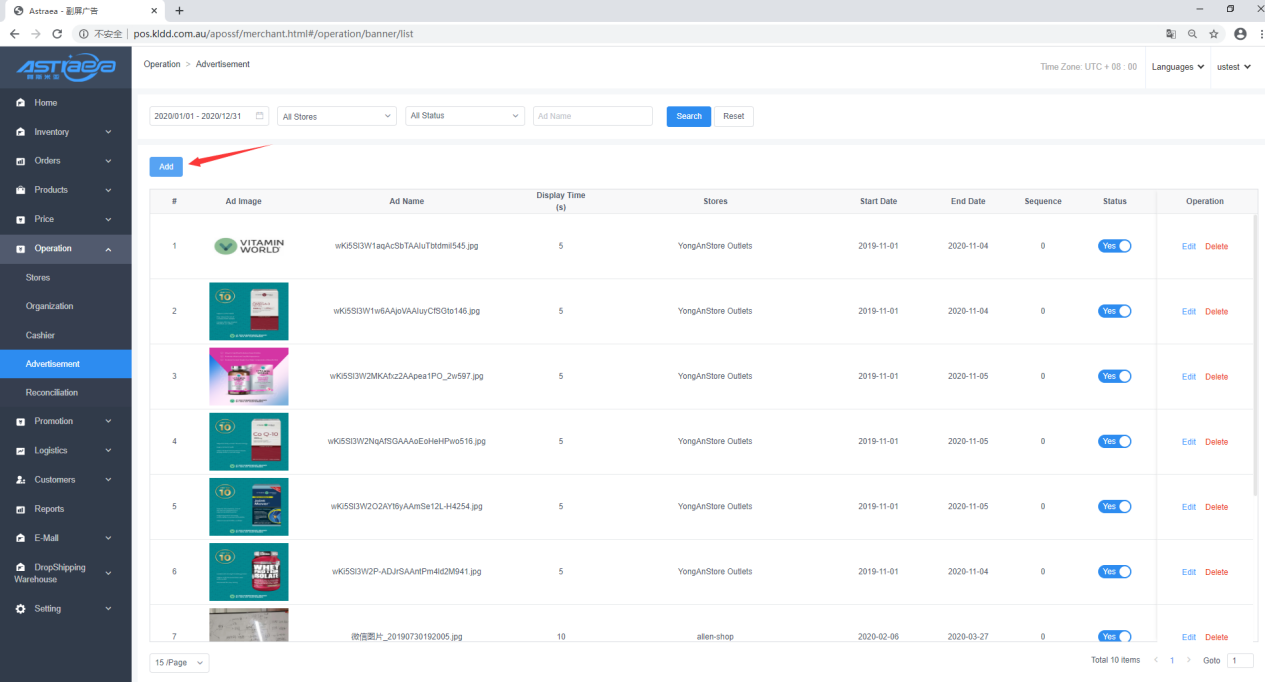
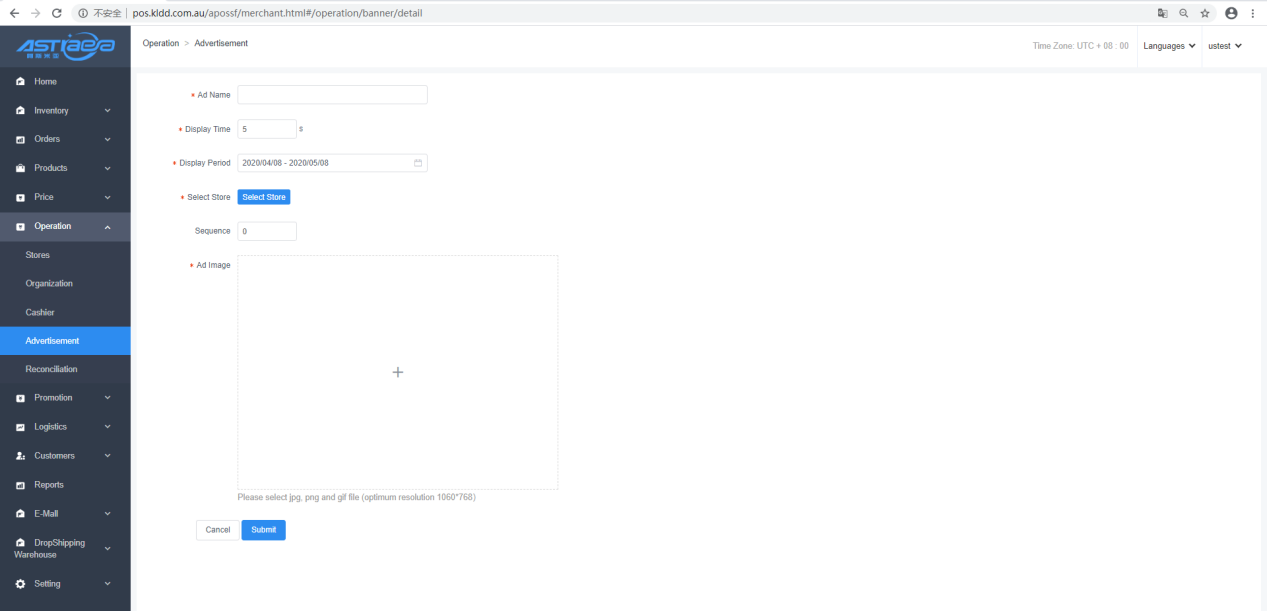
5.4.2 Add advertisement on secondary screen
[Operating steps]
Step 1: Click on the menu "Operation Management-> Sub-Screen Advertising" and click "Add"
Step 2: Enter the corresponding information
Step 3: Click “Submit”
5.5 Reconciliation
5.5.1 Export of reconciliation records
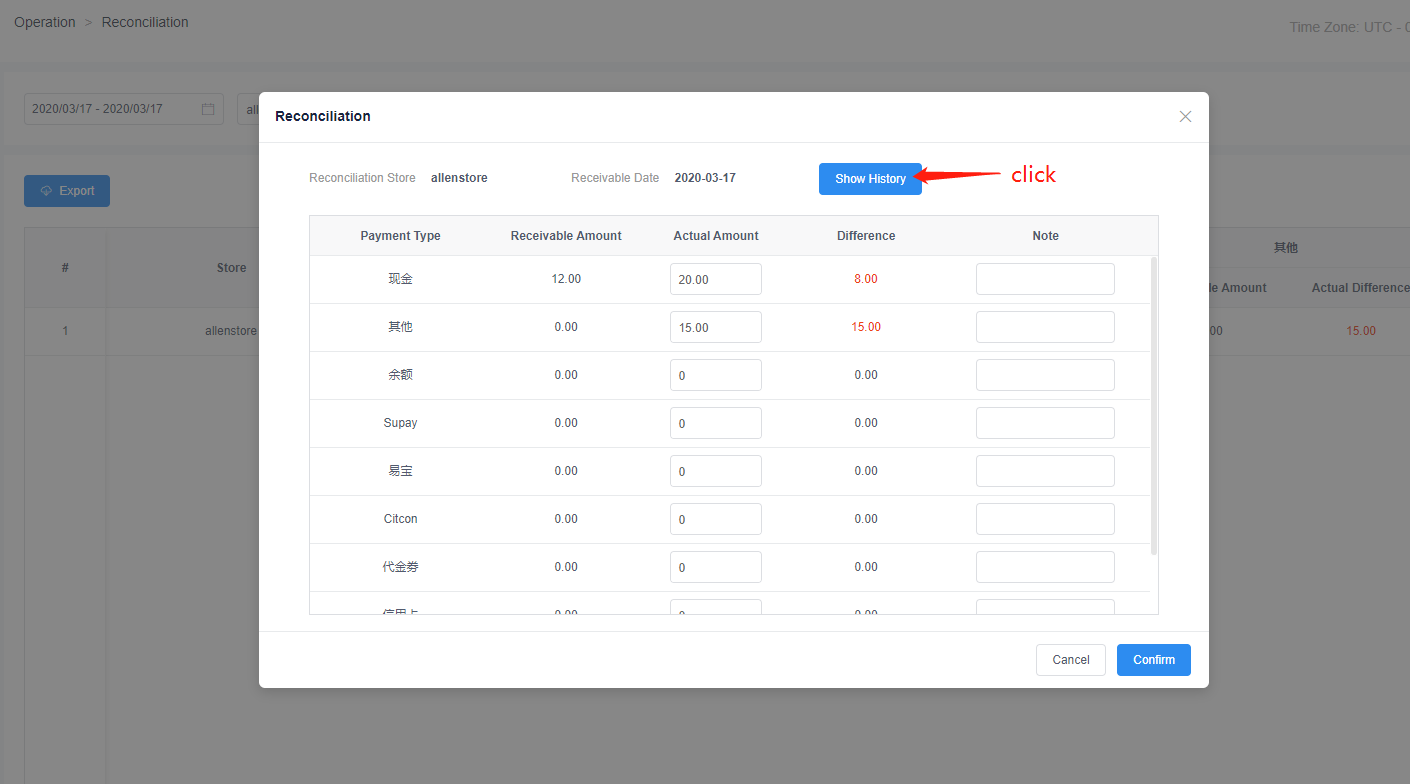
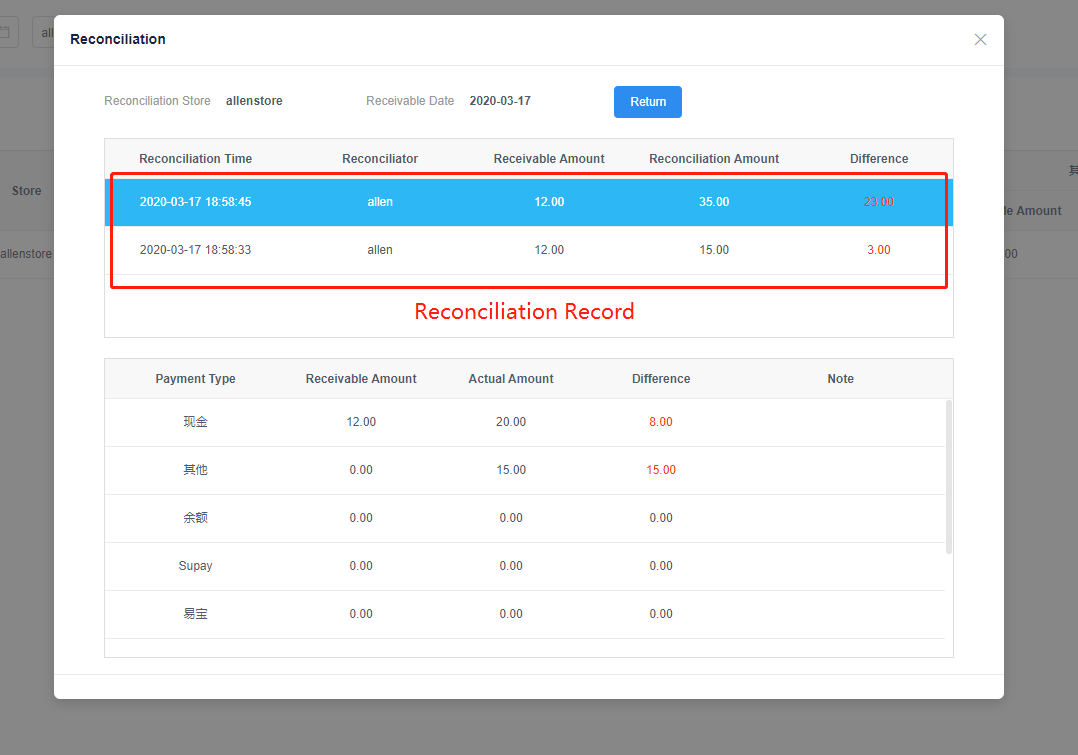
Reconciliation is used to make statistics for the daily revenues and expenditures by the enabled payment method of stores, by which actual amount will be confirmed, and the difference between it and the receivable amount will be counted. It supports export.

5.5.2 First reconciliation of records.
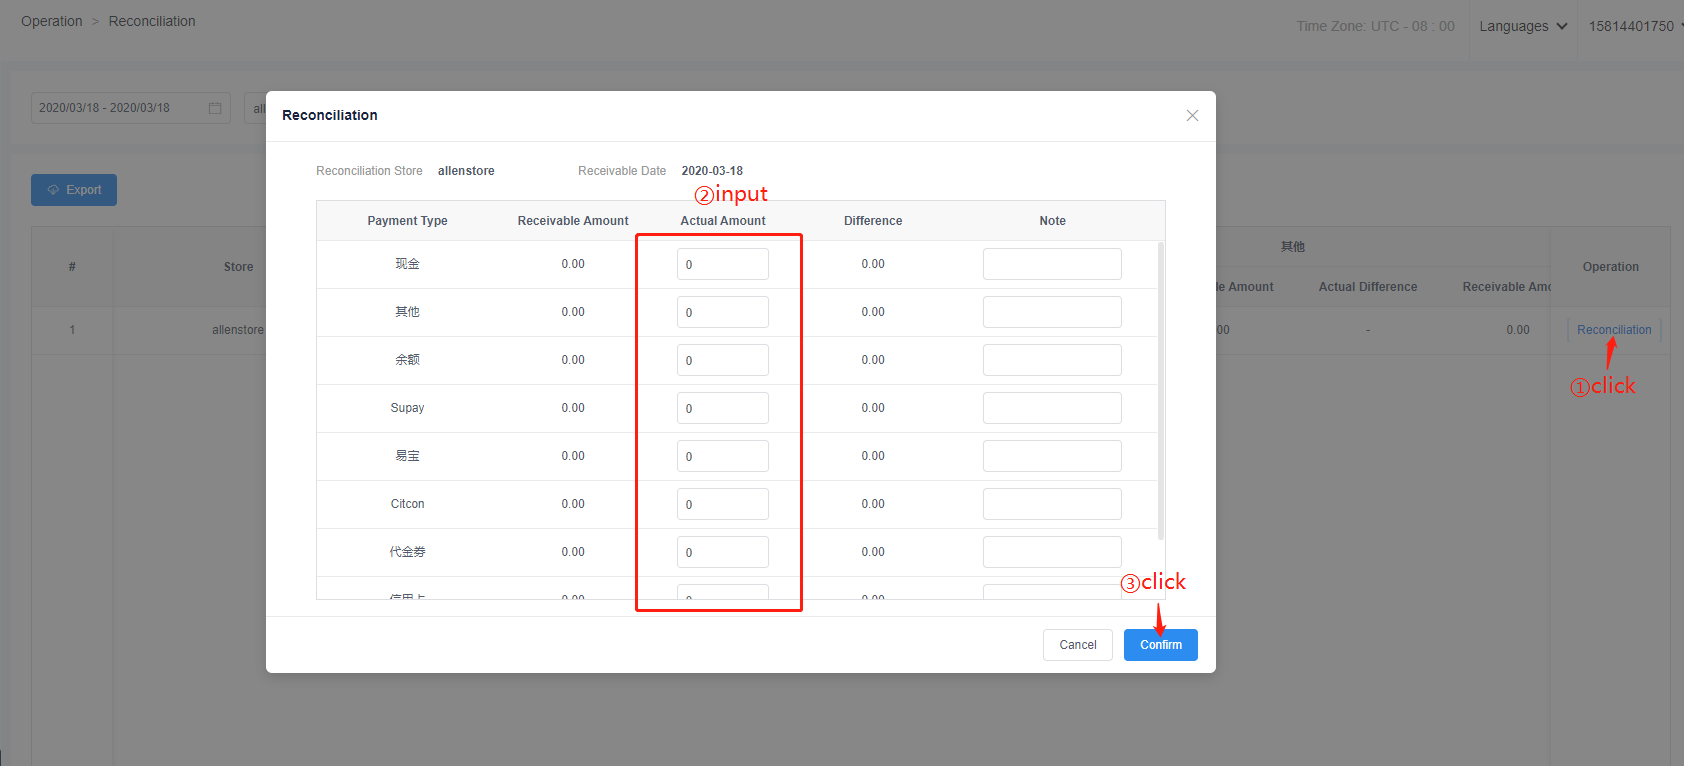
5.5.3 Multiple reconciliations of records.
5.6 Sales analysis
5.6.1 Sales analysis
Sales analysis is mainly used to query sales data. Without setting a sales target, the actual sales data can also be queried normally.
Detailed explanation of each professional noun:
Order quantity: the number of sales orders, without reducing the number of return orders;
Daily sales: the actual sales price of the day (AU/CN is tax-included price, US is tax-excluded price), actual sales (minus the return amount), including CRV Fee, excluding logistics;
Sales target: set the sales target for the current day, click the modify icon to modify the current store sales target for the current day (set the single-day sales target in the same operation as the sales target); the sales target value is not set, the sales target, the sales completion rate, The sales difference and sales deviation ratio are displayed as "-".
Sales completion rate (%): daily sales / sales target.
Sales gap: daily sales-sales target.
Sales deviation ratio (%): sales difference / sales target.
Last year's sales: the price of goods on the same day last year (AU/CN is tax-included, US is tax-free), actual sales (reduced return amount), including CRV Fee, excluding logistics; last year's sales were 0 hours, last year Sales and sales comparisons are shown as "-".
Sales comparison (%): daily sales/sales last year.
Average sales: daily sales/number of sales orders

5.6.2 Sales target
The sales target is used to query and set the sales target data. Without setting the sales target, the records can be queried normally. Can be set individually and in batches. Batch support for setting sales targets for multiple dates in a single store.
Detailed explanation of each professional noun:
Manually enter the sales target or set the sales target by custom, without benchmarking the historical sales, the reference date, reference day sales, growth rate (%) are displayed as "-".
Set the sales target by referring to the historical sales volume, and the reference date is the reference date selected at the time of setting.
Reference day sales: the reference date of the commodity price (AU/CN is tax-included price, US is tax-free price) actual sales (less return amount), including CRV Fee, excluding logistics; when the sales value is 0, it is " -".
Sales target: the sales target designed by the operating personnel.
Growth rate (%): sales target/sales on reference day-1, when there is no reference day or the sales on reference day is 0, the growth rate (%) is displayed as "-", the growth rate is calculated as a negative number, displayed in red font.


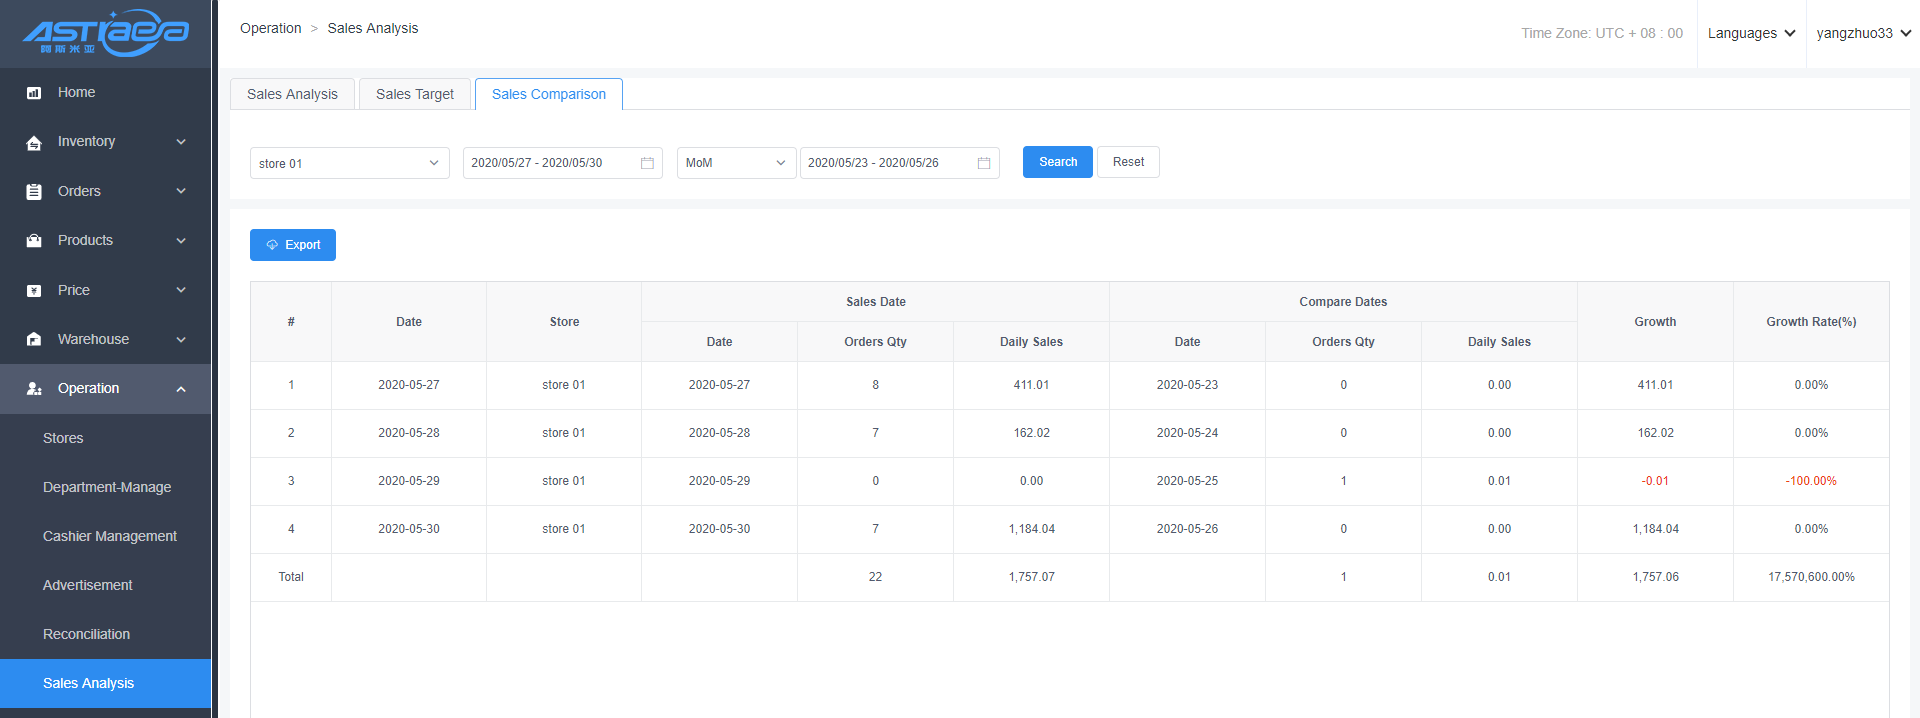
5.6.3 Sales comparison
Sales comparison is used to compare and analyze historical sales.The sales date defaults to the past 7 days (excluding the current day).
Detailed explanation of each professional noun.
Used for comparative analysis of historical sales, the sales date defaults to the past 7 days (excluding the day).
Comparison methods include year-on-year, MoM and customize, with the default MoM.
If the sales date is A~B and the comparison date is X~Y, then the relationship between the sales date and the comparison date is;
Year-on-year: compared with the same period last year (the comparison date cannot be modified), X =A–1 year, Y=X+(Y – X), if the sales date is "2019-01-01 ~ 2019-01-31",the comparison date "2018-01-01 ~ 2018-01-31".
MoM: comparing with the previous period (the comparison date cannot be modified),Y=A–1 day, X=Y–(Y-X), if the sales date is "2019-01-01 ~ 2019-01-10", then the comparison The date is "2018-12-22 ~ 2018-12-31".
Customize: the user chooses the comparison date, the ratio of the days of the comparison date is the same as the number of days of the sale date, otherwise, when the query is clicked, the message "the comparison date and the sale date are inconsistent!",modify the start comparison date to calculate the end date,Y=X+(B–A),modify the end comparison date calculation start date,X=Y–(B–A).
The comparison result is that the dates in the sales date range are compared with the dates in the comparison date range.
Increase=Sales on the sales date and day–Compare sales on the date and day.
Growth rate=growth amount/comparison date sales.
VI. Customer Center
6.1 Member management
6.1.1 Members at the server
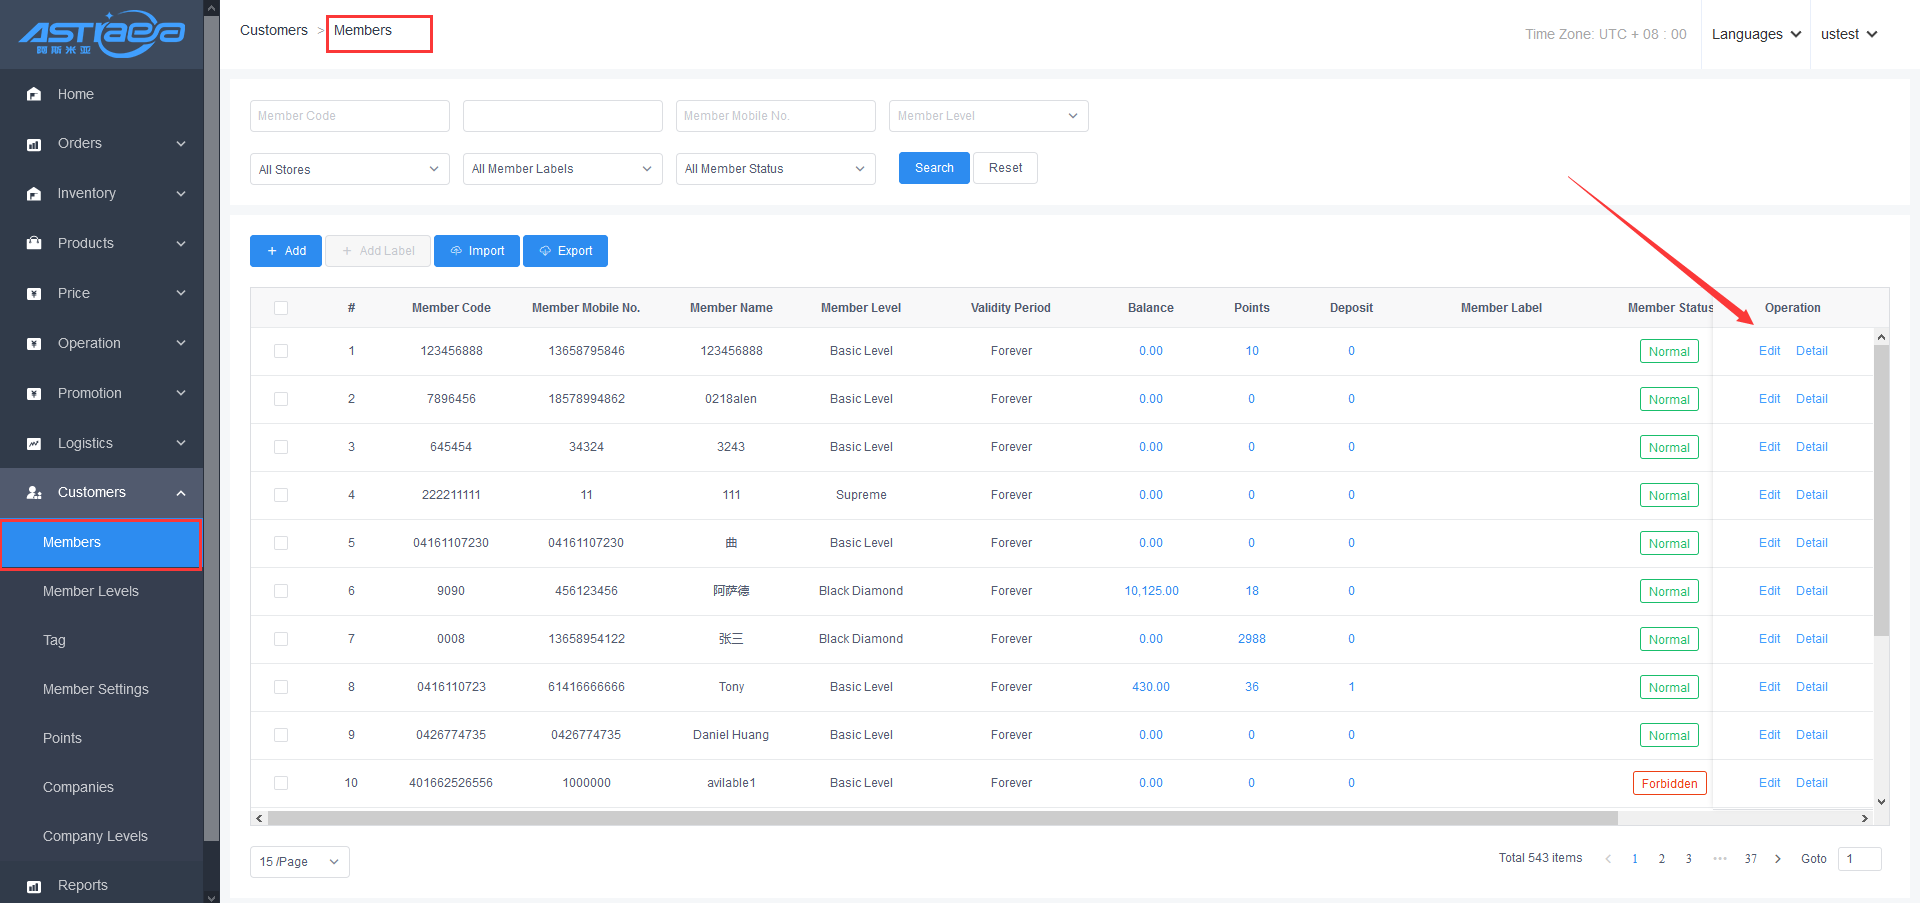
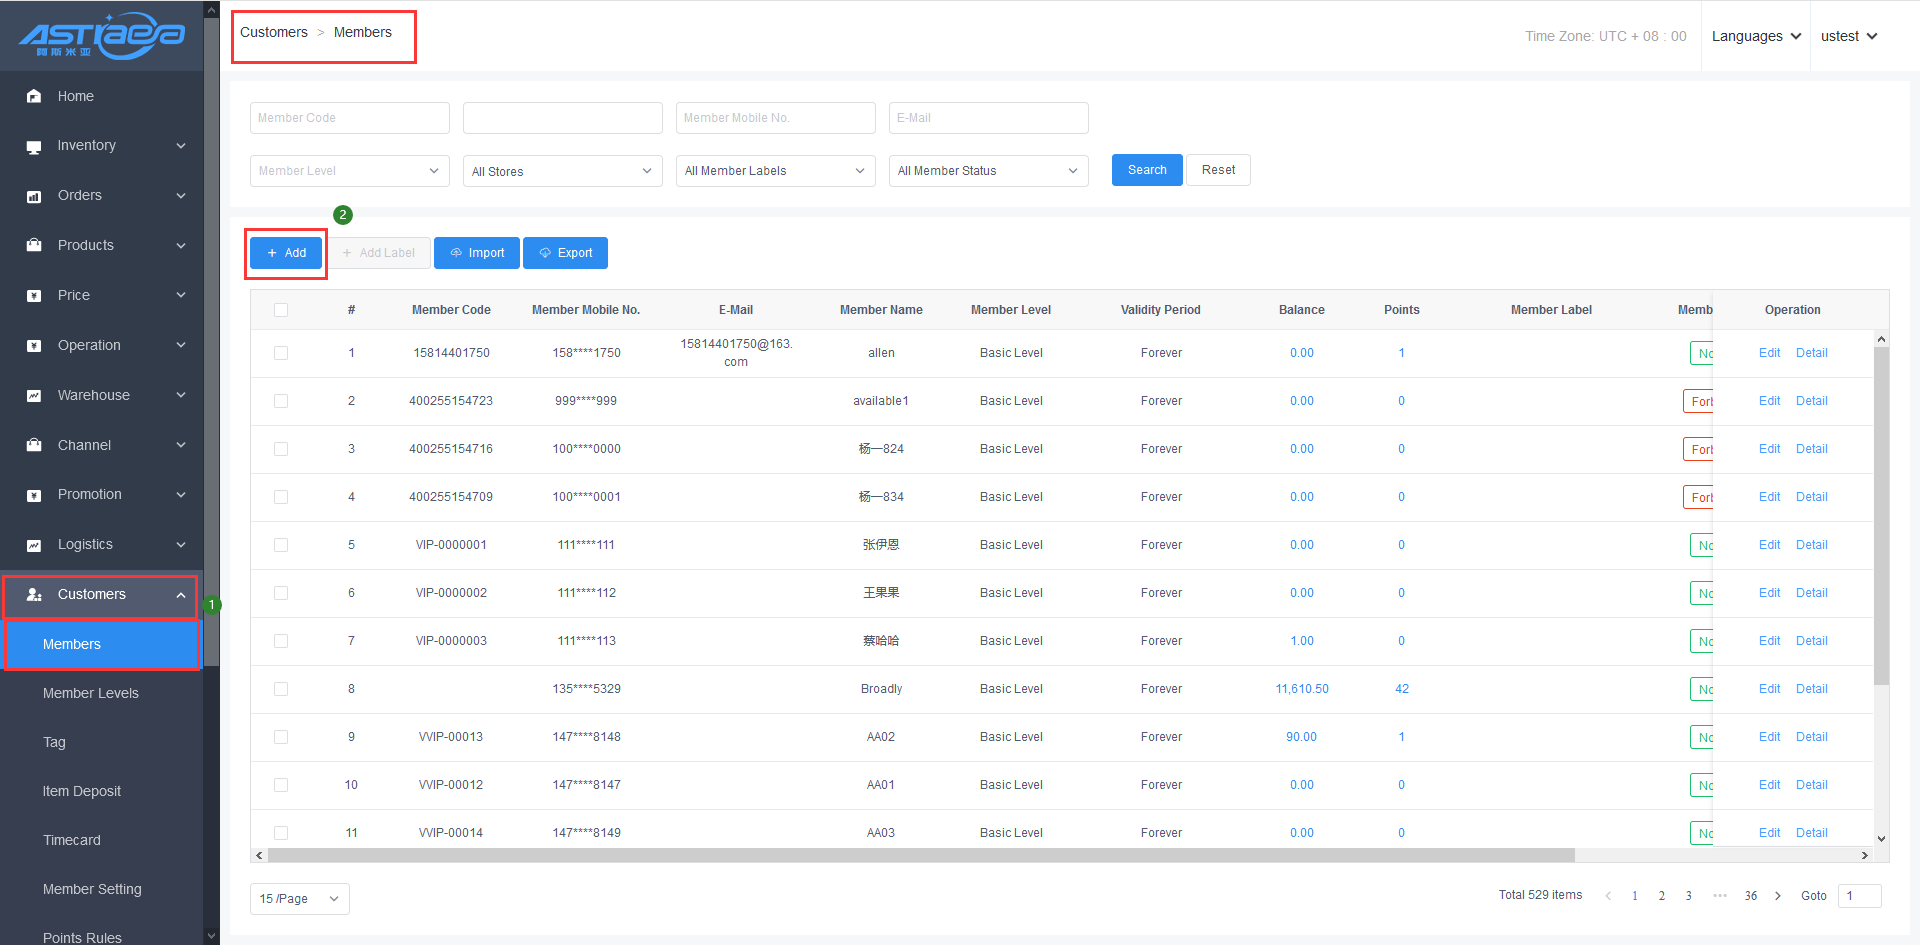
In the interface of member management function at the server, you can see all the member information under the current commercial tenant. You can add, edit, query and view the details of the member. The newly created member at the client will also be synchronous updated to the member management.
- Add single member at the server
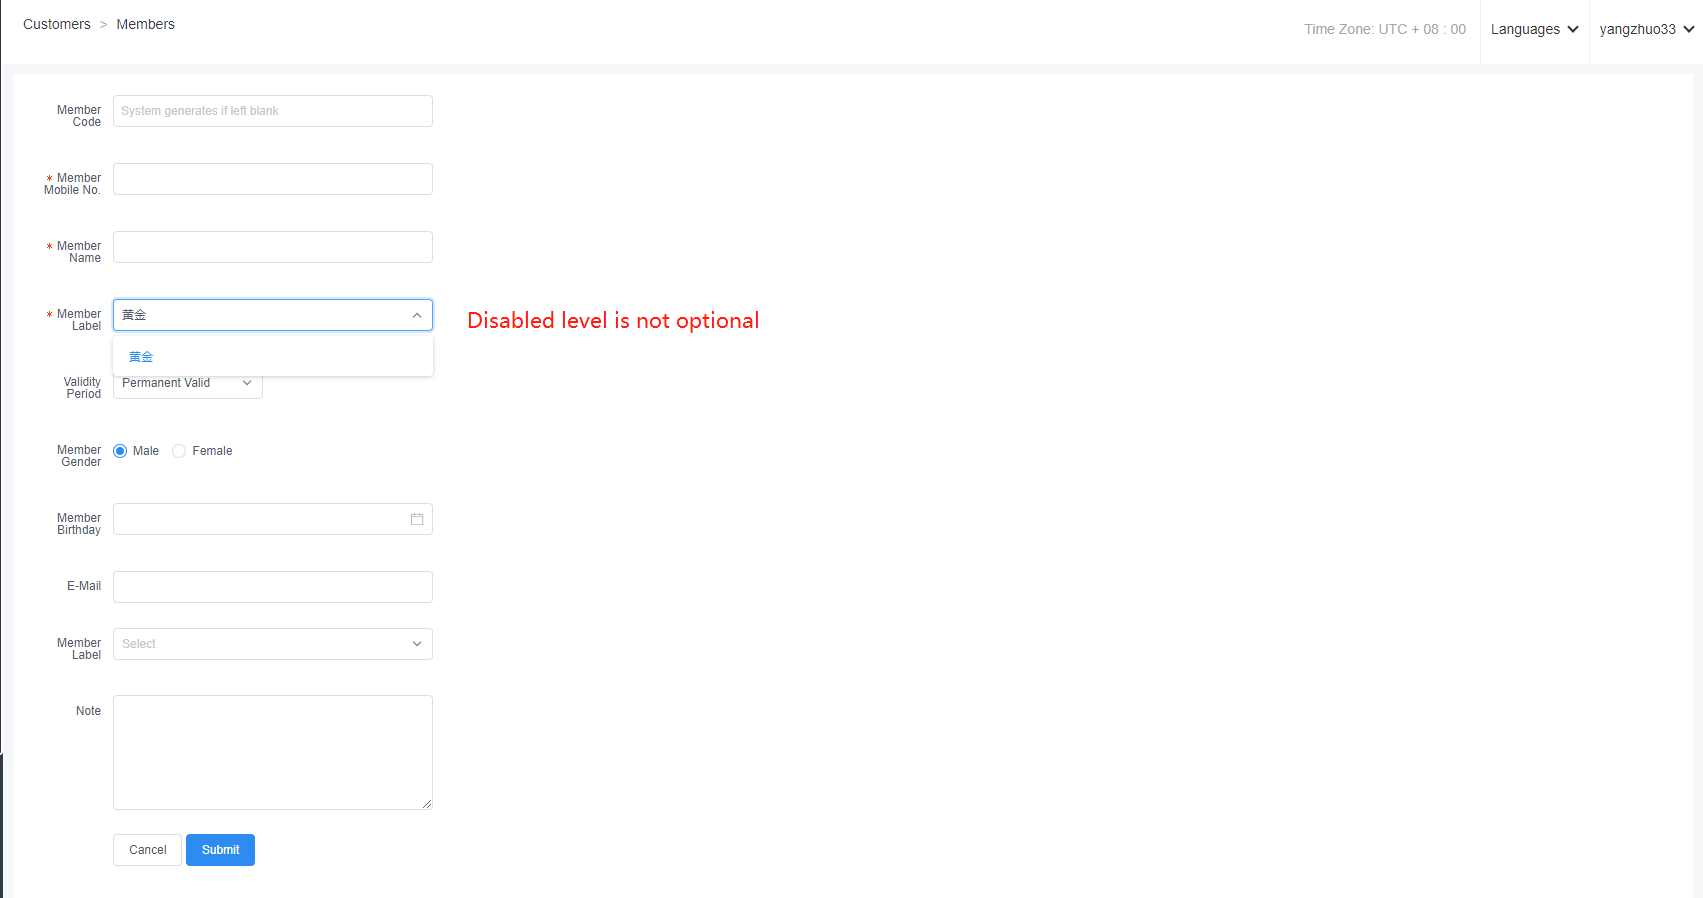
[Operating steps]
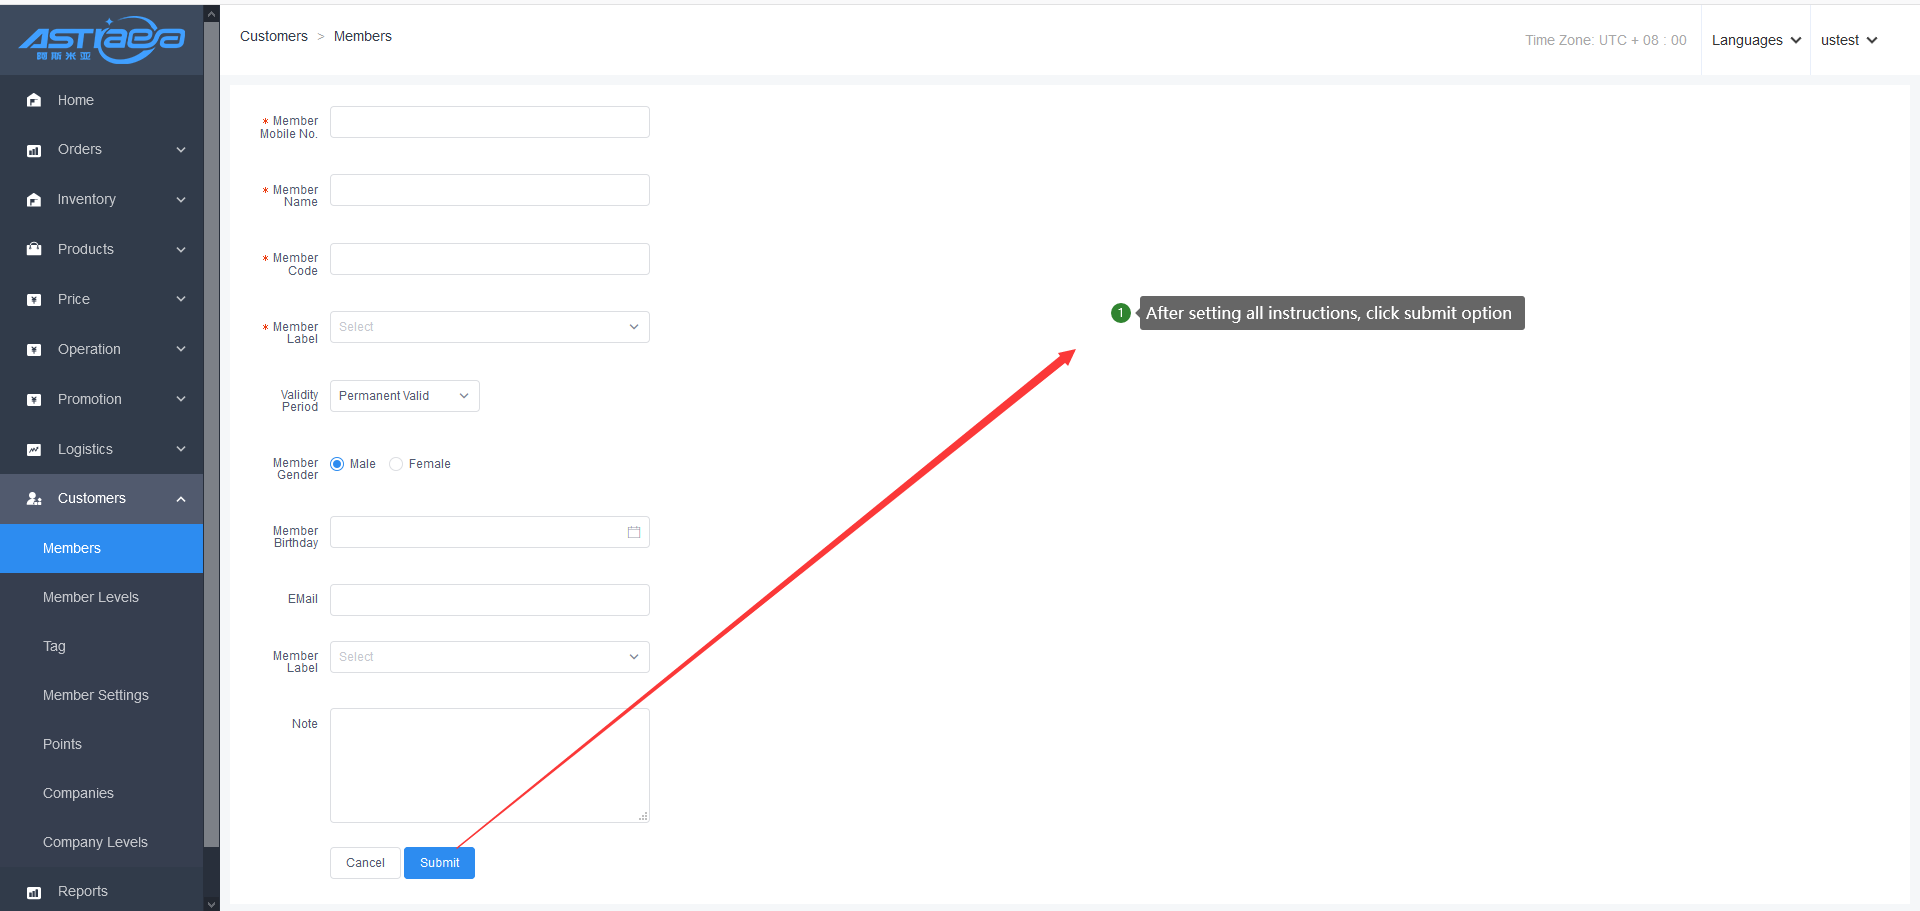
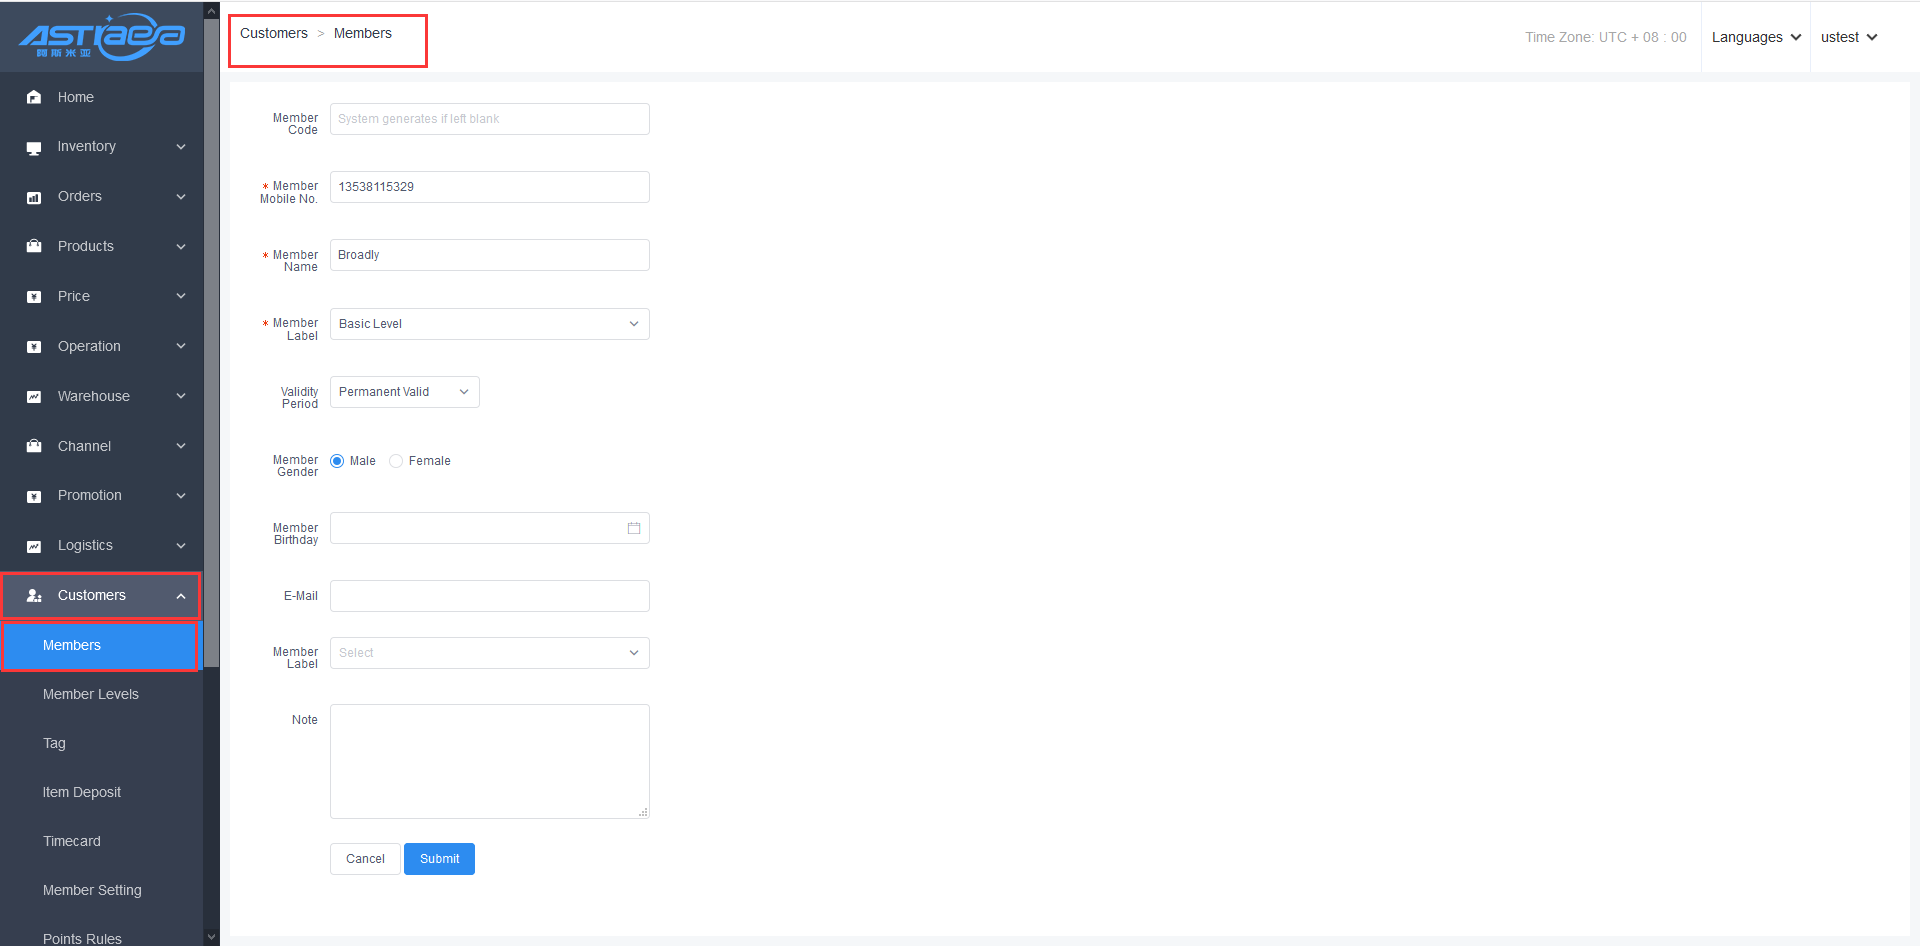
Step 1: Log in Apos server, click the Customers - Members, and click the “Add” button
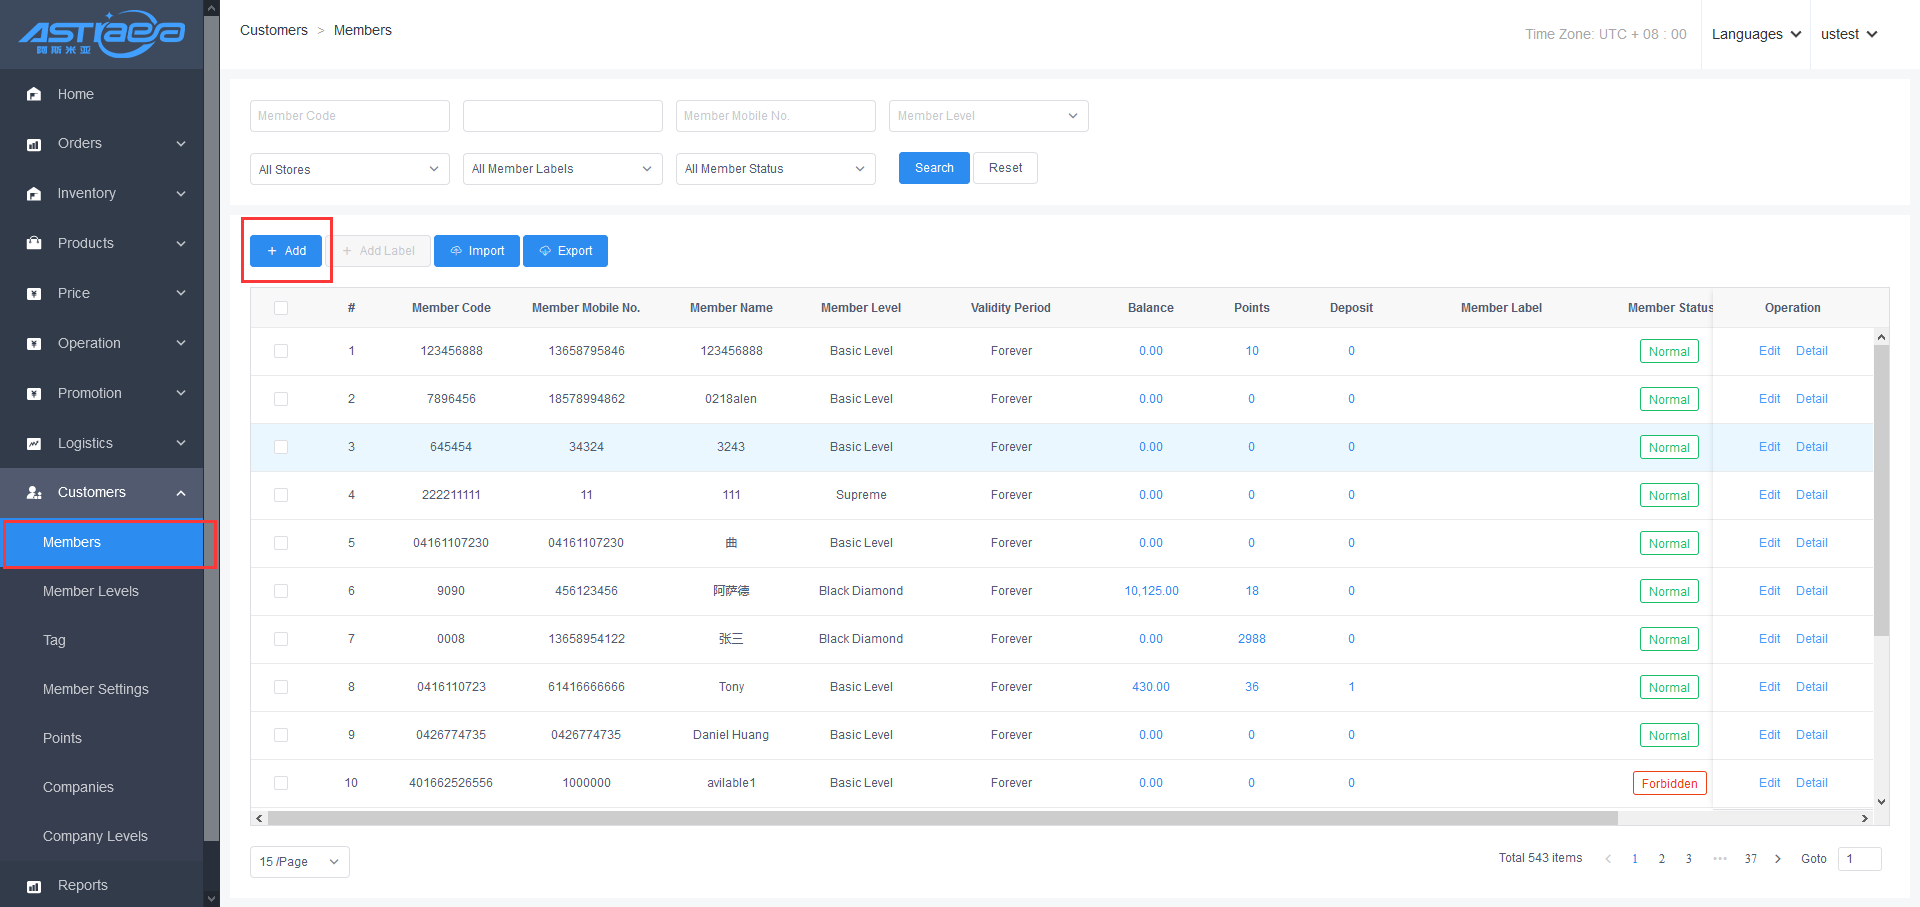
Step 2: Log in new member interface, enter the member mobile No., member name, member number, member level and other required information, you can also select to enter Tag, date of birth and other information. Click the “Submit” button to complete adding single member operation.

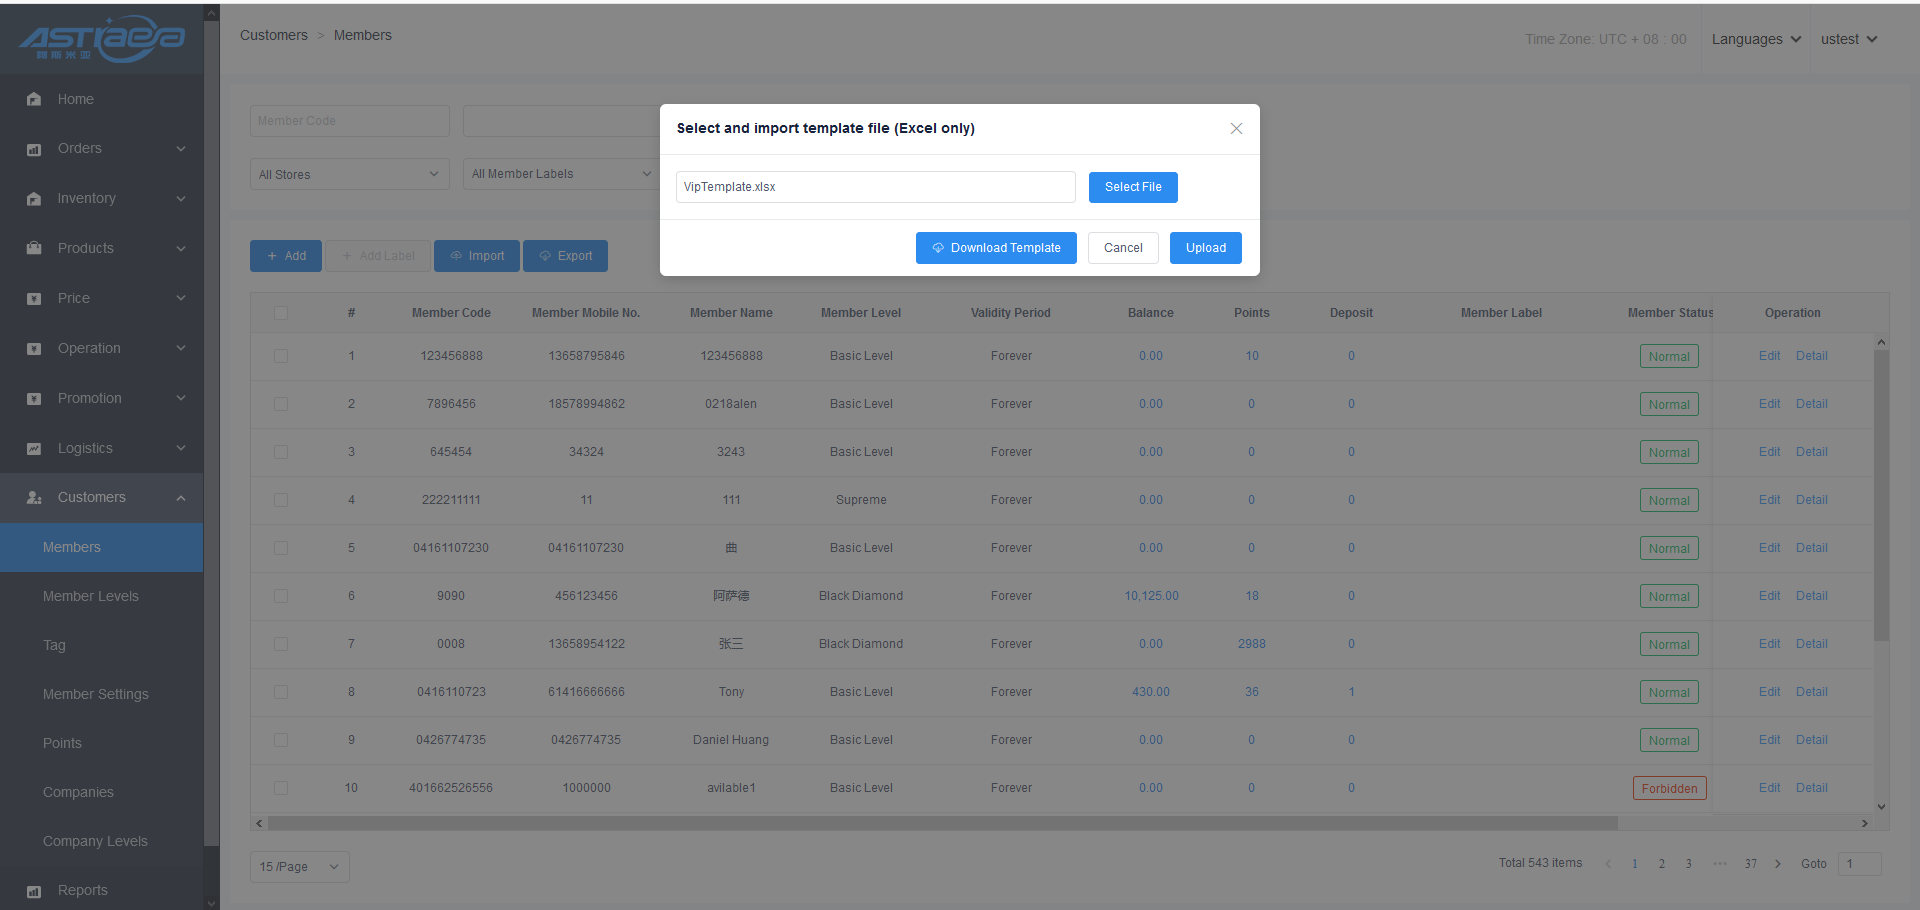
- Batch import members at the server
[Operating steps]
Step 1: Log in Apos server, click the Customers - Members, click the “Import” button, first click the “Download Template” to download the template to the local.

Step 2: According to the template, enter the required information, and save it after completion.
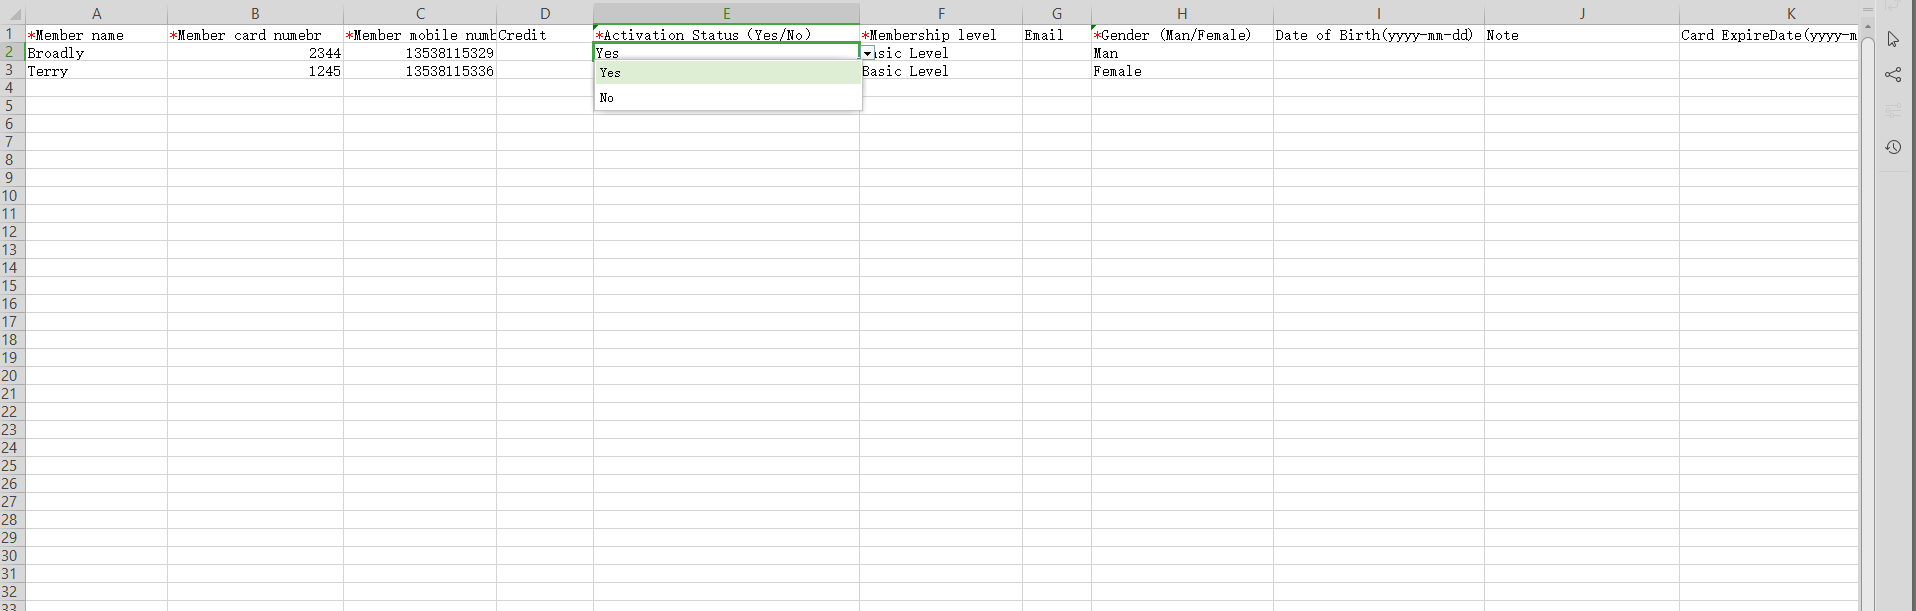
Step 3: In the import pop-up box, select the file and click upload to complete the batch import members operation.
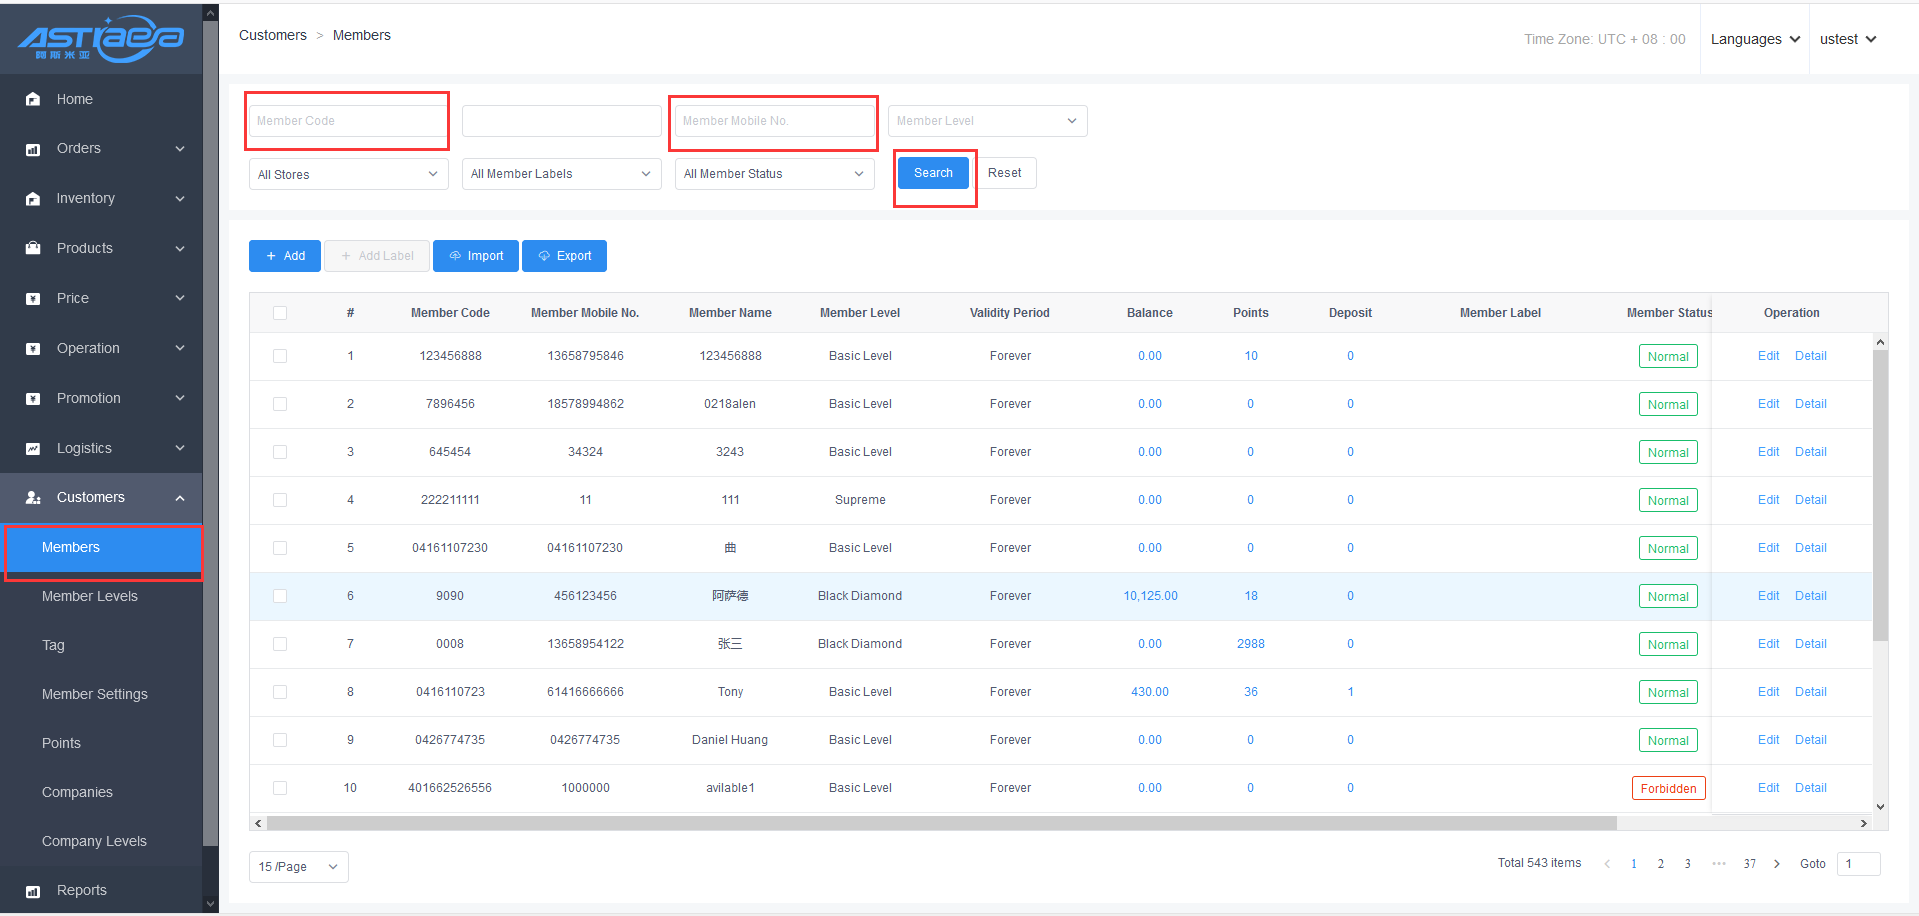
- Search members at the server
[Operating steps]
Step 1: Log in Apos server, click the Customers - Members, after entering the member number, member name, member mobile No. and other information, click “Search” button to find out the corresponding member information.
- Edit members at the server
[Operating steps]
Step 1; Log in server, click the Customers - Members, select one of the members, and click the edit button.
Step 2;You can edit and modify the member information to be modified. Click save to finish the editing member information operation.
- Search member details at the server
[Operating steps]
Step 1;Log in Apos server, click the Customers - Members, select one of the members, and click the detail button.

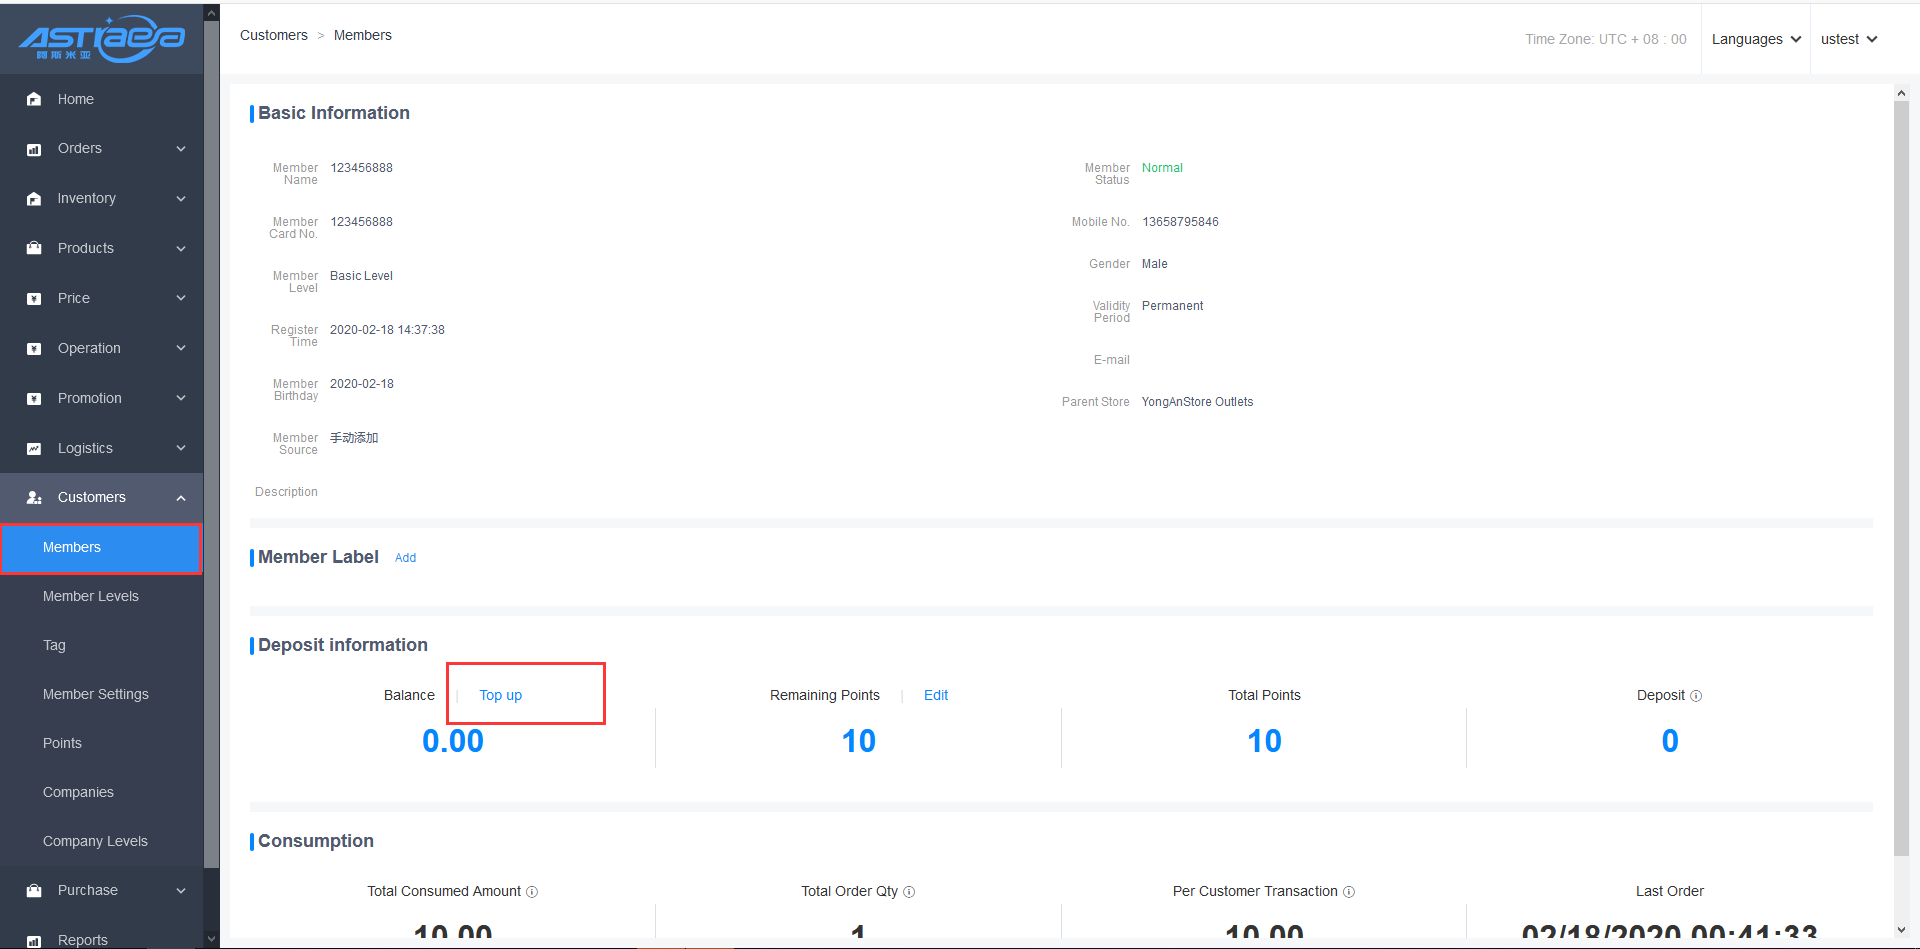
Step 2; You can directly log in to the member details interface, and view the basic information, tag information, asset information, consumption situation, etc., of the current member.

Step 3: Click on the top up to quickly top up the amount of the member (the top up option in the customer center-> member settings to set the recharge gift rule.

6.1.2 Use member settlement at the client
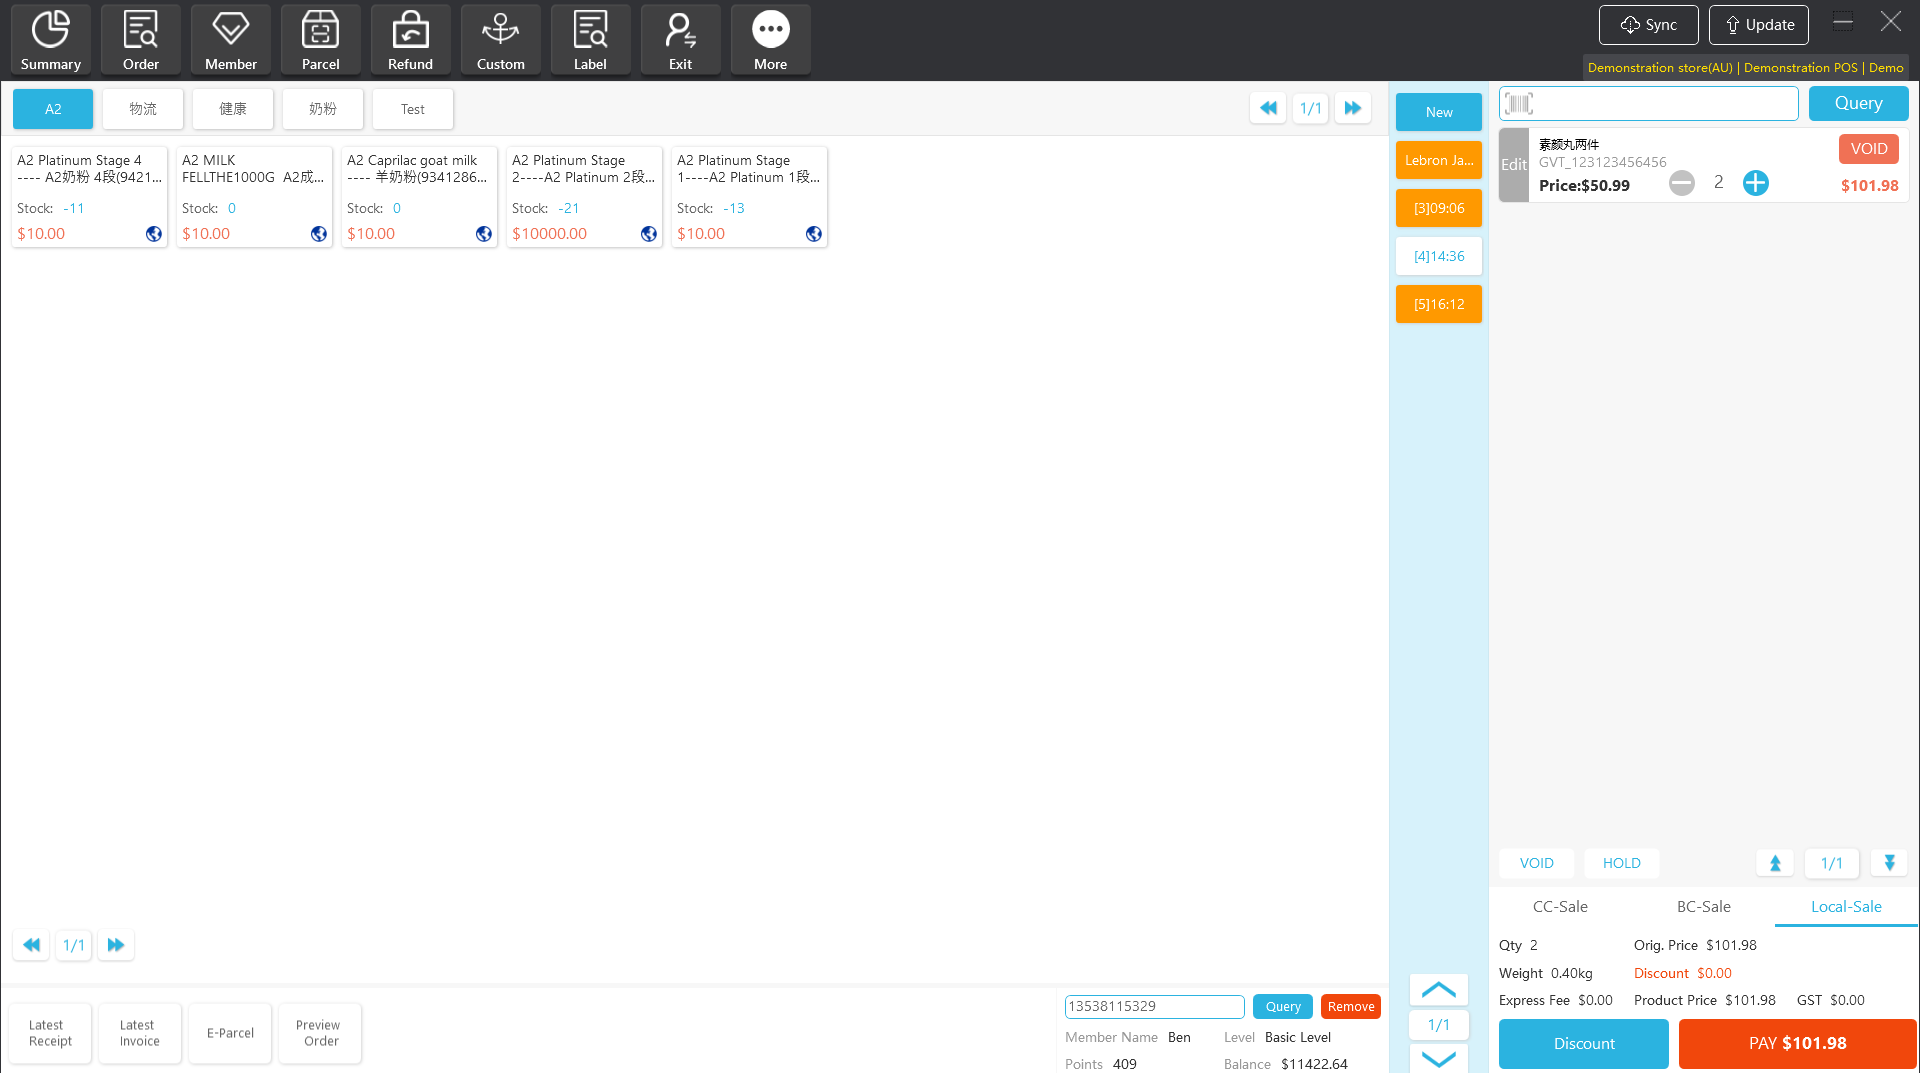
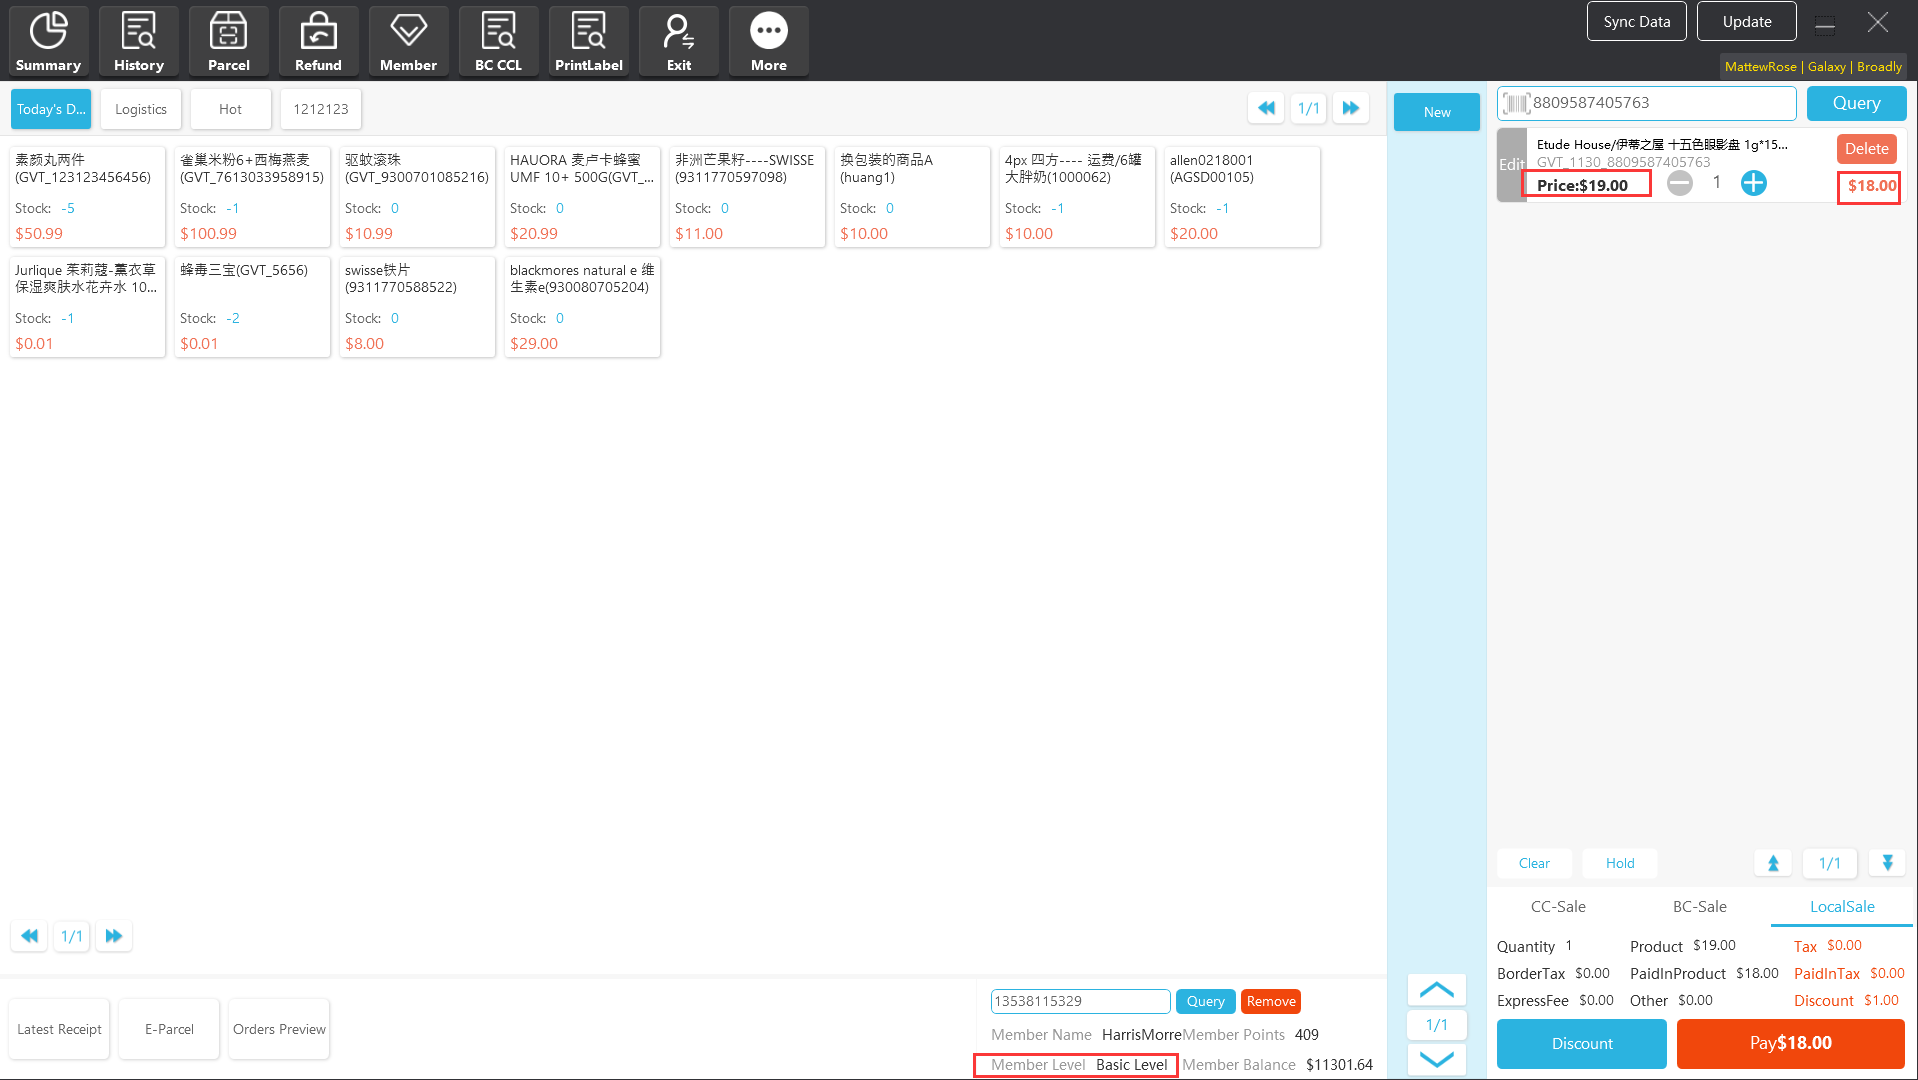
Step 1; Log in Apos client, enter the member mobile No. or member number at the bottom of the interface, click the query button to find out the member information, place an order at the client to enjoy the member price for the products and enjoy services of member points accumulation.
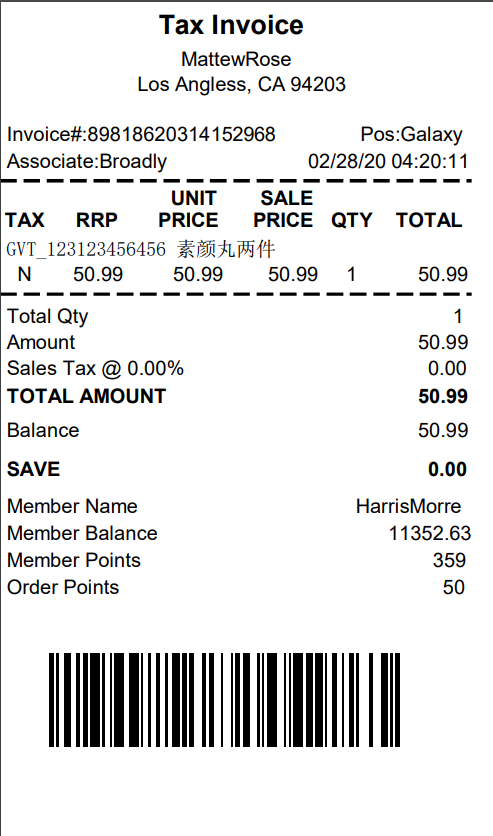
Step 2;The receipt display after placing an order as member.
6.2 Member level
6.2.1 Member level at the server
The member level at the server can enjoy the corresponding member level preferential price, and the preferential price can be set in the product price or store price. In the interface of member level function at the server, you can add, edit and modify the member level.
- Add member level at the server
[Operating steps]
Step 1: Log in Apos server, click the Customers - Member Levels, and click the Add button.
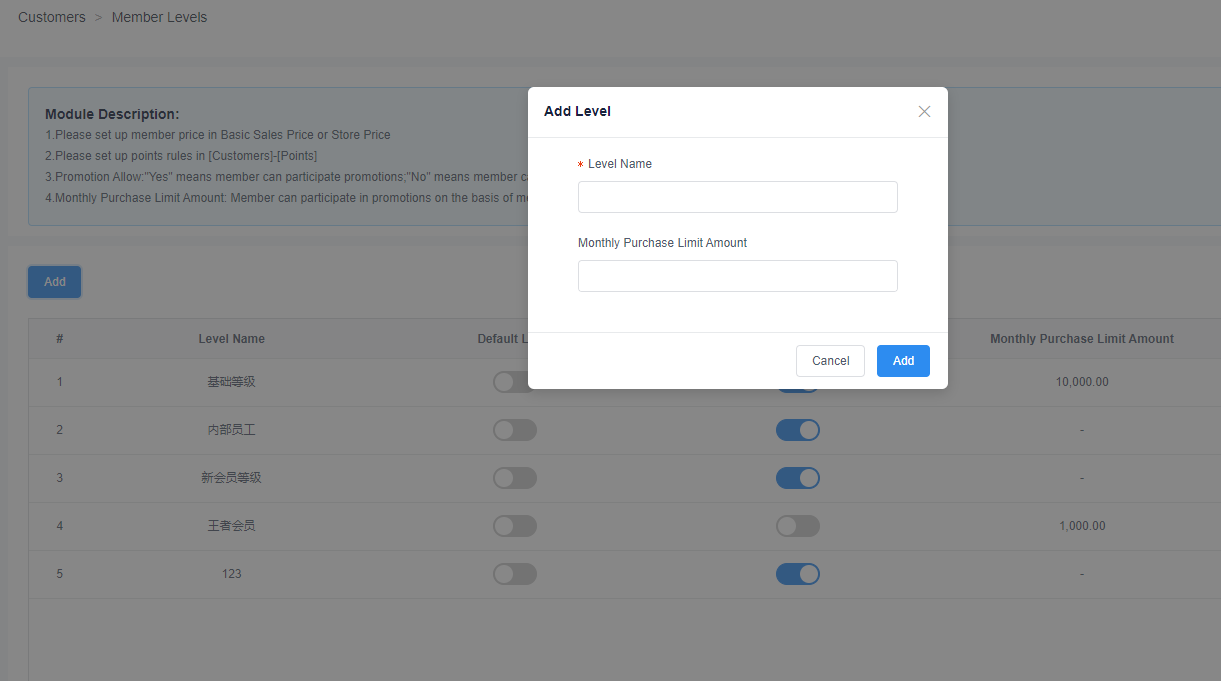
Step 2; Enter the name of the level, and you can control the monthly purchase limit of the member level according to the actual needs below. If you do not enter the amount, there is no limit. Click the Add button to complete the addition of membership levels.
- Edit member level at the server
[Operating steps]
Step 1; Log in Apos server, click the Customers - Member Levels, select one of the member level, and click the edit button.
Step 2; Click the save button to view the updated member level in the member level interface.

- Delete member level at the server
[Operating steps]
Step 1; Enter the Apos server, click the Customers-Member Level , select a member level with 0 members, and click the delete button (the delete button is not displayed if the number of members is not 0).
- Server member level price modification
[Operating steps]
Step 1; After adding a member level, click on Price-Basic Sales Price menu at the server to modify price of corresponding member level. After the modification is completed, synchronize to the client and select corresponding member to enjoy member preferential price.
Step 2; Members can also change price type to store price in Price-Store Price, and then modify corresponding member price.
- Disabled member level of server
[Operating steps]
Step 1;For the member level to be disabled, click the disable button
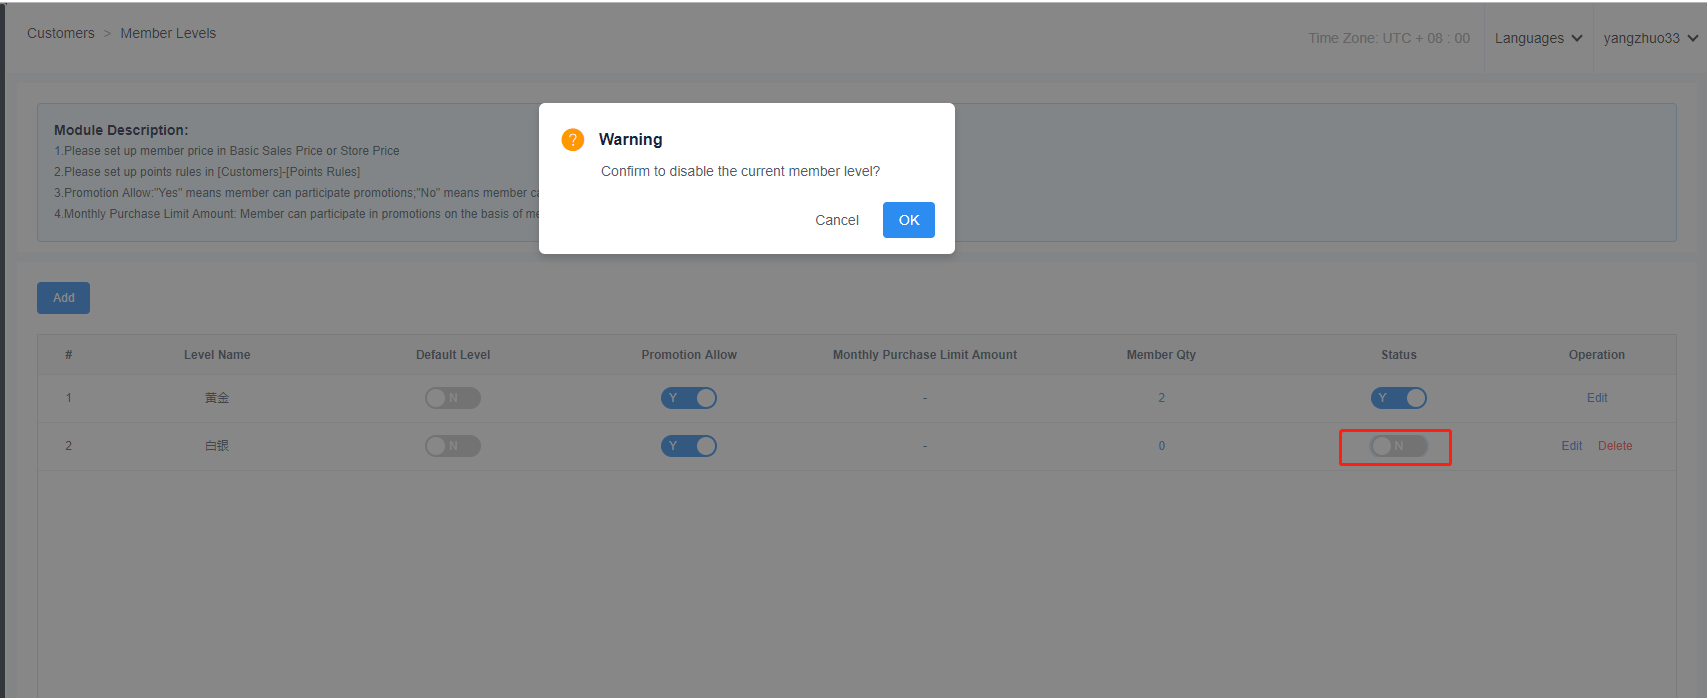
Step 2;Click OK to finish disabling. The disabled member level cannot be selected at the same time when it is added / edited (POS client is modified synchronously), that is, new members are not allowed to join.
6.2.2 Client use member level
Step 1: Log in Apos client and enter the member mobile No. at the bottom of the interface to display the member's level and use the corresponding member level price for settlement.
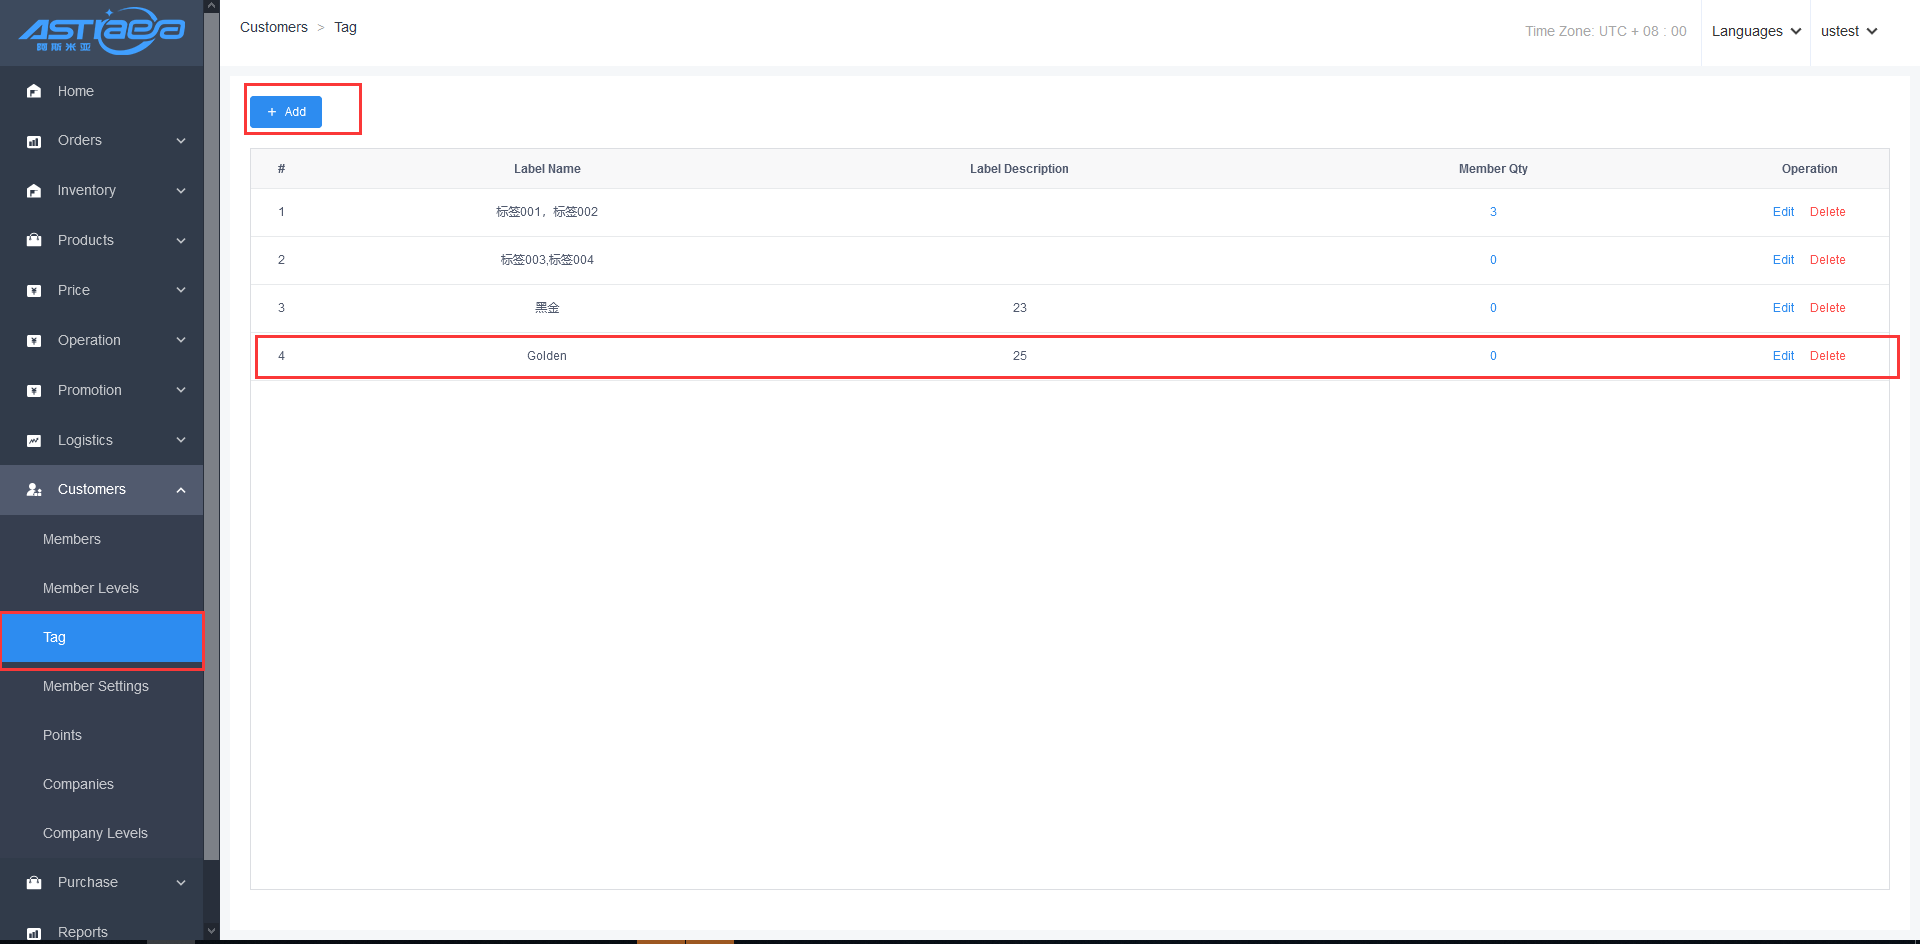
6.3 Tag
6.3.1 Server added tag
- Server added single tag
Step 1;Log in Apos server, click on Customers-Tag menu, and click on “Add" button

Step 2; After entering required Label Name and optionally entering Label Description, click on Add button to add Tag.
Step 3; When adding Members, they can choose to add Tag.

- Server tag batch settings
Step 1; Log in Apos server, click on Customers-Members menu, select the member to be labeled, and transfer Tag from Source list to Target list to complete batch label settings.

- Server tag deletion
[Operating steps]
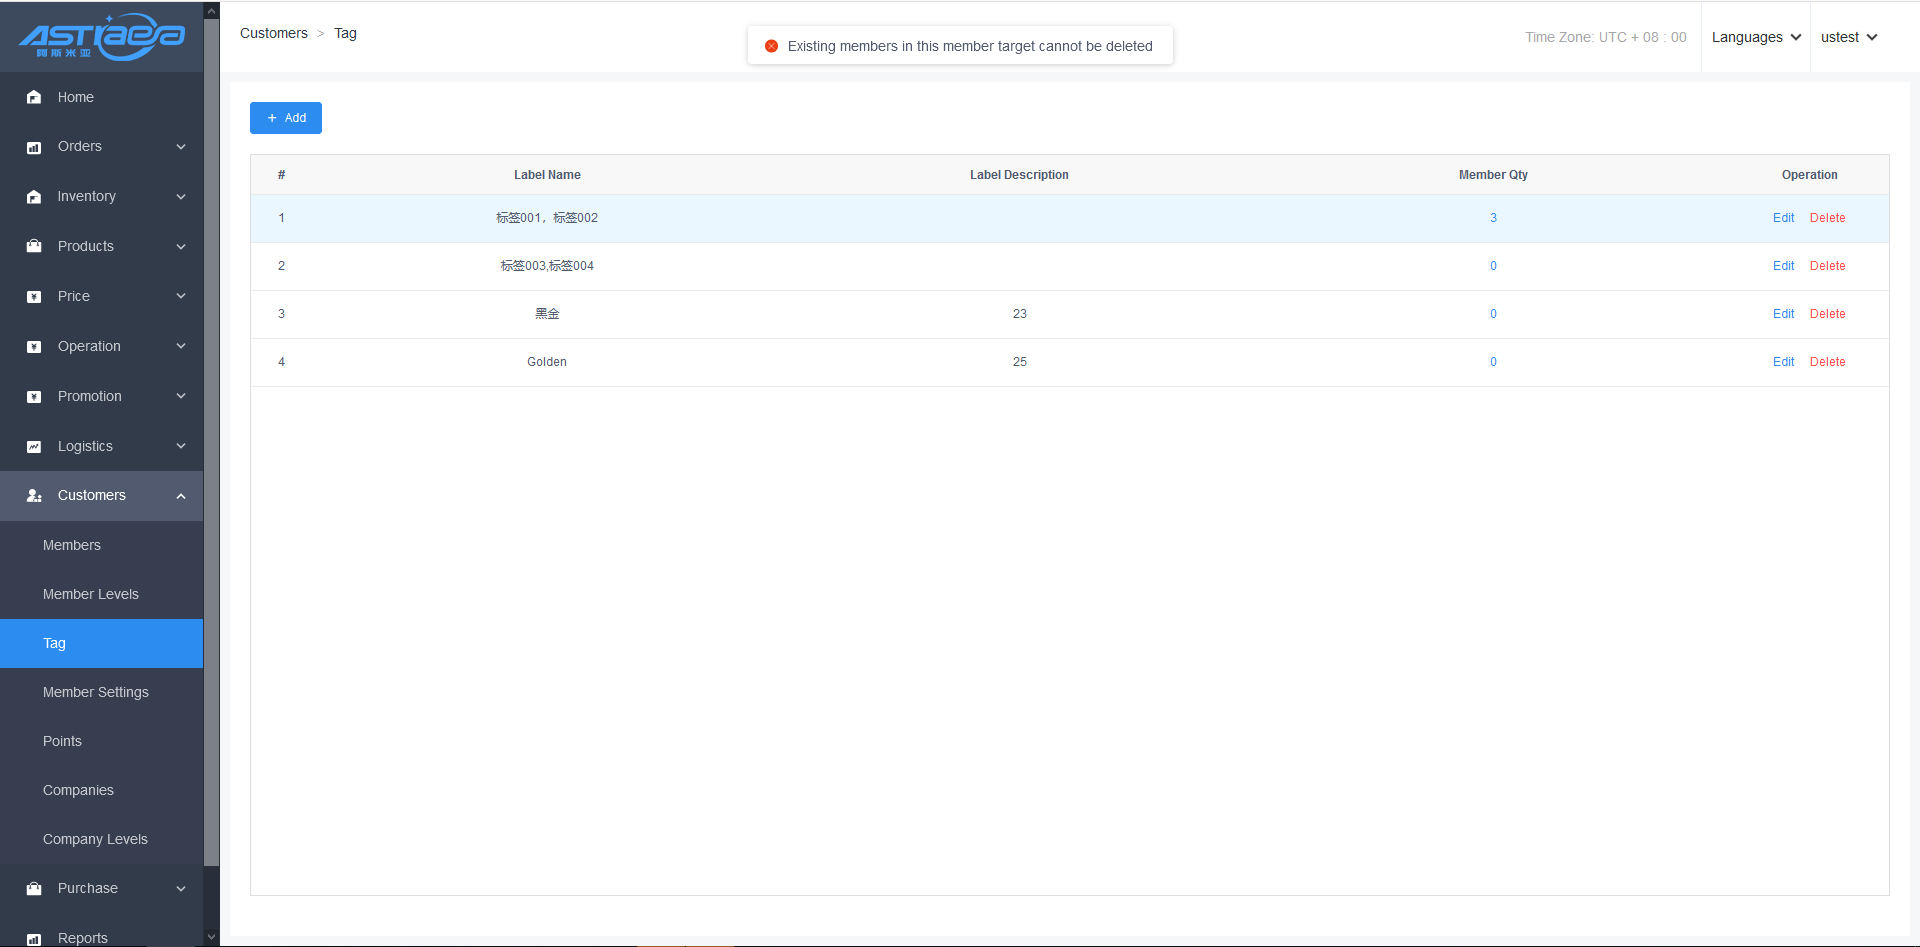
Step 1; Log in Apos server, click on Customers-Members, select a Tag, and click on delete button.
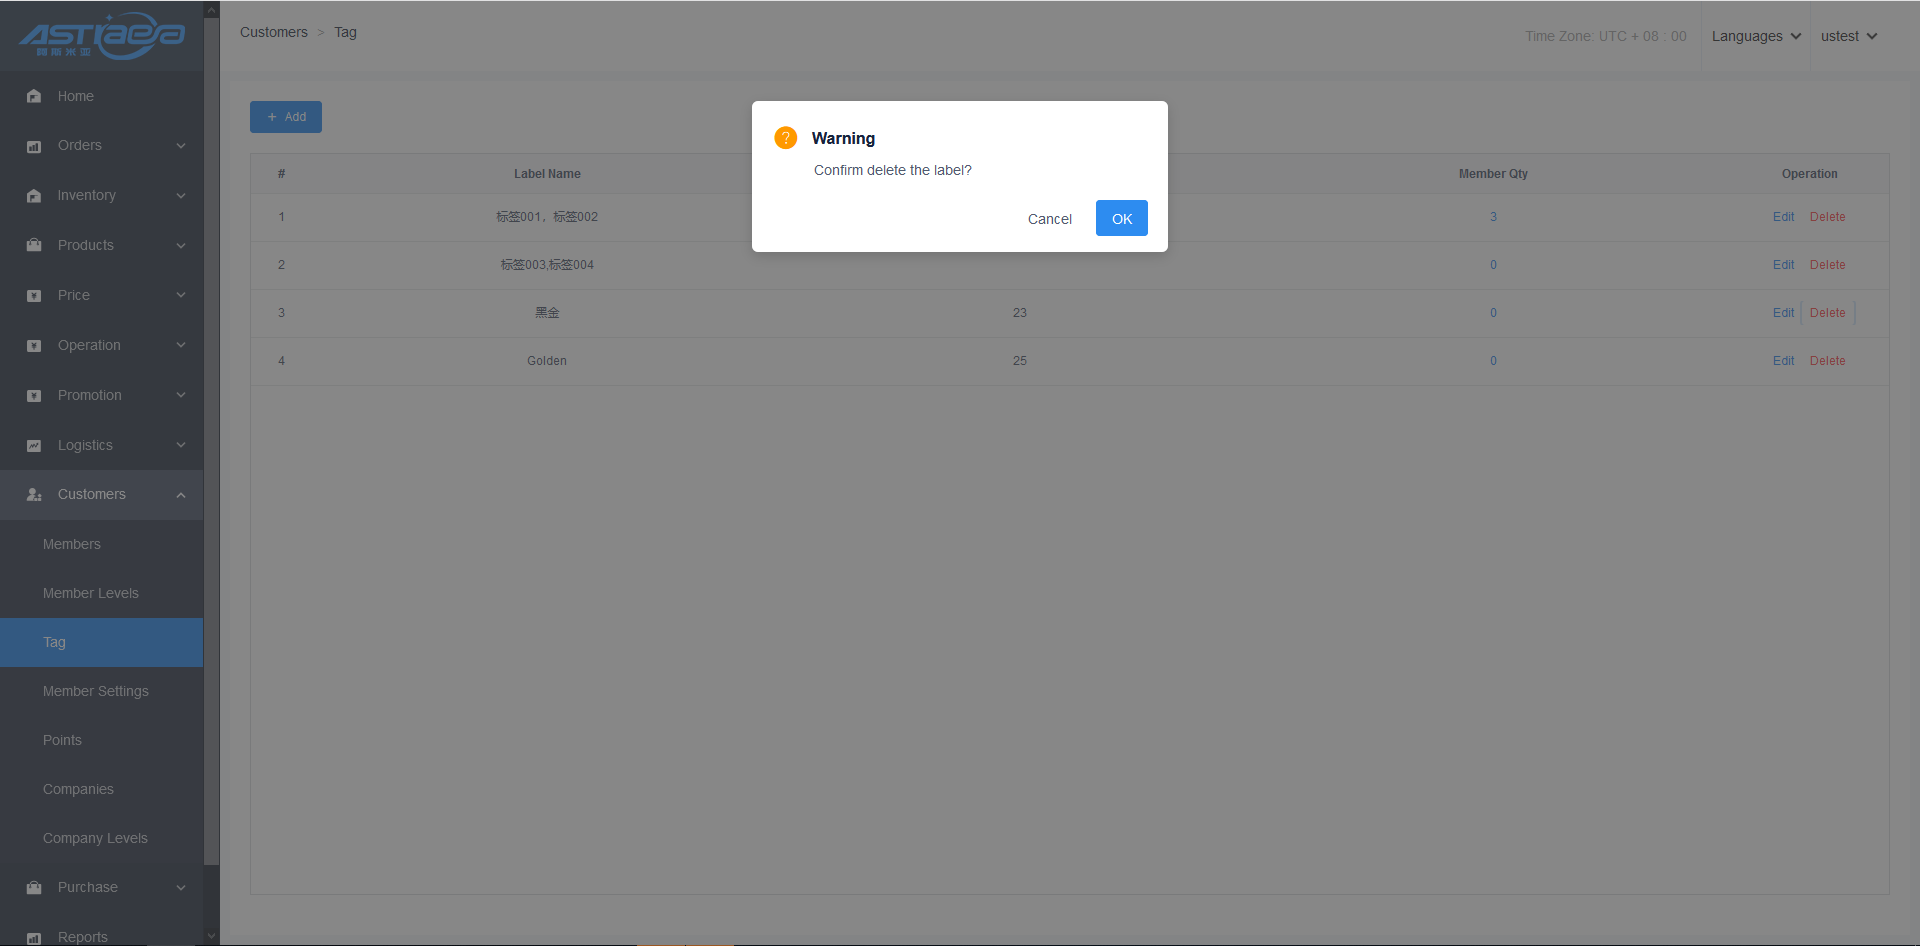
Step 2; Note: deletion operation can only be performed if there is no member under the Tag. Otherwise, deletion cannot be successful.
6.4 Member settings
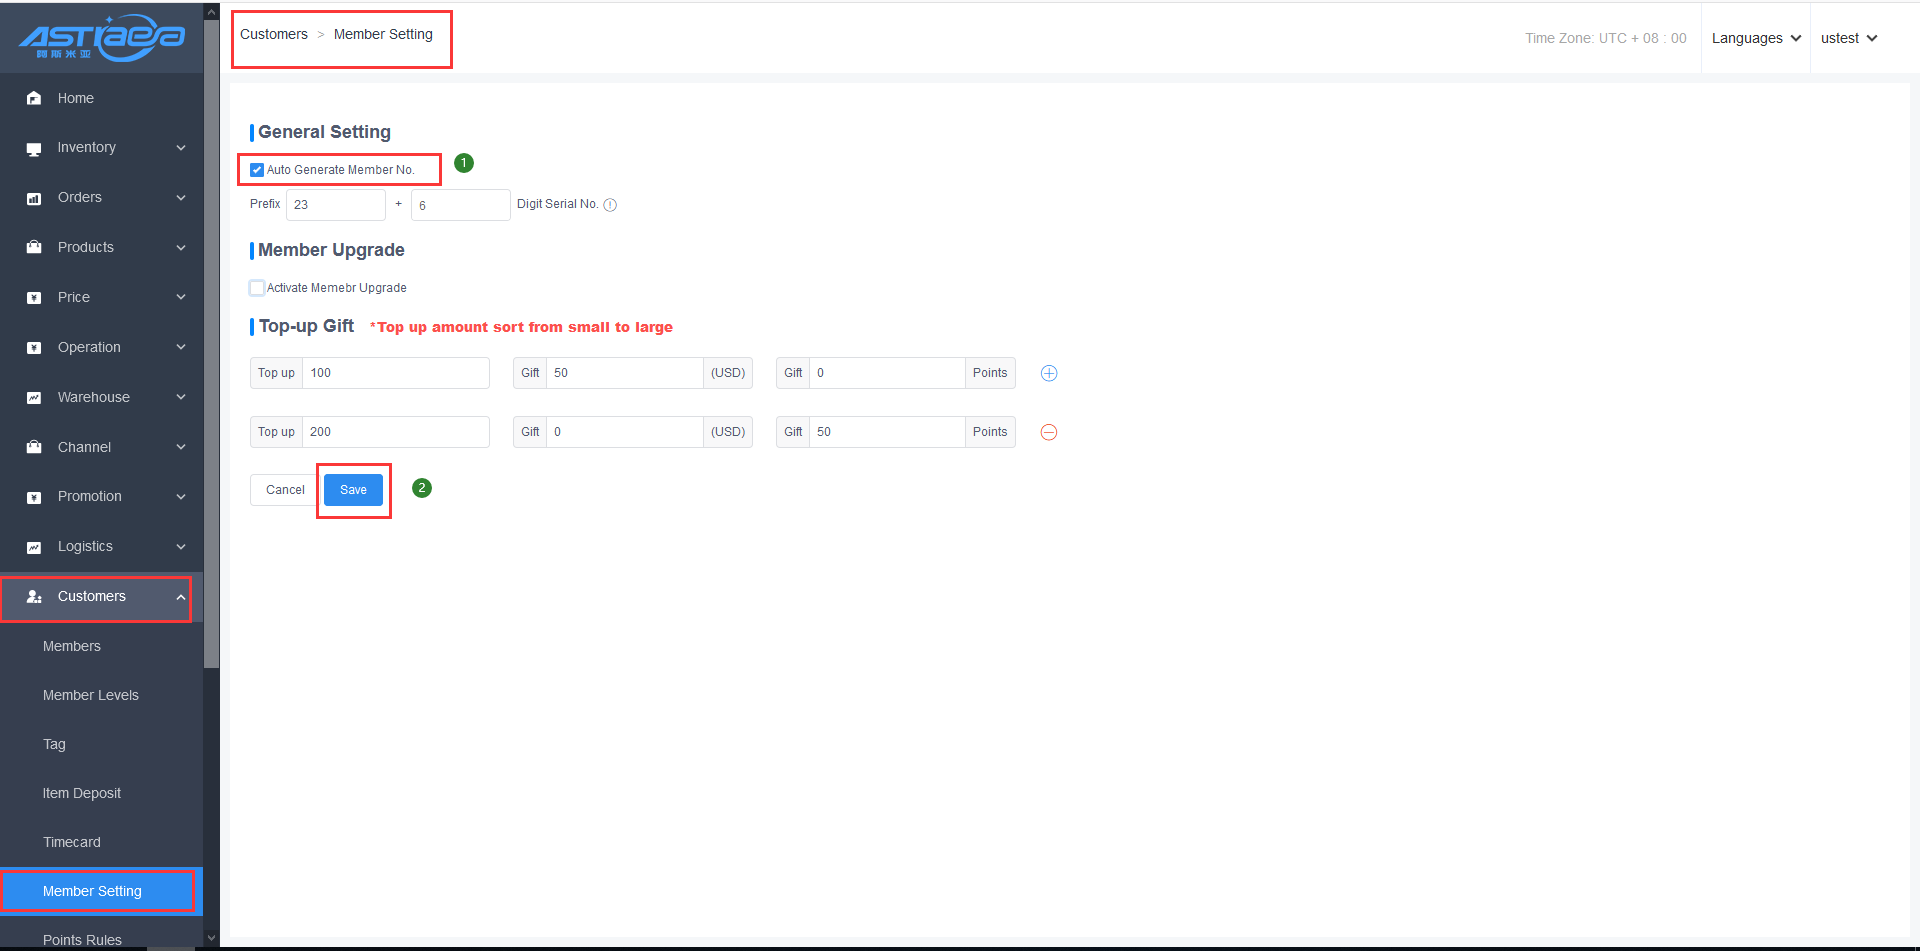
The Member Settings interface can be used for member upgrade, Top-up Gift.
6.4.1 General setting for member on the sever
[Operating steps]
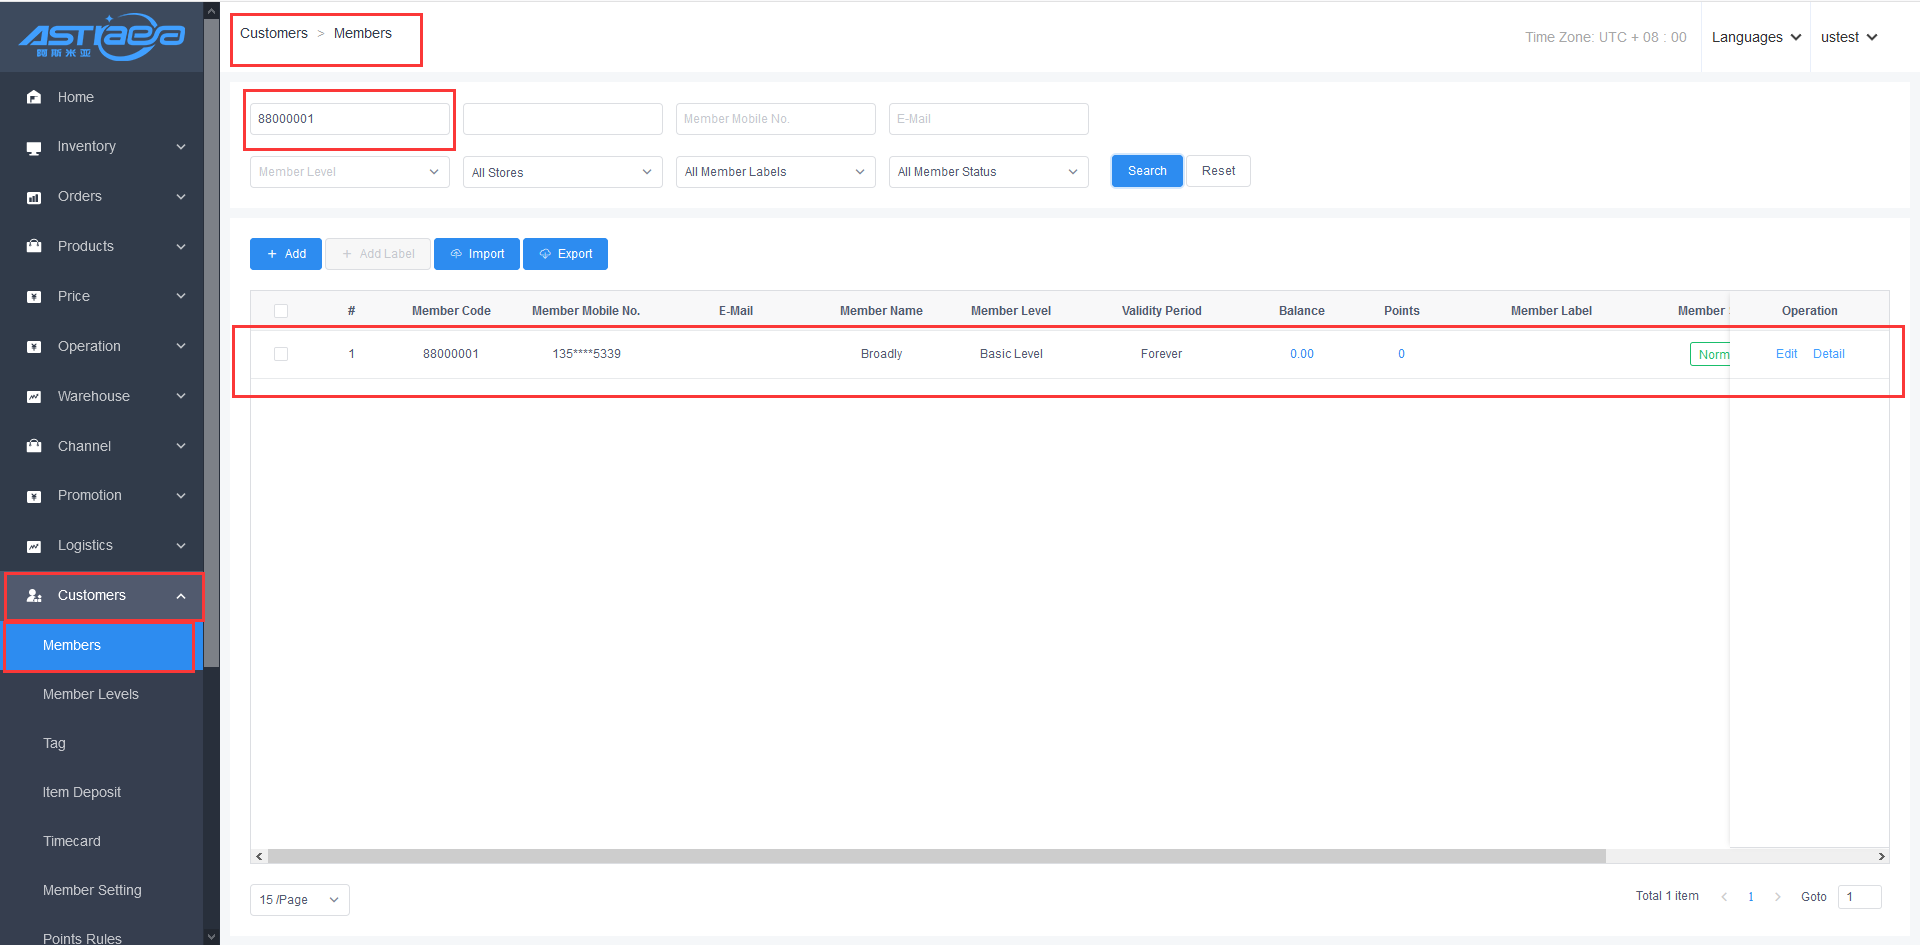
Step 1;Enter the Apos server, click the Customers-Member Settings, select the member number to automatically generate, enter the member number generation rule, such as 88 + 6 serial number
Step 2; Add a member.enter the new member information, and click "Submit"option.
Step 3;View newly added member information,member number is generated according to the member number generation rule.
6.4.2 The server shall function for member upgrade
[Operating steps]
Step 1; Log in Apos server, click on Customers-Member Settings menu, select Activate Member Upgrade, and deduct required rewards points after upgrading by default without checking. Rewards points required for upgrading members of different levels can be set according to needs of merchants.
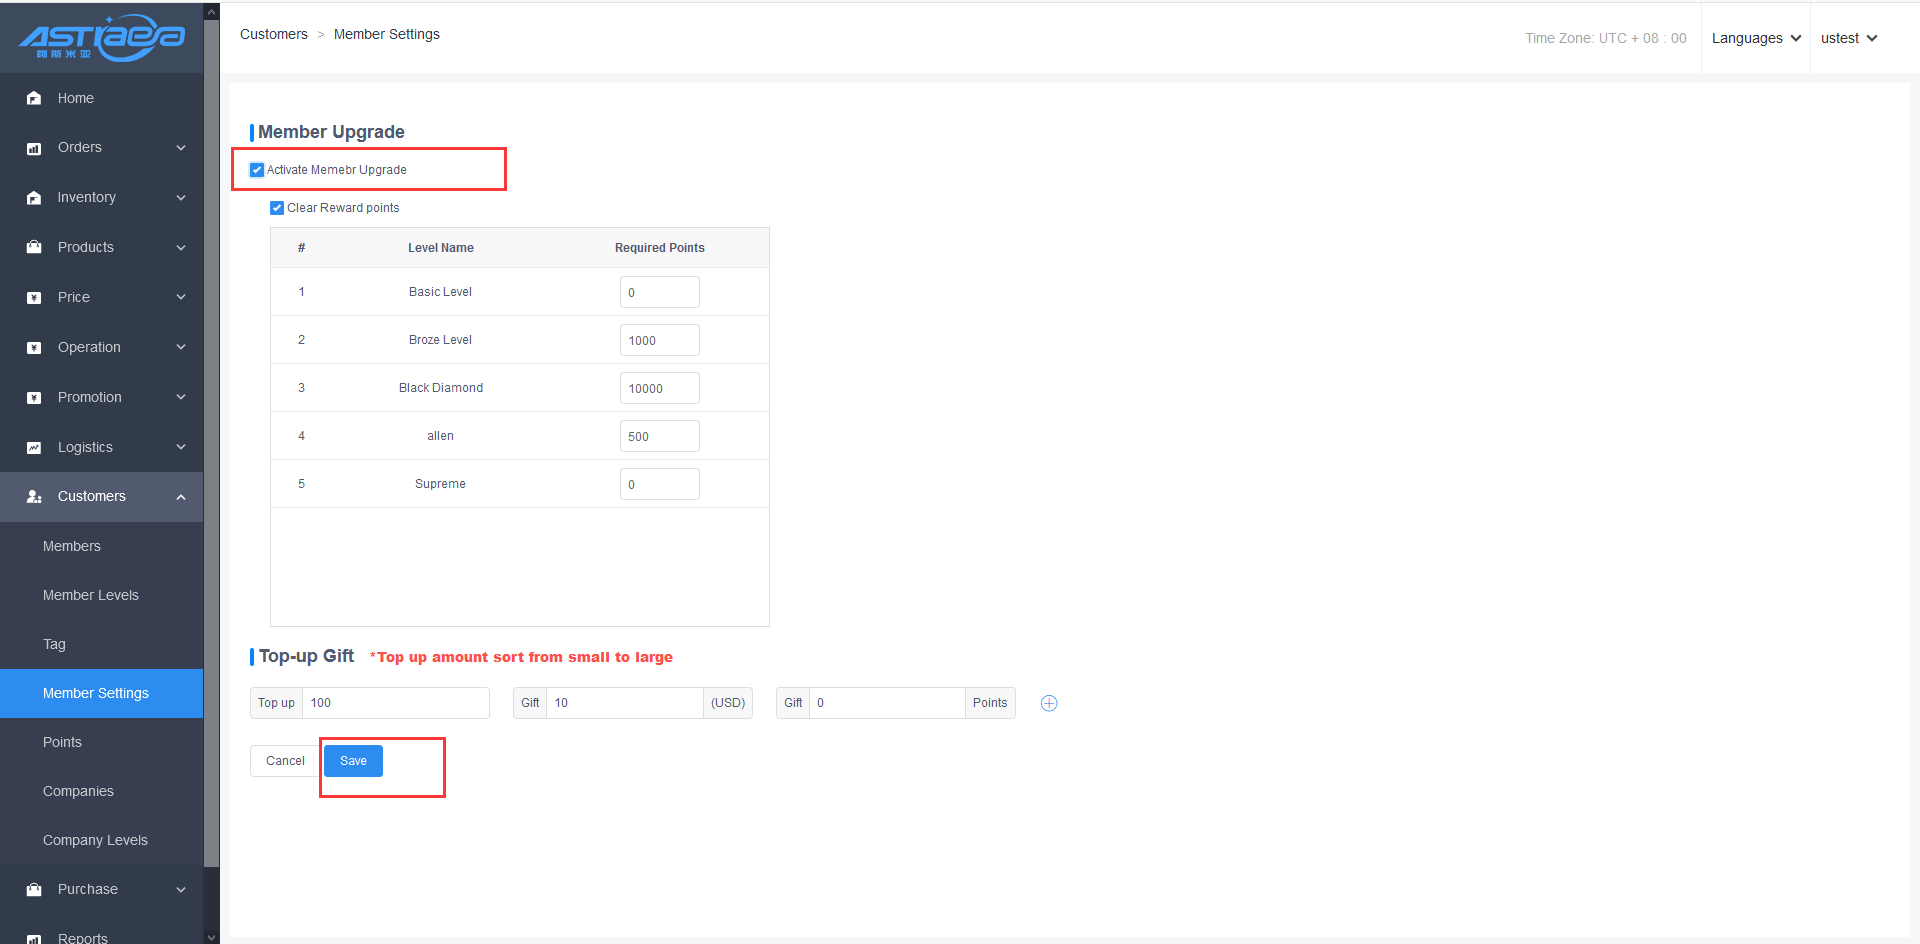
Step 2; There are two ways for members to upgrade their rewards points. Method
- Rewards points can be adjusted in member details, and rewards points of members can be adjusted to be greater than or equal to rewards points required for upgrading members. As shown in the following figure.
Point adjustment; click on Members at the server, select a member, click on details, click on balance rewards points ; after entering rewards points , adjusted rewards points are greater than or equal to rewards points required for upgrading, and member level can be automatically upgraded.

Method 2. A member places an order at the client to accumulate rewards points. When member's rewards points are greater than or equal to rewards points required for upgrading, the member can upgrade automatically.
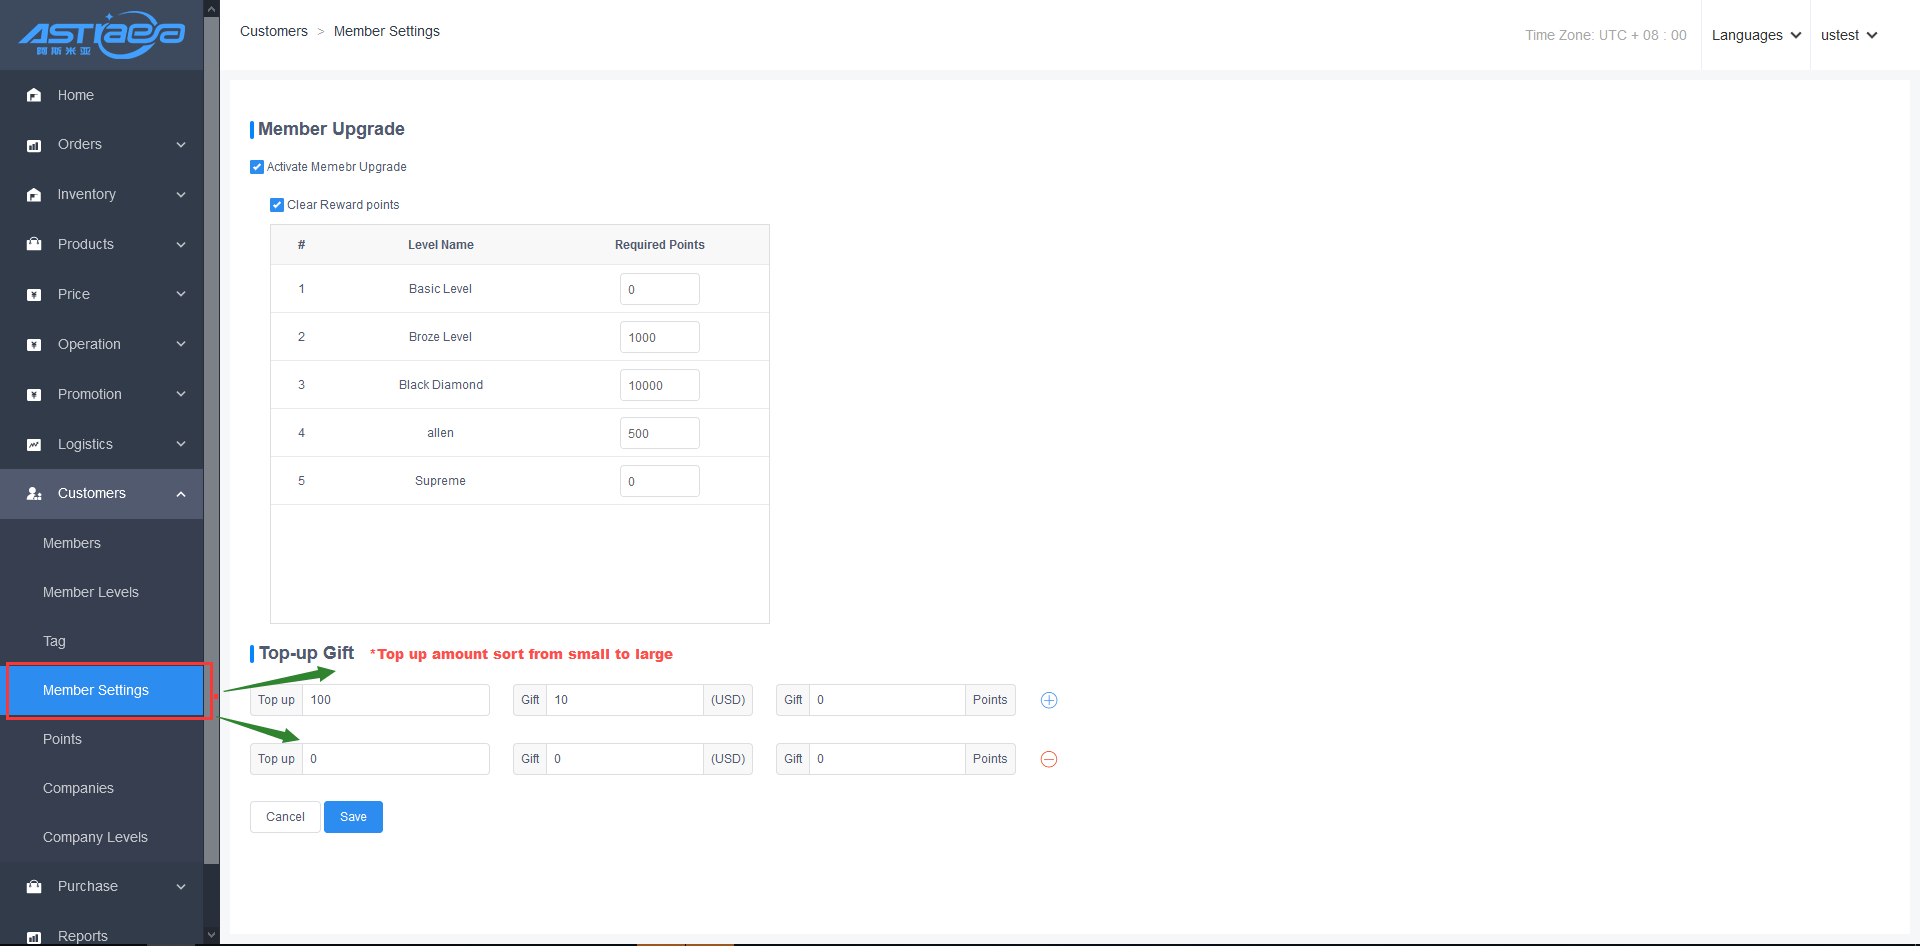
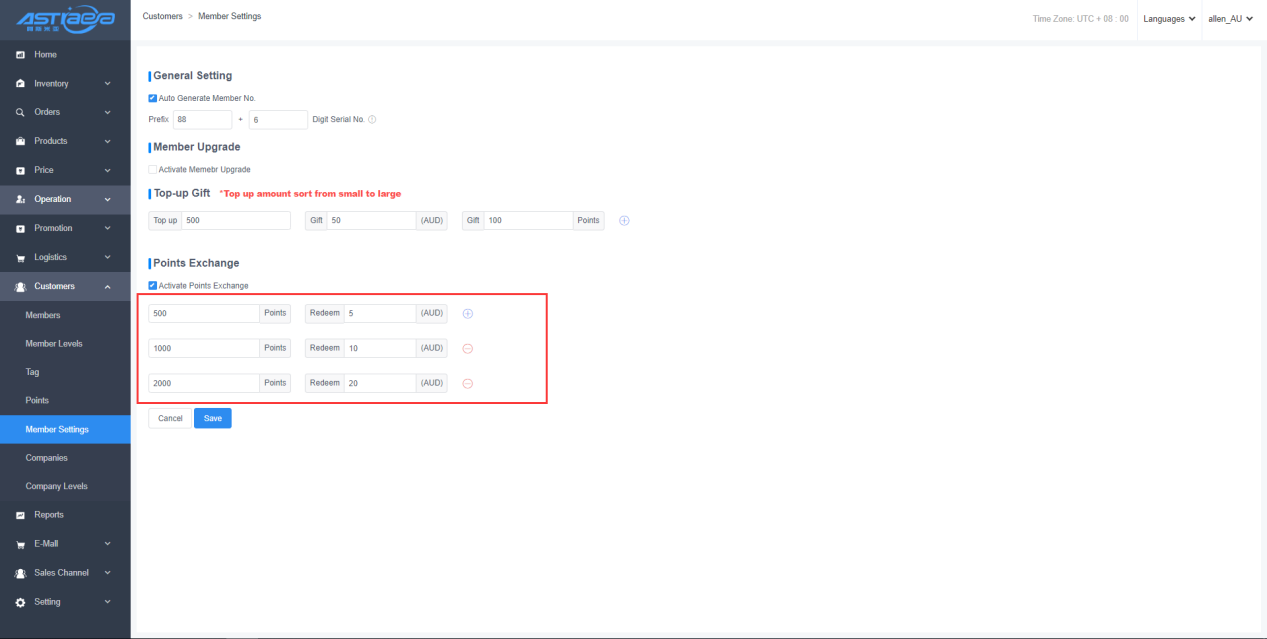
6.4.3 Server Top-up Gift settings
[Operating steps]
Step 1: Log in Apos server, click on Customers-Member Settings menu, and enter Top-up amount, Gift amount and rewards points. Rewards points cannot be overlaid for Gift. If 10 yuan is rewarded for top-up 100, the same amount will still be rewarded for top-up 1000. If necessary, members can click on small plus sign on the right to set a multi-tier Top-up Gift plan.
Step 2: Server Top-up. Click on Members, select one of members, click on details, log in member details interface, click on Top-up button, enter Top-up amount, Gift amount and Gift amount are reversely displayed by default, and click on OK button to complete Top-up.
Now balance of stored value is 110 yuan
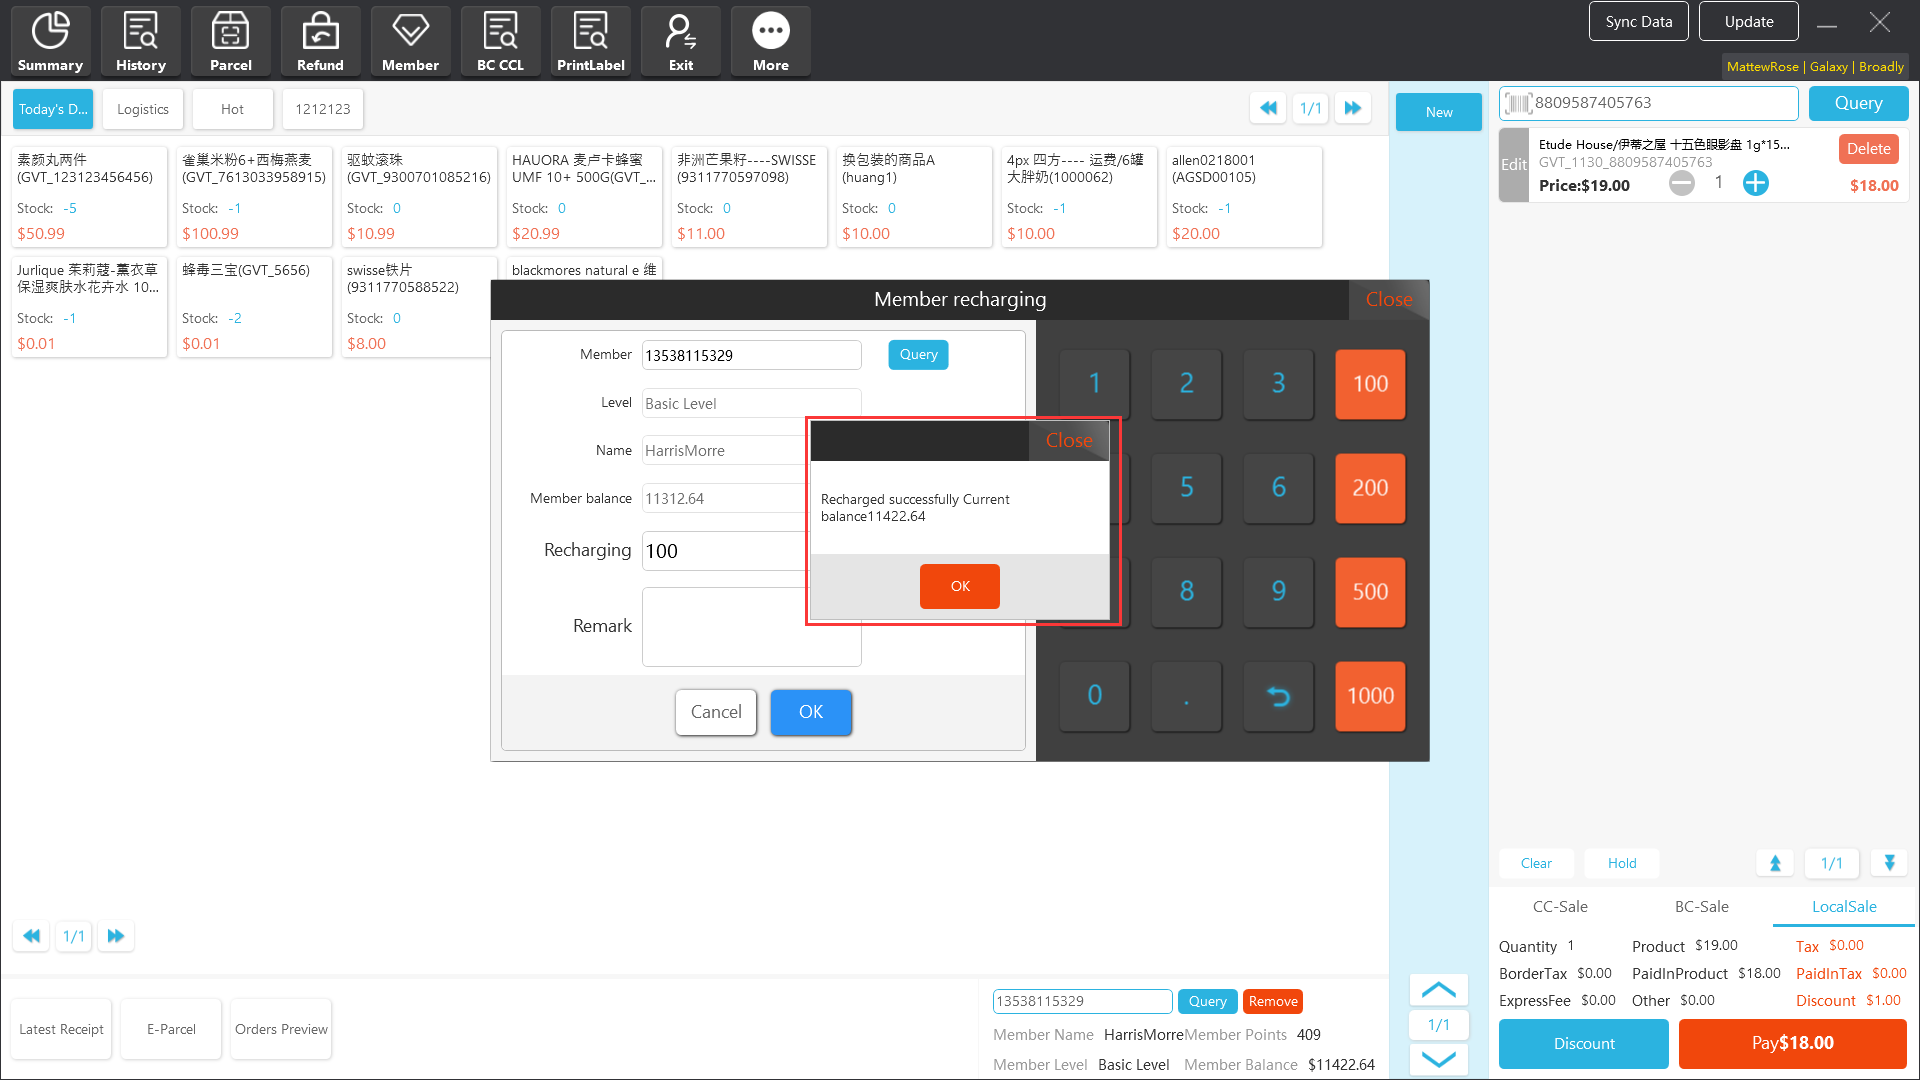
6.4.4 Client Top-up Gift
[Operating steps]
Step 1: Log in Apos client, click on Members-Member Top-up, enter Top-up amount 100 yuan, and click on OK to open Top-up success page. The Top-up amount and the Gift amount will be calculated automatically to complete client Top-up.
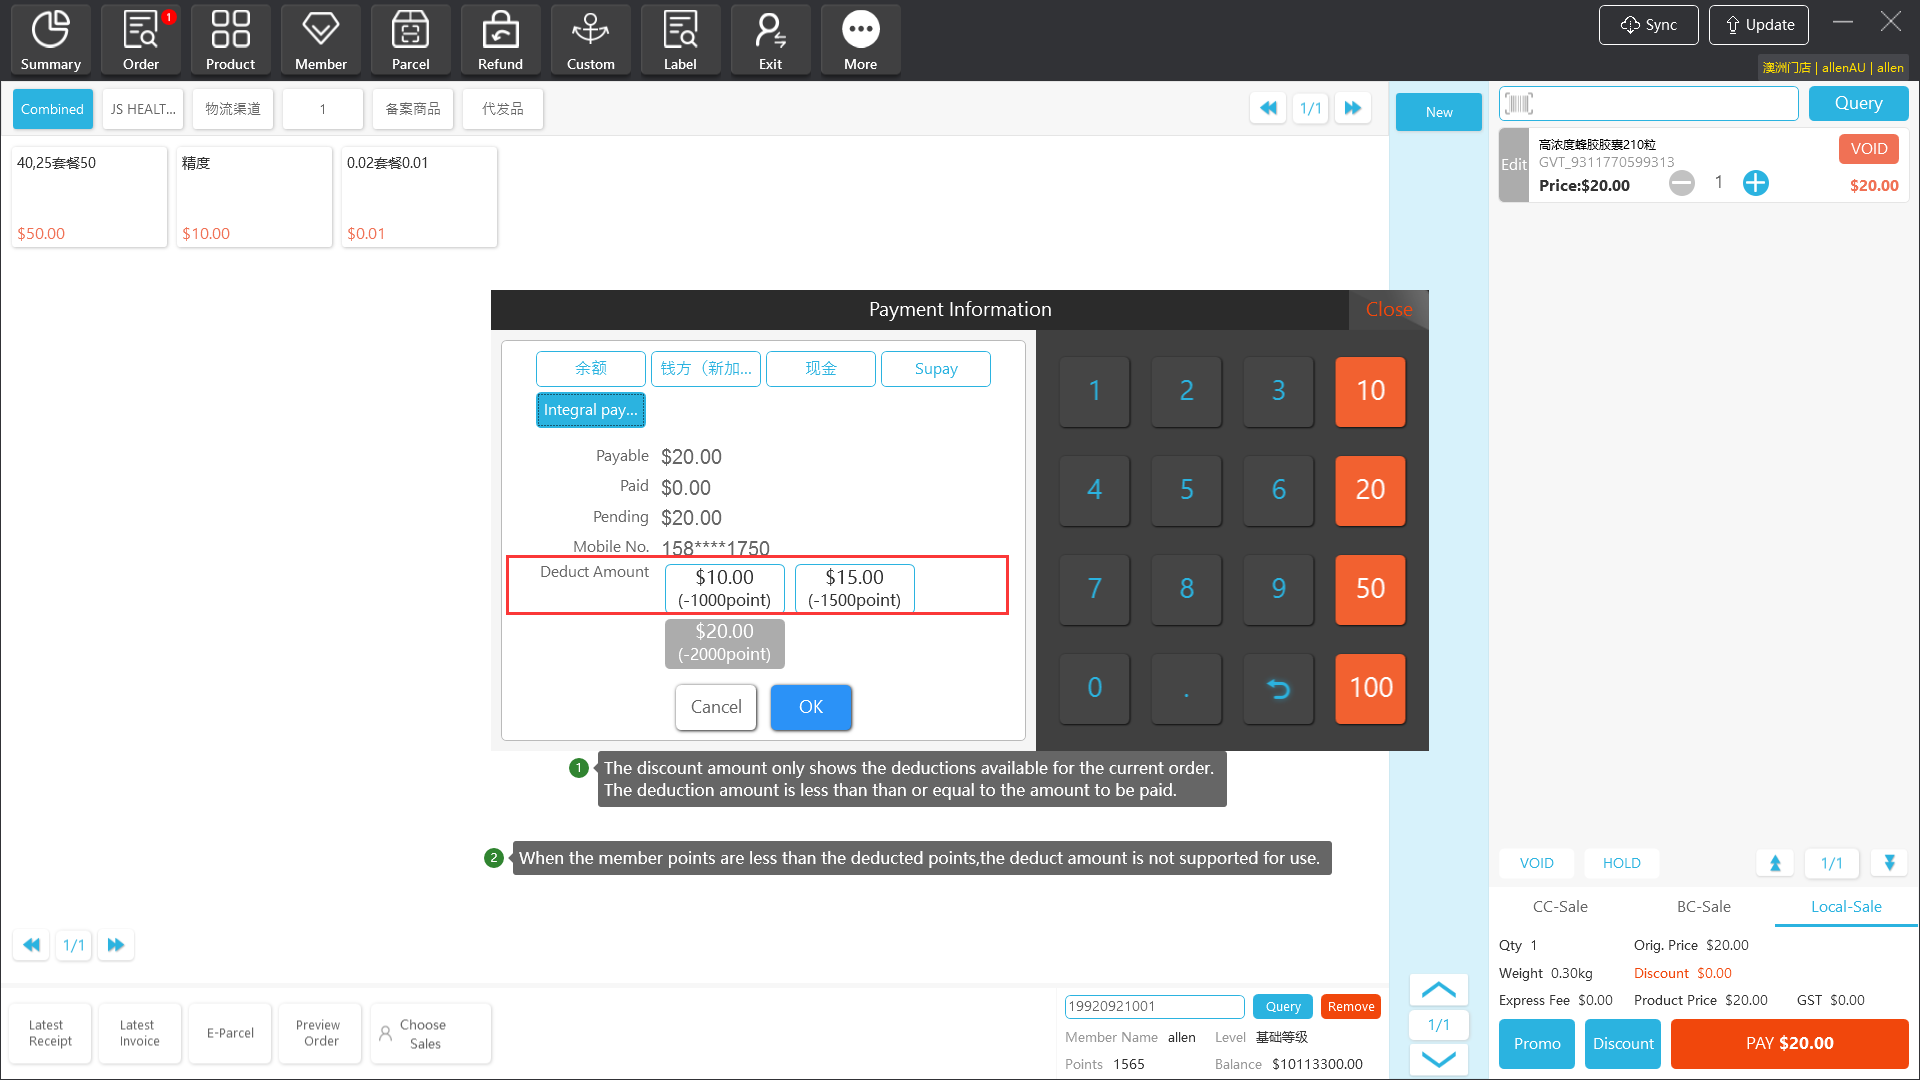
6.4.5 Members use points to pay on the client
[Operating steps]
Step 1: Enter the sever background customer center- member settings, set the points redemption rules.
Step 2: The client synchronizes data, adds products to the shopping cart, and then uses member points to settle.
6.5 Rules of points
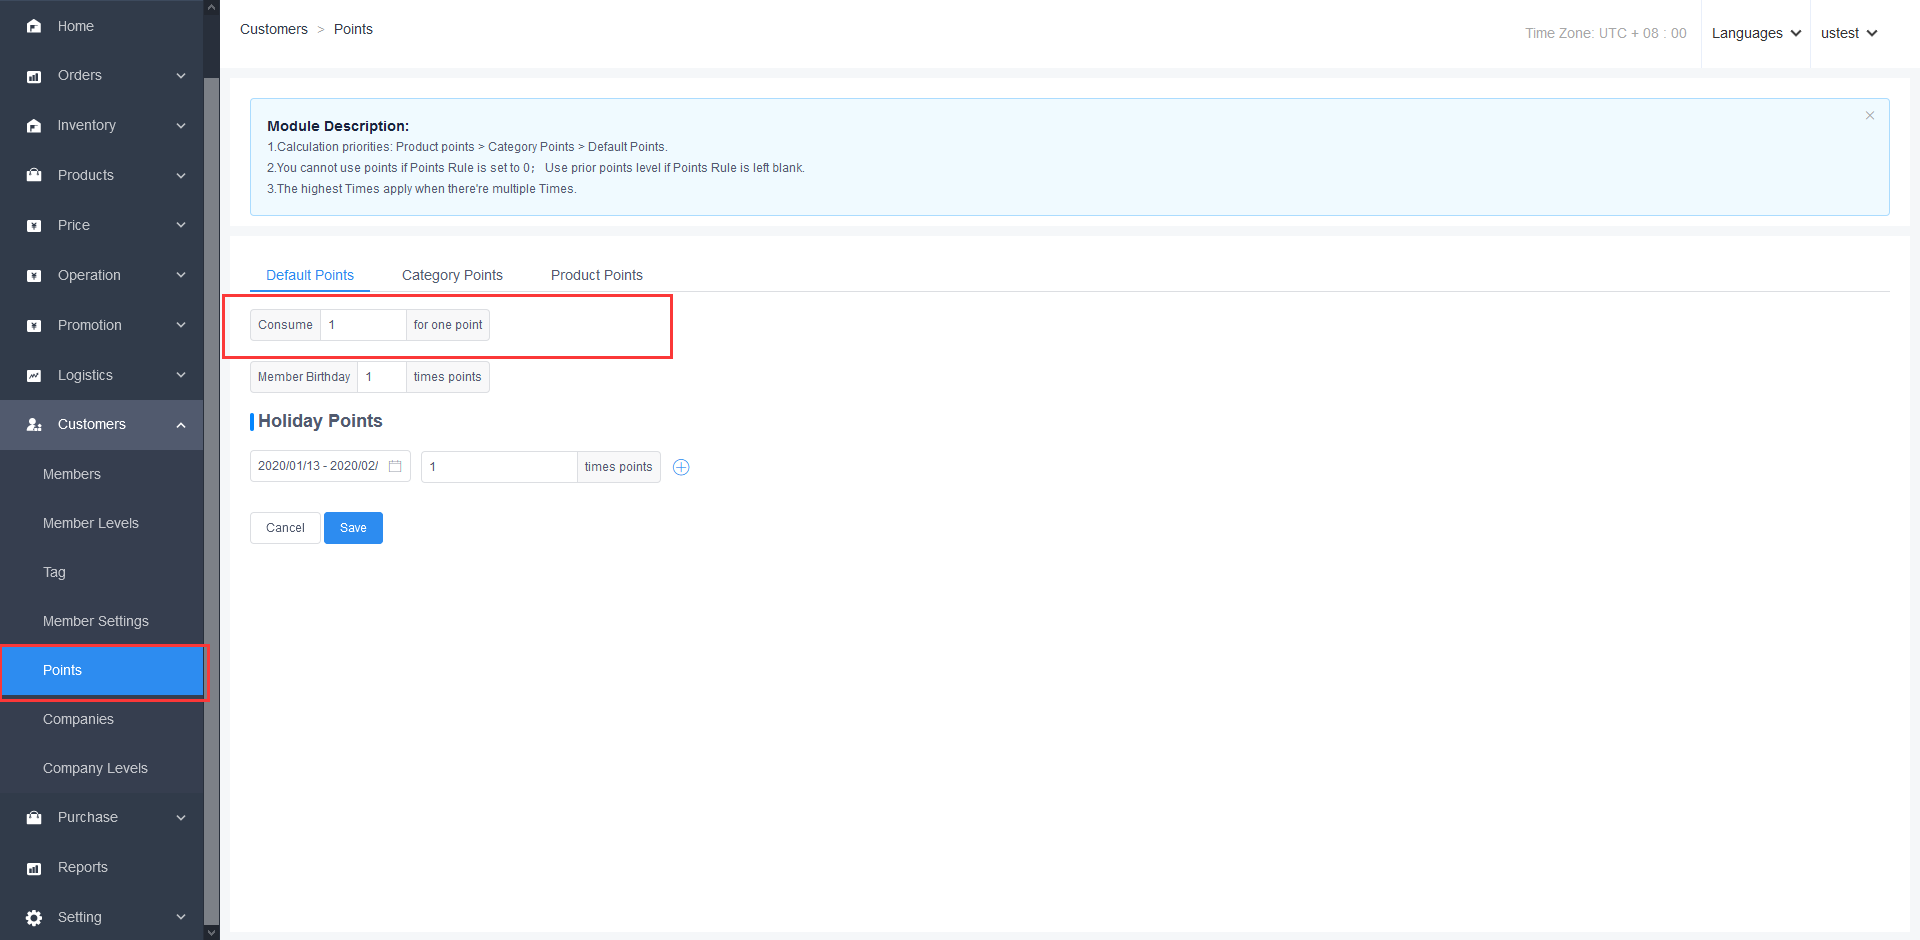
6.5.1 Server point rule settings
[Operating steps]
Step 1: Log in Apos server, click on Members-Rewards Points menu, and set the default point rule as 1 point for 1 yuan. Set the member's birthday to be 2 times the rewards points (the member's birthday can be selected on the date of creation), and then the member can consume 2 times the rewards points on the birthday. If Holiday Points are set by 3 times, the rewards points will be calculated and accumulated at 3 times of the consumption amount when members consume on holidays. If rewards points are set for products, the rewards points of products will be taken first. Priority of point rule is: products > classification > default. If the point is set to 0, no point will be accumulated; if set to be null, point rule of previous level will be taken. Member rewards points only count as product rewards points and do not include taxes, surcharges, packing fees, logistics fees and other expenses.
6.5.2 Accumulate and return points at the client
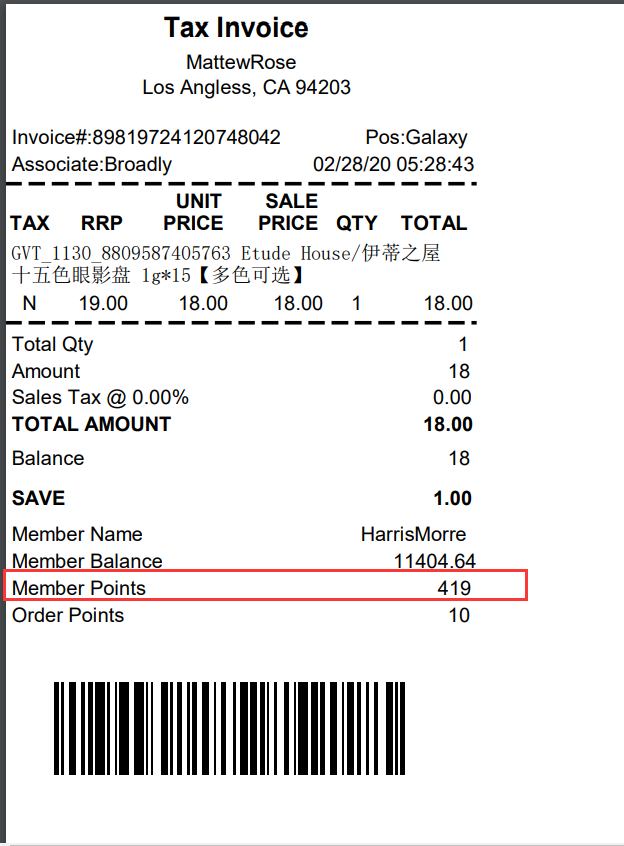
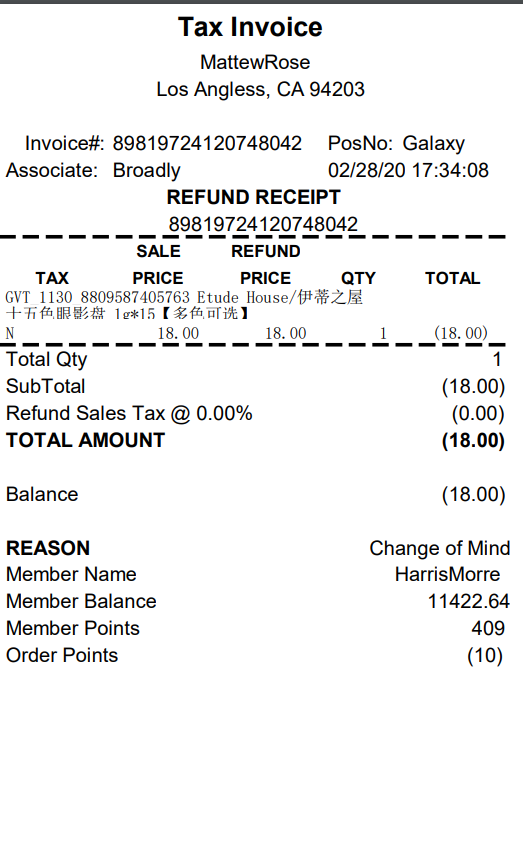
Step 1; Log in Apos client, enter the member mobile No. or member number at the bottom of the interface, click the query button to find out the member information, place an order at the client and print the receipt.
Step 2; Log in Apos client, find the newly placed order on the order query page, and click the refund button.

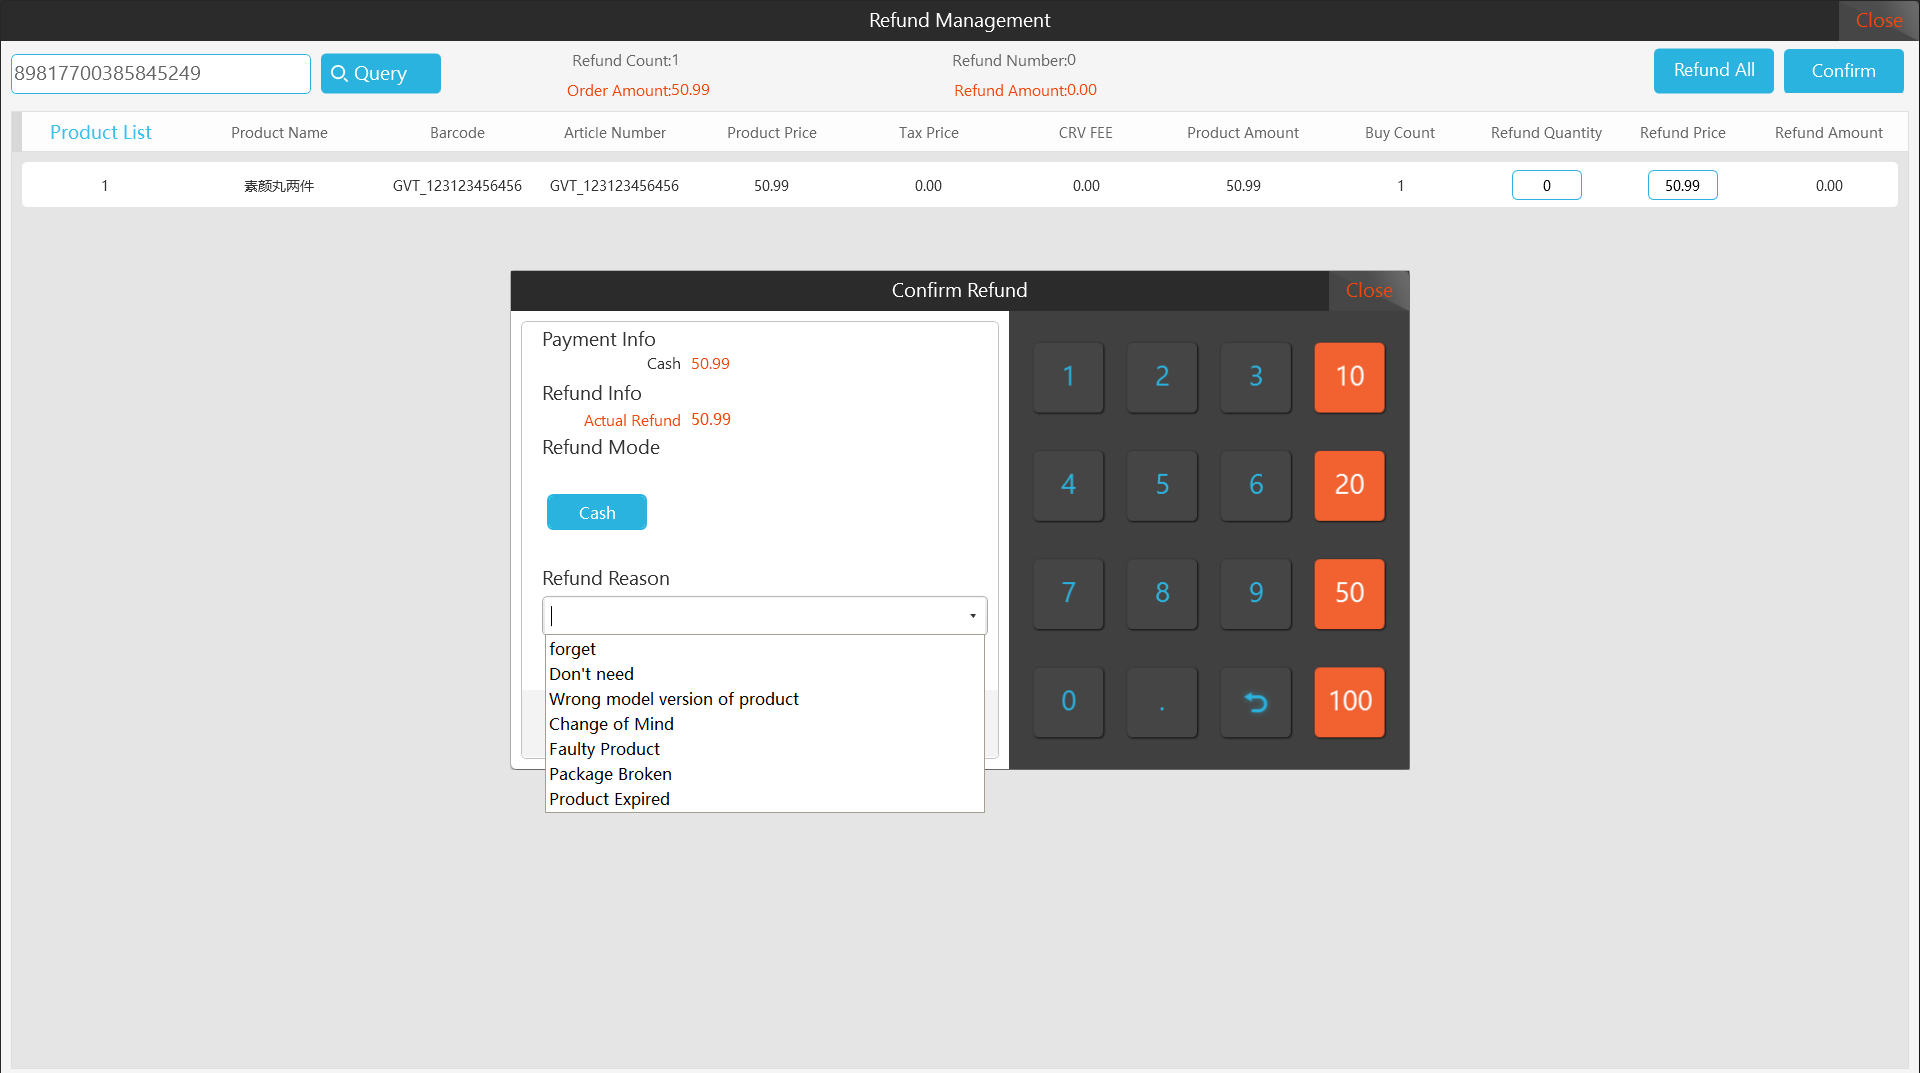
Step 3: Select the refund quantity, click the confirm refund button, enter the refund reason in the pop-up interface, and then click the confirm button to complete the refund. Member refund points will be returned at the same time when you refund.

6.6 Member deposit
6.6.1 Member deposit query function at the server
The server can query the deposit list of all stores, and select according to the member number, member mobile No. and member’s name. At the same time, you can also view the store's deposit statistics, deposit details, collection details, refund details, etc. At present, Chinese commercial tenants and Australian commercial tenants of the international version use this function, while the U.S. commercial tenants do not use this function.

6.6.2 Using member deposit at the client
Step 1: Log in Apos client, at the bottom of the interface, enter the member mobile No. or member number of the member, click the query button to find out the member information, and then click the deposit button in the order query interface after placing the order at the client, enter the deposit quantity, and click the confirm button to finish the deposit.
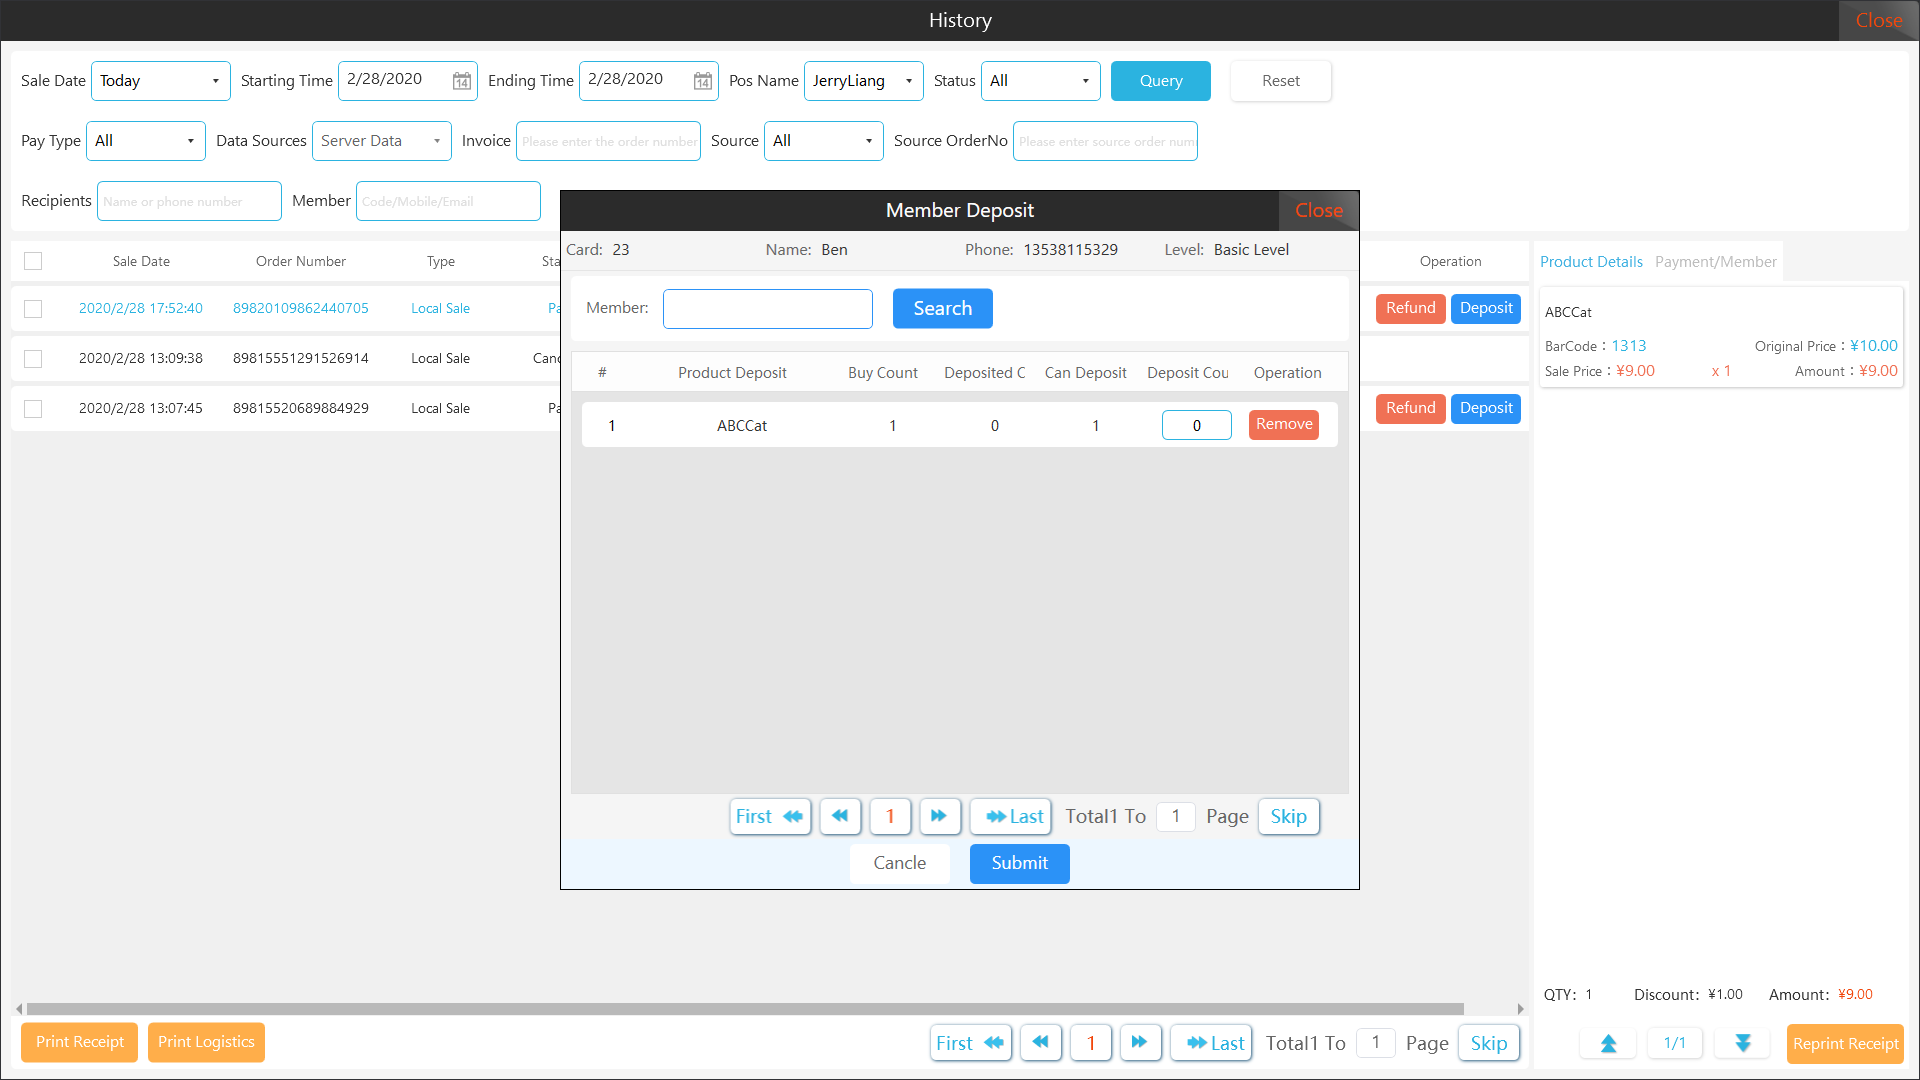
Step 2: When you collect the deposit product, enter the member information at the client and add the deposit product to the shopping cart. At this time, the settlement amount is 0. Click place an order to finish picking up the deposit product.
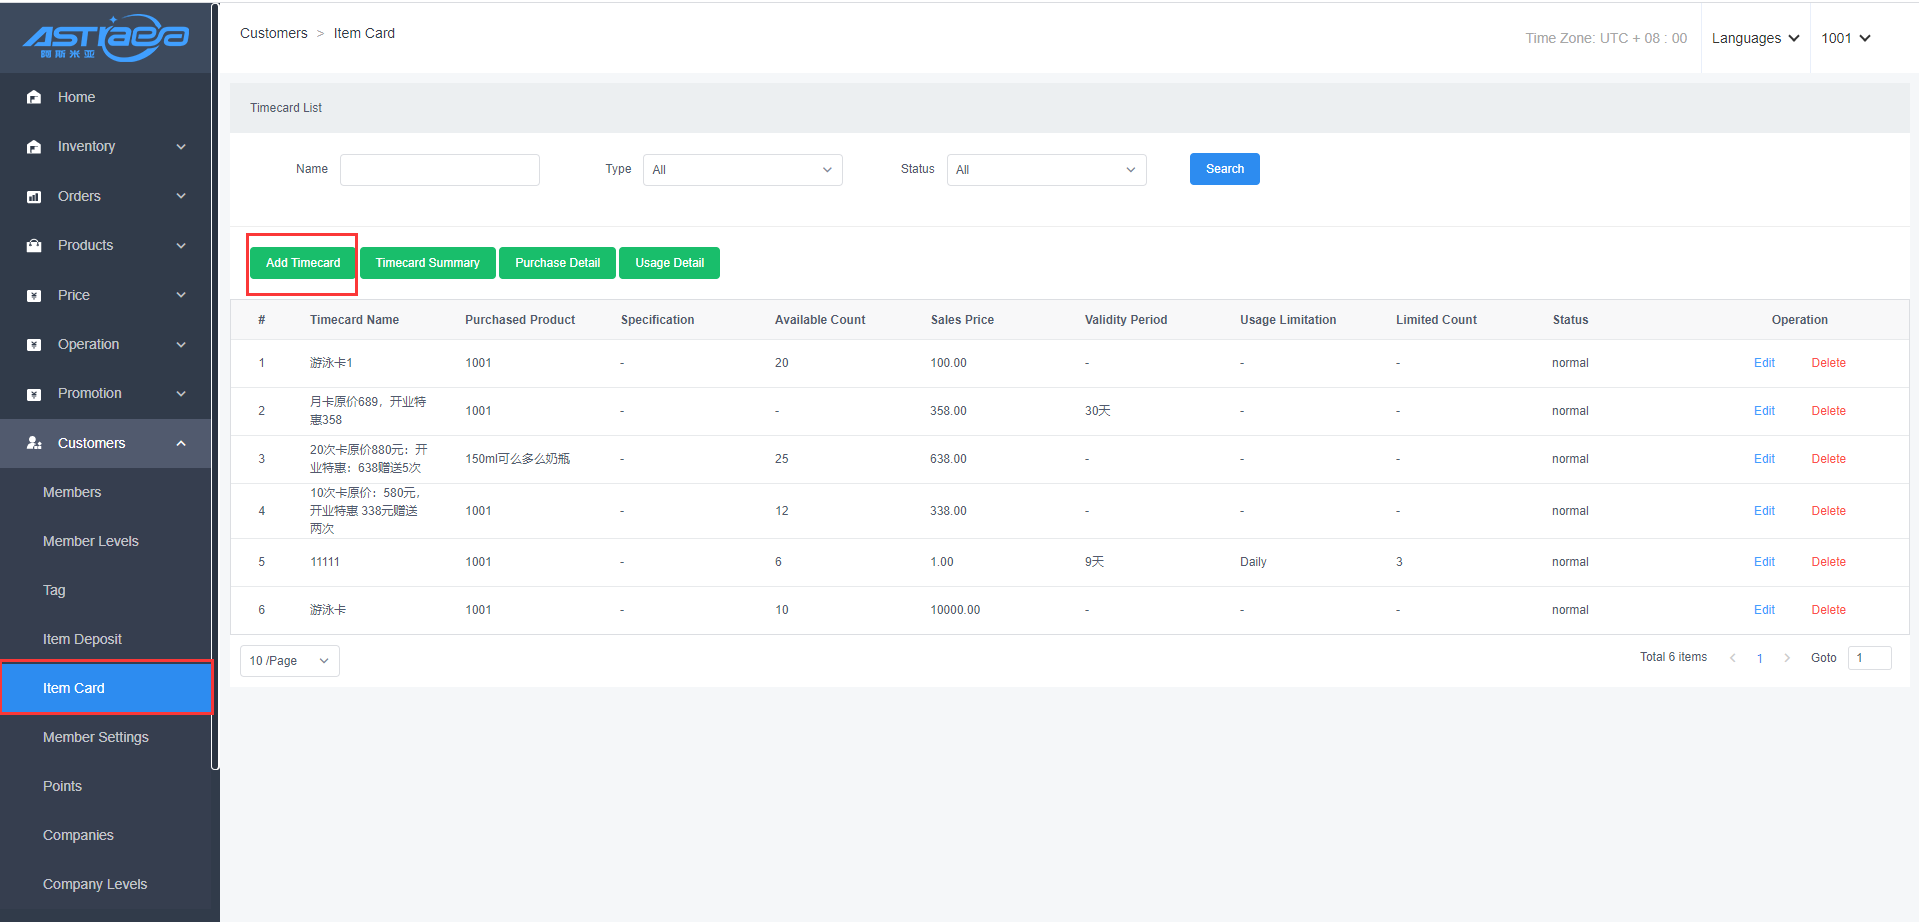
6.7 Timecard management
You can add timecard, view timecard statistics, purchase details, usage detail, etc. by the timecard management function at the server. At present, Chinese commercial tenants and Australian commercial tenants of the international version use this function, while the U.S. commercial tenants do not use this function.
6.7.1 Timecard management at the server
Step 1: Log in Apos server, click the customers - item card menu, click the add timecard button, enter the timecard name, select purchased product, enter available count and sales price, set the validity period and usage limitation, and then click the save button.

6.7.2 Timecard used at the client
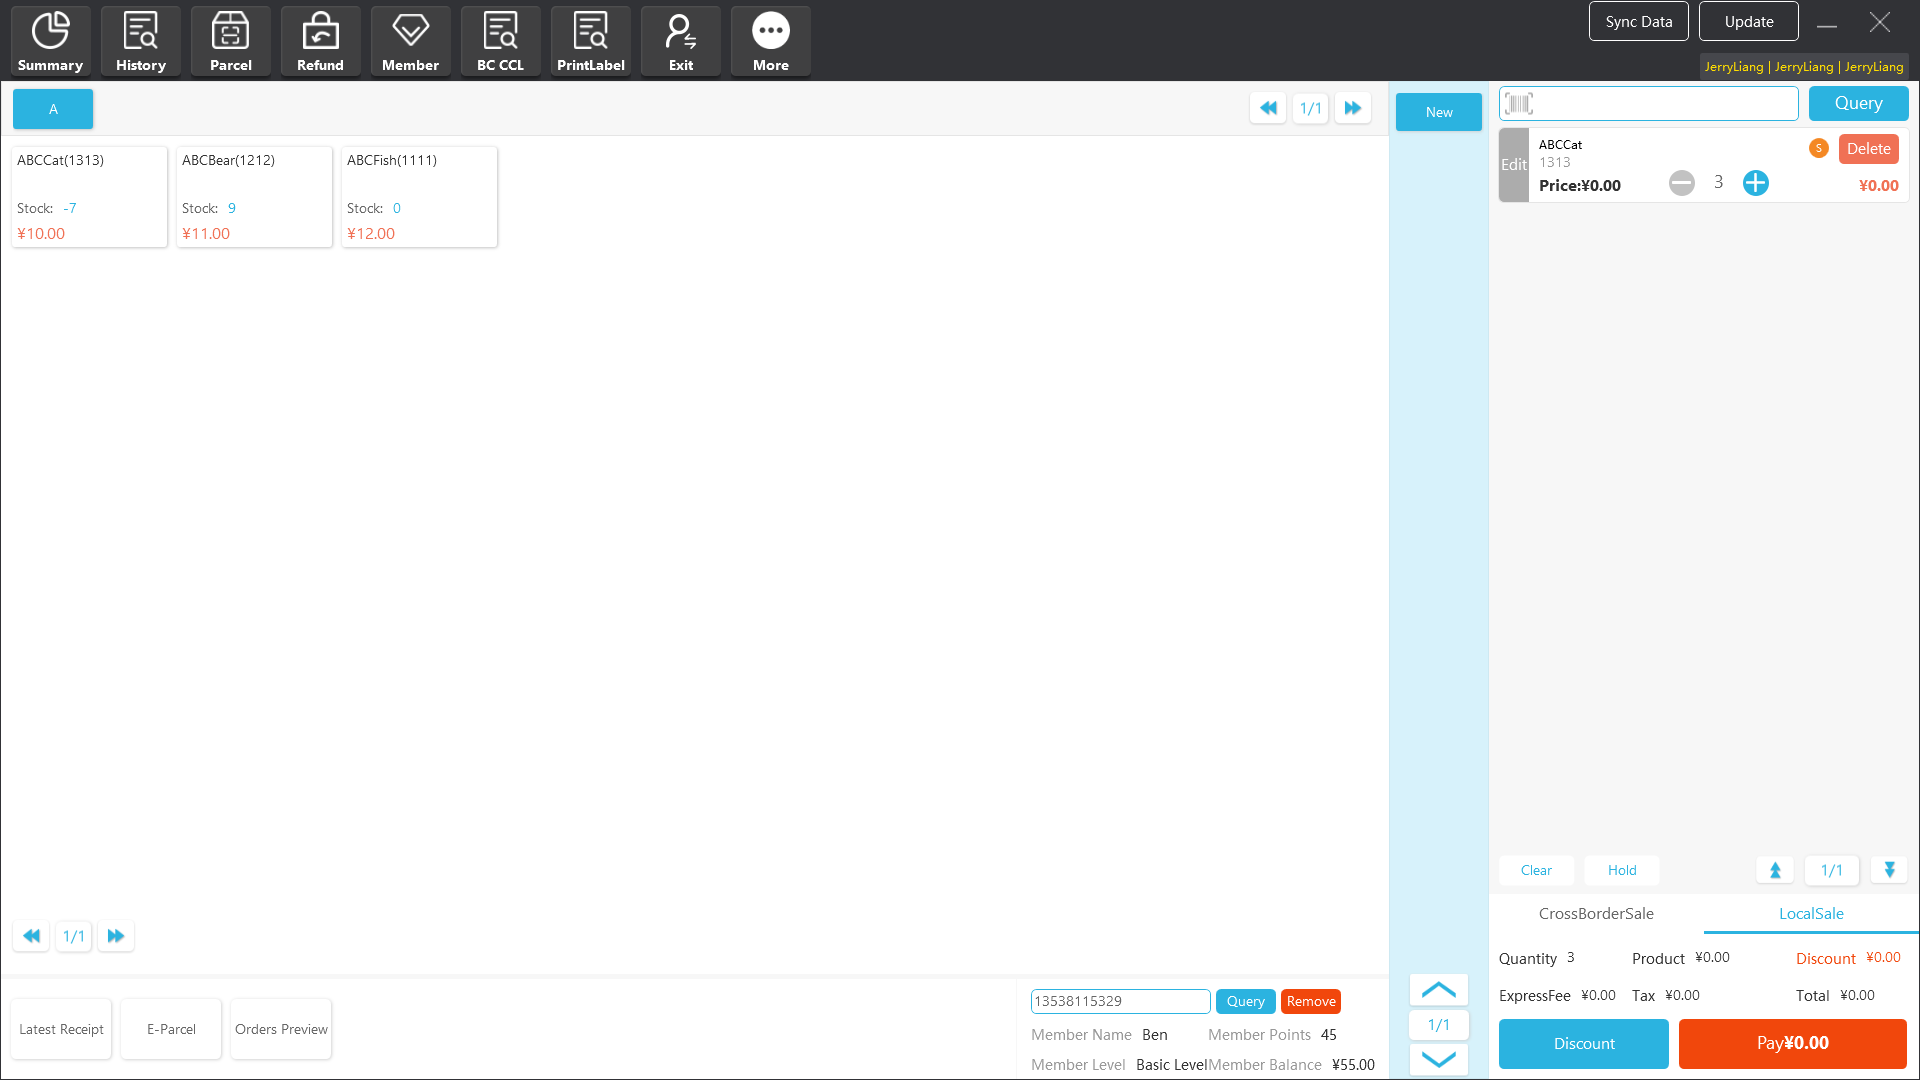
Step 1: Log in Apos client, enter the member information, click the members - buy timecard button, select the purchased timecard, click the confirm purchase timecard button to complete the purchase of timecard.
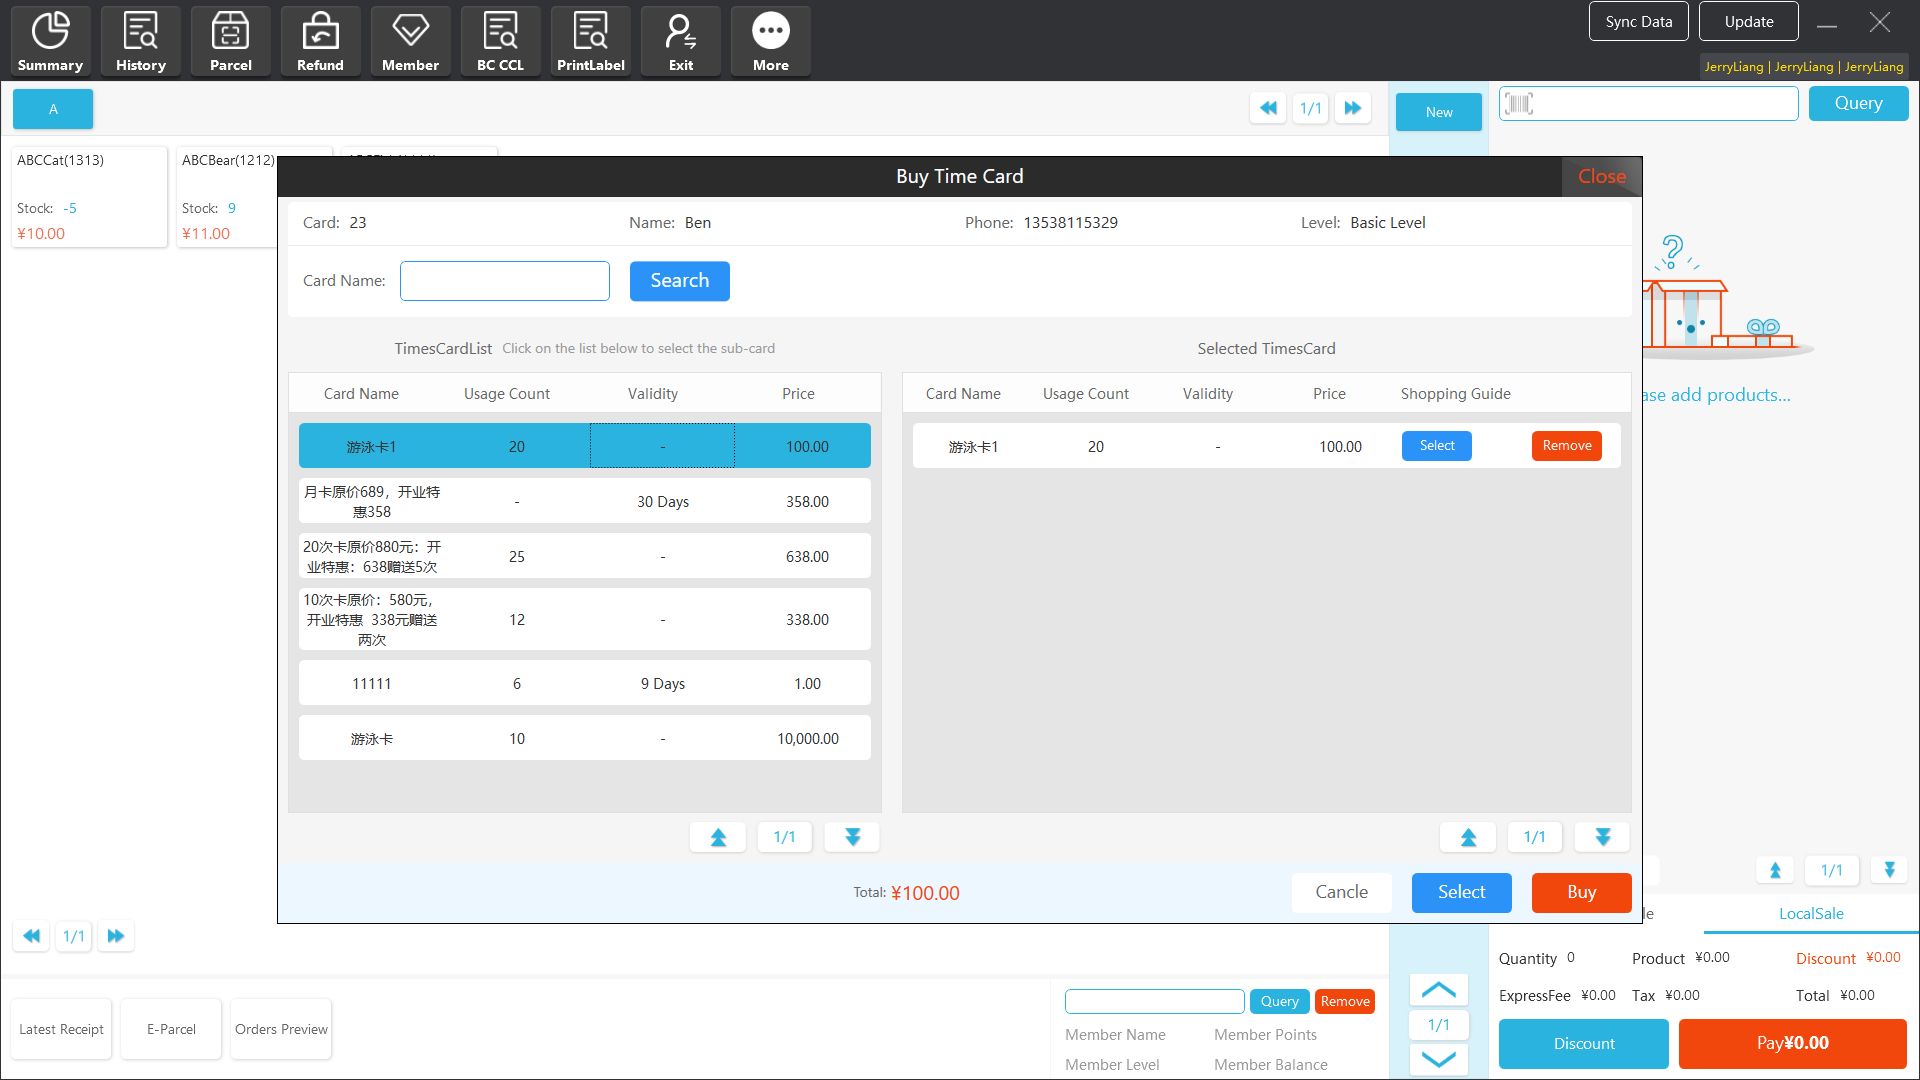
Step 2: Enter the member information at the client, select the product bound by the timecard, and the settlement amount is 0 yuan. Click pay, and the timecard is used.
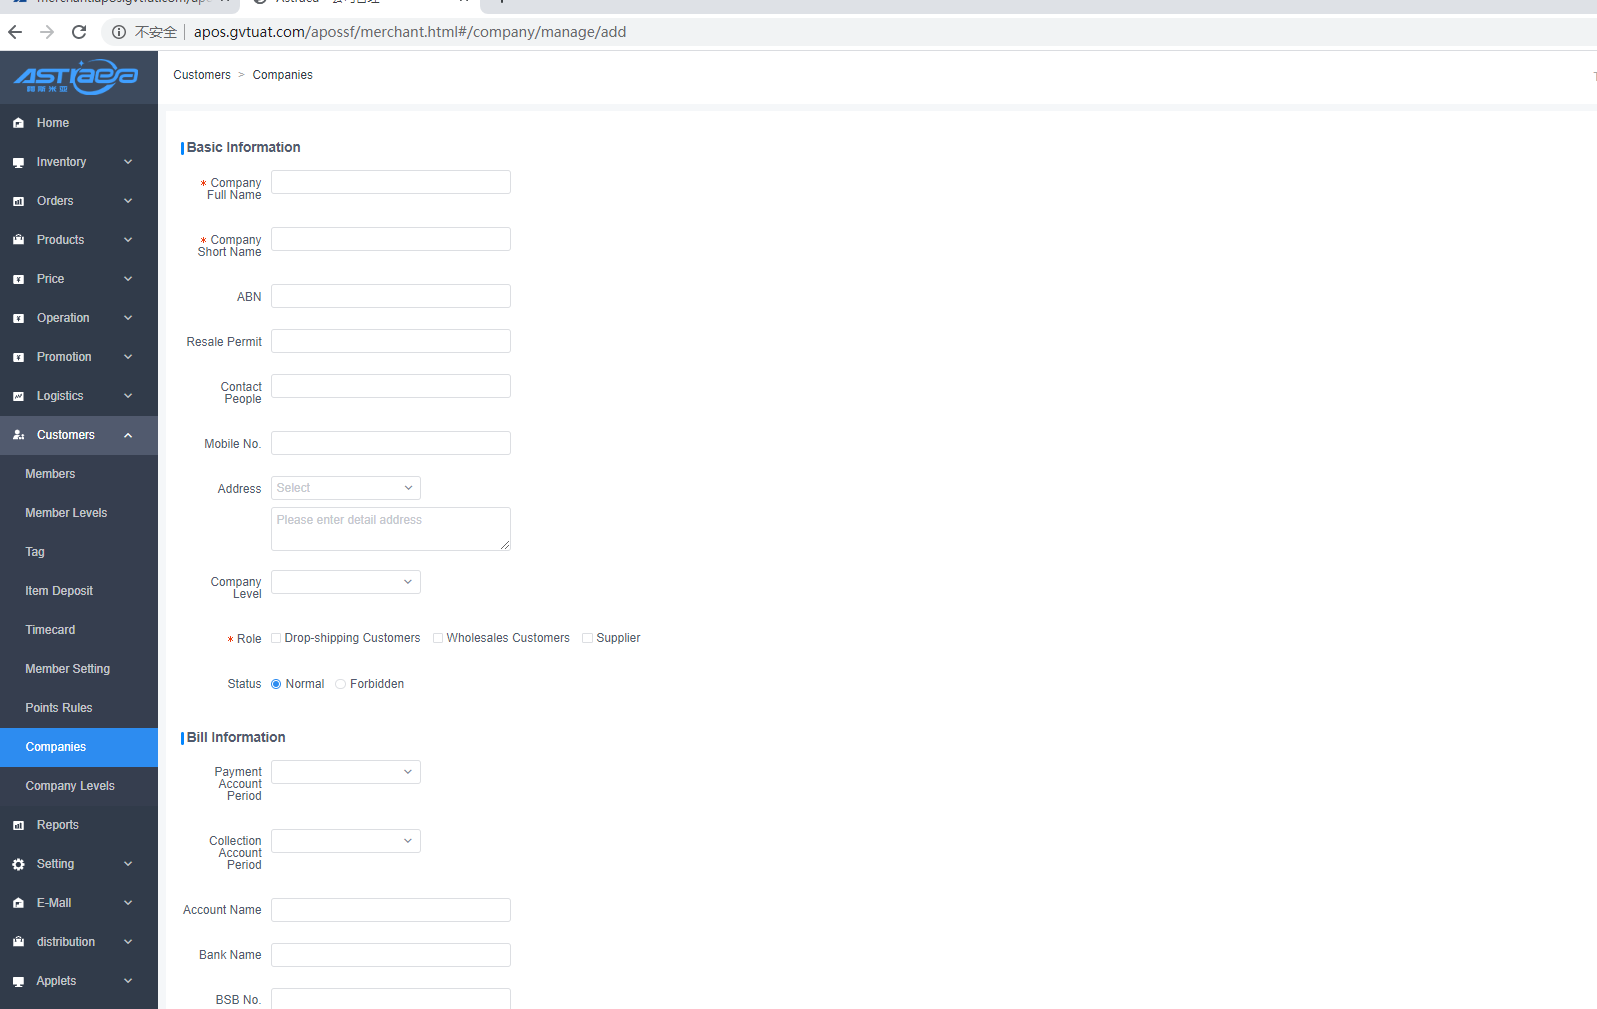
6.8 Company management
6.8.1 Add new company at the server
The company management function is mainly used to manage the companies of suppliers and customers in the warehouse, including the functions of adding, importing, editing, deleting companies, etc. as well as the collection and payment operation.
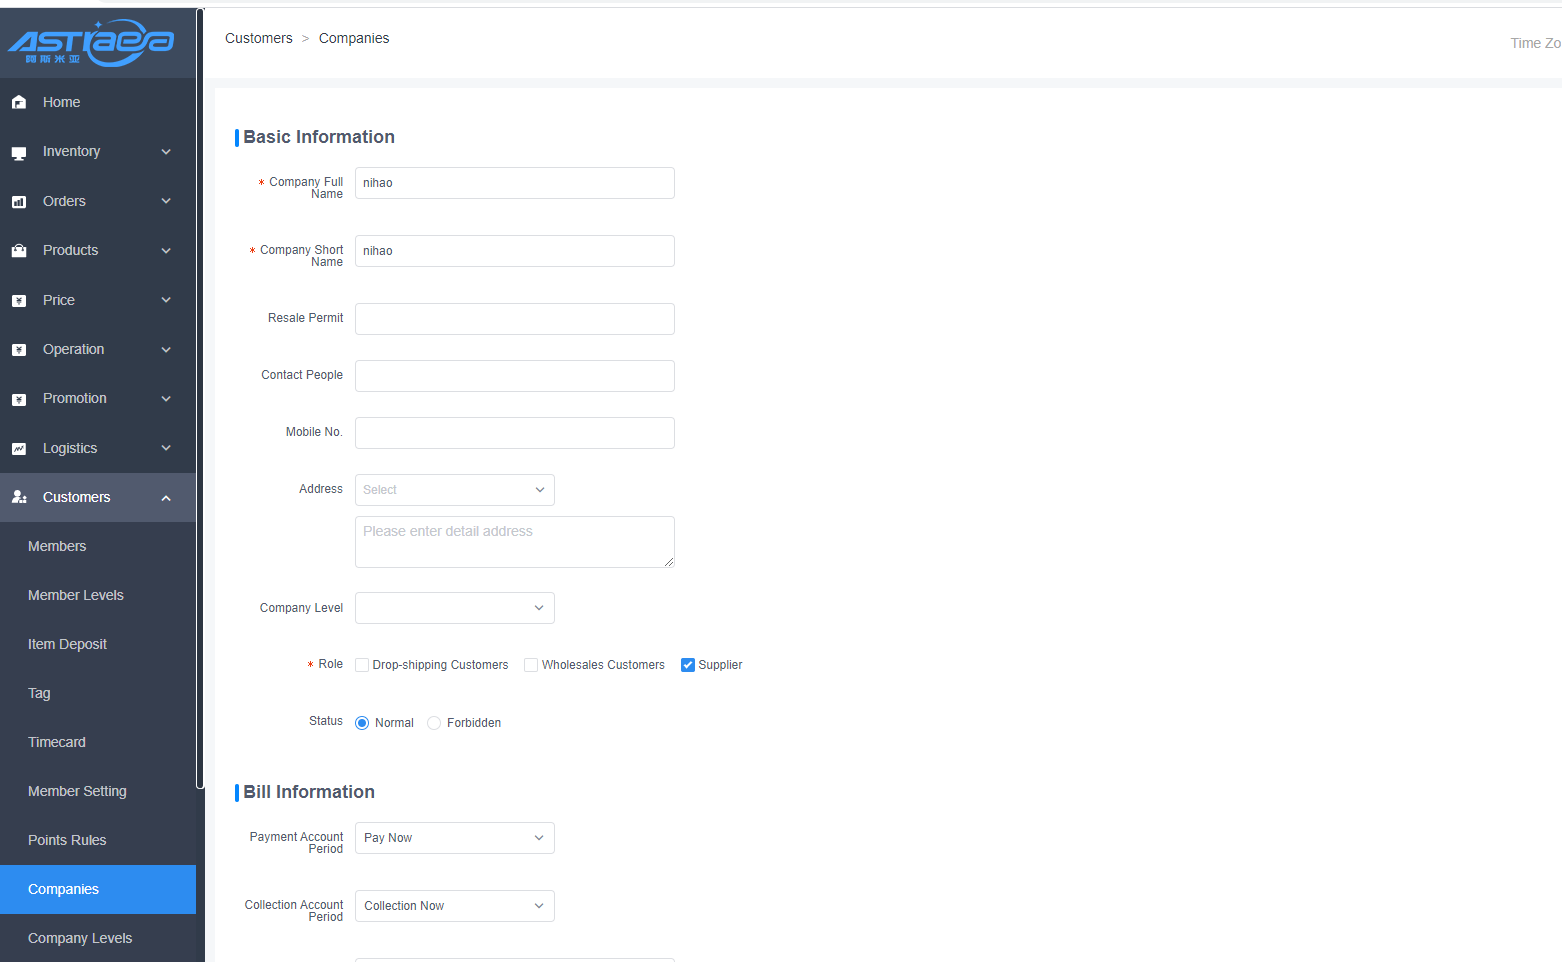
[Operating steps]
Step 1: Log in Apos server, click the customers - companies menu, click the "add" button, enter the required items of the full name, short name of the company, and the company role, you can choose to fill in other information, and click the save button to complete the operation of adding new company.

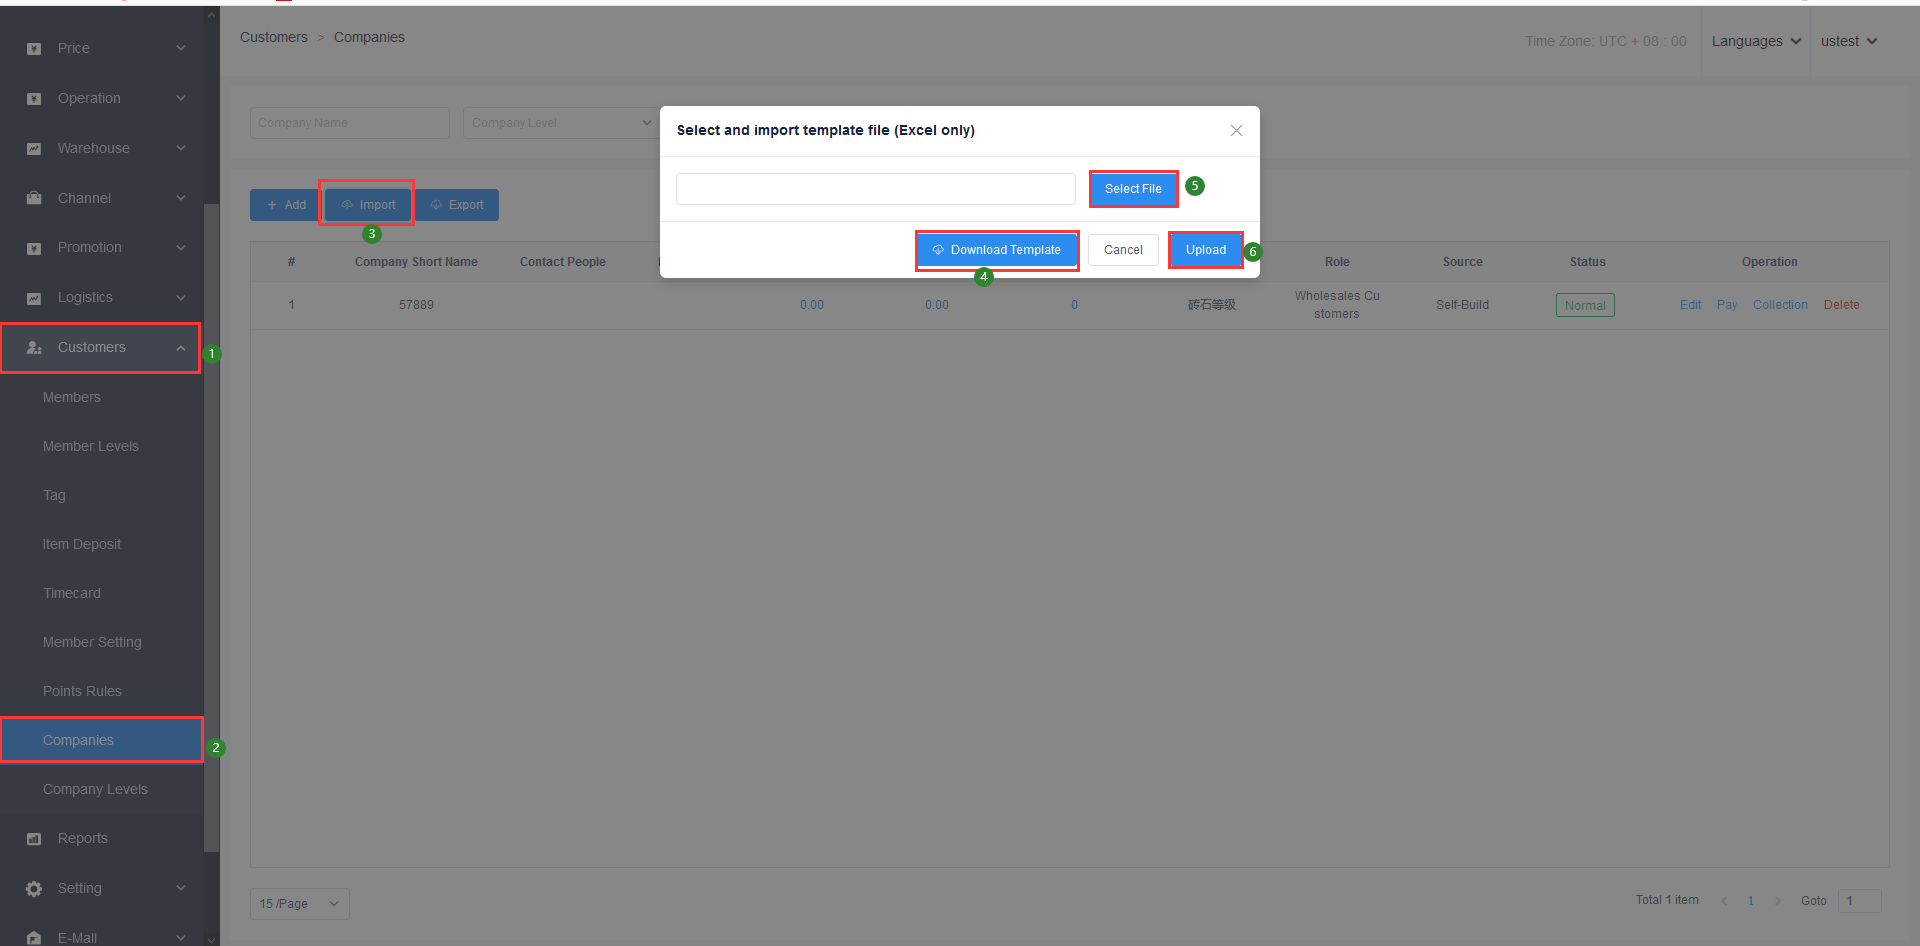
6.8.2 Batch import at the server
[Operating steps]
Step 1: Log in Apos server, click the customers - companies menu, click the "import" button, first click the "download template" to download the template to the local.
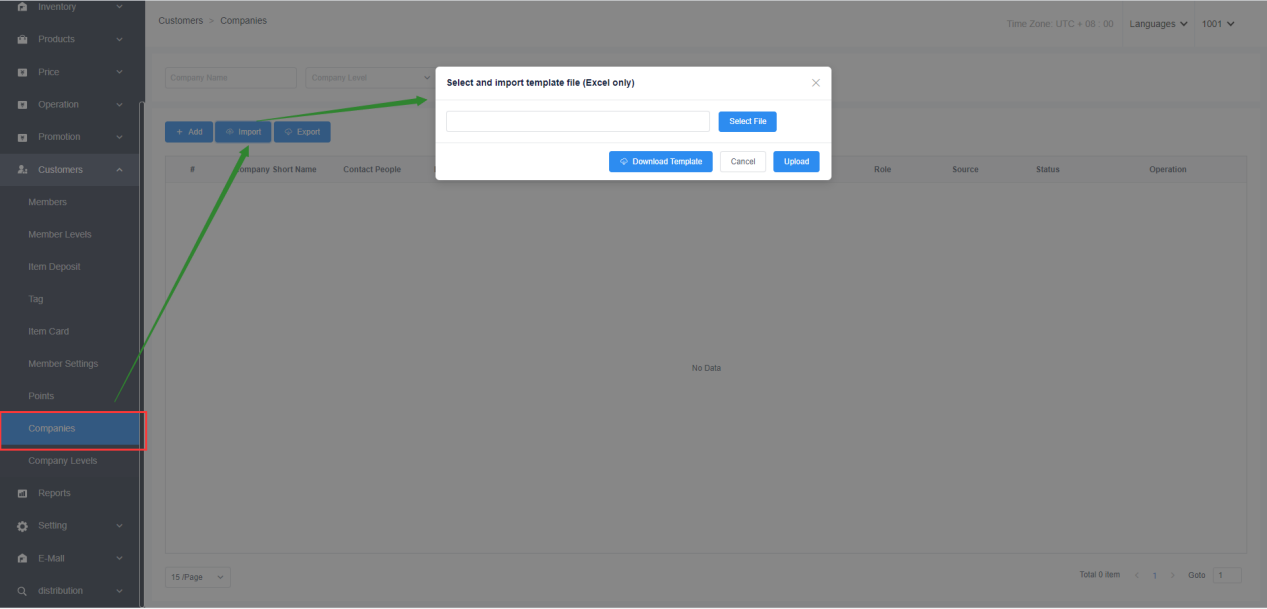
Step 2: According to the template, enter the required information, and save it after completion.

Step 3: In the import pop-up box, select the file and click upload to complete the batch import company operation.
6.8.3 Editing company information at the server
[Operating steps]
Step 1: Log in Apos server, click the customers - companies menu, select one of the companies, and click the edit button.

Step 2: You can edit and modify the company information to be modified. Click save to finish the editing company information operation.
6.8.4 Deleting company at the server
[Operating steps]
Step 1: Log in Apos server, click the customers - companies menu, select a company, and click the delete button.

Step 2: Note: only when there is no associated business under the company can the deletion be carried out, otherwise the deletion cannot succeed.

6.8.5 Company collection at the server
[Operating steps]
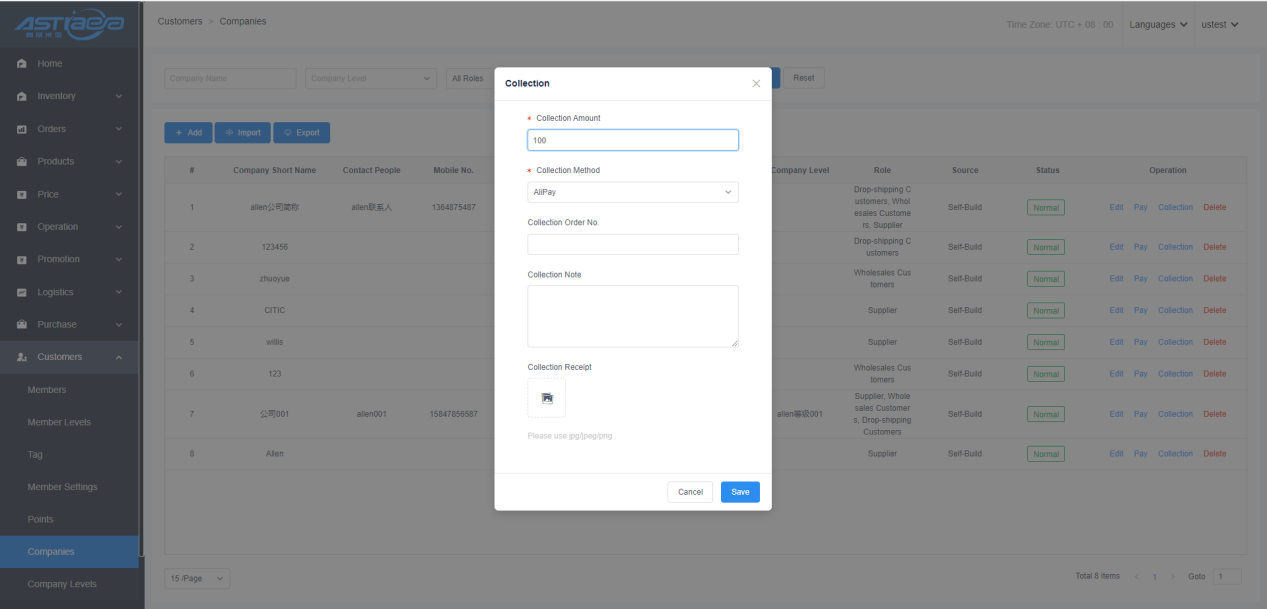
Step 1: Log in Apos server, click the customers - companies menu, select one of the companies, and click the collection button.
Step 2: After entering the collection amount, collection method and collection order No., click save to complete the collection of the company.
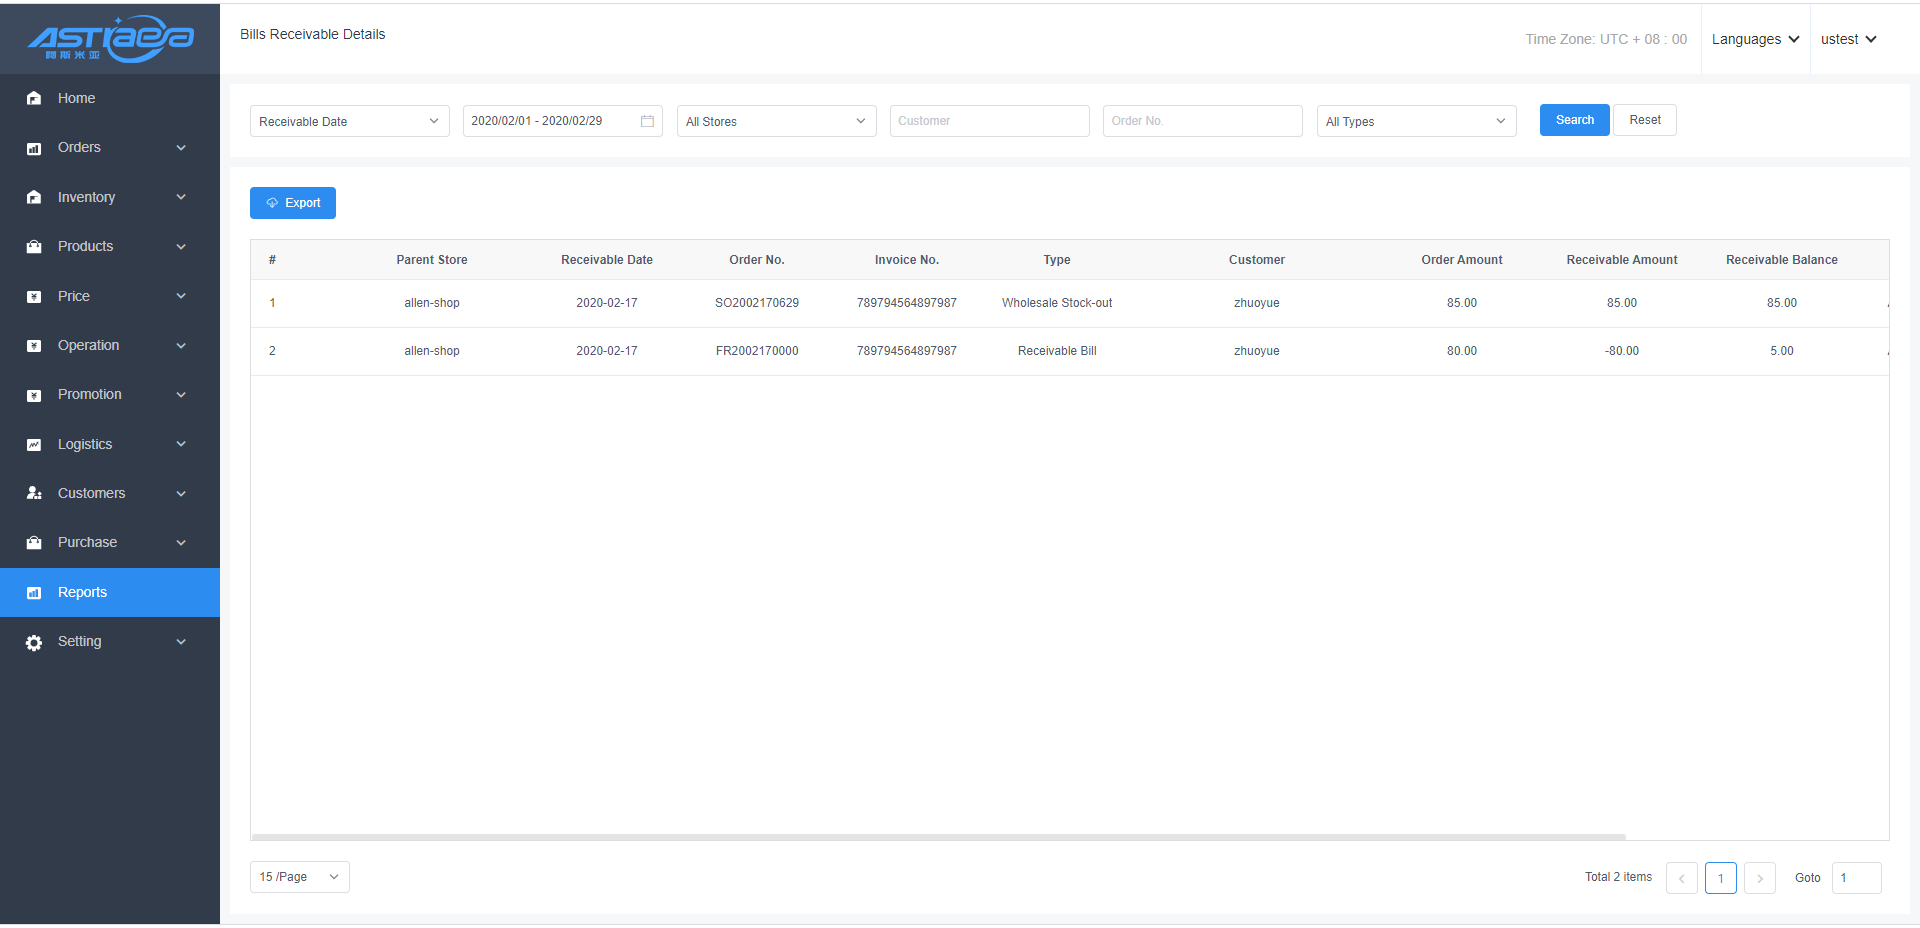
Step 3: The receivable details can be viewed in the receivable report.
6.8.6 Company payment at the server
[Operating steps]
Step 1: Log in Apos server, click the customers - companies menu, select one of the companies, and click the payment button. After entering the payment amount, payment method and payment order No., click save to complete the payment to the company.

Step 2: The collection and payment details can be viewed in the receivable report.

6.9 Company level
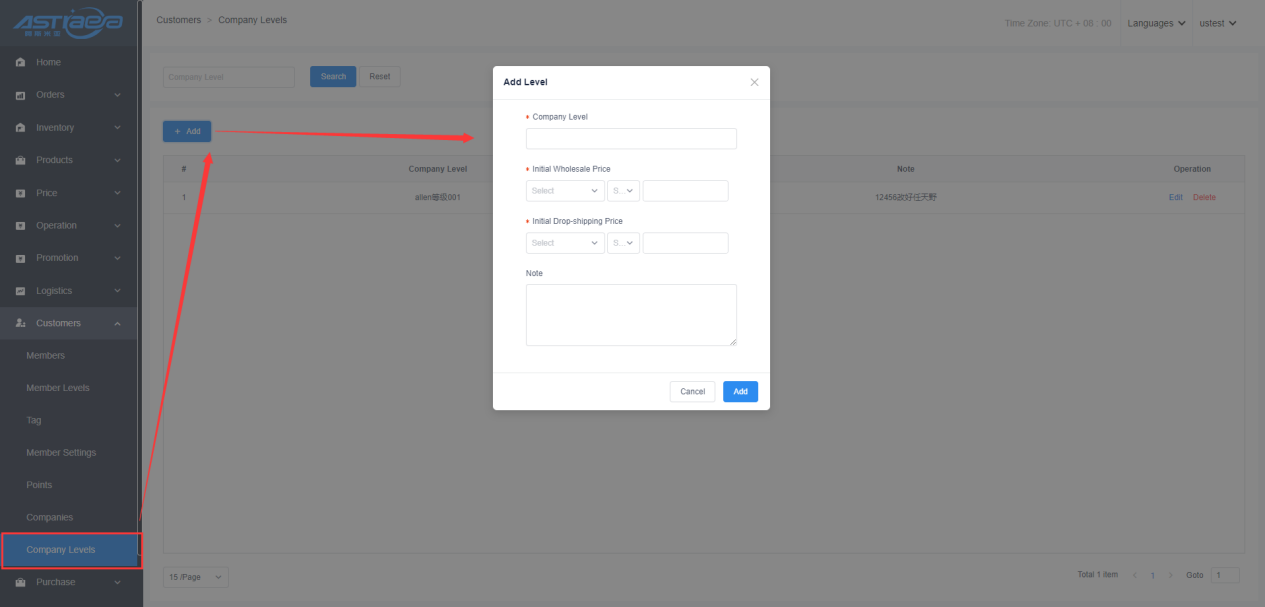
6.9.1 Add company level
[Operating steps]
Step 1: Log in Apos server, click the customers - company levels menu, click the "add" button, enter the level name, set the initial drop-shipping price of the level, and then click the save button. When wholesale product stock-out to company customers of different levels, the price will vary by different levels.
6.9.2 Edit company level
[Operating steps]
Step 1: Log in Apos server, click the customers - company levels menu, select one of the company levels and click the "edit" button to modify the company level information. You can only modify the level name and remarks, but not the level price.

VI System Settings
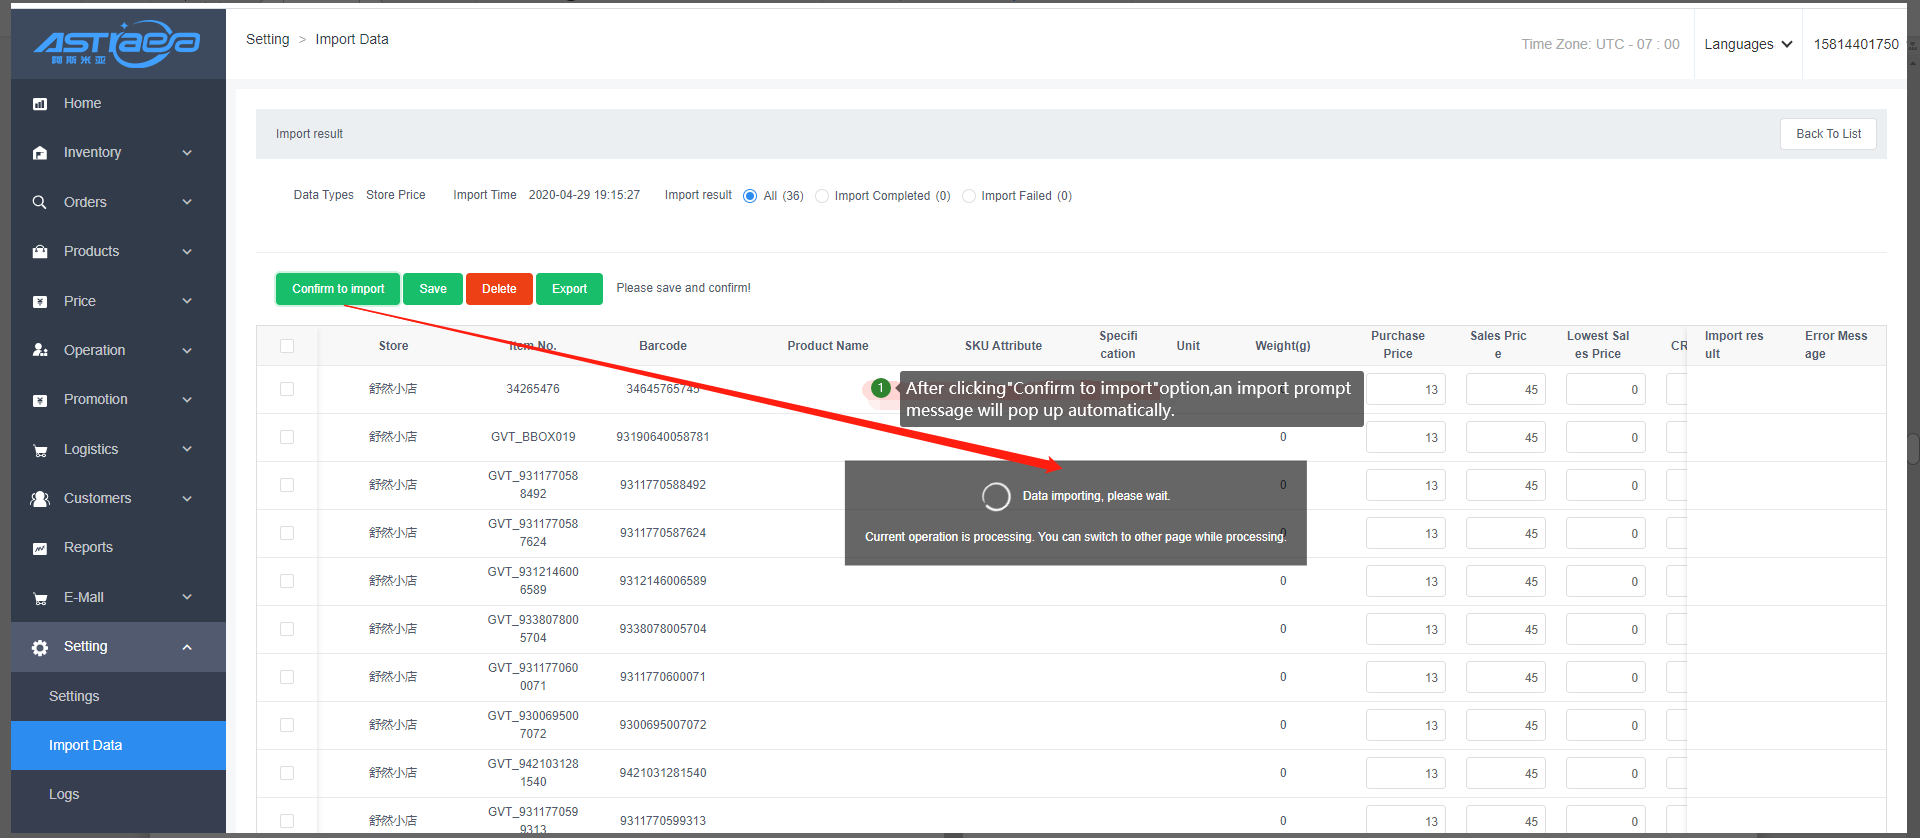
7.1 Data import
Import data is divided into product information, product price, store price, and inventory. Take import product price as an example
[Operating steps]
Step 1: Click “Import”, select “Price” from drop-down box

Step 2: Click “Download Template” (edit required imported data and save in the template Note: items with “*” are mandatory)
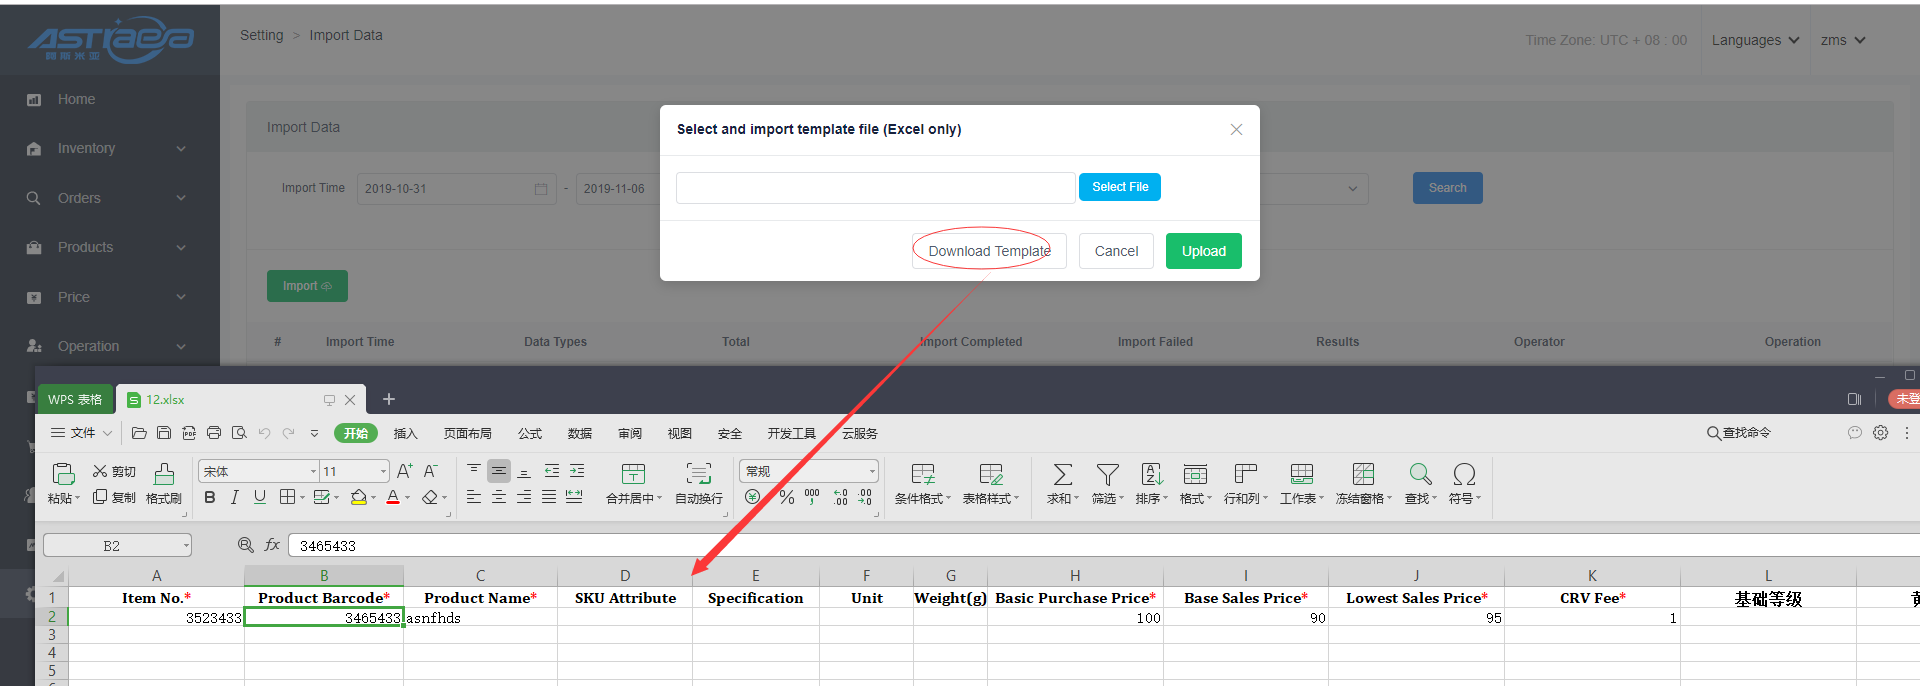
Step 3: Click “Select File”, select edited template file, click “Upload”
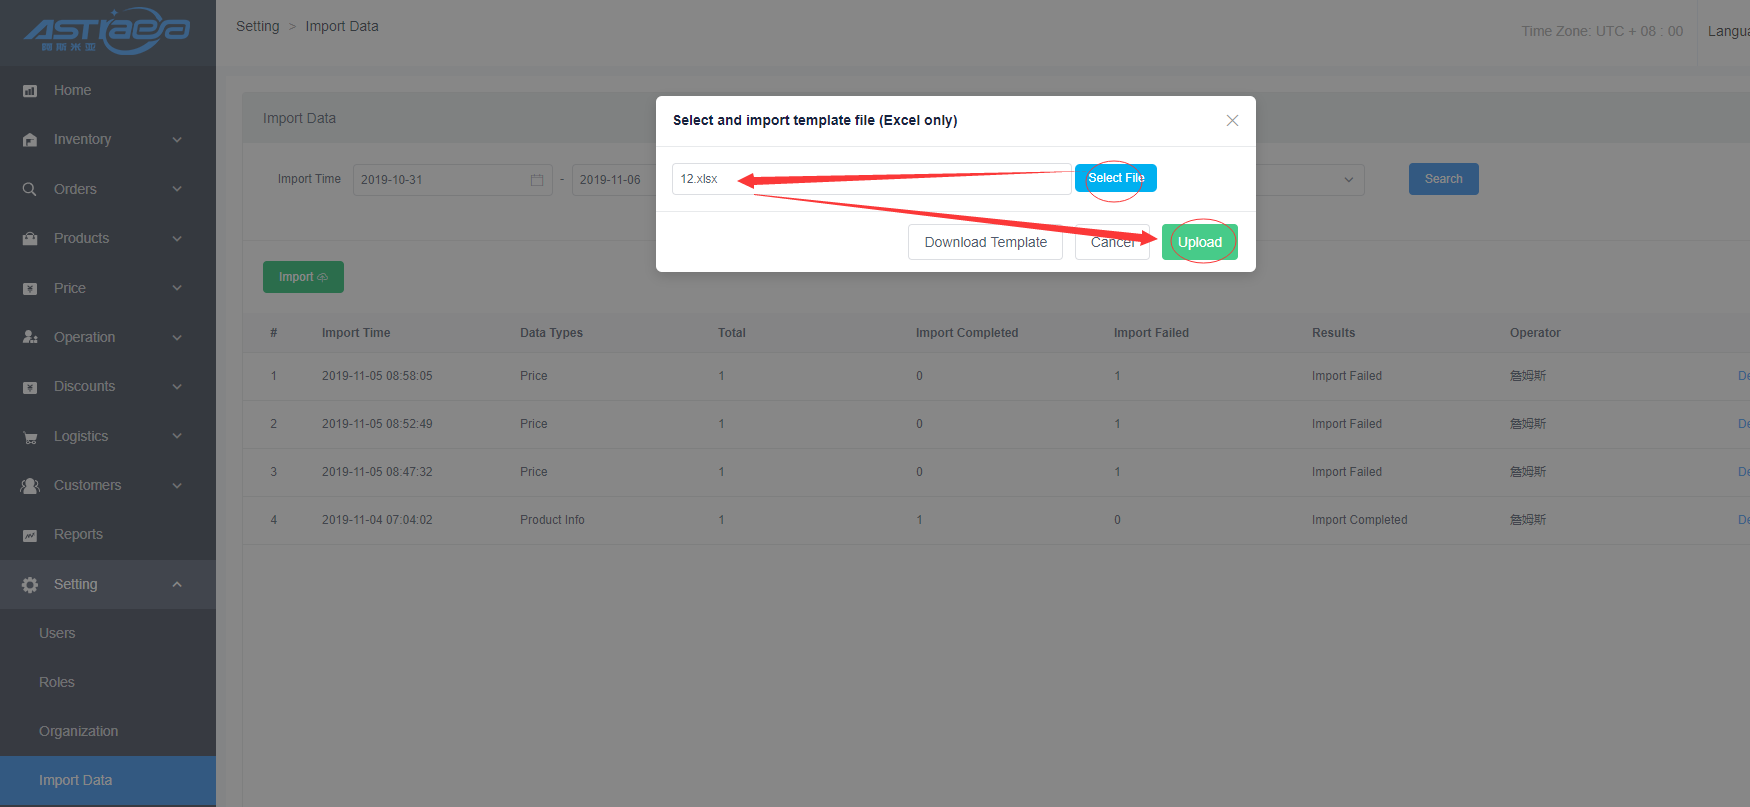
Step 4: After uploaded, the page will display upload results (including statistics of upload successful and failed data), click “Confirm to import”, import uploaded data to product price.

7.2 System settings
On the system settings page, business rules configuration can be set at the merchant level. For newly added merchant tenants, the business rule configuration in the system settings is taken by default.
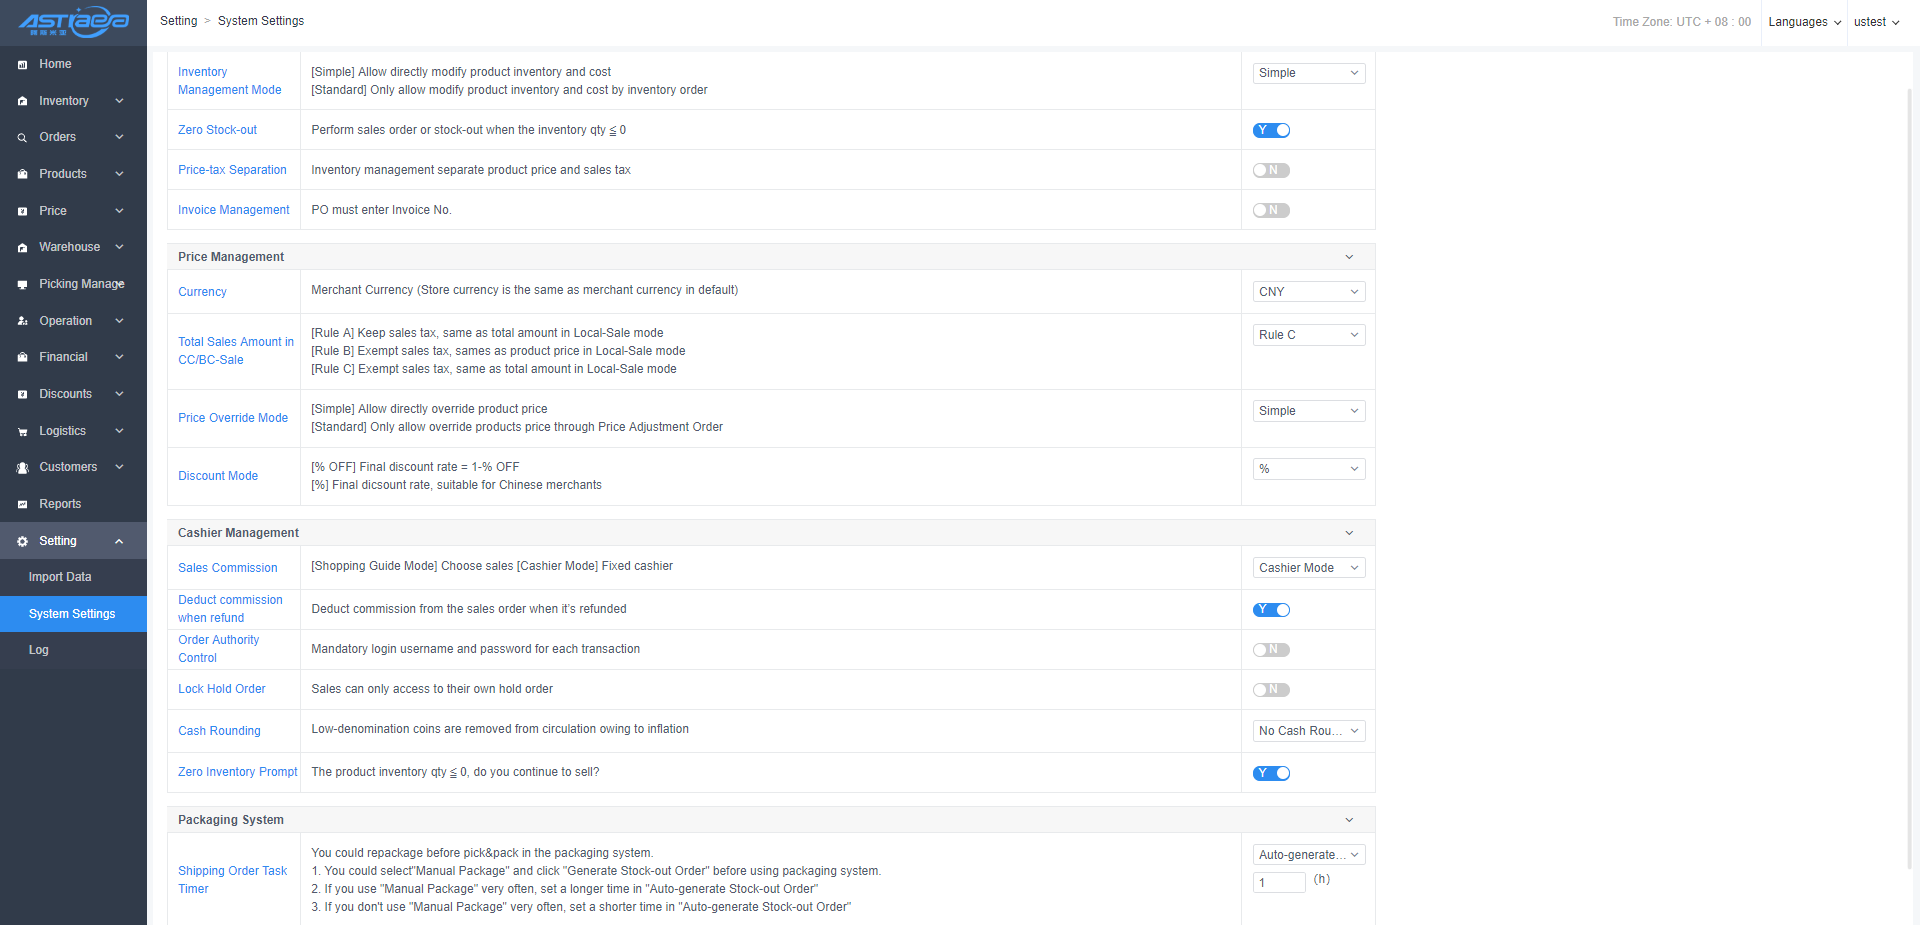
- The business rules explain:
- Cash Rounding When paying in cash, the payable amount is processed according to the set cash rounding;
- No Cash Rounding; No cash rounding, the actual amount to be paid is the order total
- Round down to 0 cents; directly round down zero cent.
- Rounding off(5 cents); rounding off 5 cents
- Round to the nearest 5 cents
- Round down to 10 cents: directly round down to 10 cents
- Round off: Round off (50 cents)
- Round to the nearest 50 cents
- The display format of the number of weighing commodities:
- Set the number of goods display format
######### 0, enter the number of goods: 1.23456, the actual display 1 - Set the display format of the number of products to
######### 0.0, enter the number of products: 1.23456, the actual display is 1.2 - Set the display format of the number of products to
######### 0.00, enter the number of products: 1.23456, the actual display is 1.23 - Set the display format of the number of goods to
######### 0.000, enter the number of goods: 1.23456, the actual display is 1.235 - Set the display format of the number of goods to
######### 0.0000, enter the number of goods: 1.23456, the actual display is 1.2346 - Set the product quantity display format to
#, ###, ###, ## 0.0000, enter the product quantity: 1.23456, the actual display is 1.2346 - Set the product quantity display format to
#, ###, ###, ## 0.000, enter the product quantity: 1.23456, the actual display is 1.235 - Set the product quantity display format to
#, ###, ###, ## 0.00, enter the product quantity: 1.23456, the actual display is 1.23 - Set the product quantity display format to
#, ###, ###, ## 0.0, enter the product quantity: 1.23456, the actual display is 1.2 - Set the product quantity display format to
#, ###, ###, ## 0, enter the product quantity: 1.23456, the actual display is 1 - Set the format of the number of products displayed as
#, ###, ###, ## 0. ####, enter the number of products: 1.23456, the actual display is 1.2346 - Set the number of products display format to
######### 0. ####, enter the number of products: 1.23456, the actual display is 1.2346 - Set the display format of the number of products to
######### 0.00 ##, enter the number of products: 1.23456, the actual display is 1.2346 - Set the display format of the number of commodities to
#, ###, ###, ## 0.00 ##, enter the number of commodities: 1.23456, the actual display is 1.2346
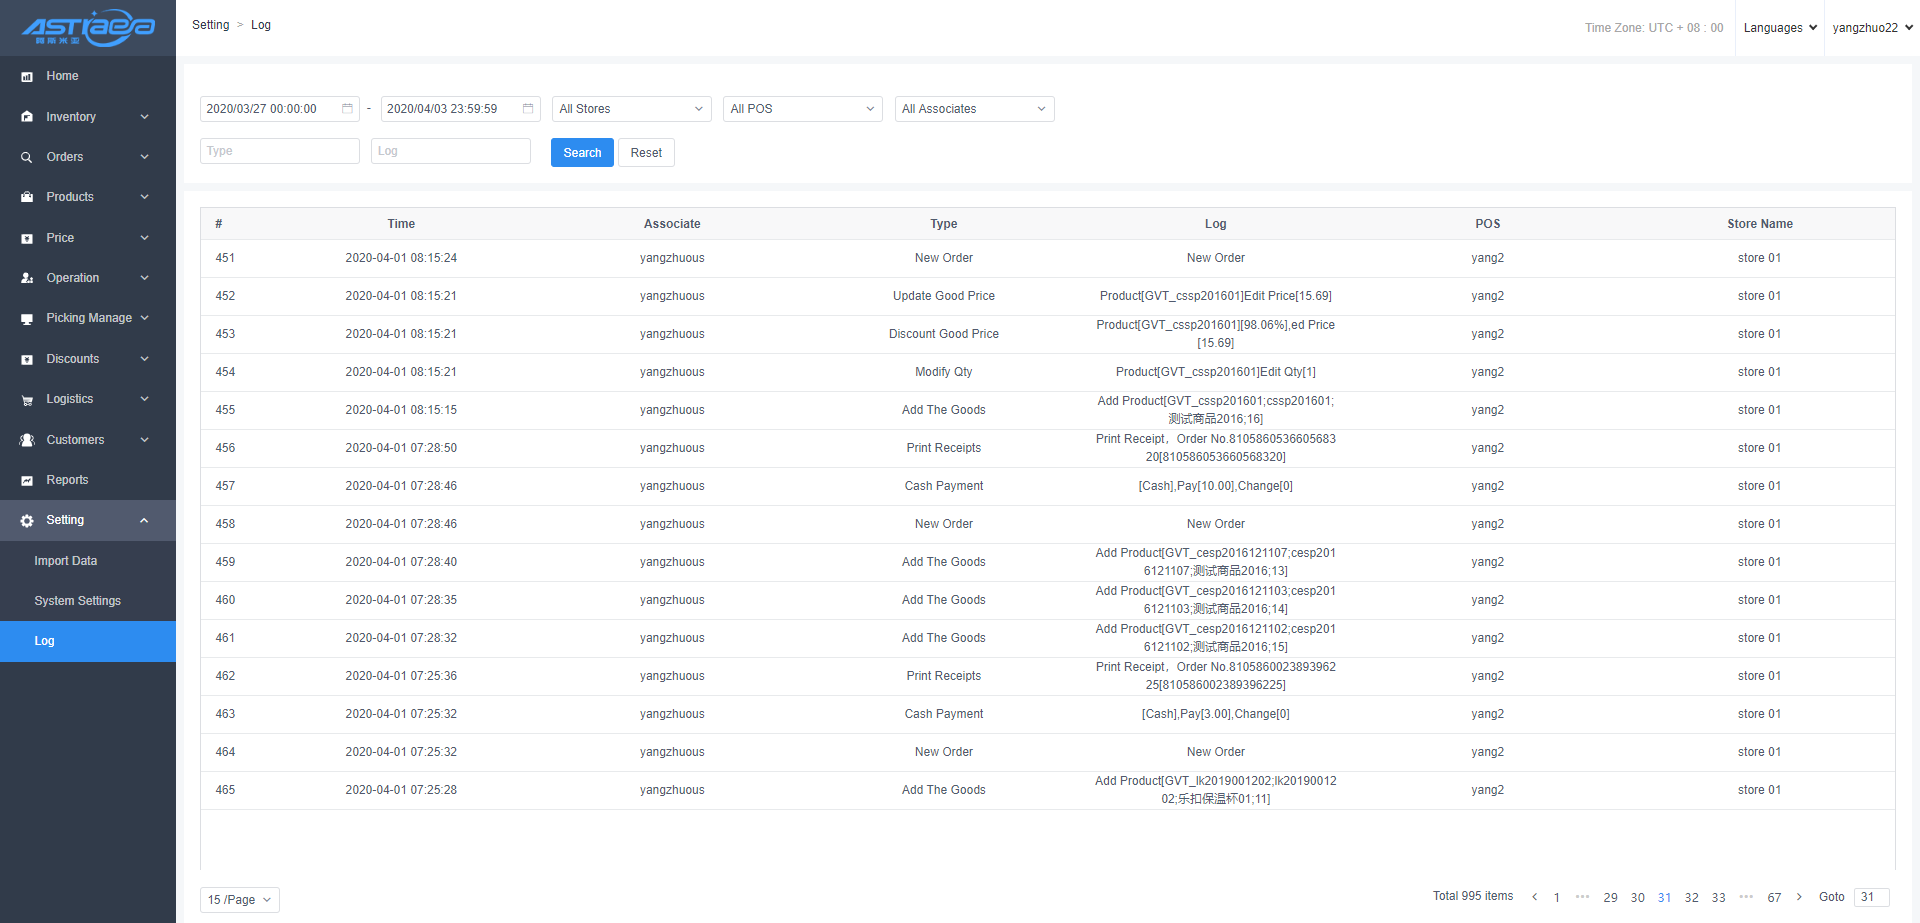
7.3 Logs
The cash log records the operation of the cashier operating the client to log in and log out, process order , synchronous upgrade, authorization and other operations. The operation record will be uploaded to the server's cash register log, which can be viewed through the background.
VIII. Promotion Management
8.1 Price break
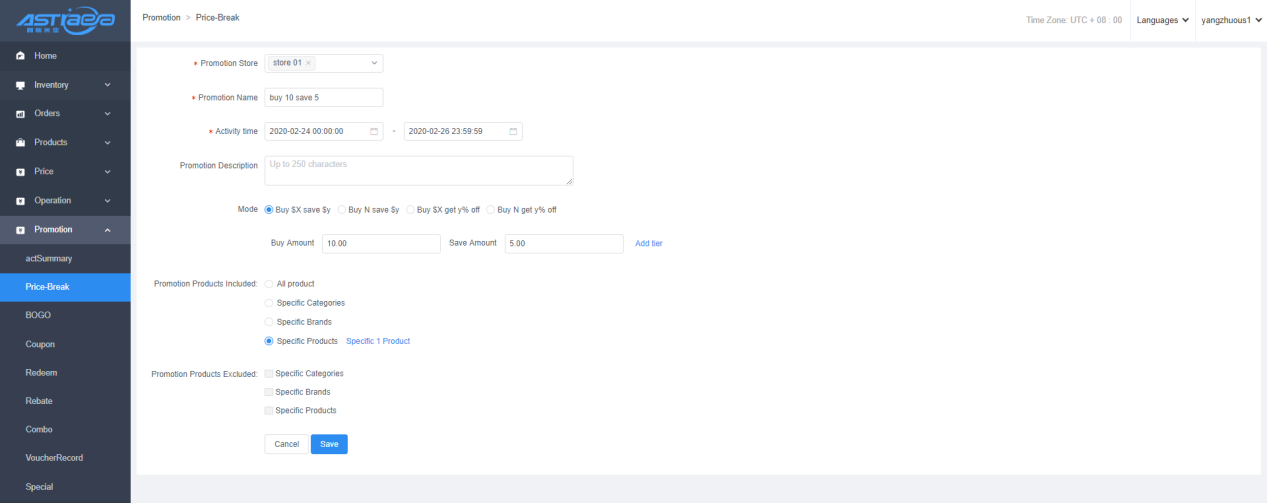
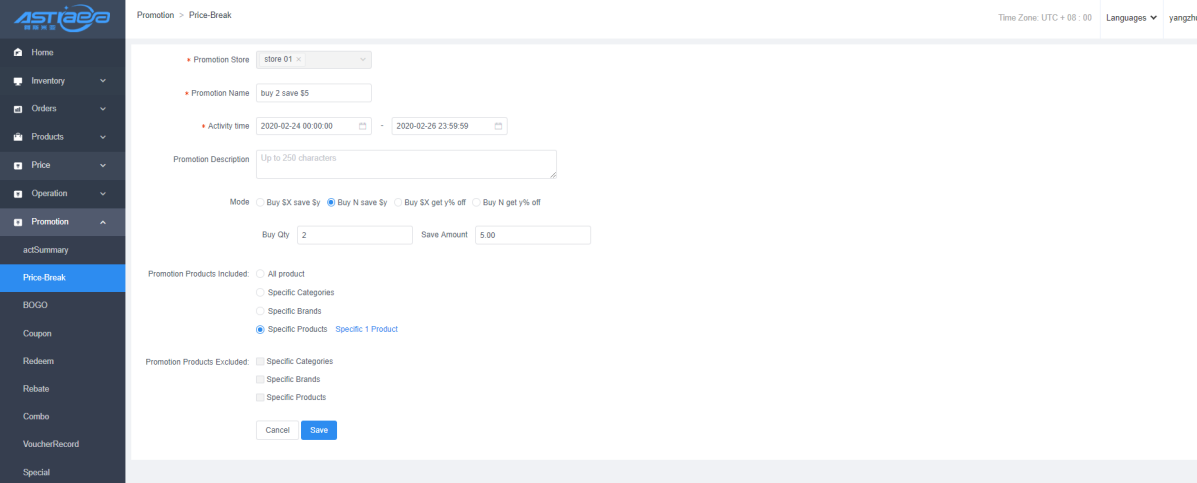
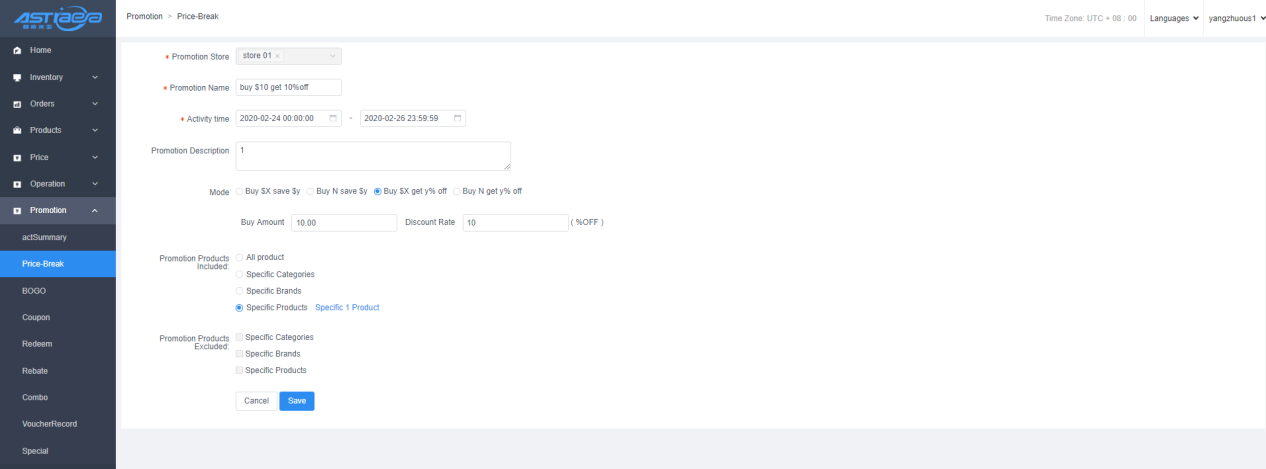
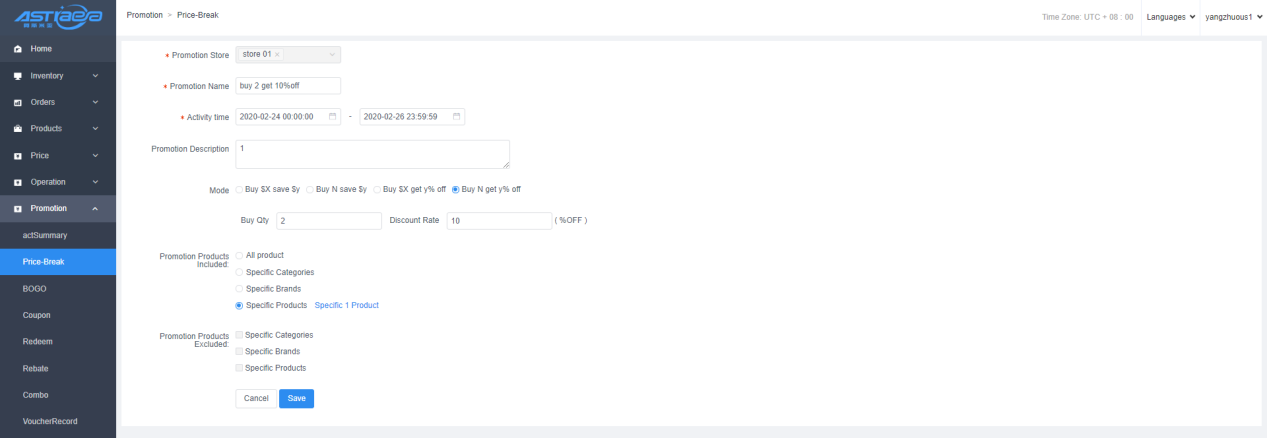
8.1.1 Create price break activity in the server
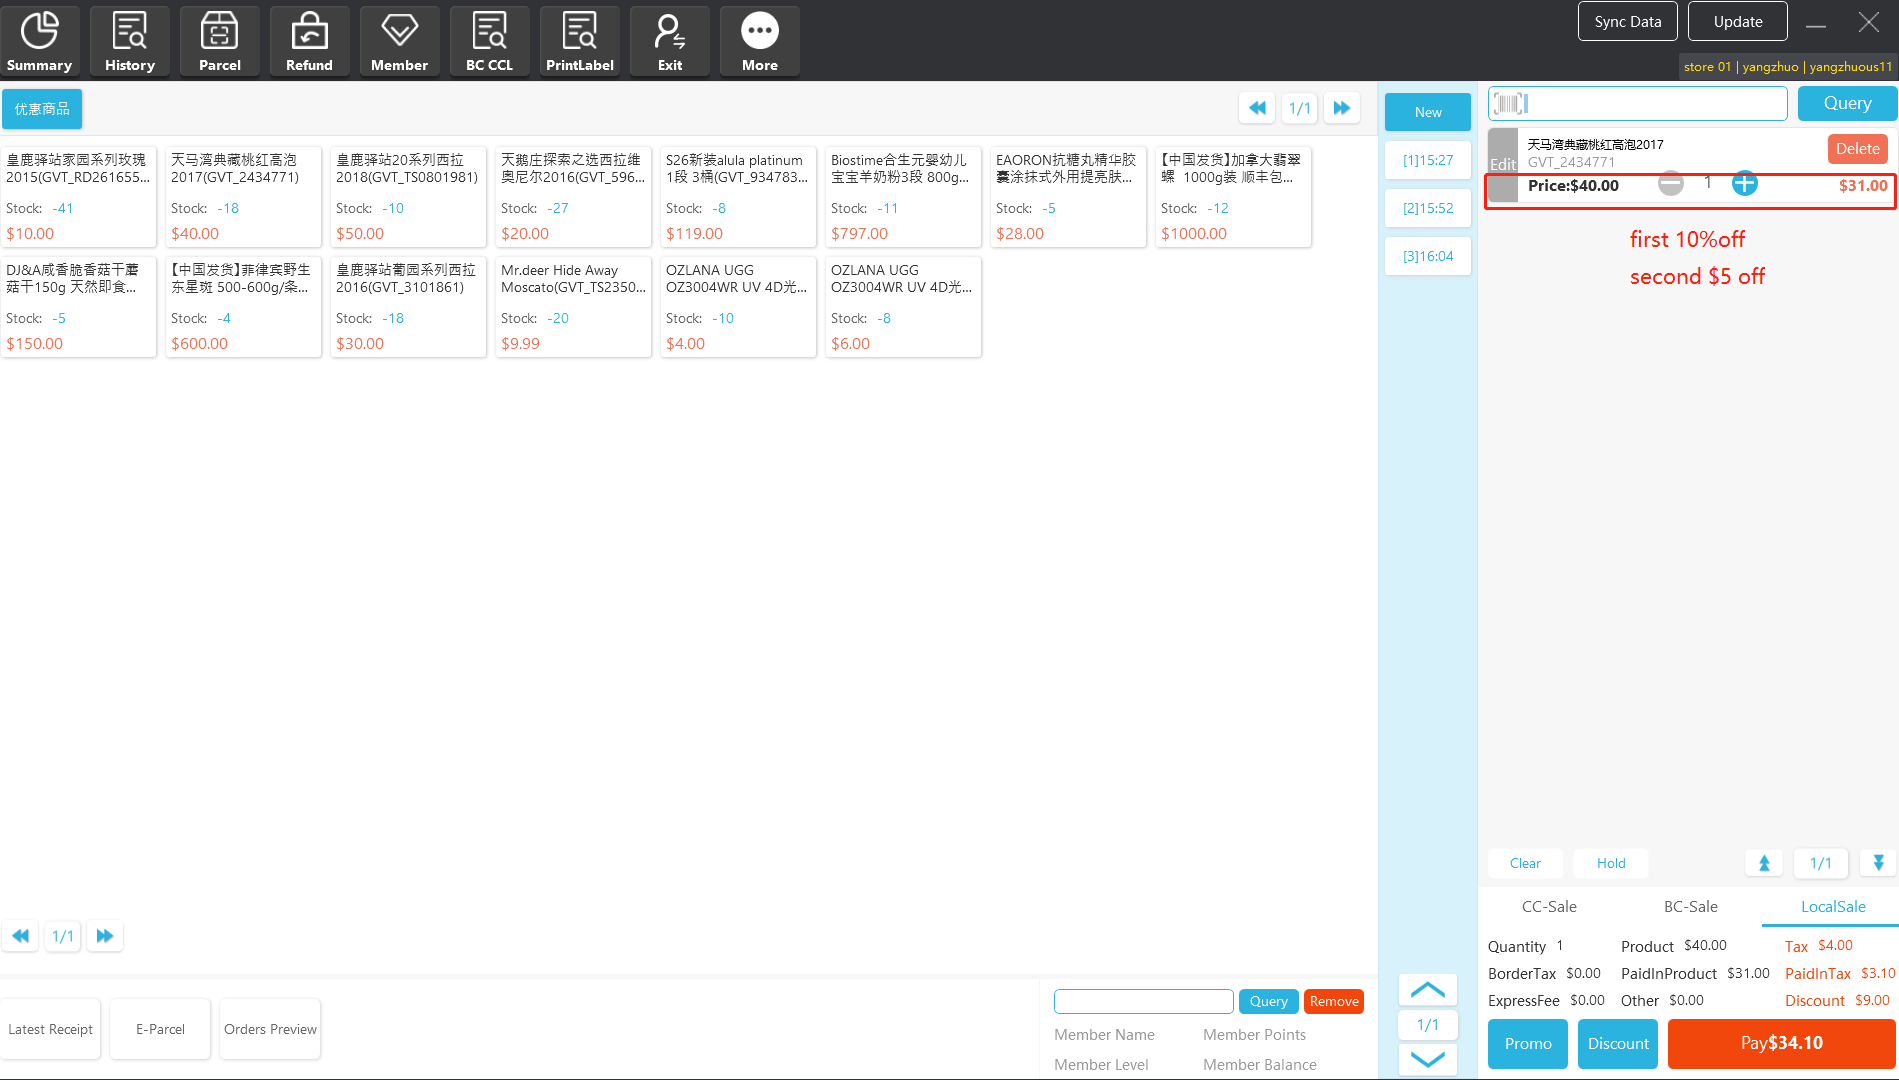
It is applicable to the activity scenario of reducing fixed amount or giving fixed discount to the products participating in the promotion after consuming N yuan or N pieces
Path: Promotion Price break Add Activity
(1) Activity organizer: set promotion store
(2) Activity name: require to be set
(3) Activity time: require to be set, from XXX to XXX
(4) Description: require to be set
(5) Discount mode: Buy $X save $y, Buy N save $y, Buy $X get y% off, Buy N get y% off where buy $X save $y is applicable to tier adding, that is, support multi-tier buy $X save $y
(6) Promotion products included: specify products that participate in the promotion
(7) Promotion products excluded: specify products that do not participate in the promotion
8.1.2 Price break activity at the client
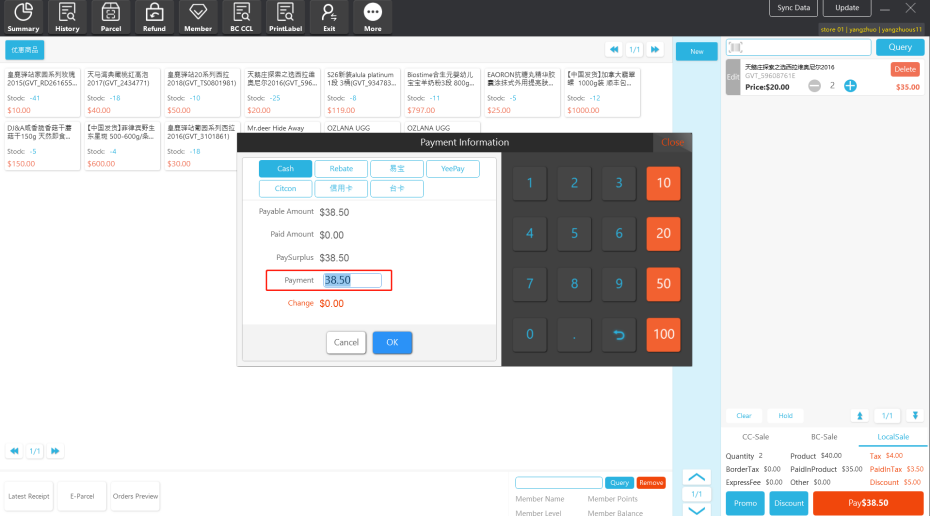
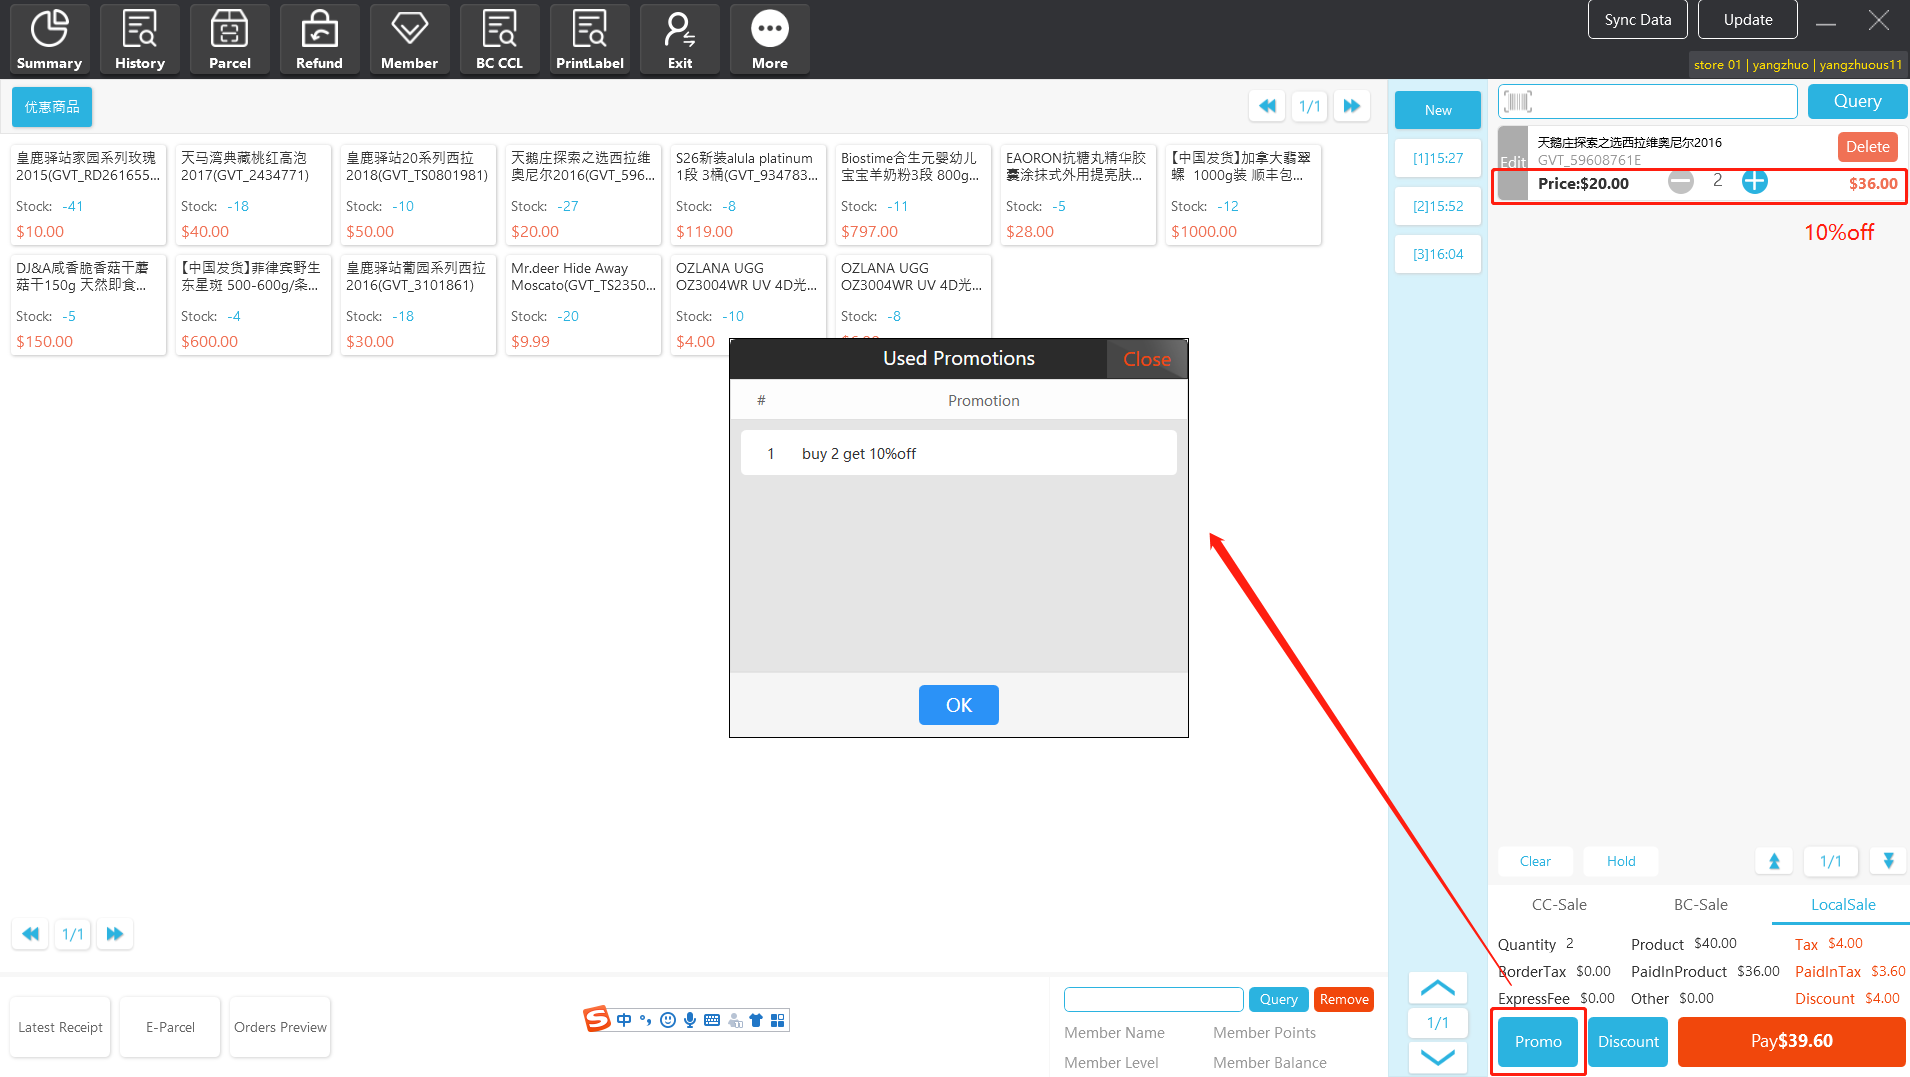
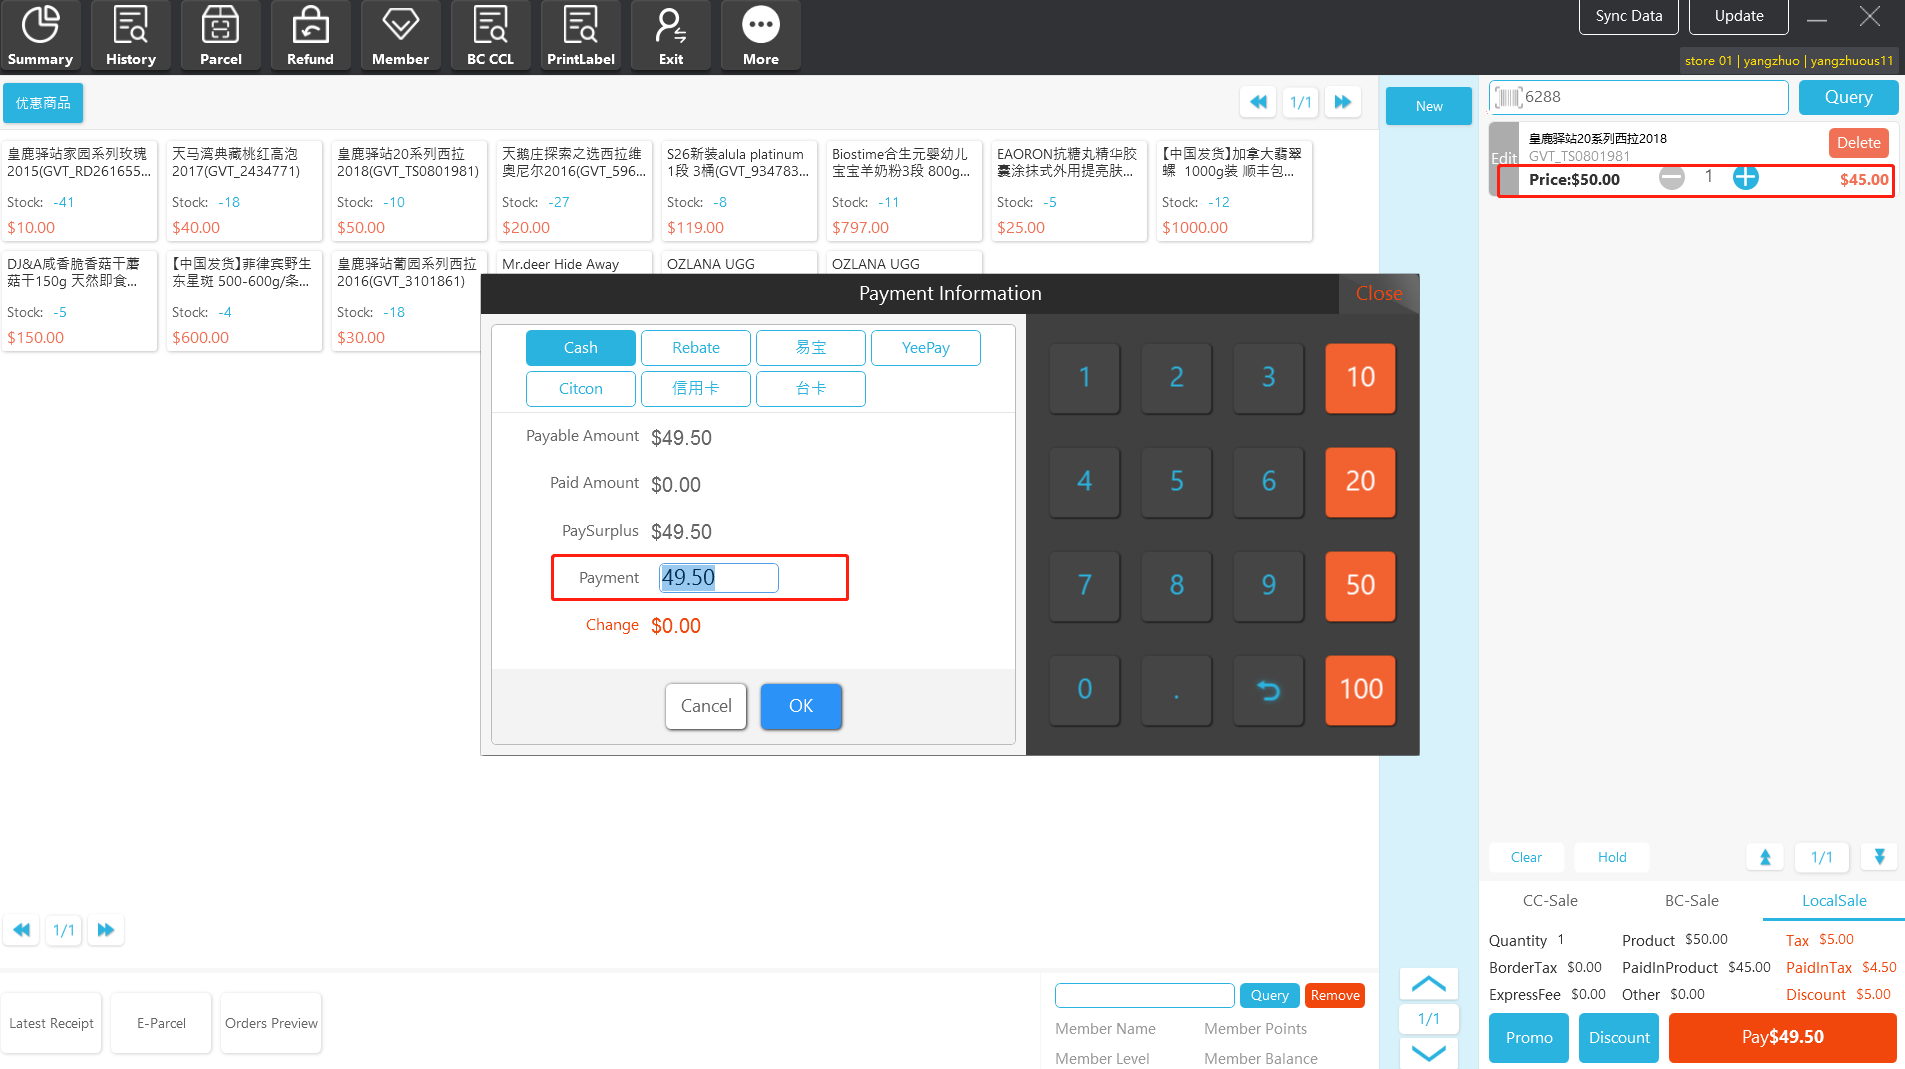
- 8.1.2.1 Price break activity at the client (Buy $X save $y)
- First create price break activity at the client, select activity mode: buy $10 save $5, select activity time and promotion products.

- Select a product participating in the promotion, click Promo and pop price break information.

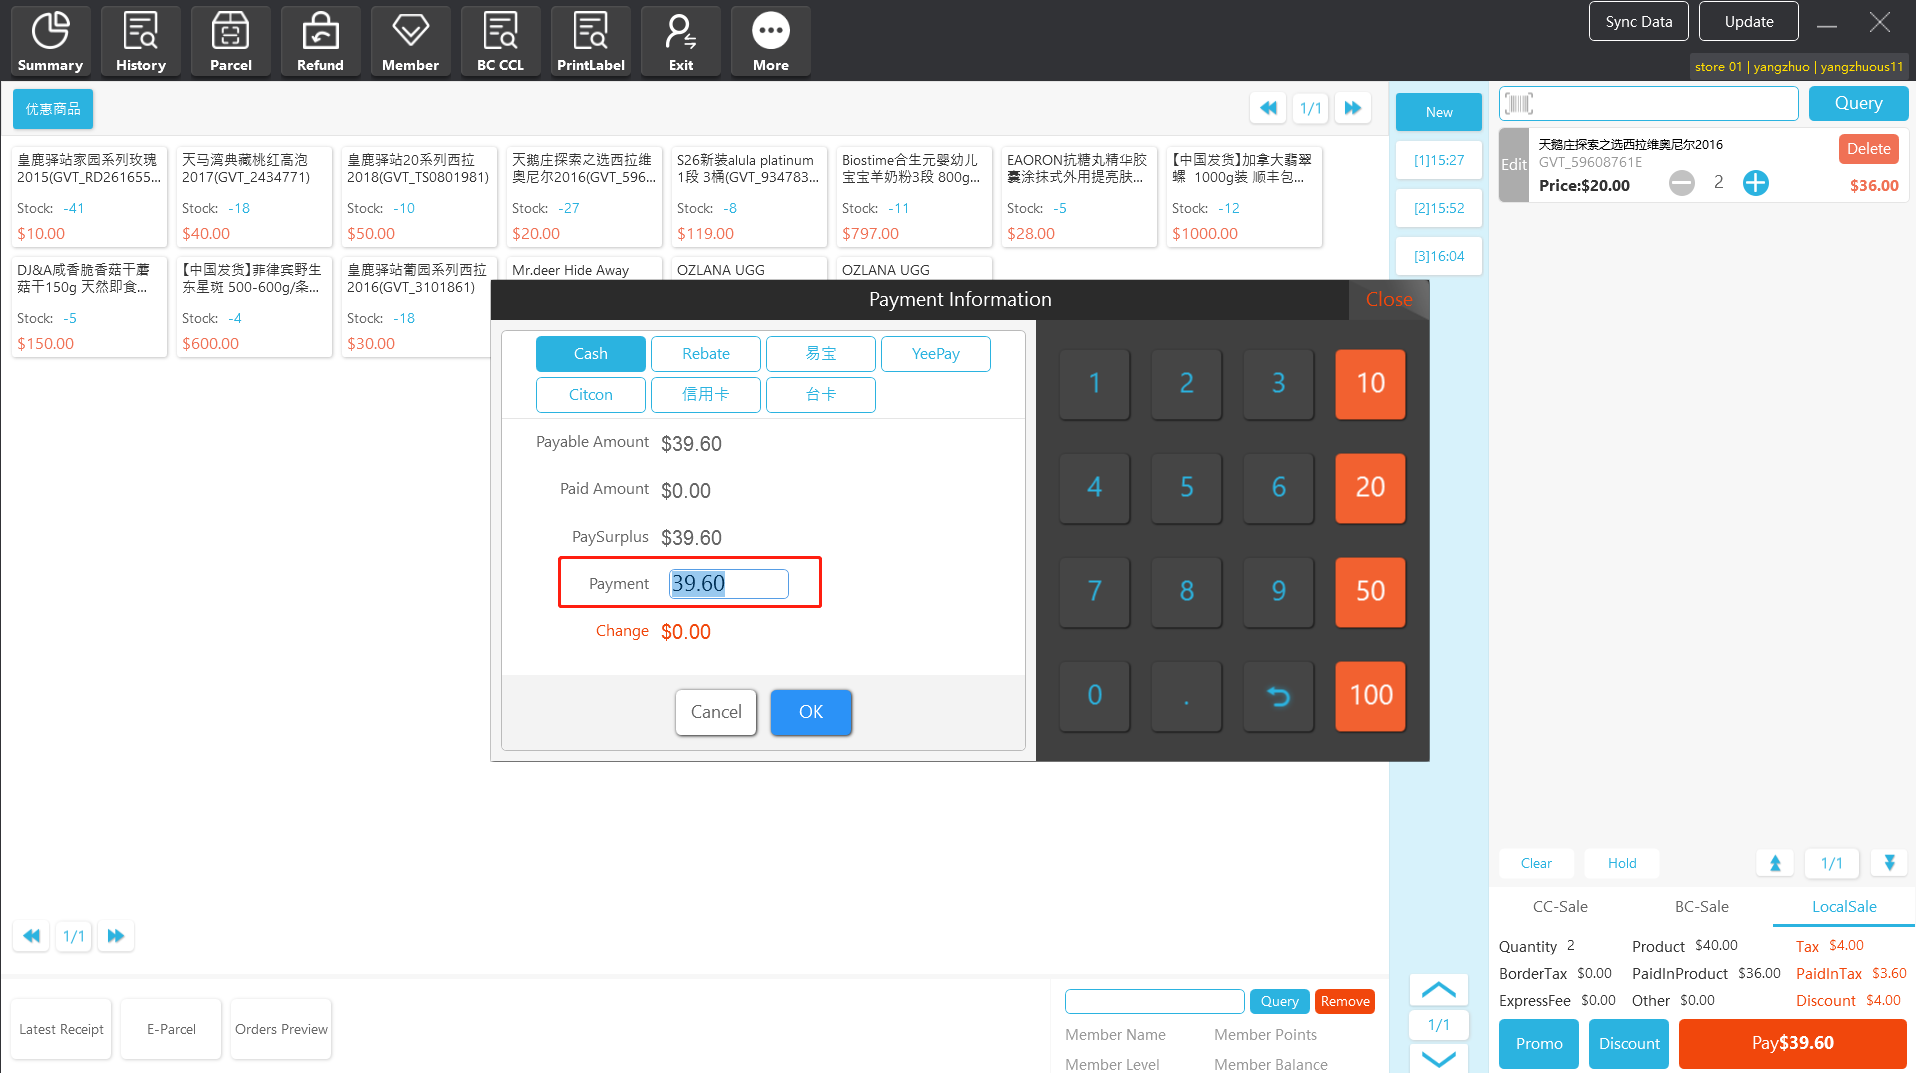
- Click ok, click pay for settlement. Settlement amount is the amount after discount (including 10% tax).

- Price break activity at the client (Buy N save $y)
- First create price break activity at the server, select activity mode: buy 2 save $5, select activity time and promotion products.
- Select 2 products participating in the promotion, click Promo and pop price break information.

- Click ok, click pay for settlement. Settlement amount is the amount after discount (including 10% tax).
- Price break activity at the client (Buy $X get y% off)
- First create price break activity at the server, select activity mode: buy $10 get 10% off, select activity time and promotion products.
- Select products participating in the promotion, click Promo and pop price break information.
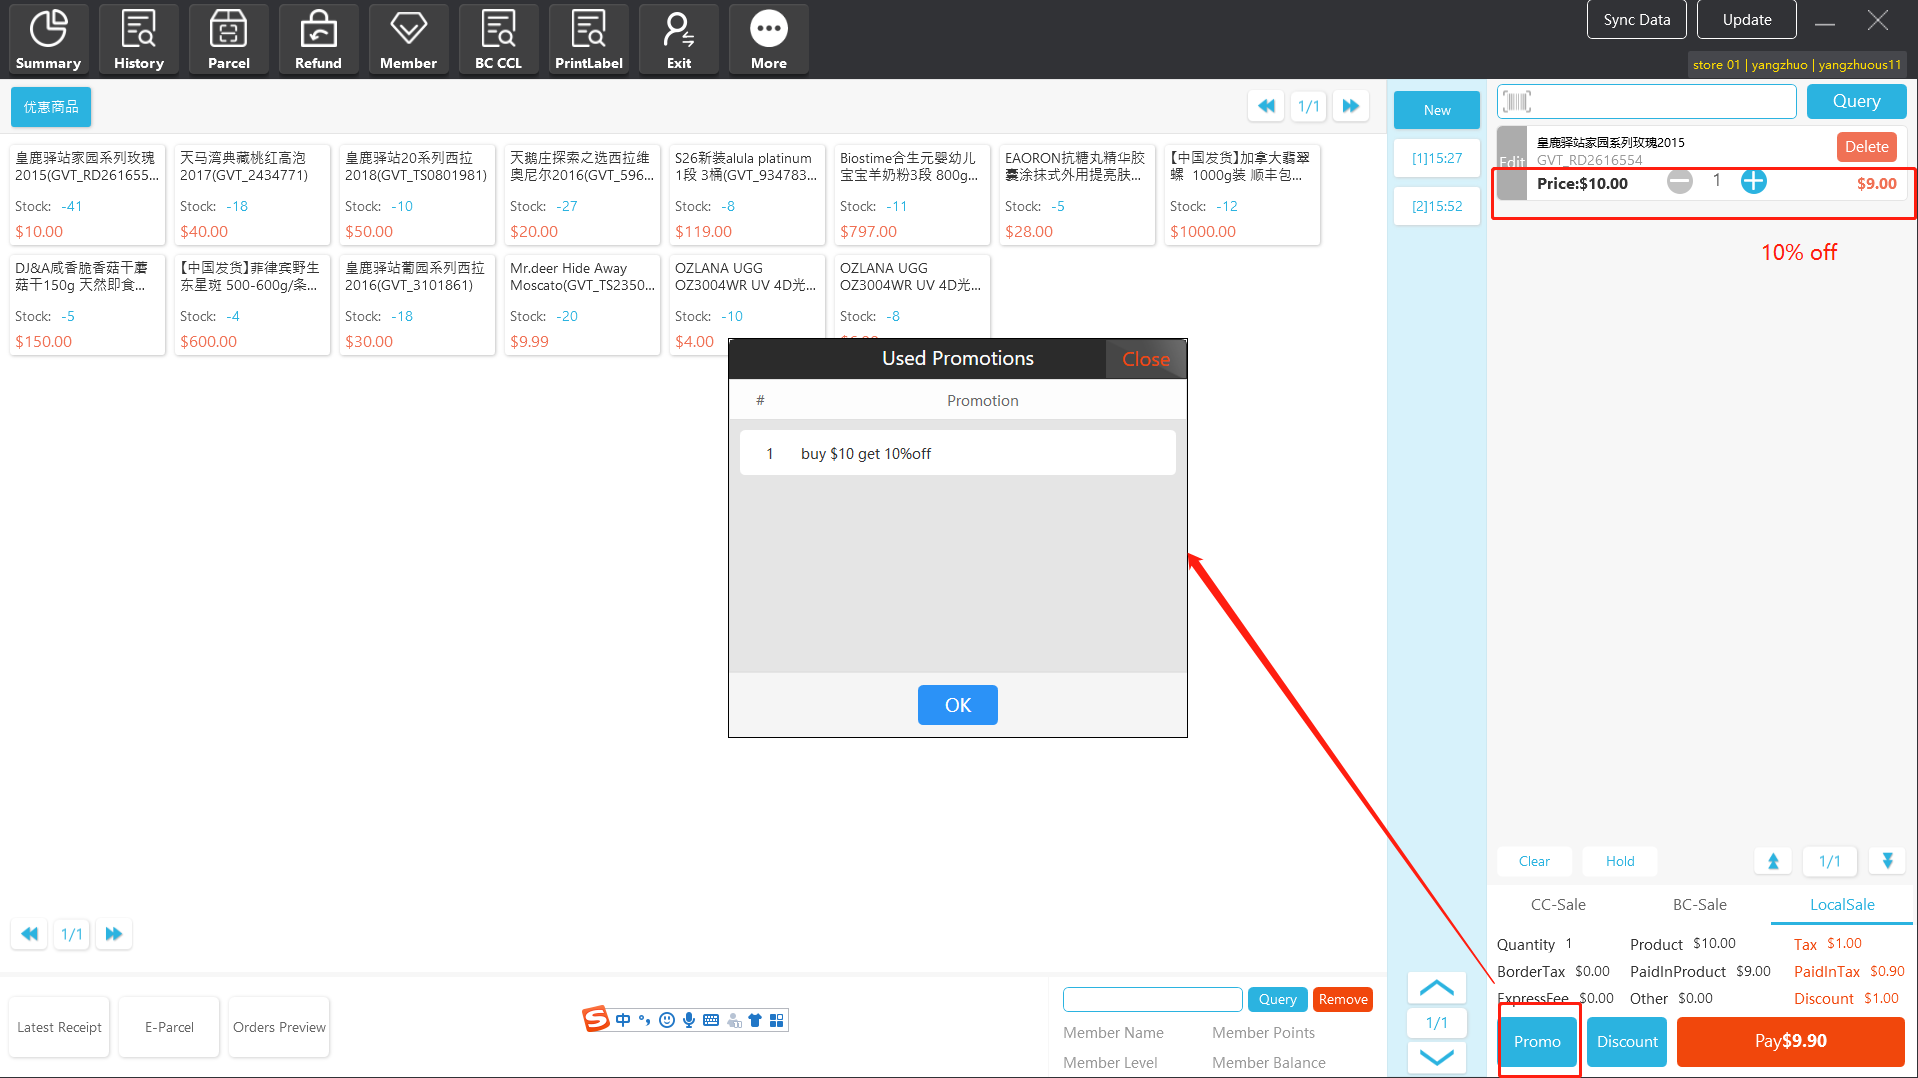
- Click ok, click pay for settlement. Settlement amount is the amount after discount (including 10% tax).

- Price break activity at the client (Buy N get y% off)
- First create price break activity at the server, select activity mode: buy 2 get 10% off, select activity time and promotion products.
- Select products participating in the promotion, click Promo and pop price break information.
- Click ok, click pay for settlement. Settlement amount is the amount after discount (including 10% tax).
8.2 BOGO
8.2.1 Create BOGO activity at the server
It is applicable to the activity scenario of presenting products or purchasing other products at a fixed discount and price after consuming N products
Path: Promotion BOGO Add Activity
(1) Activity organizer: set promotion store
(2) Activity name: require to be set
(3) Activity time: require to be set, from XXX to XXX
(4) Description: require to be set
(5) Min product Qty: the threshold meeting the requirements participating in the BOGO activity
(6) Gift Qty: number of presented products
(7) Allow additional discount: click “Yes”, Addition Discount of Price Break, Coupon and manual total discount in APOS Client, CAN be applied based on this promotion
(8) Promotion products included: specify products that participate in the promotion
(9) Promotion products excluded: specify products that do not participate in the promotion
(10) Free gift: presented products can be set as Mix & Match or Specified Product
(11) Gift price: free or discount y% off
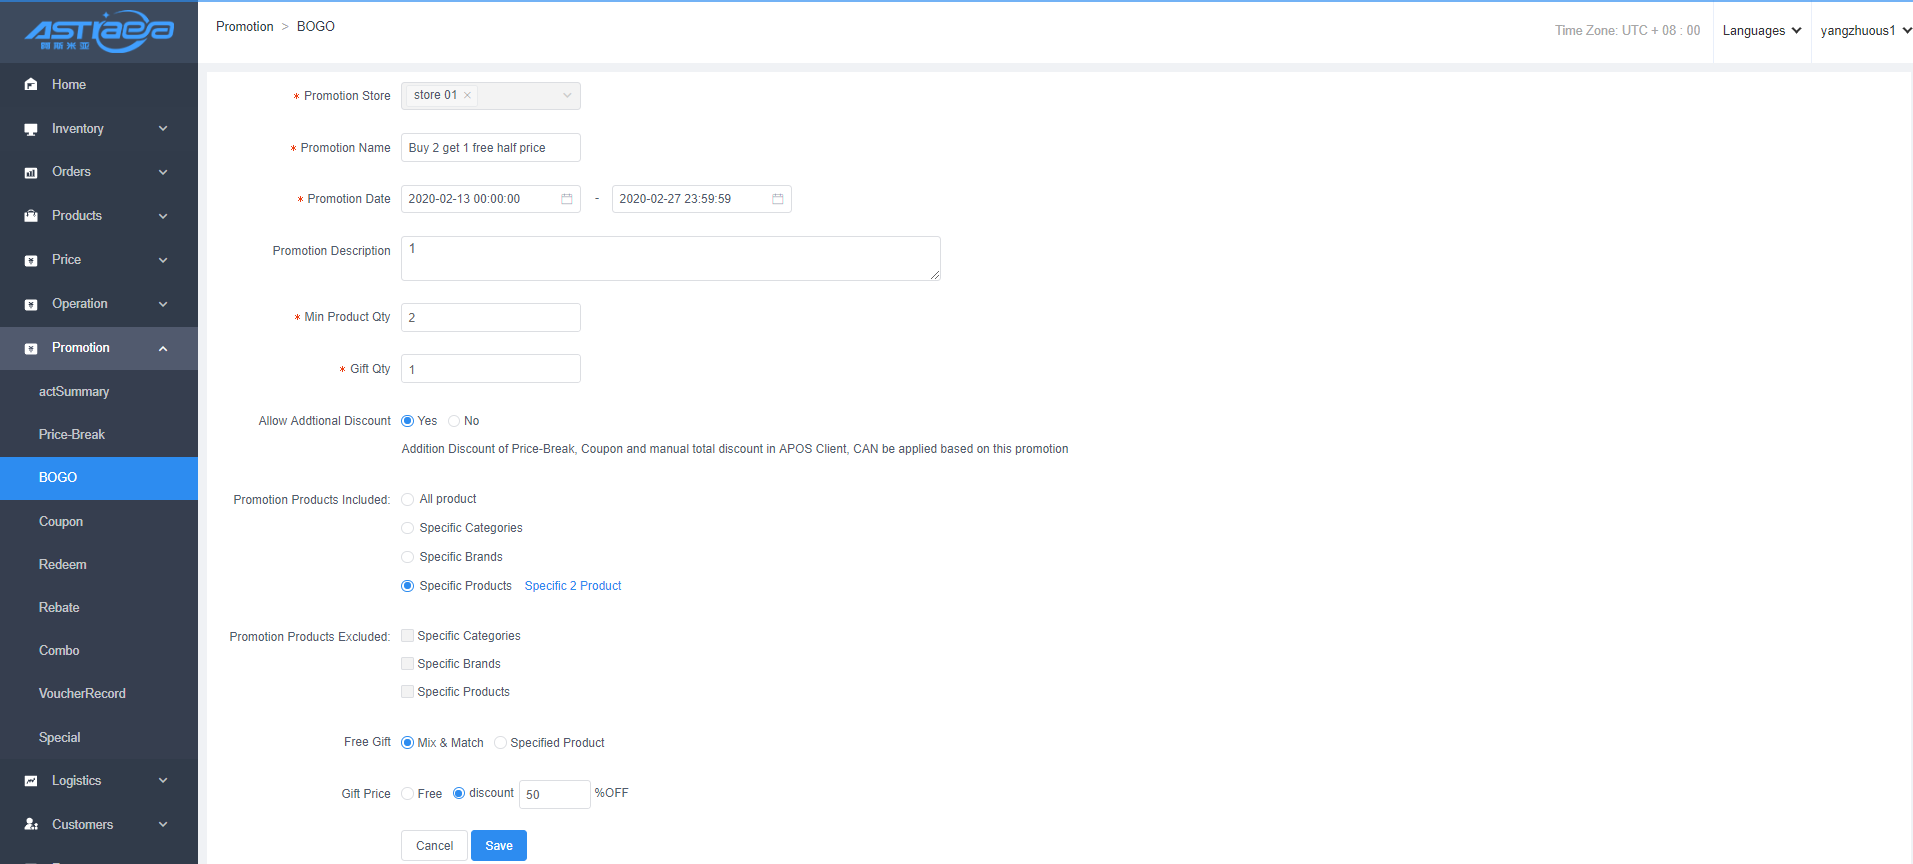
8.2.2 Use BOGO activity in the client
- First, create a BOGO activity in the server. The activity is to buy 2 get 1 free, and the third item is got by half price. Gifts are the same promotional items and are set to allow additional discount.
- Select 3 products that meet the preferential activities, and click the Promo button to pop up the BOGO preferential information.
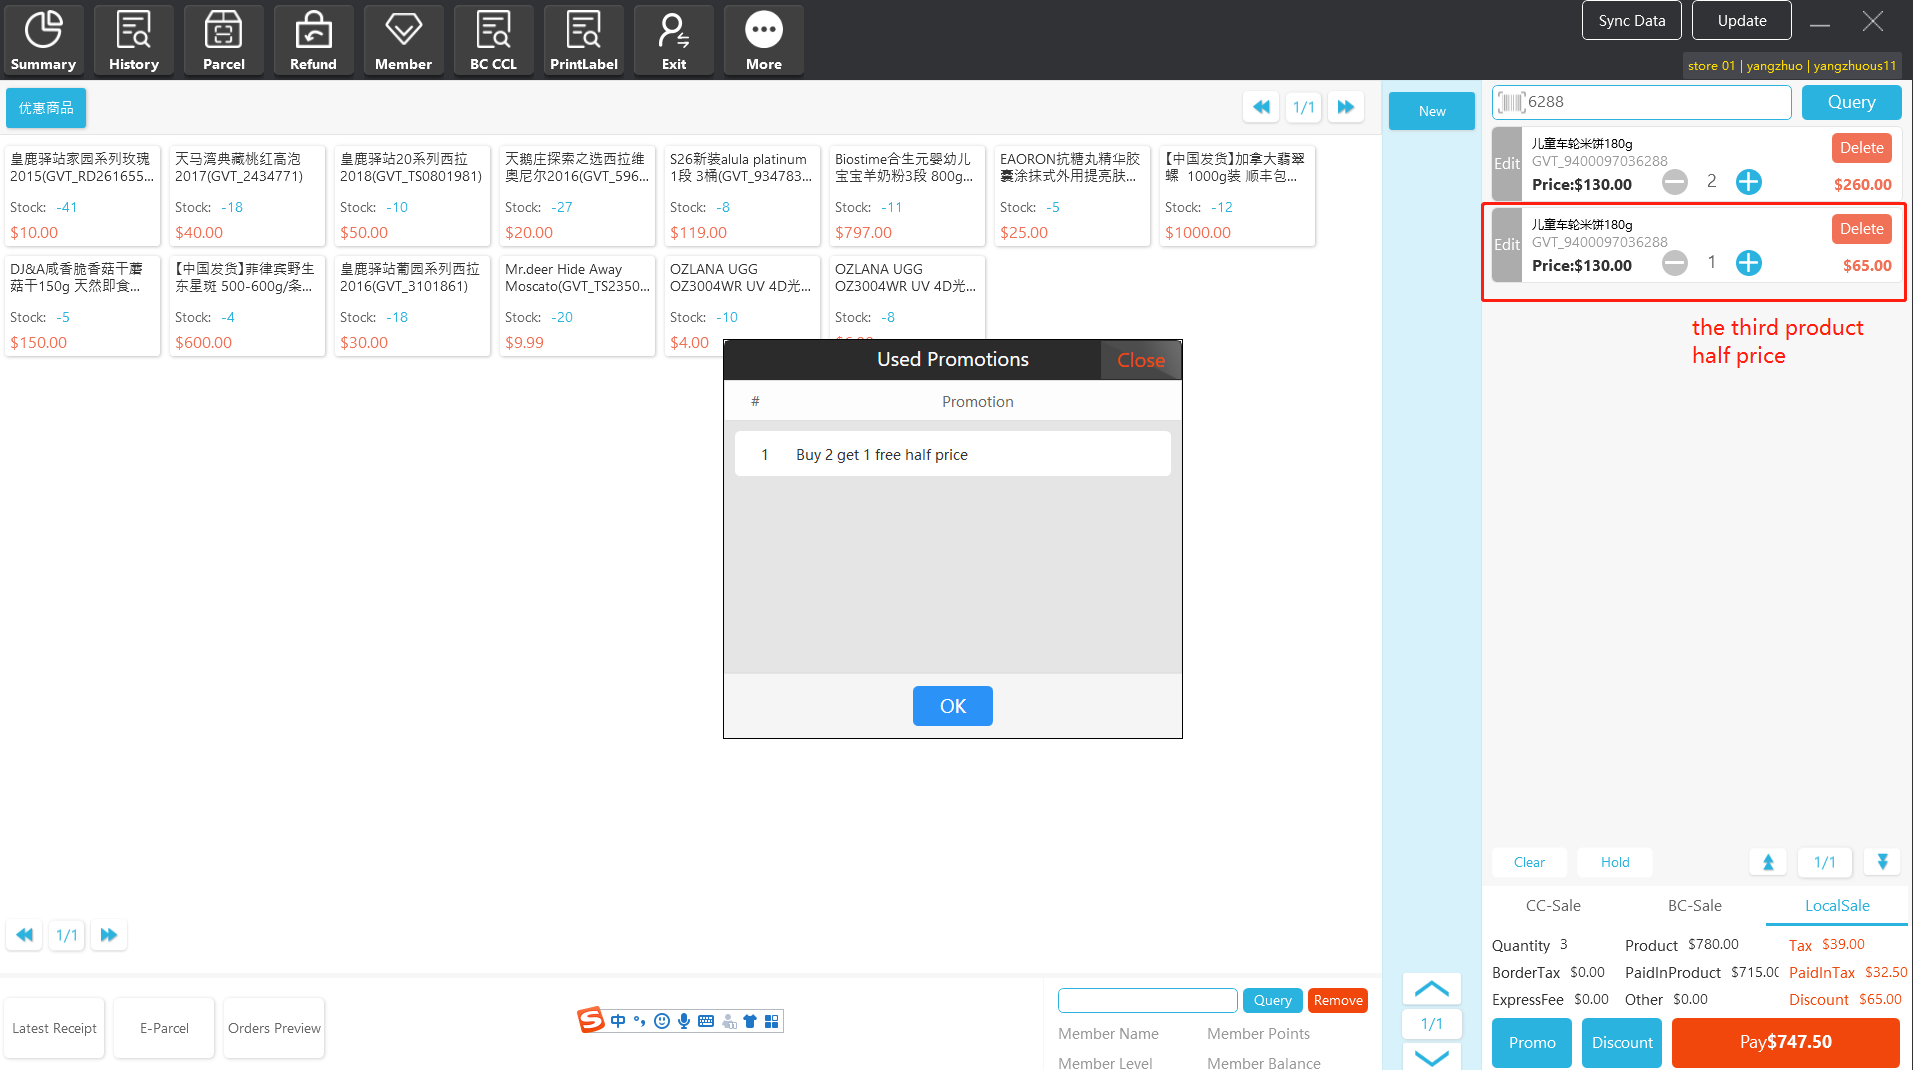
- Click the discount button to make manual total discount by 50% off, and click the ok button.
- Click the pay button to complete the price-break additional discount activity. The settlement amount is the preferential amount (including 10% tax)

BOGO rules:
Give priority to gifting the same products as the promotional products, and give the products with low prices if there are no same products. Other rules remain unchanged;
When matching BOGO activities is made, the participating products will be sorted according to the price from high to low. After sorting, the promotional products will be matched from the beginning. If the promotional products are the same products and there are still the same products that do not match the activities, the promotional products that do not match the activities are set as gifts, otherwise, the products with the lowest price are given away;
BOGO supports cumulative gifts. For example, if the buy activity is set to buy 2 get 1 free, then buy 4 get 2 free
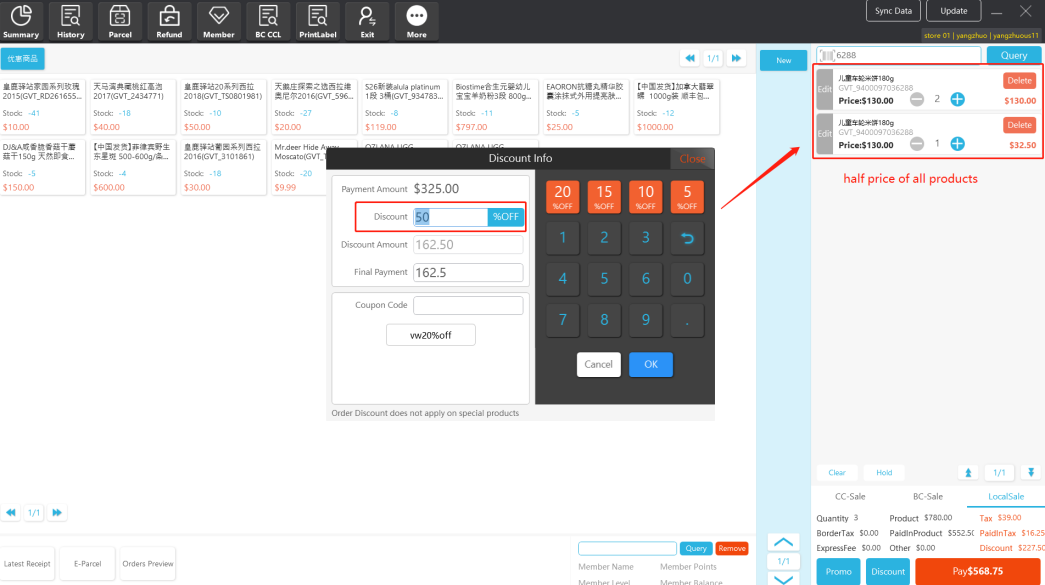
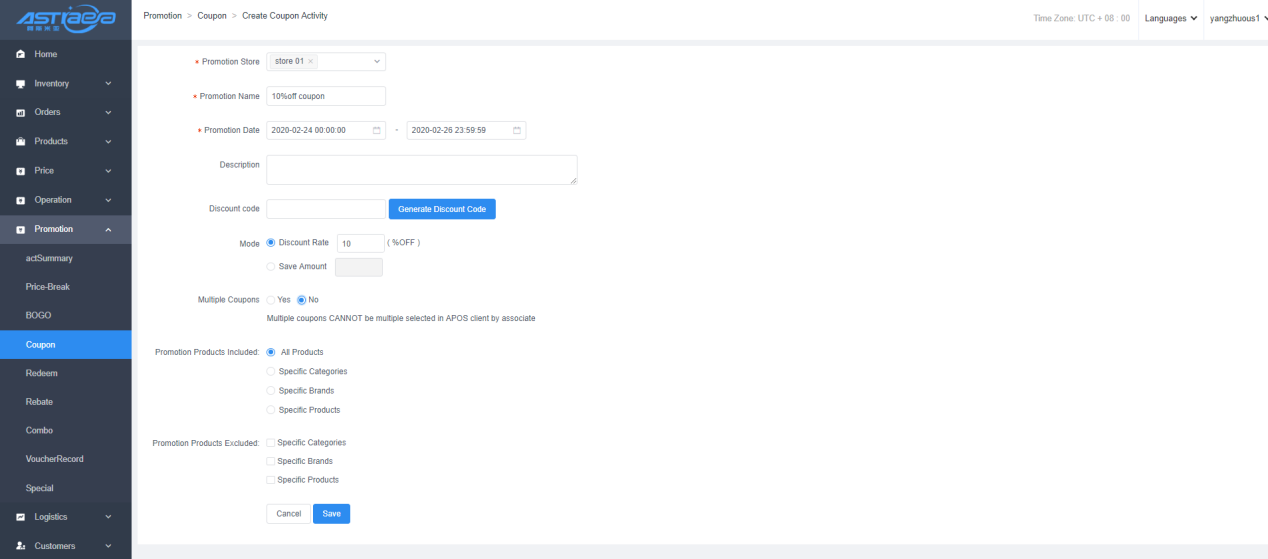
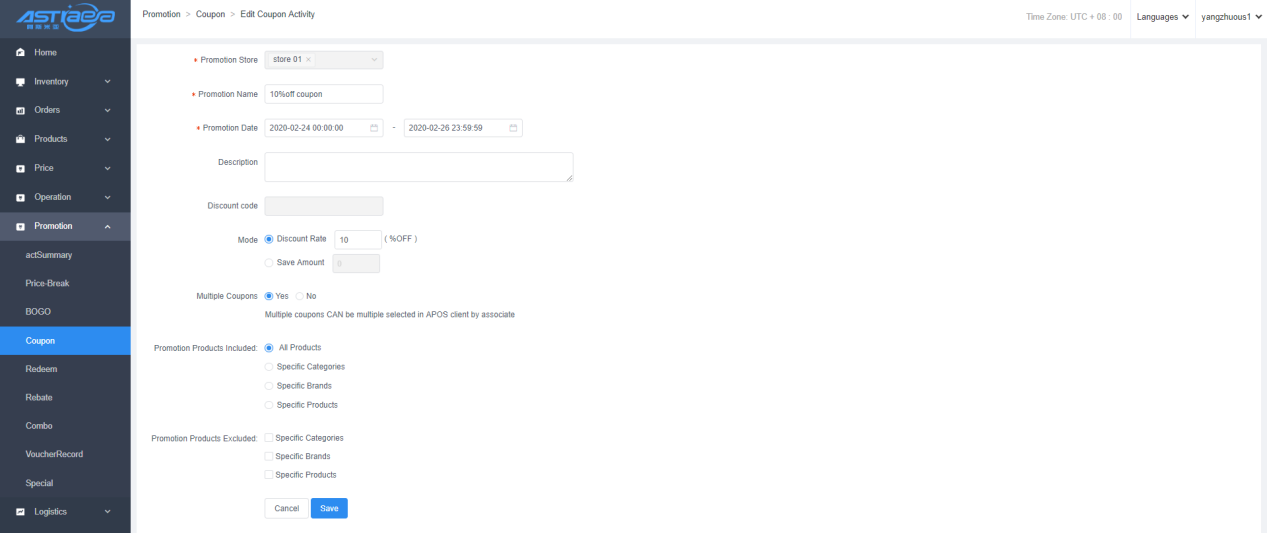
8.3 Coupon
8.3.1 Coupon
- Create coupon activity in the server
It is applicable to the scenario where the cashier is given a preset discount type and the cashier decides to give the customer a discount.
Path: Promotion Management → Coupon → Add Activity
(1) Activity organizer: set promotion store
(2) Activity name: to be set; the activity name is displayed to the fixed discount item of APOS client "Discount"
(3) Activity time: require to be set, from XXX to XXX
(4) Remarks: to be set
(5) Coupon code: used to adapt activities by scanning code, available; there is coupon code. Besides the fixed discount item shown as "Total Discount", you can also make a discount by scanning the coupon code.
(6) Discount type:
Discount: products participating in the activity enjoy a fixed discount.
Preferential amount: the accumulated amount of products participating in the activity minus a fixed amount;
(7) Multi-discount: whether this activity is allowed to be discounted together with other coupon activities; it is not allowed by default. When it is allowed, a fixed discount will be implemented first, followed by a fixed amount discount.
Allowed: when discounting is done, the current activity can be combined with other coupons that allow additional discount.
Not allowed: when discounting is done, the current activity is a single option and cannot be combined with any other coupon activities
(8) Discount proportion: to be set; i.e. set the discount proportion for products meeting the discount activities
(9) Promotion products included: specify products that participate in the promotion
(10) Promotion products excluded: specify products that cannot participate in the promotion
- Use coupon activity in the client
- Set a coupon activity, make manual total discount by 10% off, and allow multiple discounts
- After the client clicks Sync Data, add the activity products, click the discount button, and click to select the activity just created.
- Click “Pay” to complete the whole fixed discount activity. The settlement amount is the preferential amount (including 10% tax)
- If you want to use multiple discounts, you can create another coupon activity. Create a new fixed amount coupon activity of $5 again, allowing multiple discounts.

- Enter the client, select products, click discount to select two coupons at the same time, and make multiple discounts for the whole order.

- Click the pay button to complete the multiple discount activities. The settlement amount is the preferential amount (including 10% tax)

8.4 Redemption
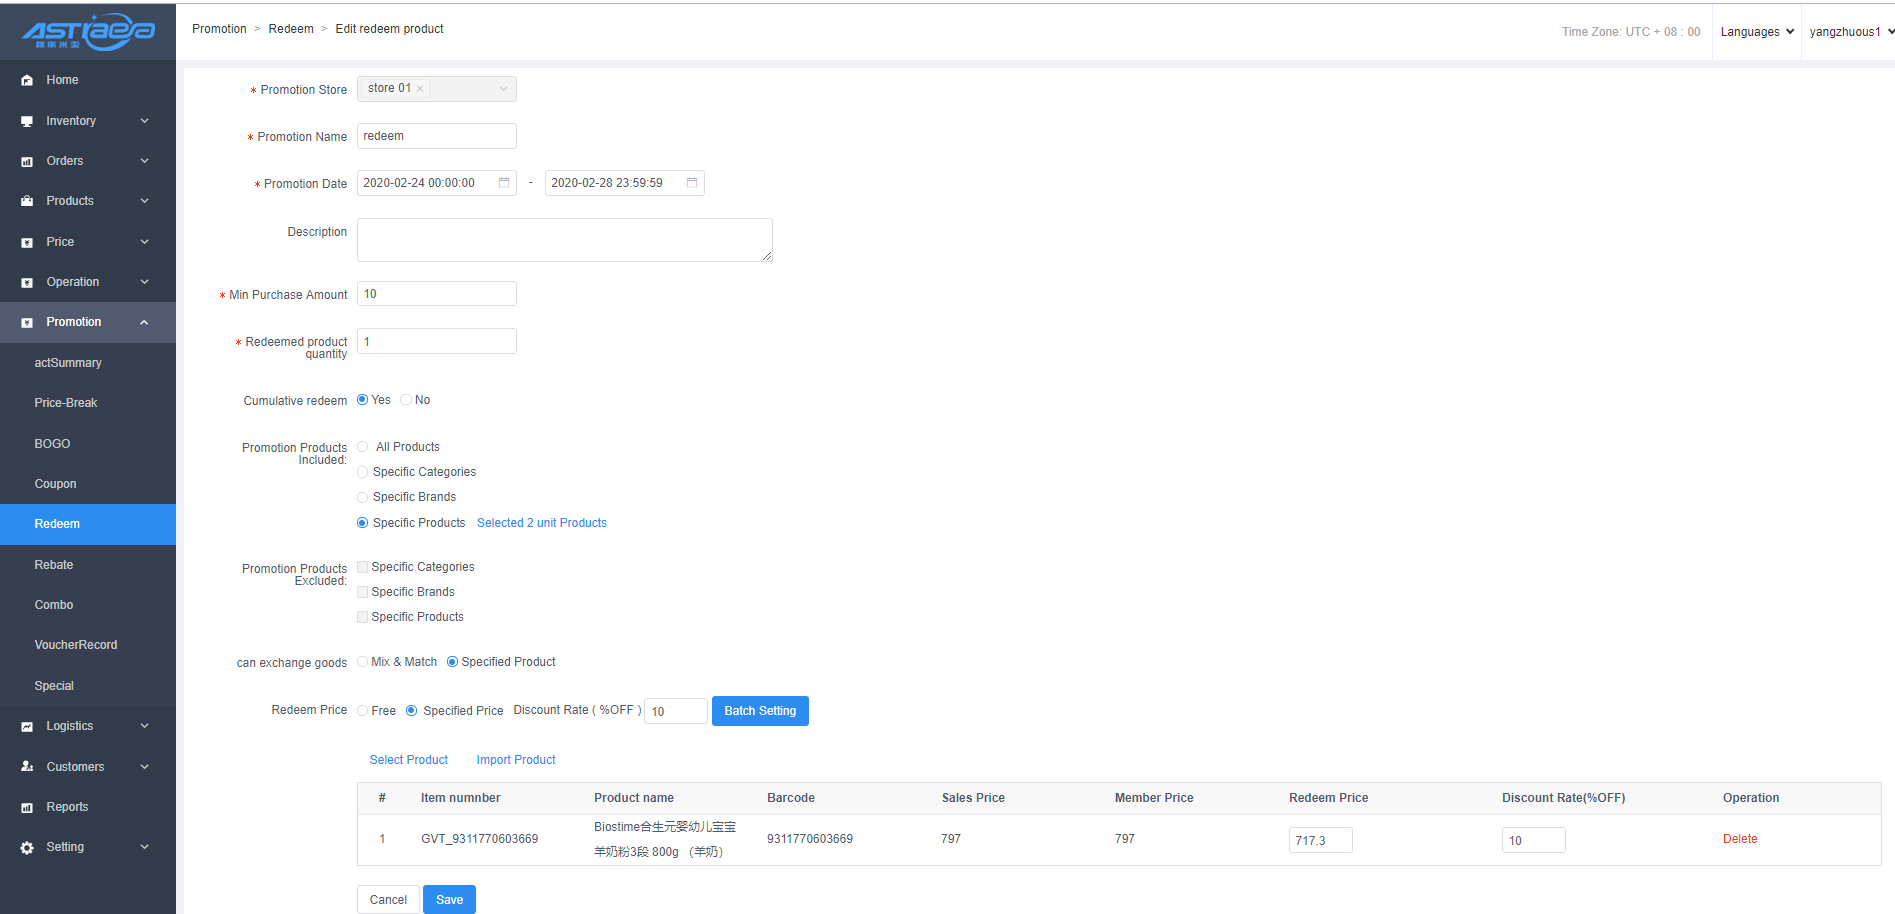
8.4.1 Create redemption activity in the server
It is applicable to the activity scenario where the consumption value is over RMB n, additional free products are gifted, or other products are additionally redeemed at a fixed discount and a fixed redemption price.
Path: Promotion Management → Redemption → Add Activity
(1) Activity organizer: set promotion store
(2) Activity name: require to be set
(3) Activity time: require to be set, from XXX to XXX
(4) Description: require to be set
(6) BOGO amount: Activity condition, which indicates how much money can be spent to enjoy the activity. Required, greater than 0;
(7) Redemption quantity: the quantity of products that can be gifted free of charge after meeting the activity conditions, or the quantity of products that can be additionally redeemed at a fixed discount and a fixed redemption price. Required, greater than 0, defaults to 1;
(8) Cumulative redemption allowed: Allowed: overlaid redemption can be done. If you meet the requirement of 1 redemption for RMB 100 or more, you can redeem 2 for RMB 200 or more.
Not allowed: overlaid redemption cannot be done. If you meet the requirement of 1 redemption for RMB 100 or more, you still redeem 1 for RMB 200 or more.
(9) Promotion products included: specify products that participate in the promotion
(10) Promotion products excluded: specify products that cannot participate in the promotion
(11) Redeemable products: designate products that can be gifted free of charge or redeemed at a fixed price
(12) Redemption price: "Free" means free gift, and the discount rate and price of each redeemable product can be entered in "specified price” and the product is finally purchased at the specified redemption price. It defaults to the specified price. The specified price is only valid for redeemable products as specified products
8.4.2 Use redemption activity in the client
- Select the products that meet the preferential activities, then attach the redeemable products in the activities, and click the "Promo" button
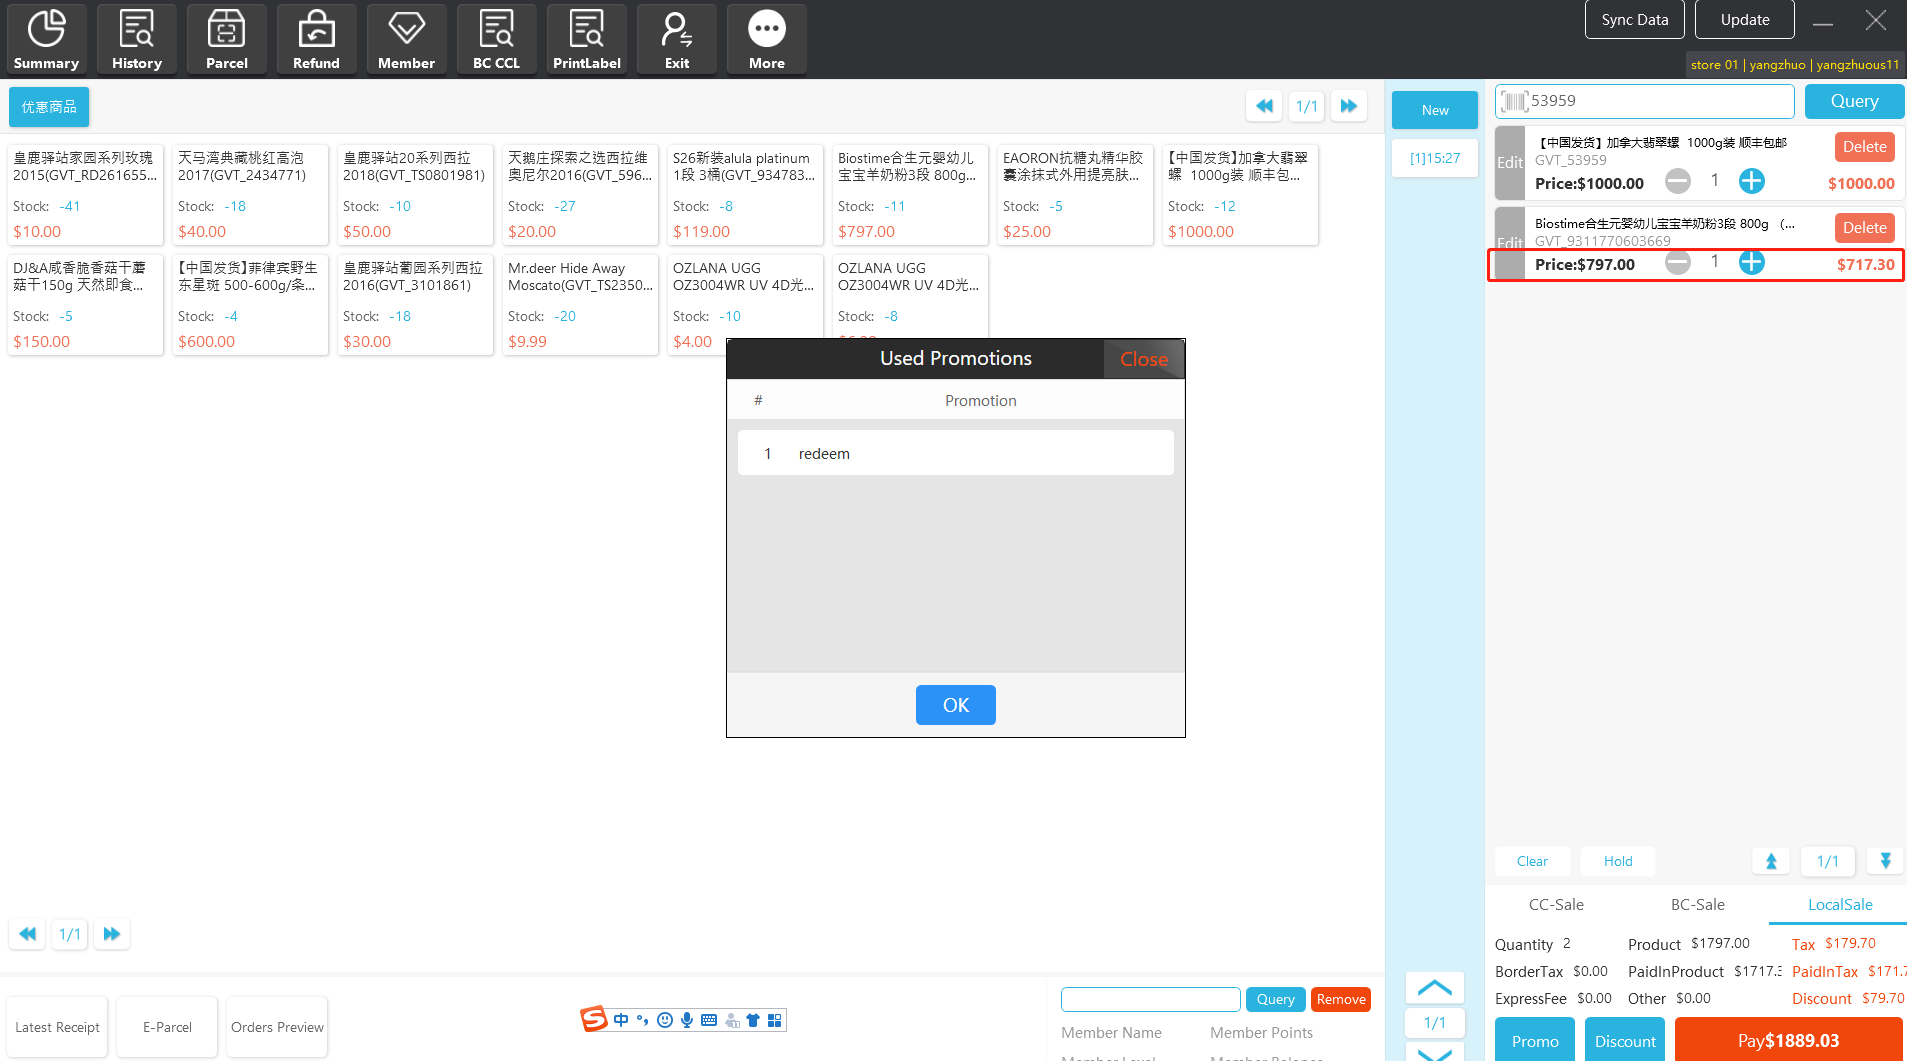
- Click "Pay" button to settle, and the settlement amount is the preferential amount (including 10% tax)
8.5 Rebate
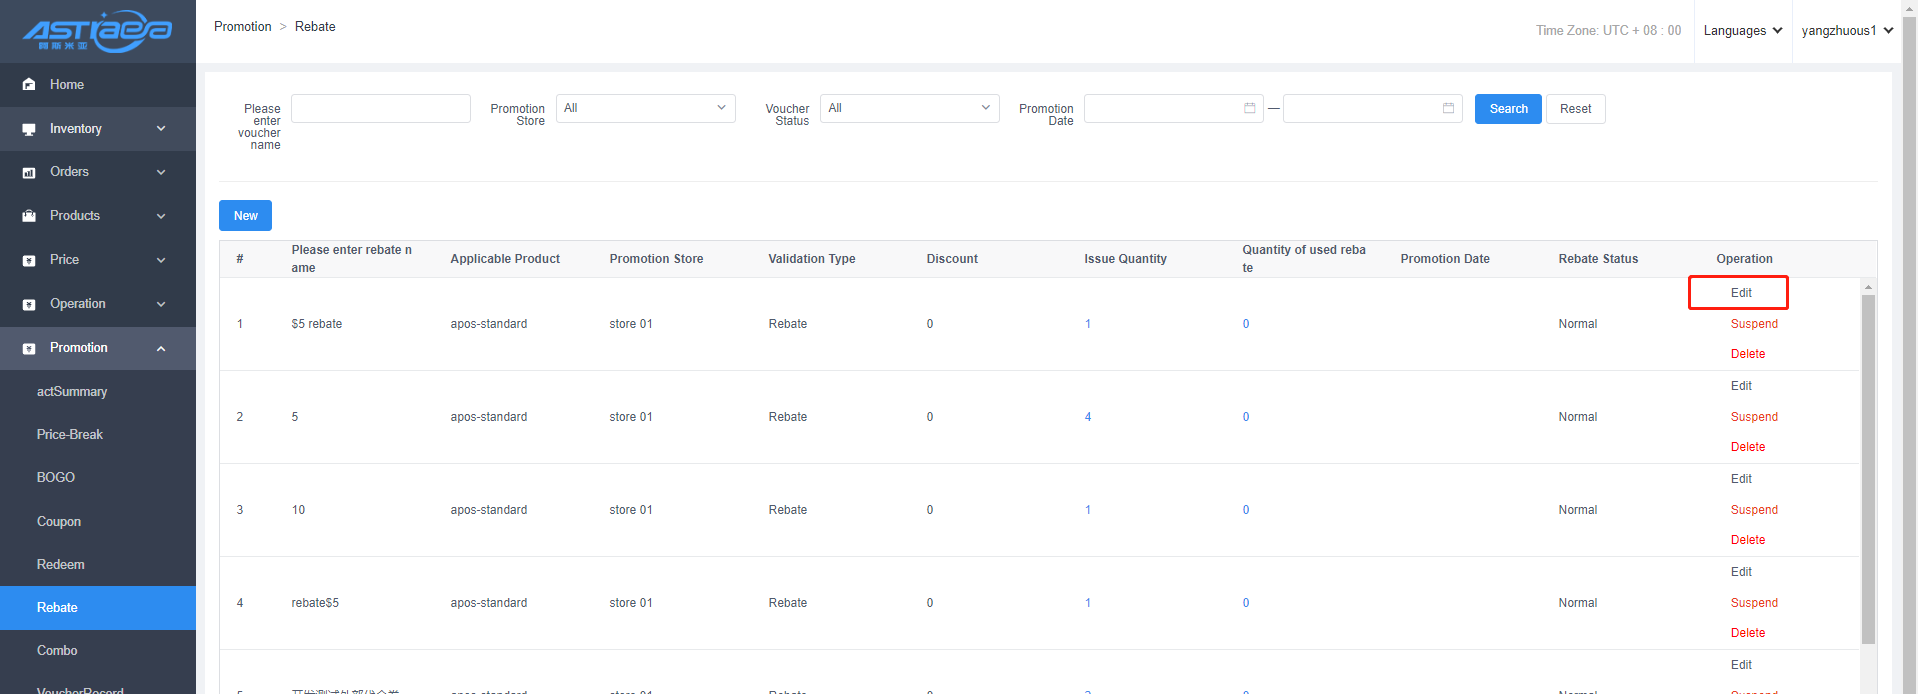
8.5.1 Rebate - add external rebate
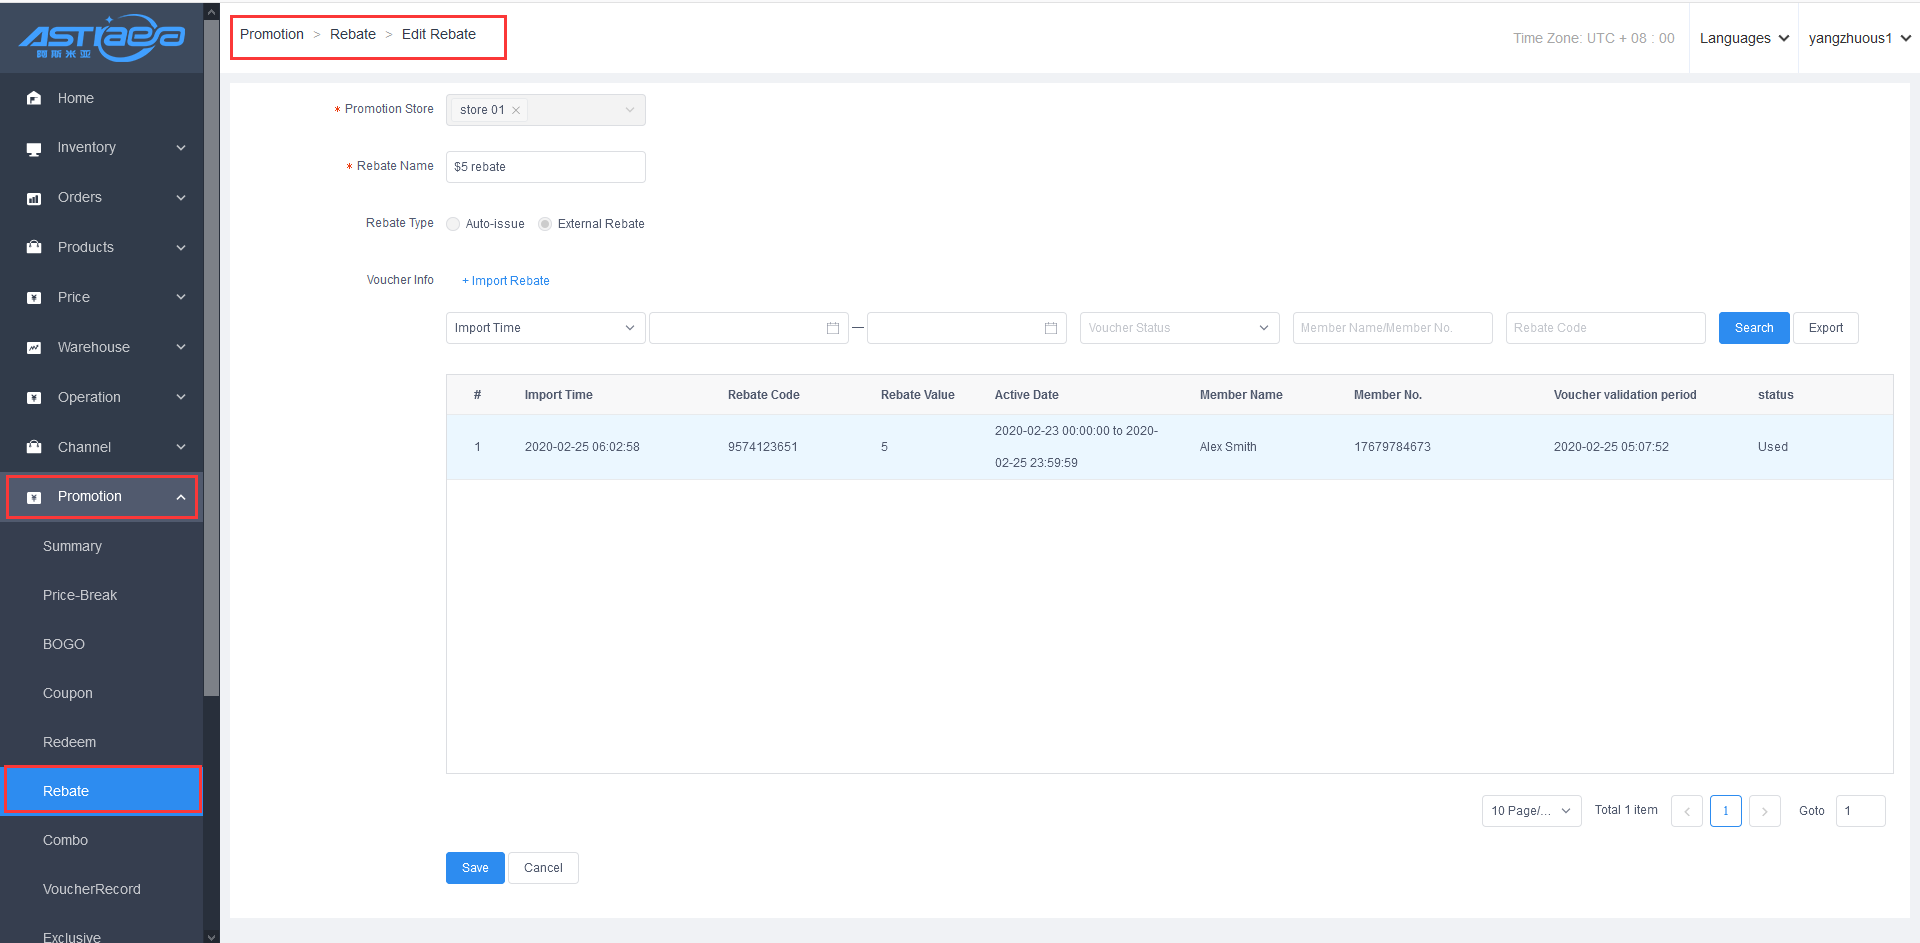
- Add external rebate in the server
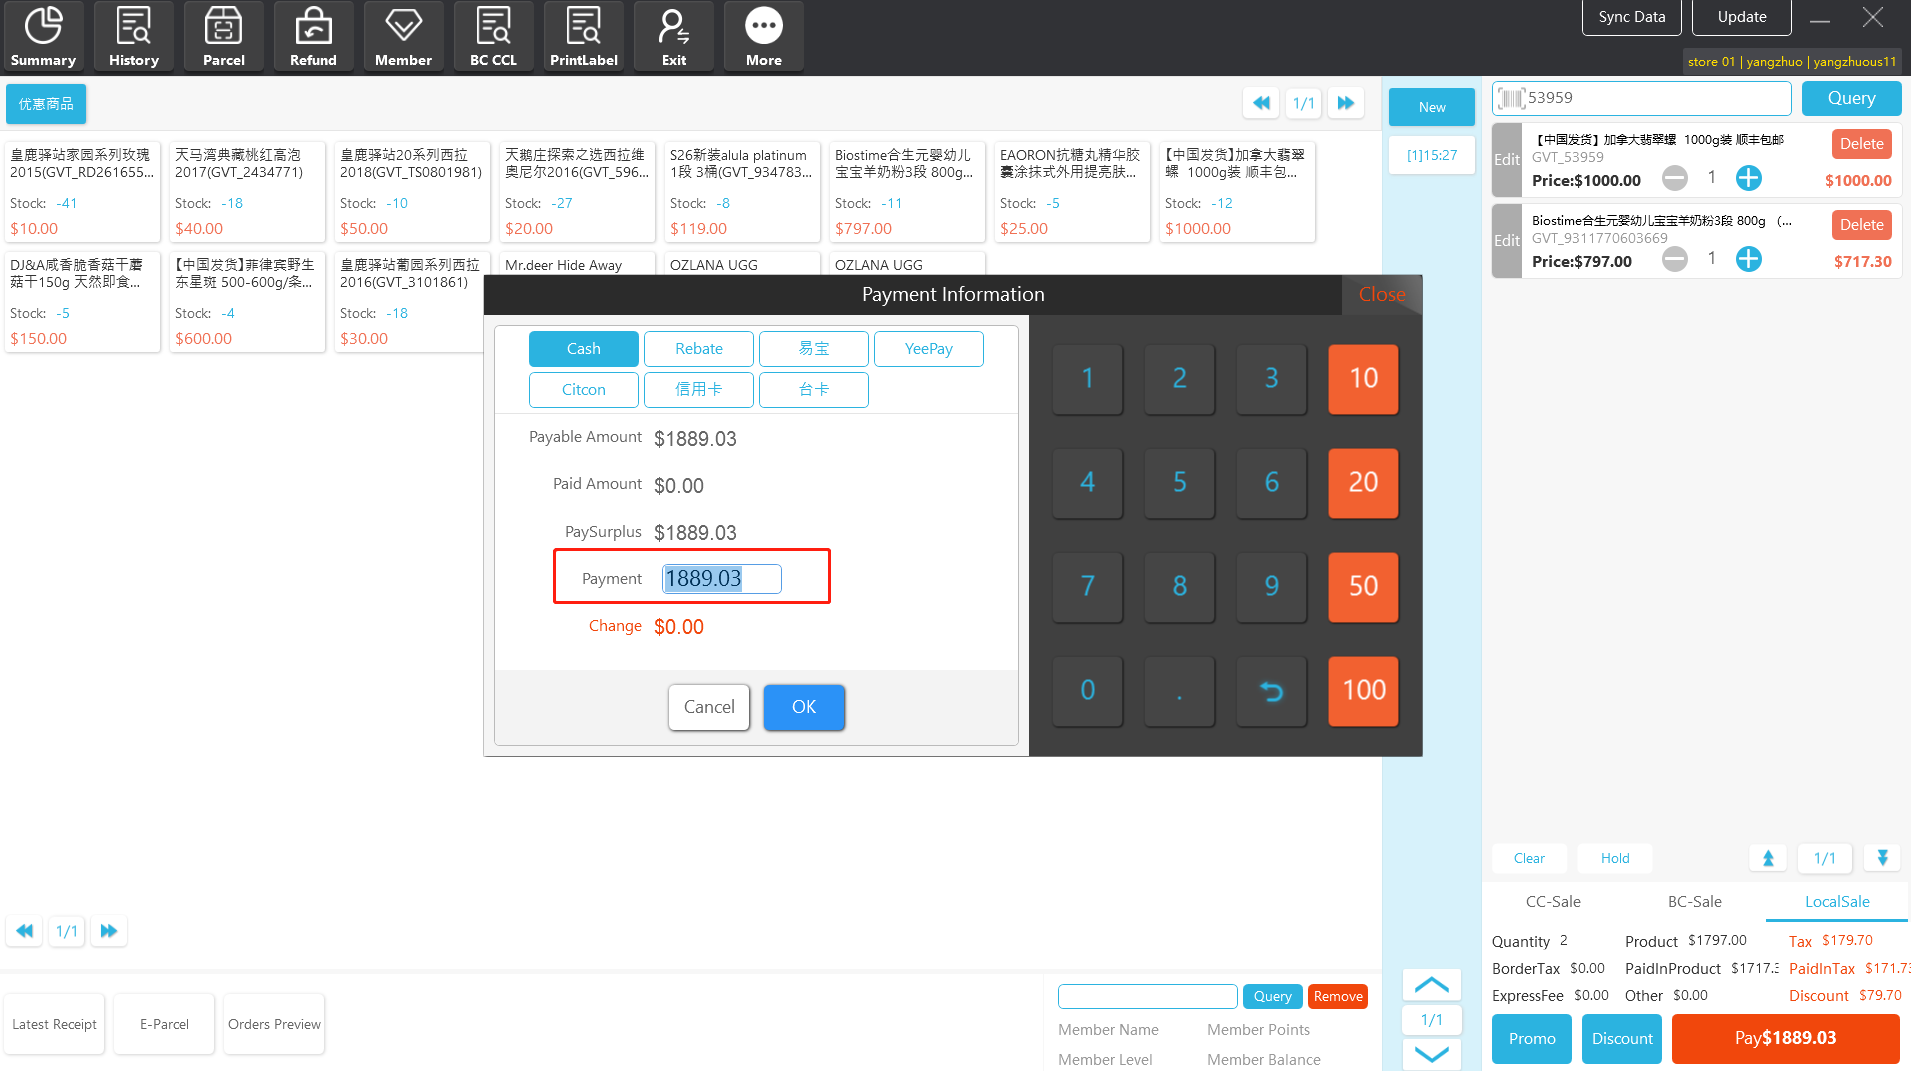
It is applicable to the scenario that the rebate can be used as cash amount and the payment amount can be directly deducted during payment.
Path: Promotion Management → Rebate → Add
- Click the Import Rebate button to import rebates from other third-party systems. There is no use threshold for external rebates.
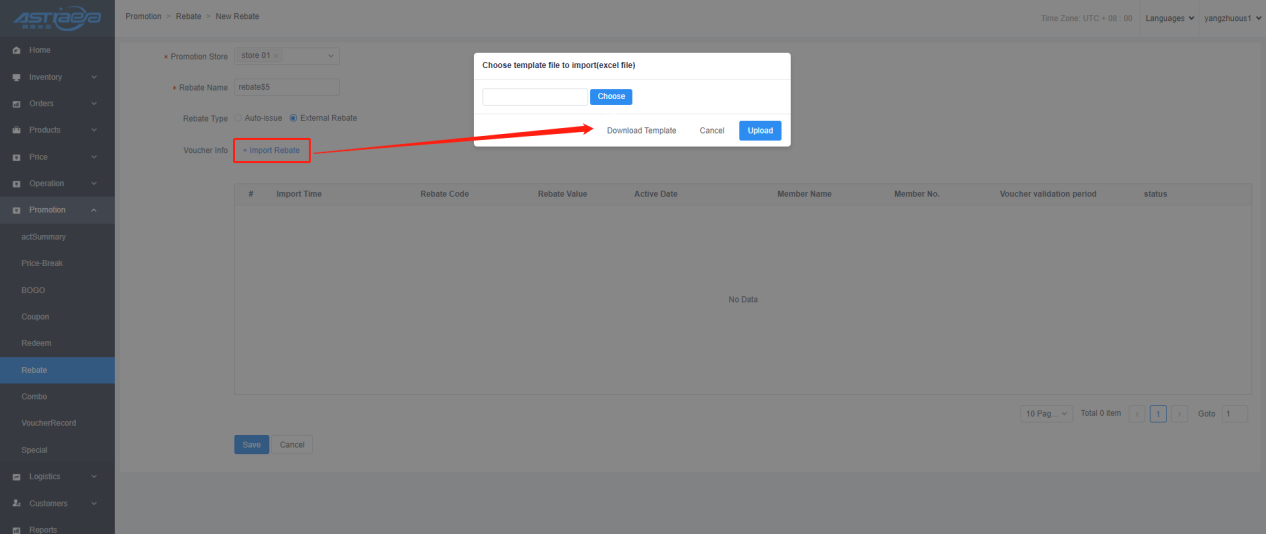
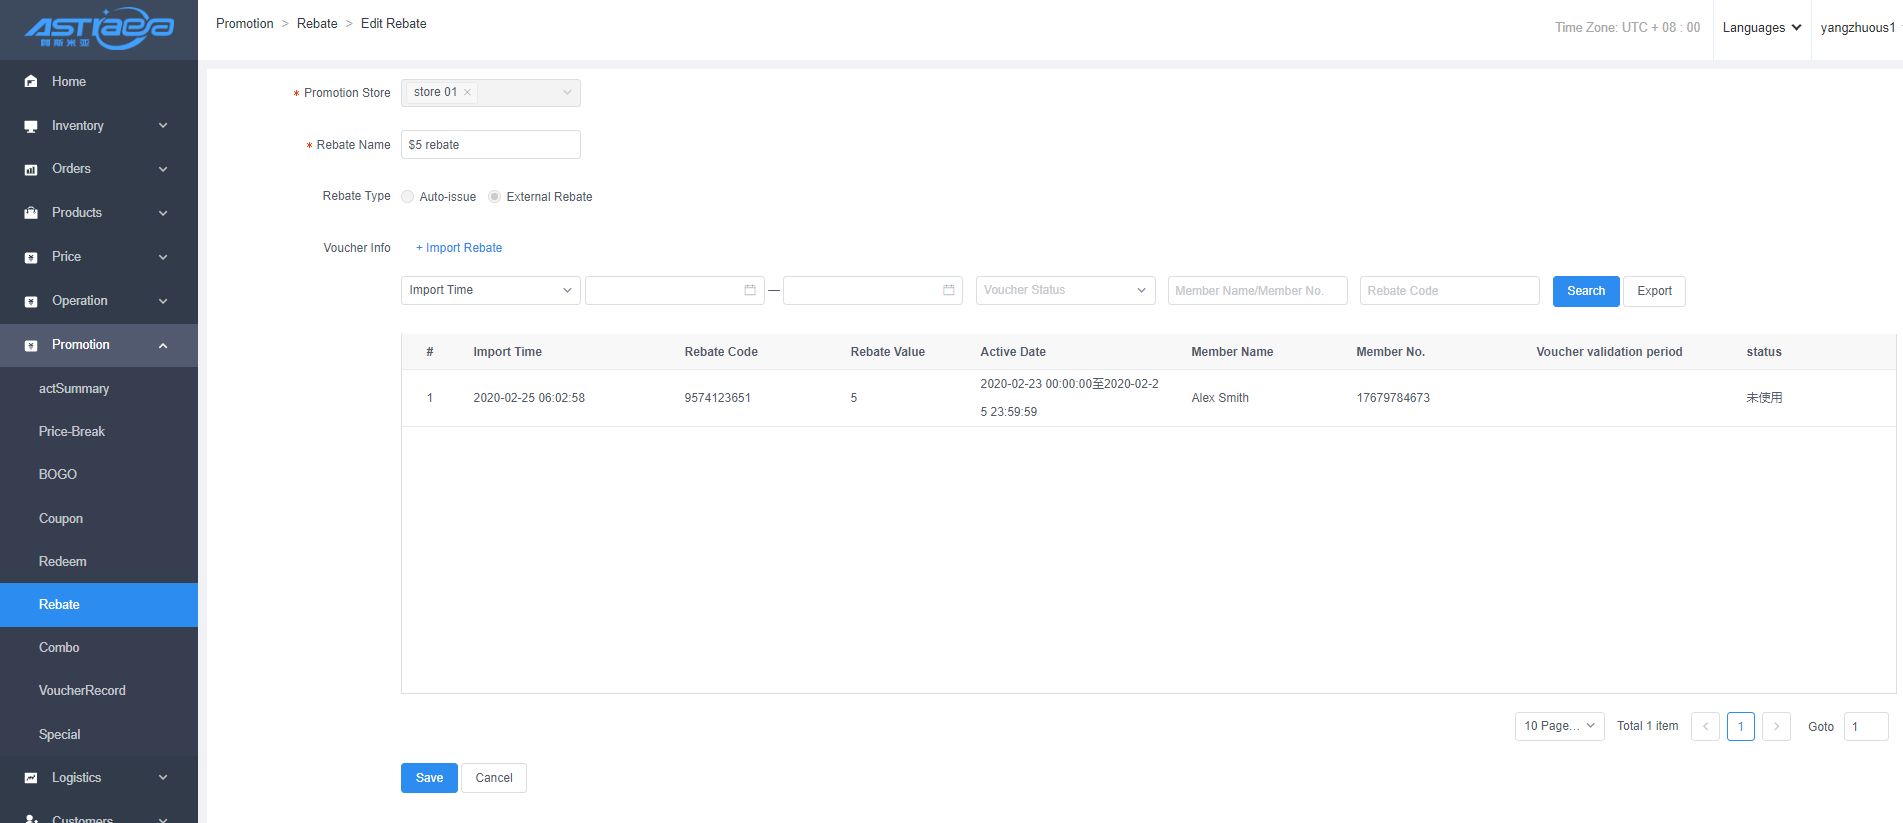
- Download the template, the rebate No., denomination, validity period, user name and No. first, then import them and click the save button.

- After saving successfully, click the edit button for the activity to see the rebate No. just imported.
- Use external rebate in the client
- Click pay after selecting the products, select rebate as the payment method, copy the rebate No. and press Enter or scan the rebate No. with a code scanner to complete the rebate verification
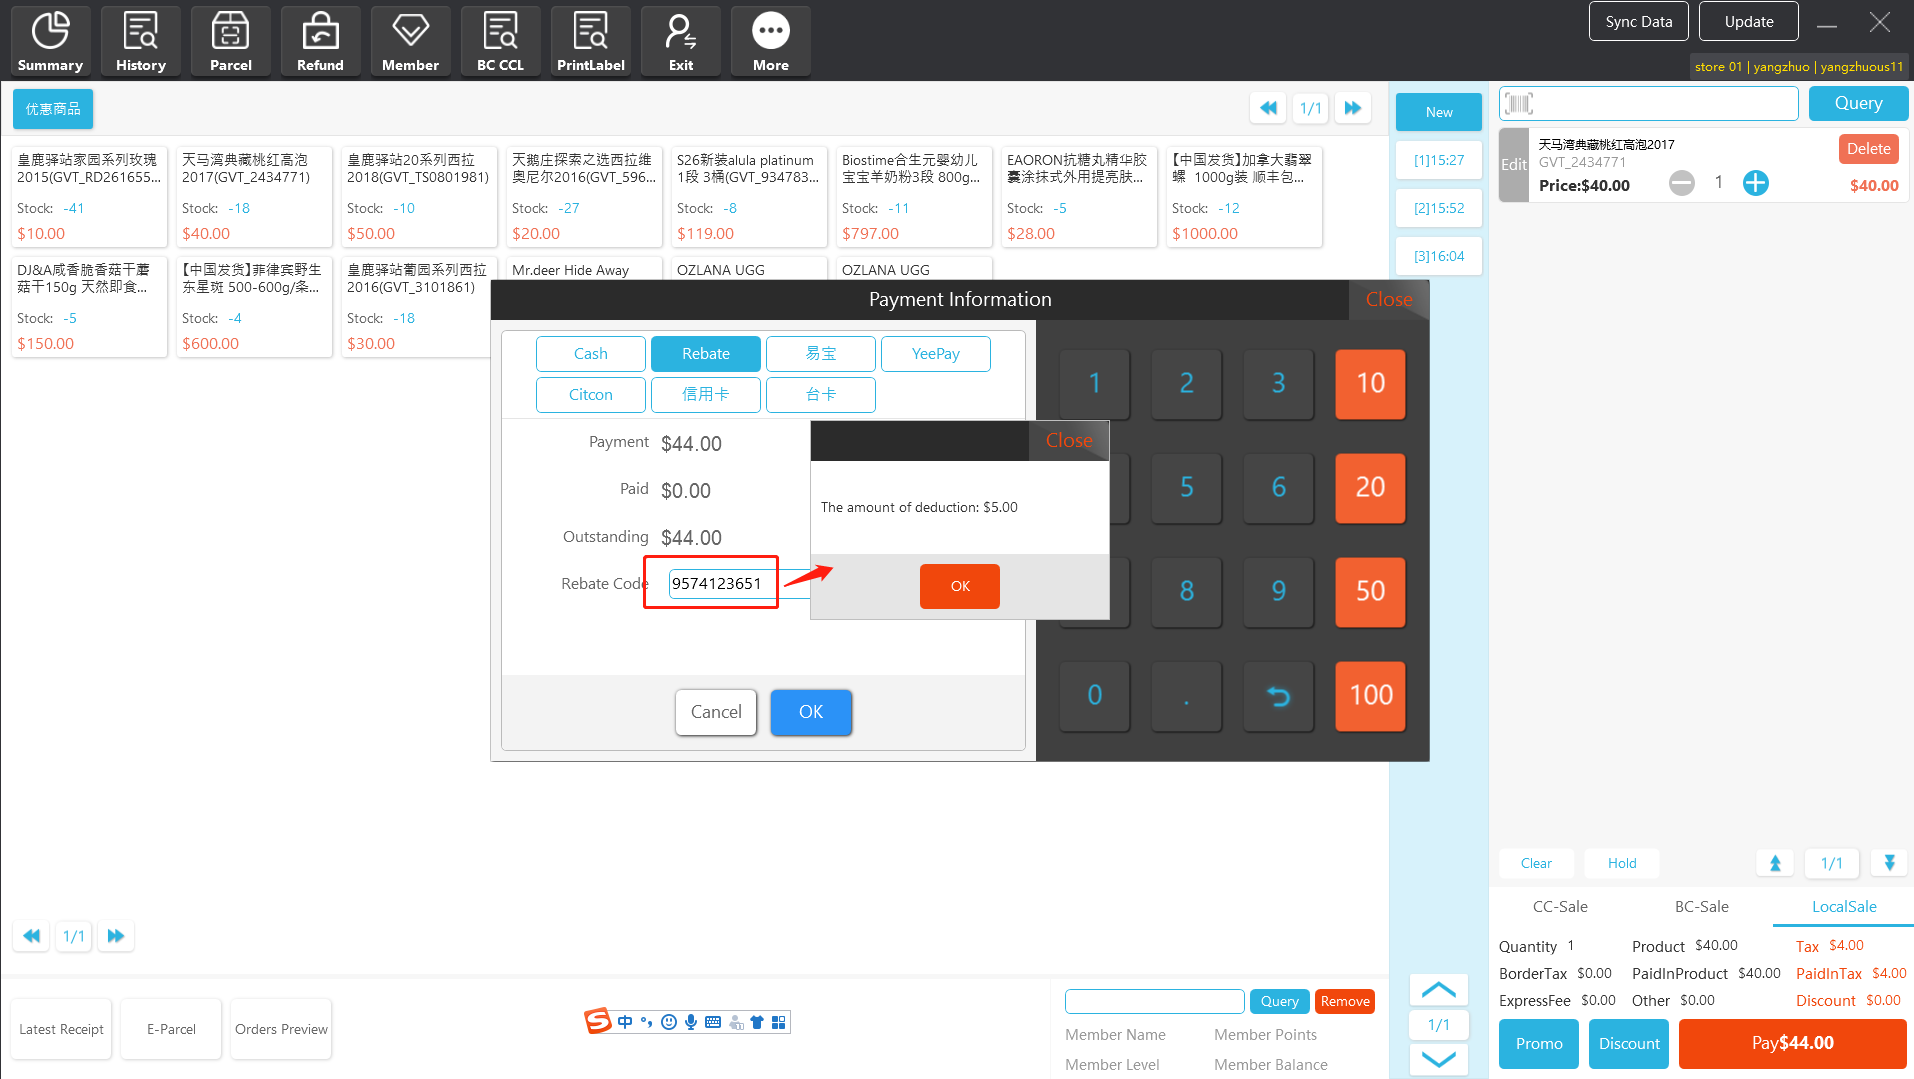
- Enter the server again, check the activity, and click Edit to see the usage record of the rebate
- Rebate is a payment method. If you want to write off rebate, you need to add a payment method for rebate in the store first. If the payment method already exists, you do not need to add it.
8.6 Combo
8.6.1 Create combo activity in the server
It is applicable to the scenario where you can enjoy a fixed amount for any number of products in the promotion
Path: Promotion Management → Combo → Add Activity
(1) Activity organizer: set promotion store
(2) Activity name: require to be set
(3) Activity time: require to be set, from XXX to XXX
(4) Description: require to be set
(5) Combined sales quantity: the number of products meeting the combined promotion activities.
(6) Combined sales price: the sales price of combined products
(7) Additional discount allowed: After combined promotion, check whether manual total discount is allowed
(8) Promotion products included: specify products that participate in the promotion
(9) Promotion products excluded: specify products that cannot participate in the promotion
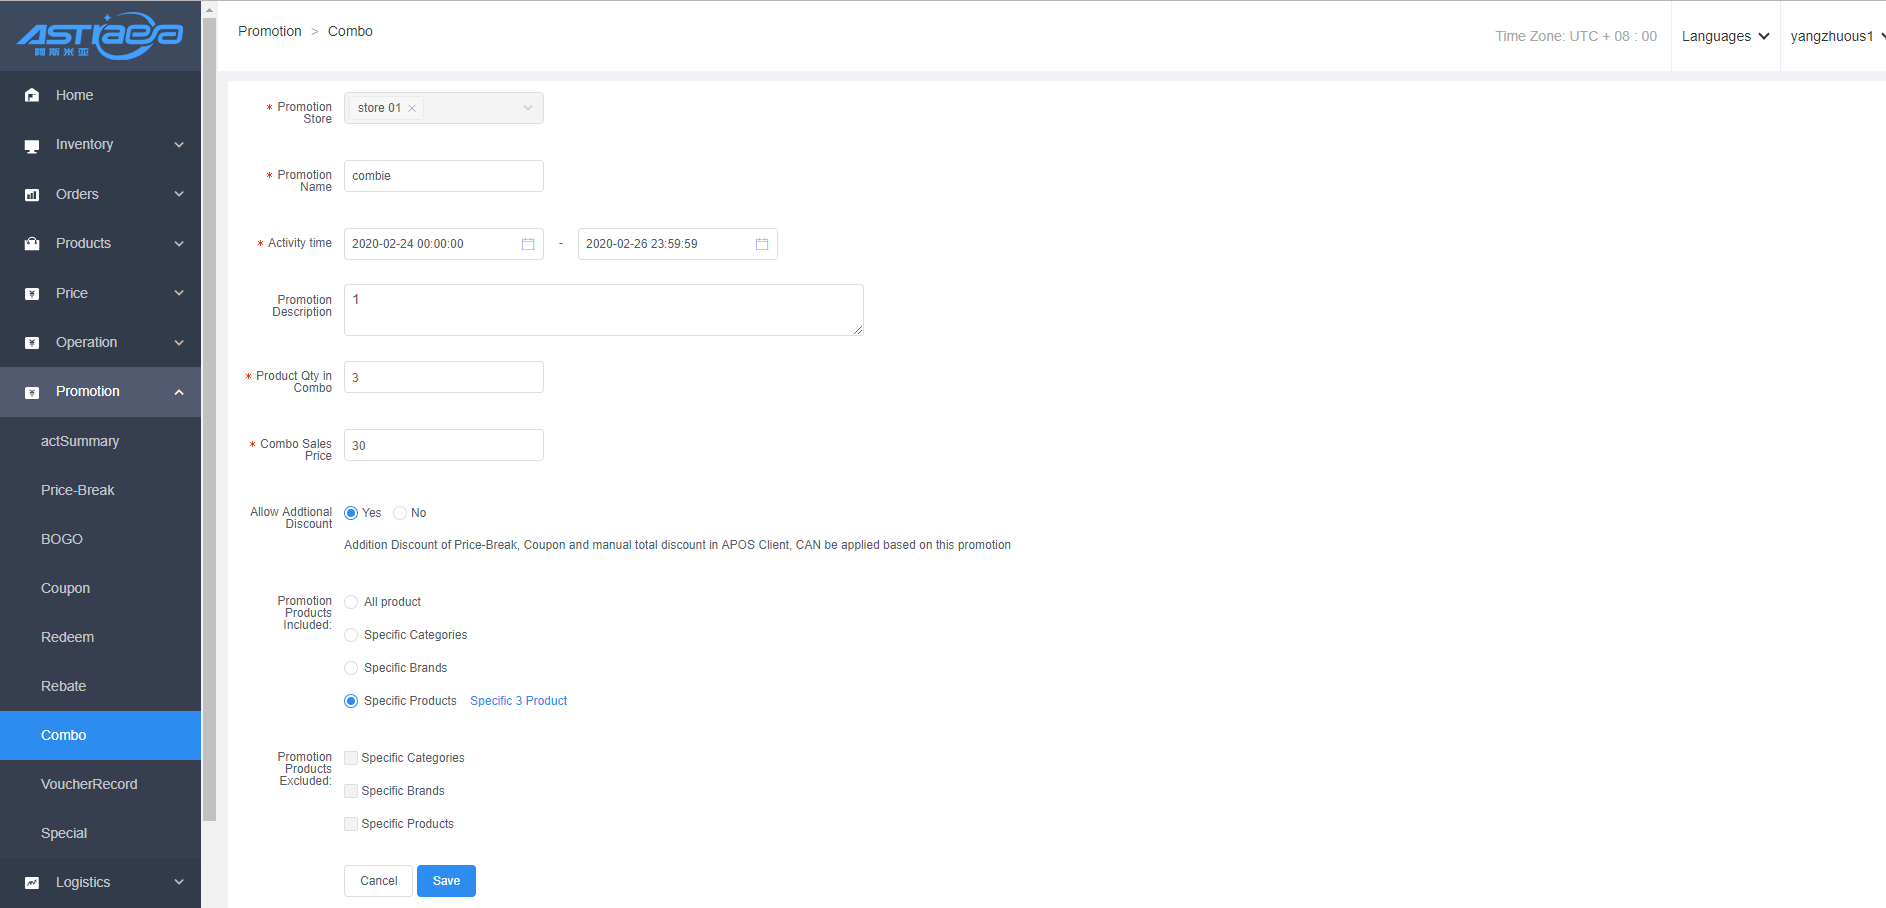
8.6.2 Use combo activity in the client
- Select the products that meet the combo activity, and click the "Preferential" button

- After clicking “confirm” button, click "Pay” to complete the settlement of products in the combo activity. The settlement amount is the preferential amount (including 10% tax)

8.7 Exclusive
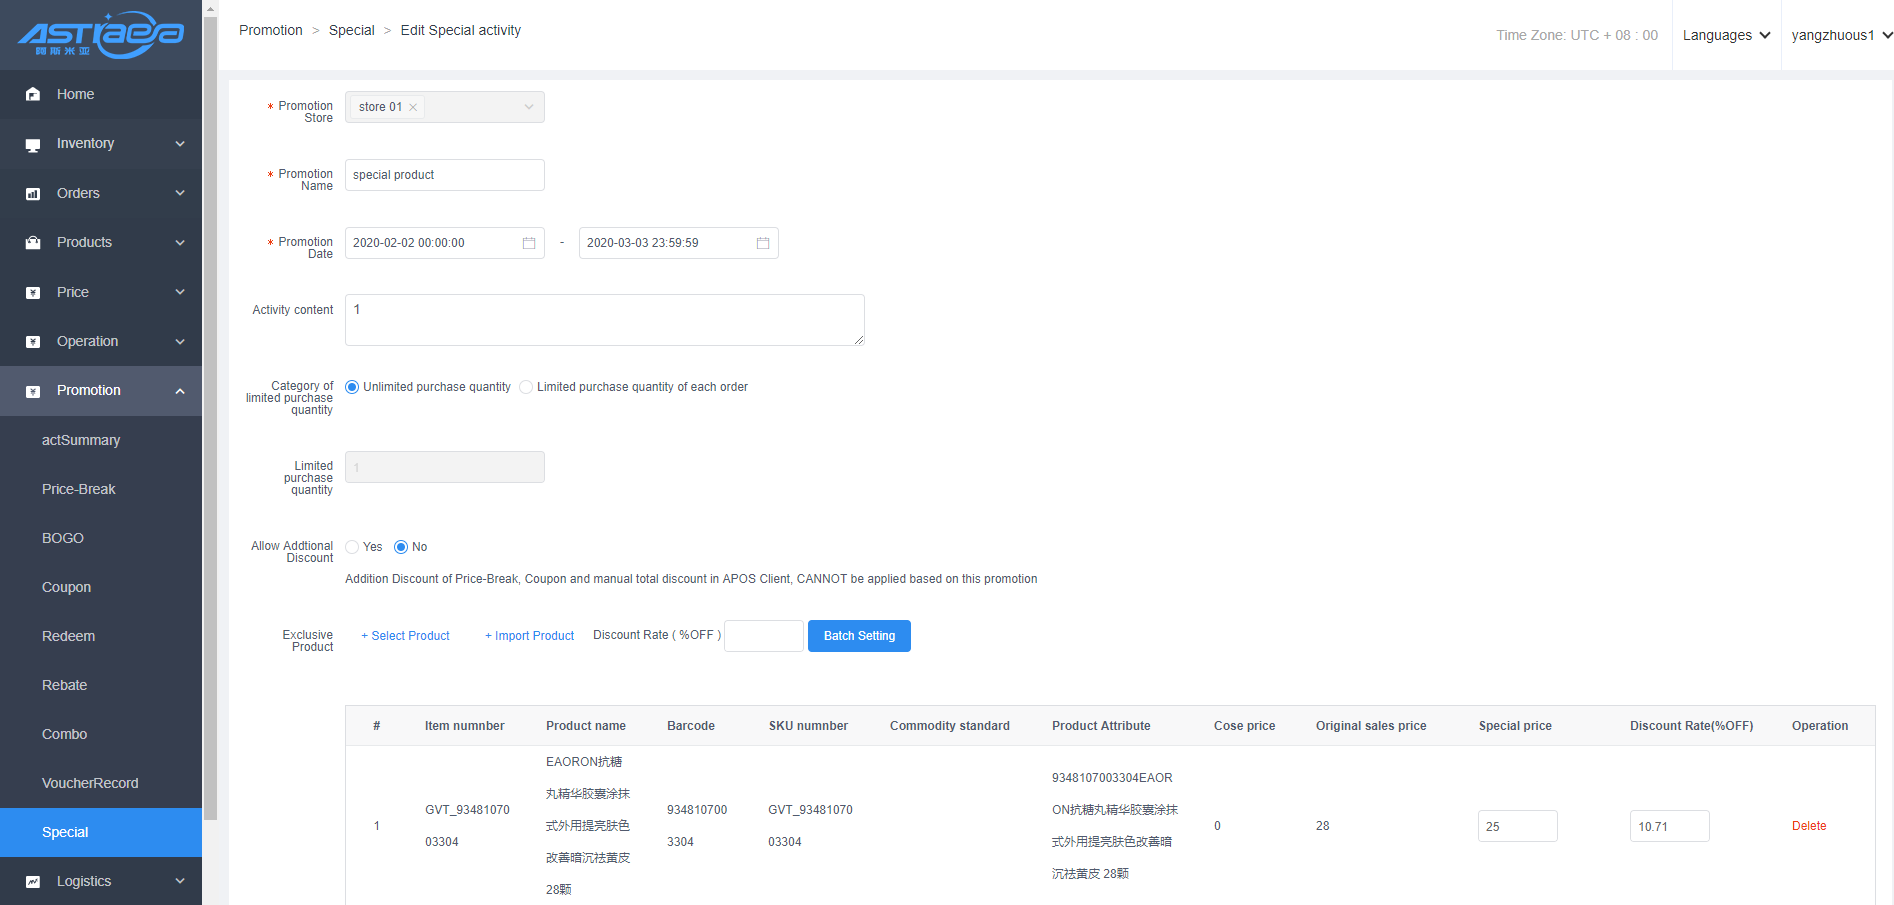
8.7.1 Create Exclusive activity in the server
It is applicable to the activity scenario where certain products enjoy a fixed preferential price within a specified period of time and the original sales price is restored after the activity is over.
Path: Promotion Management → Exclusive → Add Activity
(1) Activity organizer: set promotion store
(2) Activity name: require to be set
(3) Activity time: require to be set, from XXX to XXX
(4) Activity content: to be set
(5) Limited purchase type: "unlimited purchase" means that special products can be purchased indefinitely, "limited purchase per order" means that each order can only purchase a specified number of special products at special price; if the purchase quantity exceeds the limit, the part exceeding the limit will not enjoy the special price;
(6) Limited purchase quantity: set according to limited purchase type
(7) Additional discount allowed: After special activity, check whether manual total discount is allowed
(8) Special products: You can specify which products can participate in the special activity and set the discount rate in batches.
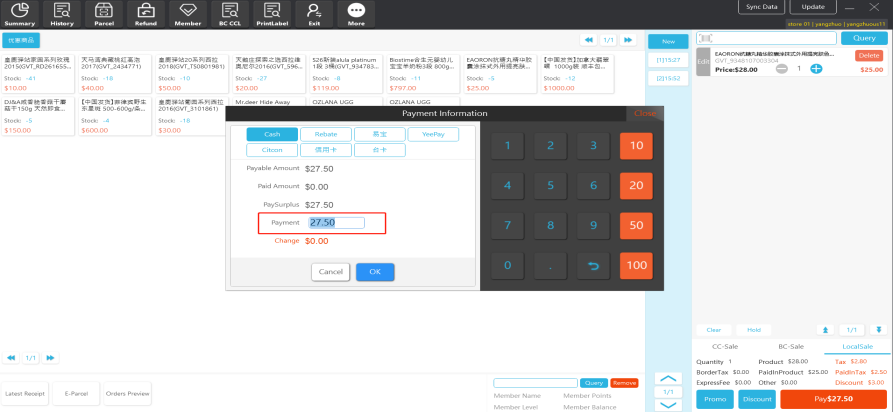
8.7.2 Use exclusive activity in the client
- After the special products take effect, the prices of the products added to the shopping cart or in the client menu will be automatically displayed as the special price.
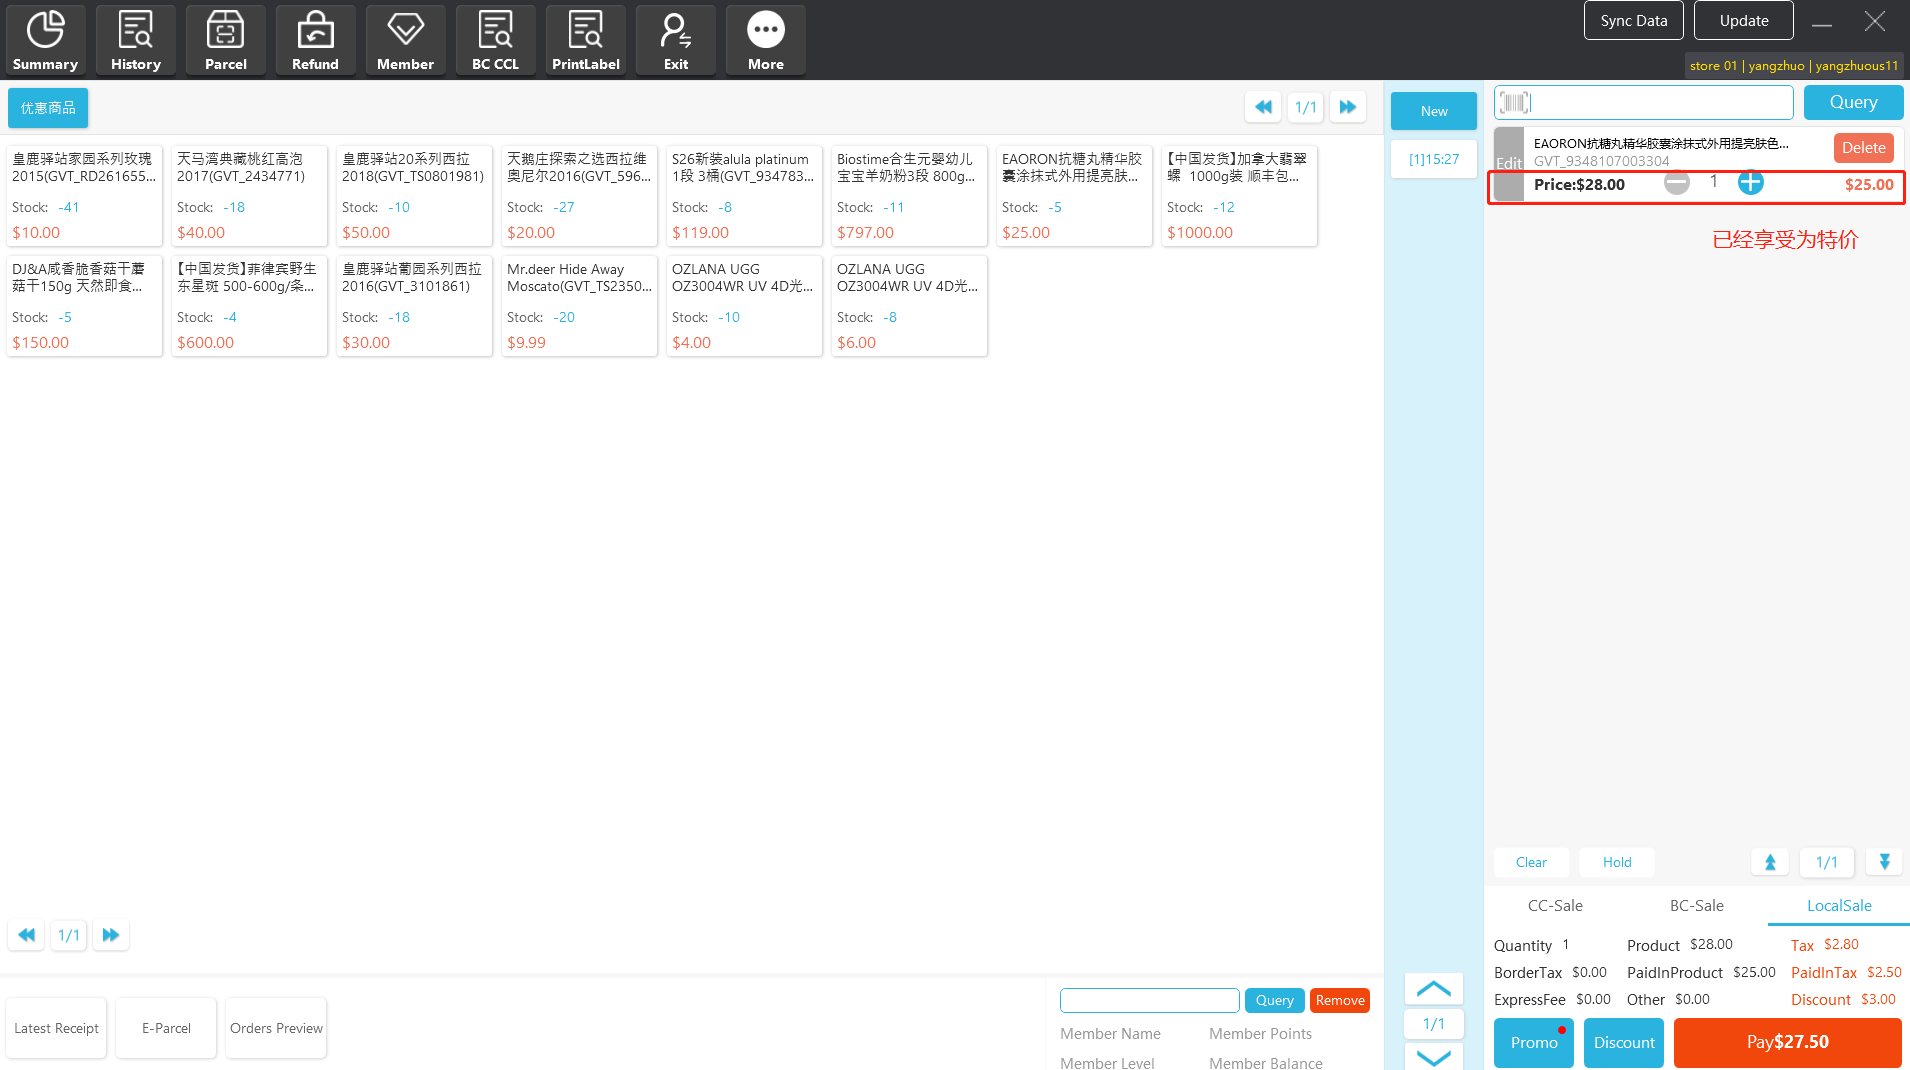
- Click “Pay” to complete the settlement of special products. The settlement amount is the preferential amount (including 10% tax)
8.8 Package
8.8.1 Create package on the sever
It is applicable for certain scenes where certain products are fixed and sold together to enjoy a fixed preferential price. After the activity time ends, the original sales price is restored.
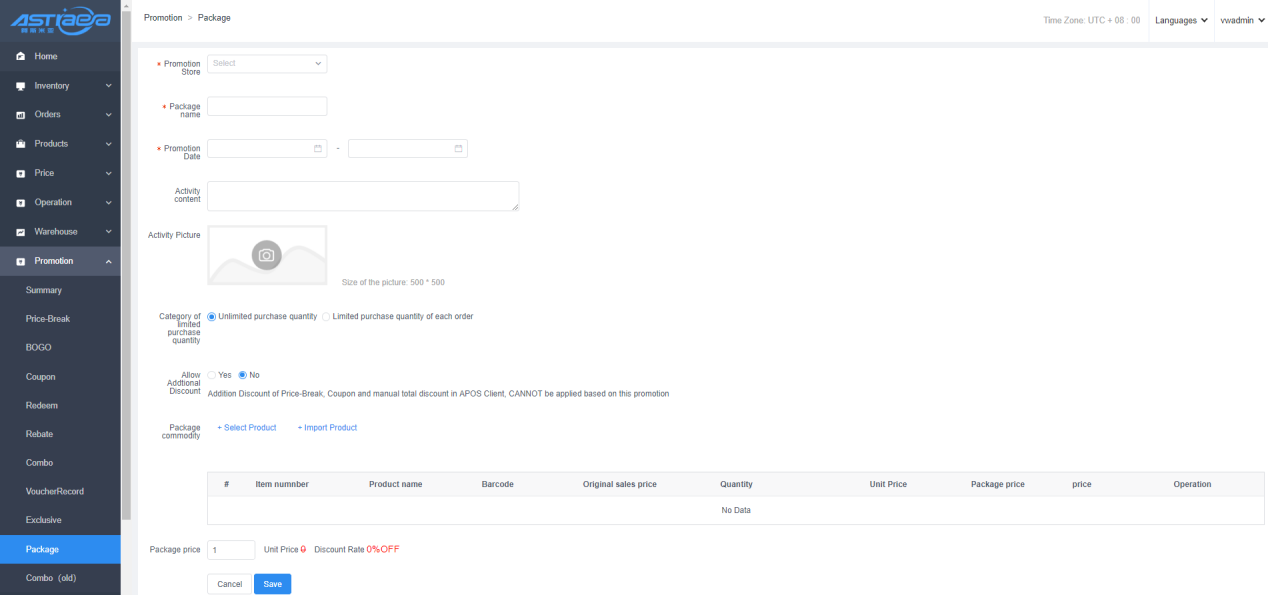
Path: Promotion→Package→Add Package
(1) Activity organizer: set promotion store
(2) Activity name: require to be set
(3) Activity time: require to be set, from XXX to XXX
(4) Activity content: to be set
(5) Activity picture: require to be set,
(6) "Unlimited purchase" type means that the package can be purchased unlimitedly at the package price, and "Unlimited purchase per order" means that each order can only purchase a specified number of special products at the package price. if the purchase quantity exceeds the limit, the part exceeding the limit will not enjoy the special price;
(7) Limited purchase quantity: set according to limited purchase type
(8) Additional discount allowed: The products of this package have enjoyed the package price, whether they can still enjoy coupons / Coupon activities and manual discounts. It is not allowed by default.
(9) Package product field description:
Original sales price: Non-member sales price
Default Member Price: Member price of the default membership level
Quantity: the number of current products in the package, the default is 1
Amount of original price: original sales price * quantity
Package price: Buy the entire package, the final transaction price of the product
Amount: Package price * Quantity
(10) Package price: The current package price, entered manually, cannot be empty, greater than 0; modify the package price according to the original price amount to calculate the package price and calculate the discount rate
Original price: the sum of the original price of all package products
Discount ;Package/Original price
8.8.2 Using package activity in the client
- After the package activity products take effect, you can see the package products in the client menu. Click the products in the package event to add the package products to the shopping cart.
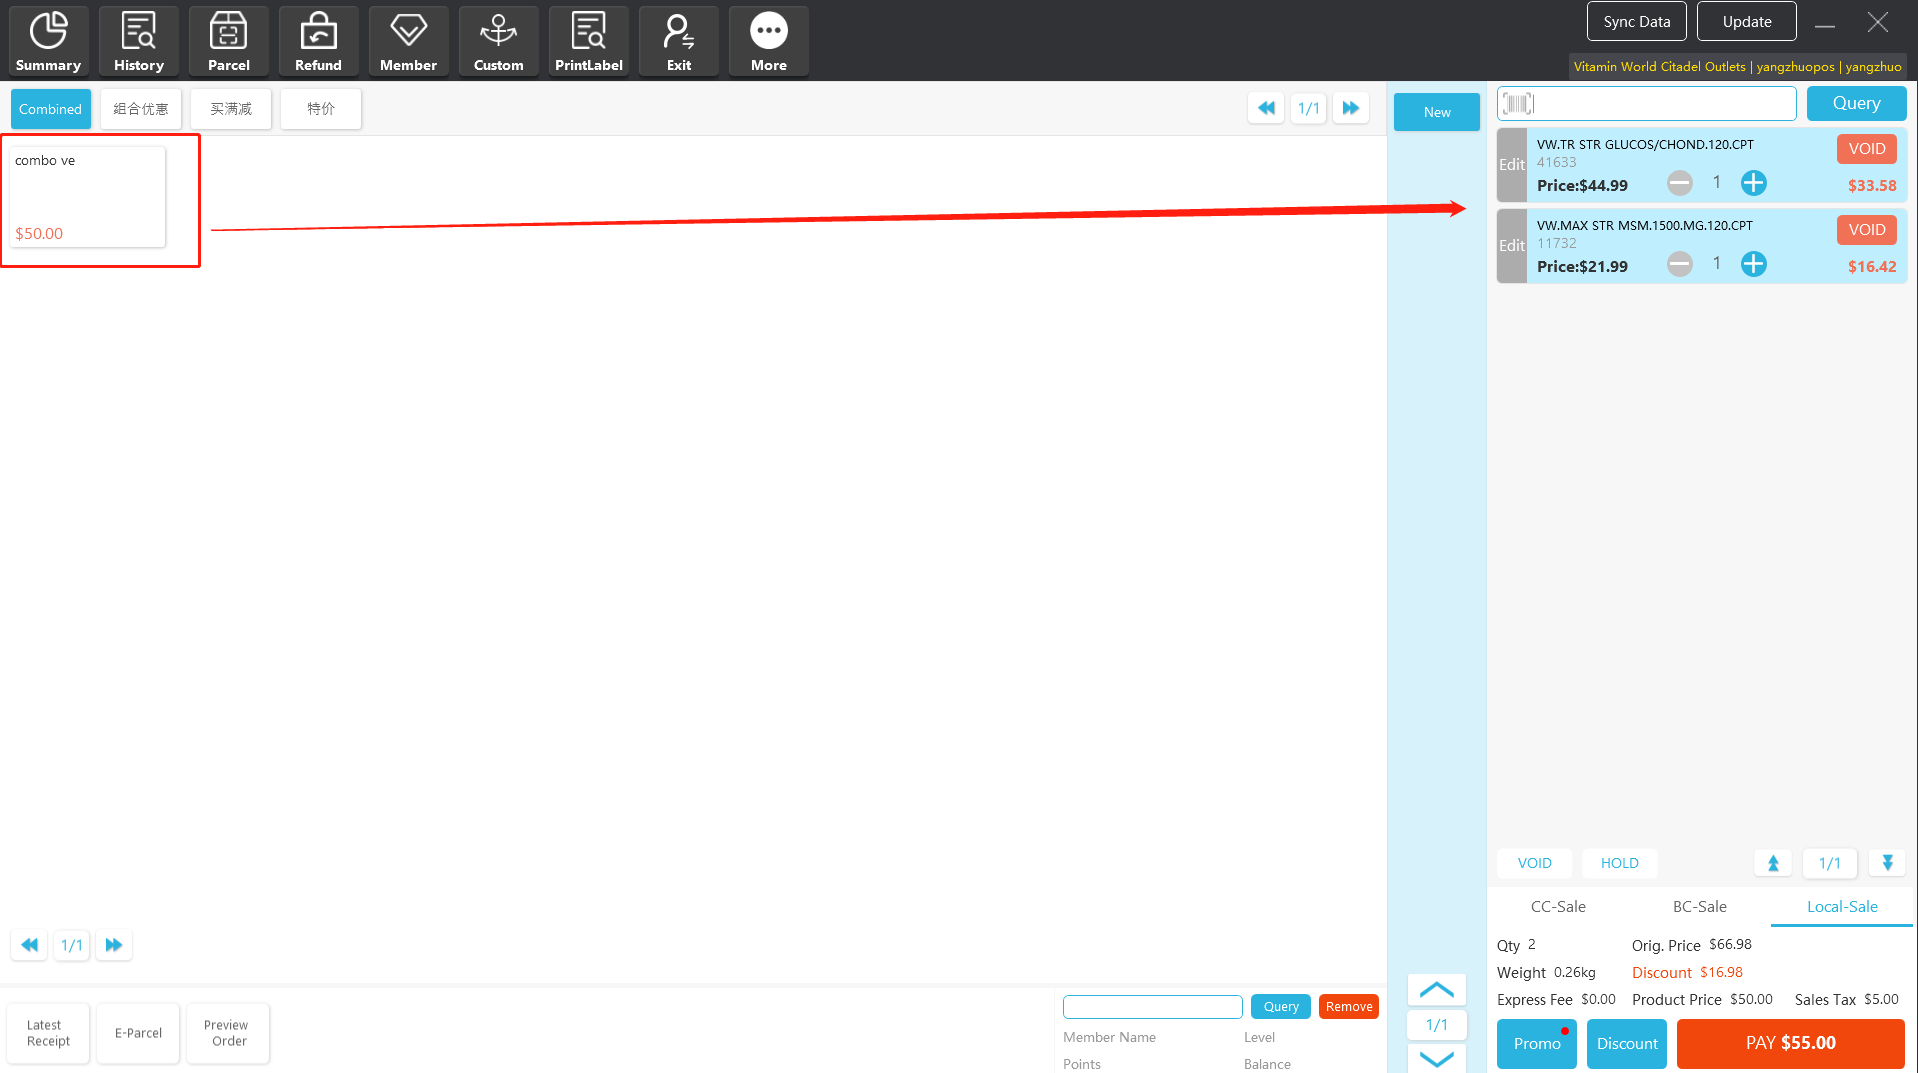
- Click “Pay” to complete the settlement of package activity products. The settlement amount is the preferential amount (including 10% tax)
8.9 Rules for preferential activities
8.9.1 Price change/discount for single item
Support the price change of single shopping cart item, and support three price change methods, discount rate, discount price and total price change.
There is a member price for products. When members buy, the price will change on the basis of the member price.
The priority of price change for single item is higher than the existing member price and various activity prices.
The right to change the price of single item is the highest. If there is no right to discount single item, the store manager's user name and password shall be entered for authorization.
8.9.2 Rules for matching preferential activities
Promotions include: price-break, BOGO, redemption, combo and special
Manual total discount includes: manual whole order and coupon
After the price of the single item is changed manually, it will no longer participate in promotions and manual total discount.
If the price of a product is changed after participating in the promotion, the remaining products will be re-matched with the promotions. If the price of a product is changed after participating in the manual total discount, the discount for other products will remain unchanged.
The discount system supports additional discount. BOGO, combo, special can be set to support additional discount, that is, after products participate in promotions, they can participate in the manual total discount. Additional discount is not supported for price-break or redemption, i.e. after participating in promotions, participating in the manual total discount is not supported for products. If a product participates in the manual total discount first and then in the promotion, the original price will be restored before matching the promotion.
When users as members participate in preferential activities, they match the preferential activities and the manual total discount based on the member price.
After users participate in the preferential activities, products can be increased or decreased or the price of single item can be changed, and the preferential activities will be matched again during settlement.
8.9.3 Price change for whole order/manual total discount
The manual total discount function supports price change of whole order in the shopping cart. Manual total discount includes manual whole order and coupon.
Manual total discount. Discount is given to products that have not participated in the preferential activities and products that have not undergone price change for single items. If the promotions support additional discount, manual total discount can be carried out again.
Manual total discount can support multiple discounts. When it is allowed, the discount of coupon proportion shall be implemented before the reduction of coupon amount.
Manual total discount adjusts the amount of products, excluding tax.
The amount of manual total discount is allocated to the products participating in the manual total discount. After allocation, the total price of products is the same as the amount entered.
Products that cannot be discounted when enjoying the preferential activities are not only certain products enjoying the preferential activities, including products that contribute to the activities, such as “buy product A get B free”, and both products AB do not participate in the manual total discount.
8.9.4 Price-Break and BOGO, Combo, Packages, Exclusive are allowed to be superimposed
According to the activity rules and activity examples, when BOGO, Combo, Packages, and Exclusive are allowed to be superimposed, you can enjoy Price-Break activities again;
According to the activity processing method, the activities are divided into three categories, "client matching" activities, "sever matching" activities, and "manual matching" activities;
"Client Match" activity includes Exclusive and Packages, matching activity when added by APOS client to the shopping cart. Products that are allowed to be superimposed and can participate in the "Sever Matching" Price-Break activity and "Manual Matching" coupon activity.
"Sever matching" activities include BOGO, Combo, redemption and Price-Break. Matching activities are performed when the client clicks "Promo" operation. This type of activity is divided into two priority matching activities. BOGO, Combo, and redeem are the first priority. The same product can only enjoy one activity within this priority; Price-Break belong to the second priority. A "Promo" action matches two priority activities in priority order. After matching the activities of the first priority, the products that have not been matched with the activities and the products that are allowed to be superimposed and superimposed are continued to match the activities of the second priority.
The "manual match" activity includes coupons and rebates, and the matchmaking activity is triggered by the cashier. Products that are superimposed and that are allowed. After matching other activities, you can continue to match coupons activity.
8.9.5 Mutual exclusion rules for activity products
- For the three types of activities (BOGO, combo and special), only one activity can be configured for the same product on the same day; otherwise, the following information will be prompted;

- If the same product is a product that does not participate in promotion in one of the activities, it can be added to the products participating in the promotion in other activities.
IX. Report Center
9.1.1 Store operation report
Report statistics: The store operation report can show the statistical summary of the order sales, product profit, member top up, receivables, payment methods, income and expenditure, and cash receipts and payments of each store under the commercial tenant.
9.1.2 Product summary report
Report statistics: the product summary report refers to the statistics of product sales in terms of product dimensions, which can be queried according to store, product name, product barcode, product No., brand, category, sales quantity, sales amount, etc.
9.1.3 Product category sales summary report
Report statistics: all orders that have taken effect, including POS orders, mall orders and return orders, only include merchandise sales, not including logistics.
9.1.4 Store sales report
Report statistics: the store sales report can show the store's sales data, cost, gross profit rate, etc. The report can be exported.
9.1.5 Daily settlement report
Report statistics: the daily settlement report is used to count the daily sales of the store, including the sales amount. Return amount, number of sales order, number of return order, etc.
9.1.6 Channel sales summary
Report statistics content: query the sales quantity of each sales channel of goods. All orders, including POS orders, mall orders and return orders, only include goods sales, excluding logistics. Summarize according to the products, one piece of data for each product.

9.1.7 Product sales report
Report statistics: the product sales report shows the specific sales situation of products.

9.1.8 Product return report
Report statistics content: product return details are the specific returns of the product.
9.1.9 Discount detail report
Report statistics: sales order data of all products whose transaction price is lower than the original price, including POS orders and mall orders, including only product sales, excluding returns and logistics
9.1.10 Manual discount report
Report statistics: the manual discount report makes statistics on record of product price change in the client, including member price/catalog price, selling price, price difference, reason for price change, price change comments, etc. Each store has a total (only the quantity and price difference are added up)
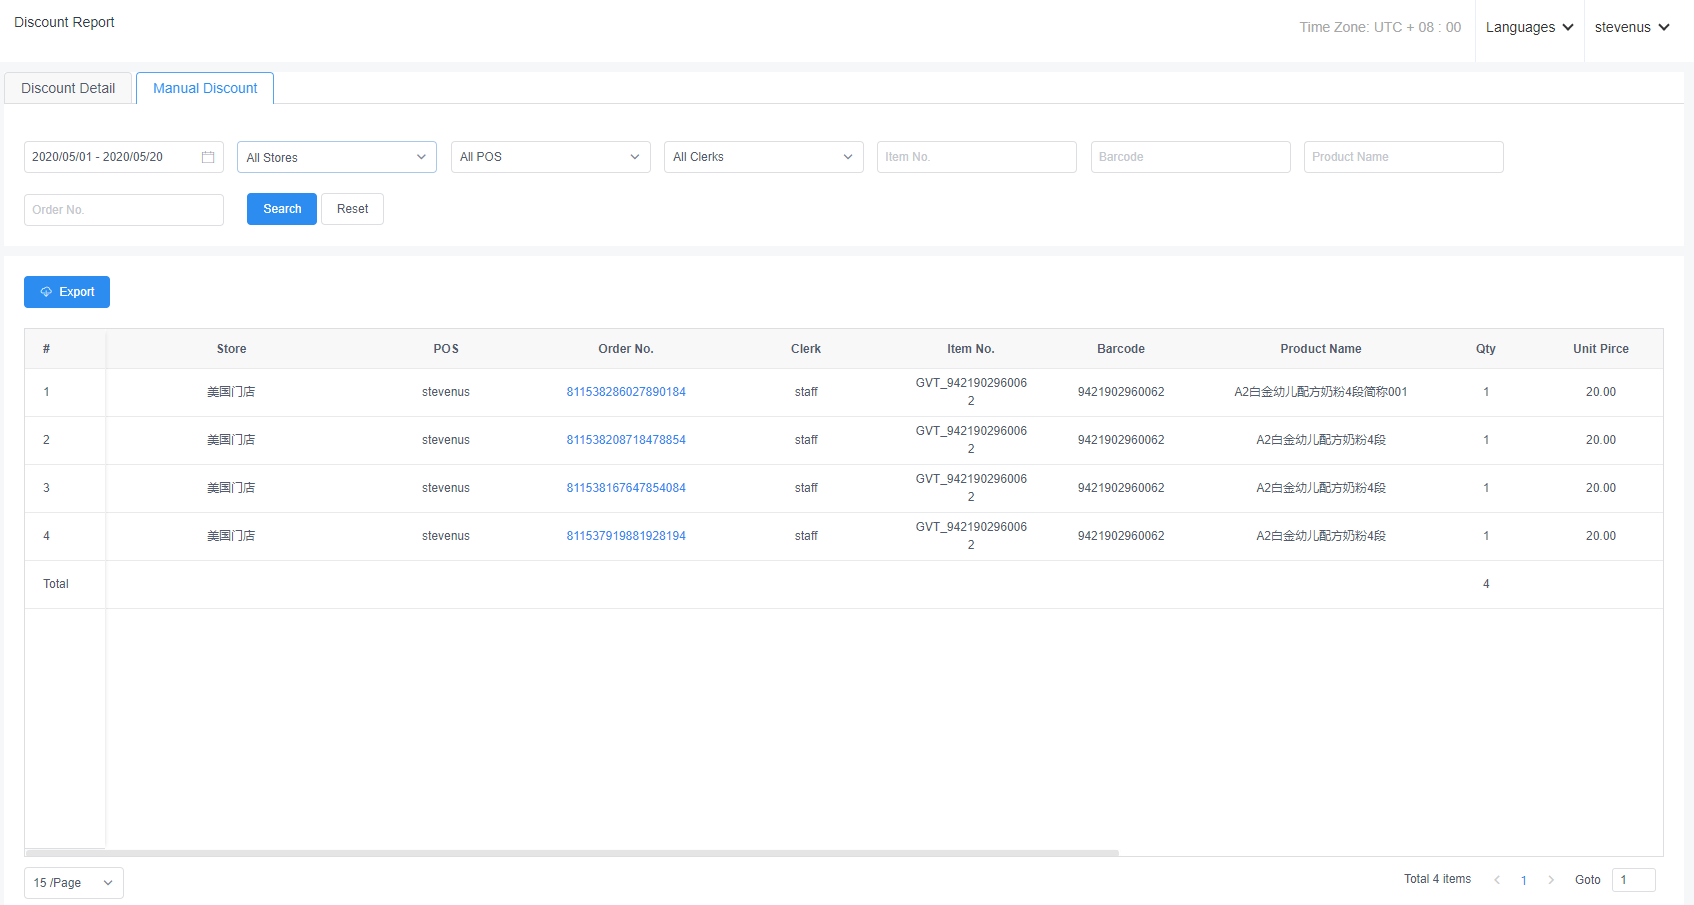
9.1.11 UPT report(Units per transaction)
Report statistics: all sales orders that have taken effect, including POS orders and mall orders, only include merchandise sales, not including logistics.

9.1.12 E-custom status details
Report statistics: the E-custom status report mainly shows whether the push customs clearance of three data (data source: APOS, mall and overseas purchase assistant) is successful
9.1.13 Tax report
The tax report can make statistics on the state tax, county tax, community tax, and total tax of stores, and can be filtered by time.
9.2 Bills Reports
9.2.1 Receivable summary
Report statistics: the receivable summary is the receivable information and summary information of all cashiers in each store
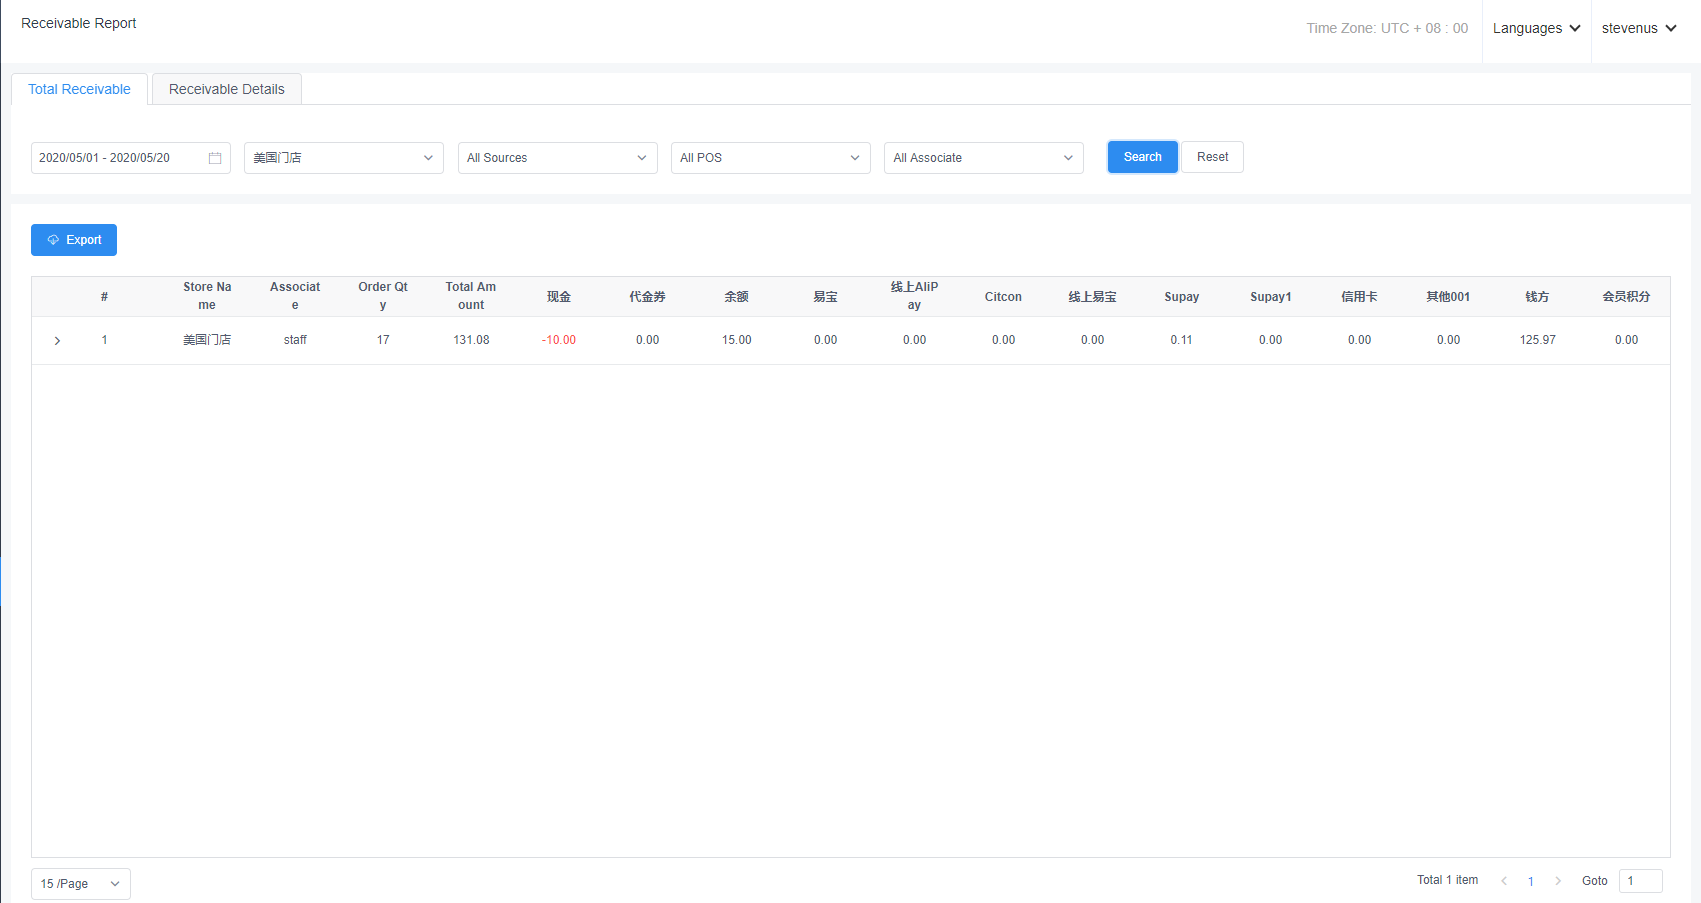
9.2.2 Receivable details
Report statistics: the receivable detail report shows the receivable details of each order
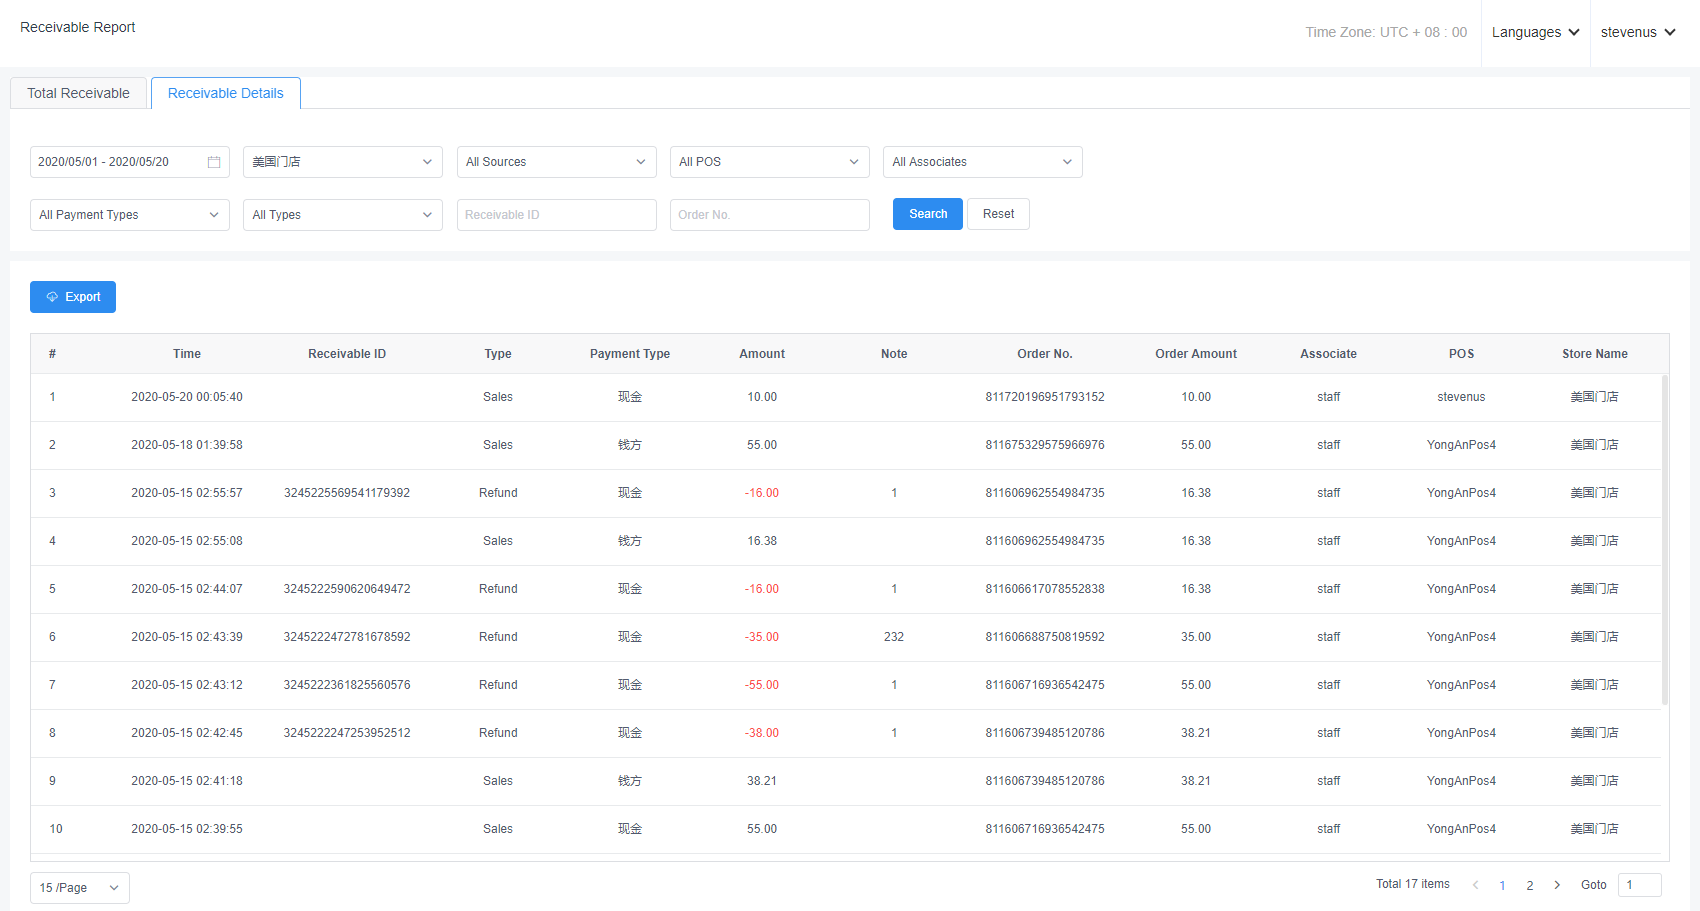
9.2.3 Cash summary
The cash summary report can count the details of the store's daily cash reserve income and expenditure

9.2.4 Cash-in/cash-out details
Cash-in/cash-out detail report can be used to make statistics on the store's cash-in/cash-out record details and comments
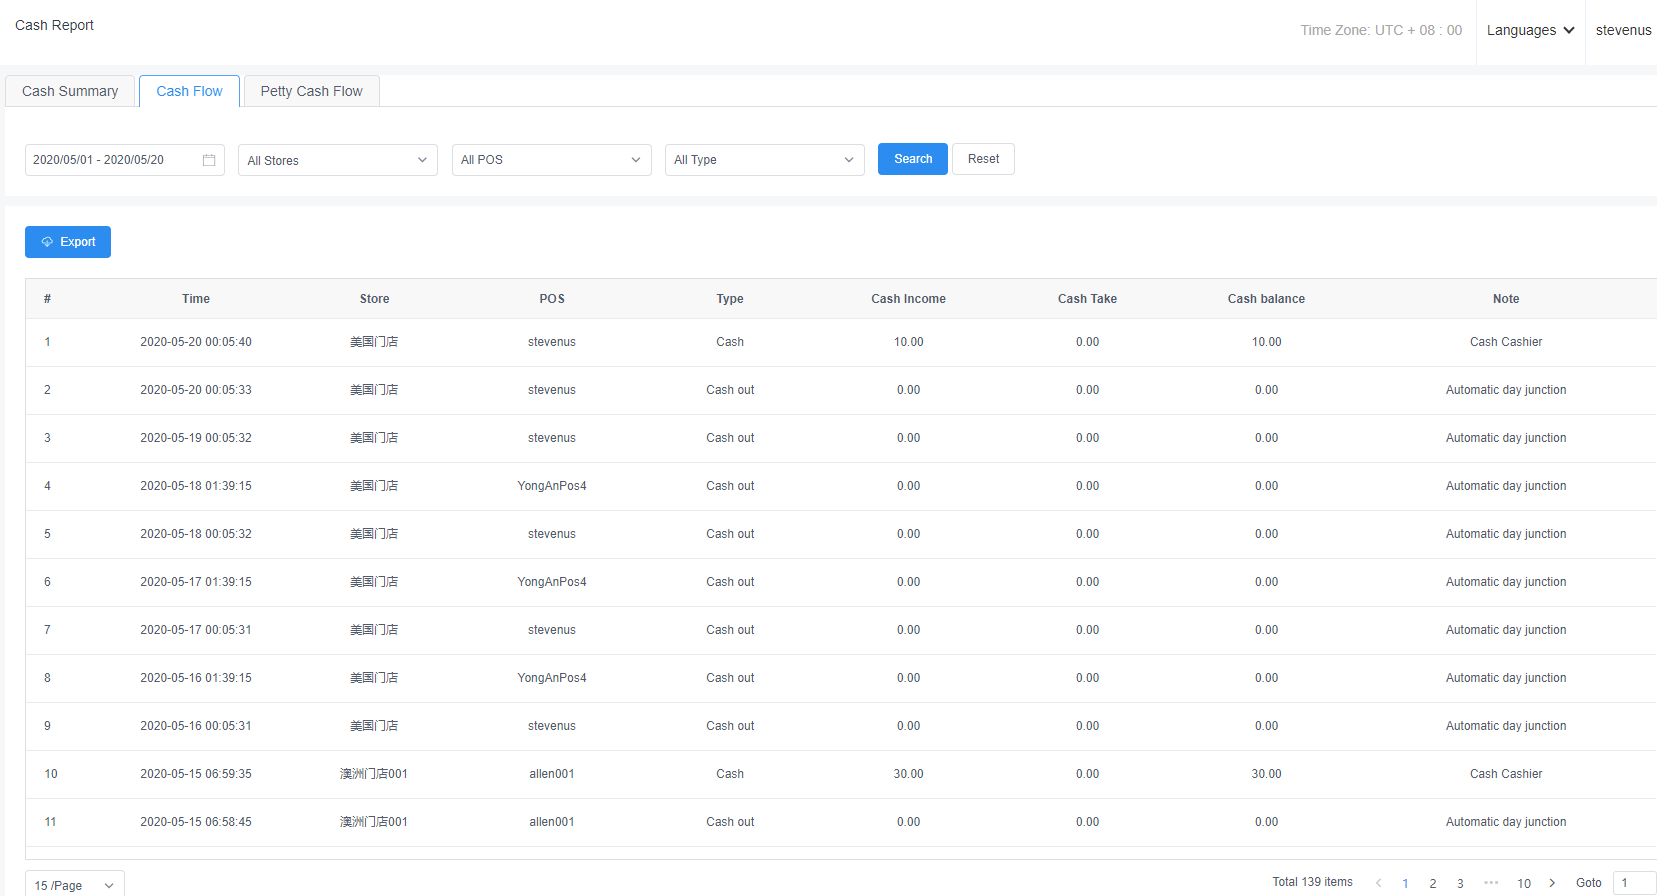
9.2.5 Cash Reserve details
The petty cash detail report can be used to make statistics on the details of the store's petty cash-in/cash-out as well as comments
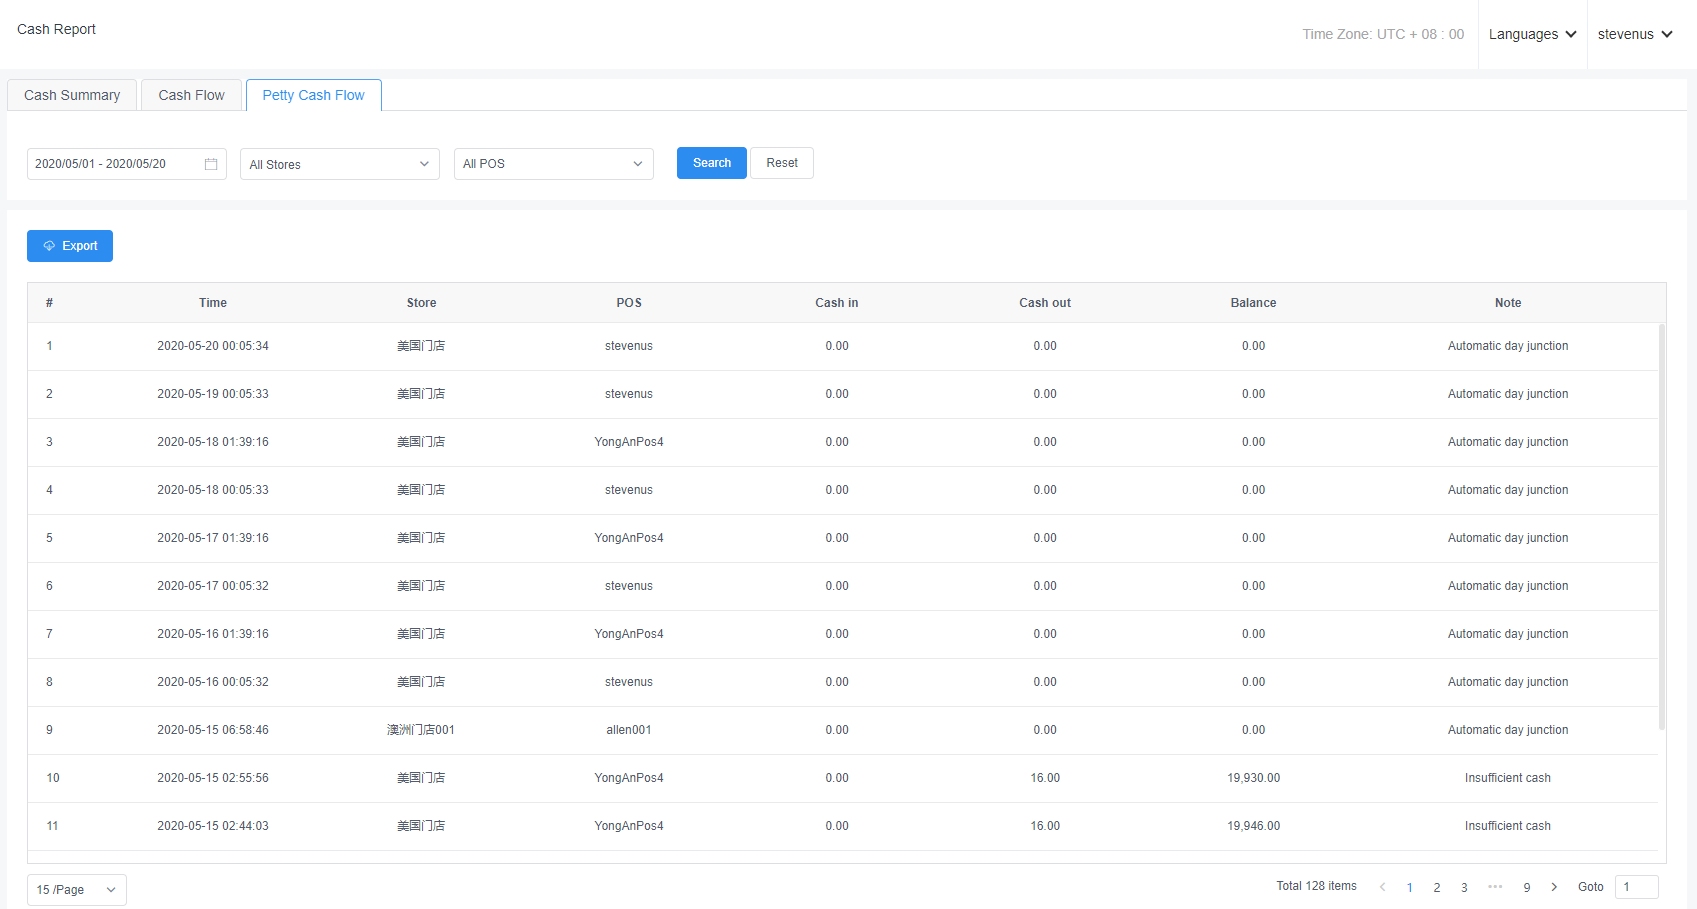
9.2.6 Bills Receivable Details
Report statistics: the bills receivable report makes statistics on the bills receivable details in the stock-in and stock-out business
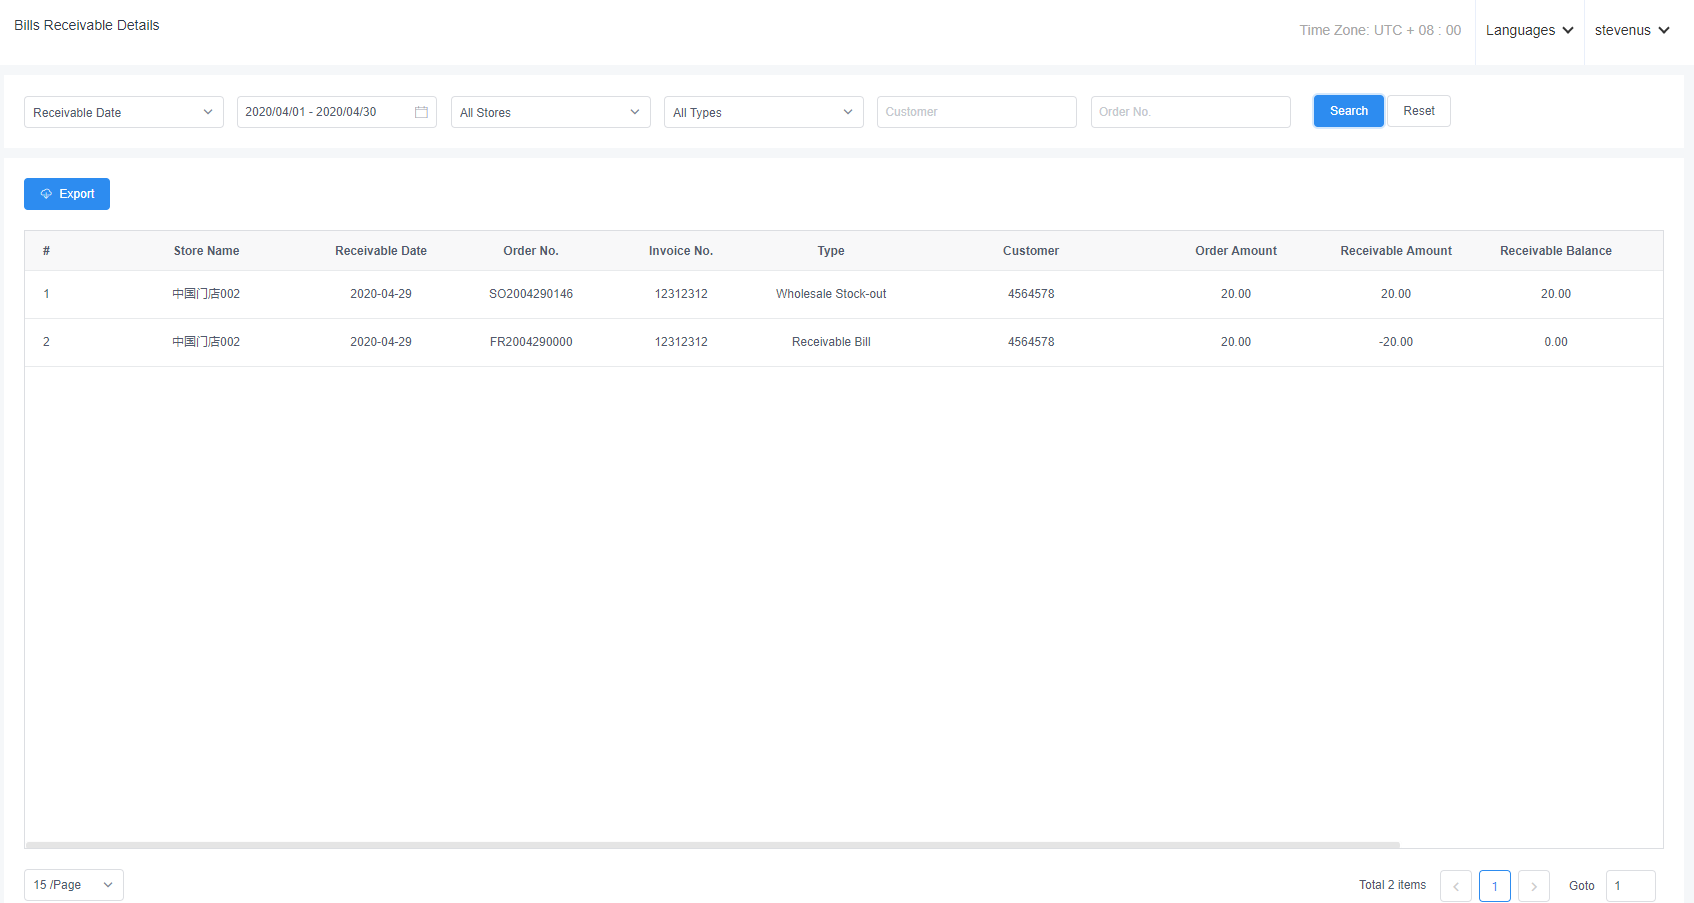
9.2.7 Bills Payable Details
Report statistics: the bills payable report makes statistics on the bills payable details in the stock-in and stock-out business
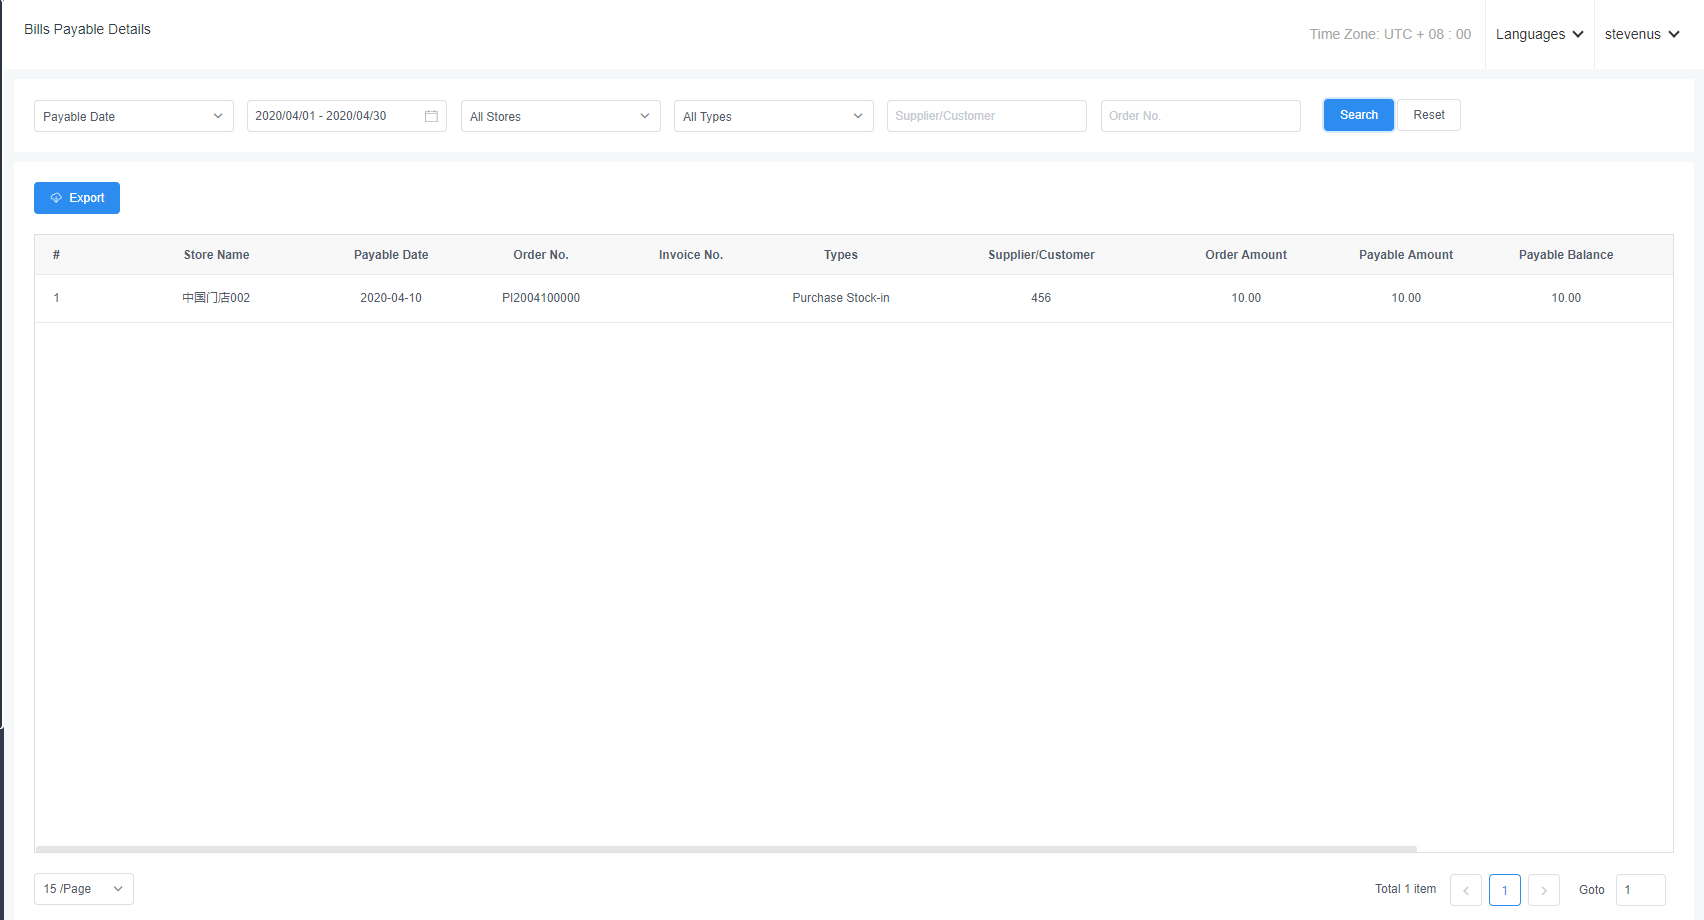
9.3 Stock Reports
9.3.1 Stock-in summary
Report statistics: the stock-in summary statistics are the information data of all stock-in businesses, which can be queried by store, stock-in No, stock-in time, etc.
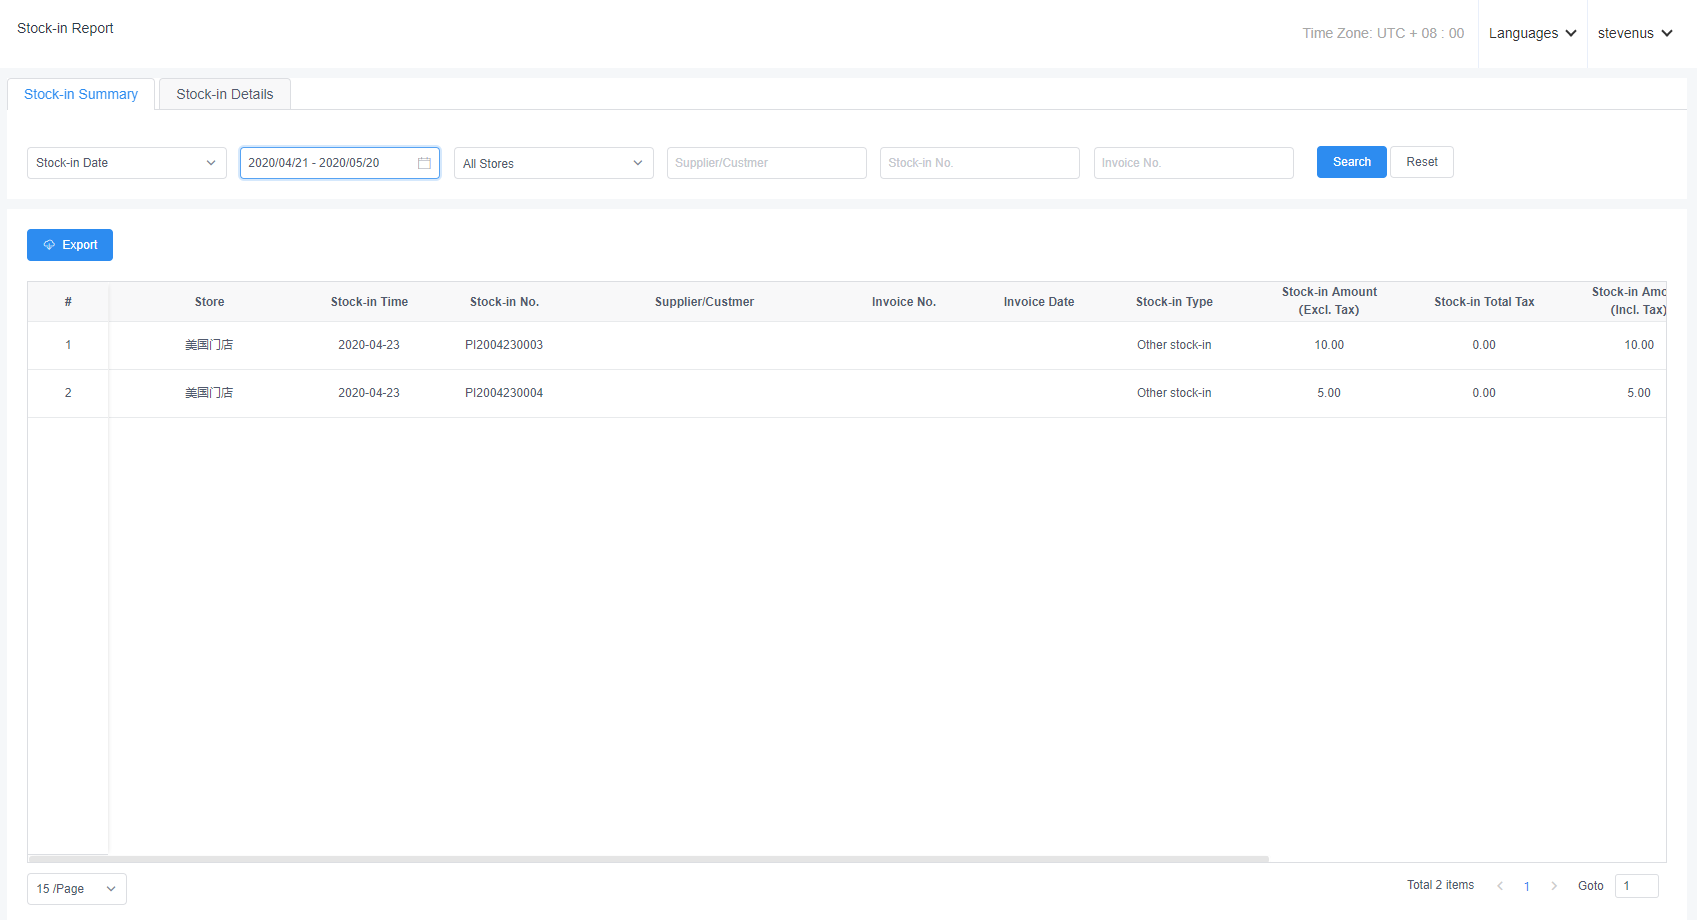
9.3.2 Stock-in details
Report statistics: the stock-in detail report shows the detailed information of each stock-in product, which can be queried by store name, product No, product name, stock-in No, invoice No, stock-in time, etc.
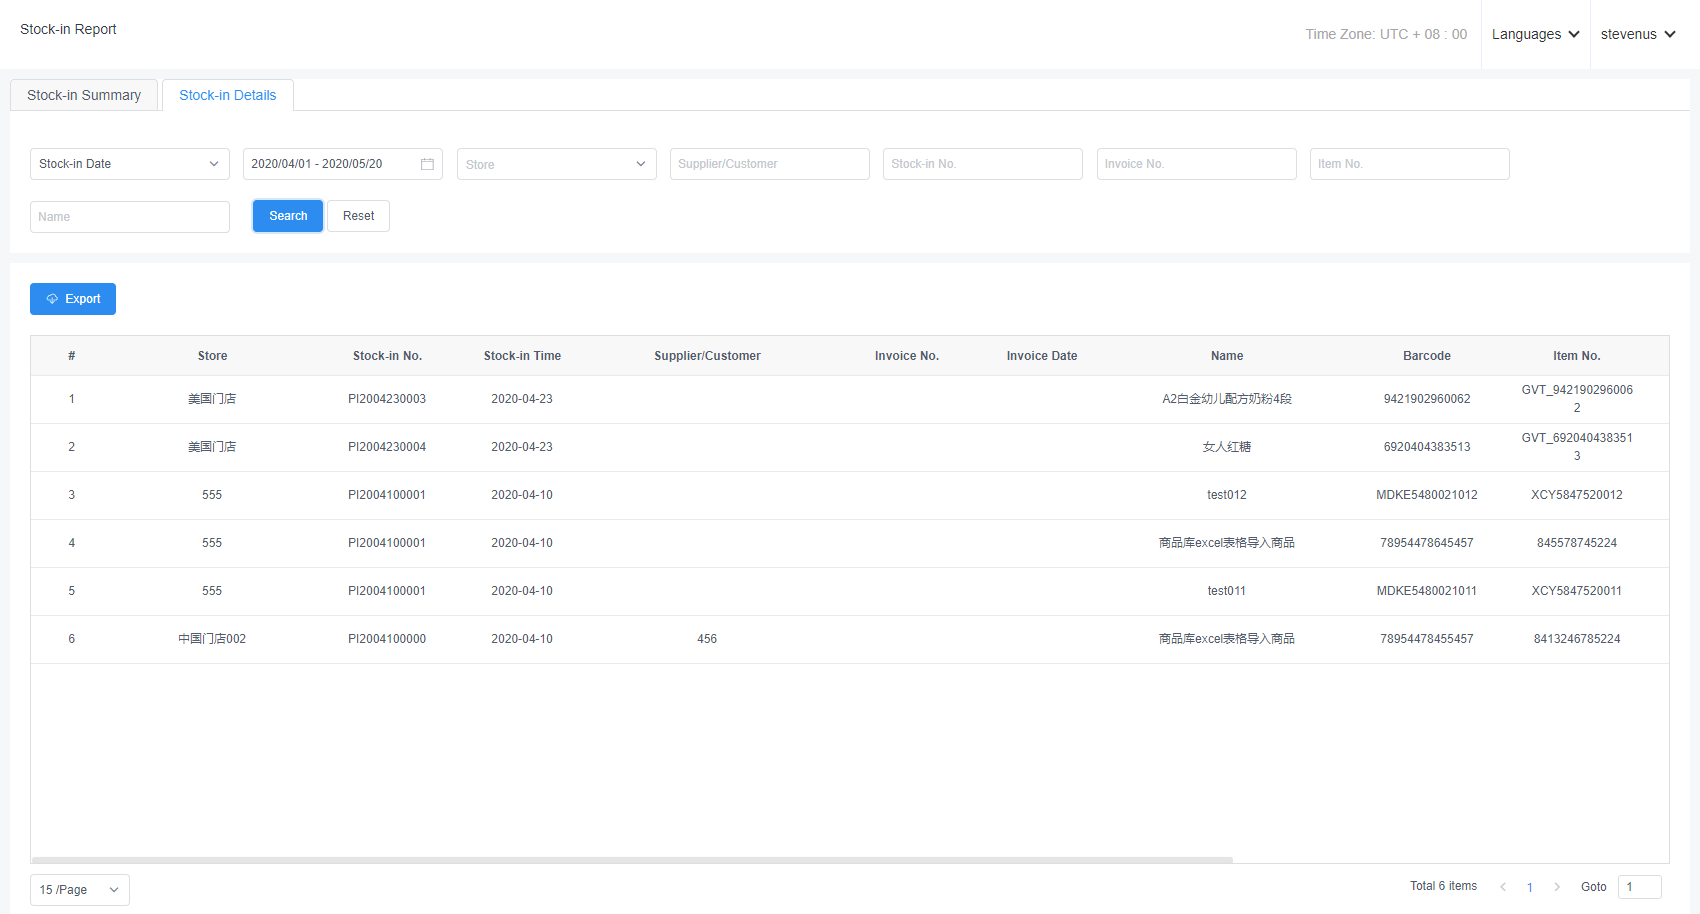
9.3.3 Stock-out summary
Report statistics; statistics are the information data of all stock-out businesses, which can be queried by store, stock-out No, stock-out time, etc.
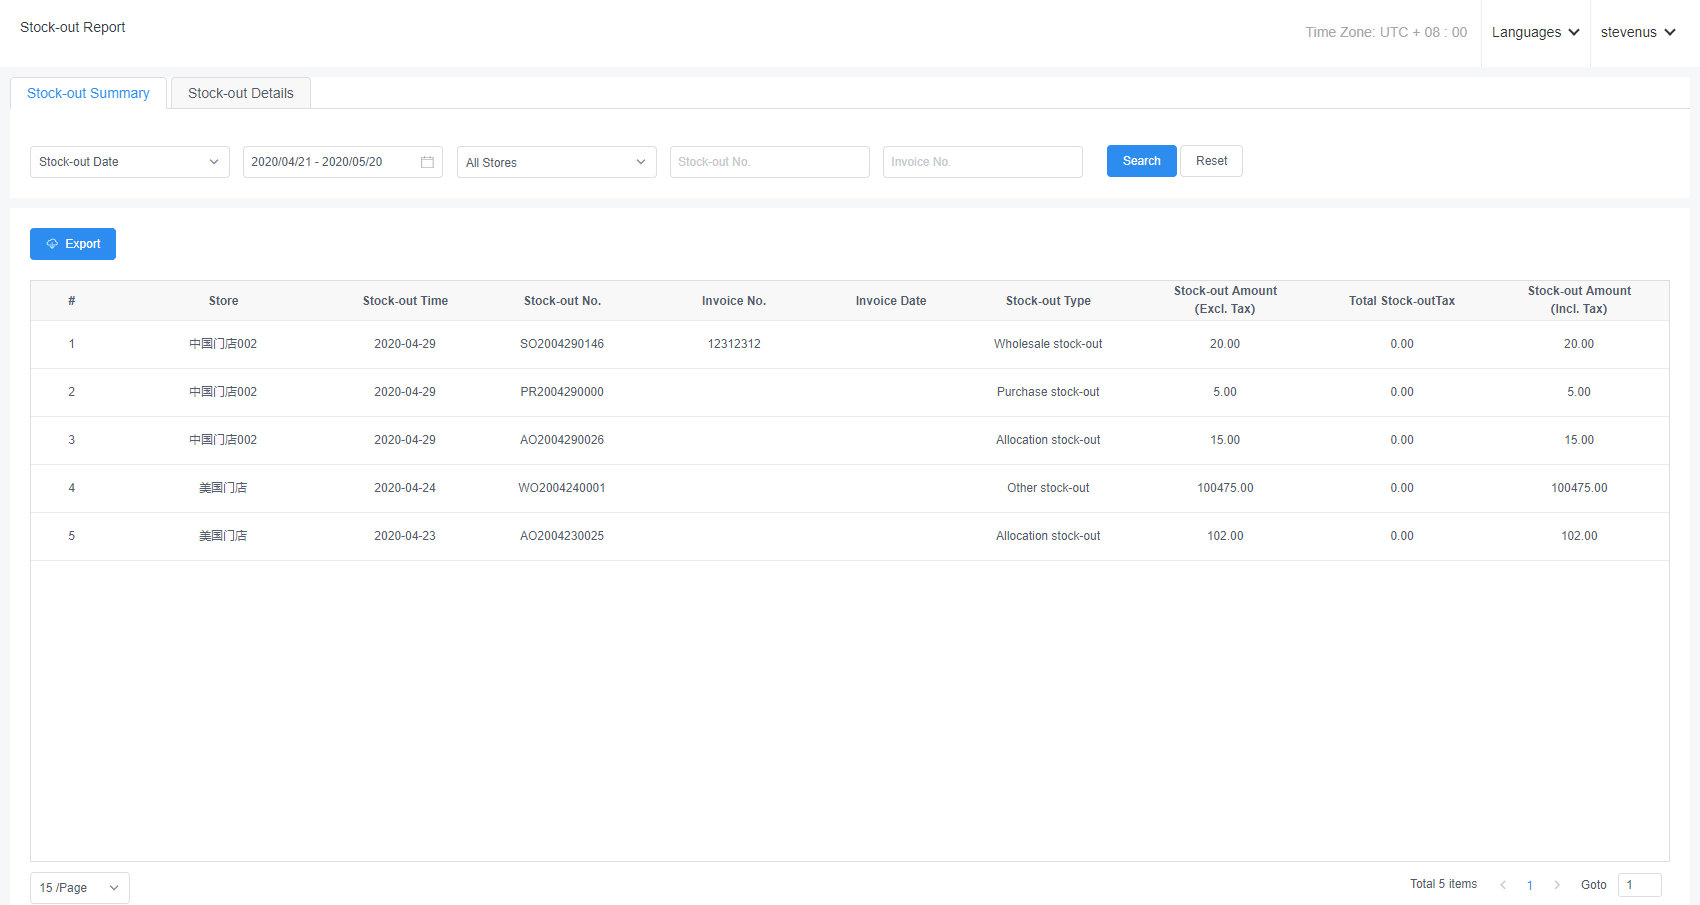
9.3.4 Stock-out details
Report statistics; the stock-out detail report shows the detailed information of each stock-out product, which can be queried by store name, product No., product name, stock-out No, invoice No, stock-out time, etc.
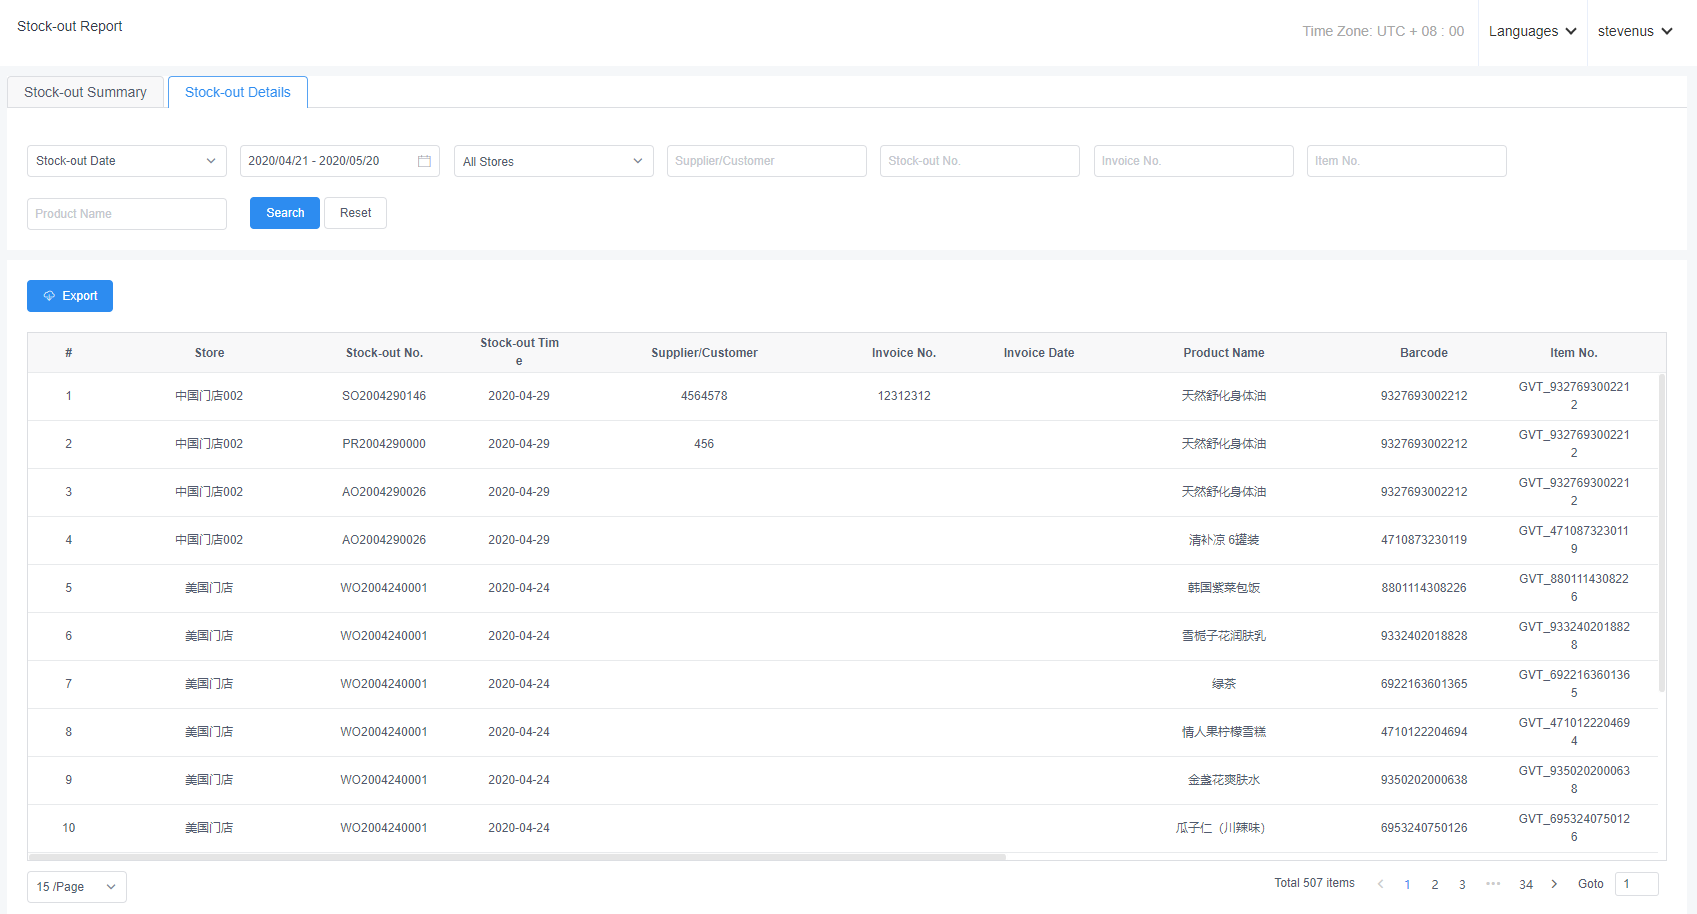
9.3.5 Stock-check report
Report statistics; the stock-check report shows the detailed information and inventory changes of the products counted, which can be queried by store name, product No, product name, stock-check No, stock-check time, etc.

9.3.6 Stock flow
Stock flow report can count the details of the quantity and amount of products in and out of the store, as well as the unit price and cost price, which can be queried by the store, business type, product name, etc.
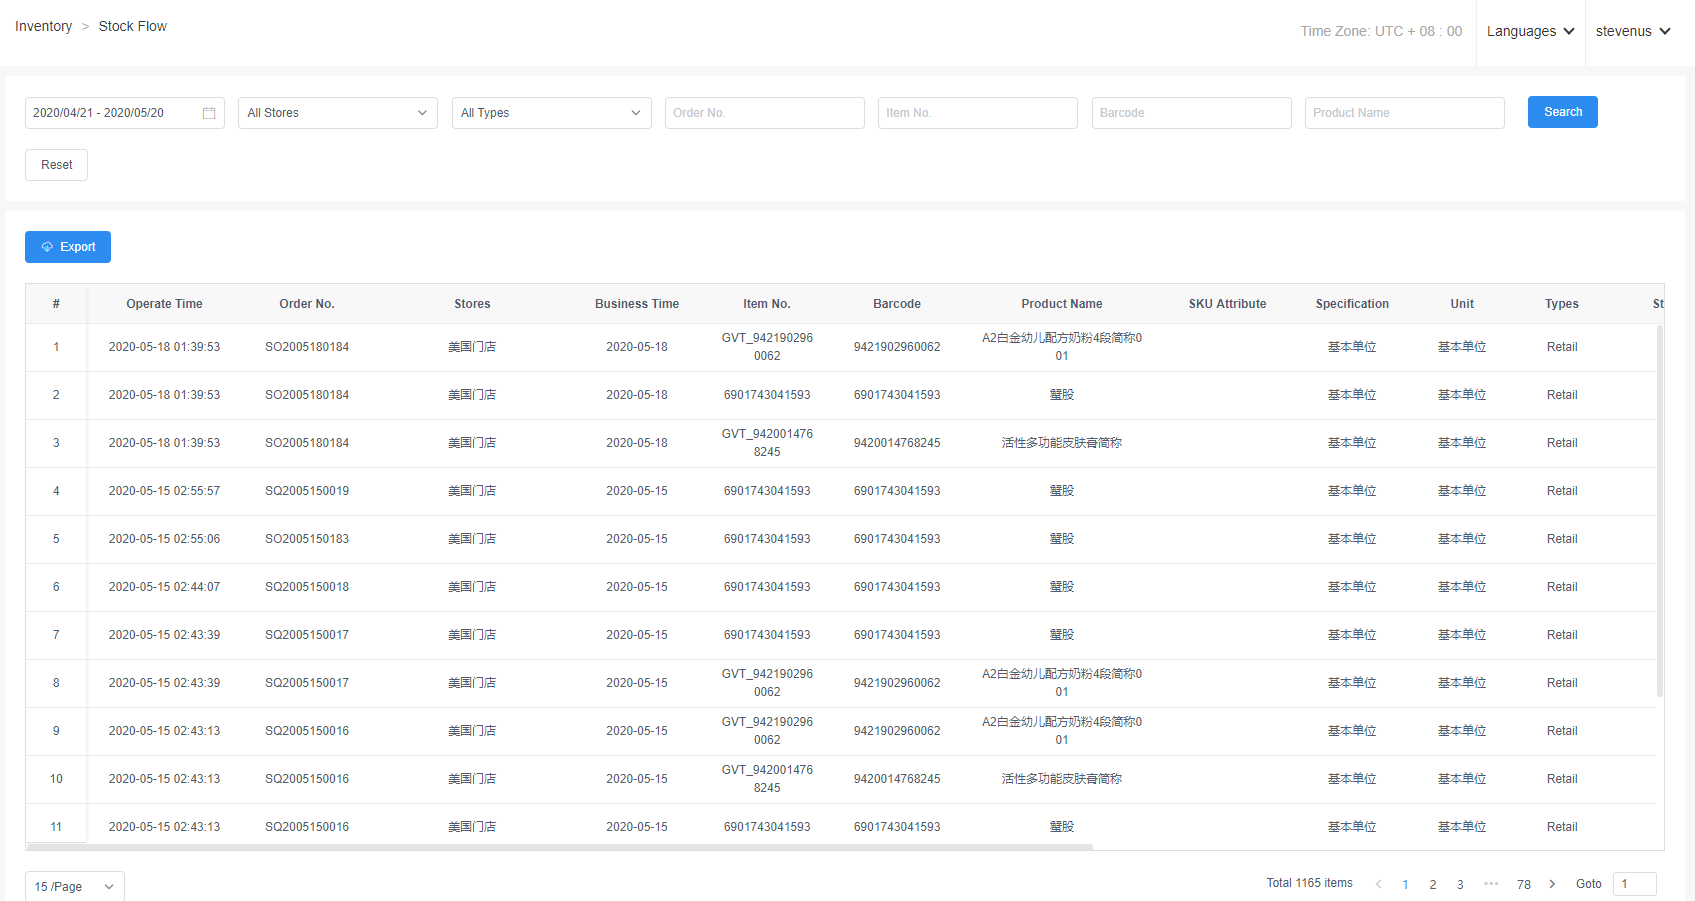
9.3.7 Inventory
Inventory report can count the inventory quantity, inventory amount, status and retail price of the products in the store, which can be queried by the store, product classification, product brand, etc.
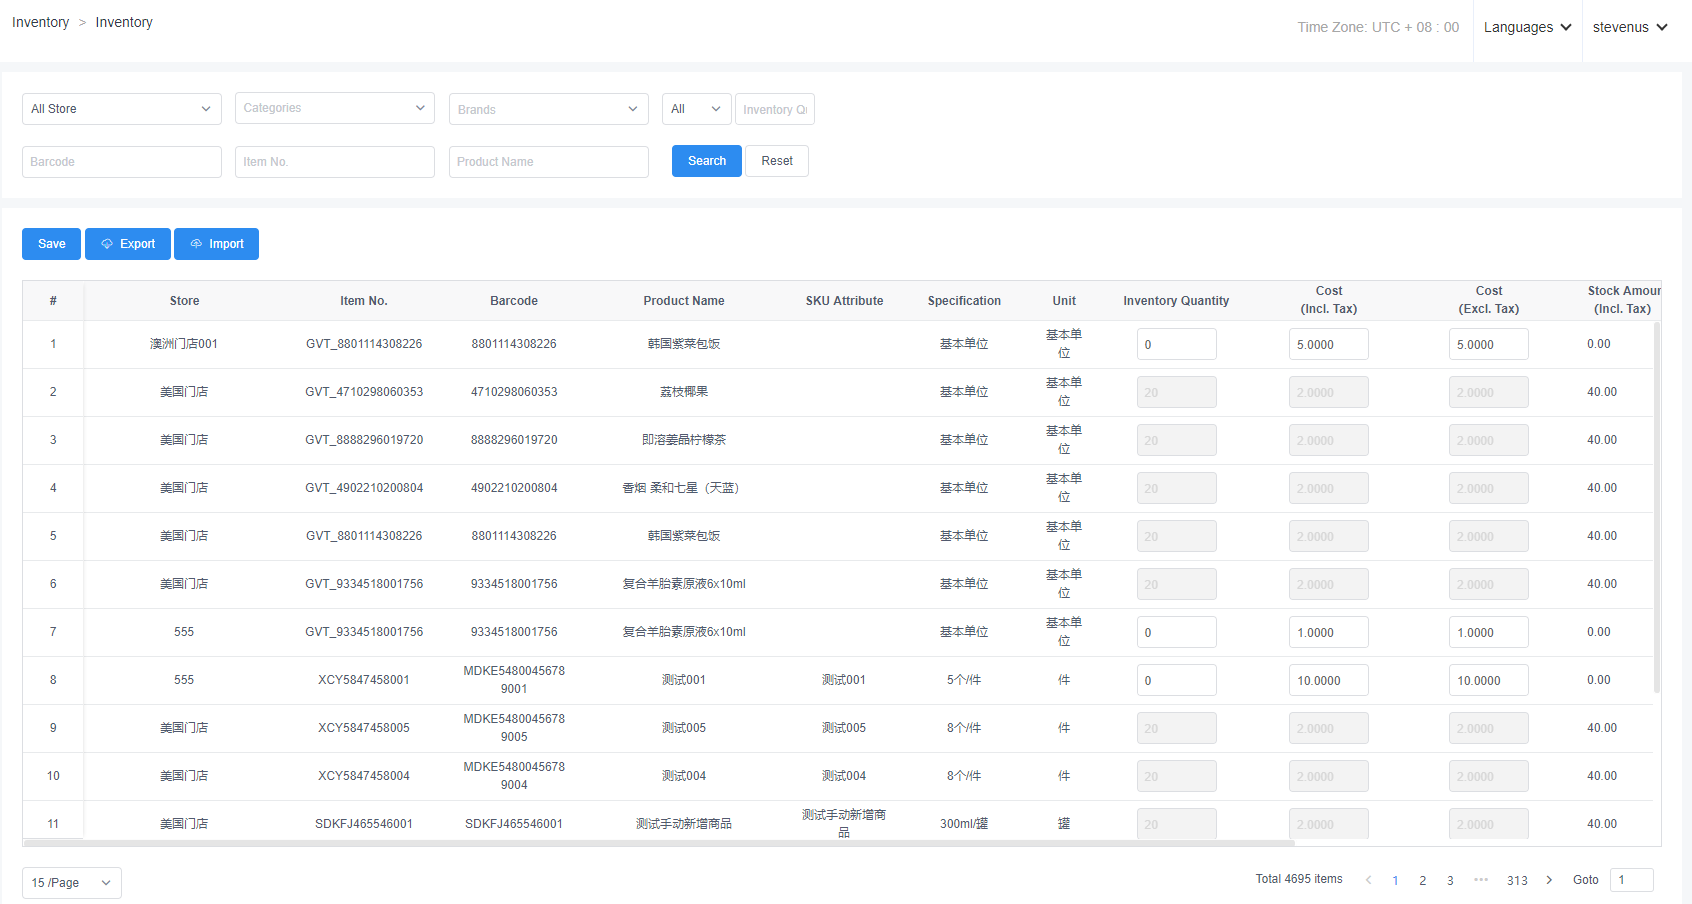
9.3.8 Monthly settlement
The data in the product procurement, sales and inventory report are generated after the monthly settlement. They can be used to count the product summary data of each store stock-in/-out/stock-check/sales in each month and the last inventory quantity of the previous month, specifically including opening inventory, PO stock-in, purchase refund, sales stock-out, sales refund, allocation stock-in, allocation stock-out, wholesale refund, wholesale stock-out, inventory profit, inventory loss, other stock-in, other stock-out, ending inventory, etc.

9.4 Member Reports
9.4.1 Rewards points details
Report statistics; the rewards points detail report shows the information of each store member and the change of rewards points, which can be queried by store name, business type, member No, member mobile No. and member name.
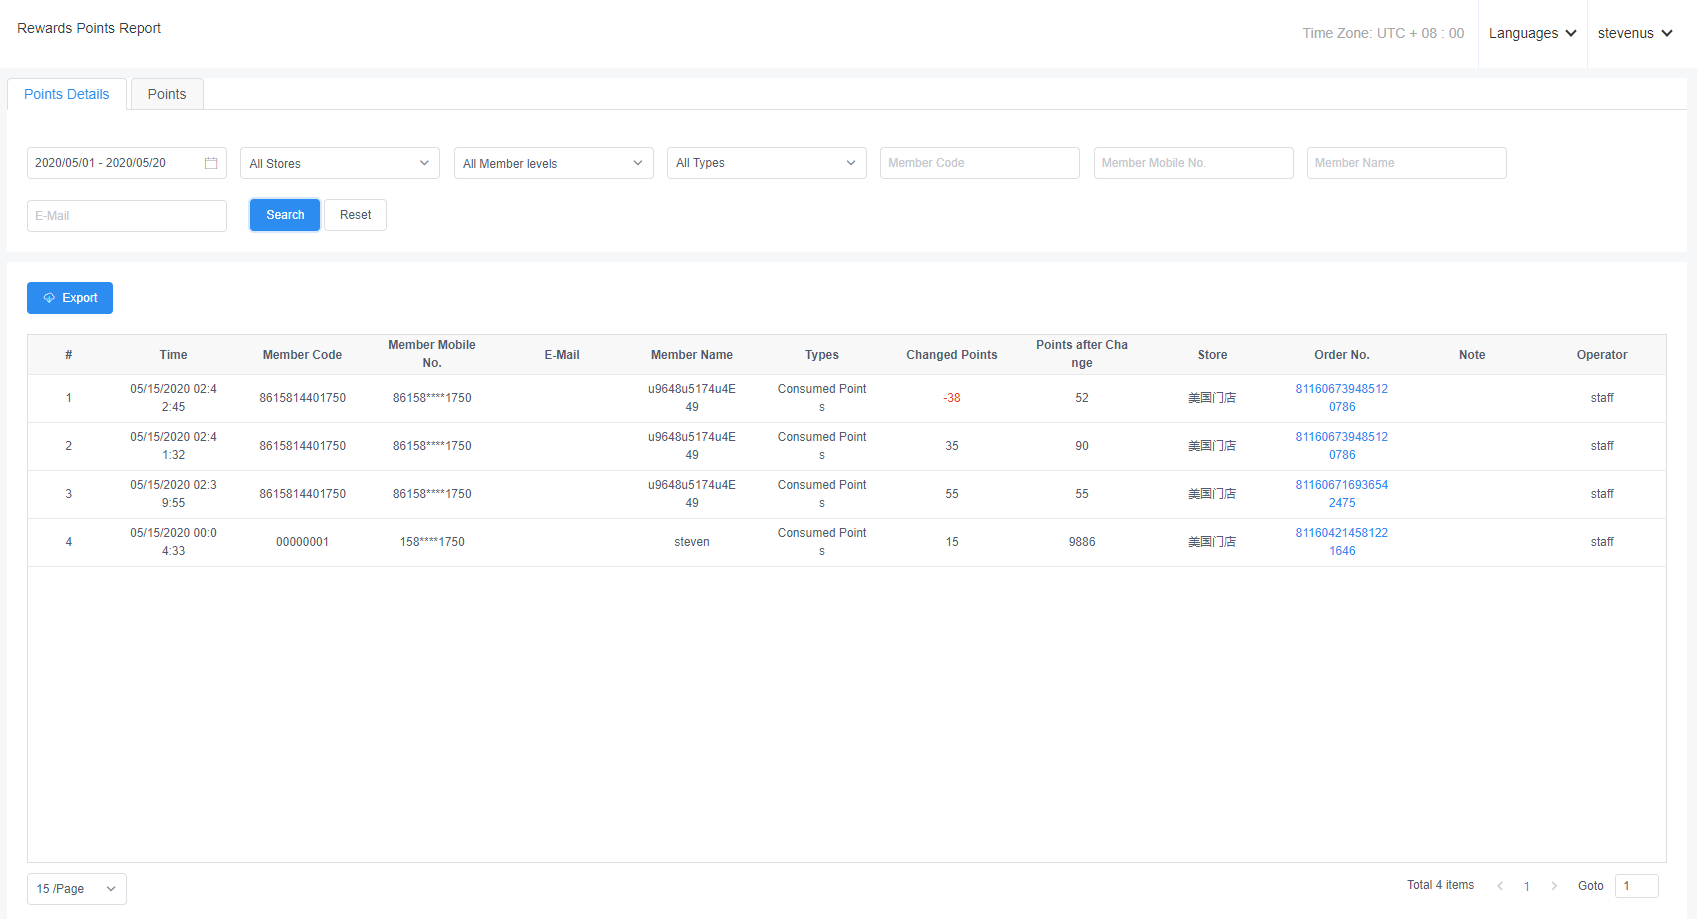
9.4.2 Rewards points summary
Report statistics; the rewards points summary report counts the basic information of all members of each store and the sum of points, which can be queried by time, store name, member No, member mobile No, member name, etc.
9.4.3 Top-up details
Report statistics; the top-up detail report is a record showing changes in the balance of top-up of products, which can be queried by store name, business type, member No, member mobile No, etc.
9.4.4 Top-up summary
Report statistics; the top-up summary report makes statistics on the combination of top-up data of each member and the sum of top-up data of all members in the store,which can be queried by store name, member No, member mobile No, etc.
9.4.5 Product consumption summary
Report statistics; the product consumption summary report makes statistics on the information summary of products consumed by members, which can be queried by store name, product name, product barcode, product No, member name, member No, member mobile No, etc.
9.4.6 Product consumption details
Report statistics; the product consumption detail report makes statistics on the detailed information of products consumed by members, which can be queried by store name, product name, product barcode, product No, member name, member mobile No, etc.

9.4.7 Member purchase summary
Report statistics; Member purchase report counts the number of consumer orders and the amount of products that the client uses the member to settle the products according to the member level function.
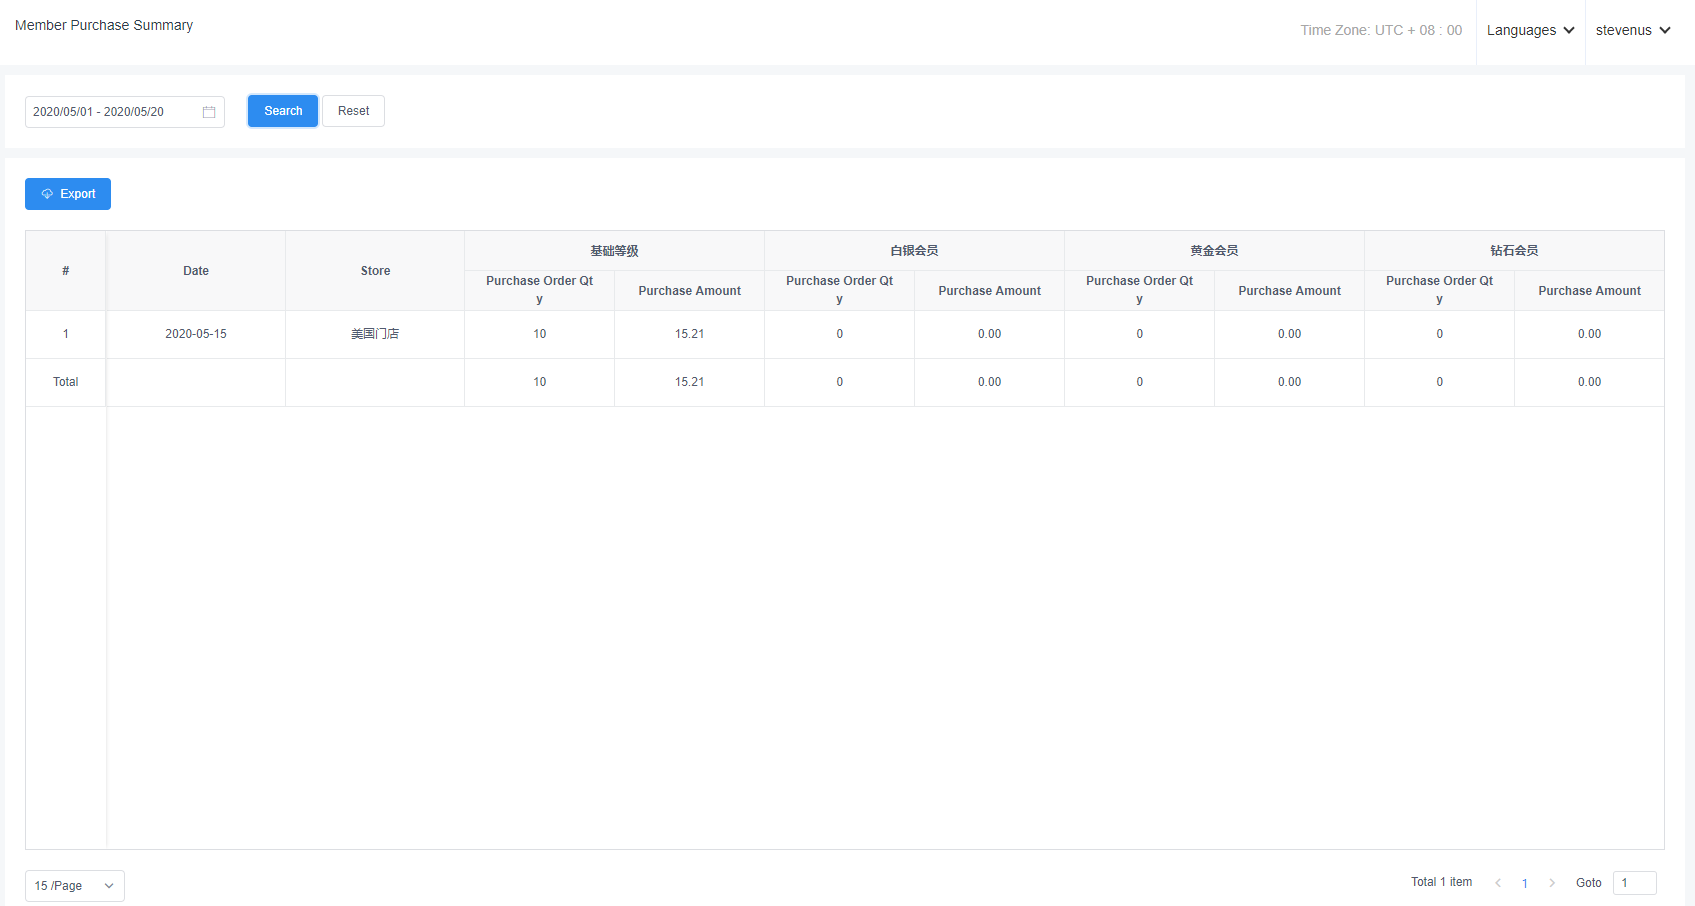
9.4.8 Deposit details
Report statistics; the deposit detail report makes statistics on the detailed information of products deposited by members, which can be queried by store name, business type, product name, product barcode, product No., member name, member mobile No, etc.
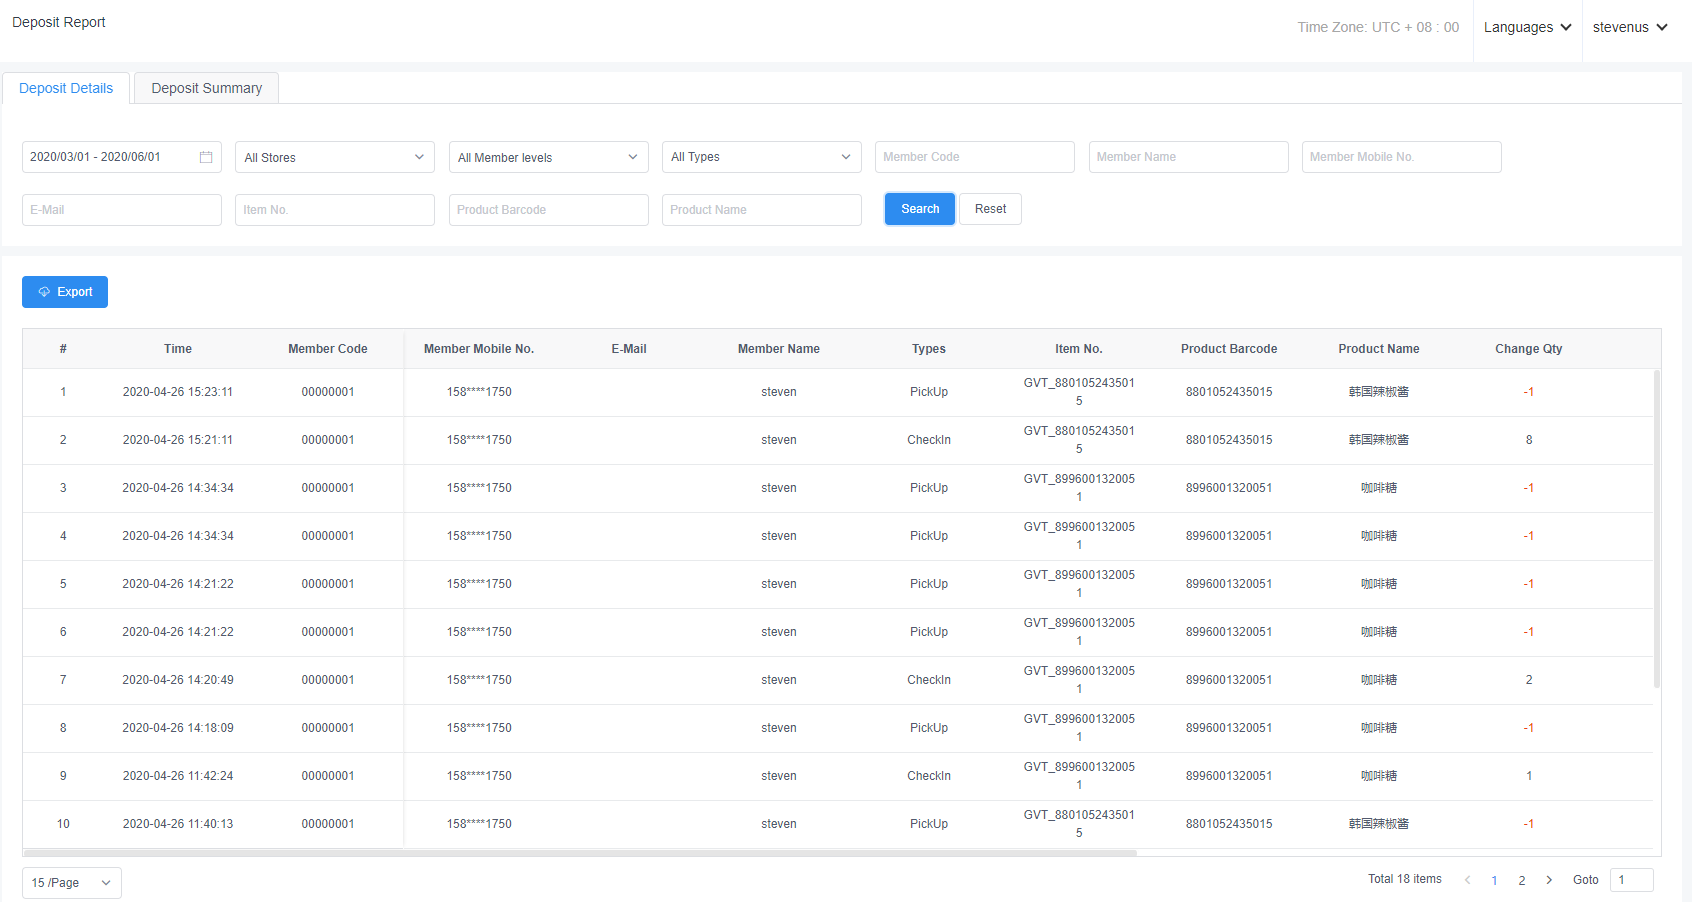
9.4.9 Deposit product summary
Report statistics: the deposit product summary report makes statistics on a summary of information of products by deposited by members, which can be queried by store name and product name.
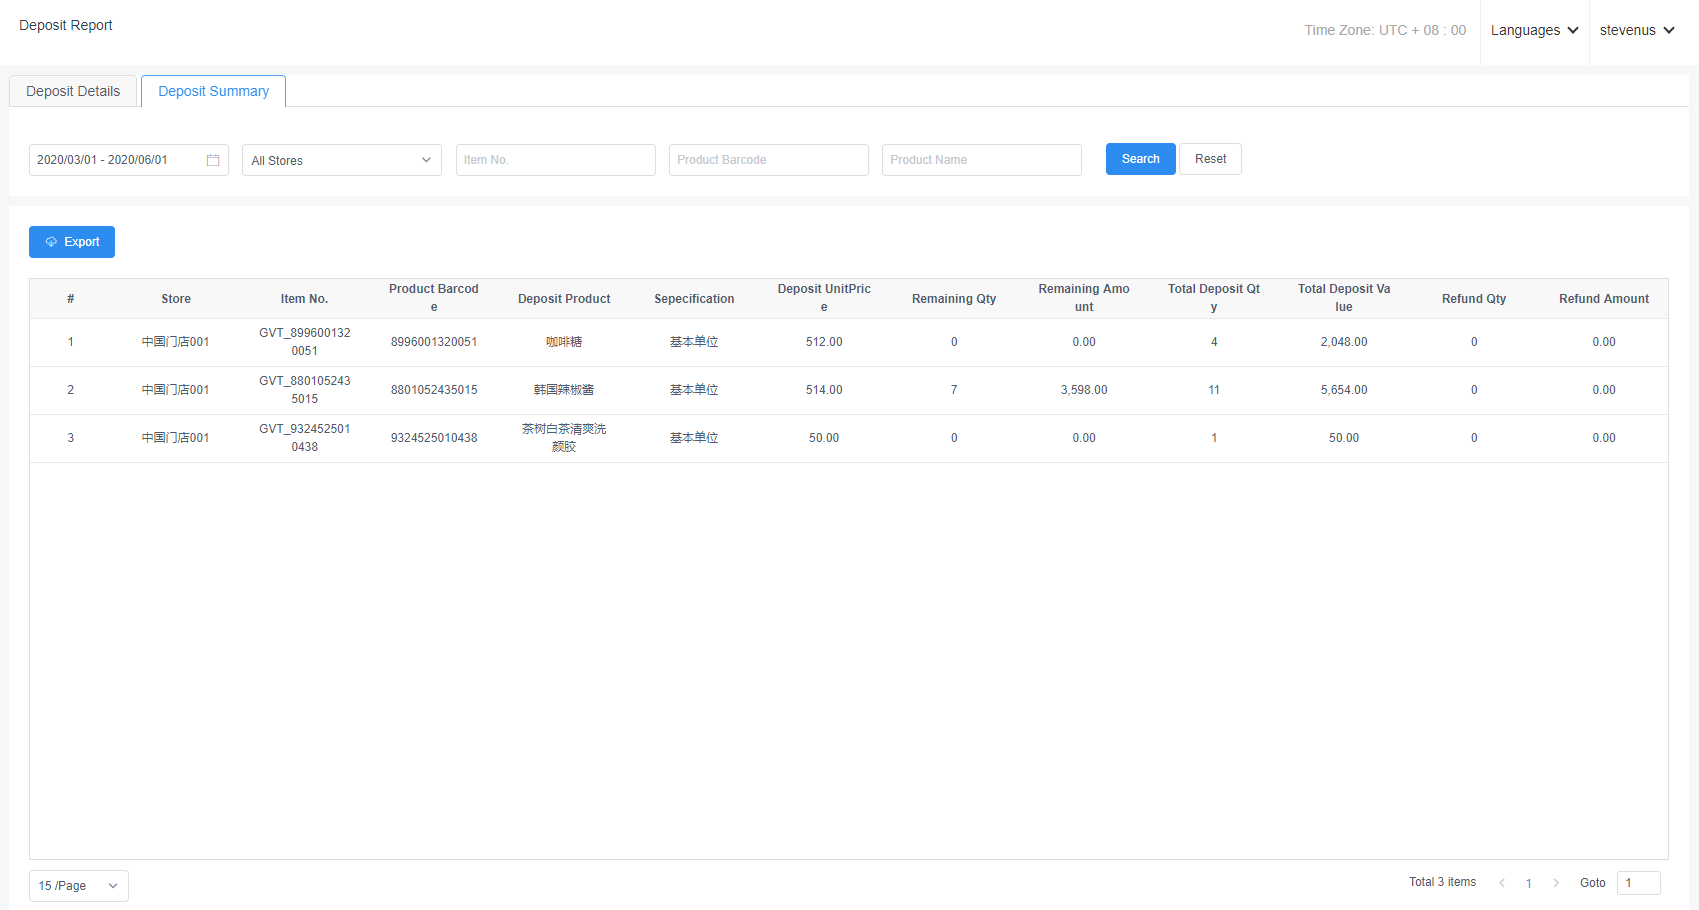
9.4.10 Timecard summary
Report statistics; the timecard summary report makes statistics on a summary of details of timecards used by members, which can be queried by store name and timecard name.

9.4.11 Member purchase summary
Report statistics; Member purchase report counts the number of consumer orders and the amount of products that the client uses the member to settle the products according to the member level function.
9.5 Staff Reports
9.5.1 Staff selling report
The employee selling report can count the details of all products sold by the employee, such as product name, sales quantity, total sales volume and other details, which can be filtered by information such as store and employee name.
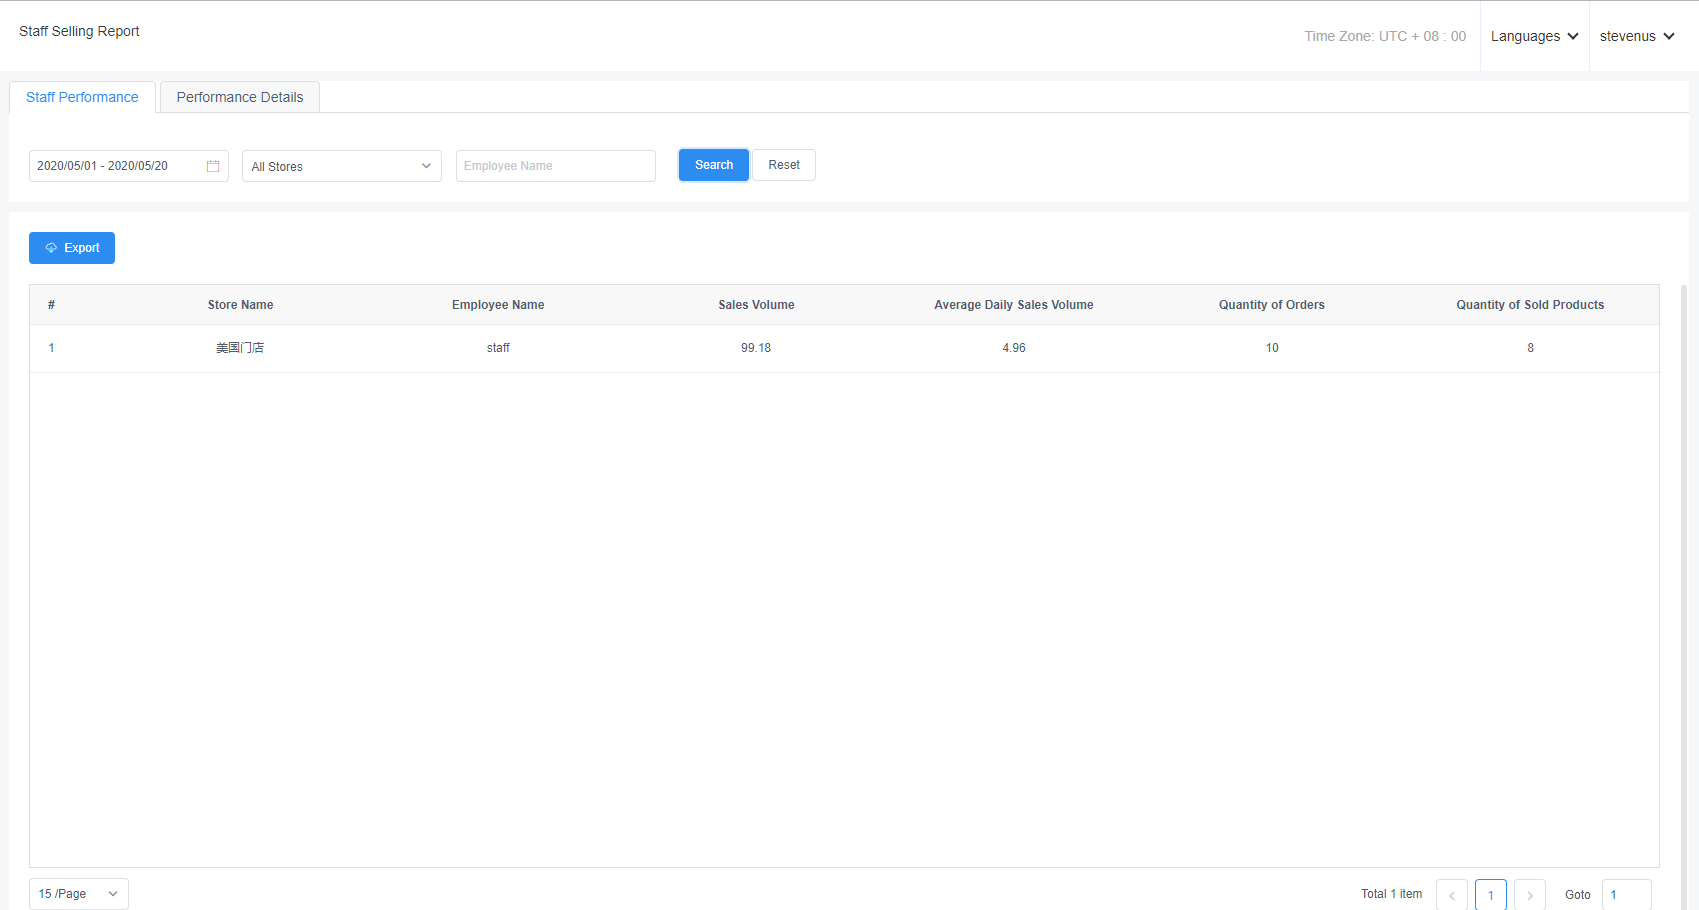
9.5.2 Staff selling details
The employee selling detail report can count the total sales volume, average daily sales volume, number of orders sold, number of products sold, etc.
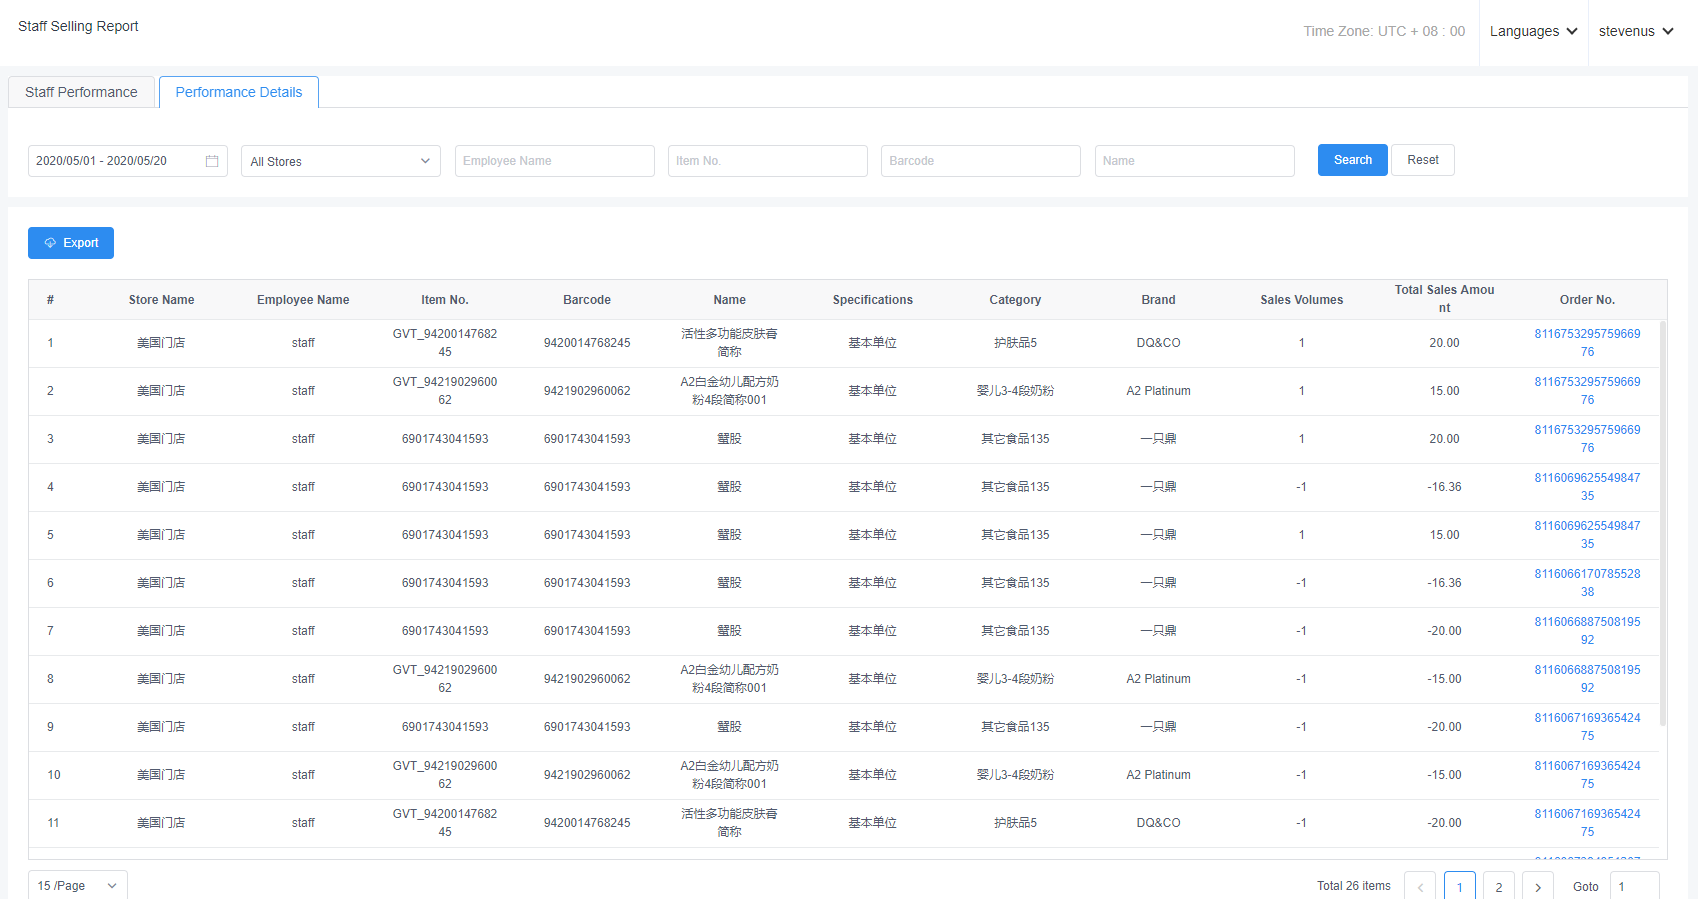
9.5.3 Sales commission report
The sales commission report can count the employee's sale commission containing product commission, including the number of orders,sales amount,commission method and commission amount ("sales amount" and "commission amount" add up to the total query result)
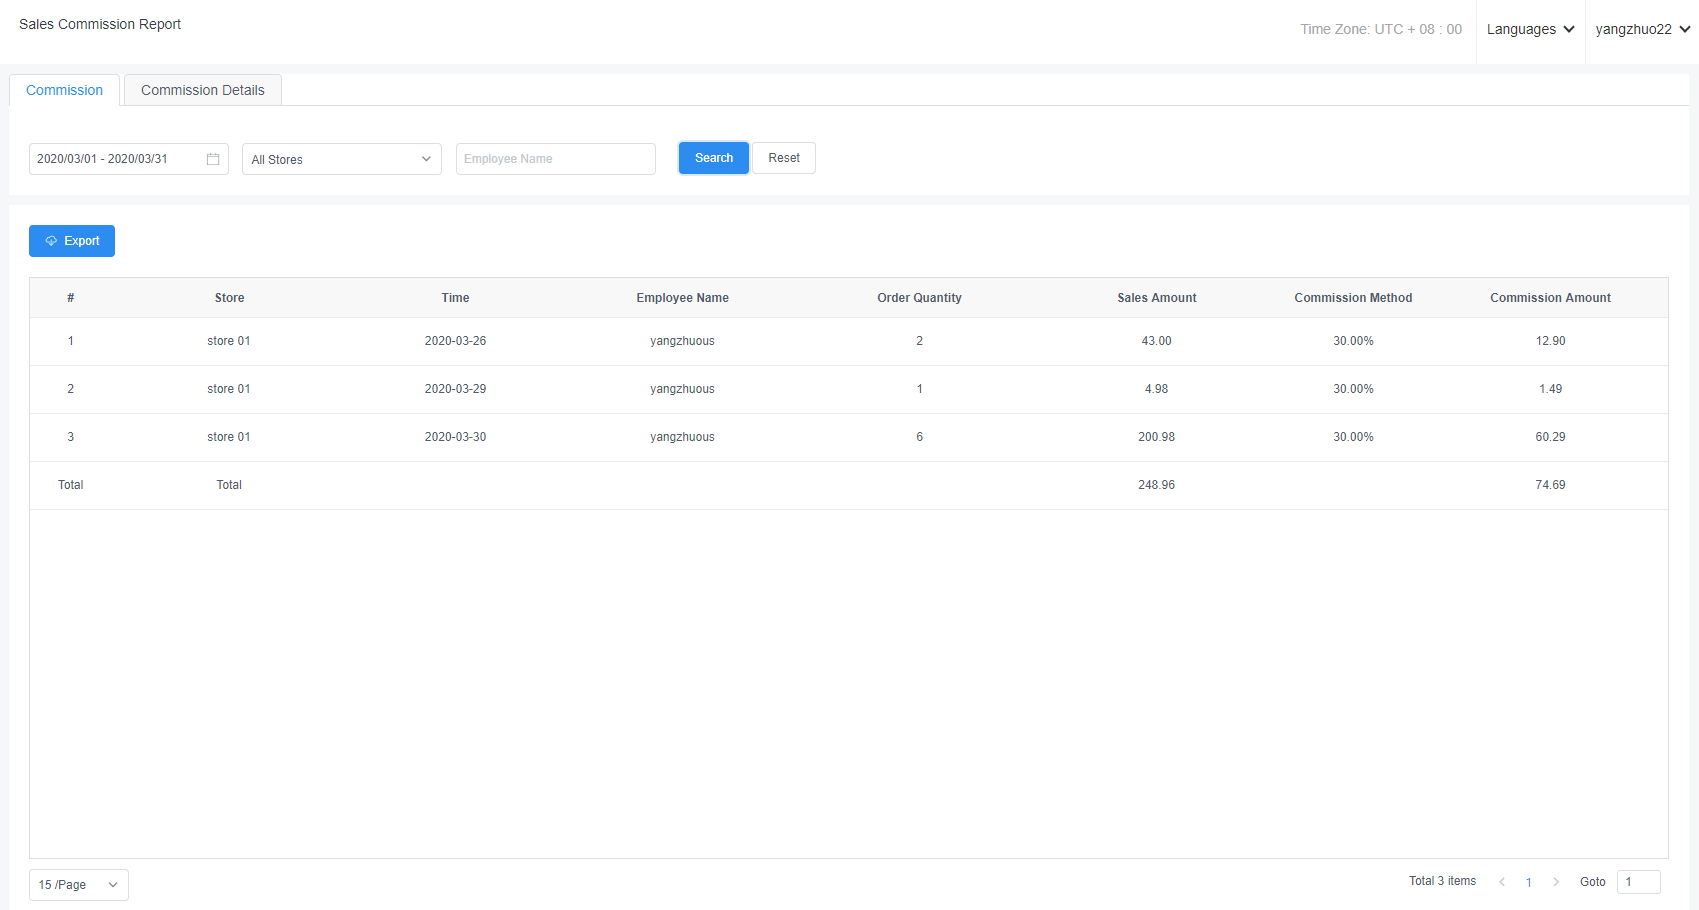
9.5.4 Sales commission details
The Detail Report of Employee Commission can be used to summary each order with commission item,including the sales time, sales volume,sales amount,commission mode, commission amount,etc. When refunding the products,the "Sales Volume","Sales Amount" and "Commission Amount" are displayed as negative.
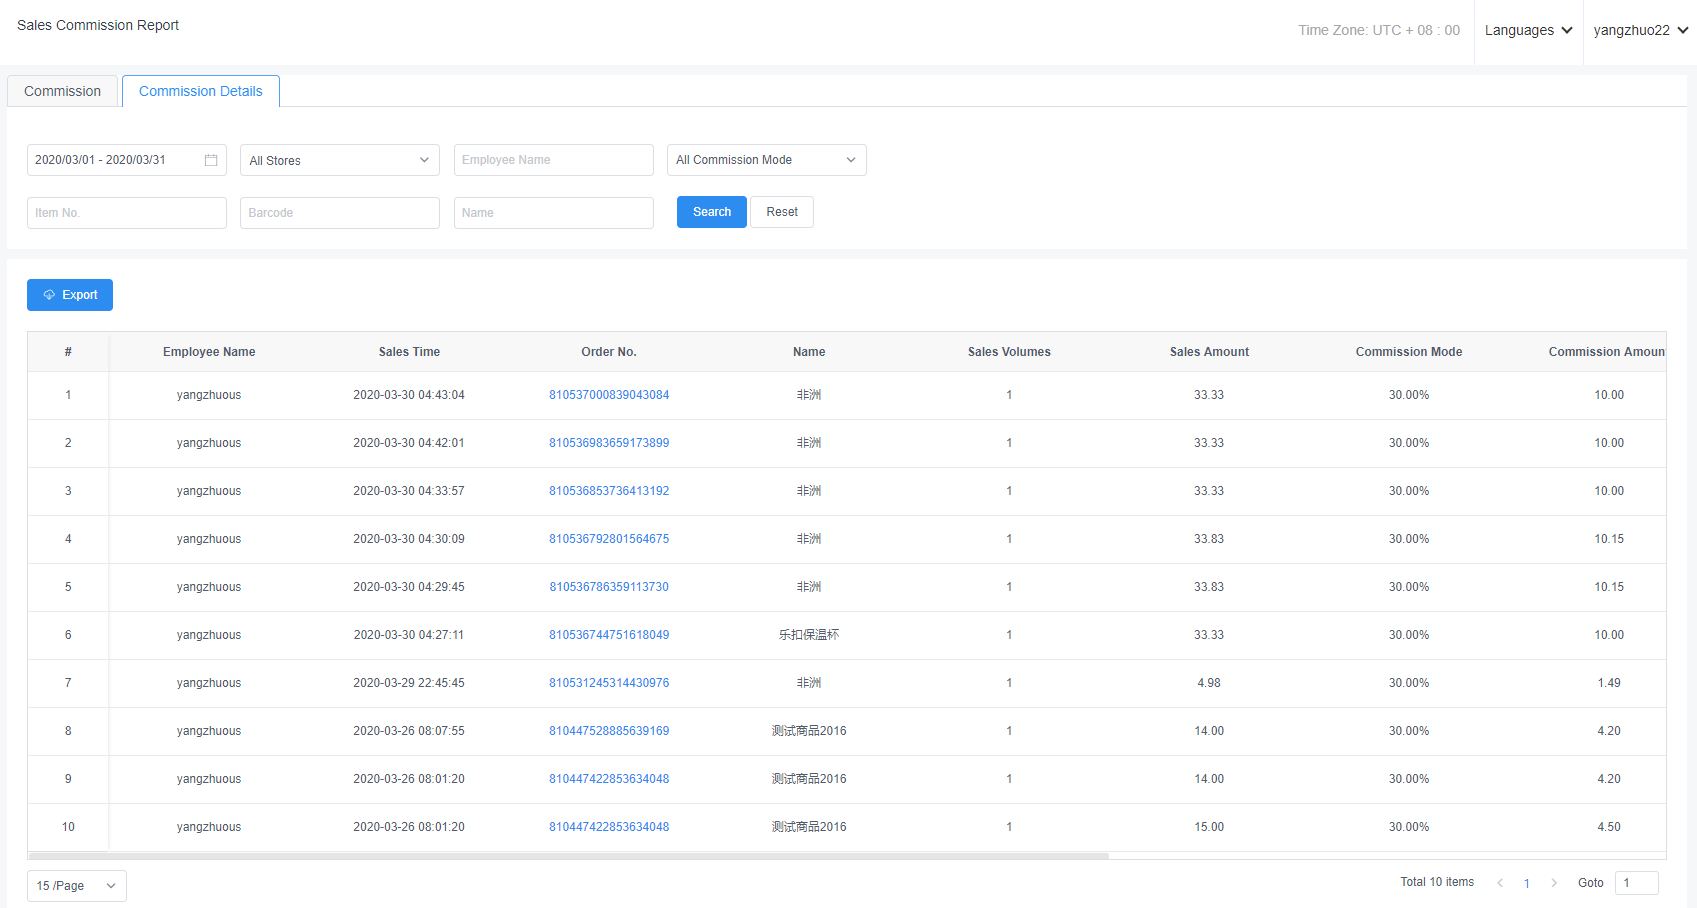
9.5.5 Staff Punch Record
Attendance report is used to make statistics on the attendance data of cashiers. Attendance data is recorded in cashiers mode. All POS client login / logout records, one for each group. For example, after 8:00 login, power failure occurs at 8:50 and the system is shut down abnormally, then the login record at 8:00 has no corresponding login time, that is, only the working time has no off time, and the working time is not calculated item.
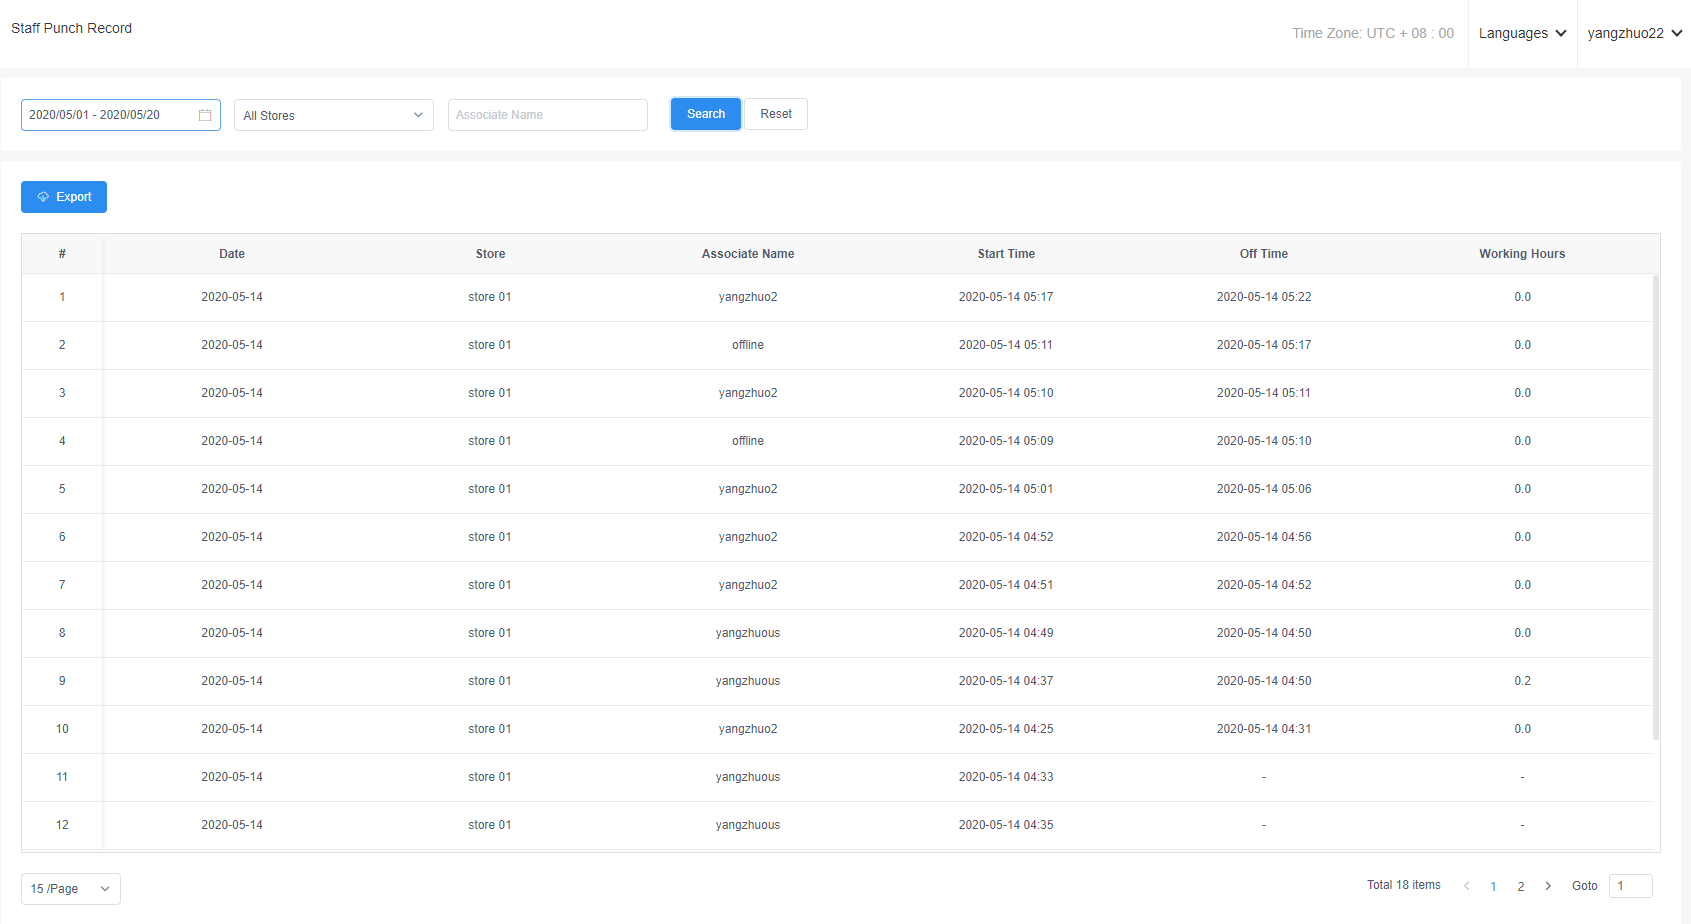
9.6 Other Reports
9.6.1 Price adjustment report
The price adjustment report mainly queries the historical price adjustment records of products, and displays all confirmed price adjustment order data, including the basic sales price, store price, wholesale price and dropshipping price.
Basic sales price;

Store price;
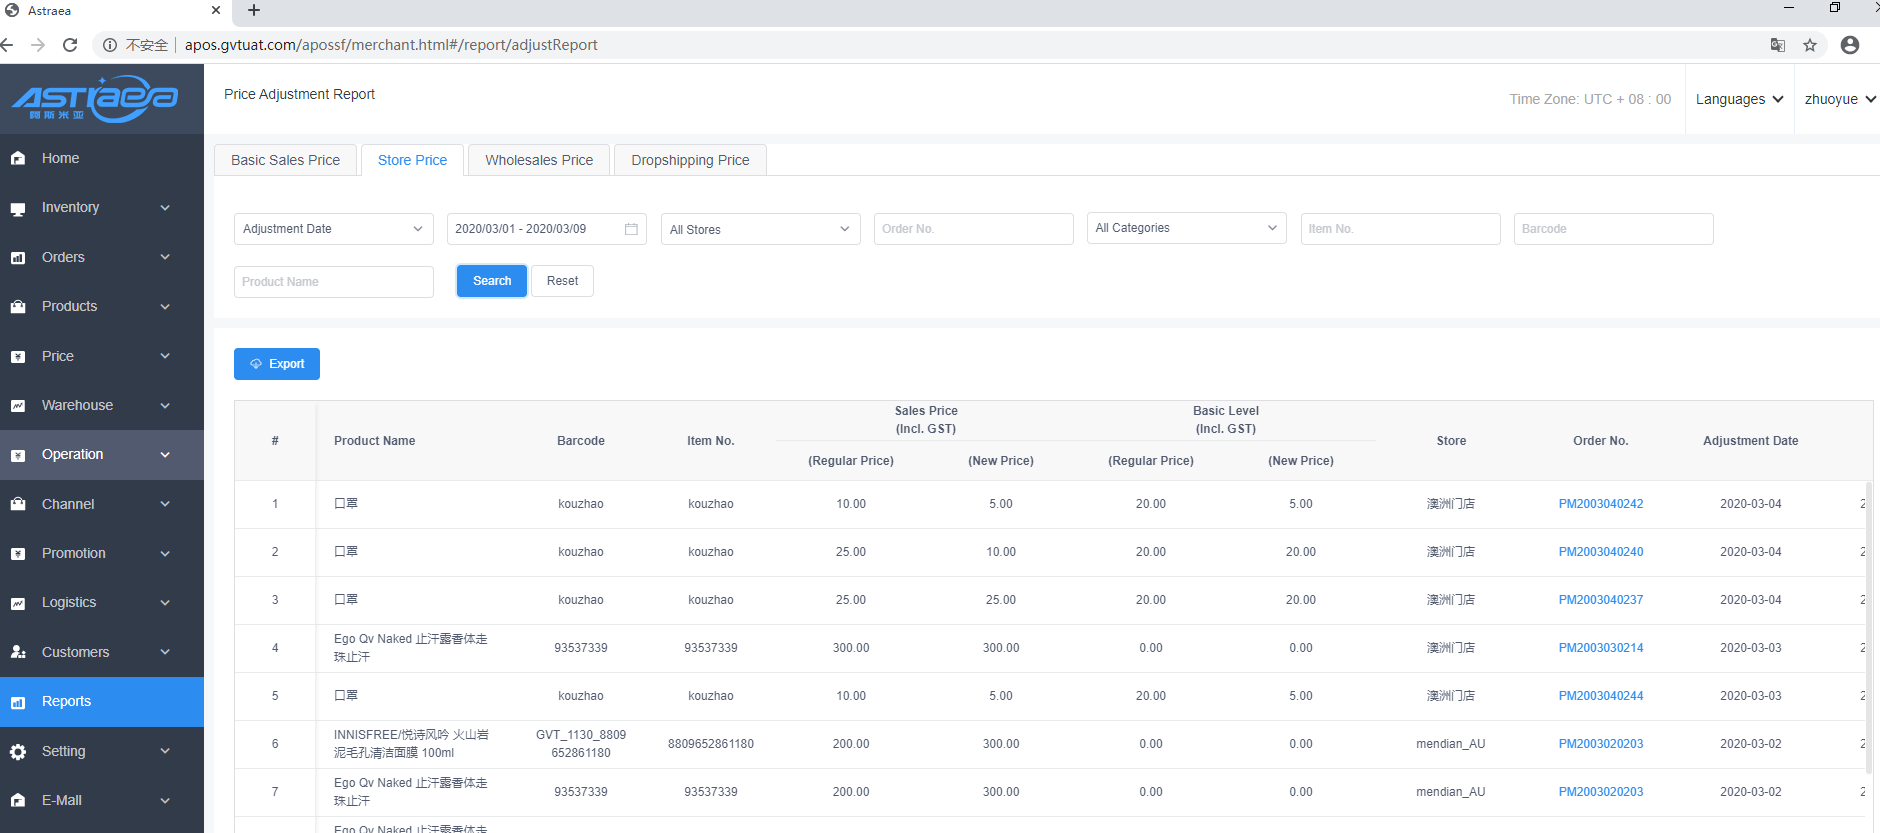
Wholesale price;

Dropshipping price;

X. Logistics
10.1 Logistics company
10.1.1 Manage logistics group
Step 1: Log in “Logistics -> Logistics Company” page, click the "Manage logistics group" option to enter the interface.
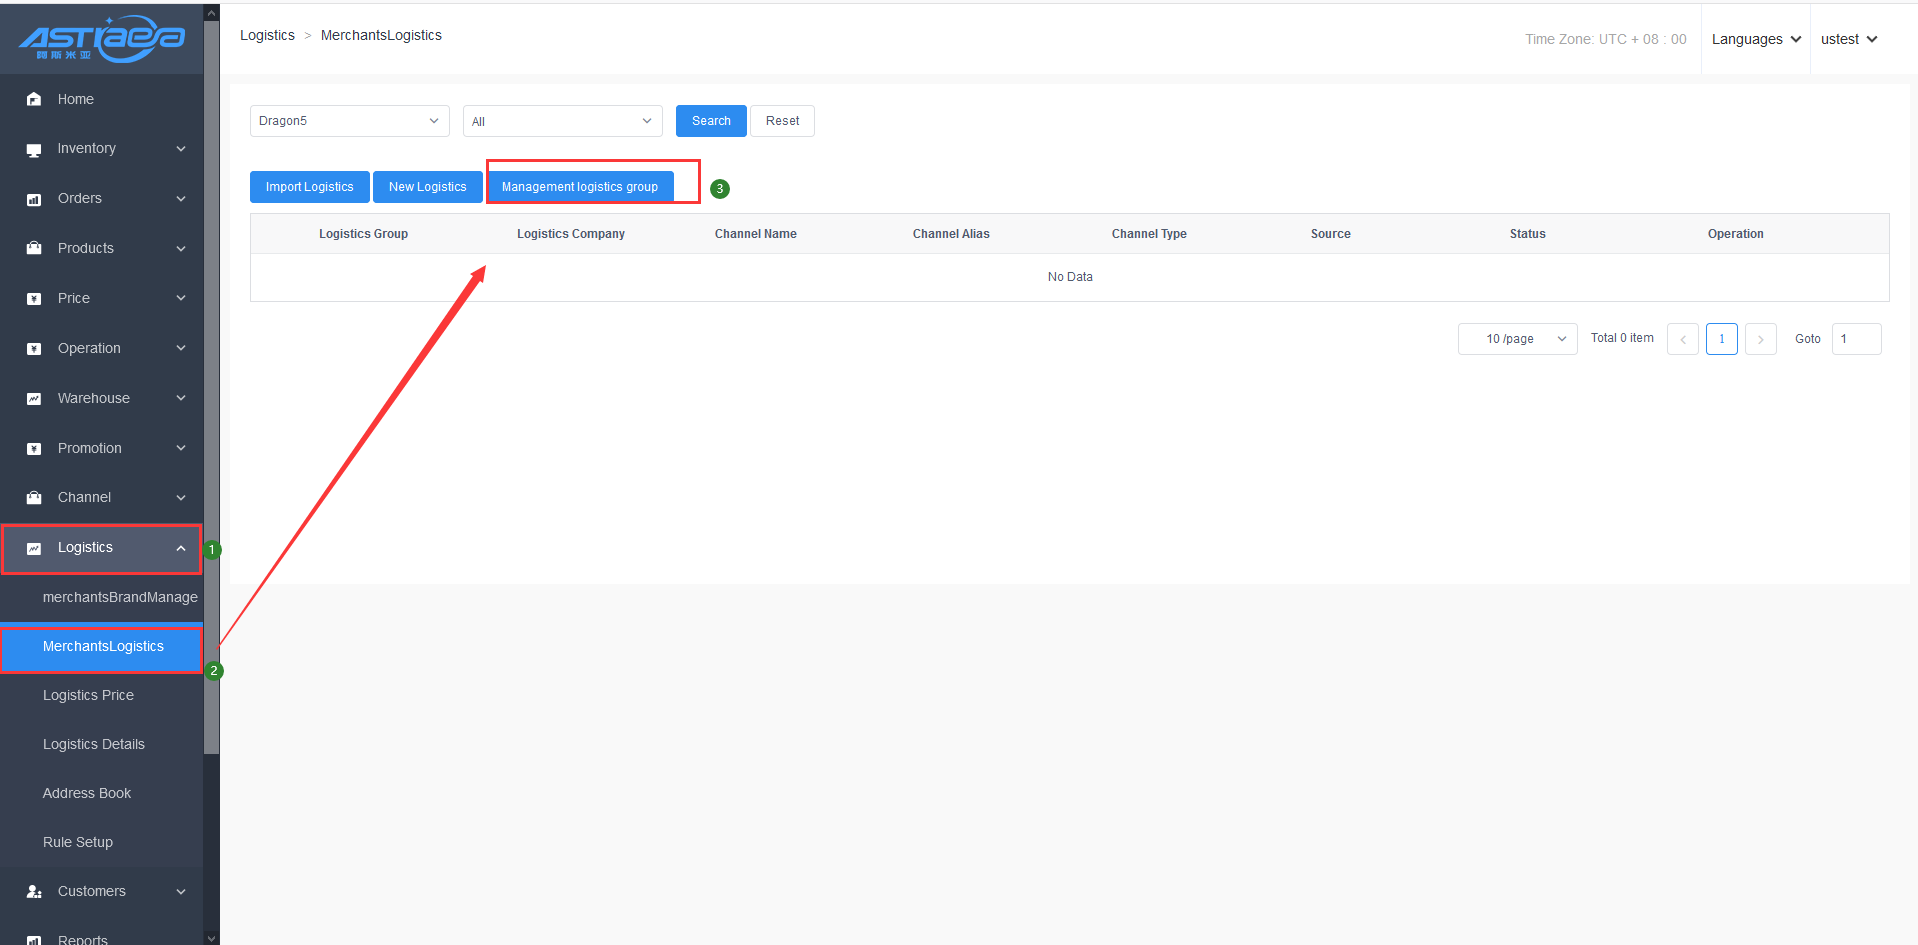
Step 2; Click the “New Logistics Group”option to create a new logistics group.
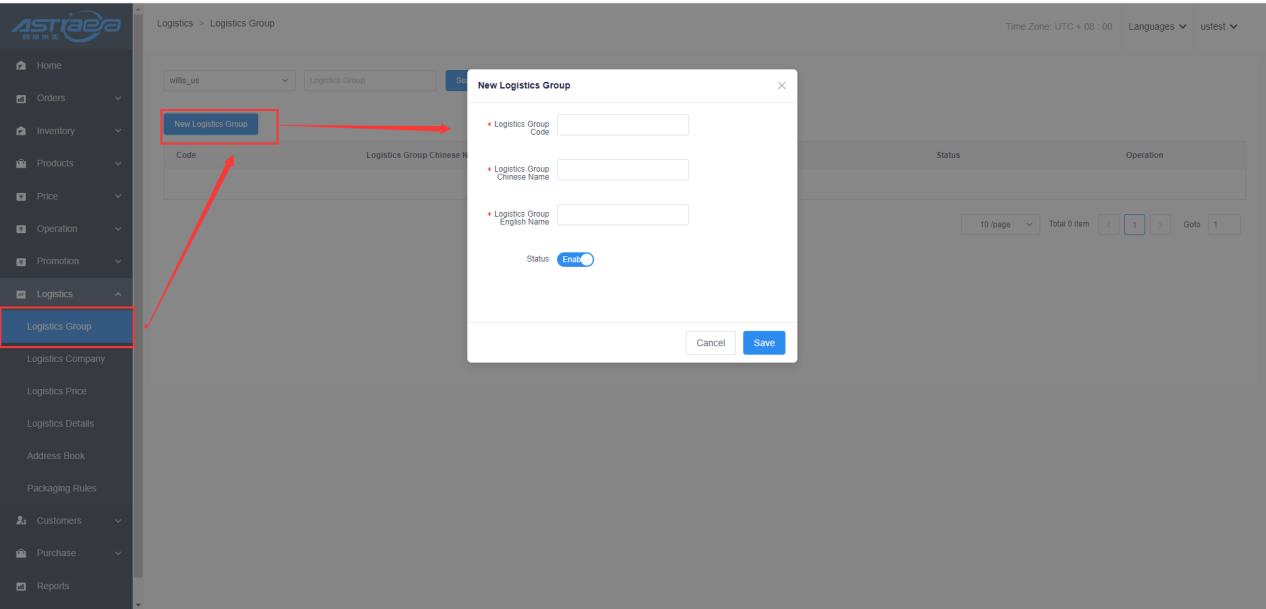
10.1.2 New logistics
Step 1; Log in “Logistics-Logistics Company” page, click the “New Logistics” option to enter the interface.

Step 2; Enter the relevant data and click “Save” option to add new logistics. Logistics group can also be added on this interface.
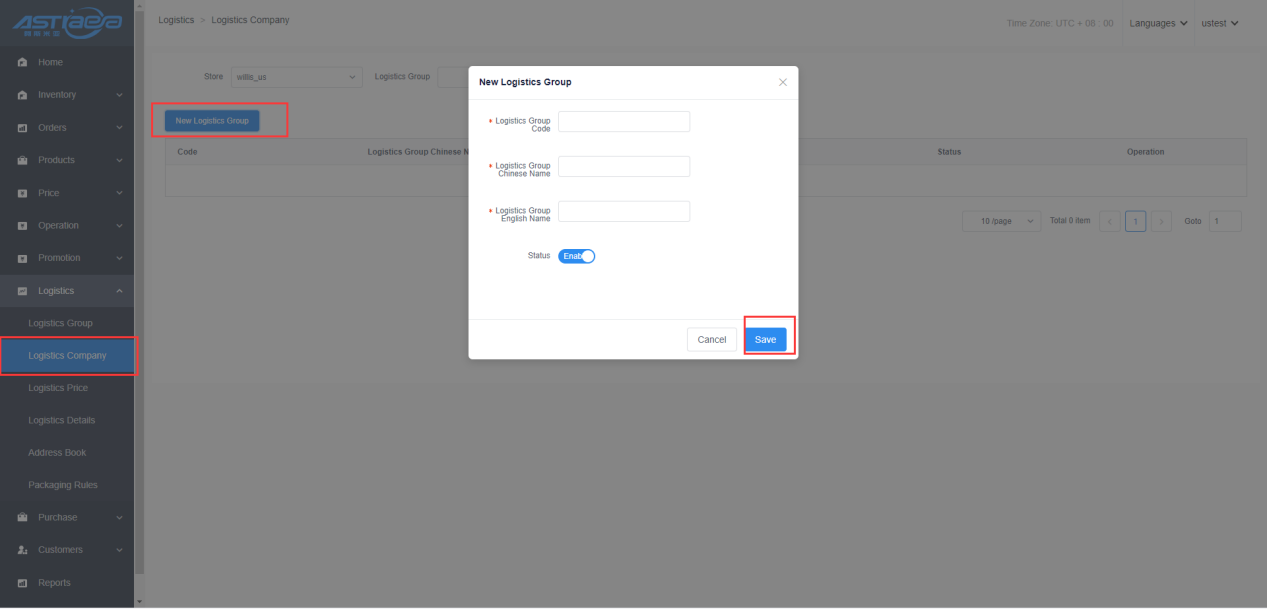
10.1.3 Add channel
Step 1; Log in the “Logistics Company” interface, and click "Add Channel" on the logistics company to which you want to add new logistics channels.
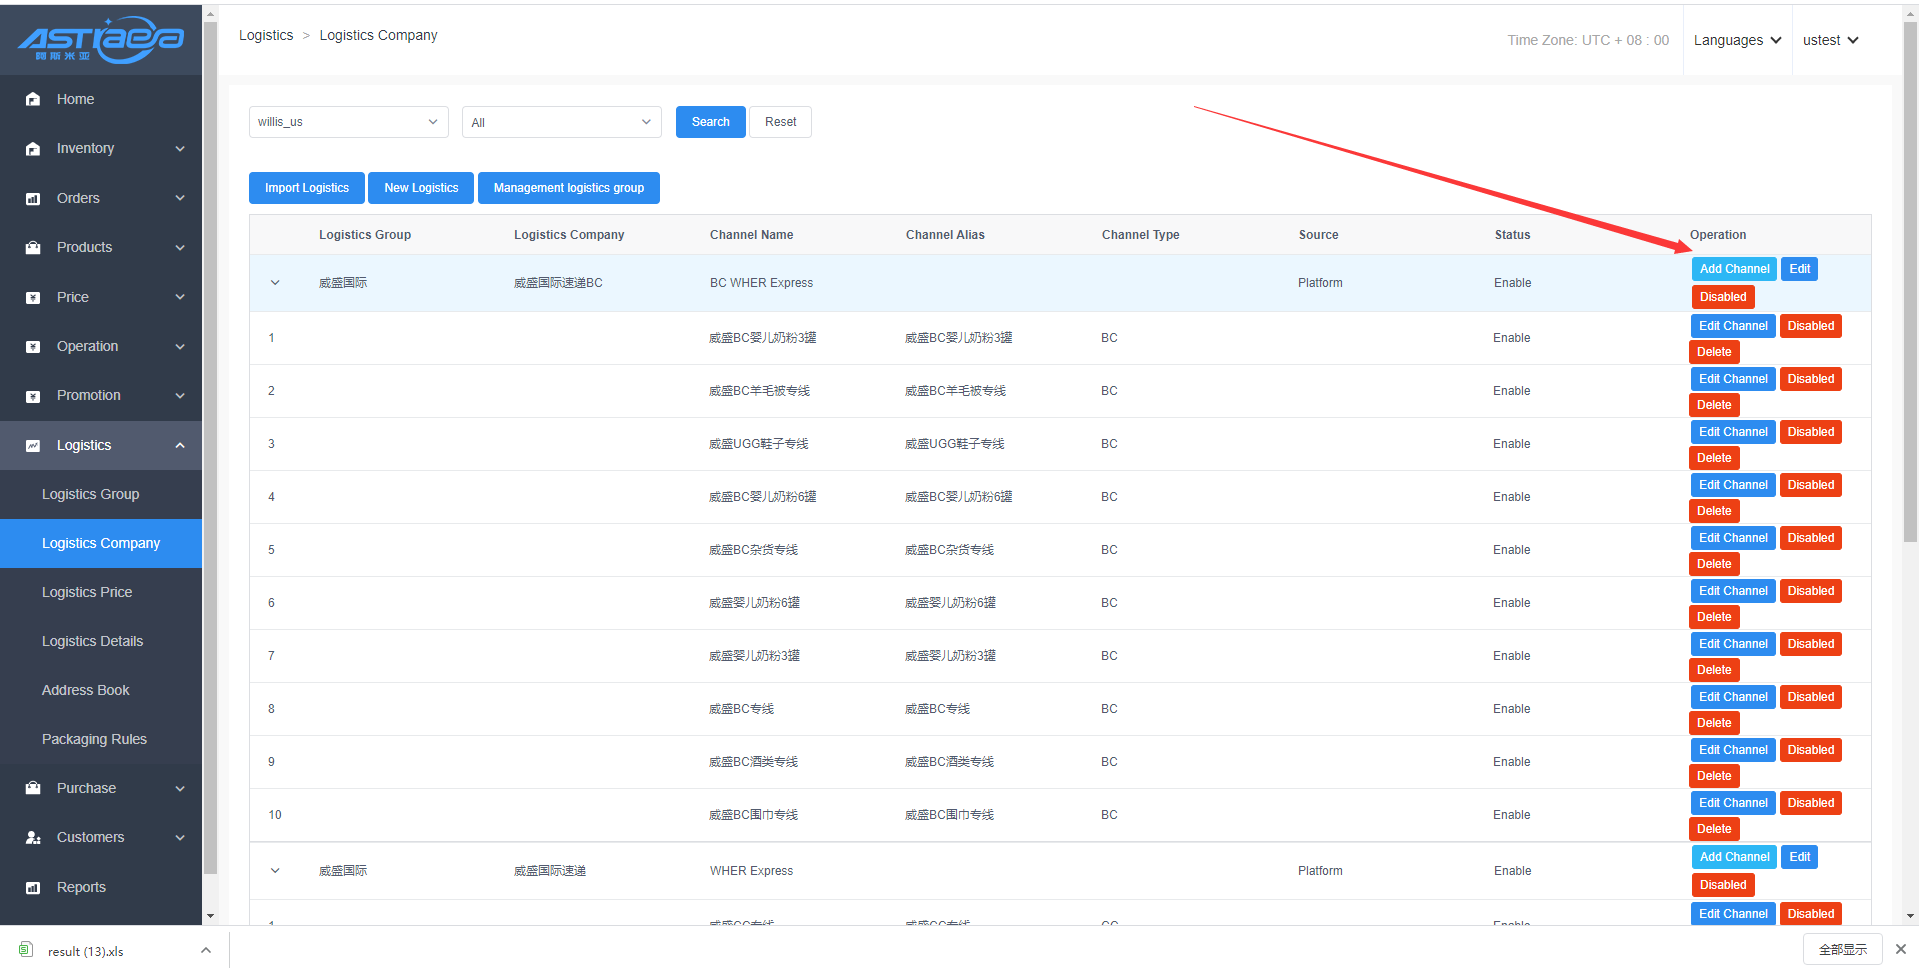
Step 2: Enter the relevant data and click “Save” option to finish all operation steps.
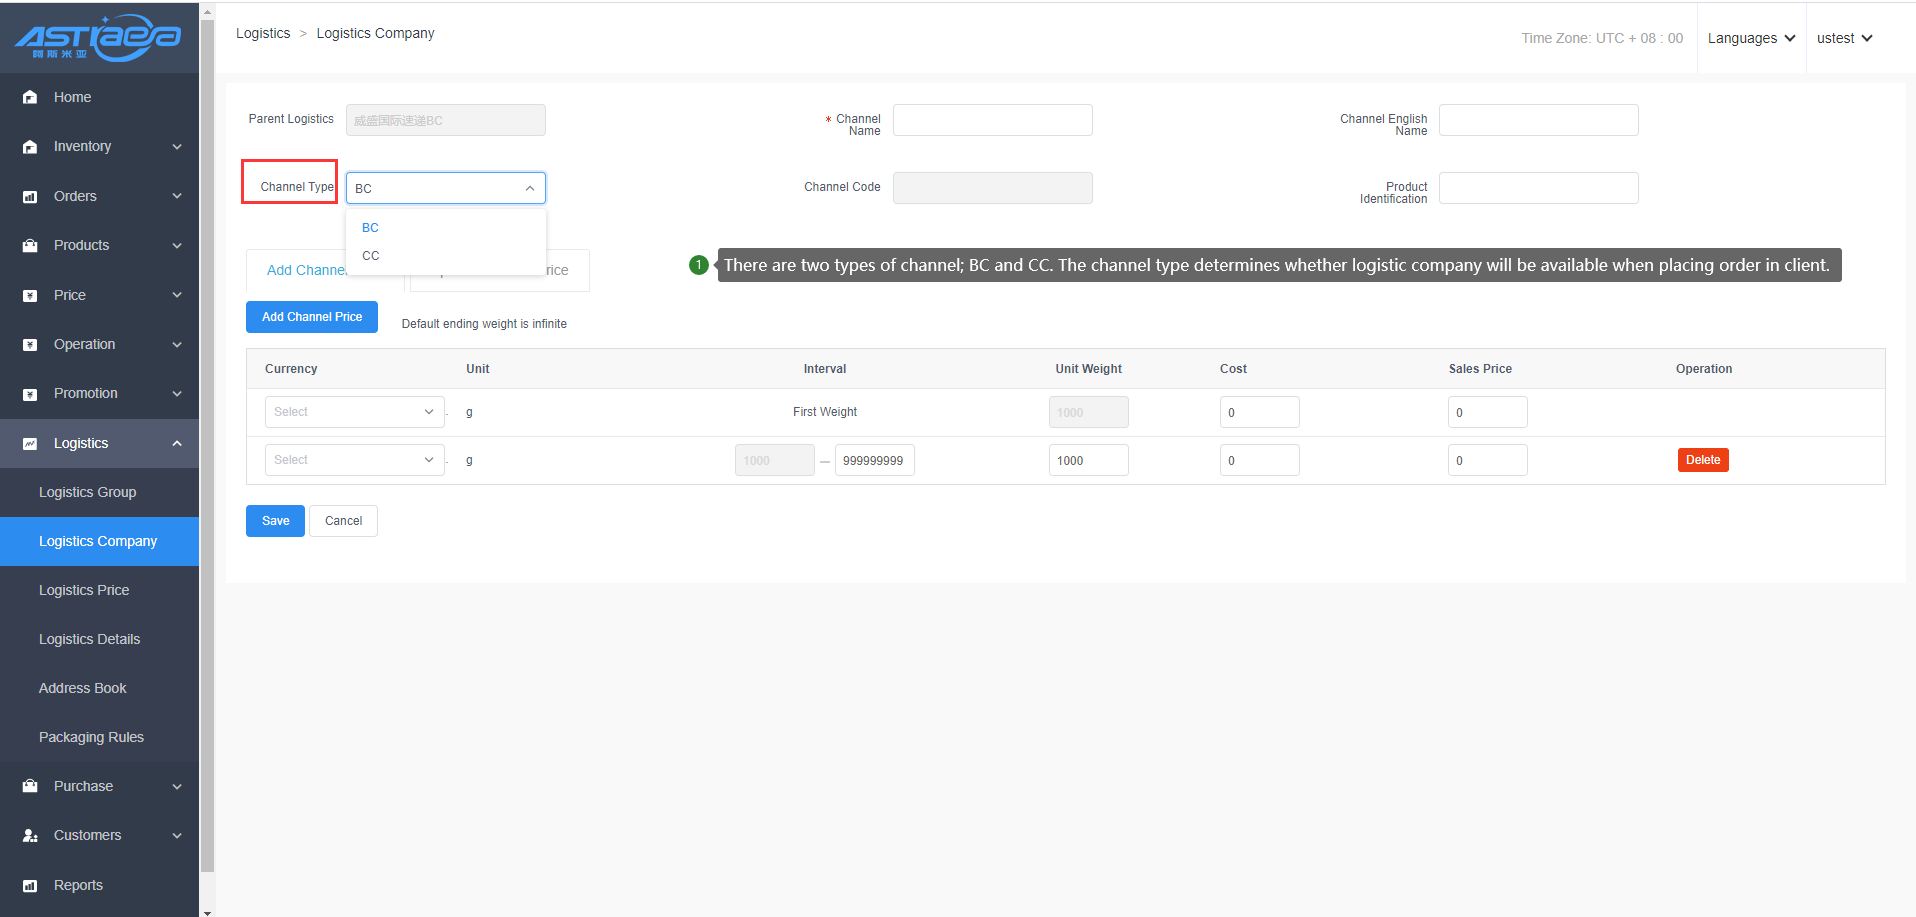
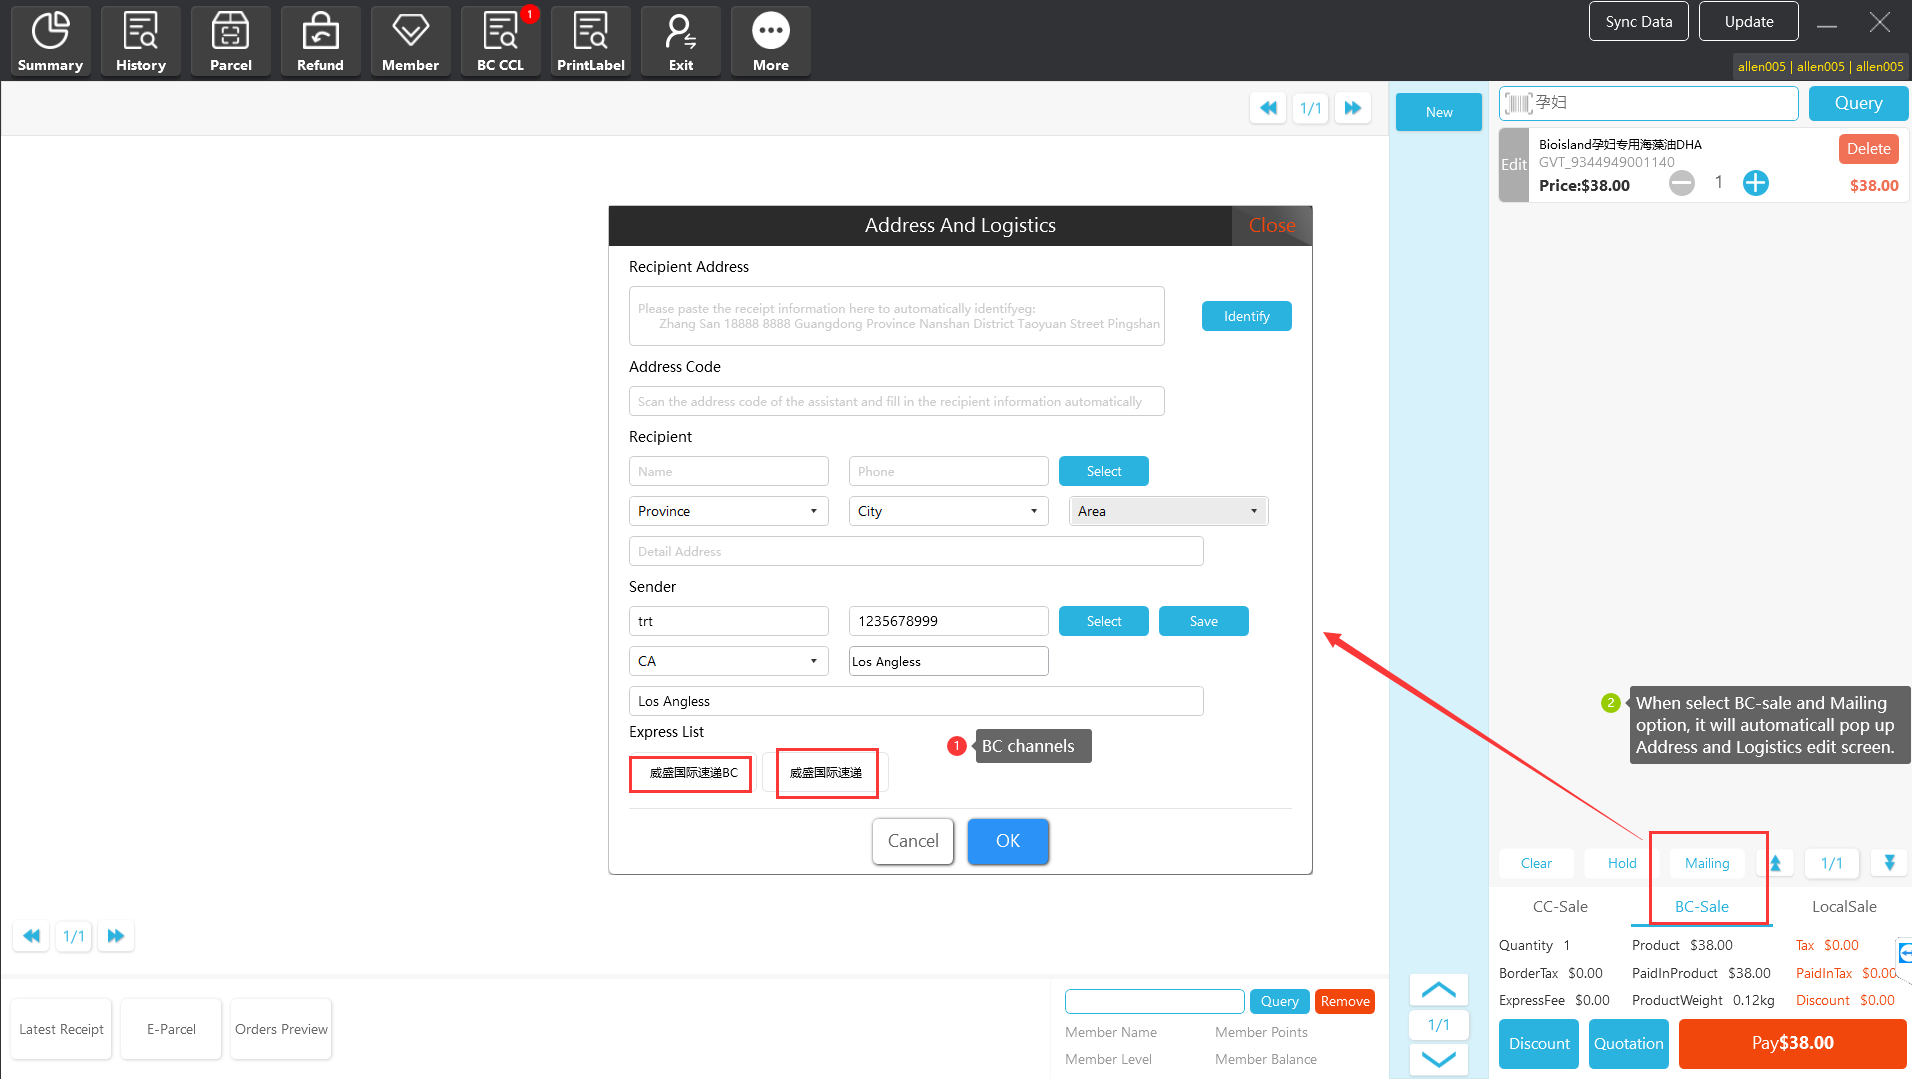
10.1.4 Import platform logistics
Note: Platform logistics refers to the logistics data created by the logistics system
Step 1; Log in “Logistics -> Logistics Company” page, click the "Import Logistics" option to enter the interface.
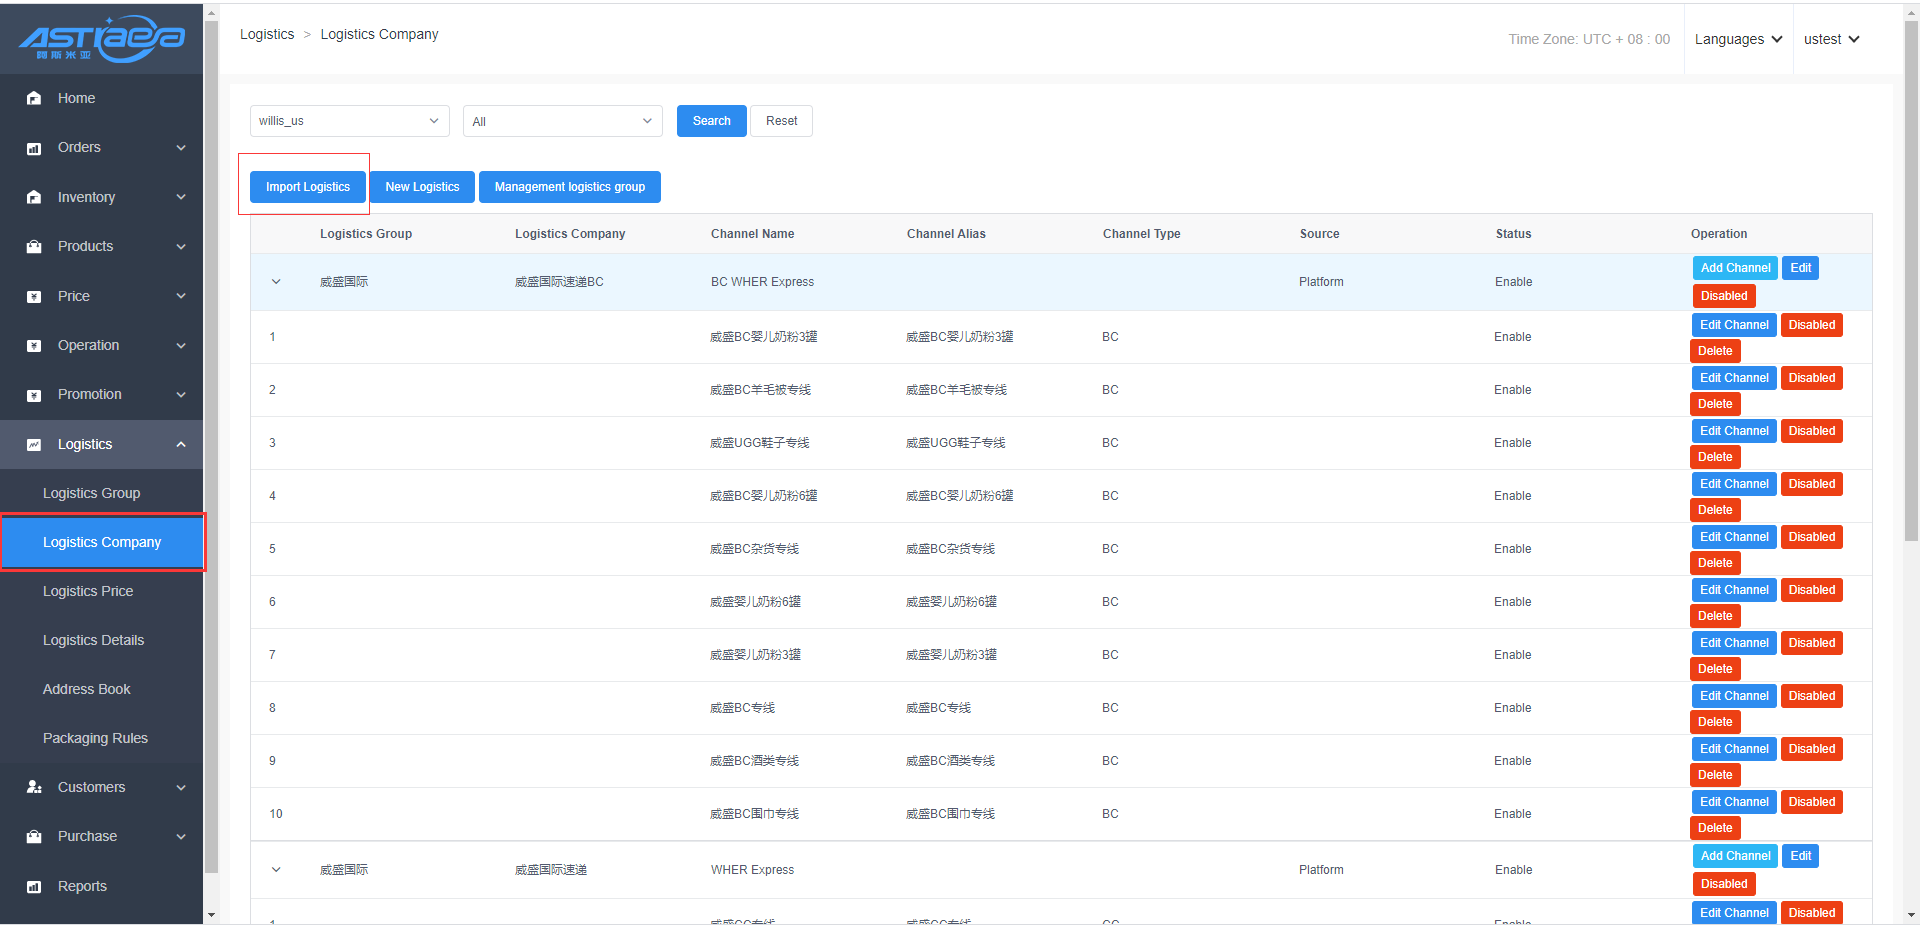
Step 2: After ticking the logistics group to be imported, tick the logistics companies. By default, all the logistics company channels will be ticked. Click "Save" option to finish all operation steps successfully.
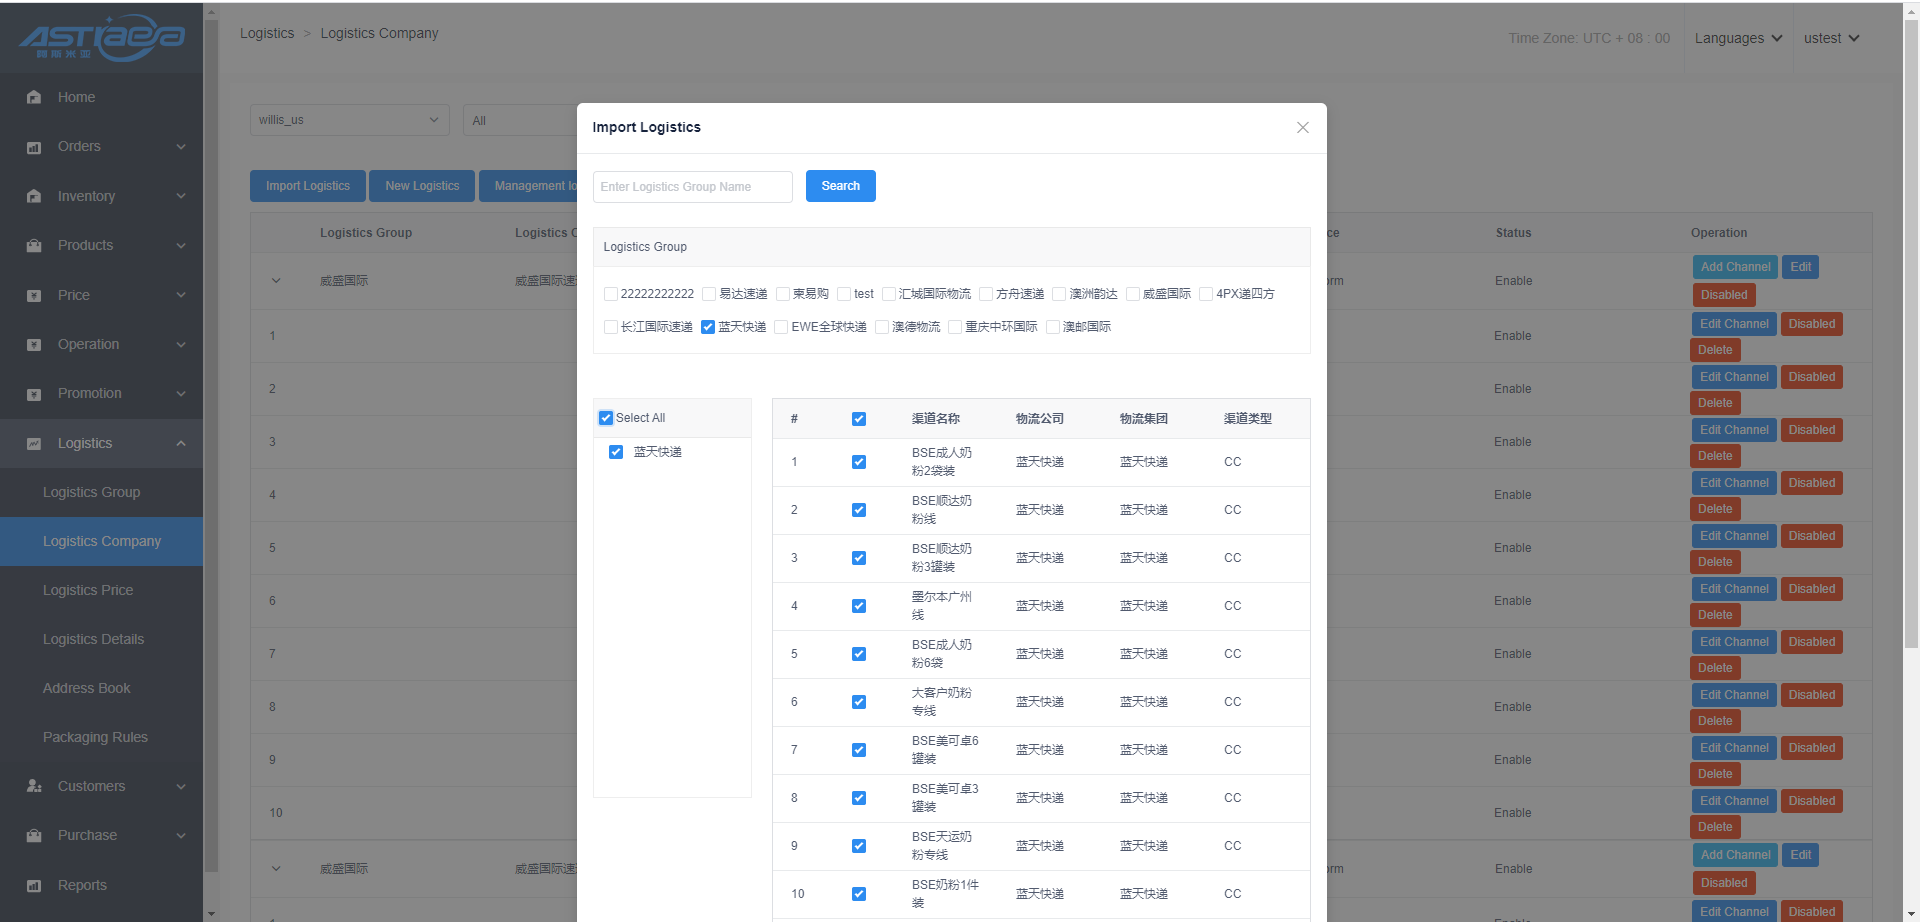
10.2 Logistics price
10.2.1 Set price
Step 1: Log in “Logistics -> Logistics Price” page, click the "Price Setup" option after the channel where the logistics price is set.
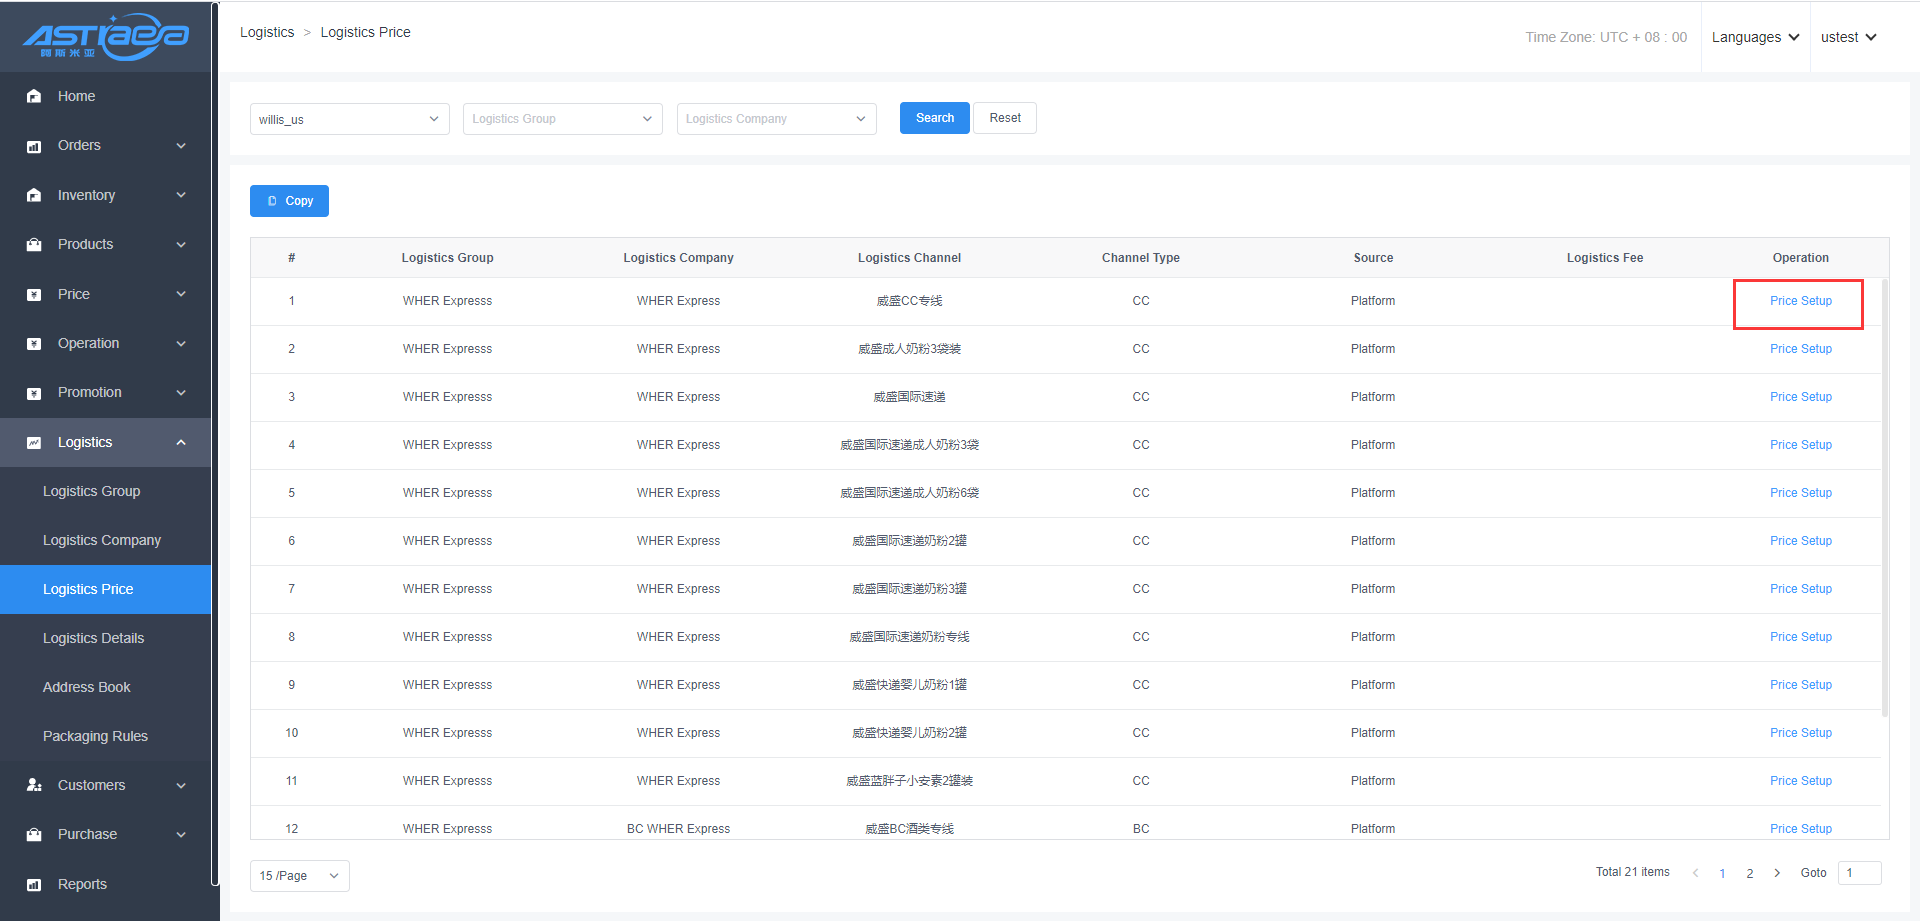
Step 2: Enter the cost and sales price and click "Save" option to finish all operation steps successfully.
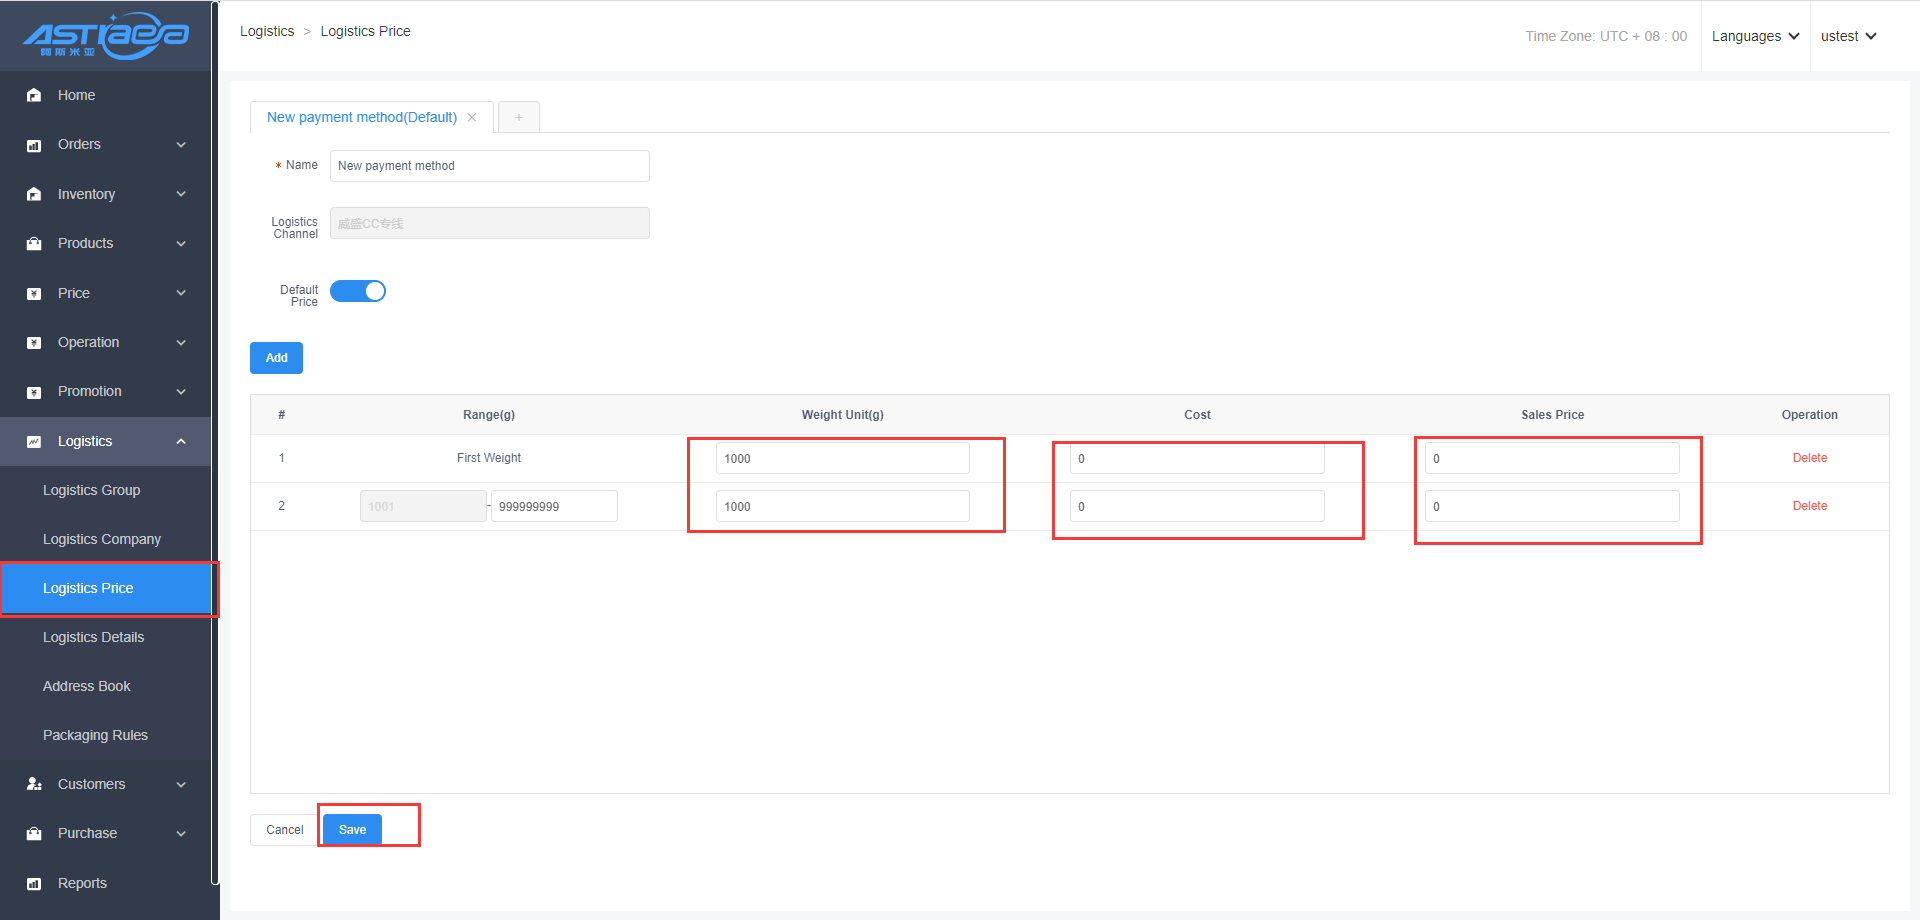
Step 3: Add a new payment method.
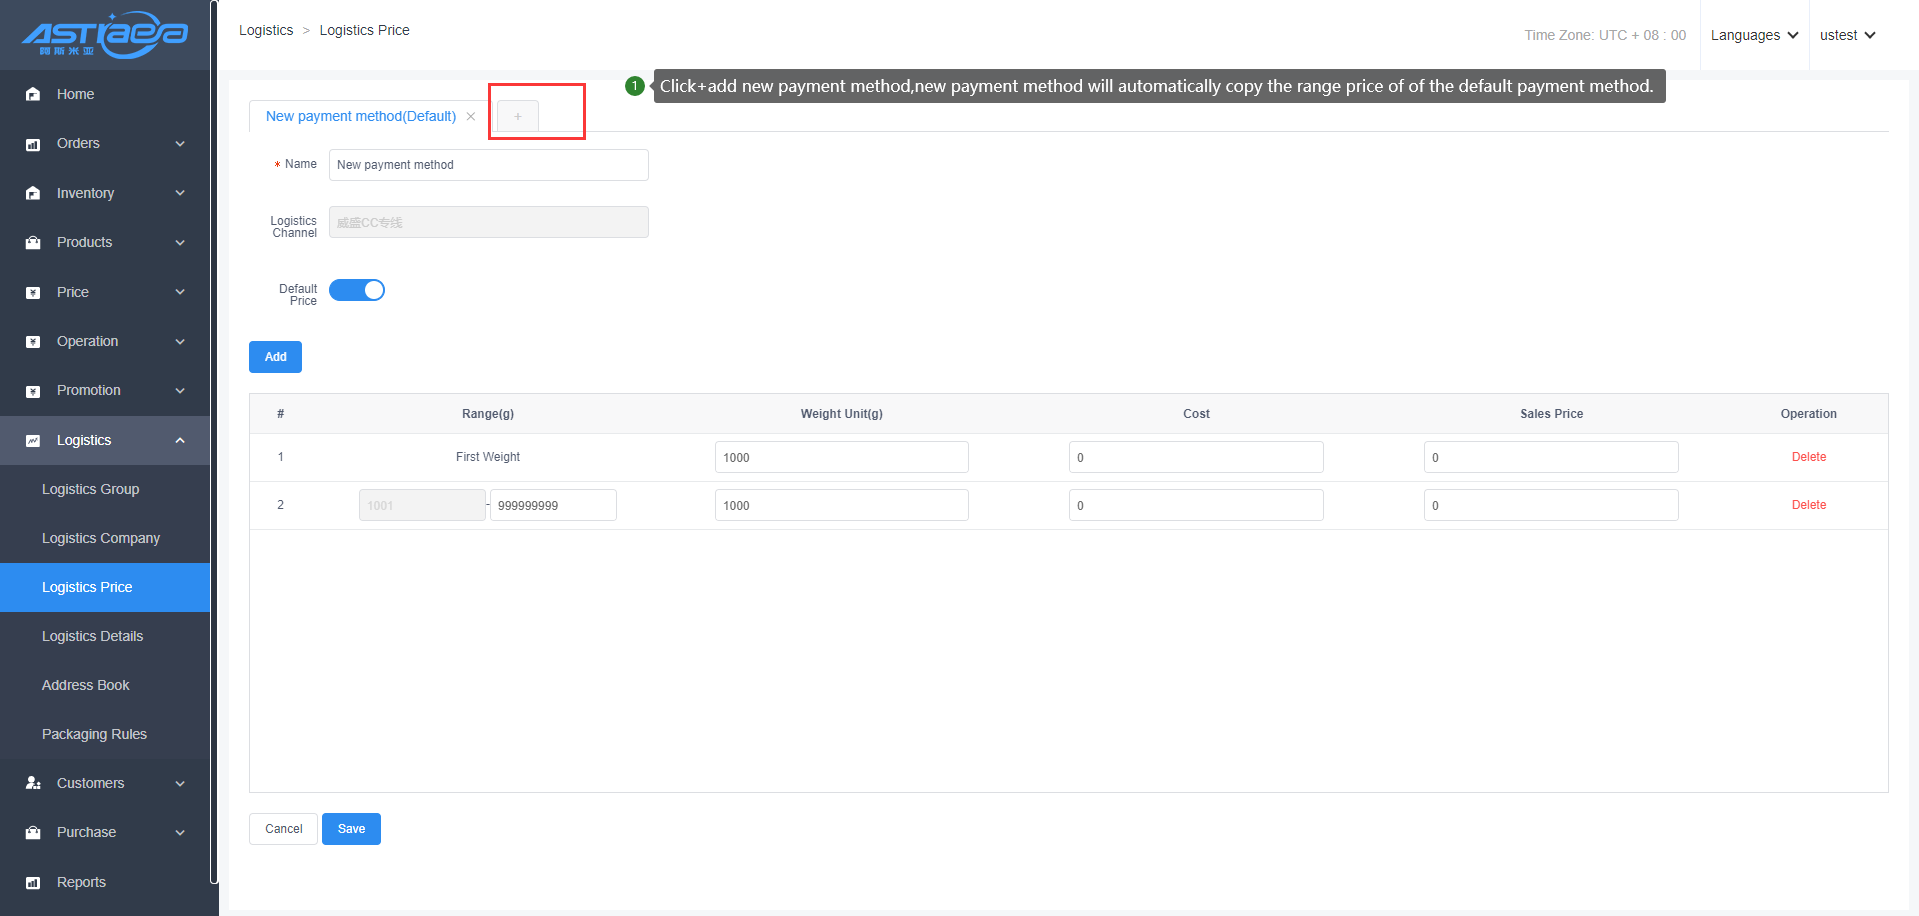
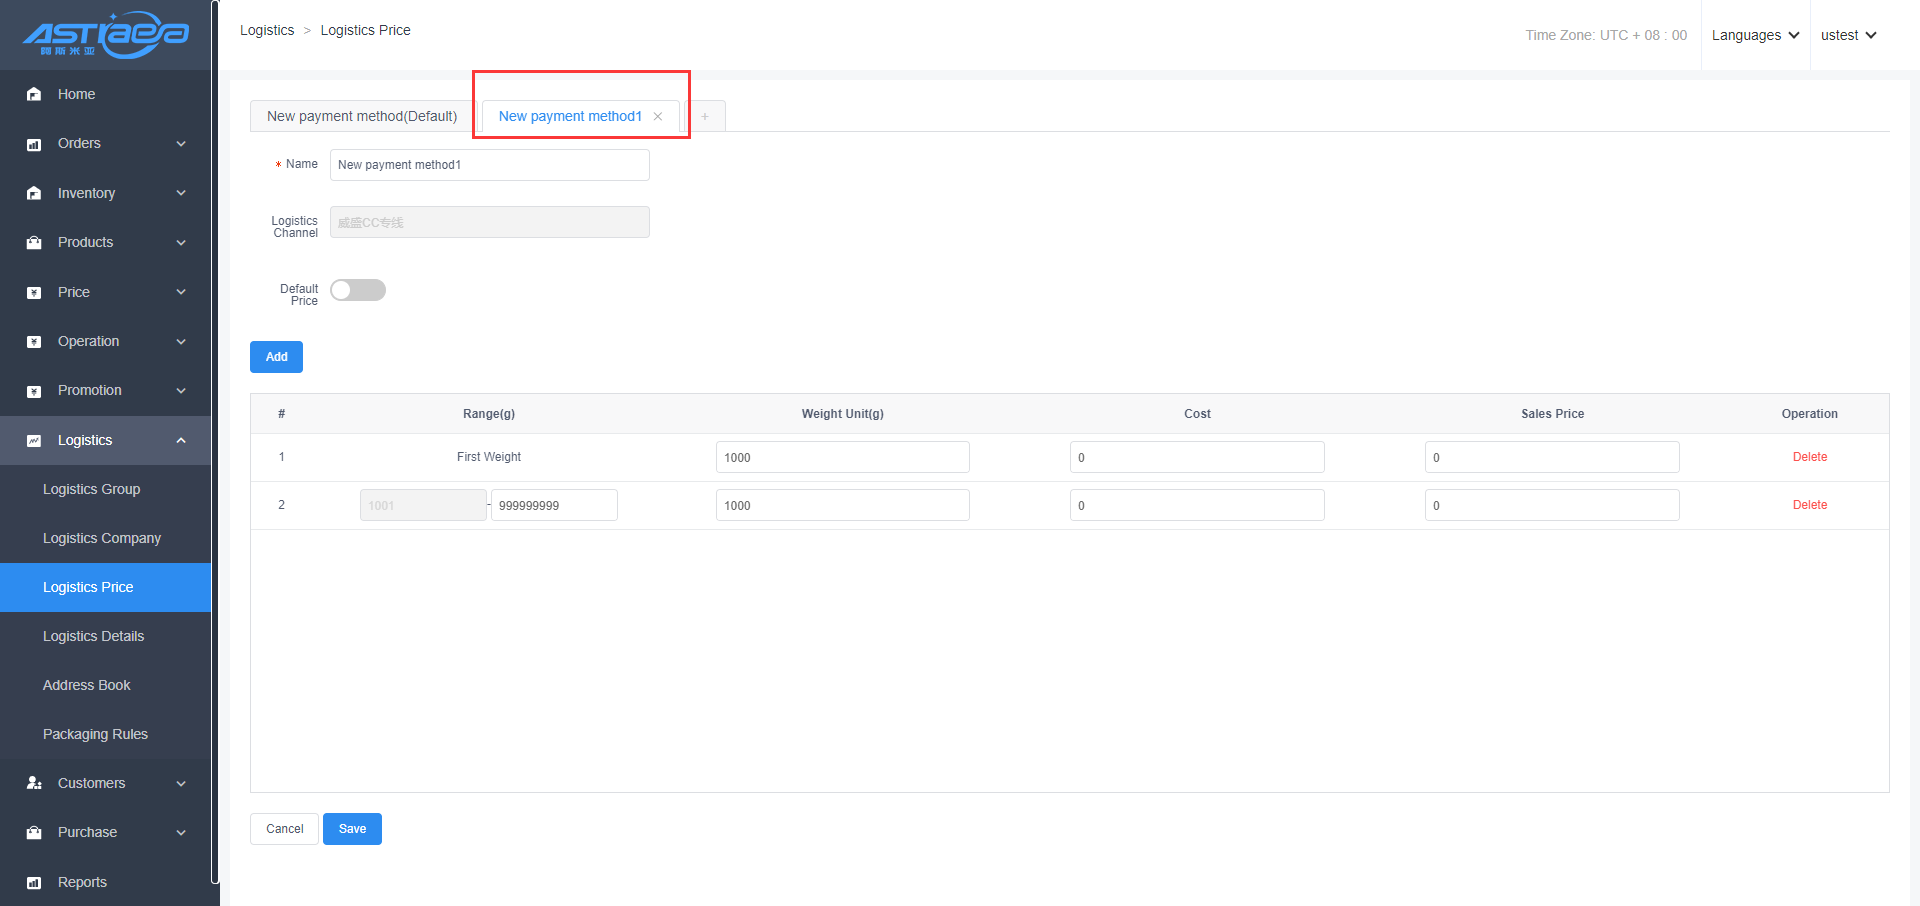
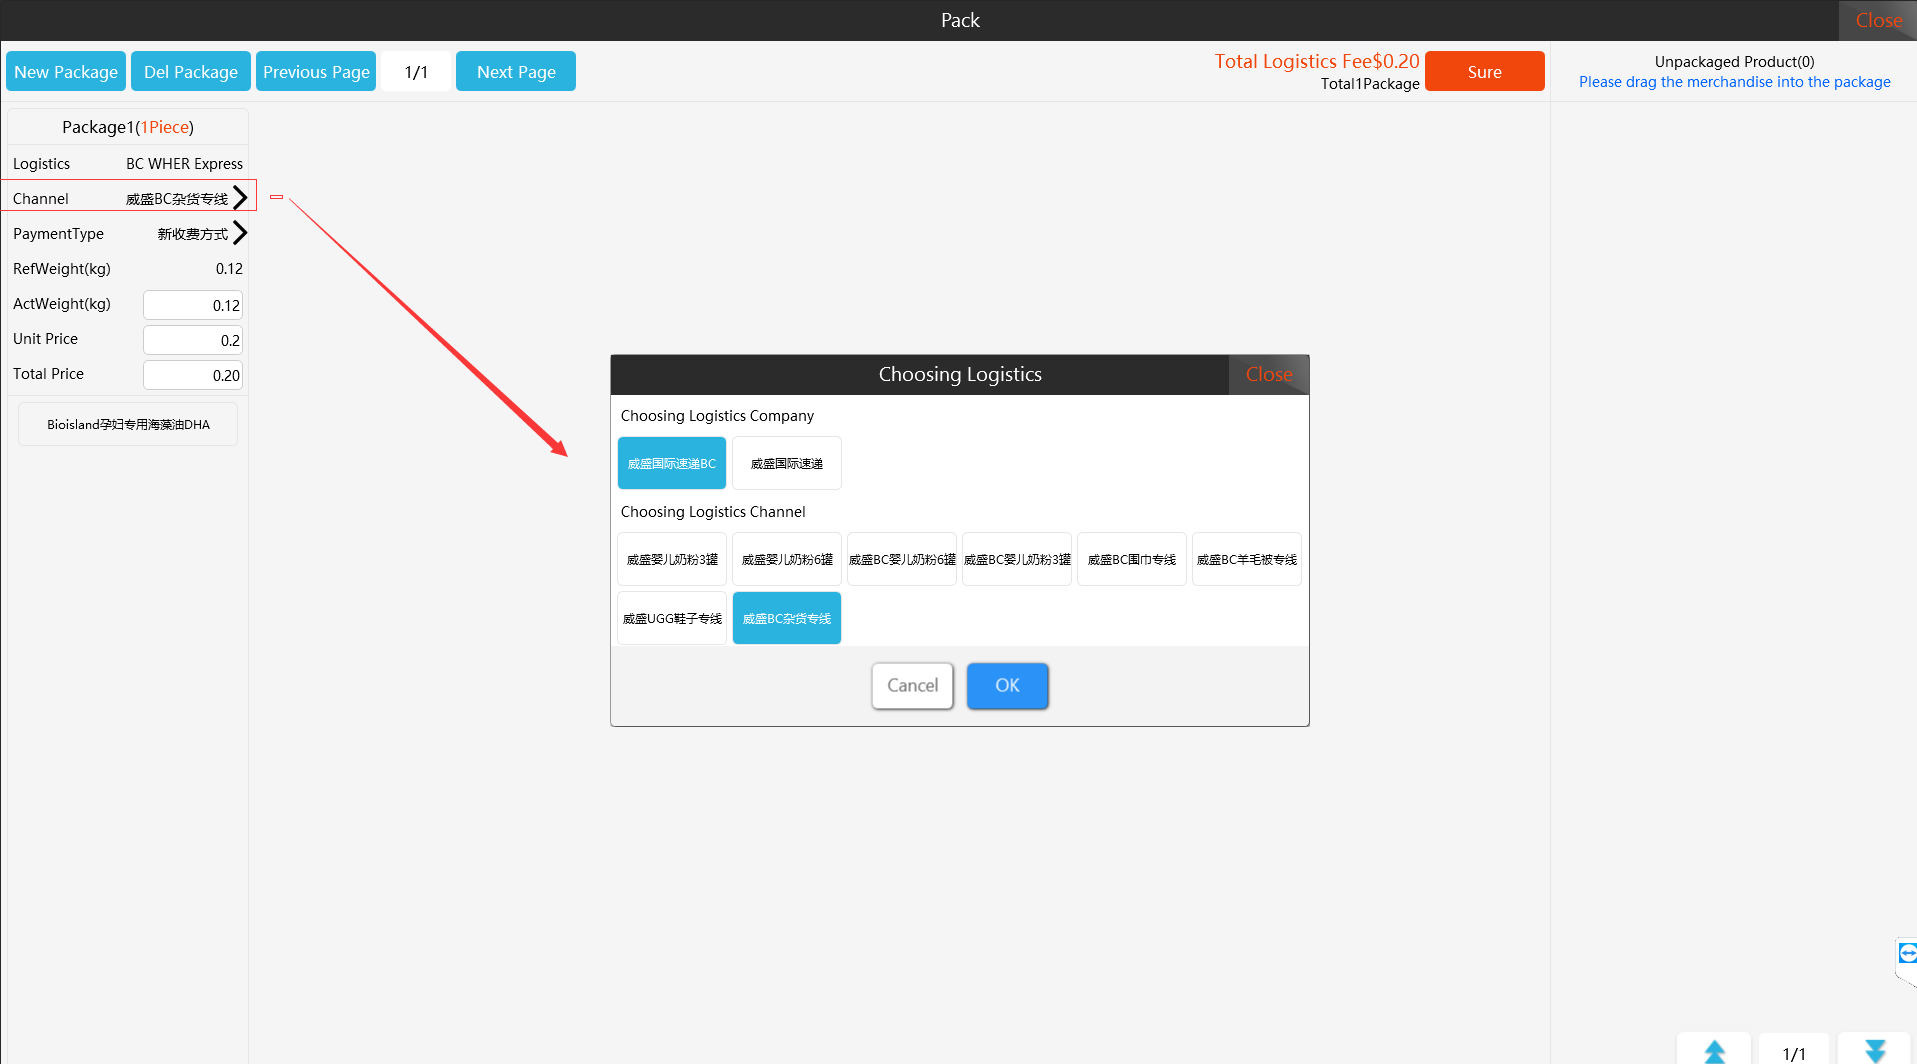
10.2.2 Copy price
Step 1: Log in “Logistics -> Logistics Price” page, click the "Copy" option.
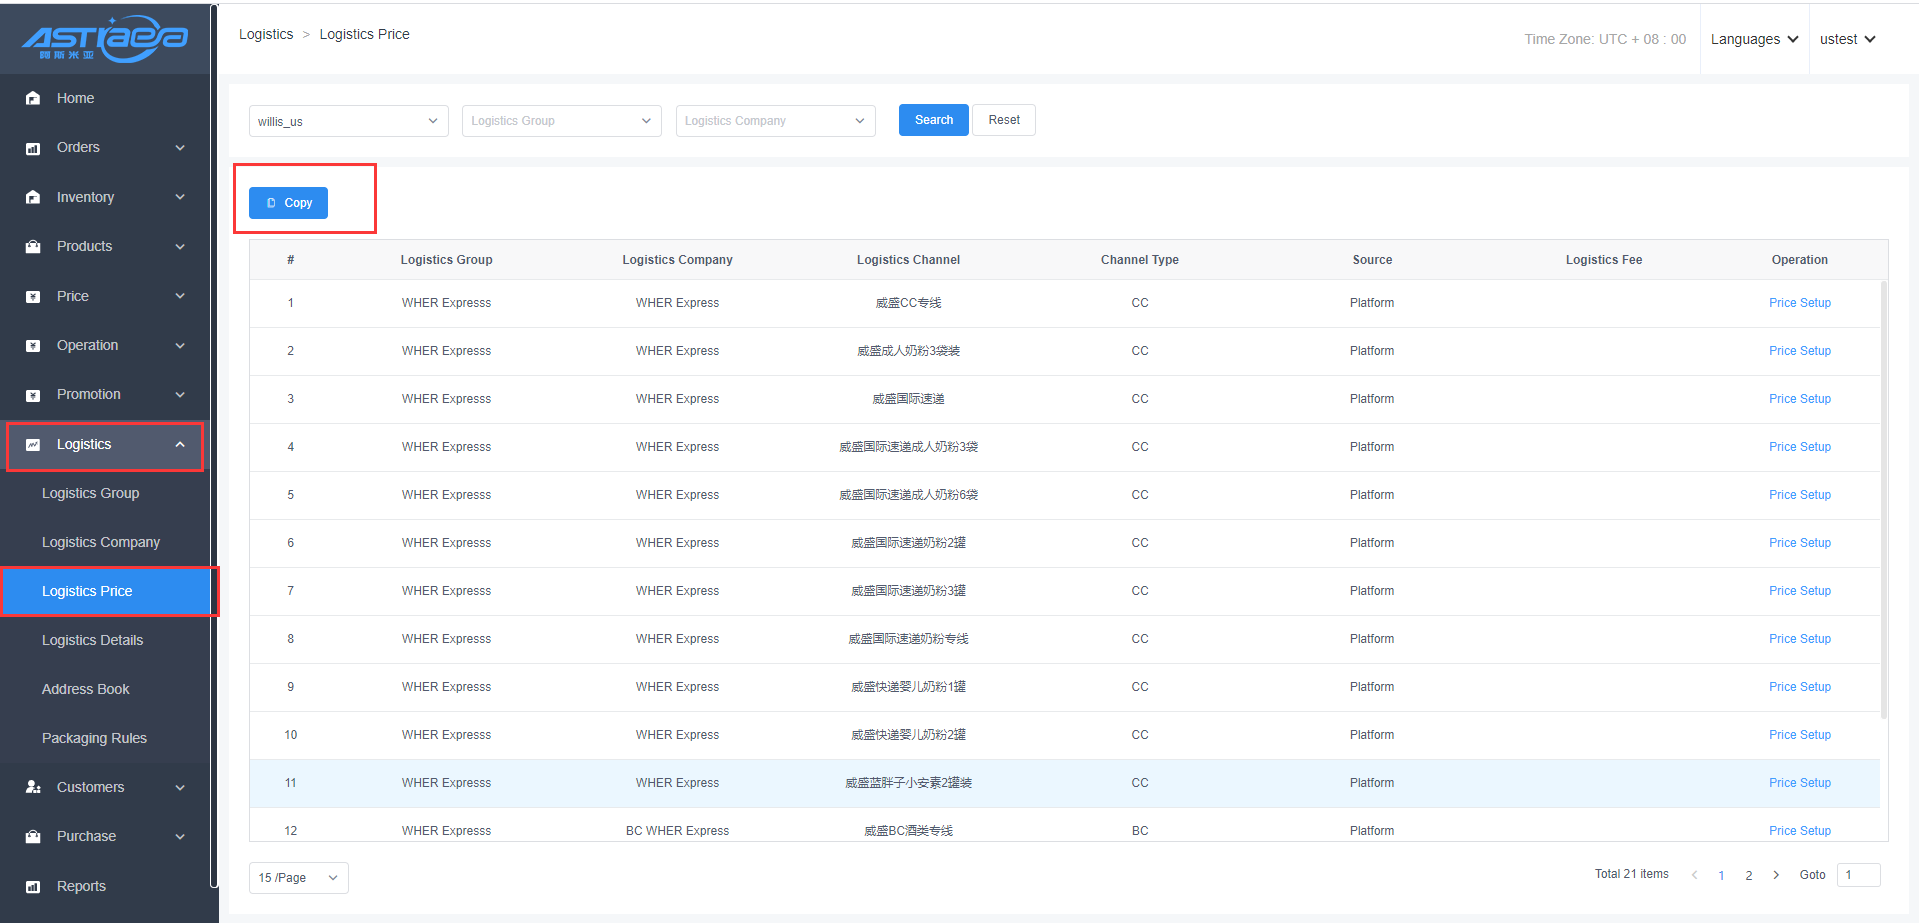
Step 2: Select “store -> logistics price -> target store” (multiple choices) (multiple choices are allowed); choose channels for target store corresponding to the logistics price.
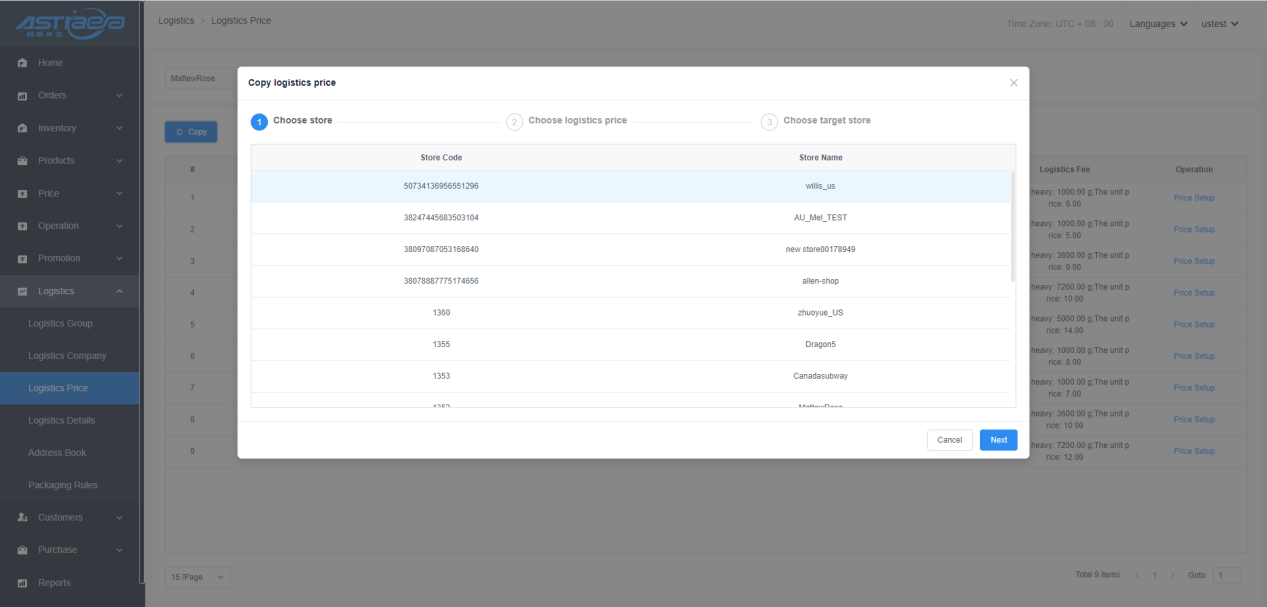
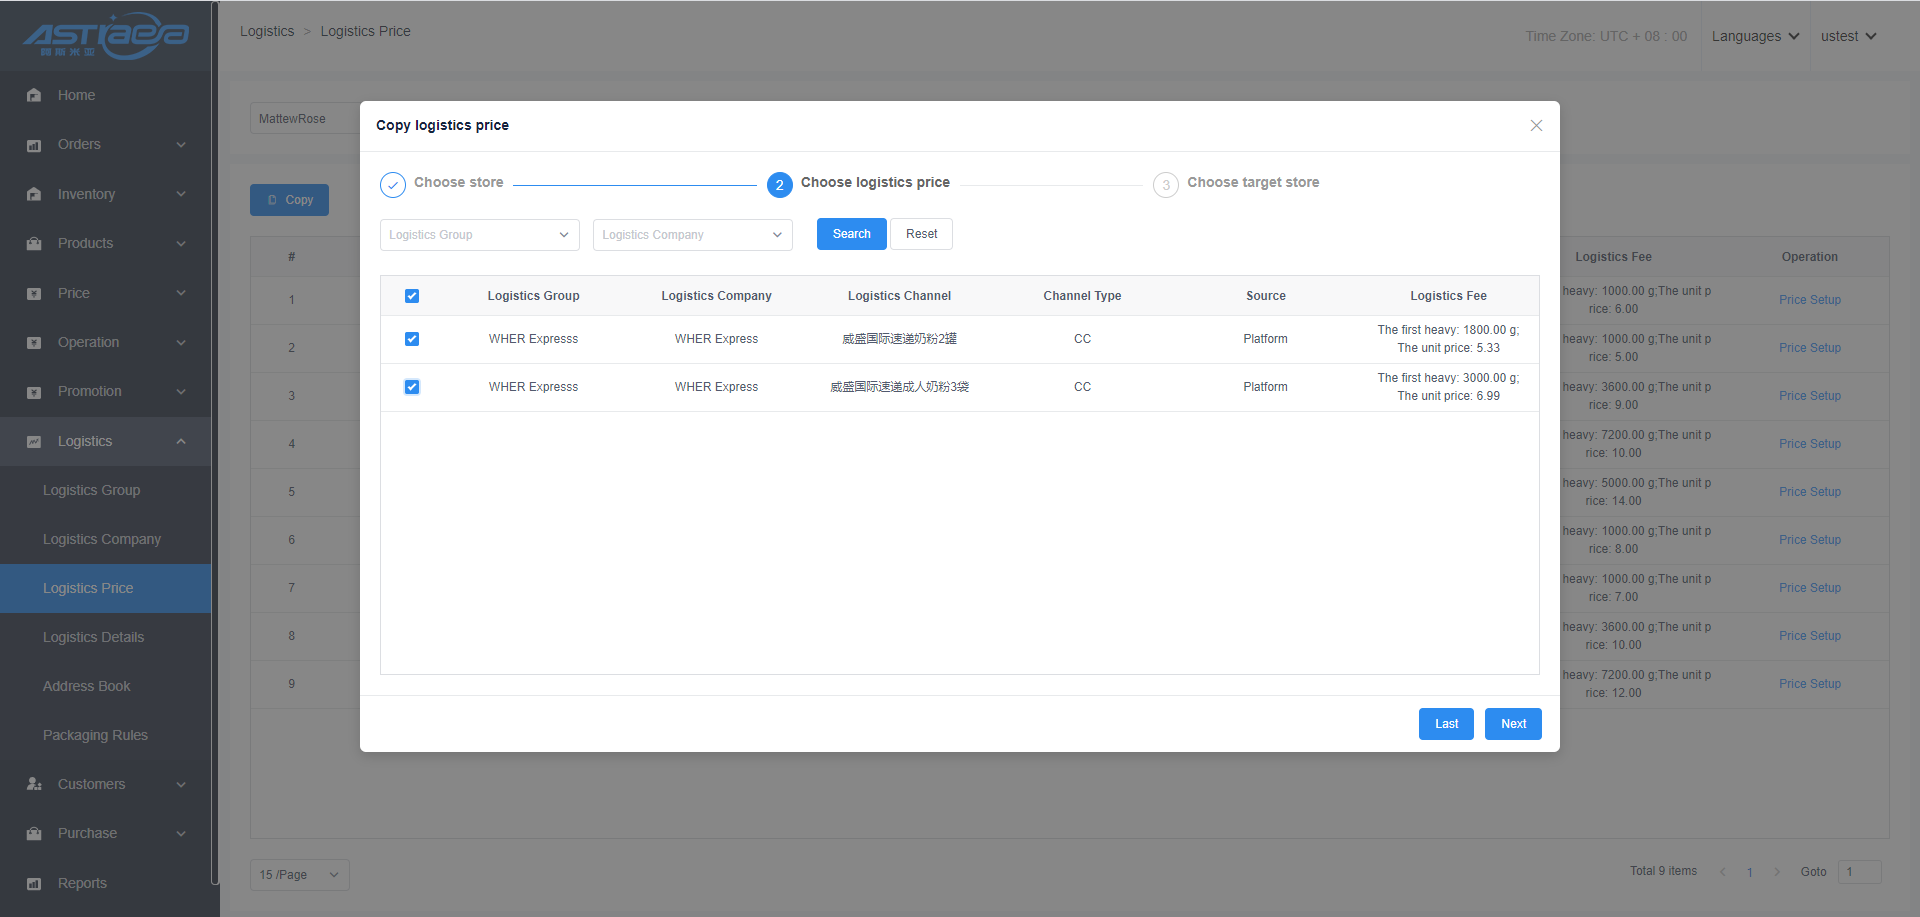
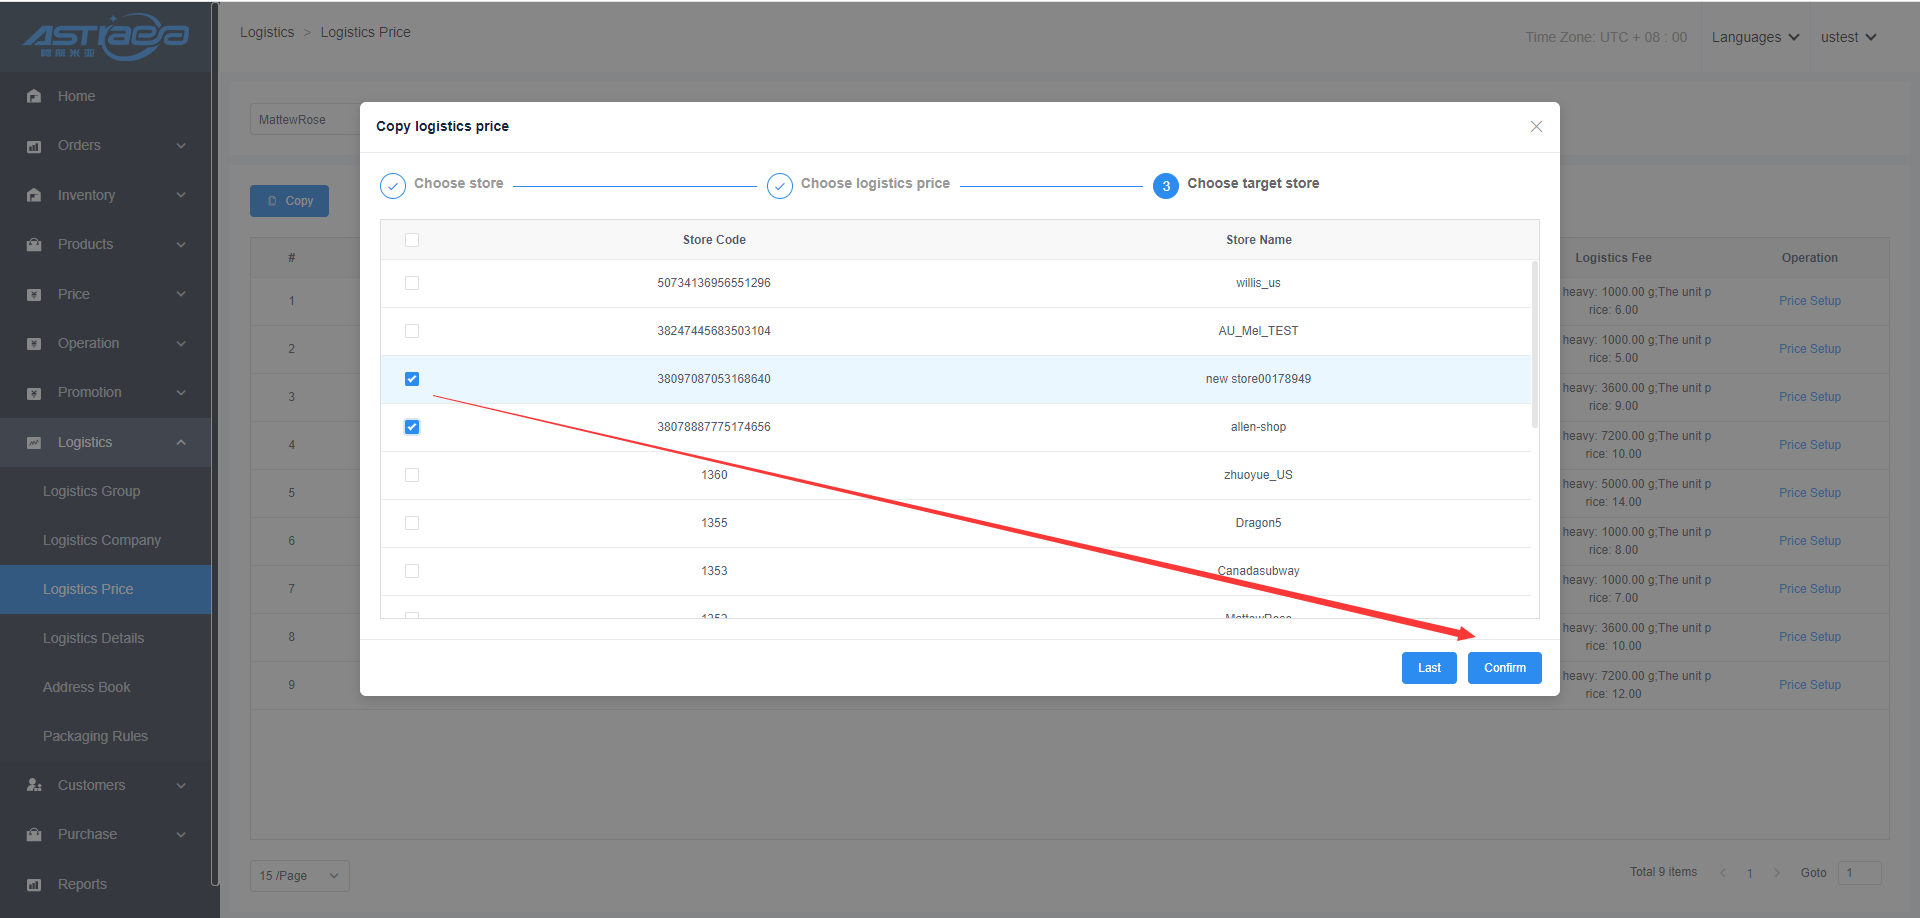
10.3 Logistics details
10.3.1 Report statistics
Logistics details can summary the logistics information generated by BC and CC orders under APos stores. Such details can be screened according to stores, logistics status, type of express sheet, logistics company, recipient, logistics bill number, etc.
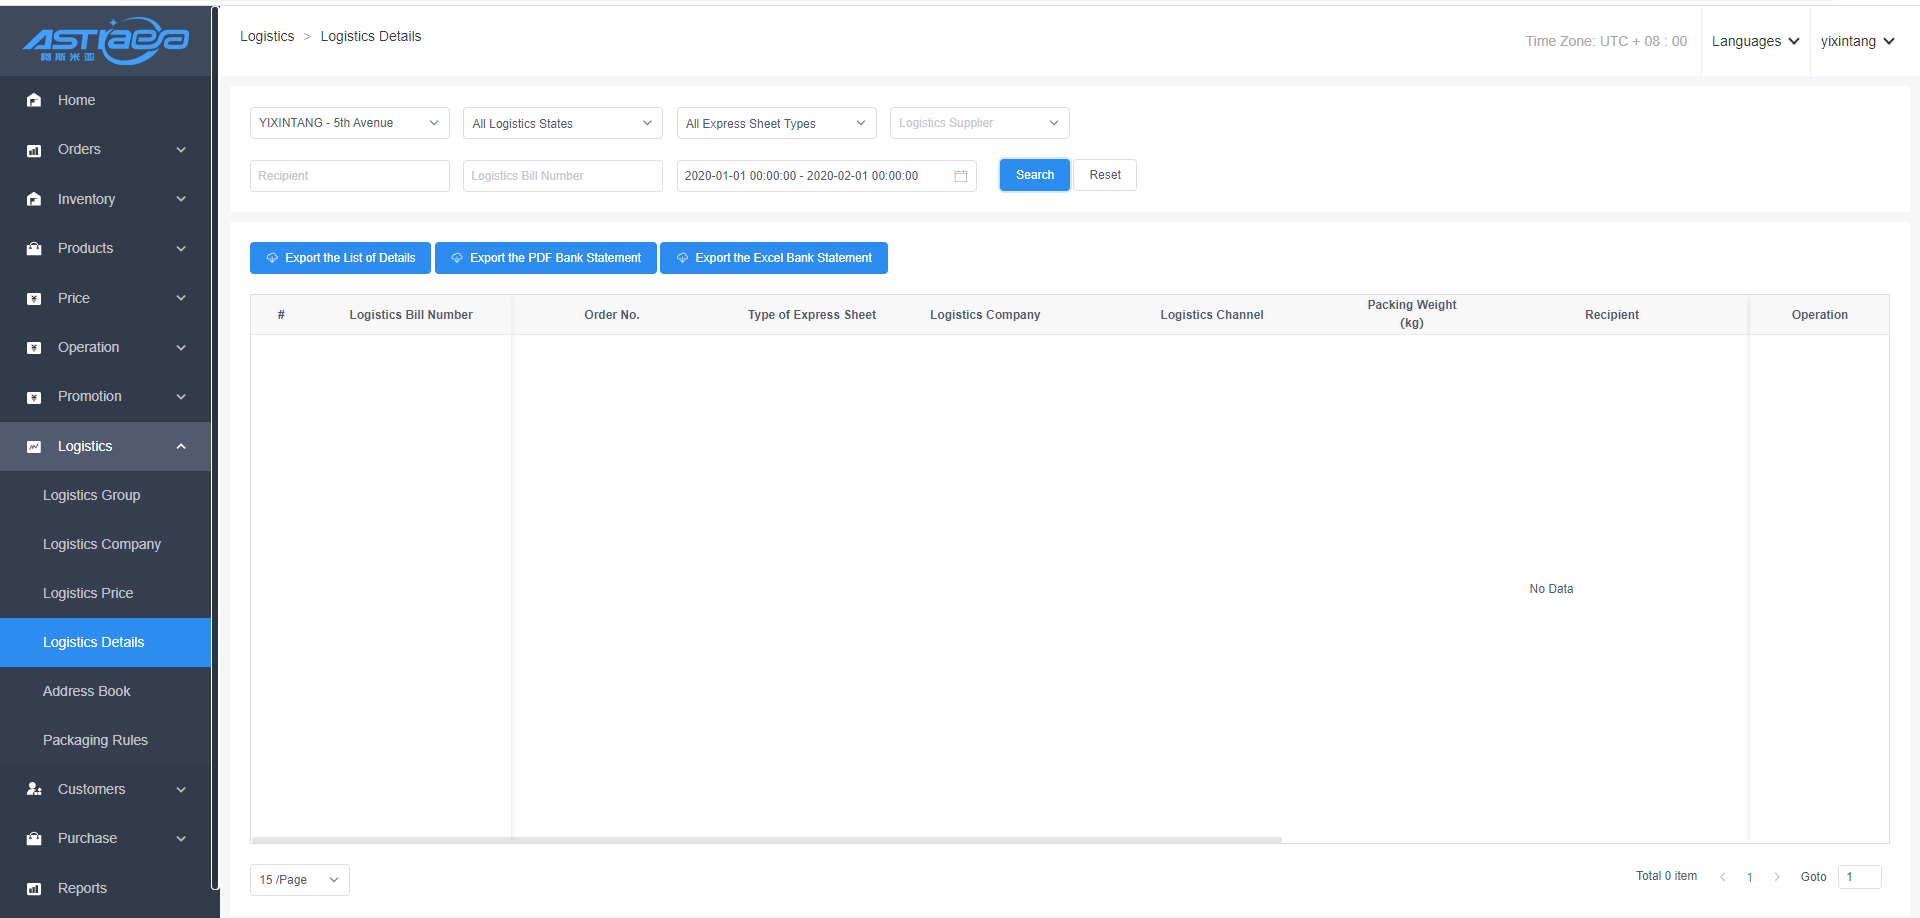
10.4 Address book
10.4.1 Add recipient address book
Step 1;Logistics-Address Book, select”Recipient Addressbook”,and click the “Add” option.
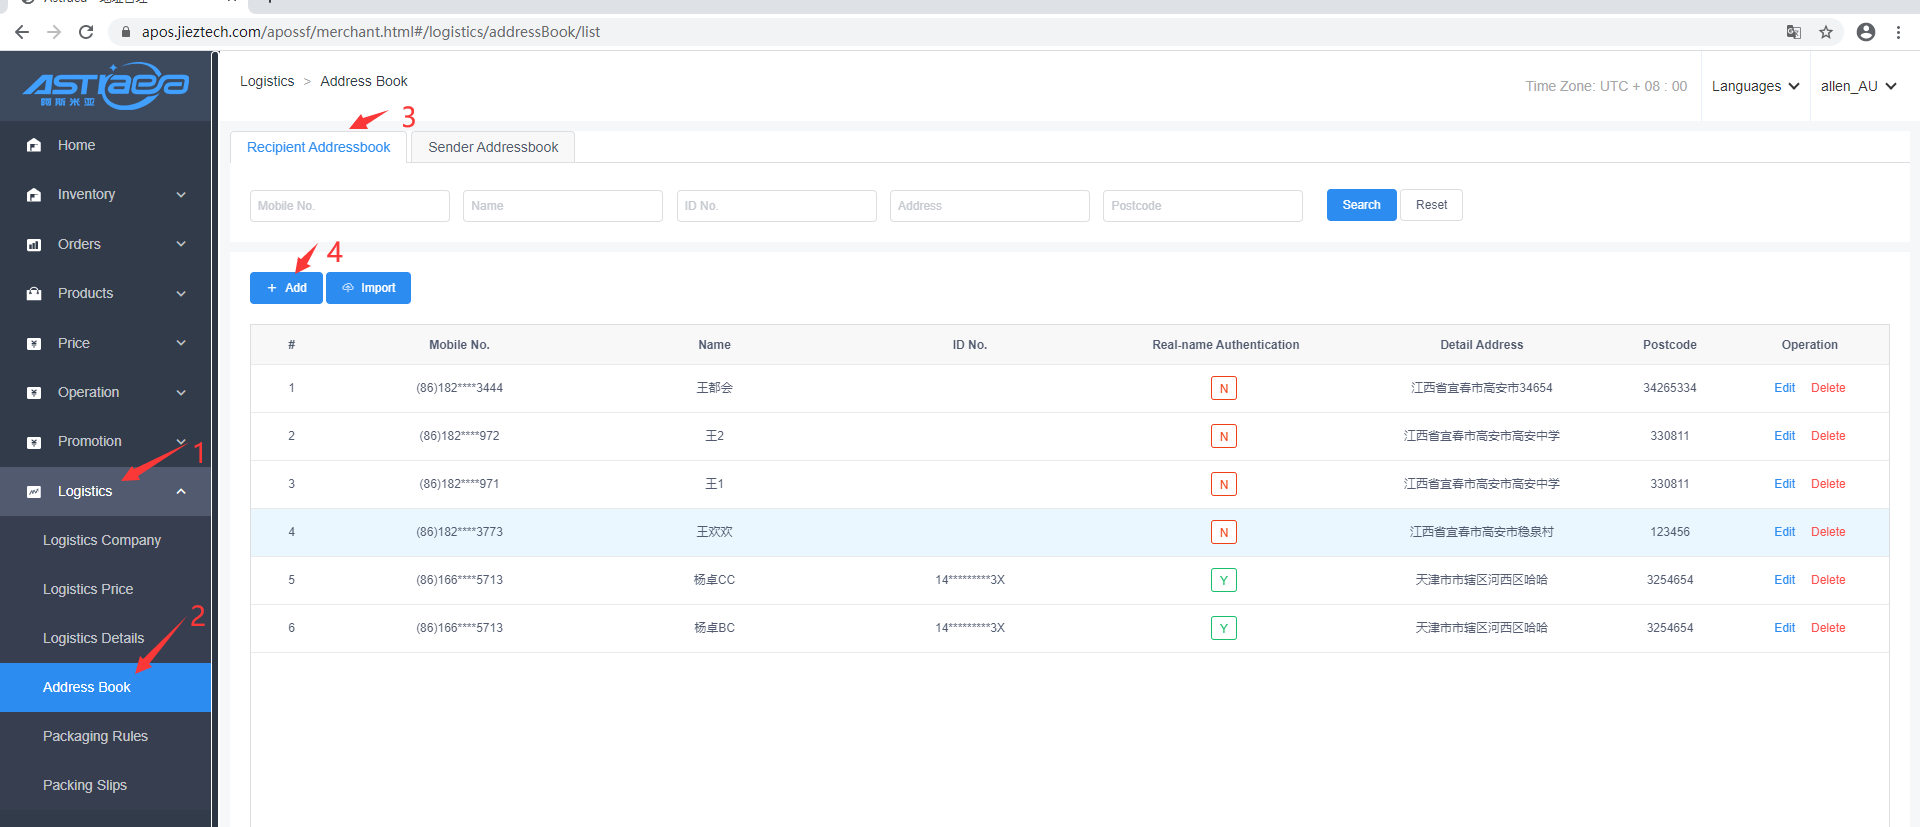
Step 2; Fill in the related information. If you click the “Save” option, the addition is successful, but the page still stays on the new recipient page; if you click “Save&Close”, the addition is successful, but the new page is closed Go to the main page of the recipient.
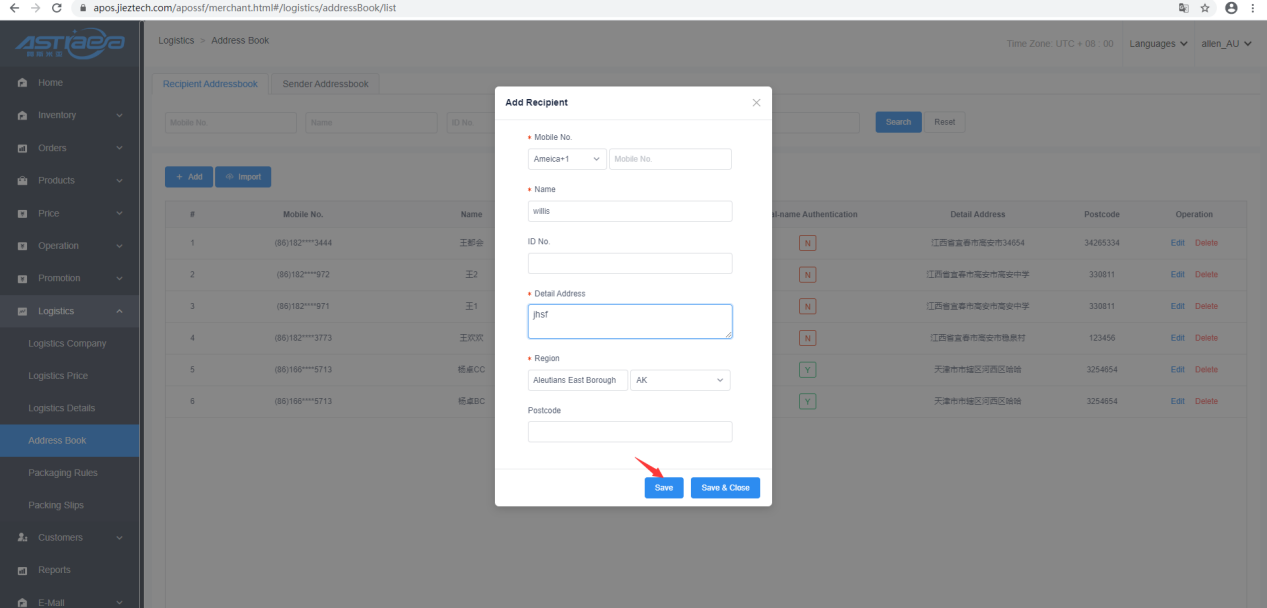
10.4.2 Import recipient address book
Step 1; Logistics-Address Book, select “Recipient address book”and click the “import”.
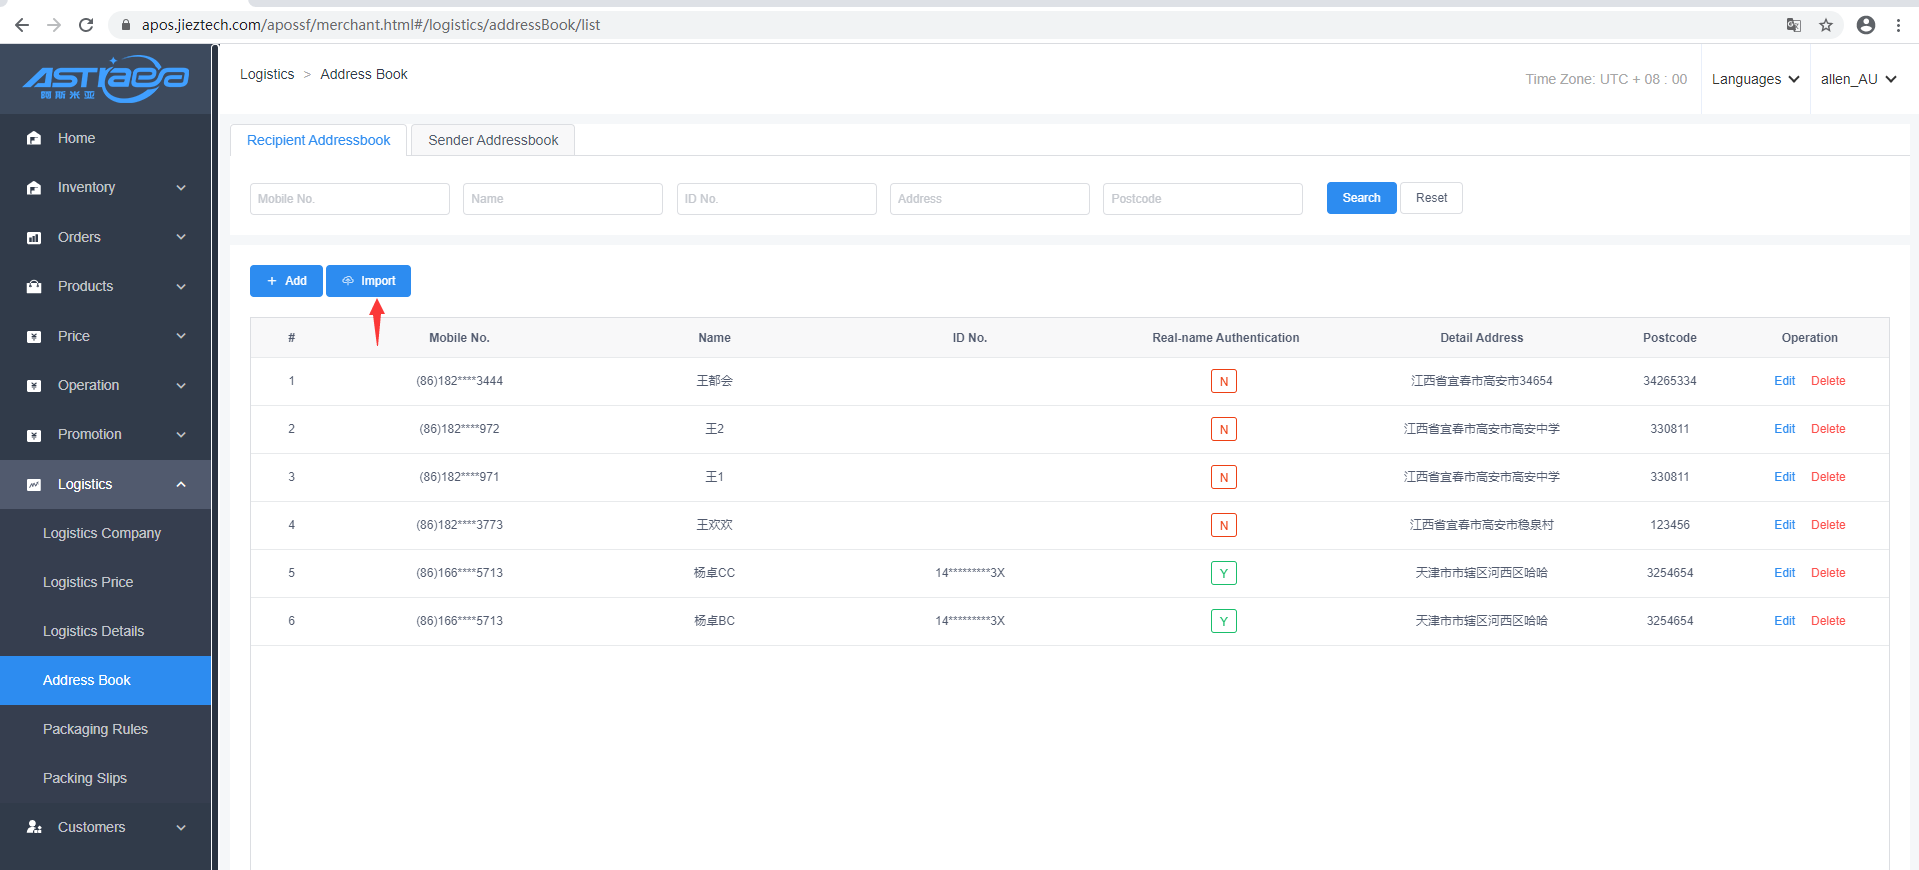
Step 2;Click to download the template.
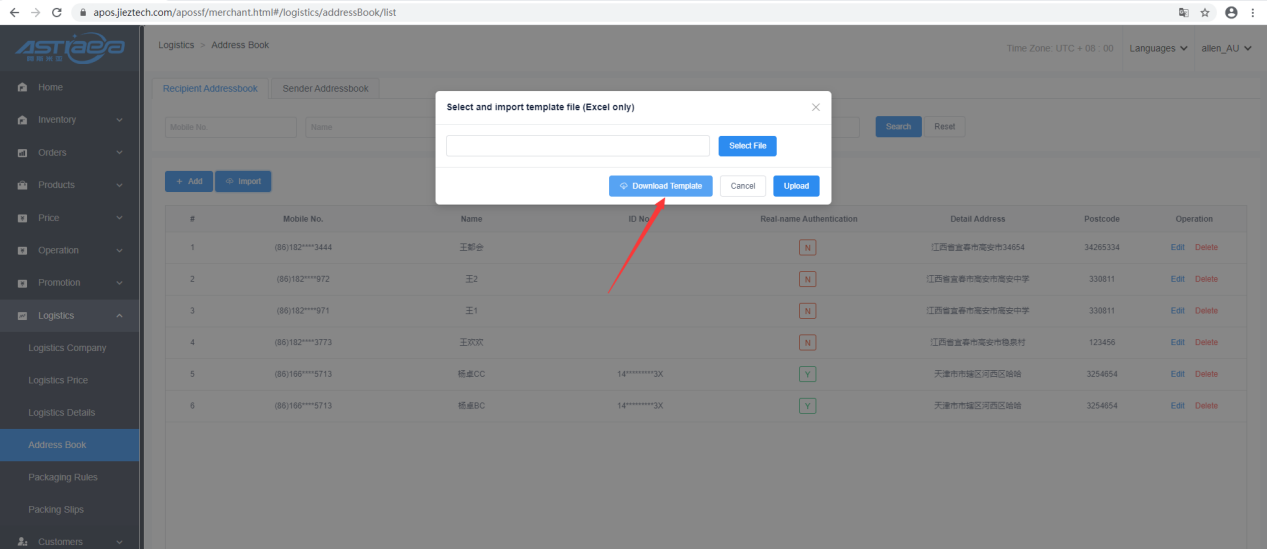
Step 3; Enter the recipient information to be imported, save to file 1, select file 1, and click "Upload".
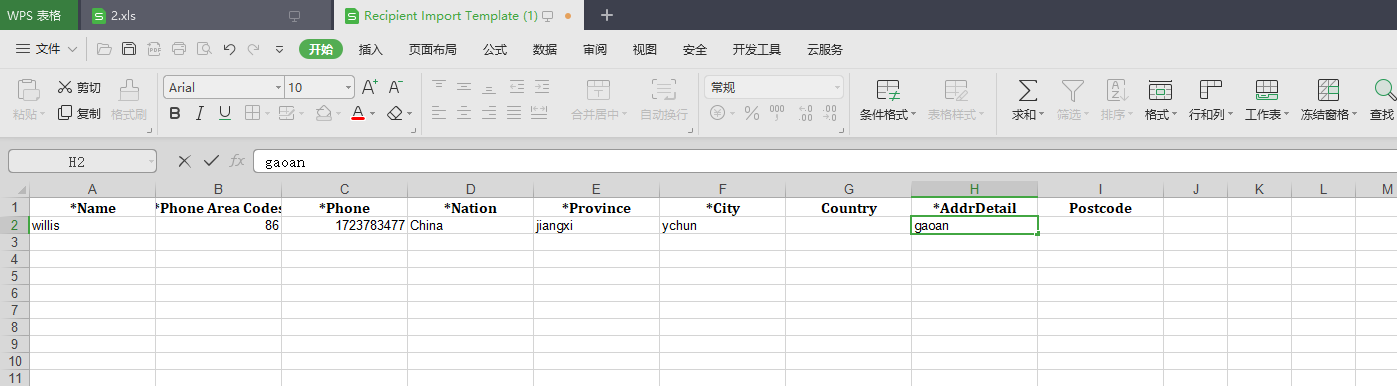
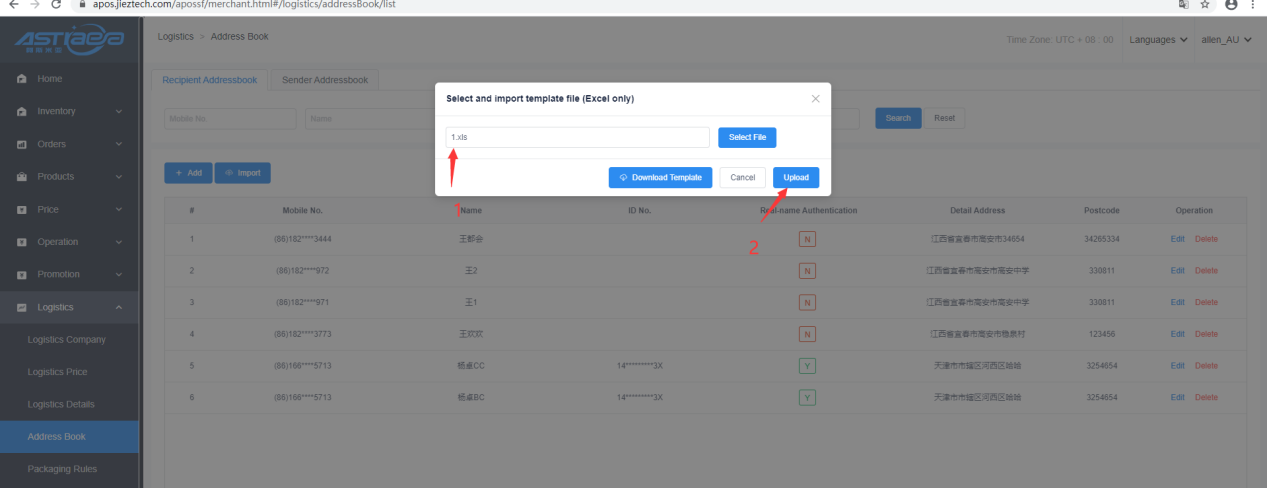
10.4.3 Add Sender Address Book
Step 1; Logistics-Address Book, select”sender address book” and click the “add” option.
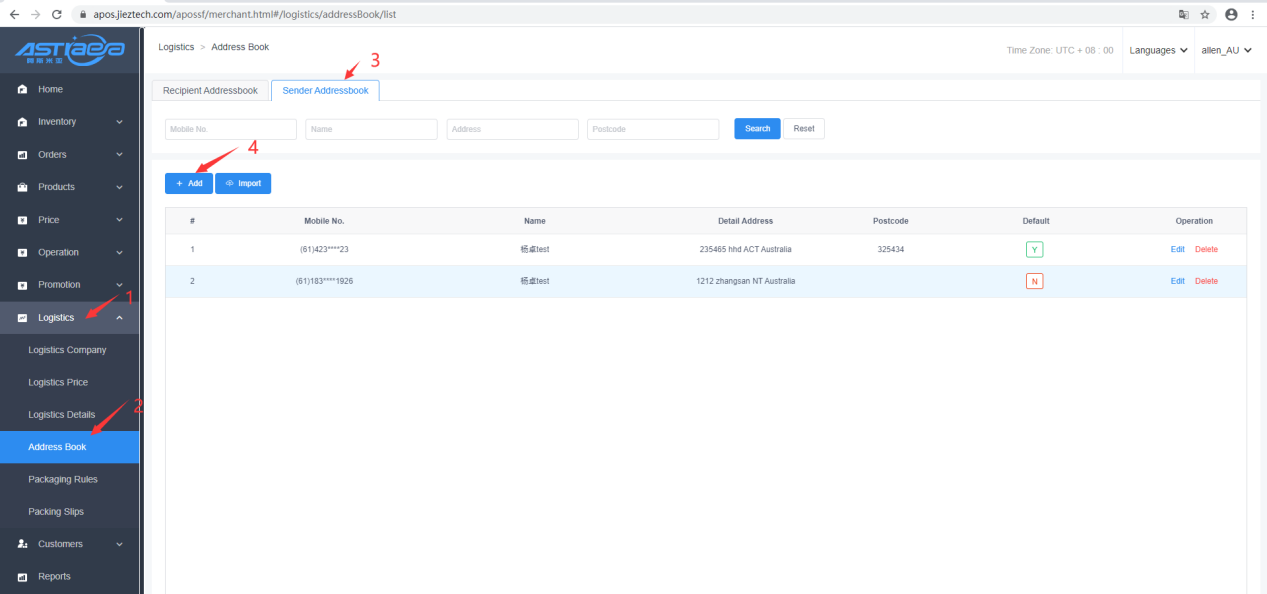
Step 2; Fill in the related information, if you click the “Save” option, the addition is successful, but the page still stays on the new sender page; if you click “Save&Close”, the addition is successful, but the new page is closed, back Go to the main page of the sender.
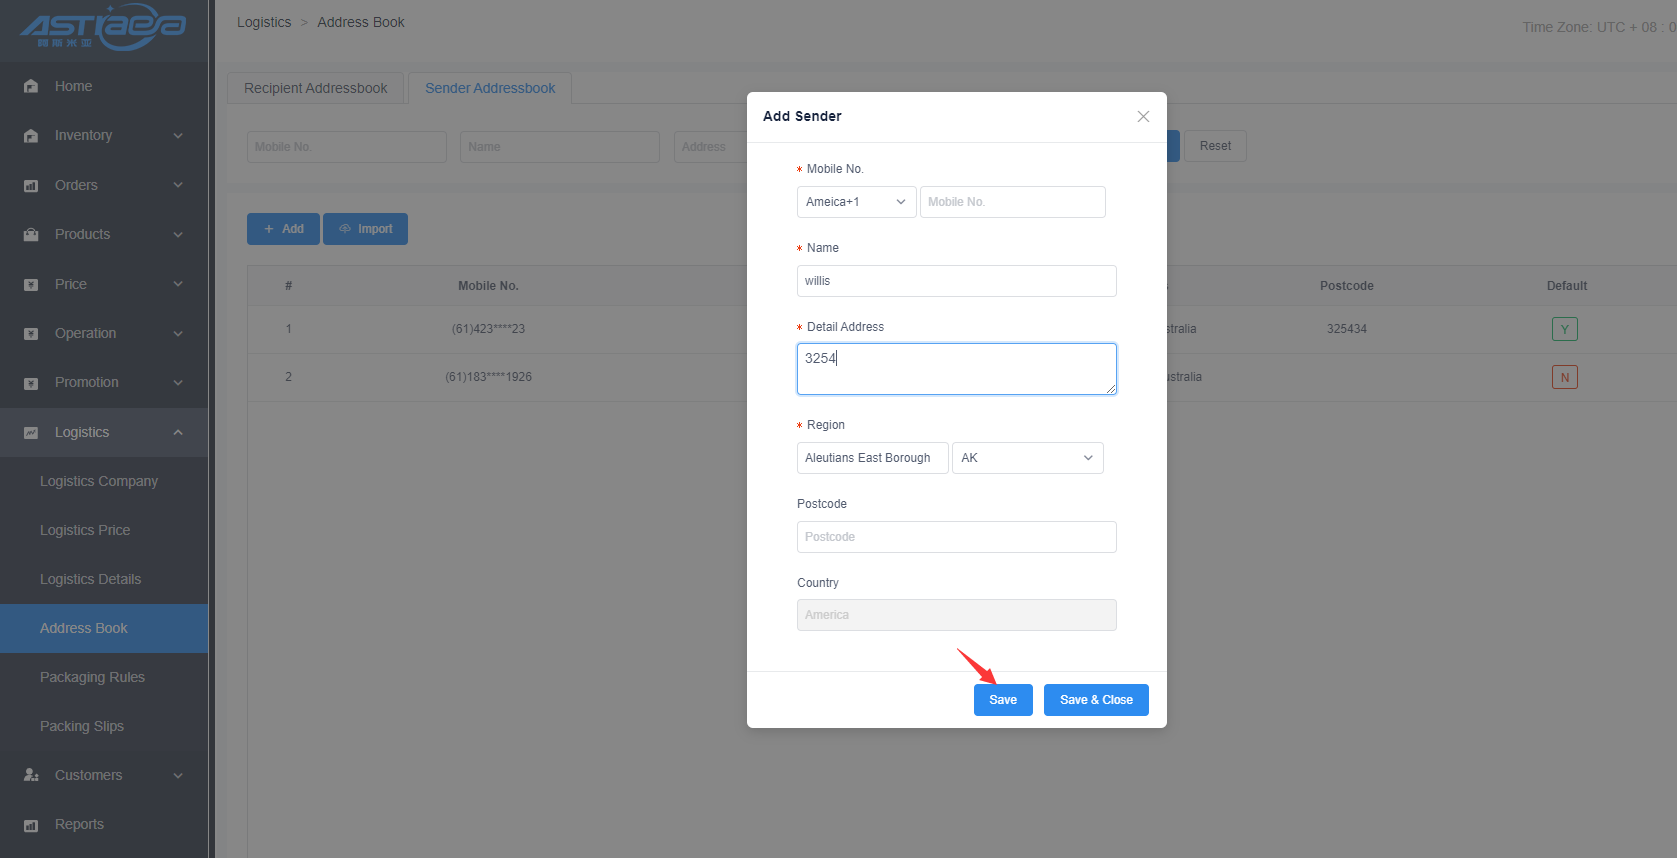
10.4.4 Import Sender Address Book
Step 1; Logistics-Address Book, select”Sender Address book”and click the “import”option.
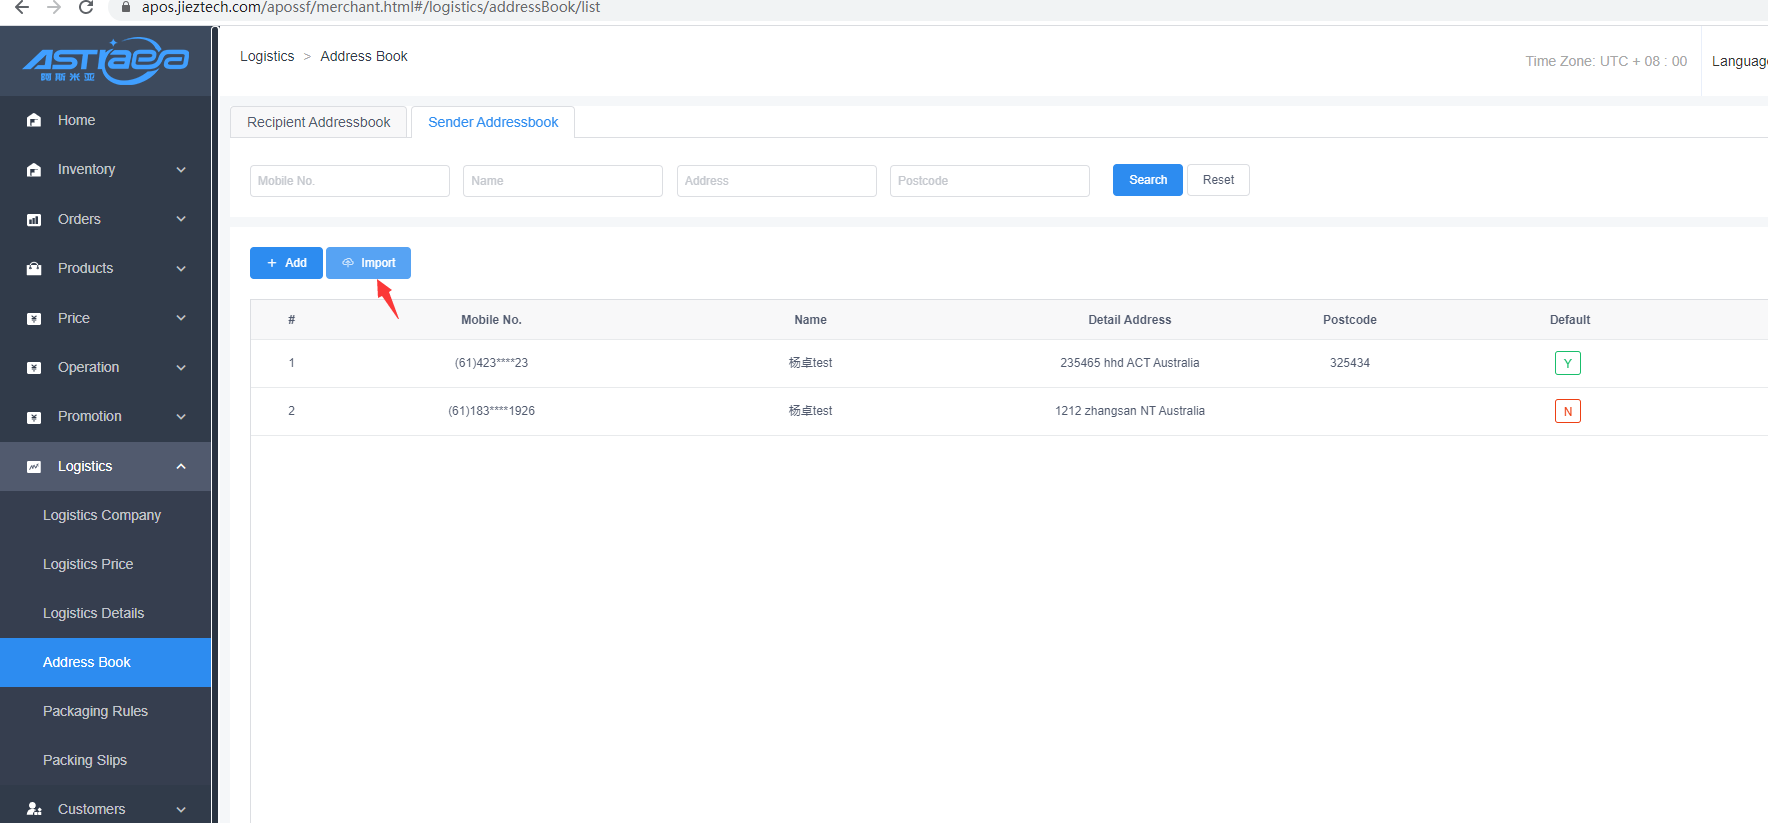
Step 2; Click”Download Template”
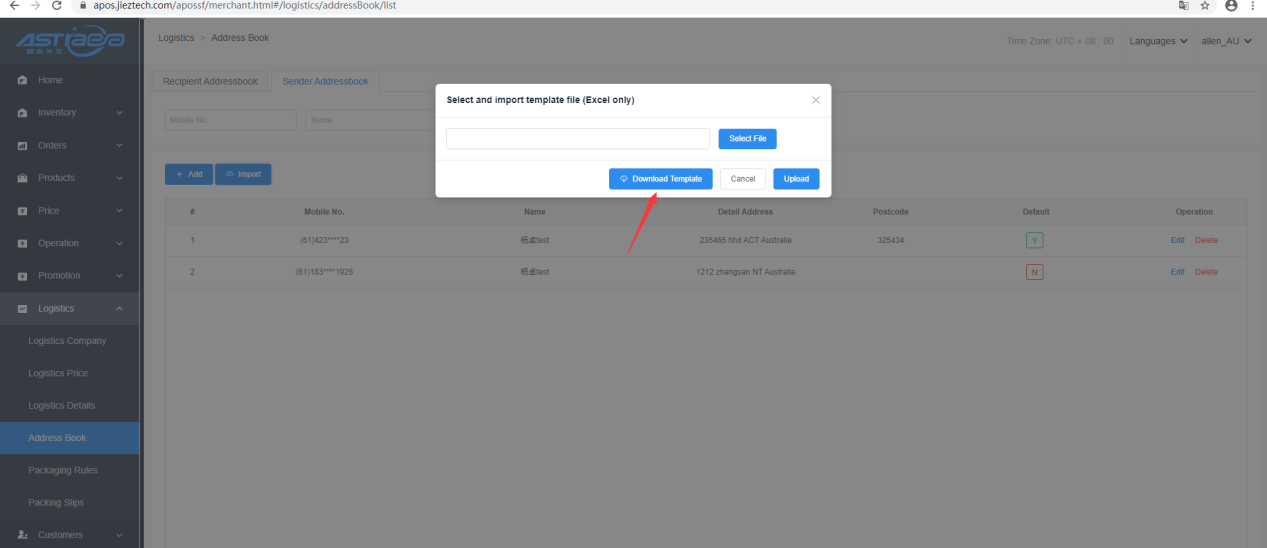
Step 3;Enter the sender information to be imported,,save to file 1, select file 1, and click “Upload”.
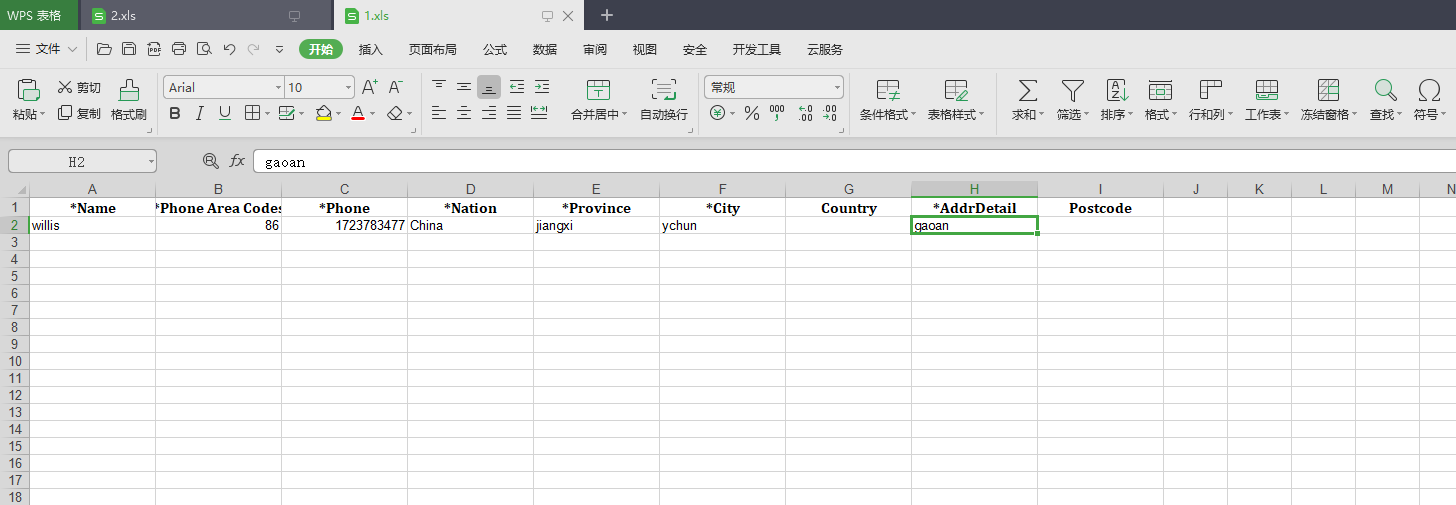

10.5 Set packaging rules
Note:
It is necessary to set the logistics price for the logistics channel corresponding to the packaging rules, and set the classification for the products packaged under the packaging rules, so that the successful packaging is achieved at APos client.
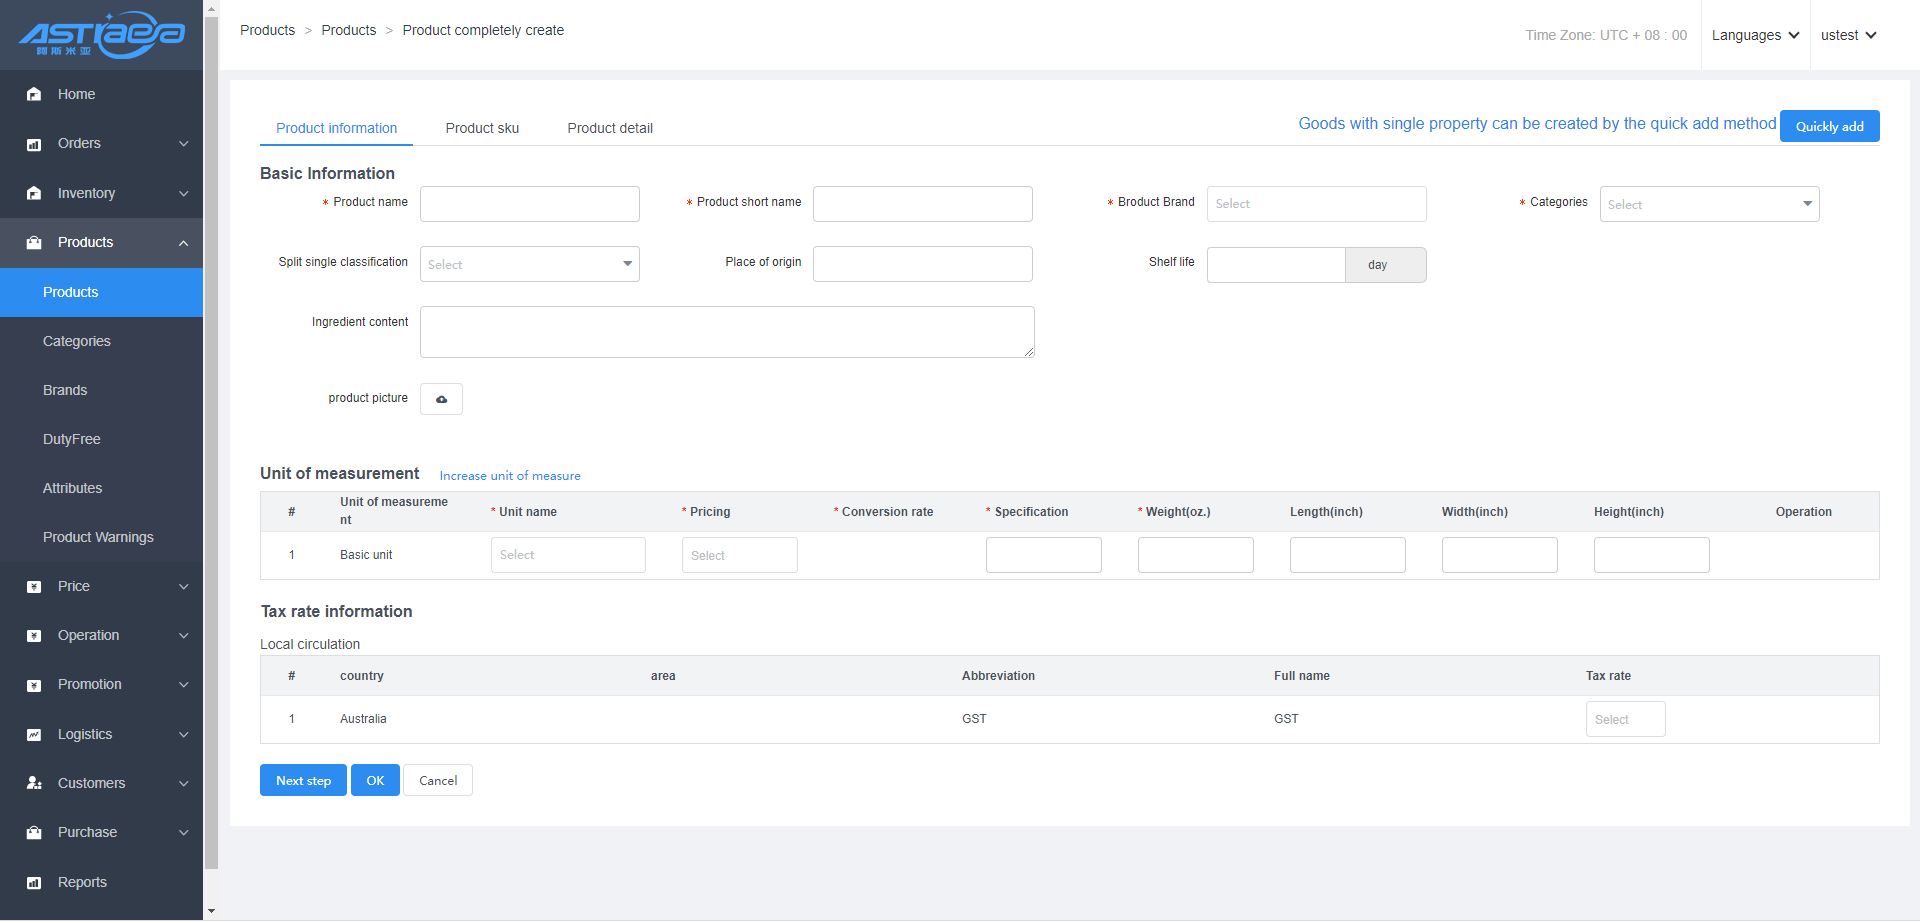
10.5.1 Add packaging rules
Note: The platform's packaging rules refer to those created after logging in the administrator's account. Once the commercial tenant imports platform logistics, the platform's packaging rules corresponding to the imported logistics channels will be automatically synchronized to the list of commercial tenant's packaging rules.
Step 1: Log in “Logistics -> Packaging Rules” page, click "Add” option;
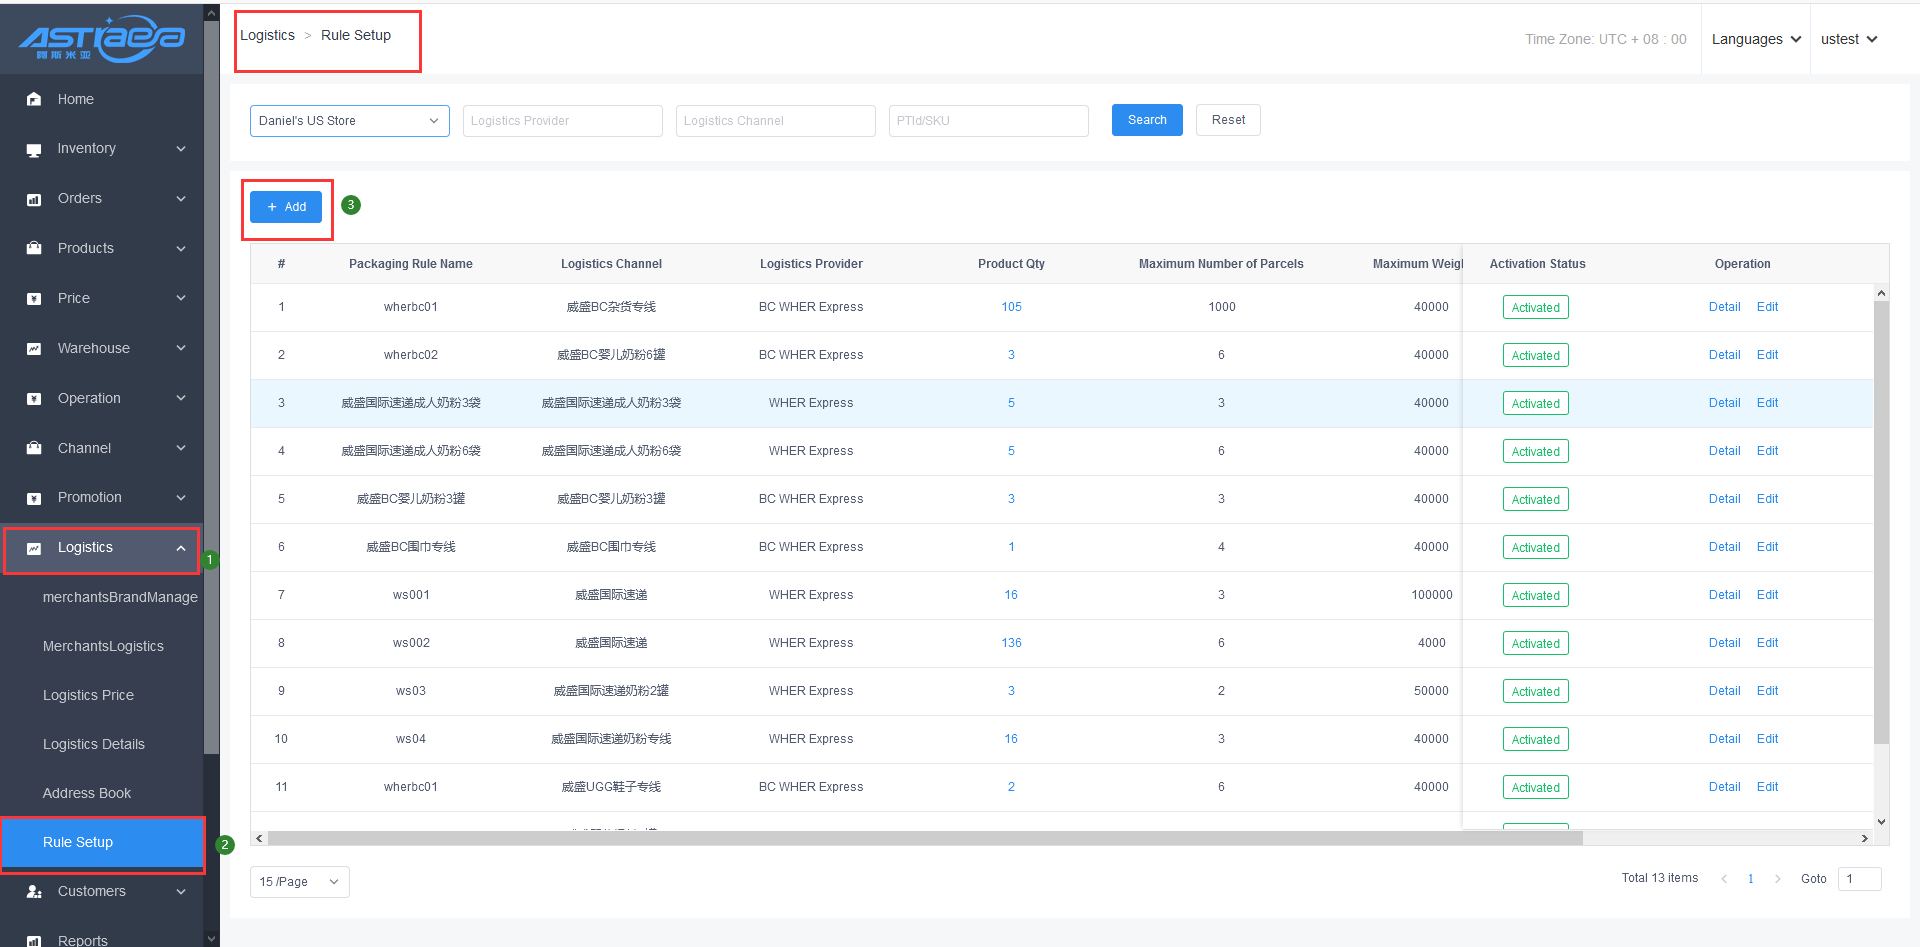
Step 2: Enter the relevant data and click “Save” option.

10.5.2 Add packaging products under packaging rules
Step 1: Log in “Logistics -> Packaging Rules” page, click "Detail” option after the package rules.
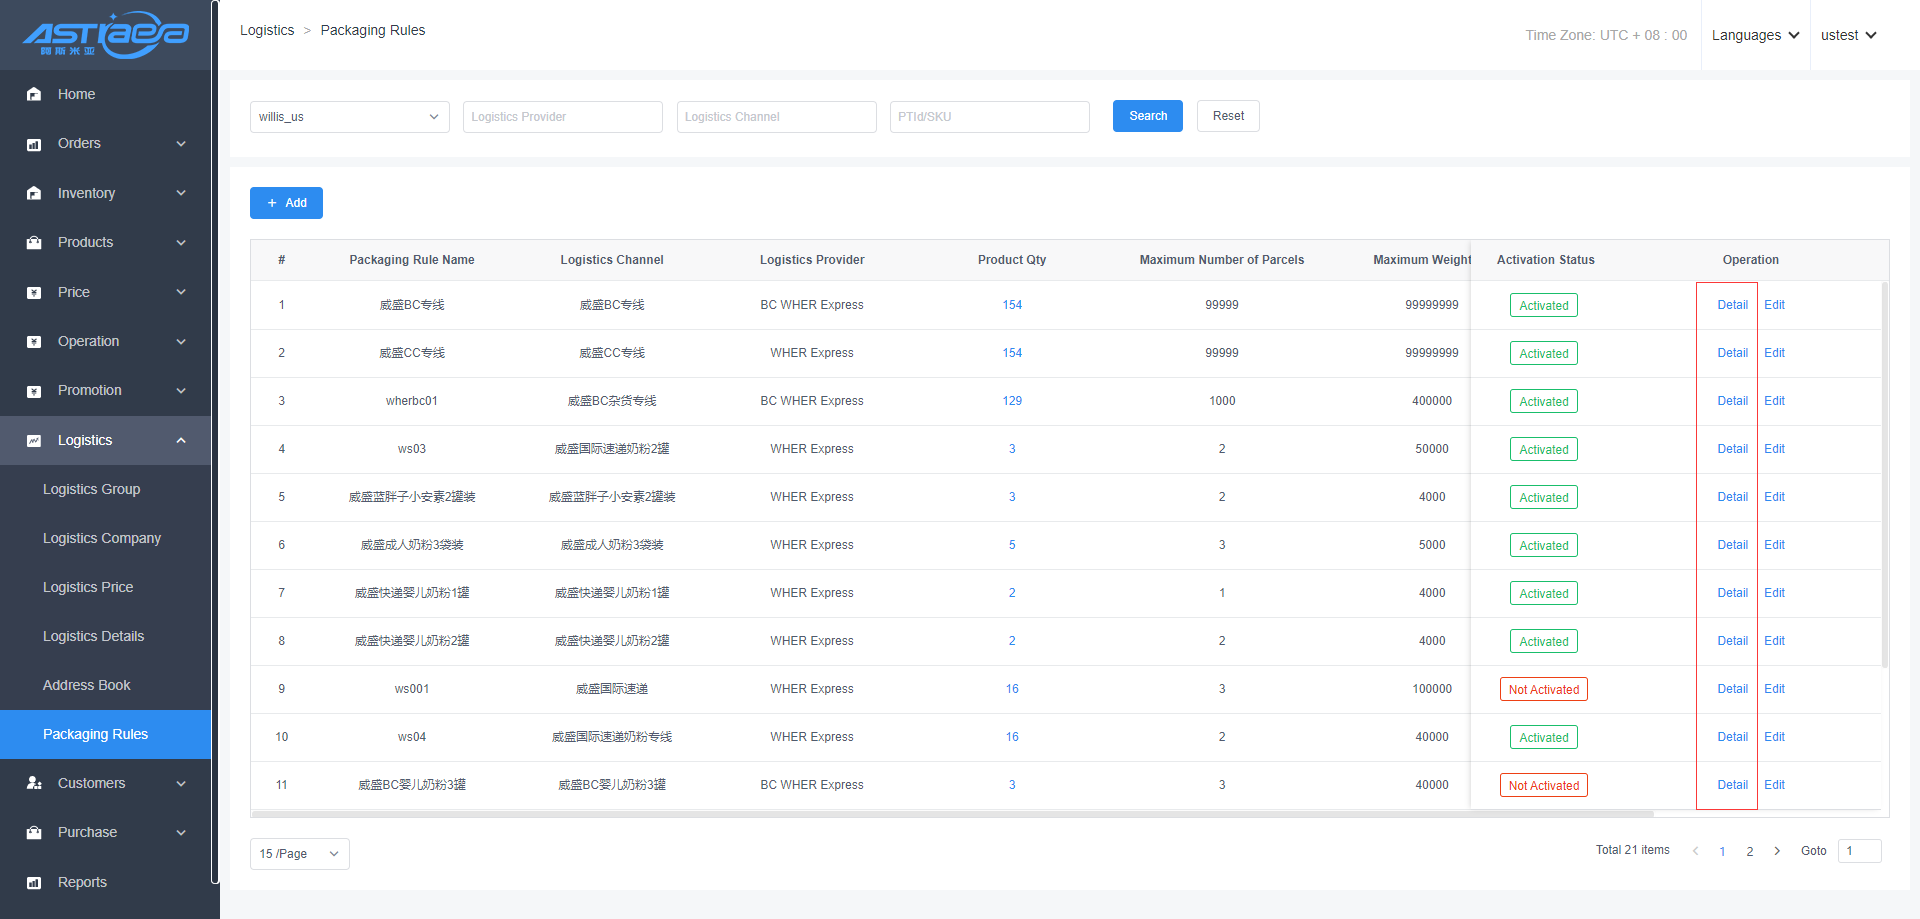
Step 2: Click "Add Packaging Products” option -> click "Select Product” option.

Step 3; In “Select Product” pop-up window, add the product to the list of “Binding Packaging Products” by adding or ticking, and click "Save" option to finish all operation steps.
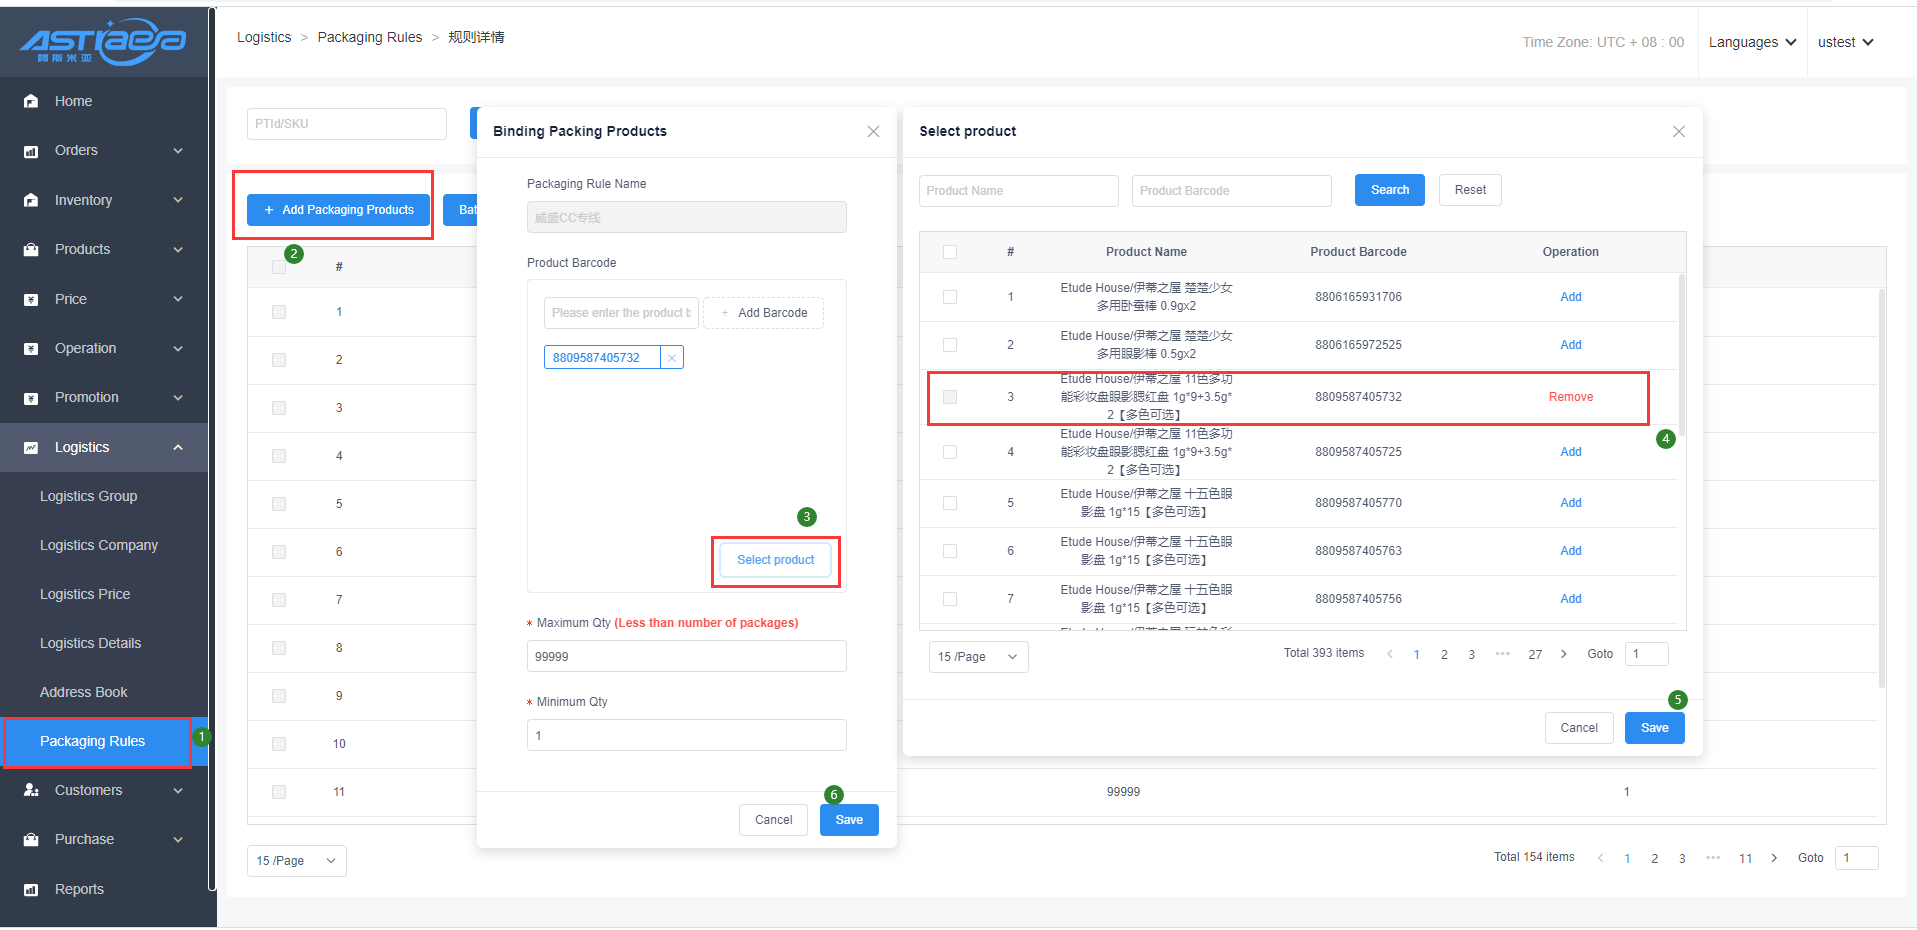
10.5.3 Set quantity of packaging products in batches under packaging rules
Step 1; On the “Rules Details” interface, tick the packaging products with the maximum quantity and minimum quantity to be set, and click "Batch Qty Settings” option.
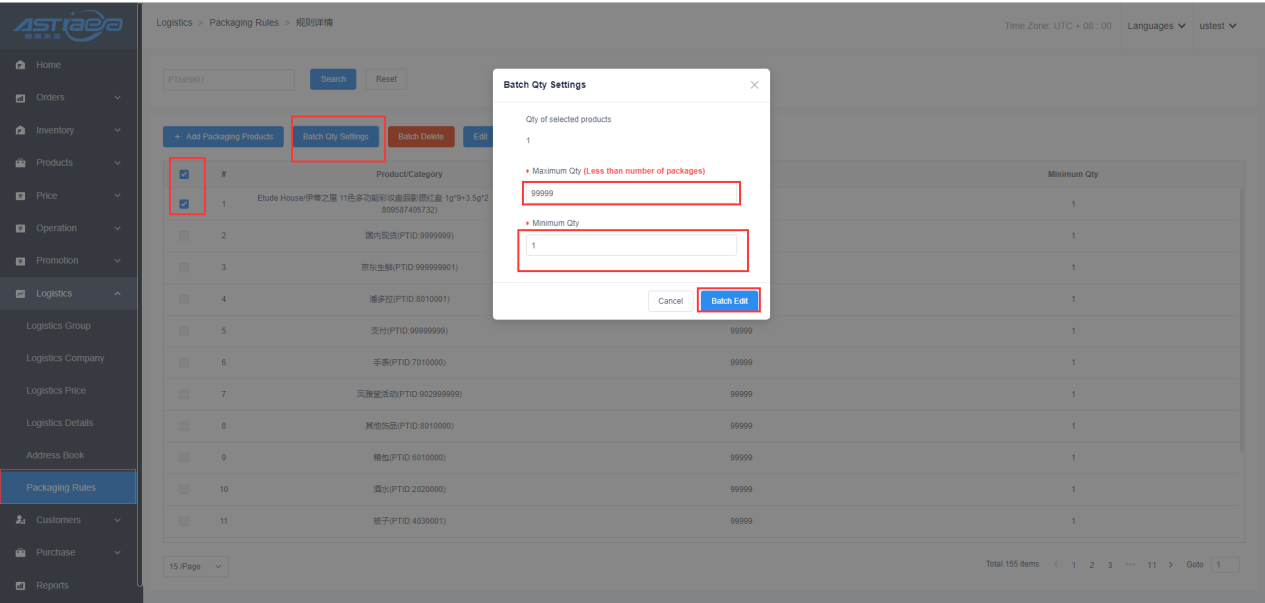
10.5.4 Delete packaging products in batches under packaging rules
Step 1; On the “Rules Details” interface, tick the packaging products to be deleted, and click "Batch Delete” option.
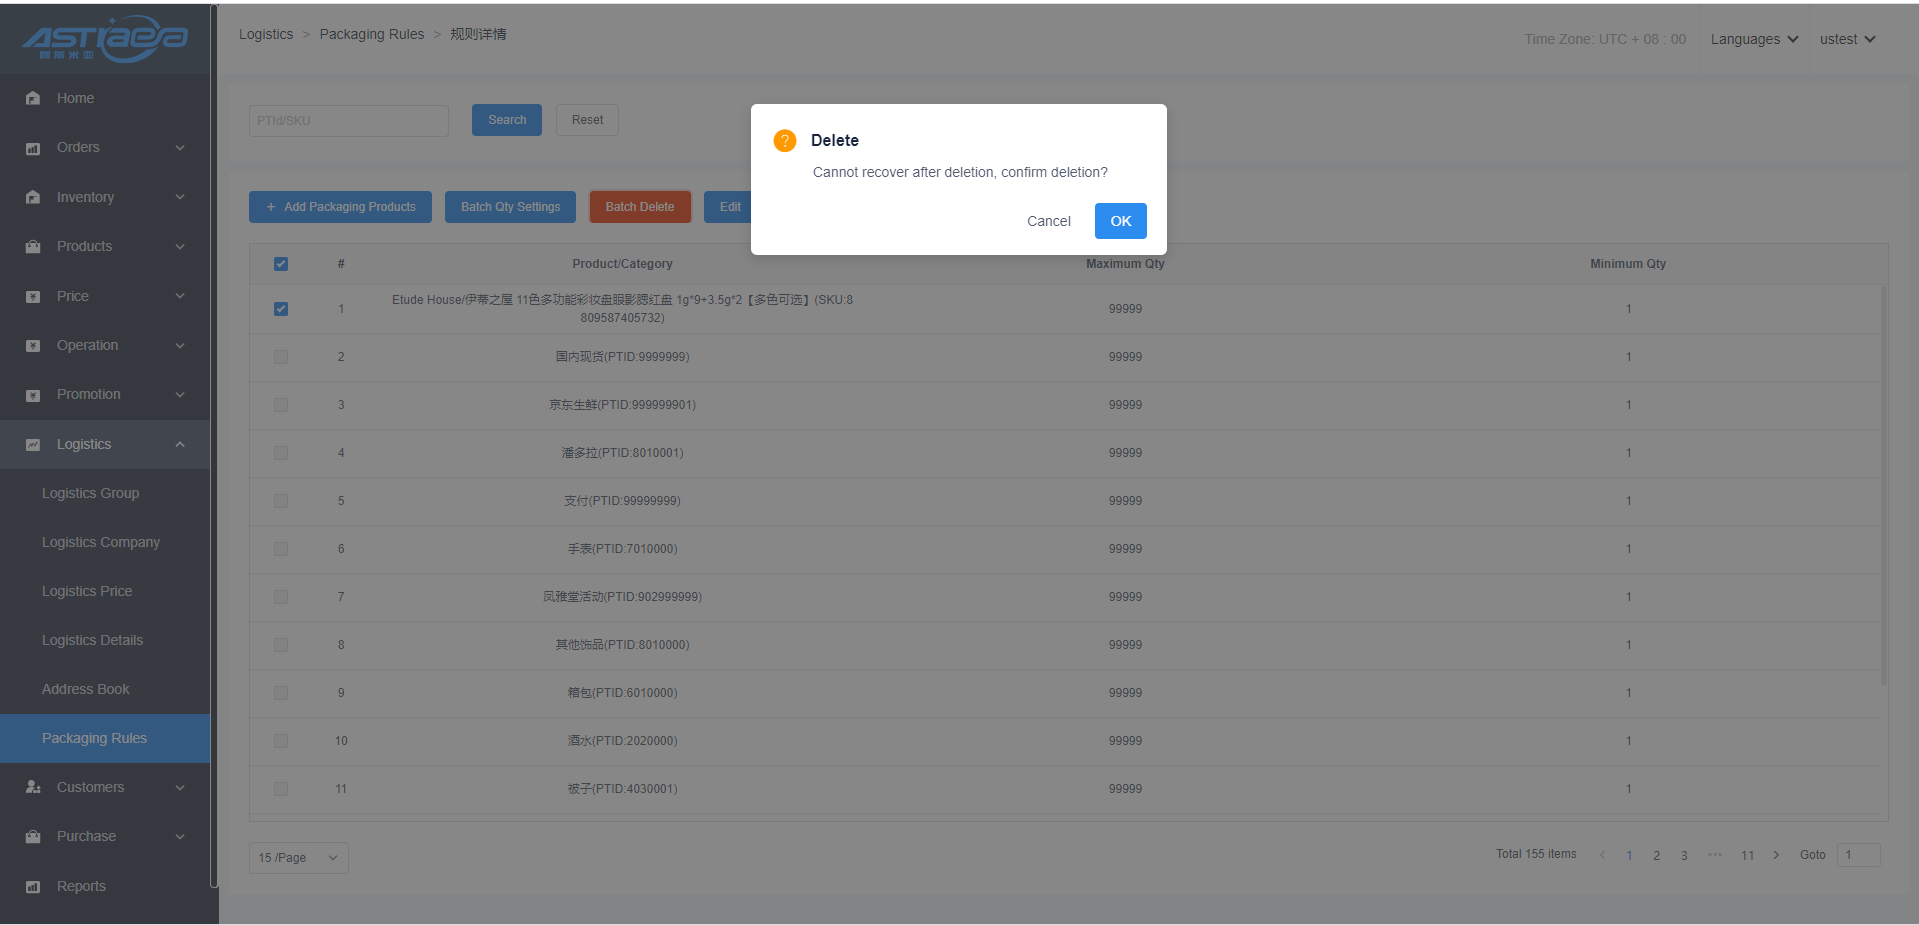
10.5.5 Set quantity of packaging products separately under packaging rules
Step 1; On the “Rules Details” interface, click ‘Edit’ option.
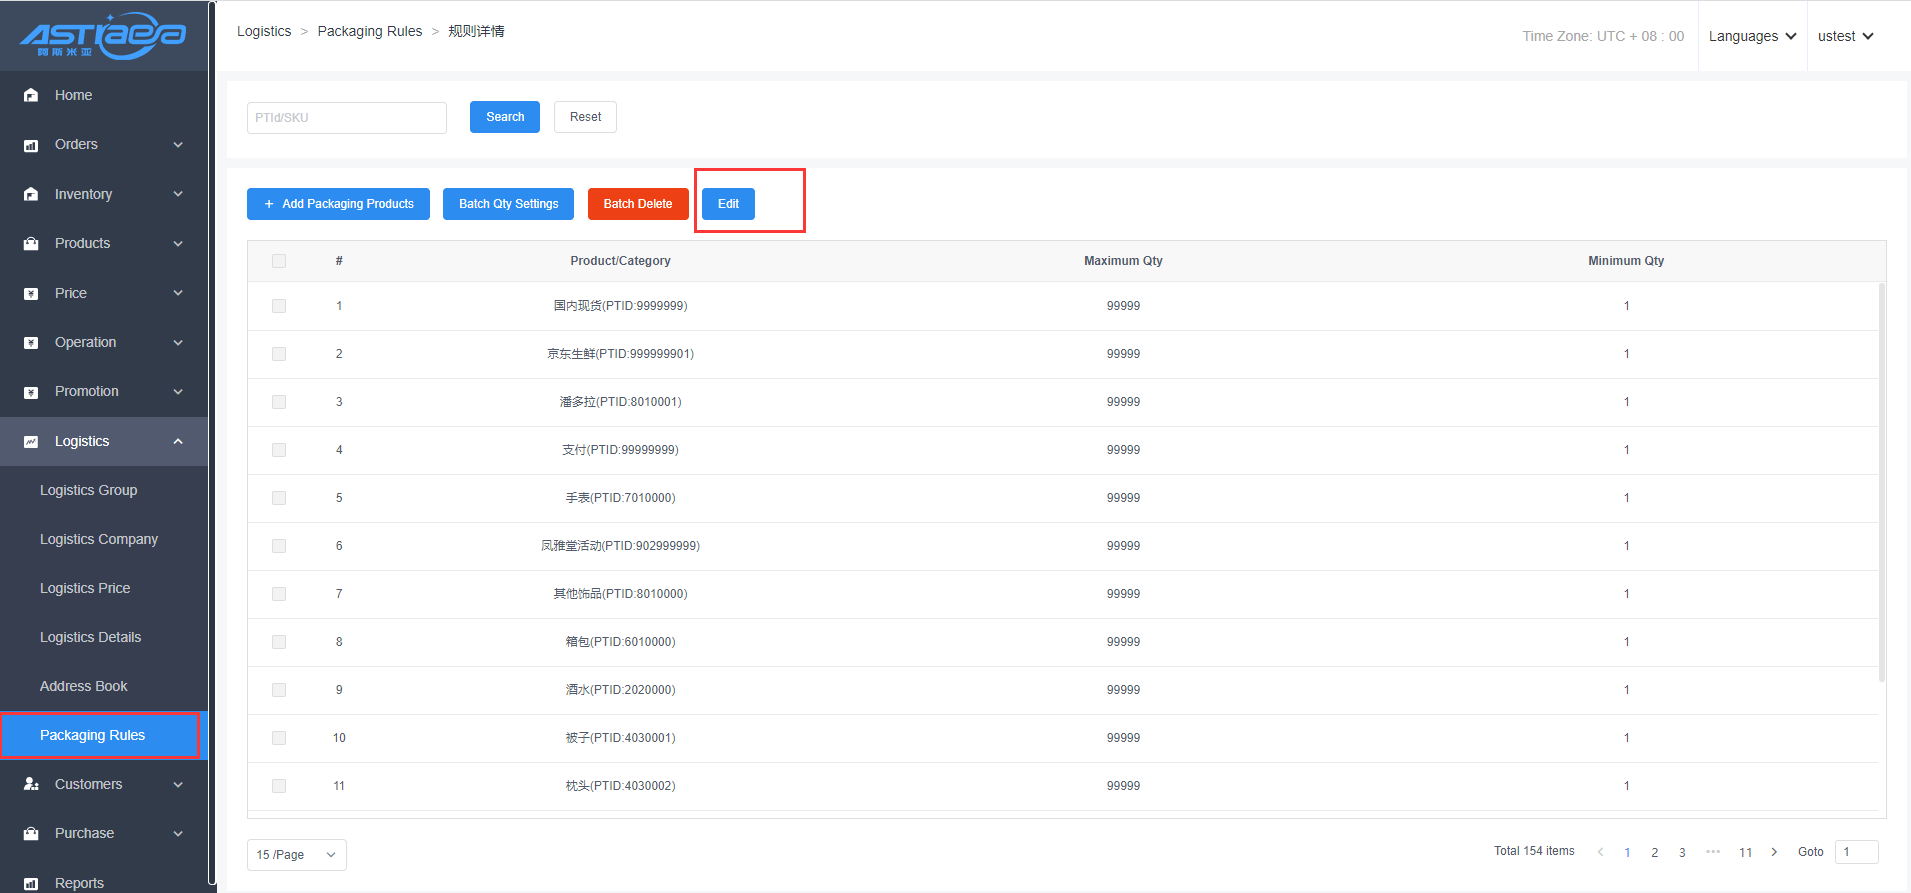
Step 2; Enter the maximum quantity and minimum quantity of packaging products and then click "Save” option.
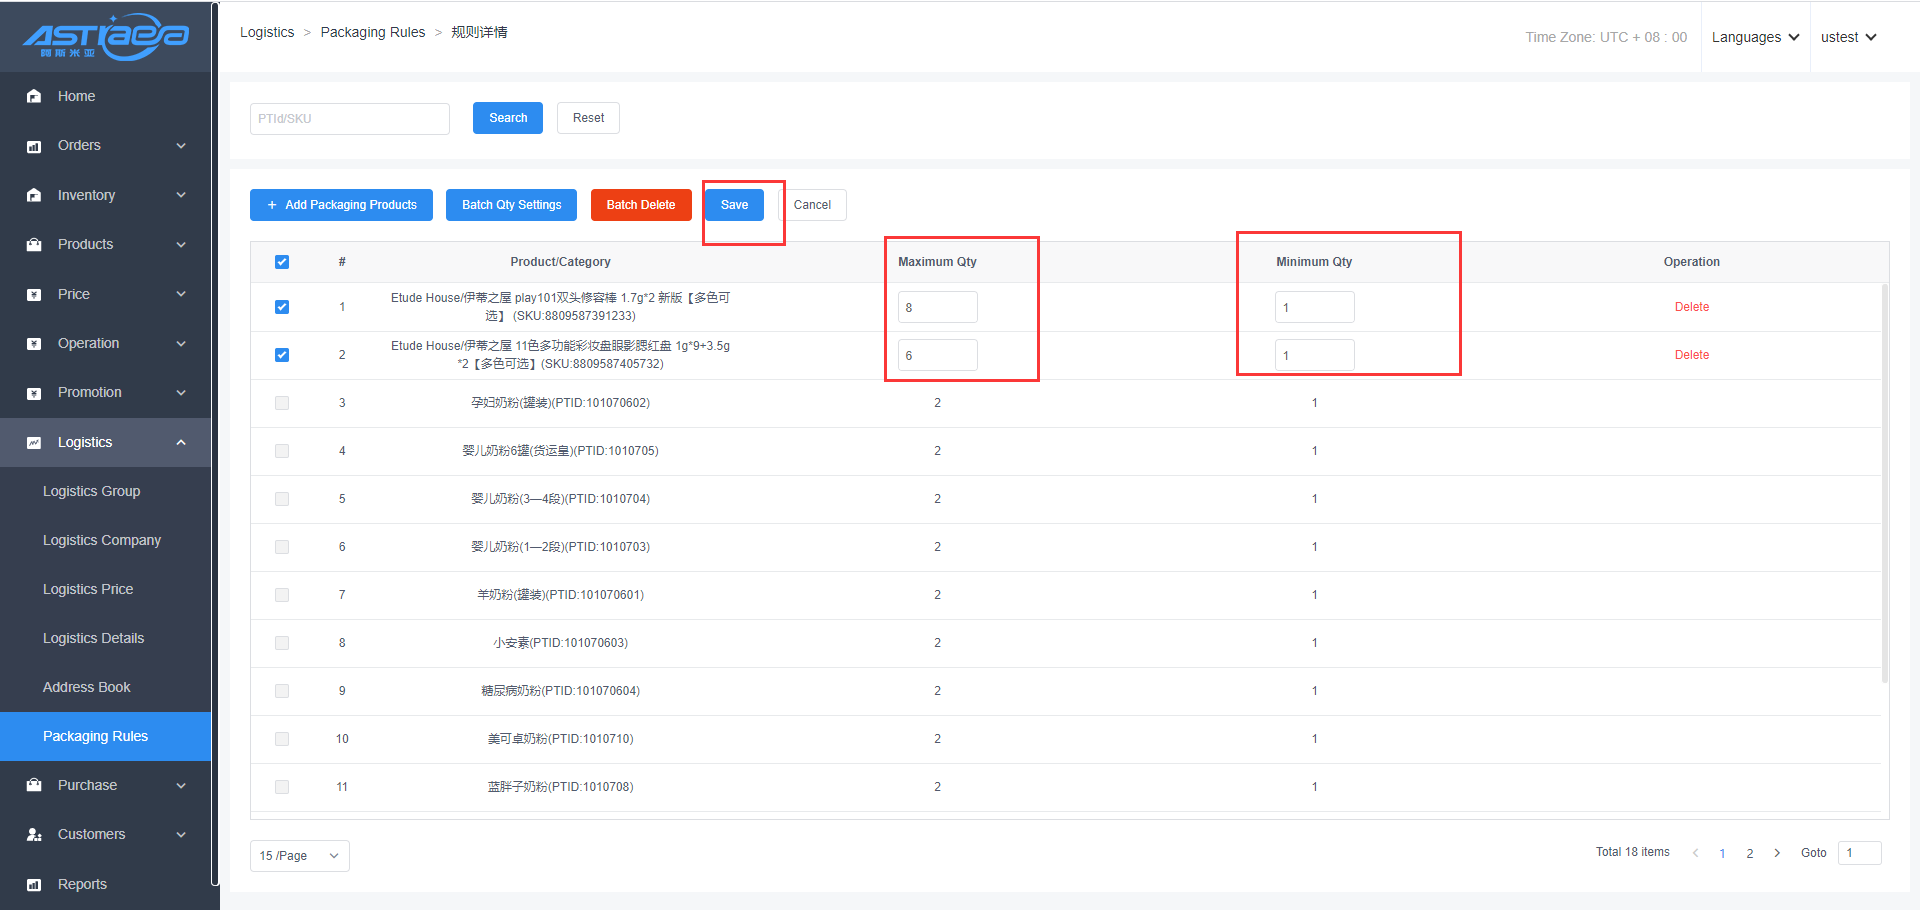
10.5.6 Delete packaging products separately under packaging rules
Step 1; On the “Rules Details” interface, click ‘Edit’ option.

Step 2; Click "Delete" option after the packaging rules to be deleted.
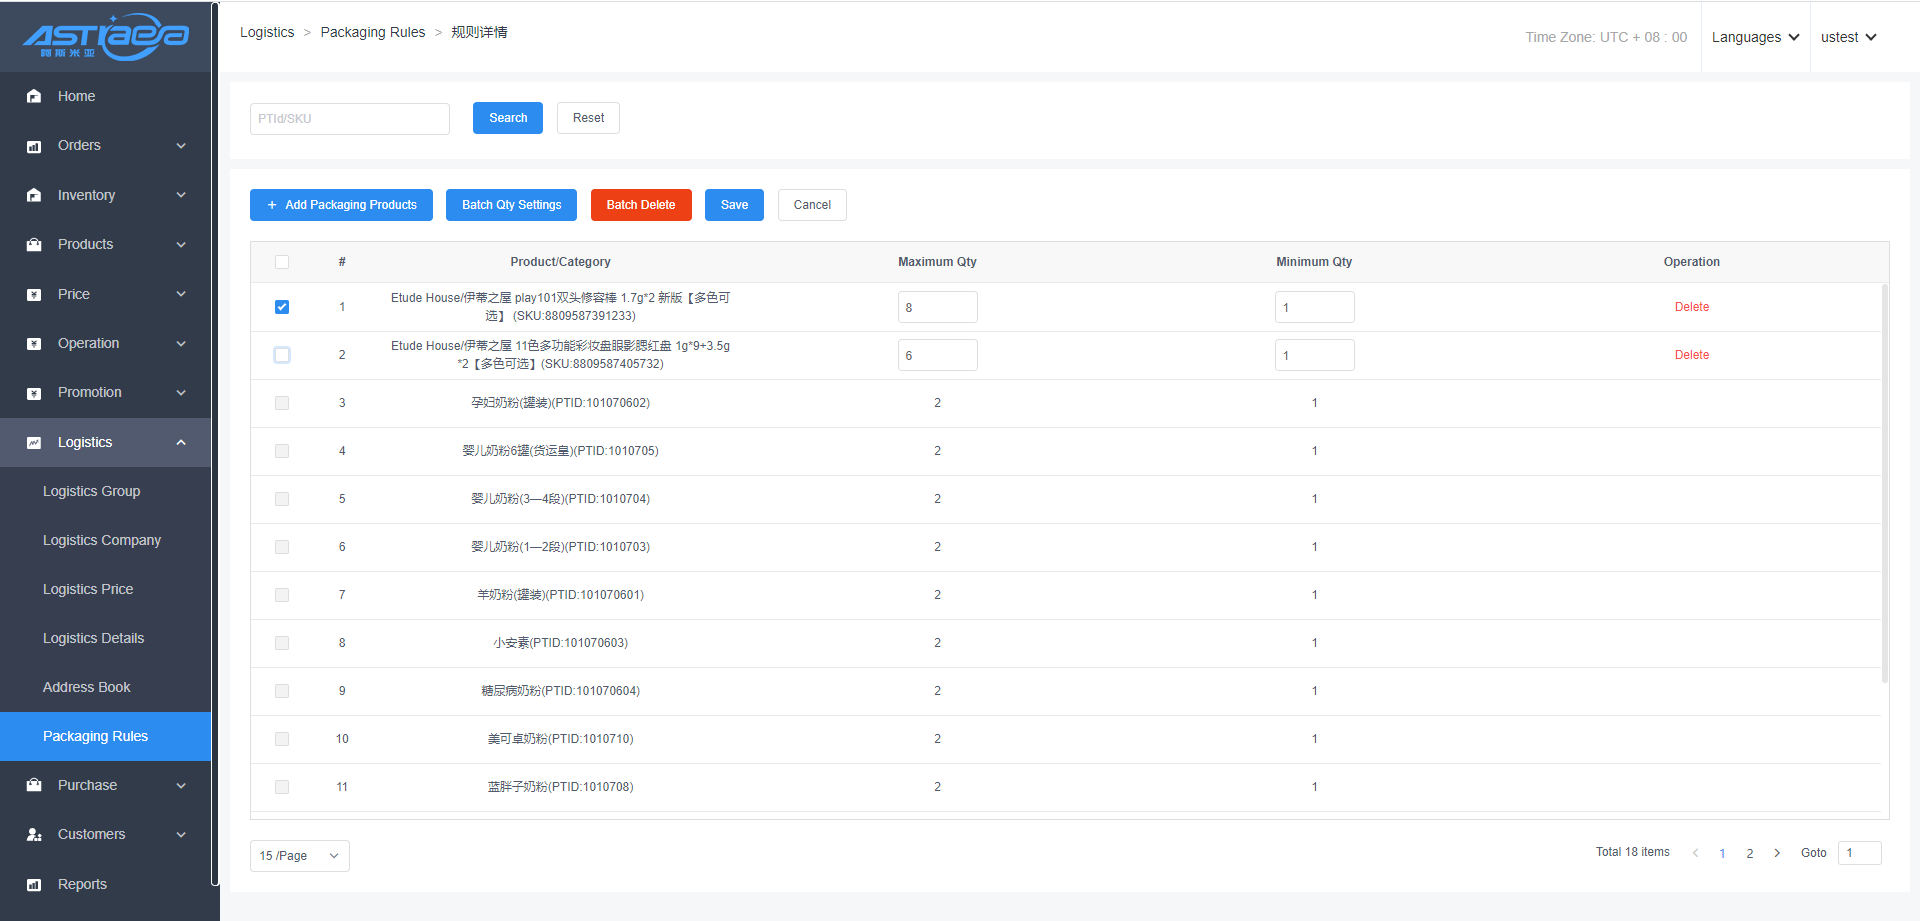
XI. Merchant Tenant Registration
11.1 Merchant Registration
Step 1; Enter the login page of APos and click “Register Account”.
Step 2; Enter the page named Account, then enter your information according to your actual situation.You can choose America, China, or Australia.If you finish it, please click “Next”.
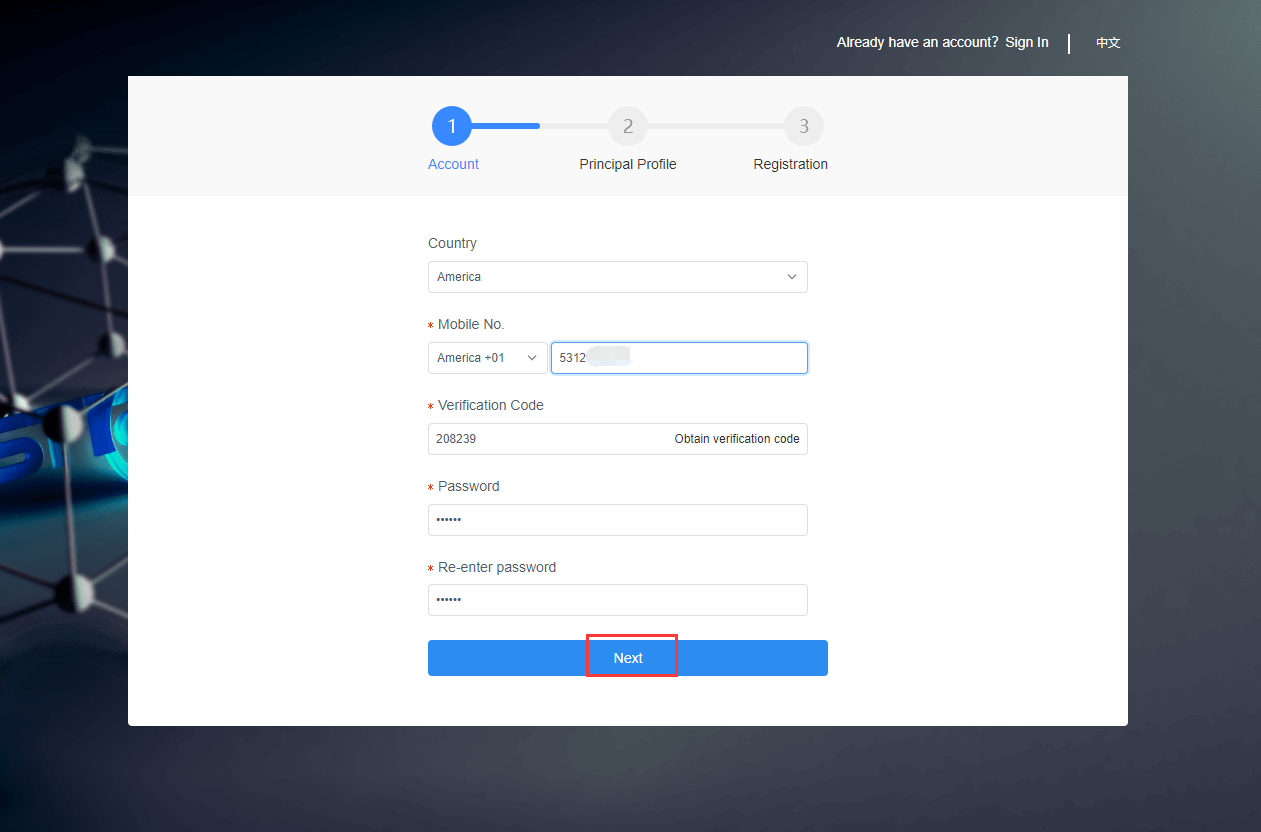
Step 3; Enter the page named Principal Profile, then enter your information.If you finish it, please click “Next”.
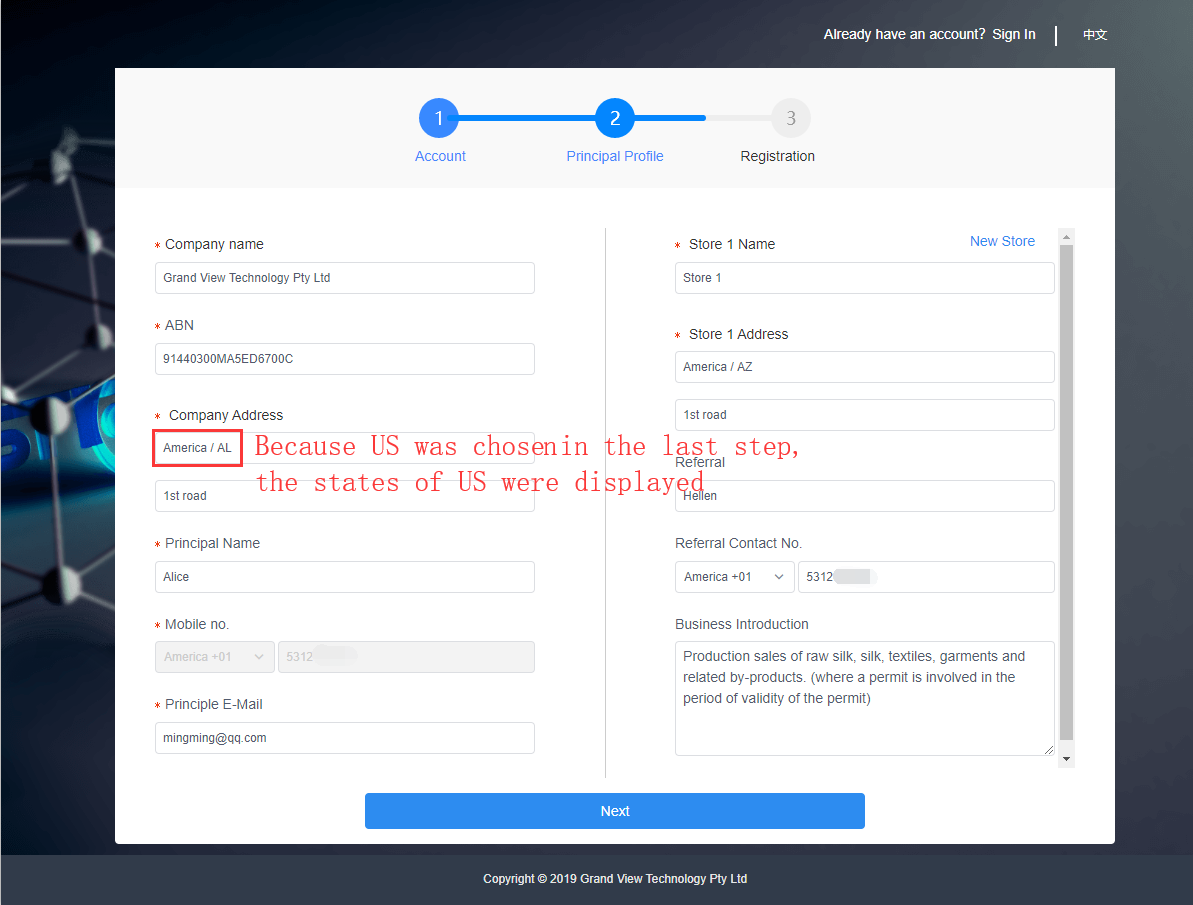
Step 4; Enter the page named Registration,choose the product version you need.When you agree to the user agreement,please click “Activate Account”.
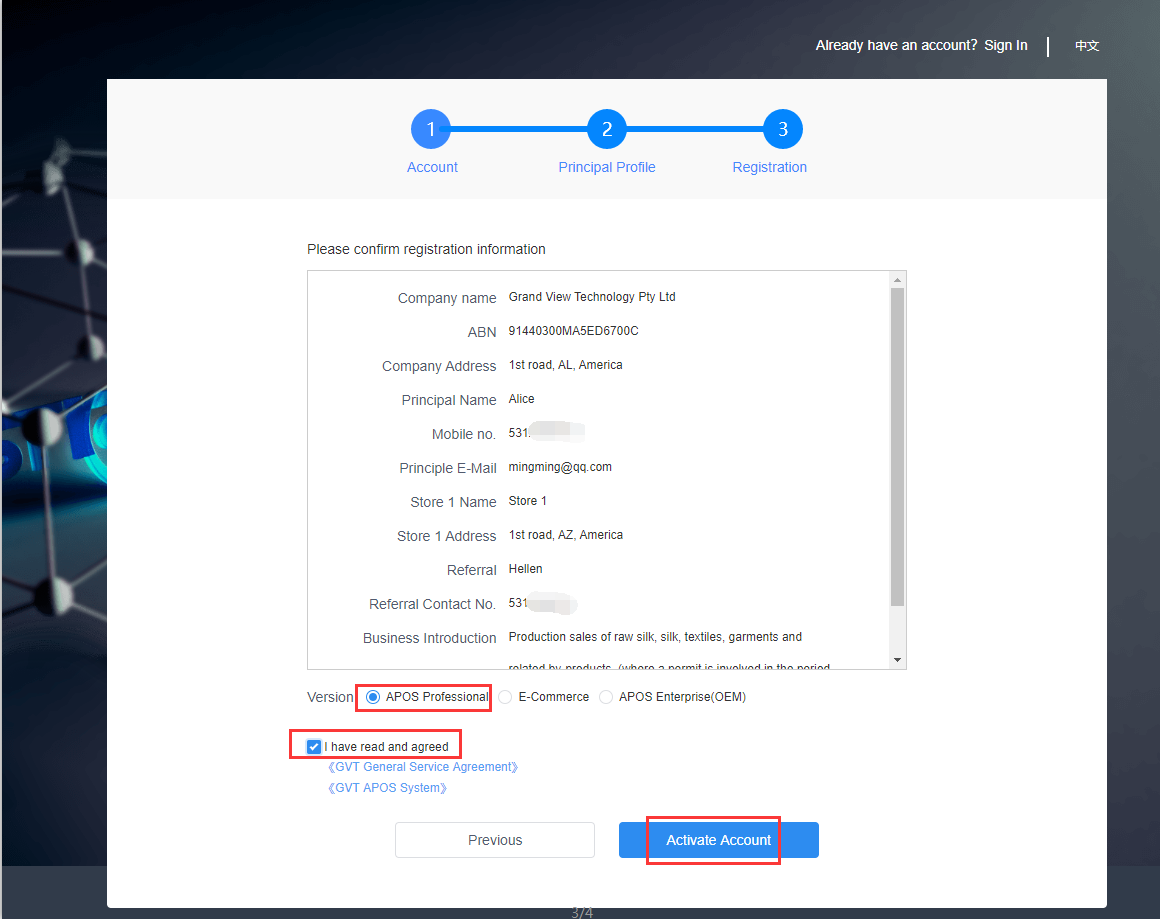
Step 5; Enter the login page of APos and enter your phone number or email to login.

XII. Daily Sales at Client
Note:
Local goods and cross-border goods cannot be ordered at the same time.
Third-party cross-border payment must be made for cross-border products.
12.1 Local product sales
Step 1; Enter the product and click "Pay” option.
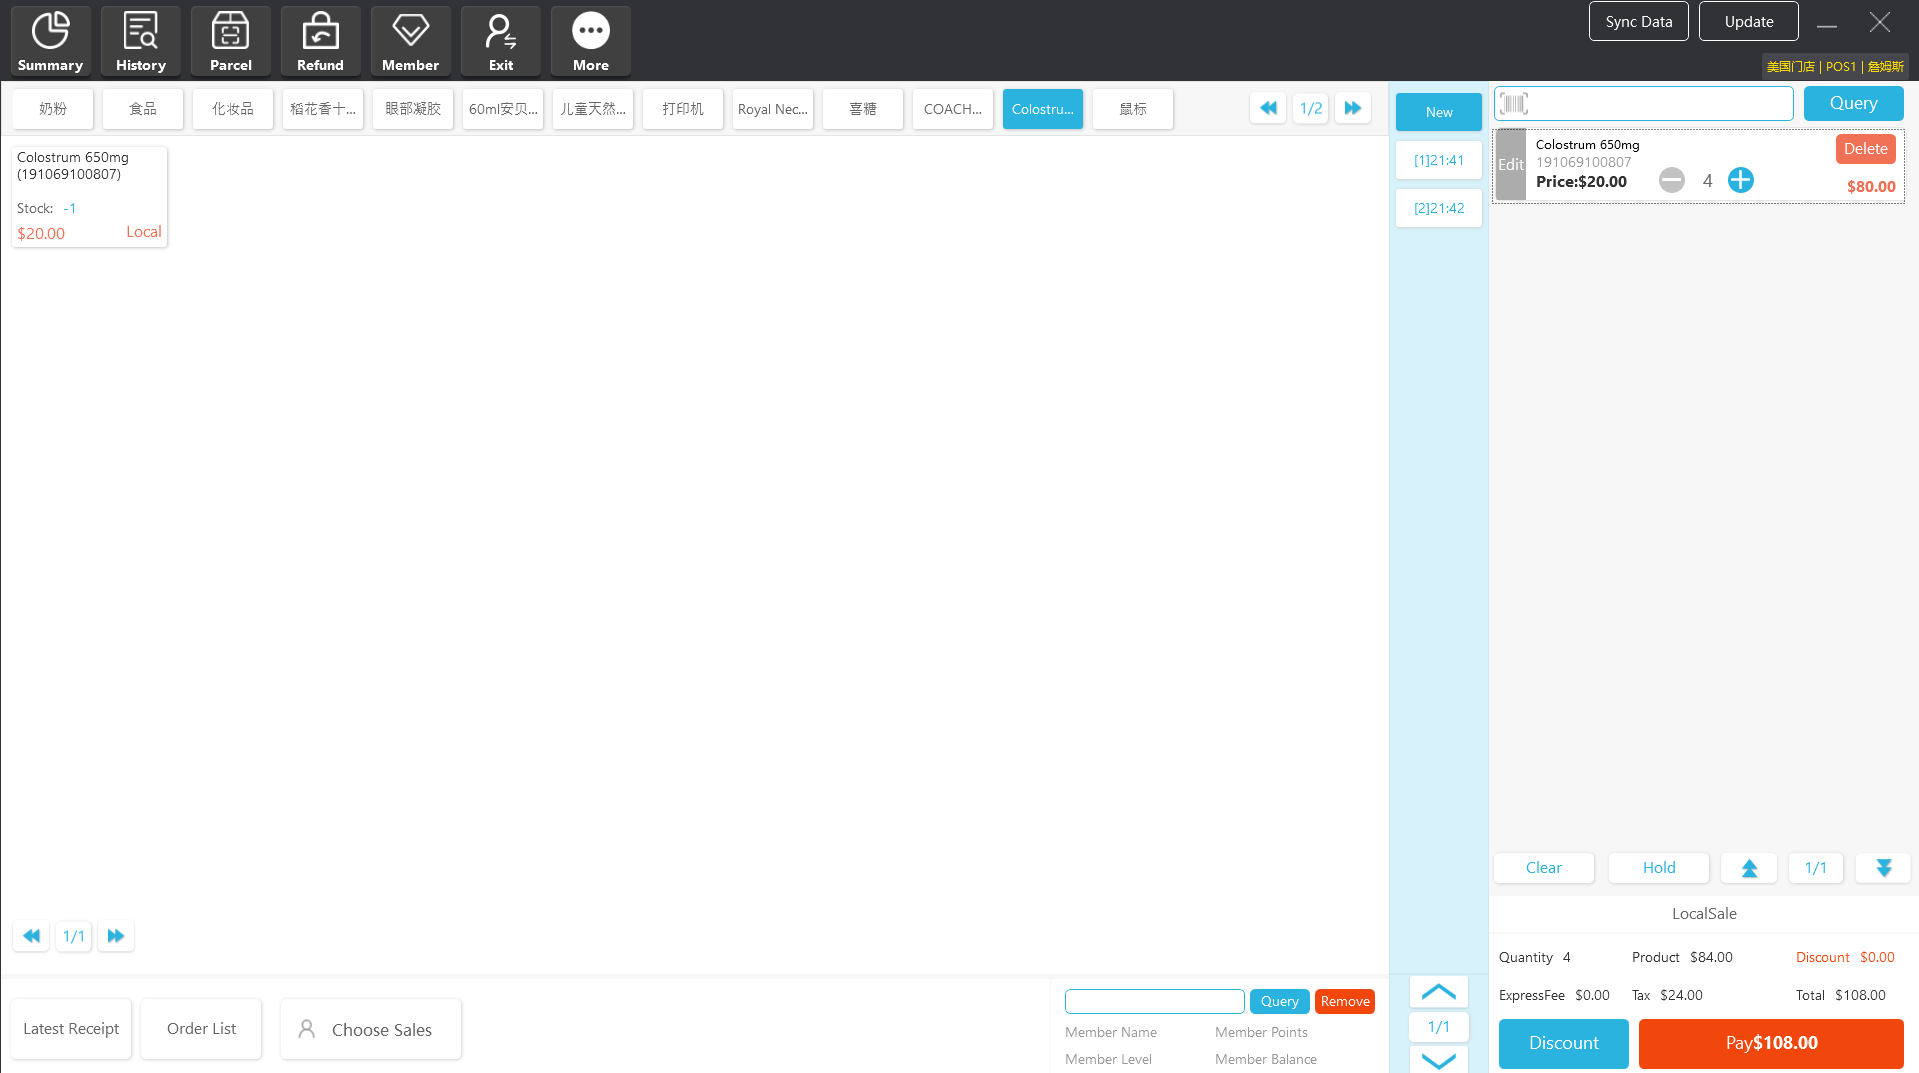
Step 2; Select payment method.
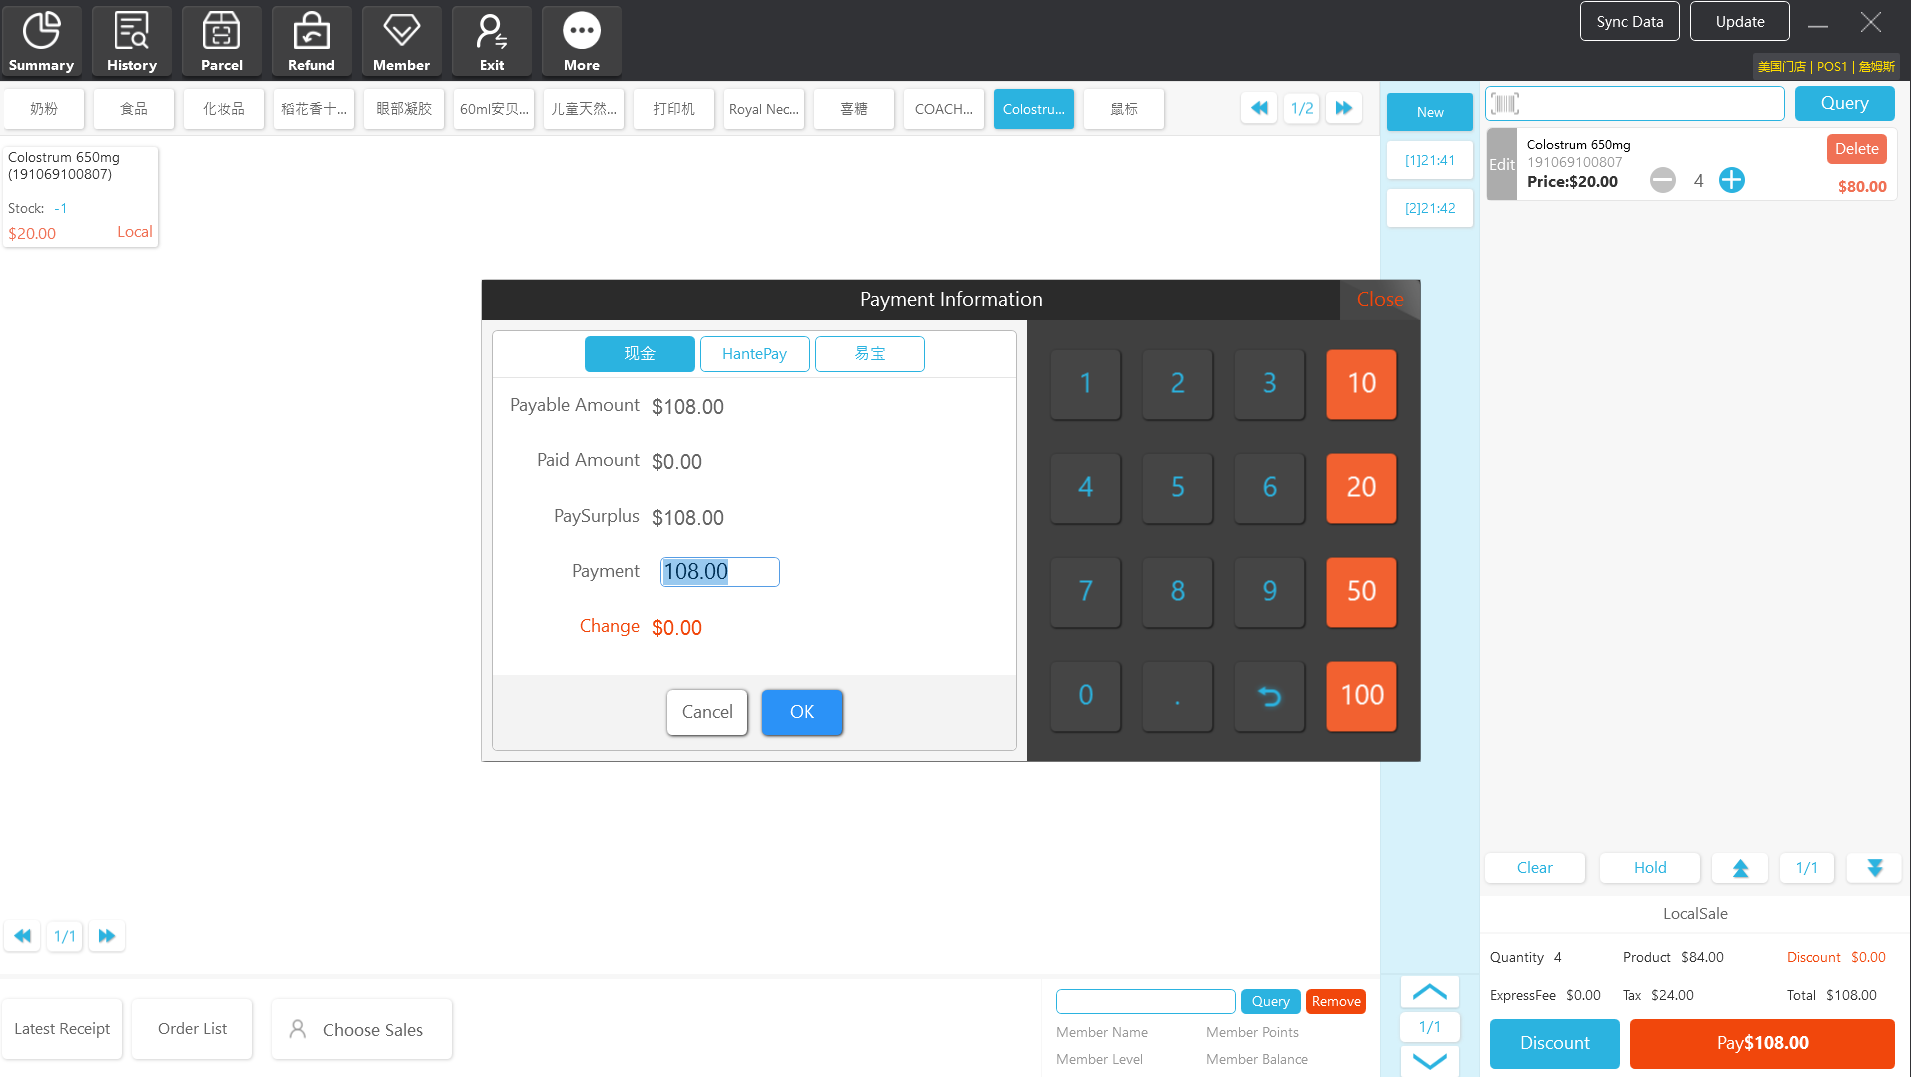
Step 3; Click “OK” option, and print the receipt to finish all operation steps.
12.2 Return of Goods
Note: Refund of cross-border product is not currently supported.
The refund process for local orders is as follows:
Step 1;
- Log in the “Refund” interface, and enter or scan the order No. on the receipt.
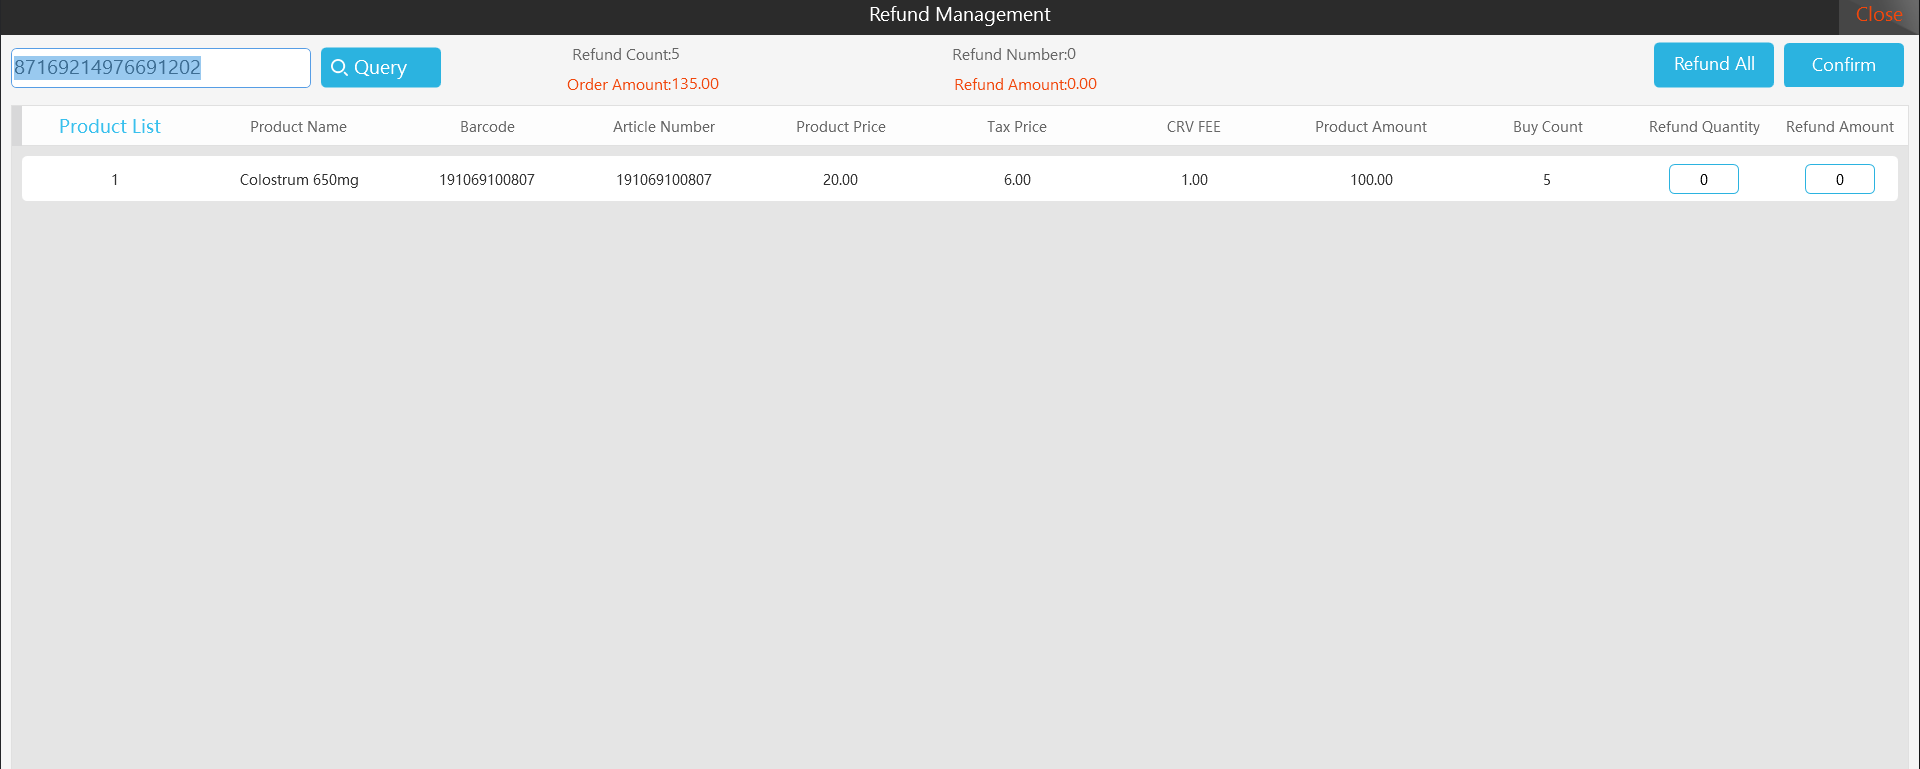
- On the “History” interface, query the order and click
Refundoption.
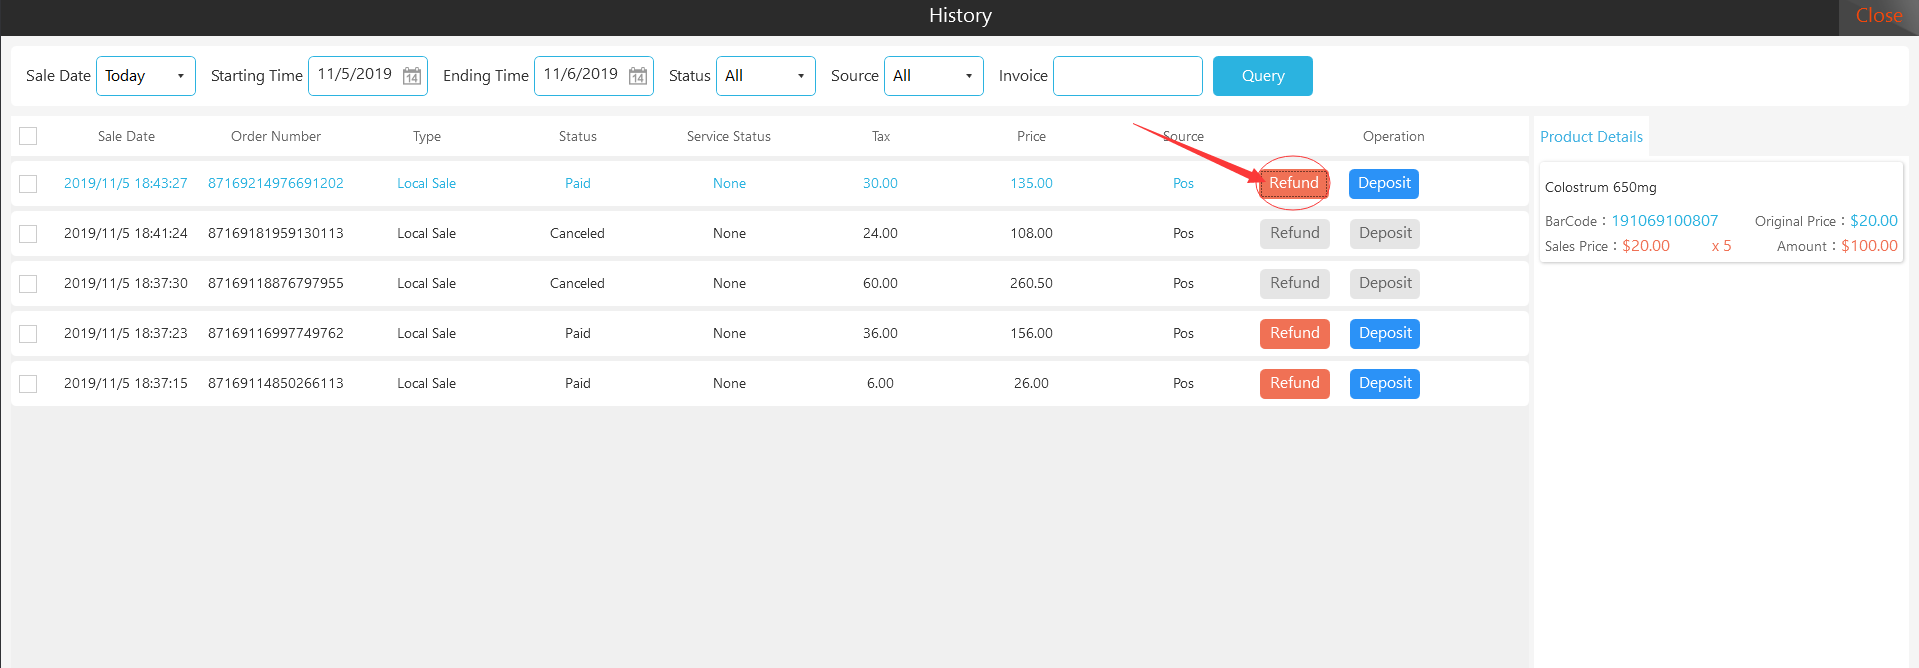
Step 2;
If the refund of all products is supported, click [Refund All] option.
If the refund of some products is supported, select the product to be refunded, enter the quantity and refund amount, and click
Confirmoption.

Step 3; Select the refund method, enter or select "Refund Reason", and click "Confirm" to finish all operation steps.
12.3 Today performance
Description;
Order sales (incl. tax), including refund order

Total revenue: transaction amount of sales order (after-discount)

Product sales: after-discount sales amount of products, including tax

Logistics sales: after-discount sales amount of logistics, including tax

Product refund (incl. tax)

Refund amount: transaction amount of refund order (after-discount)

Product refund: after-discount refund amount of products, including tax

Logistics refund: after-discount refund amount of logistics, including tax

Receivable

Receivable amount = total revenue - refund amount + top-up amount = top-up
receivable + product receivable + logistics receivable

Product receivable = product sales - product refund

Logistics receivable = logistics sales - logistics refund

Actual payment

Amount payment = total receivable + surcharge - wide surplus
Cash of cash receipts and payments
Cash income refers to the total amount payment in cash, without deduction of refund amount.
Cash refund refers to the refund amount in cash when refunding the product
Take cash refers to the sum of "take cash from store" and "daily take cash settled”
Cash income - cash refund - take cash = cash balance
Pretty cash of cash receipts and disbursements
Initial pretty cash refers to the pretty cash amount transferred the day before.
Add pretty cash refers to the amount increased through the "add pretty cash”
Take pretty cash refers to the amount of "take pretty cash”
Initial pretty cash + add pretty cash - take pretty cash = pretty cash surplus
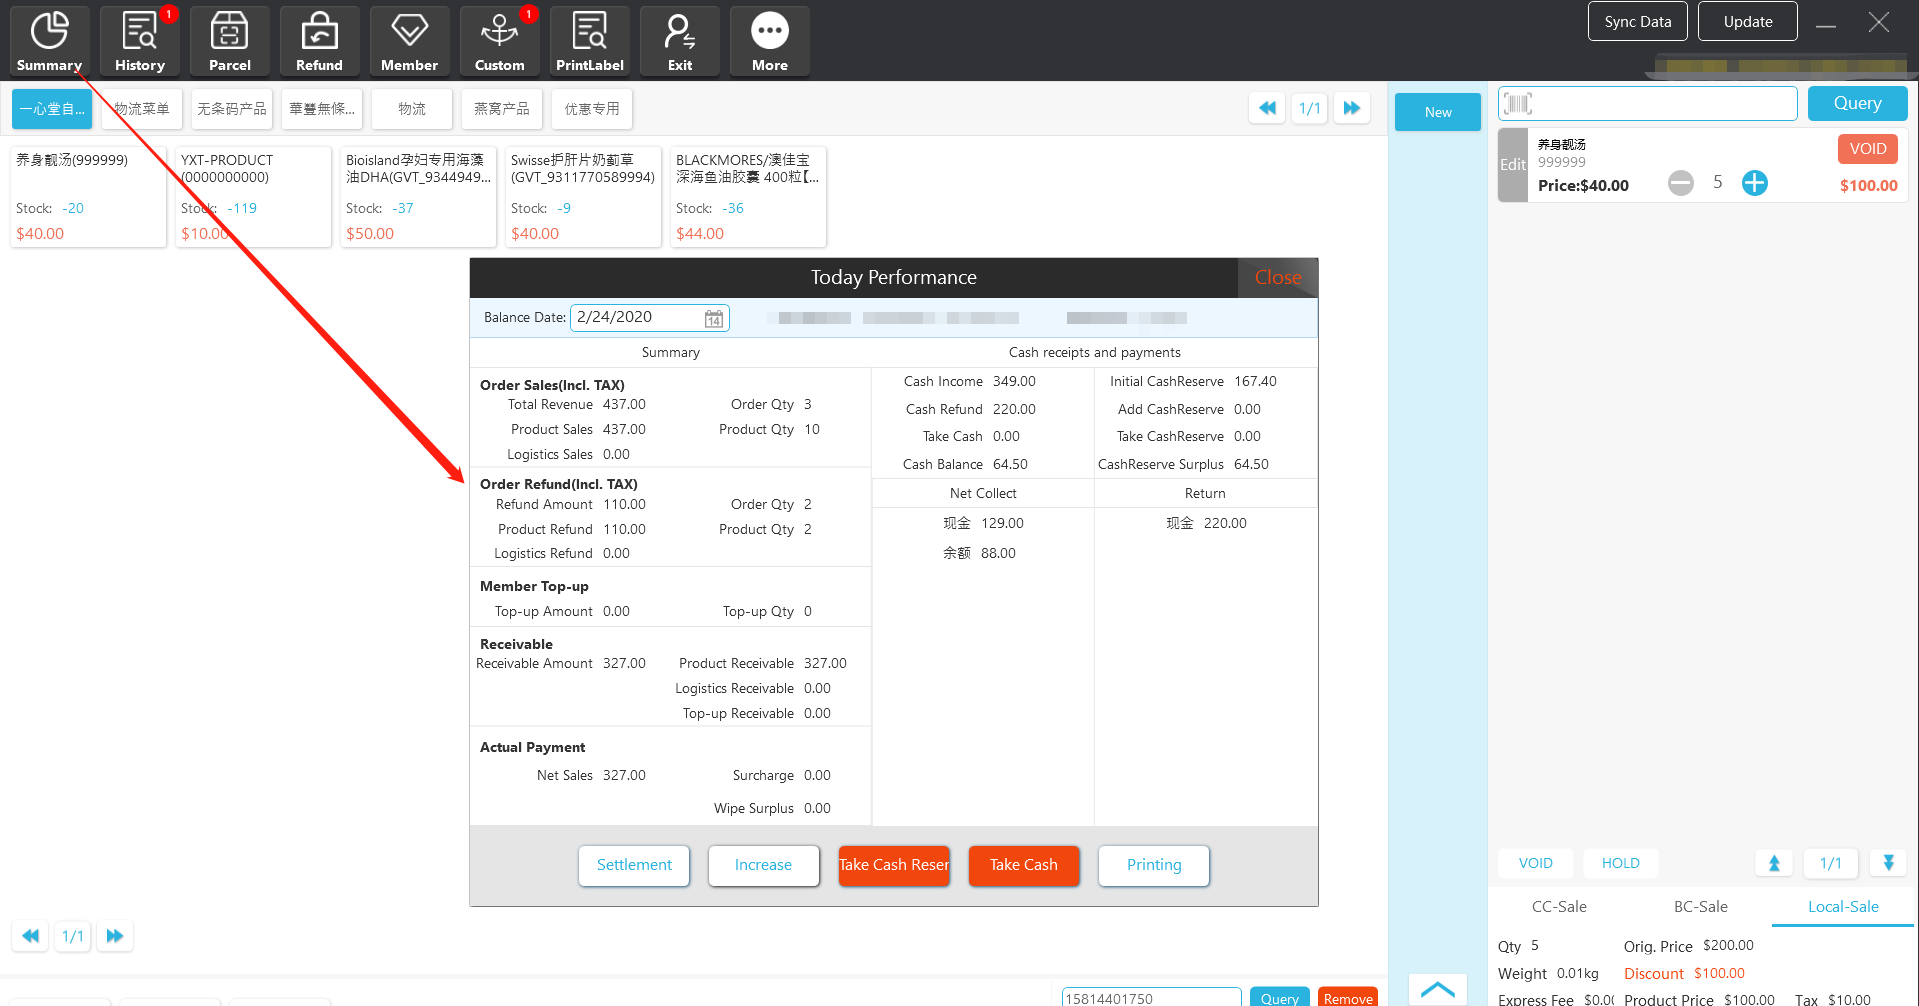
Daily settlement: take the cash balance and the amount from pretty cash. The cash amount not taken after daily settlement will be automatically transferred to pretty cash.
Add pretty cash: Increase the amount to the pretty cash of the stores
Take pretty cash: Take the cash amount from the pretty cash
Take cash: Take the amount from the cash balance
Print: Print the data of daily settlement, in which all amount of cash balance is transferred to the pretty cash balance by default.
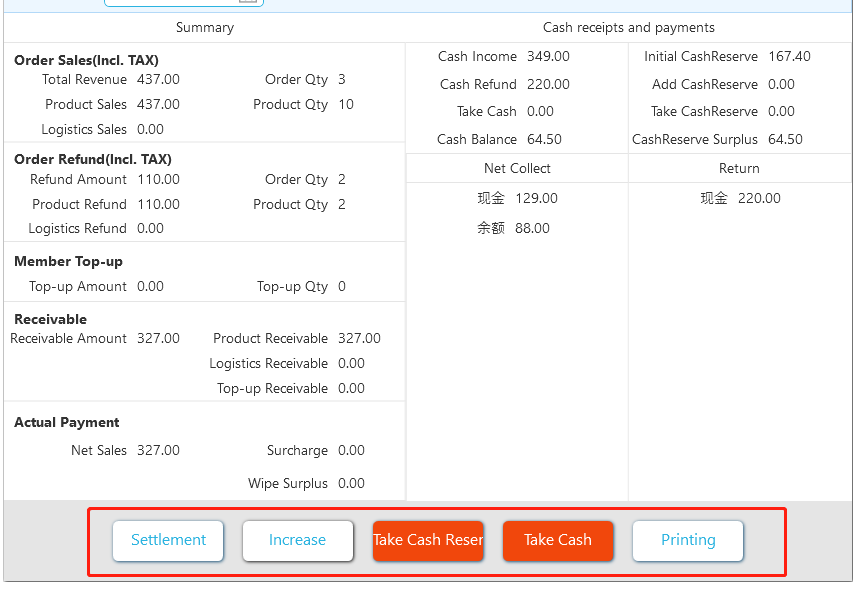
12.4 Order query
[Operating steps]
Step 1; Click "Query" option in the navigation bar to enter the order query interface
You can query the order information, print the order receipt, refund the product, deposit the product, reprint the receipt, etc. on the order query interface.
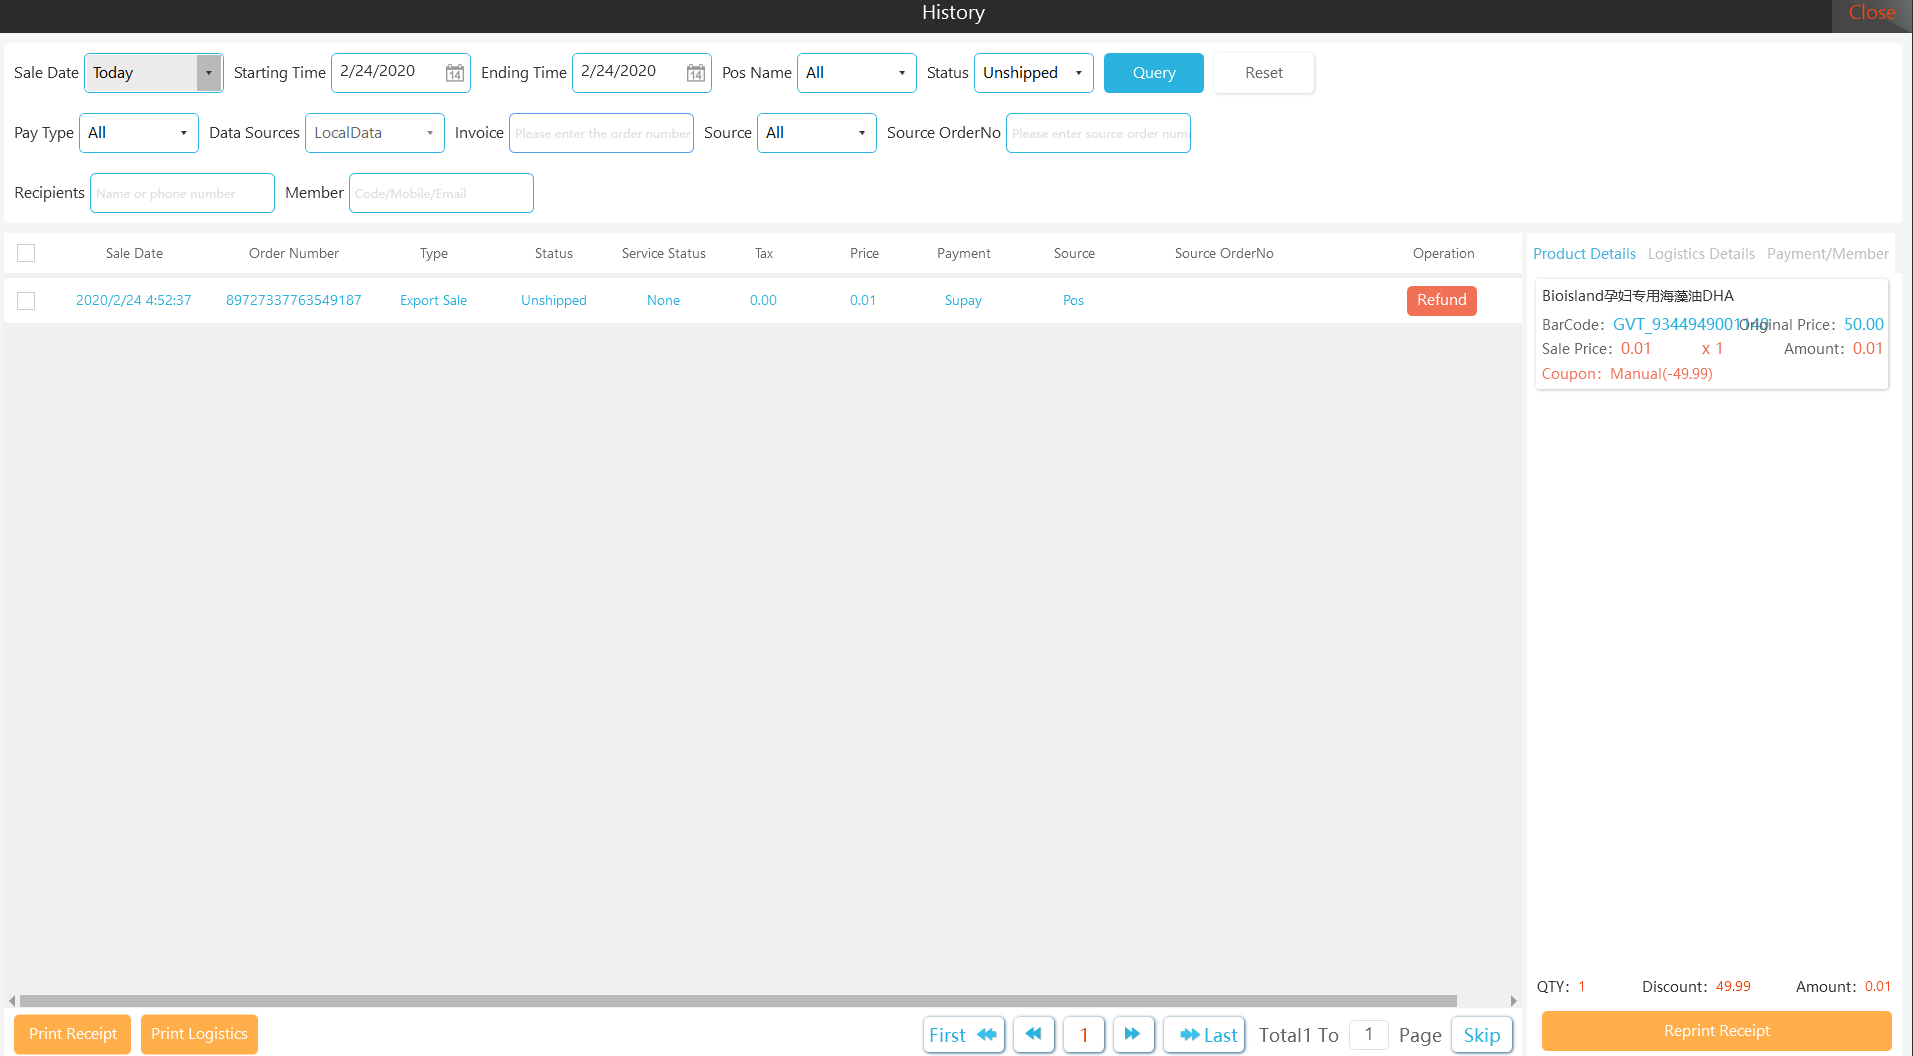
12.5 Parcel
12.5.1 Parcel Details
【Steps】
Step 1; Click "Parcel" in the navigation bar to enter the parcel details page.
Step 2; Select the corresponding logistics order, and click "Reprint Logistics Order"
Step 3; Select the uncollected logistics order, and click "Bulk Collection" (the logistics status changes from not collected to collected)
Step 4; Click "Print" to directly print the logistics bill and calculate the number of prints to display the print time.
Step 5; Click "Details" to view the detailed information of the package (including product information, logistics orders, logistics tracks, packing photos, picking up orders,etc.)

12.5.2 Pick up
【Steps】
Step 1; Enter the Parcel details page
Step 2; Scan the logistic bar code with a code scanning gun or manually enter the logistic bar code and click “Enter” option.
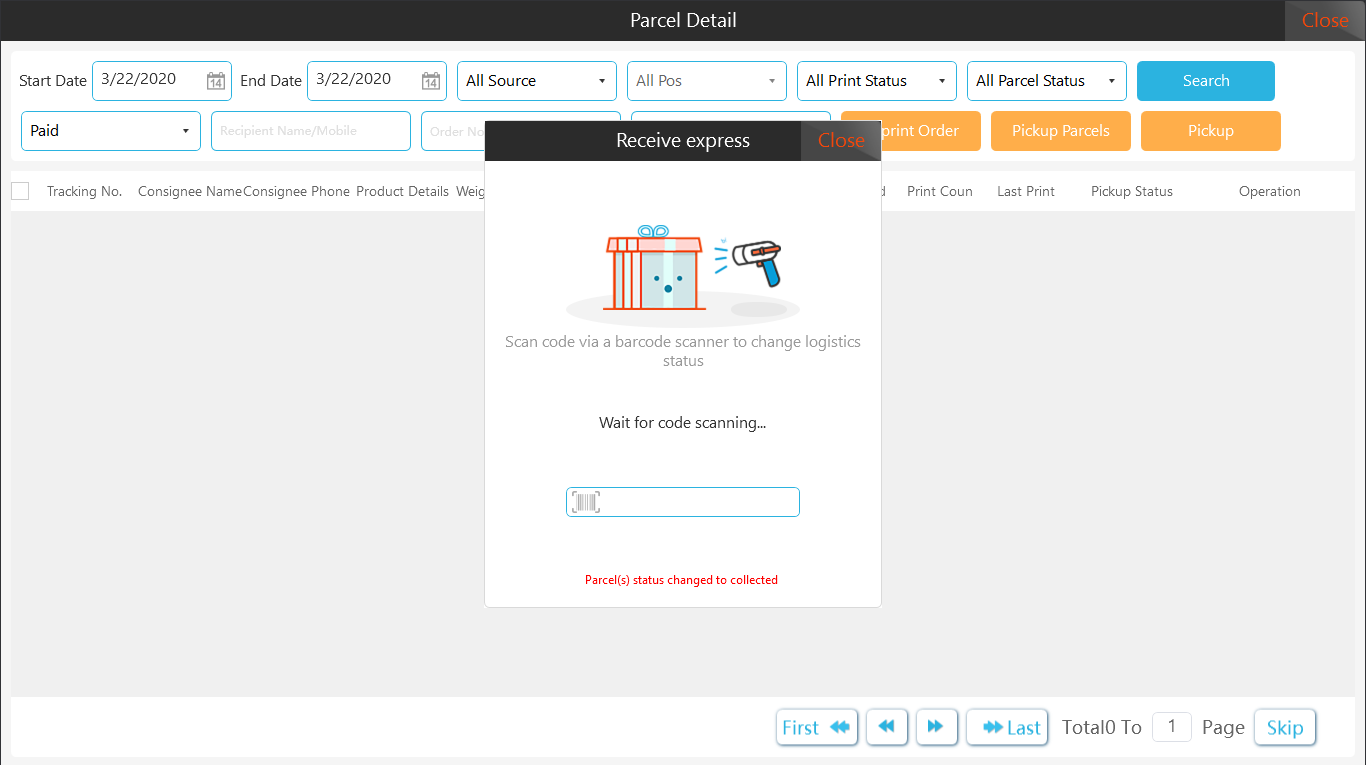
12.6 Member
12.6.1 Center
[Operating steps]
Step 1; Click "Member" option in the navigation bar and select "Center" from the drop-down box.
Step 2; Enter the member mobile No. to query the member information and enter the Center interface.
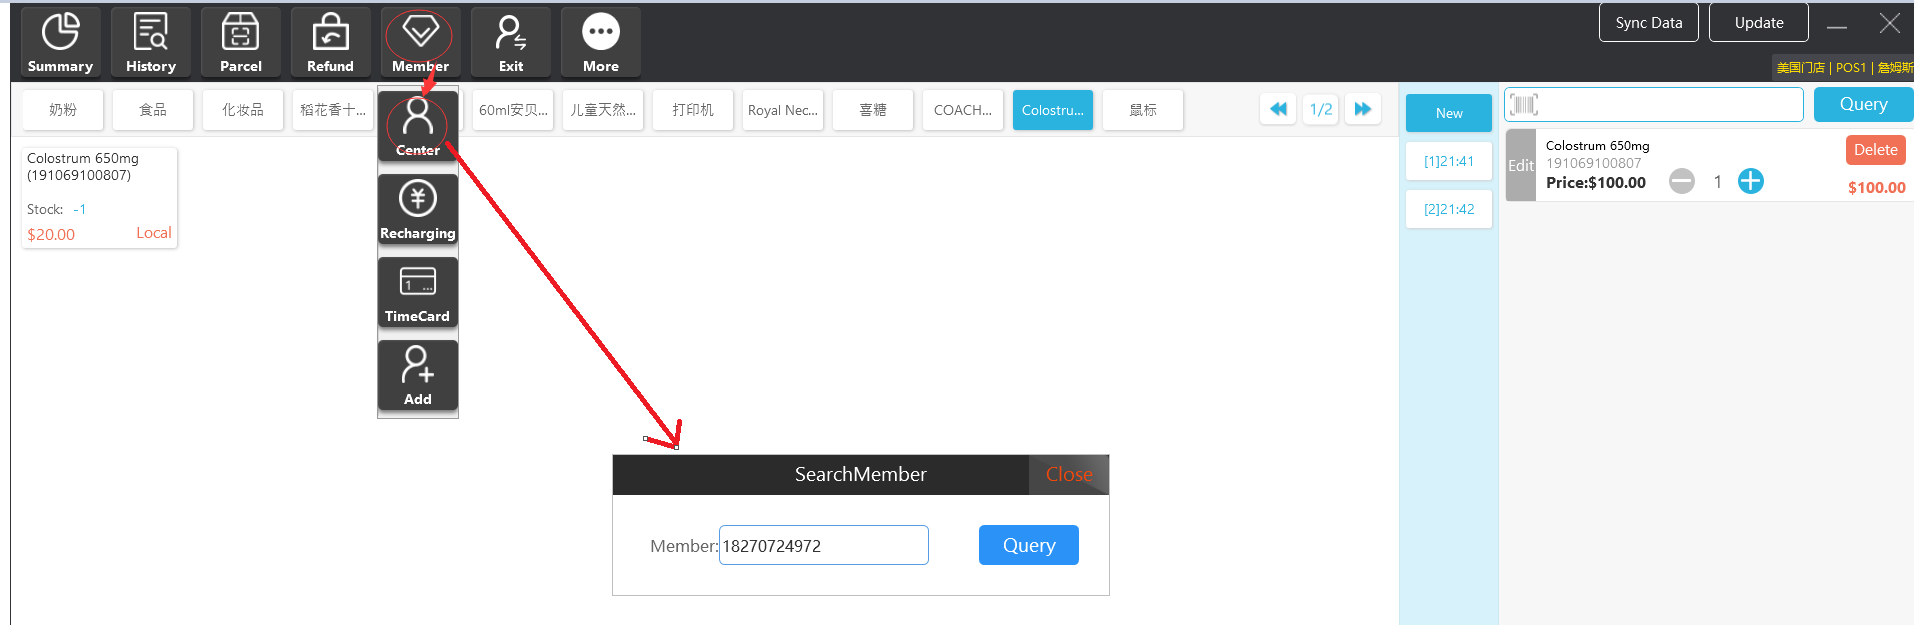
Step 3; On the Center interface, you can top-up your card, buy a timecard, and view your points, deposit, and the usage detail of the timecard, etc.
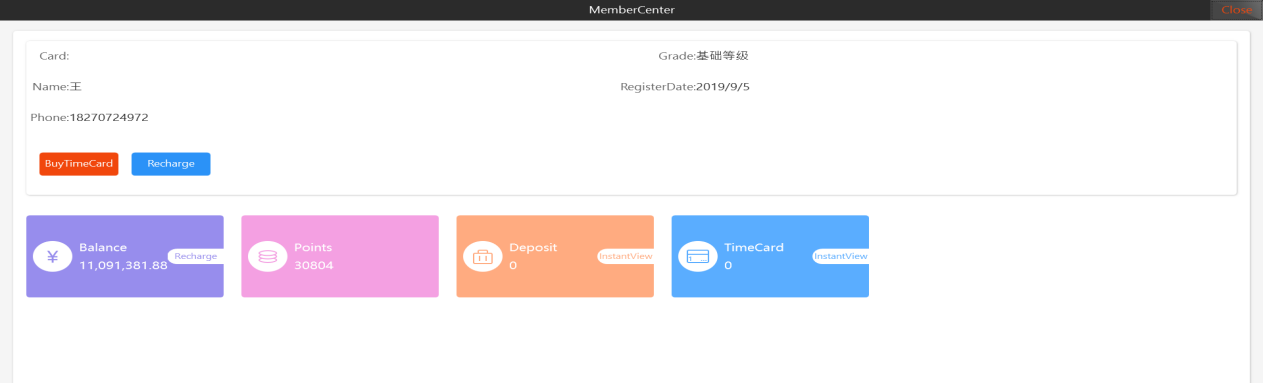
12.6.2 Top-up
[Operating steps]
Step 1; Click "Member" option in the navigation bar and select "Top-up" from the drop-down box.
Step 2; Enter the member mobile No. to query the member information, enter the top-up amount and remark content, and click “OK” option.
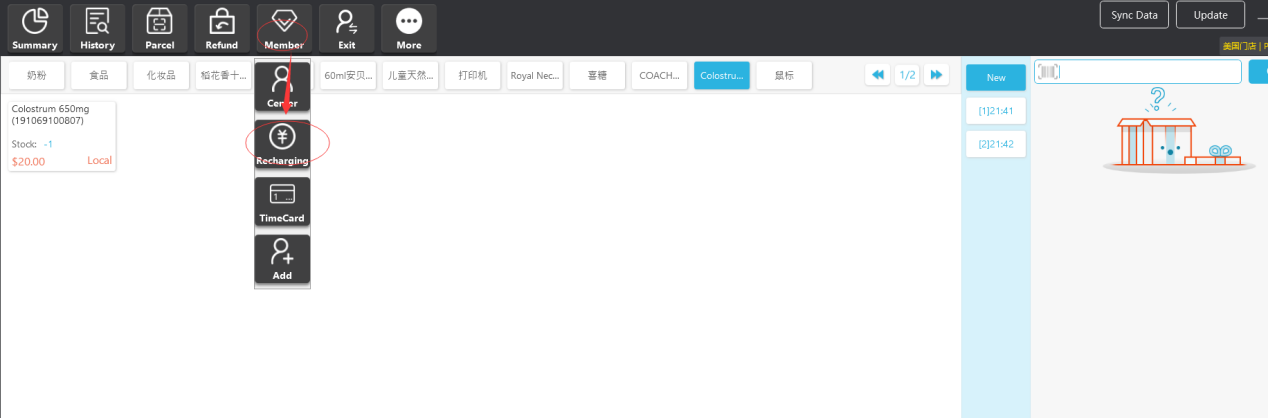
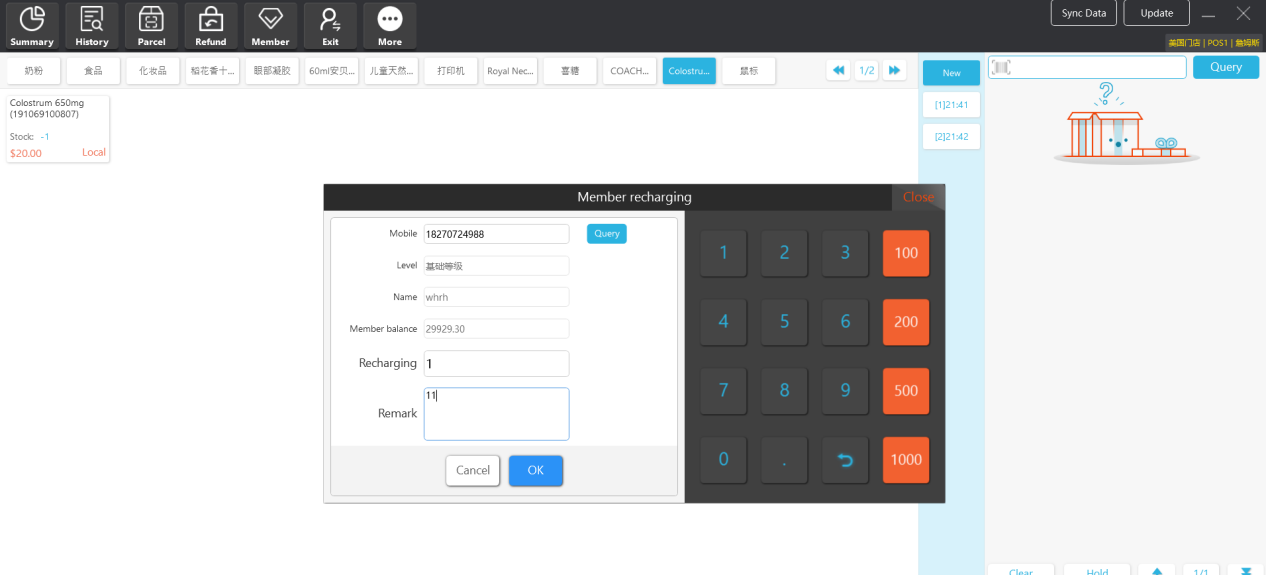
12.6.3 Buy timecard
[Operating steps]
Step 1; Click "Member" option in the navigation bar and select "Timecard" from the drop-down box.
Step 2; Enter the member mobile No. to query the member information and enter the “Buy Timecard” interface.
Step 3; Select the corresponding time card and click “Buy” option.
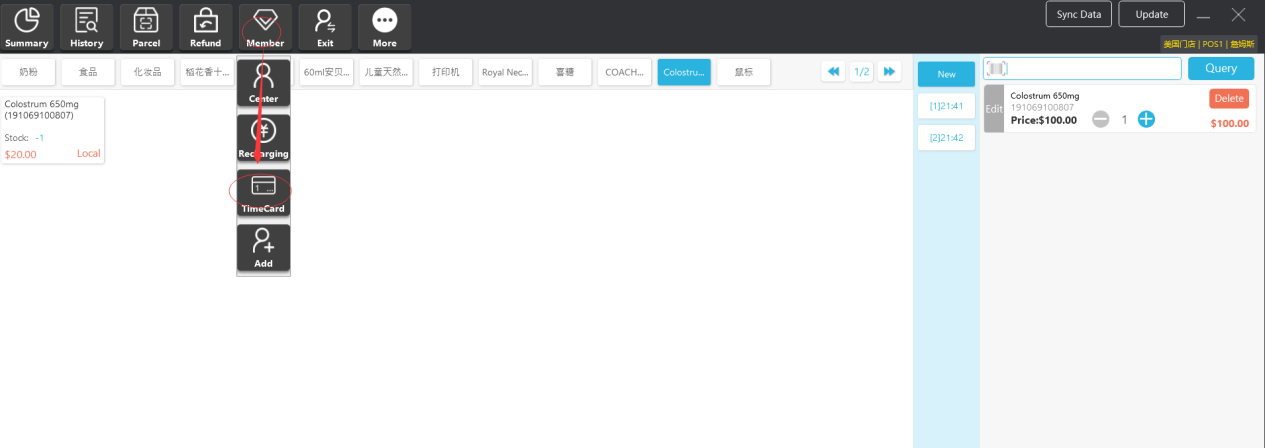
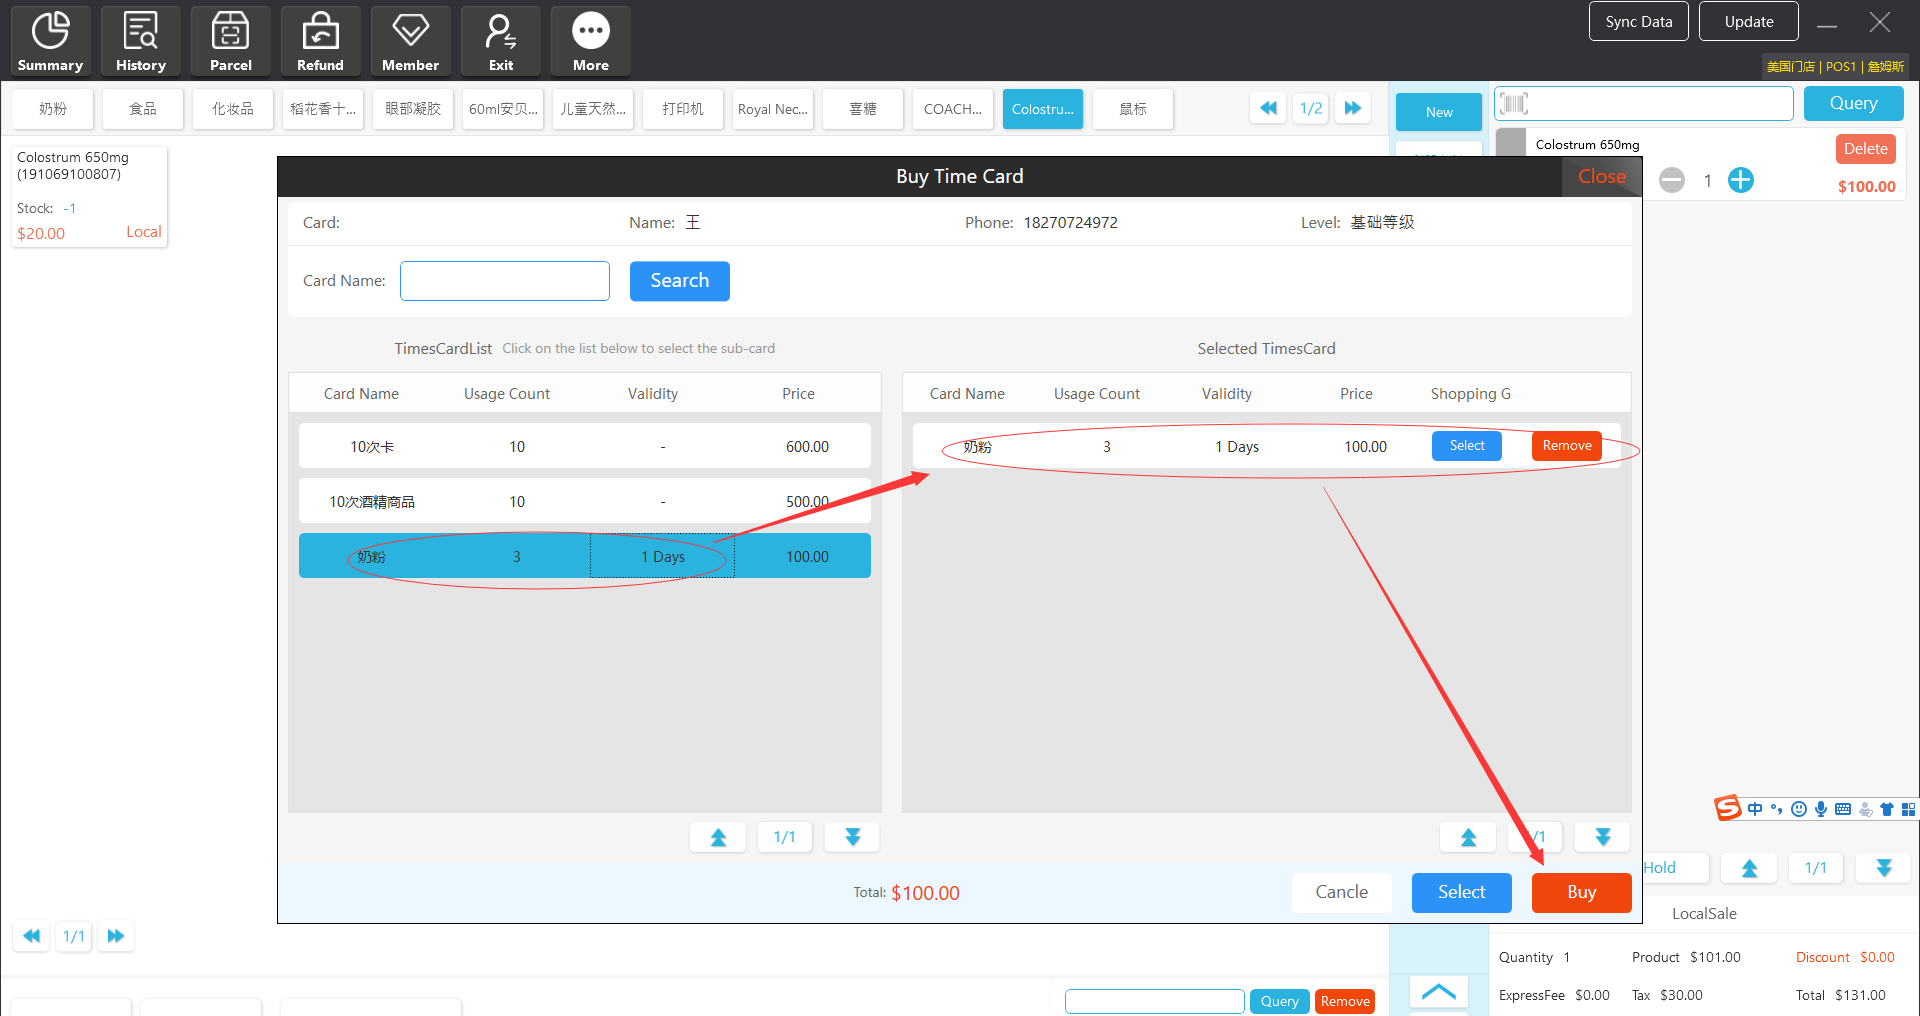
12.6.4 Add member
[Operating steps]
Step 1; Click "Member" option in the navigation bar and select "Add" from the drop-down box.
Step 2; Enter the relevant member information and click "Save” option.

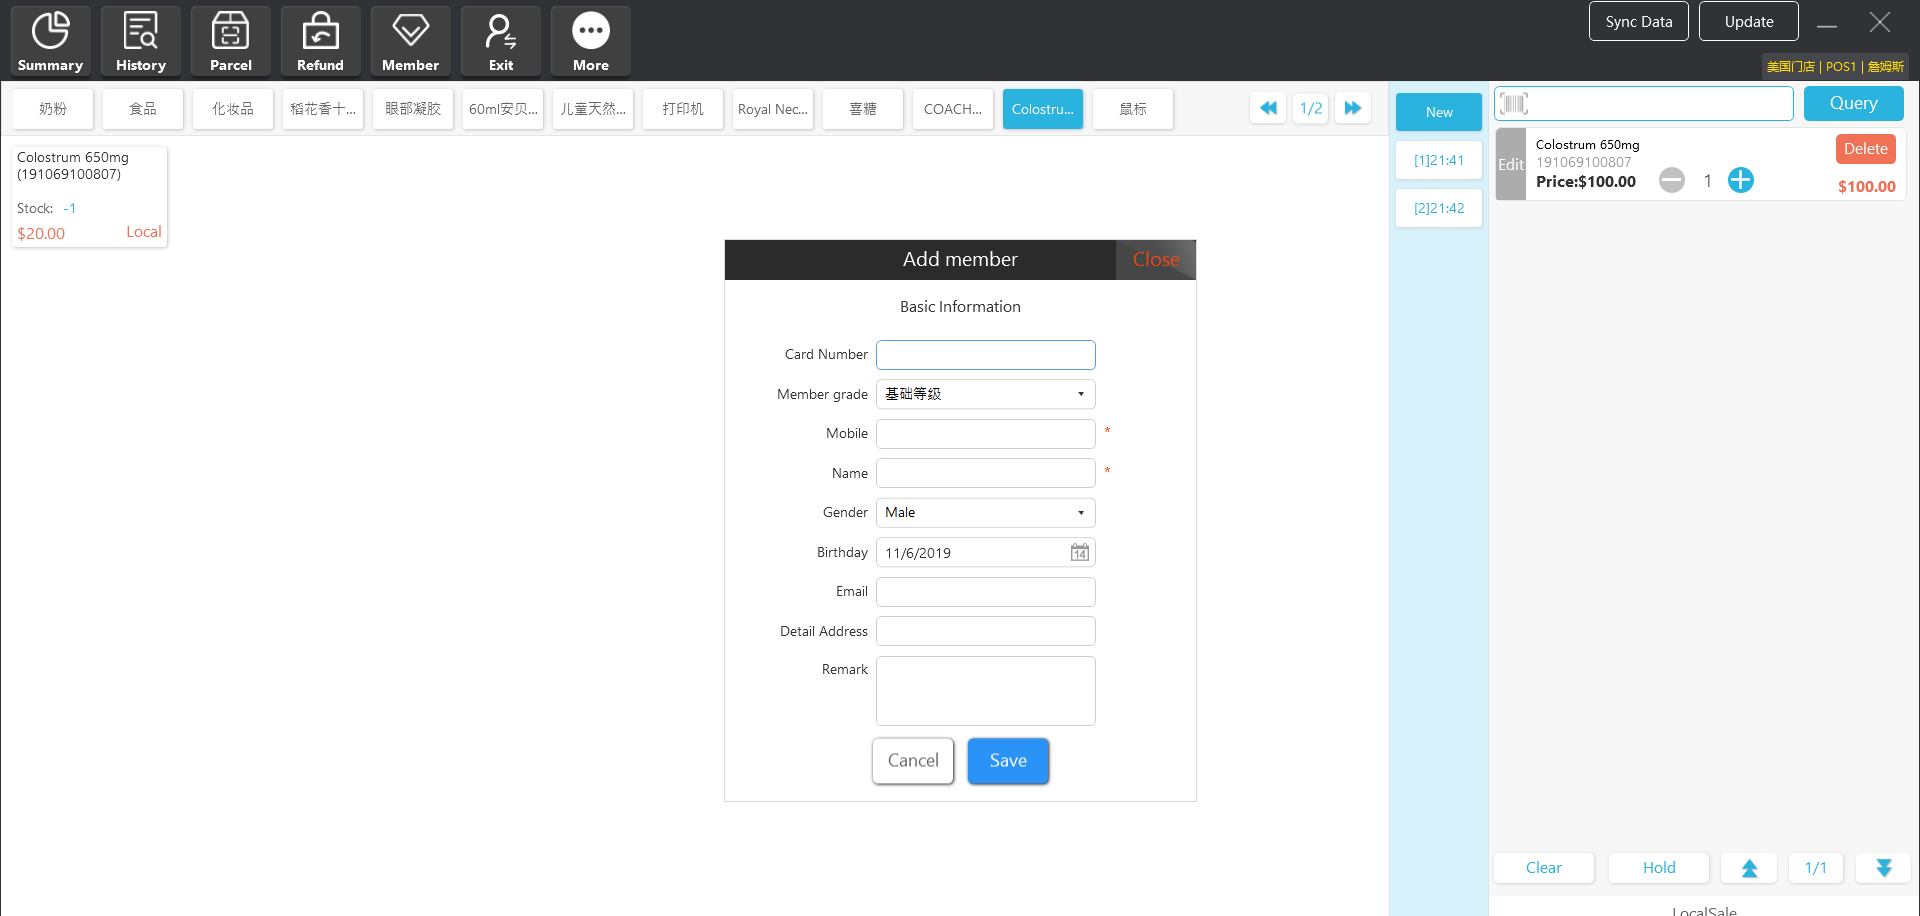
12.6.5 Member payment with balance
[Operating steps]
Step 1; Enter the member’s name or mobile phone number in the query box, and click “Query” option.
Step 2; Select the product
Step 3; Click “Pay” option.
Step 4; By default, members choose to make payment with their balance. Click “OK” option.

12.7 More
12.7.1 Common settings
[Operating steps]
Step 1; Click “More” option in the navigation bar and select “Common Settings” from the drop-down box.
Step 2; Click "Common Settings” option. If English is selected, click “Close” option, then the settings will be available.
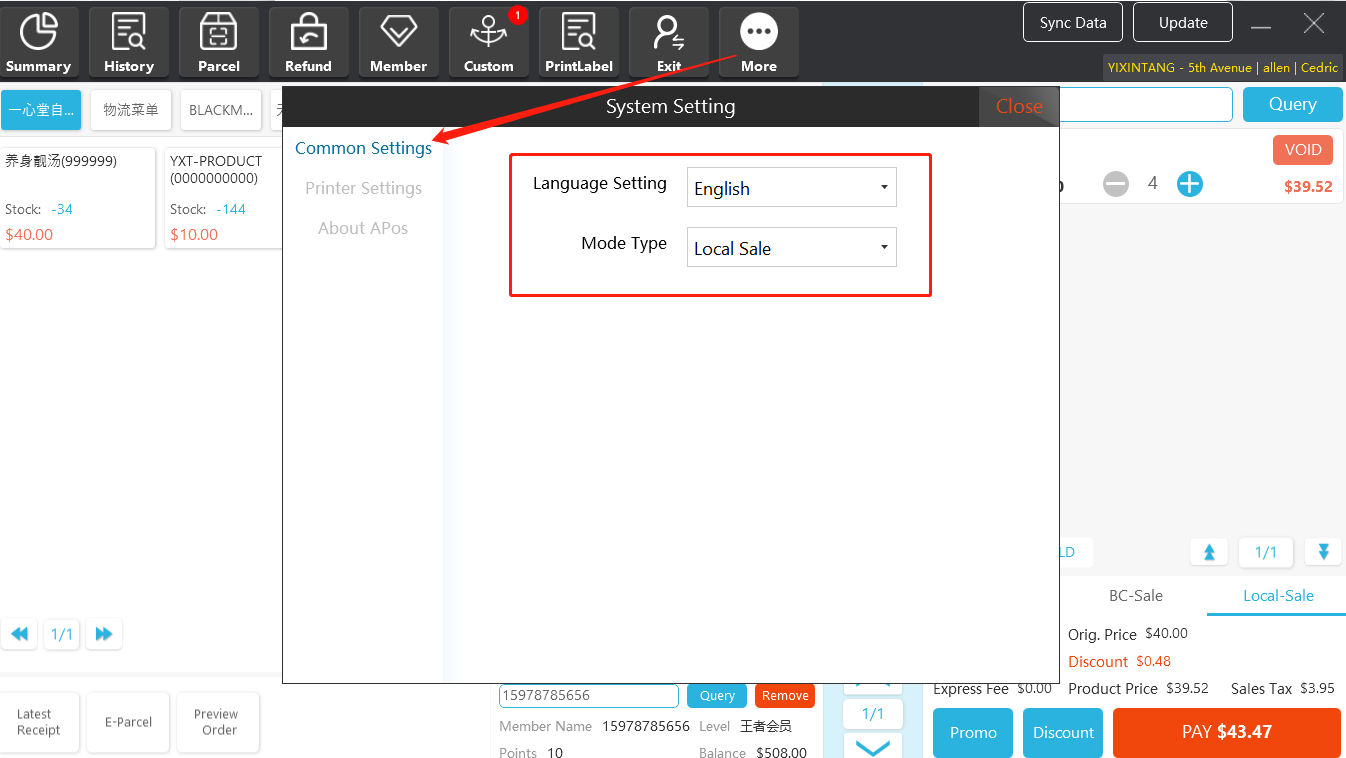
Step 3; Click "Printer Settings" to configure the printing parameters. Click "Close" option, then the settings will be available.

Step 4; Click "About APos" option to view the version of APos.
12.7.2 Newly added cash drawer log and print small tickets
【Steps】
Step 1; Click "More" in the navigation bar and select "Settings" icon from the drop-down box.
Step 2; Click "Printer Settings" and click the "Open Cash Drawer" button. Need to set the cash drawer to print a small ticket as “Yes” option.
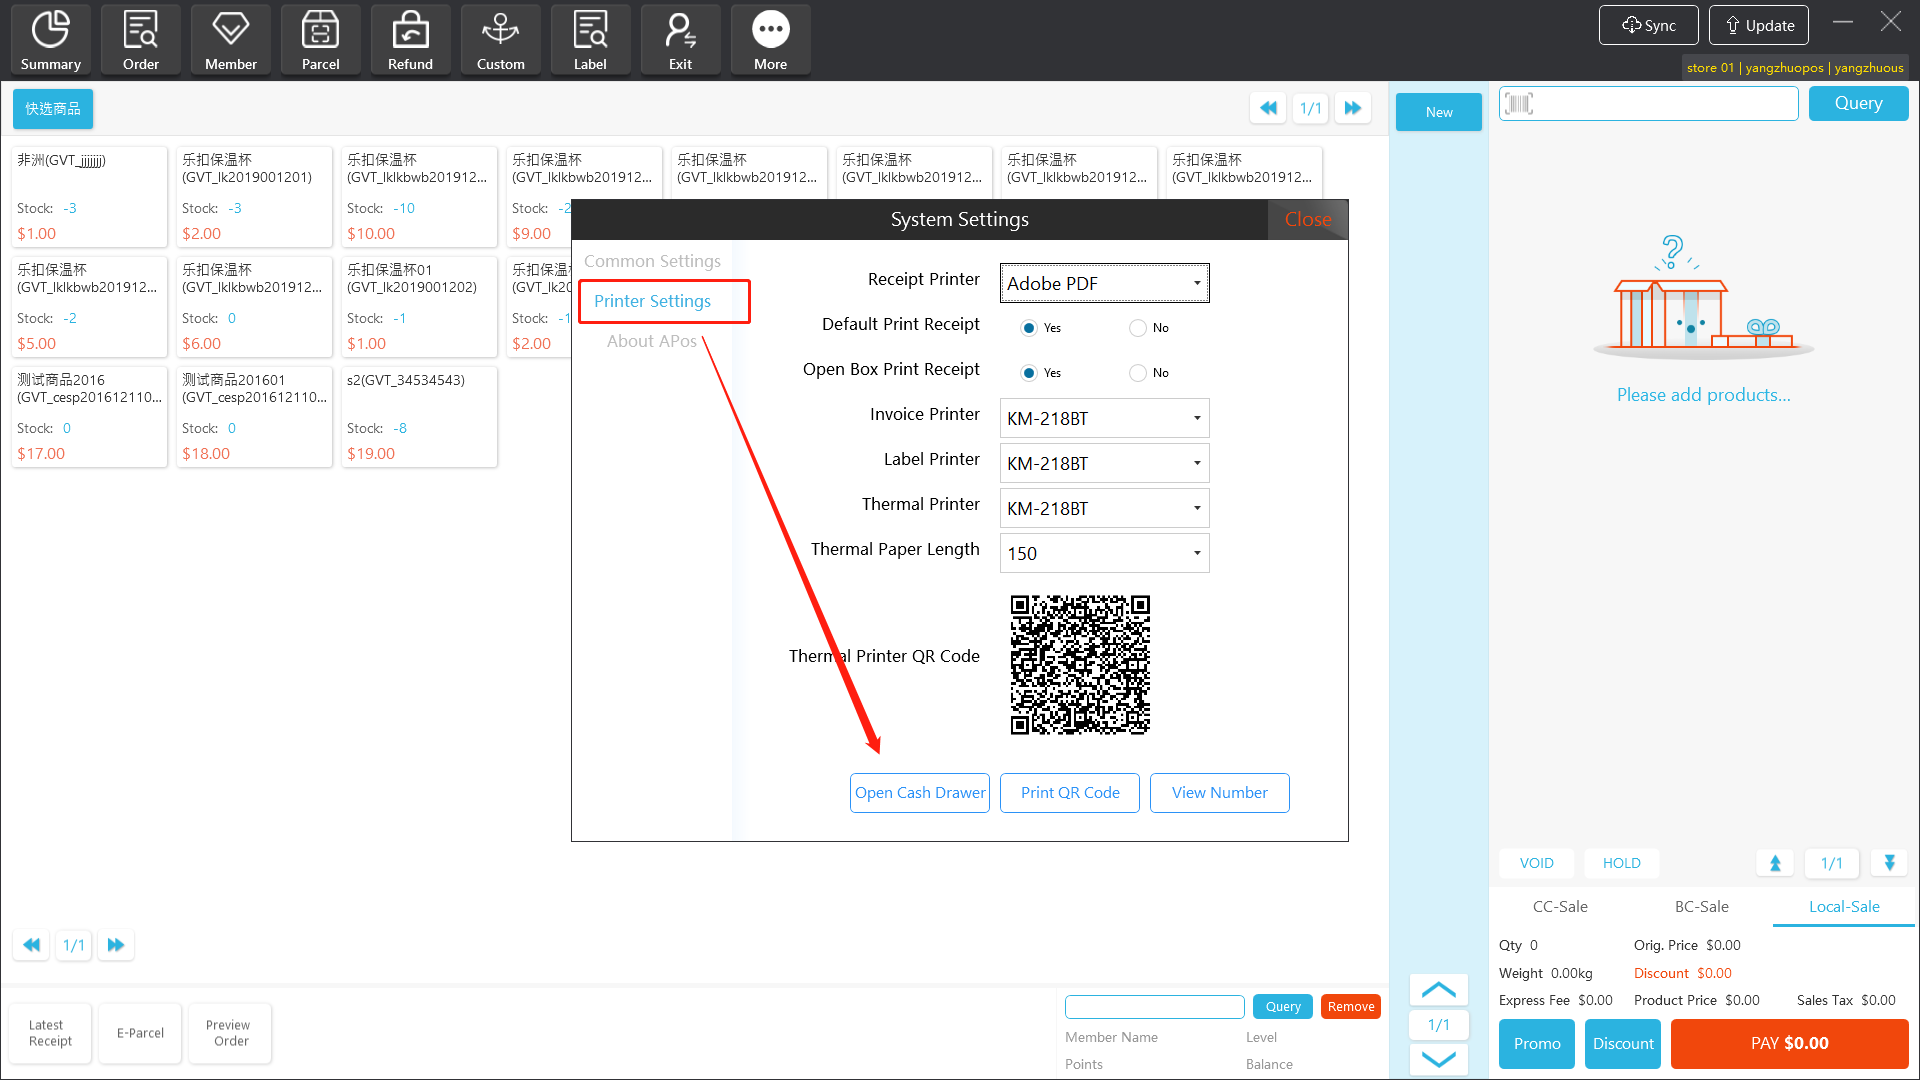
Step 3; The cash drawer is opened at this time, and a cash drawer ticket is printed out. The example picture below shows the details of the ticket. Including store, order number, operated time, cash drawer, authorized person.
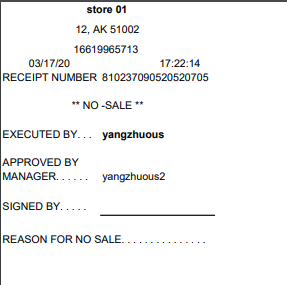
Step 4; The operation of opening the cash drawer will be recorded in the operation log.

Note:
"Open Cash Box" is the cash register permission. The "Shop Manager" role has permission by default, and other users have no permission by default.
This permission is only applicable to manual cash drawer operation. The system automatically opens the cash drawer after normal payment is not affected by this permission.
12.7.3 Client upgrade adds permission control
【Steps】
Step 1; Use the clerk user to log in to the client and click the "Software Update" button.
Step 2; When updating the version, you need to get authorization from the manager.
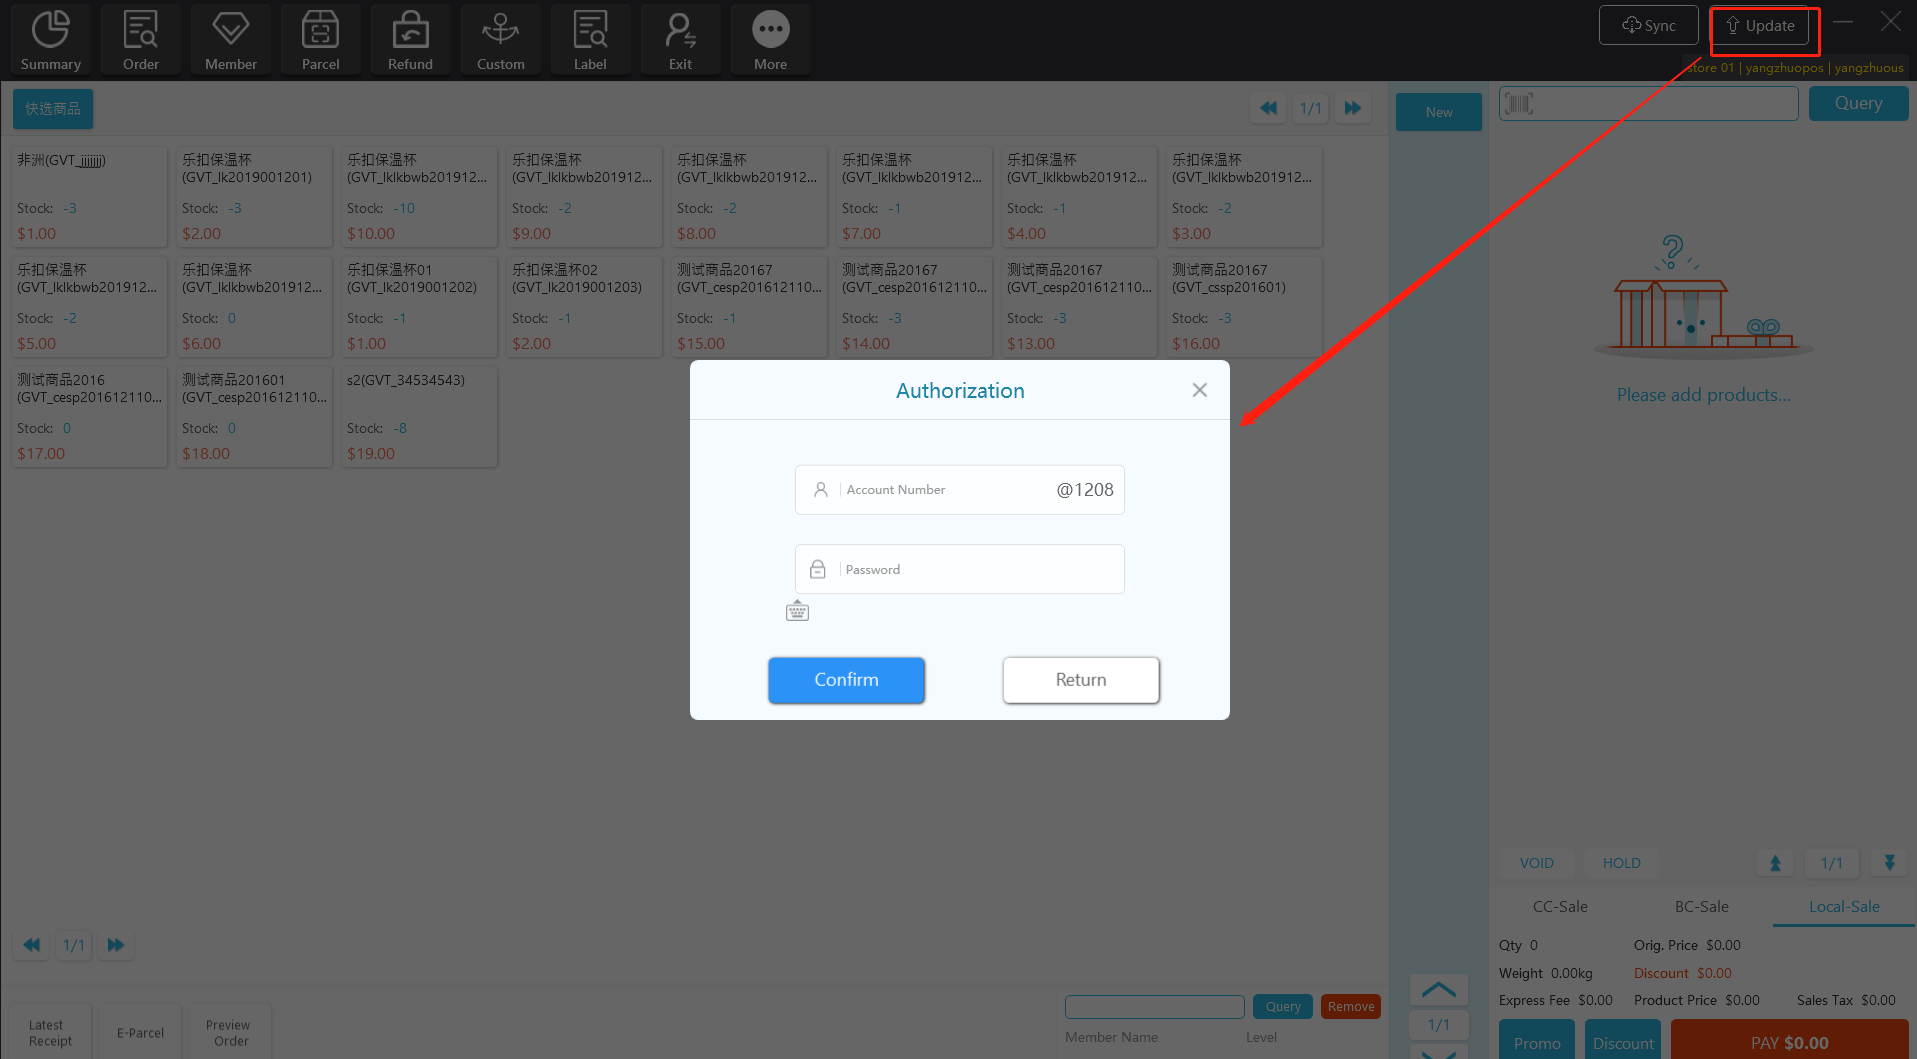
Step 3; After entering the username and password, the store manager completes the authorization and clicks the "Update Now" button to perform the upgrade operation.
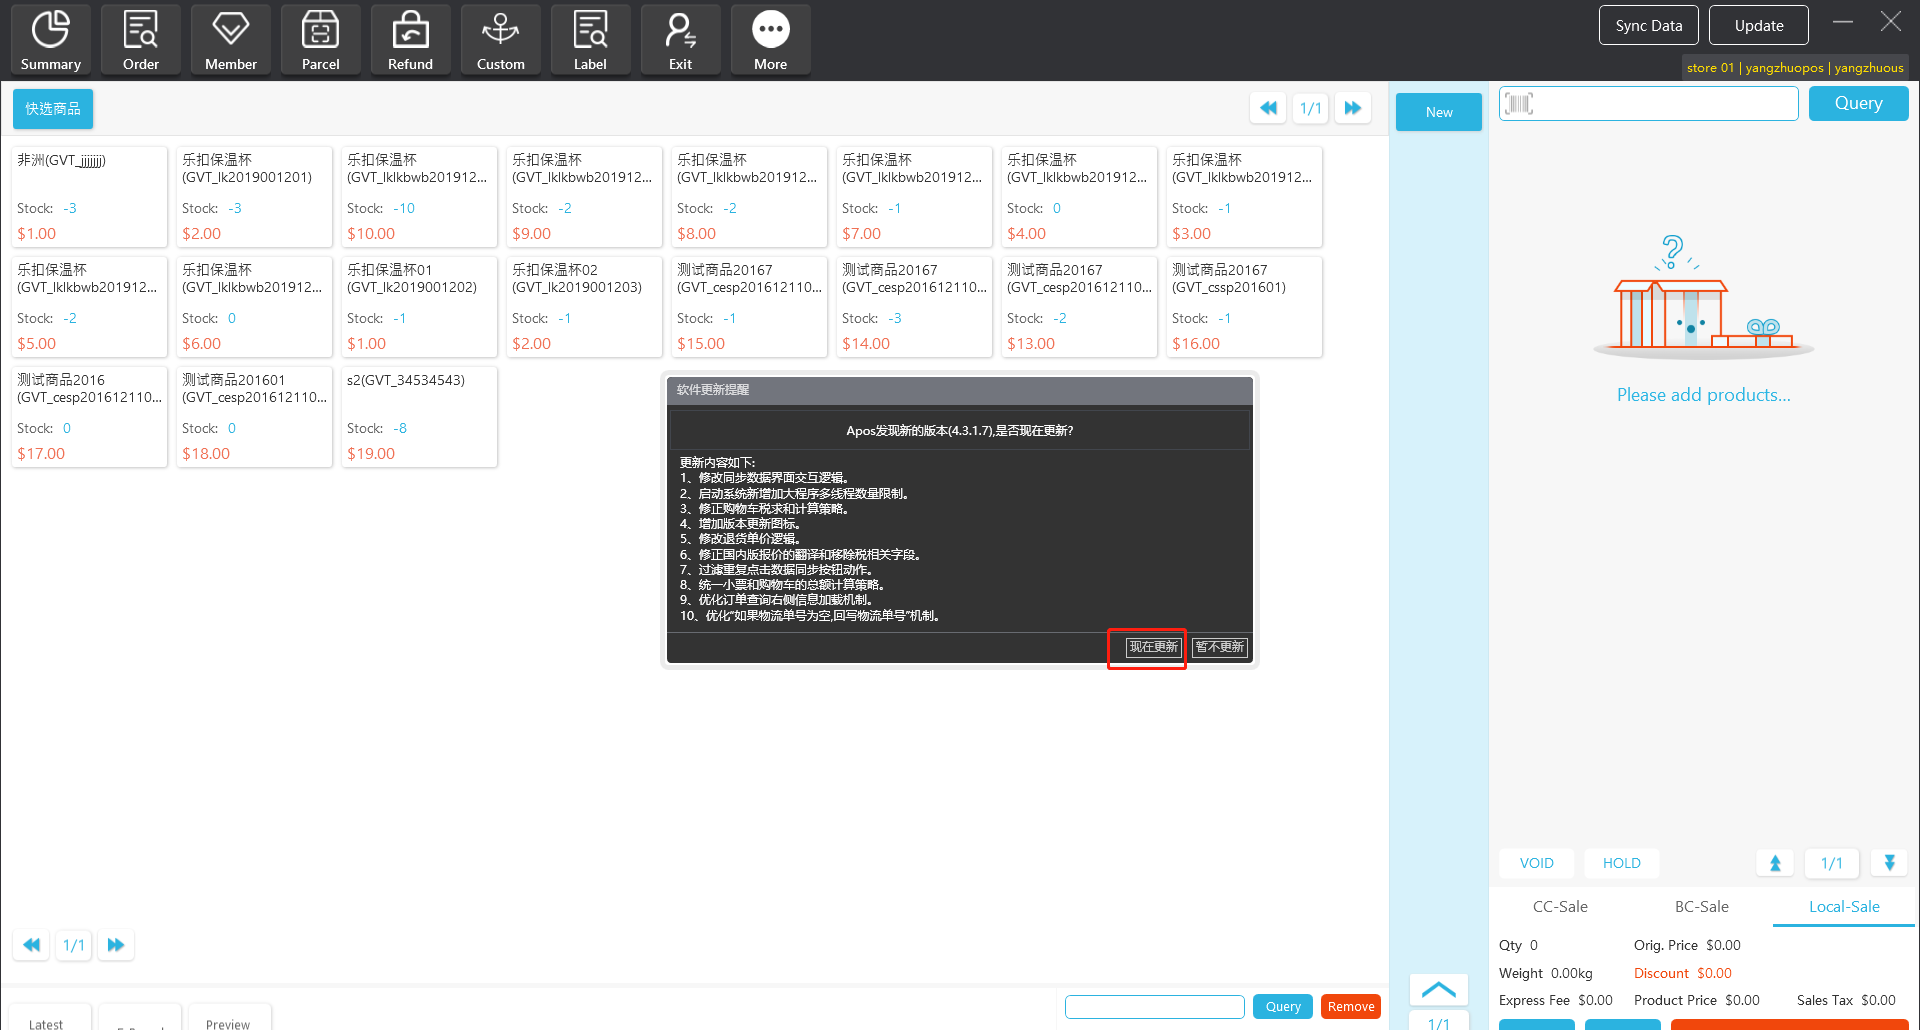
Note:
"Version Upgrade" is the cash register permission. The "Shop Manager" role has permission by default, and other users have no permission by default.
This permission is only applicable to the manual upgrade operation after logging in to the system, and prompts for authorization when there is no permission.
The sever is configured as a forced upgrade, and the version upgrade is prompted when the program starts, and it can only be upgraded, not canceled, and is not affected by the "version upgrade" permission.
12.8 Discount for individual products
Prerequisites: The settings of POS allow a cashier to adjust the price.
If the store has set the minimum sales price for the product, when a cashier adjusts the price, the price shall not be lower than the minimum sales price (when the price is lower than the minimum sales price, the system will give a prompt that "the set amount is beyond the scope of authority and the price will be automatically set as the minimum price". Click “OK”, then the price of the product will be automatically changed to the minimum price).
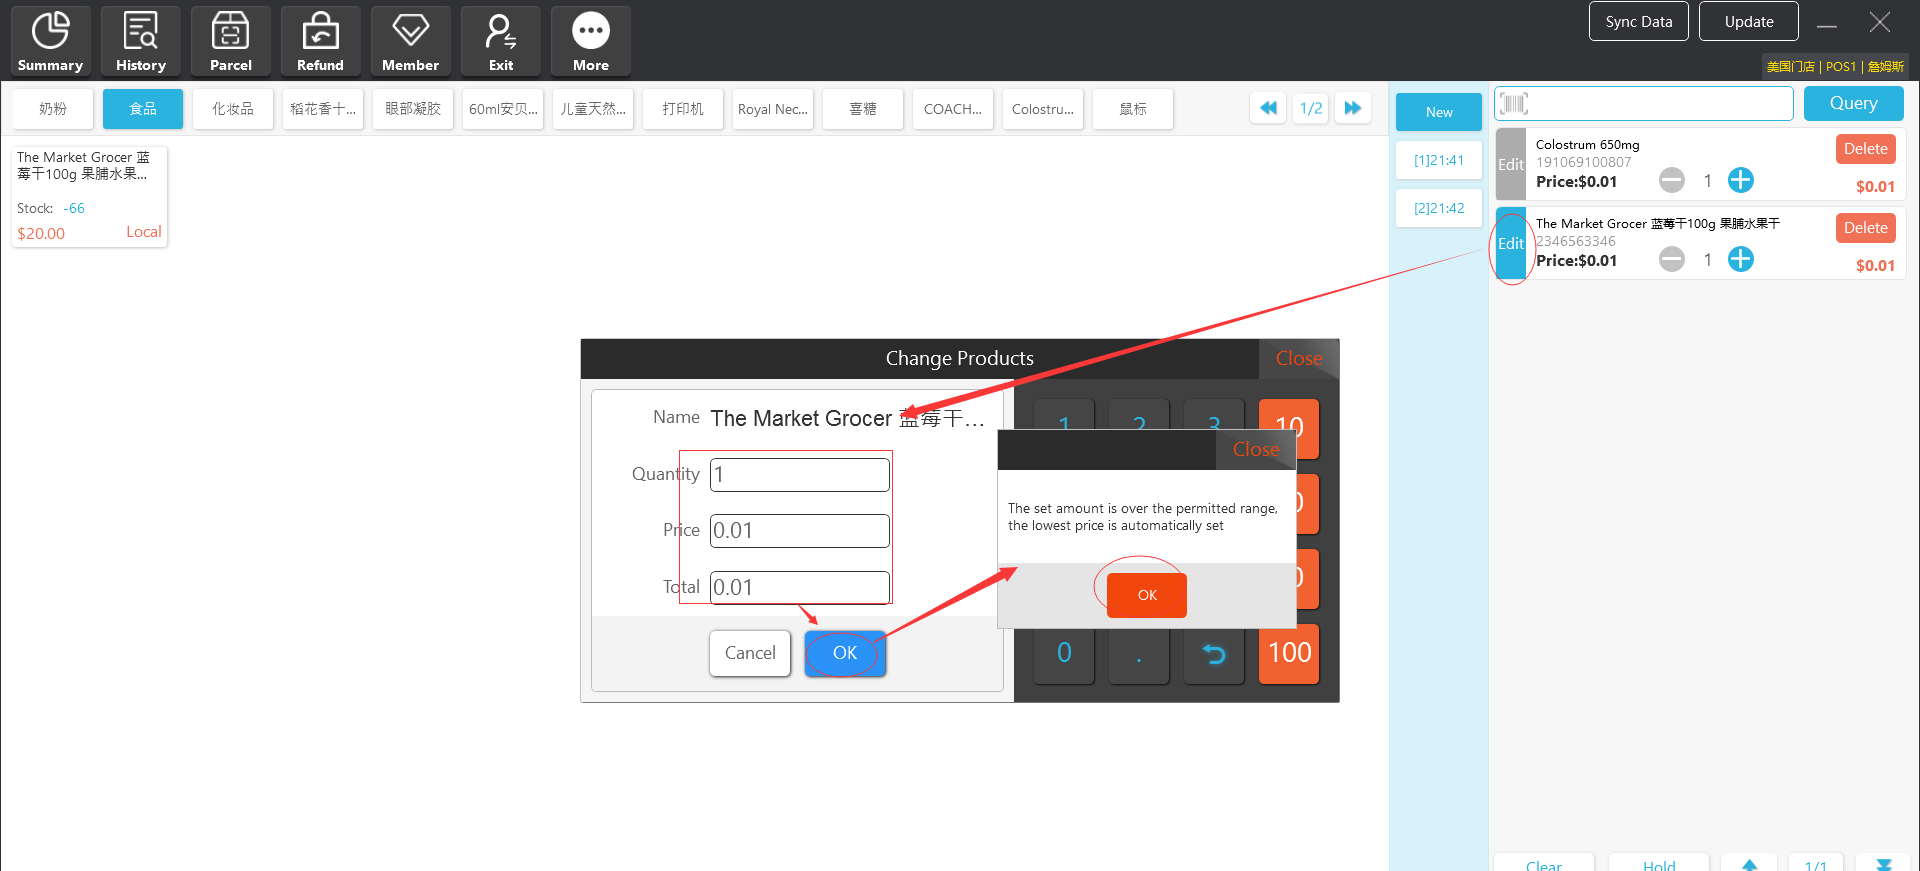
If the store has not set the minimum sales price for the product, the cashier can adjust the price of the product at will (the price of the product is greater than 0).
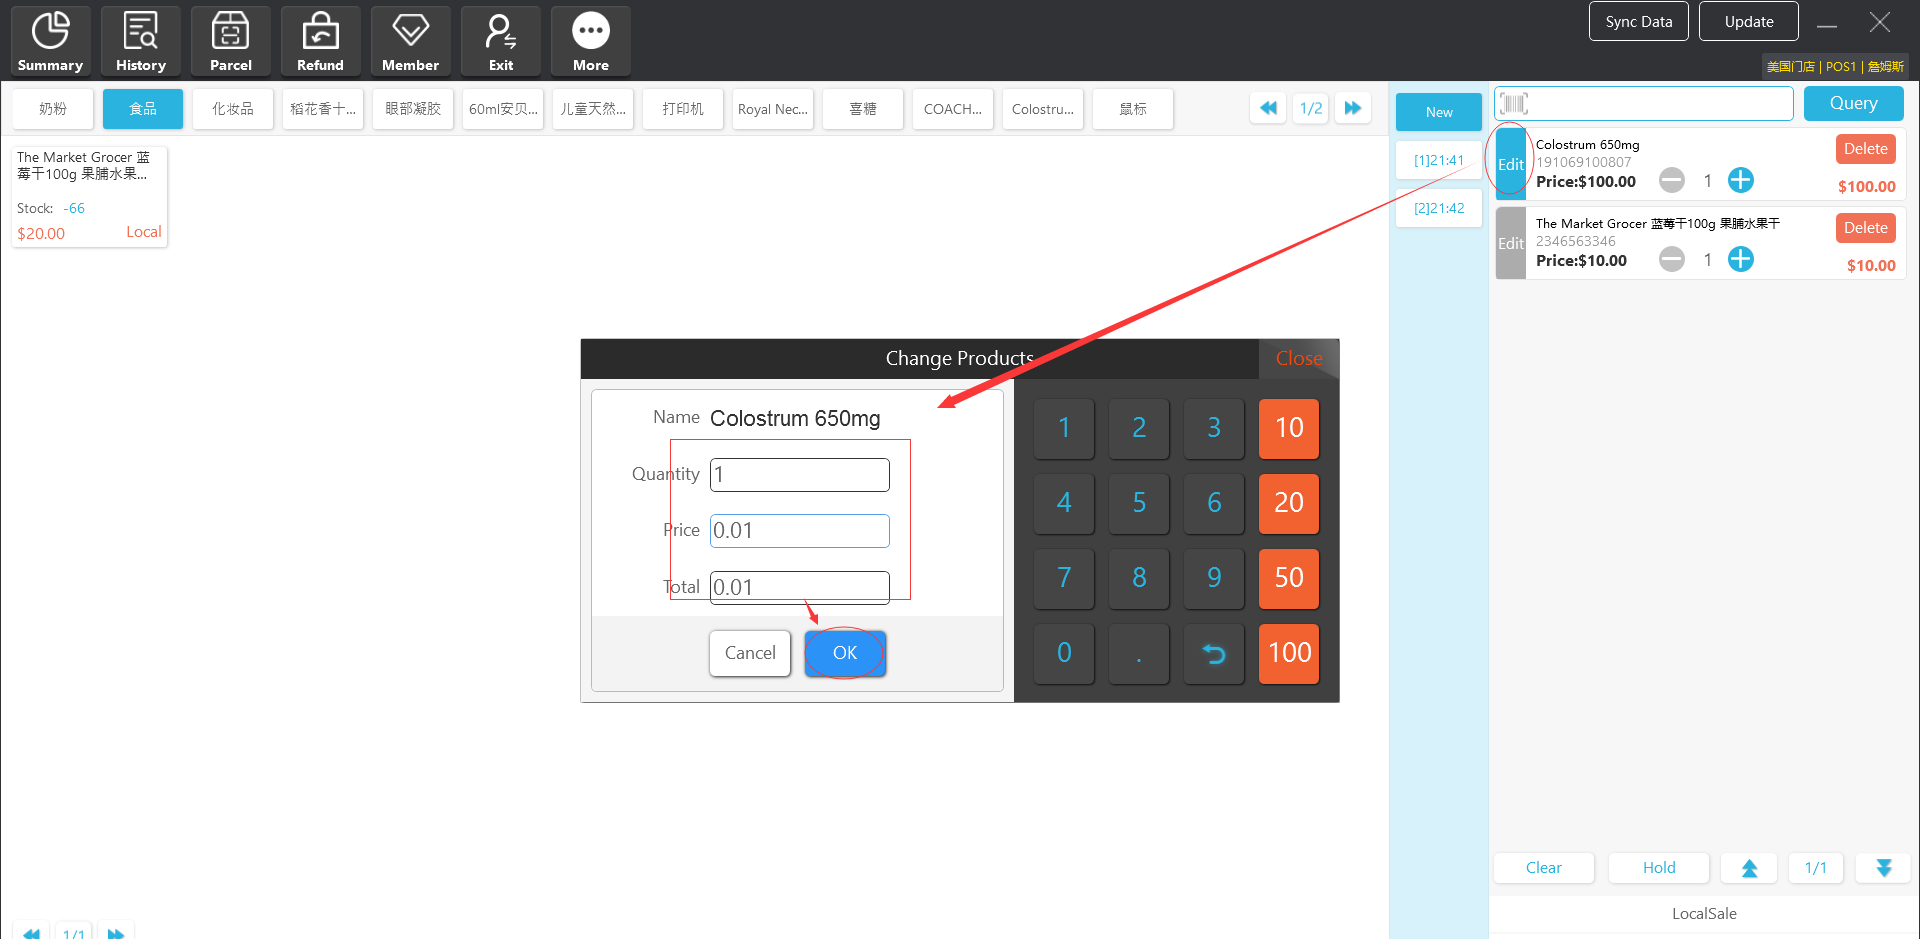
12.9 Manual total discount
Prerequisites: The settings of POS allow a cashier to adjust the price.
12.9.1 Discount
In the common settings at the server, select the discount of the whole order at discount proportion client.
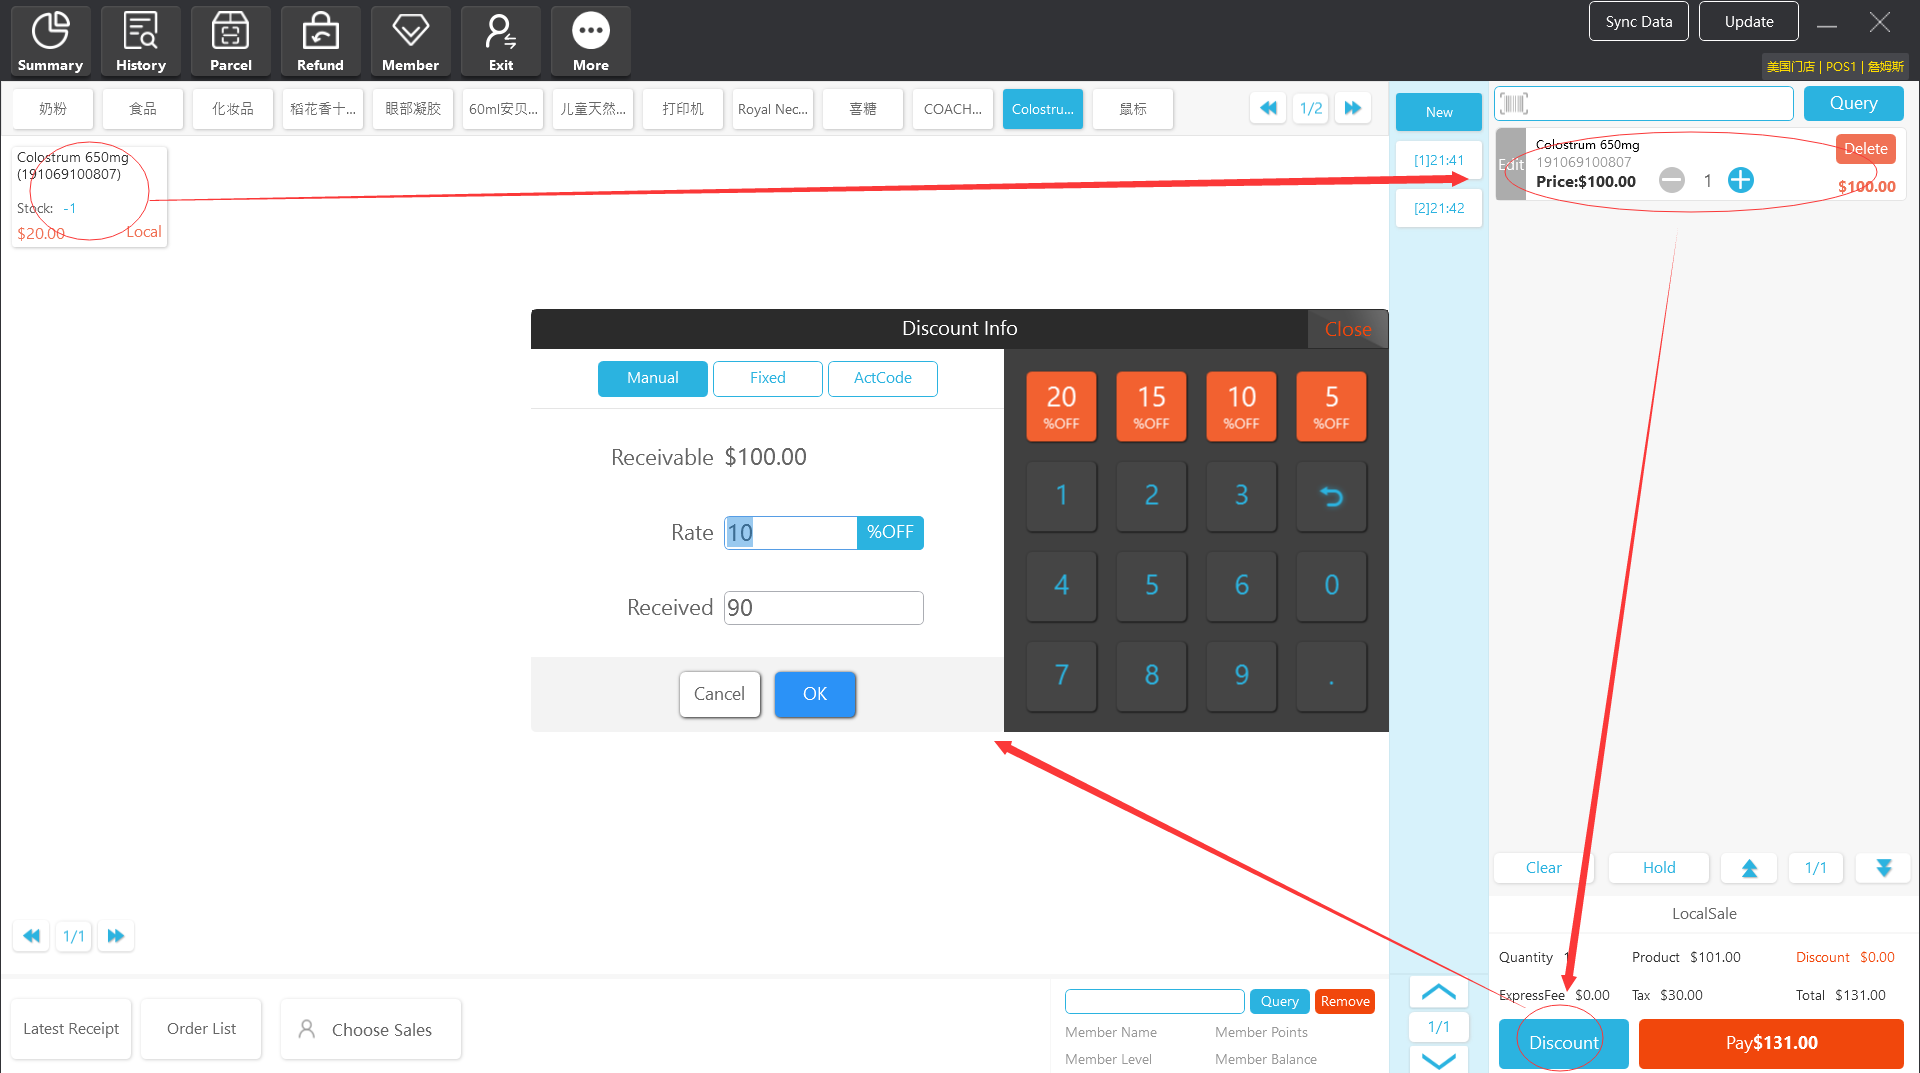
12.9.2 Choose sales
Prerequisites; The “Cashier mode” is selected for the commission on the “Server System Management -Setting-Checkout Setting-Commission” interface
When placing an order of the product at the client, you can manually choose the sales (in case of commission item, the sales may obtain the corresponding commission)
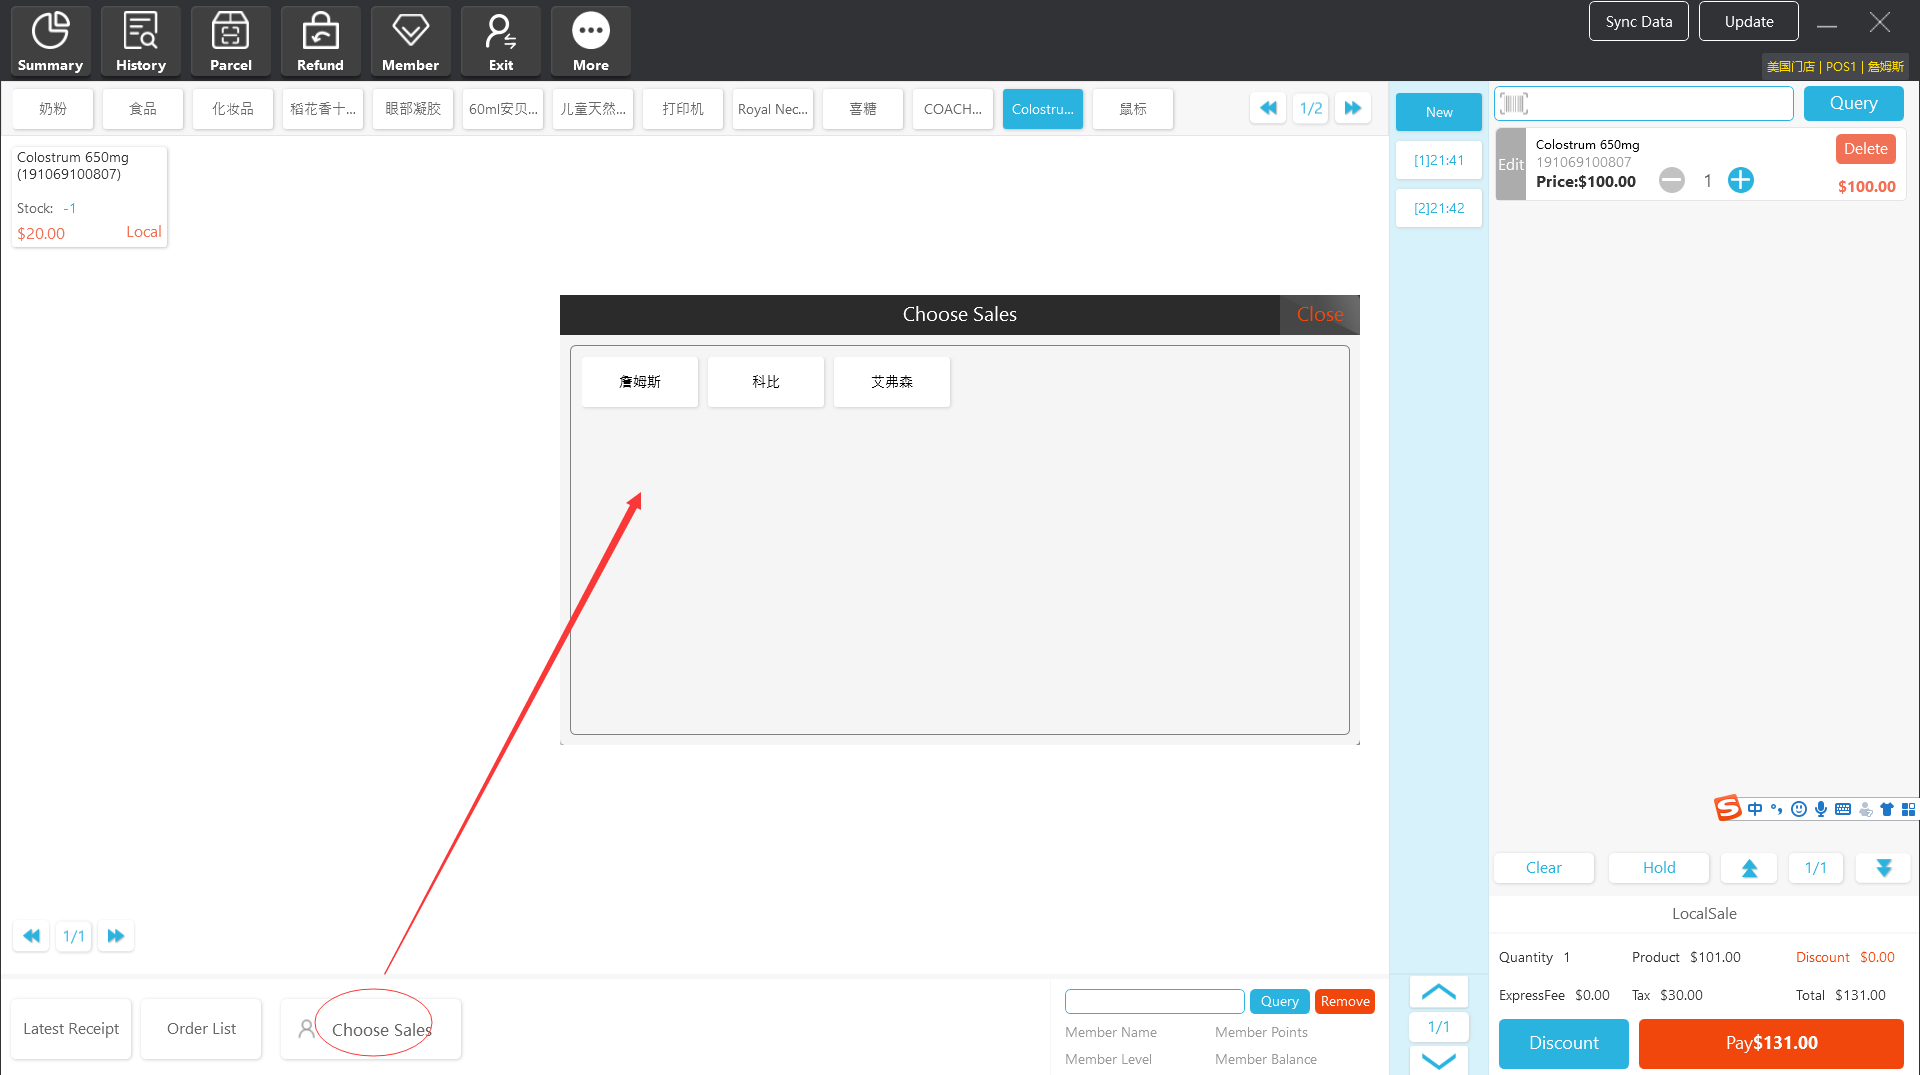
12.10 Authorization
If a cashier does not have permission to use a certain function, the permission to use this function can be granted by an authorized cashier or store manager. This window will exit automatically after the operations are completed. Authorization is also required for the next time.

12.11 BC CCL
Step 1; After the product is added to the shopping cart, select BC CCL and click "Mailing” option.
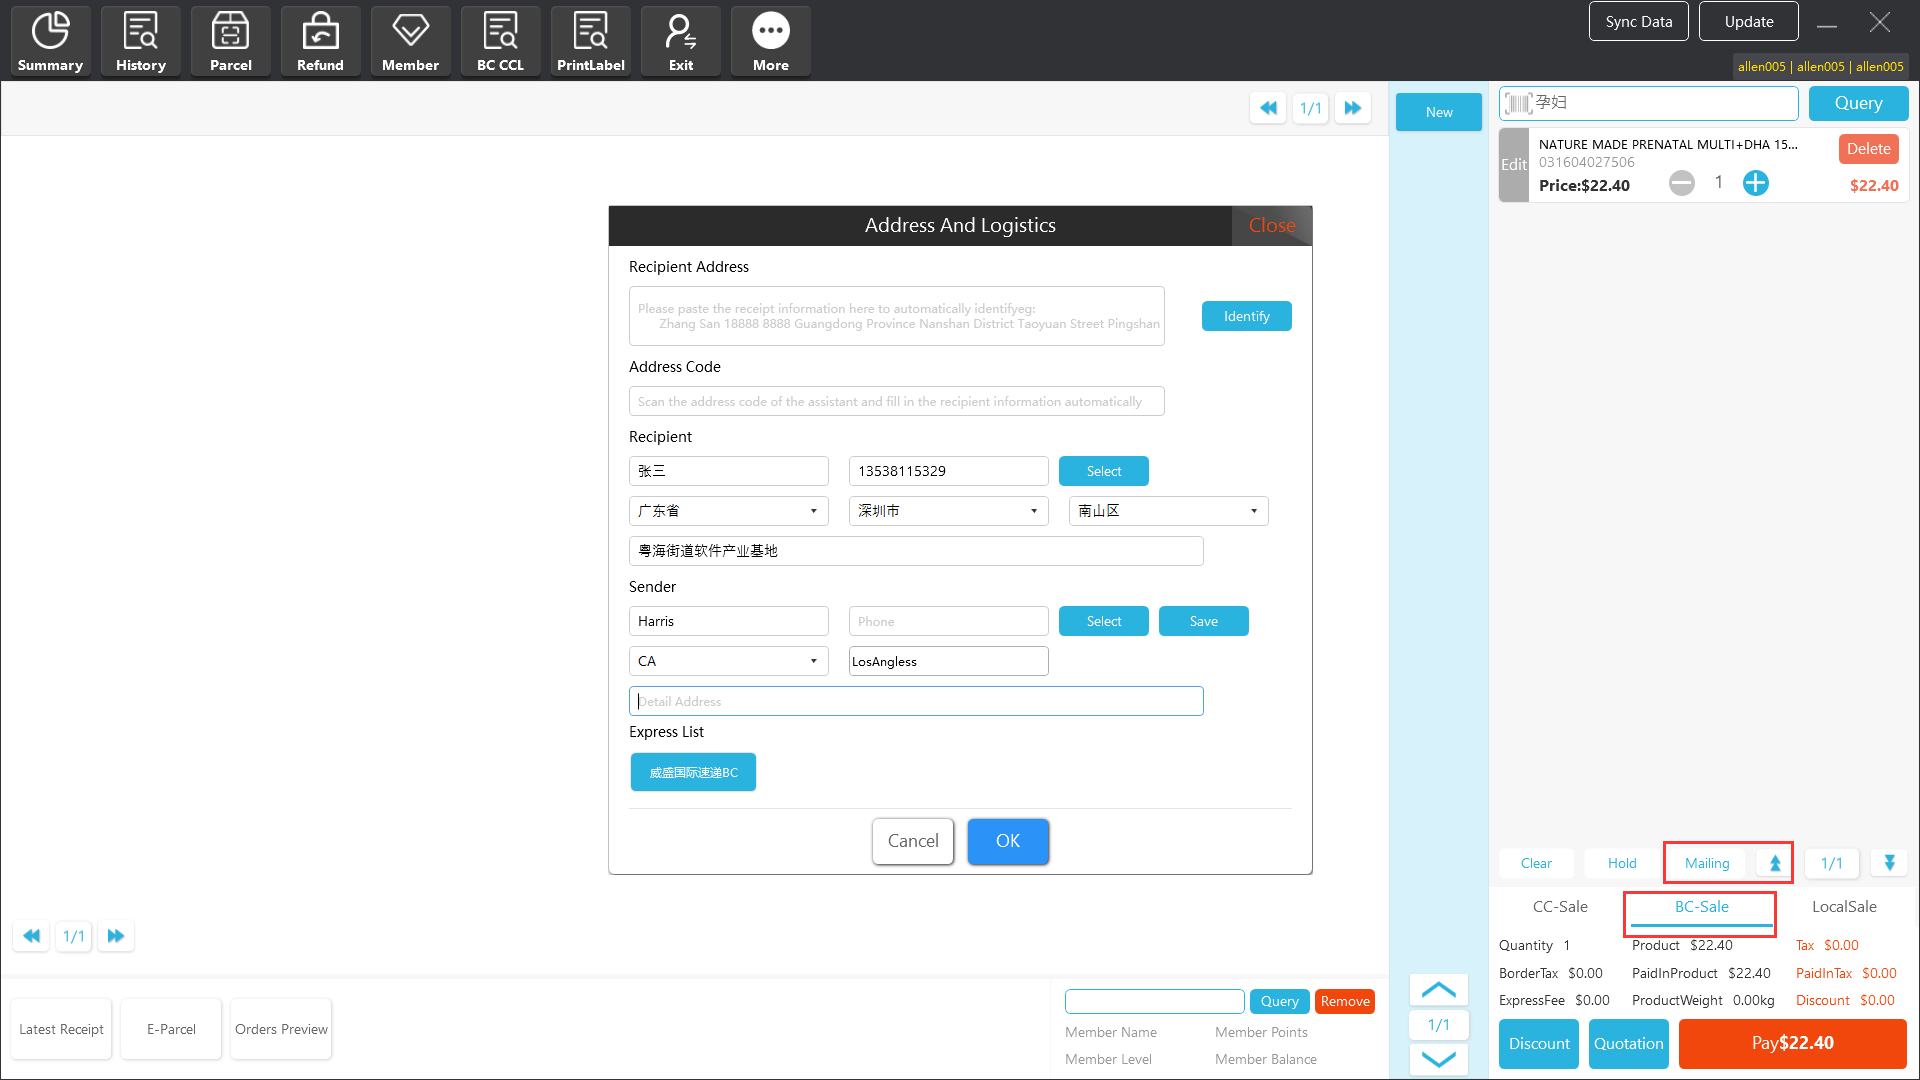
Step 2; Enter the information about the sender and the recipient, and select the logistics company.
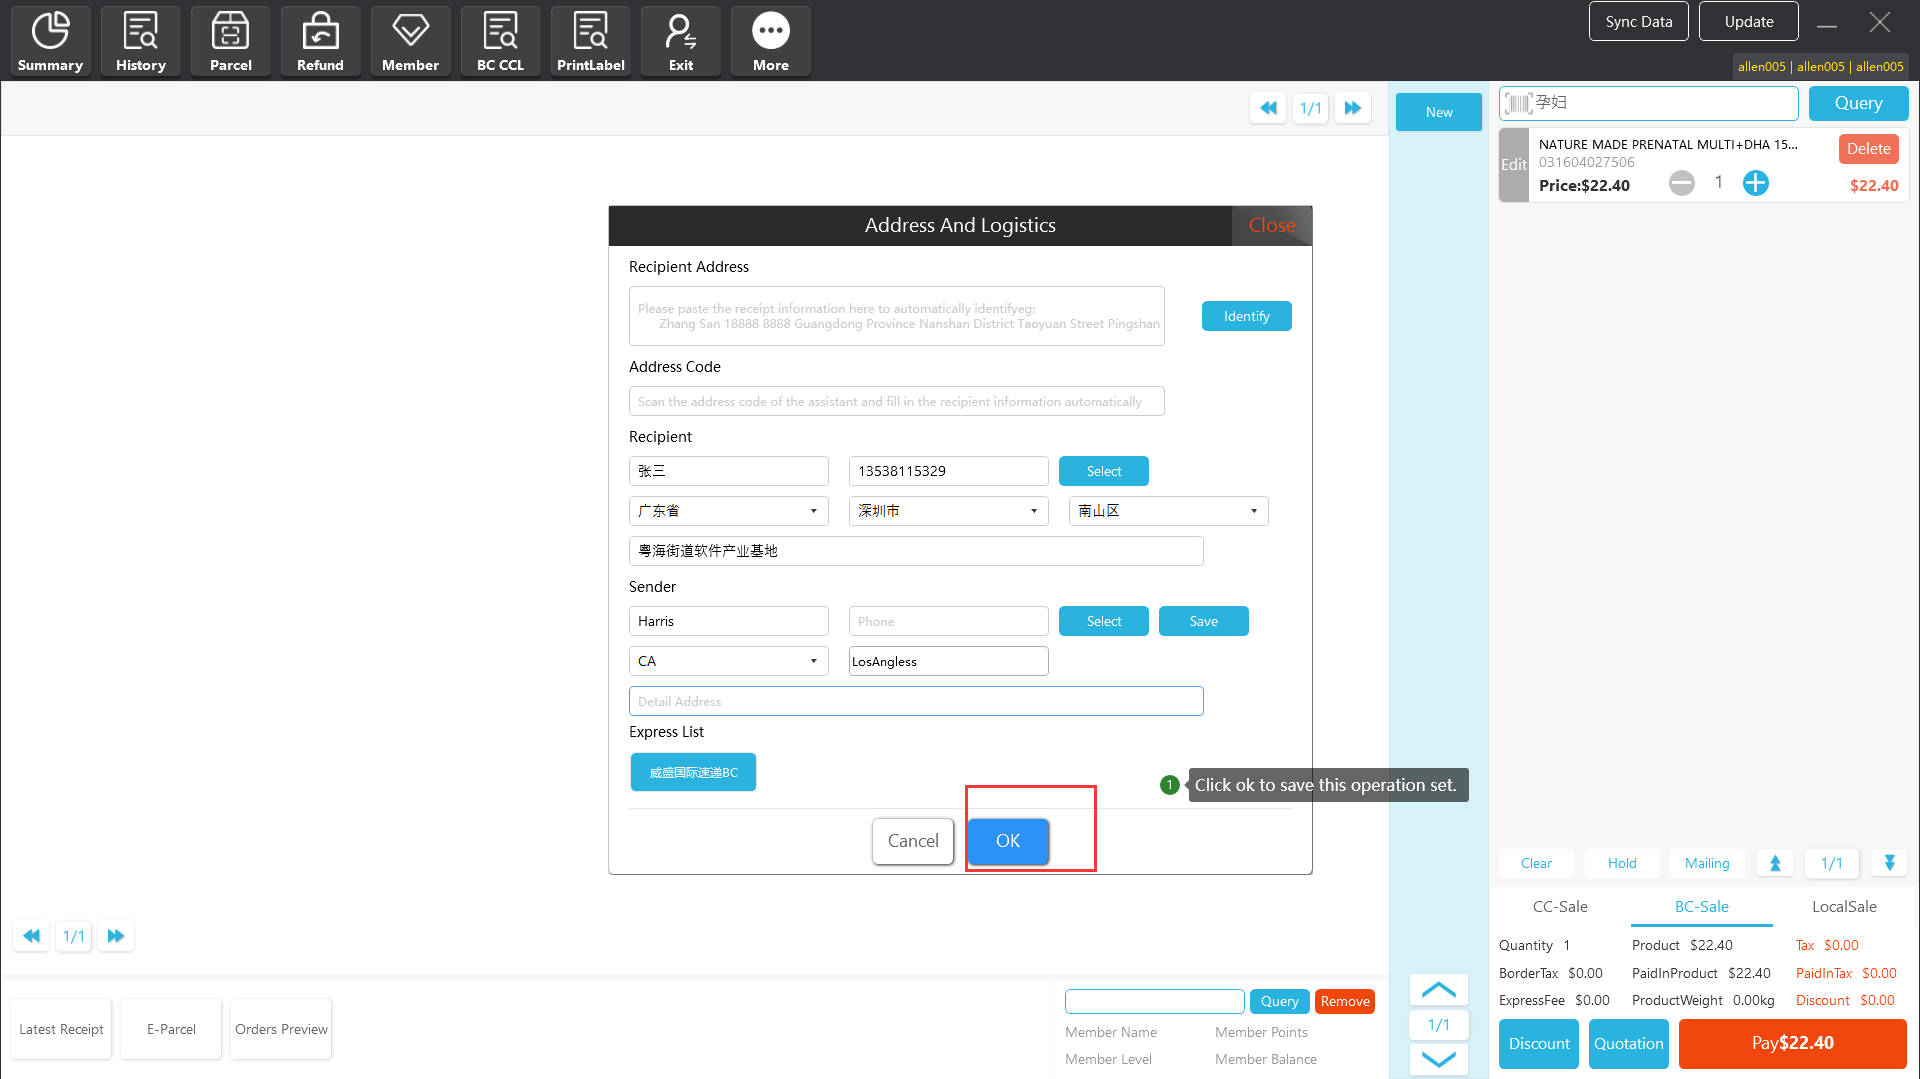
Step 3; Log in the “Pack” interface to manually pack the products that have not been automatically packed.
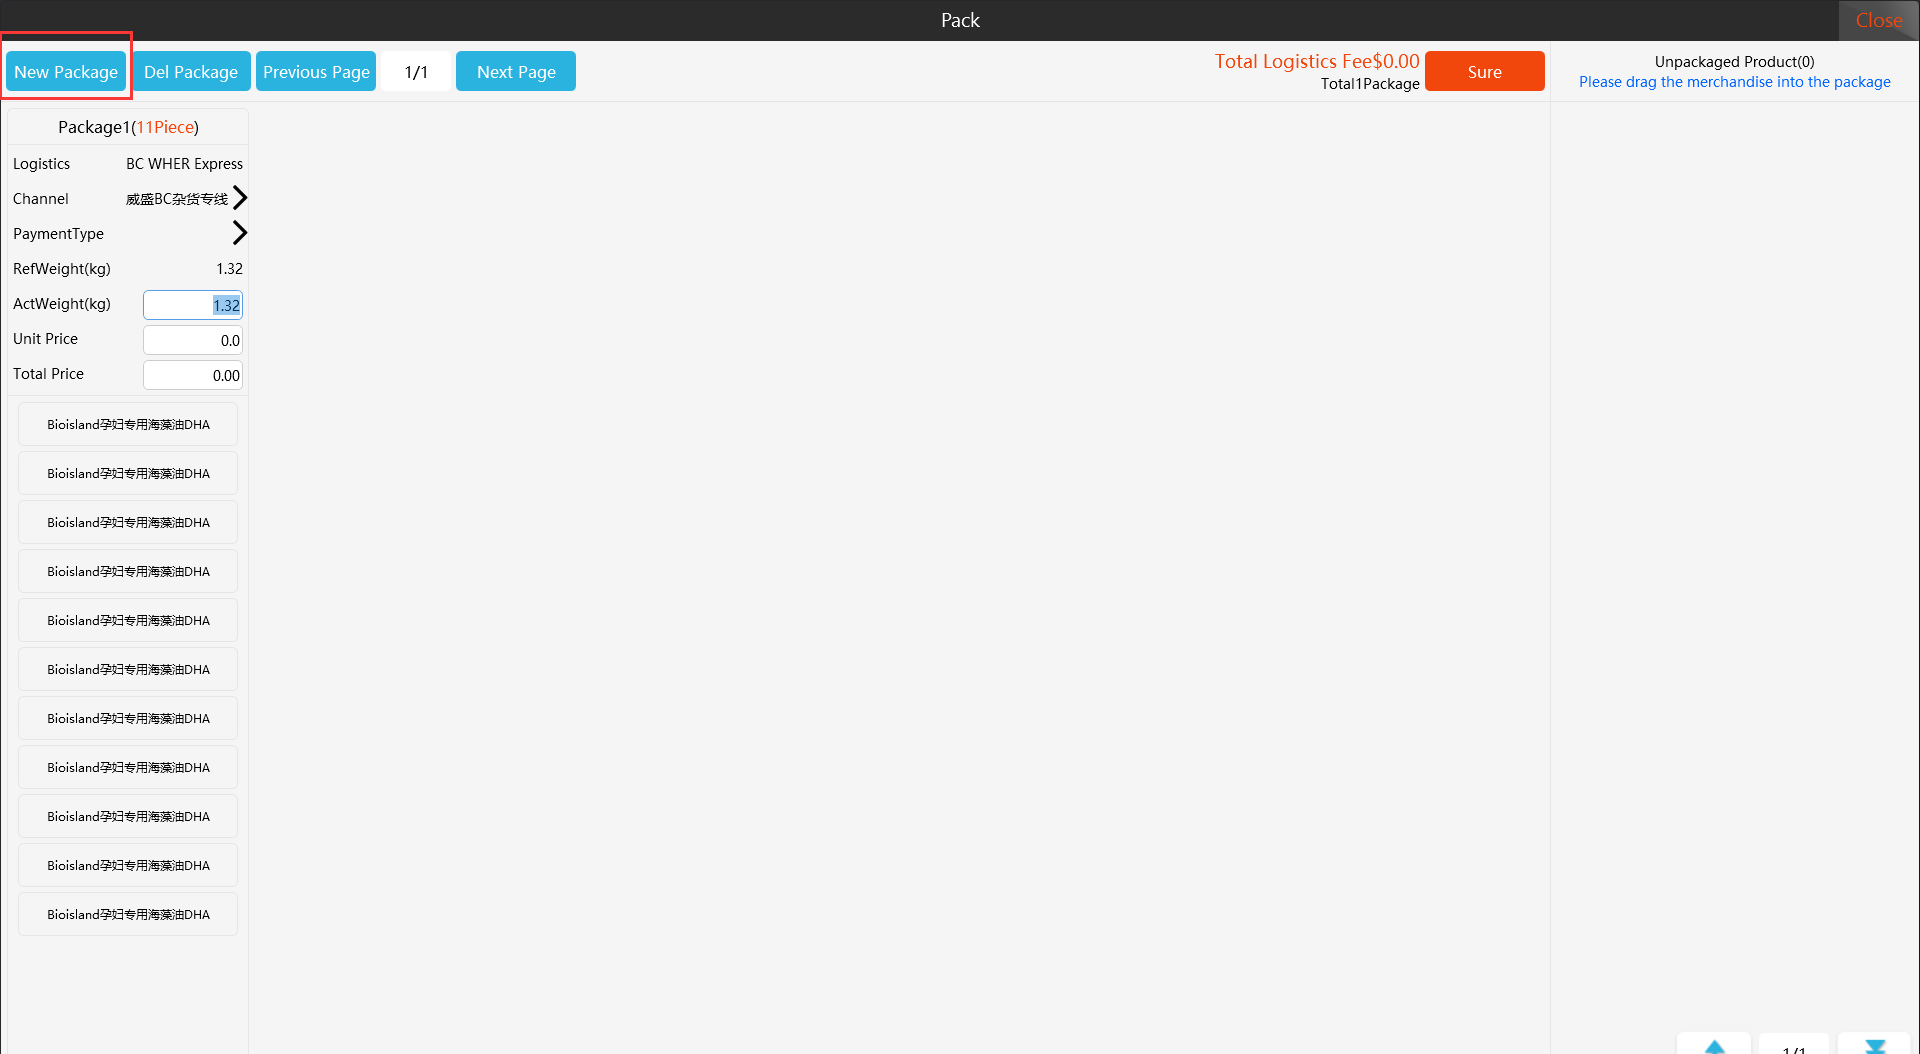
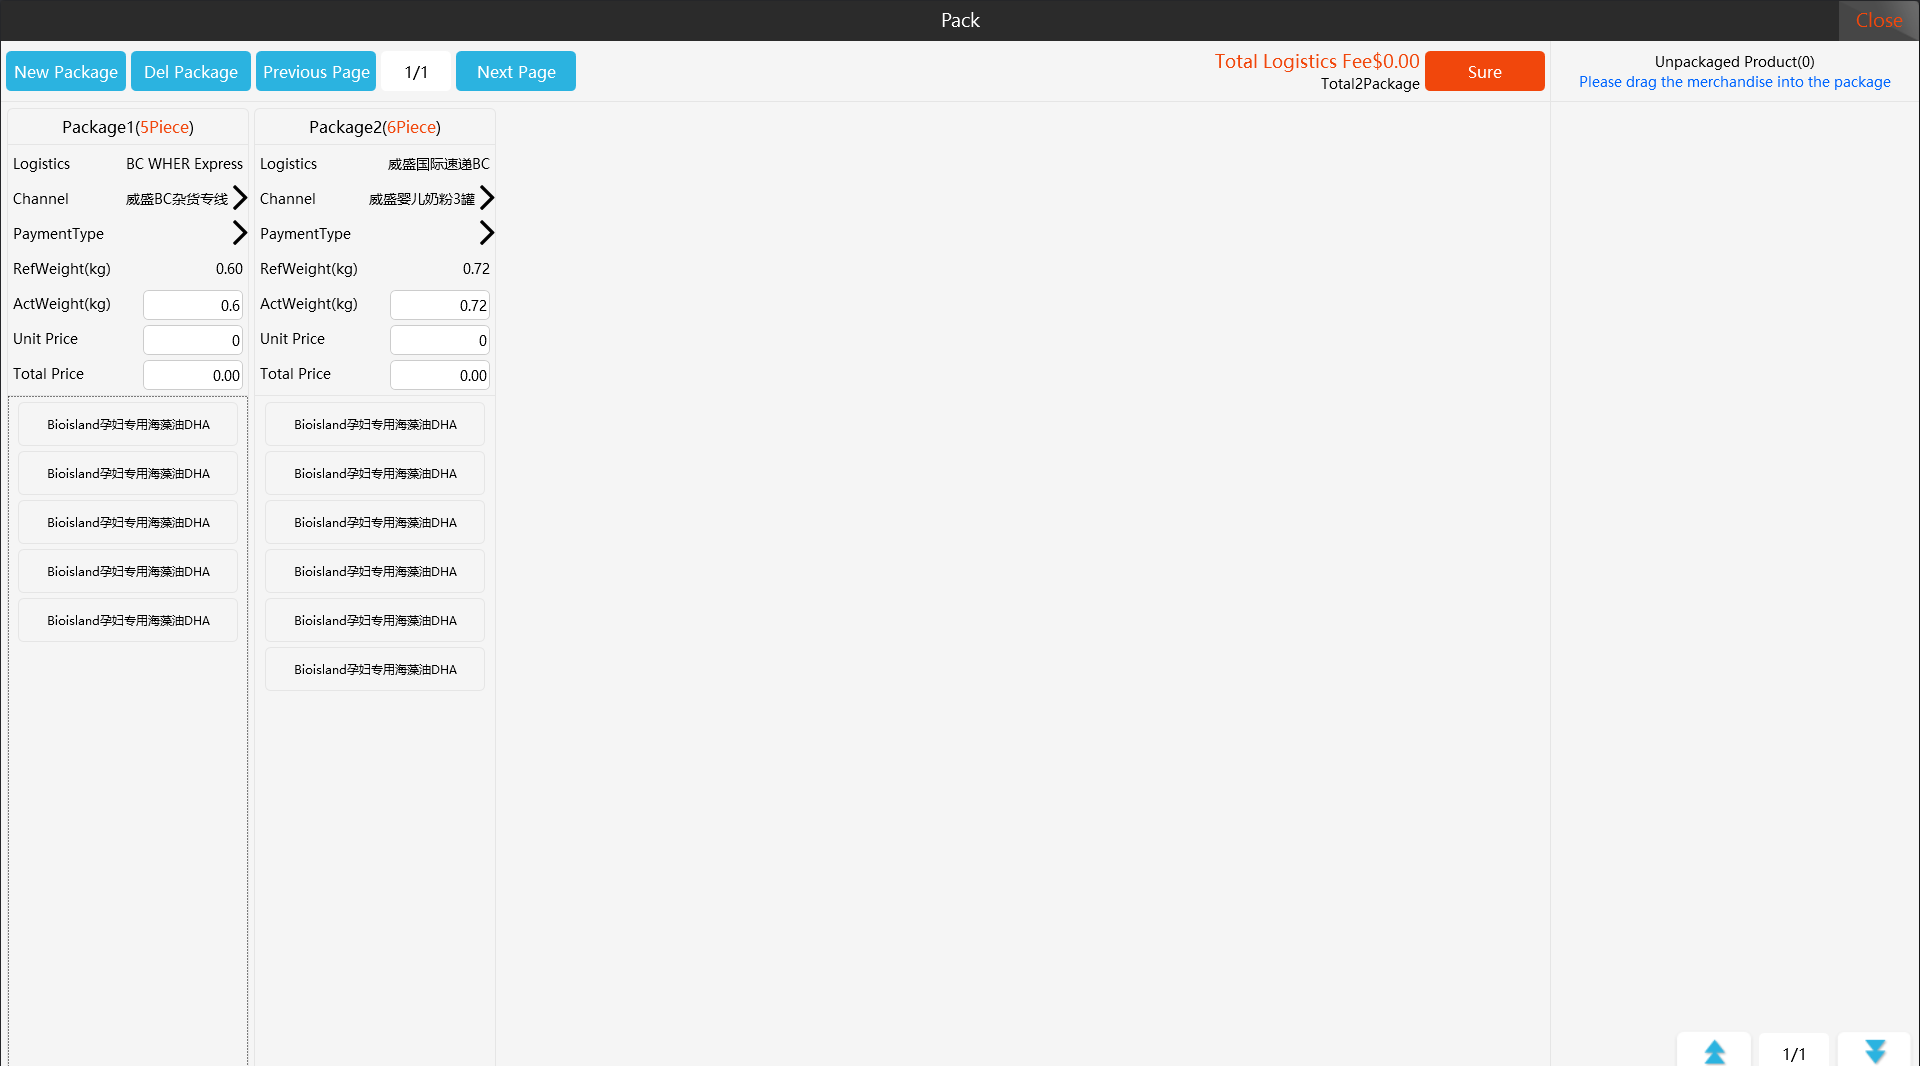
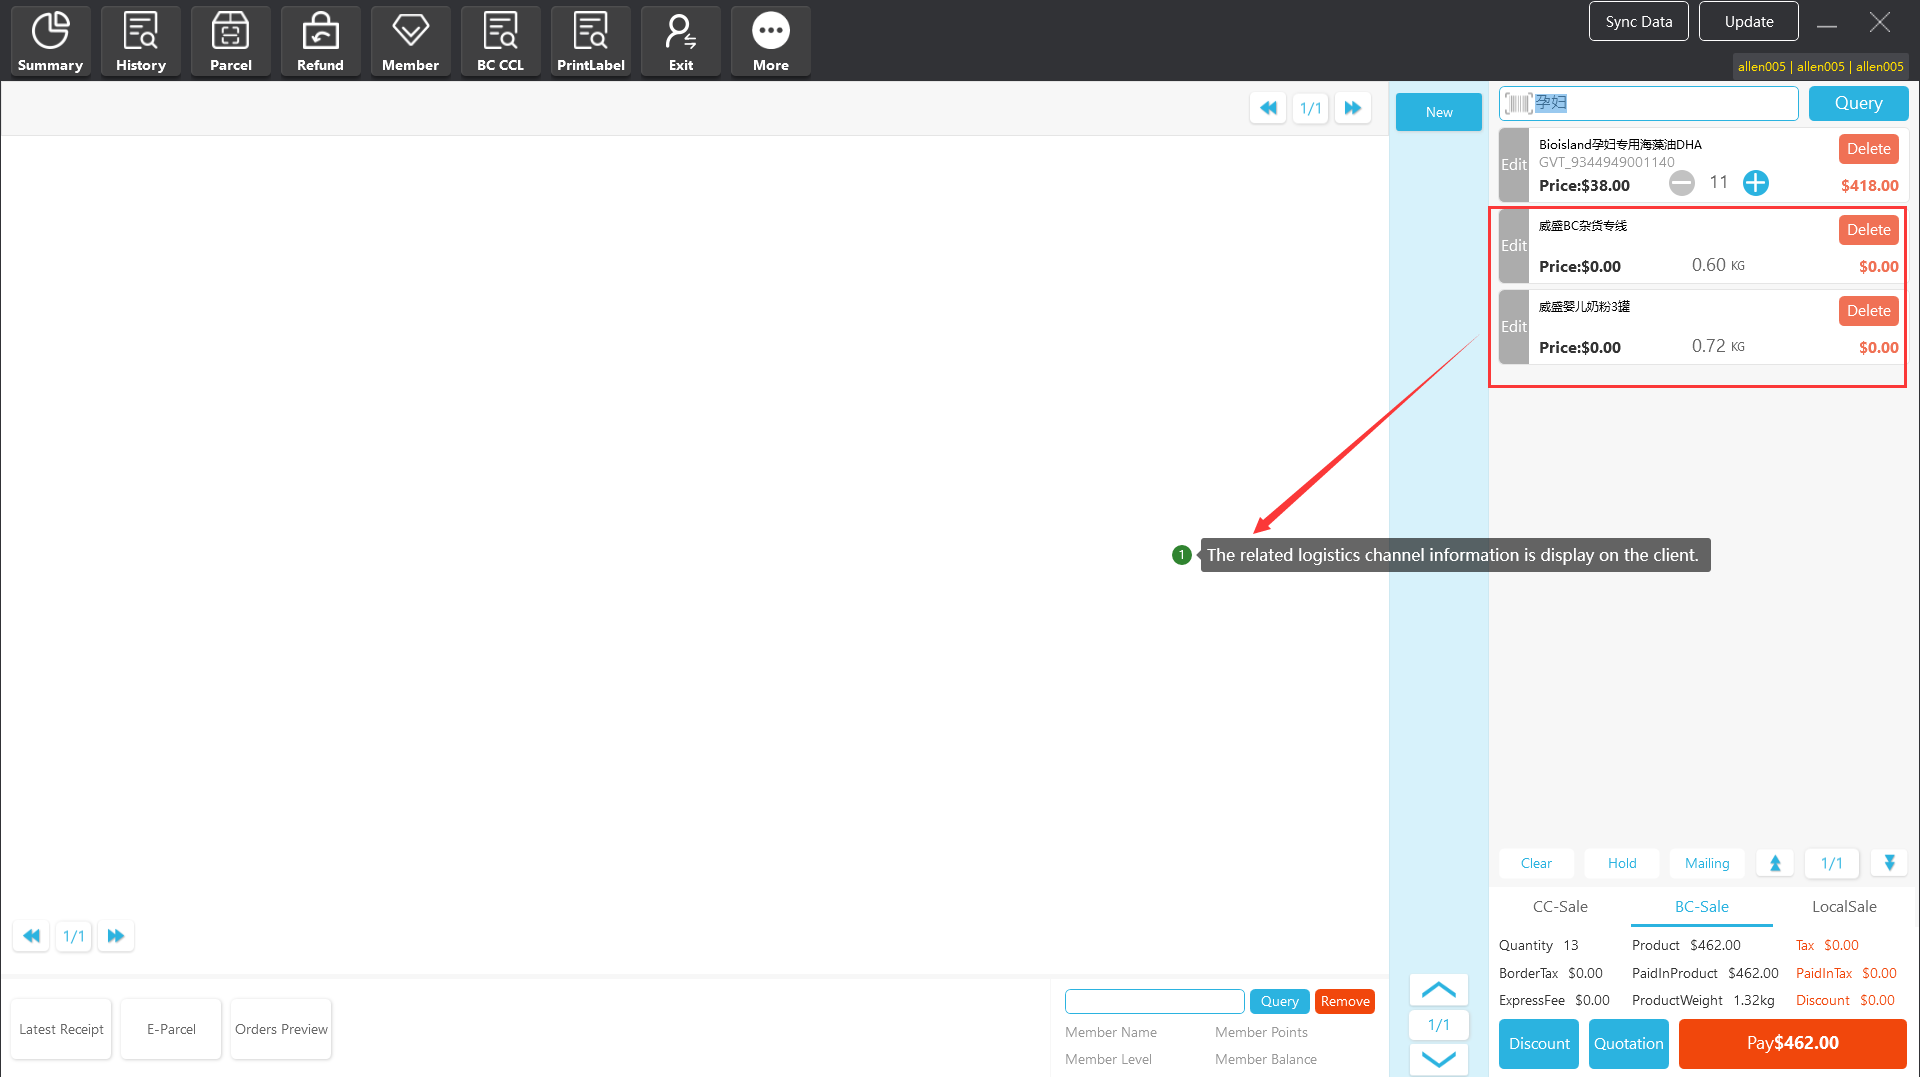
Step 4; Click “Order Quotation” option
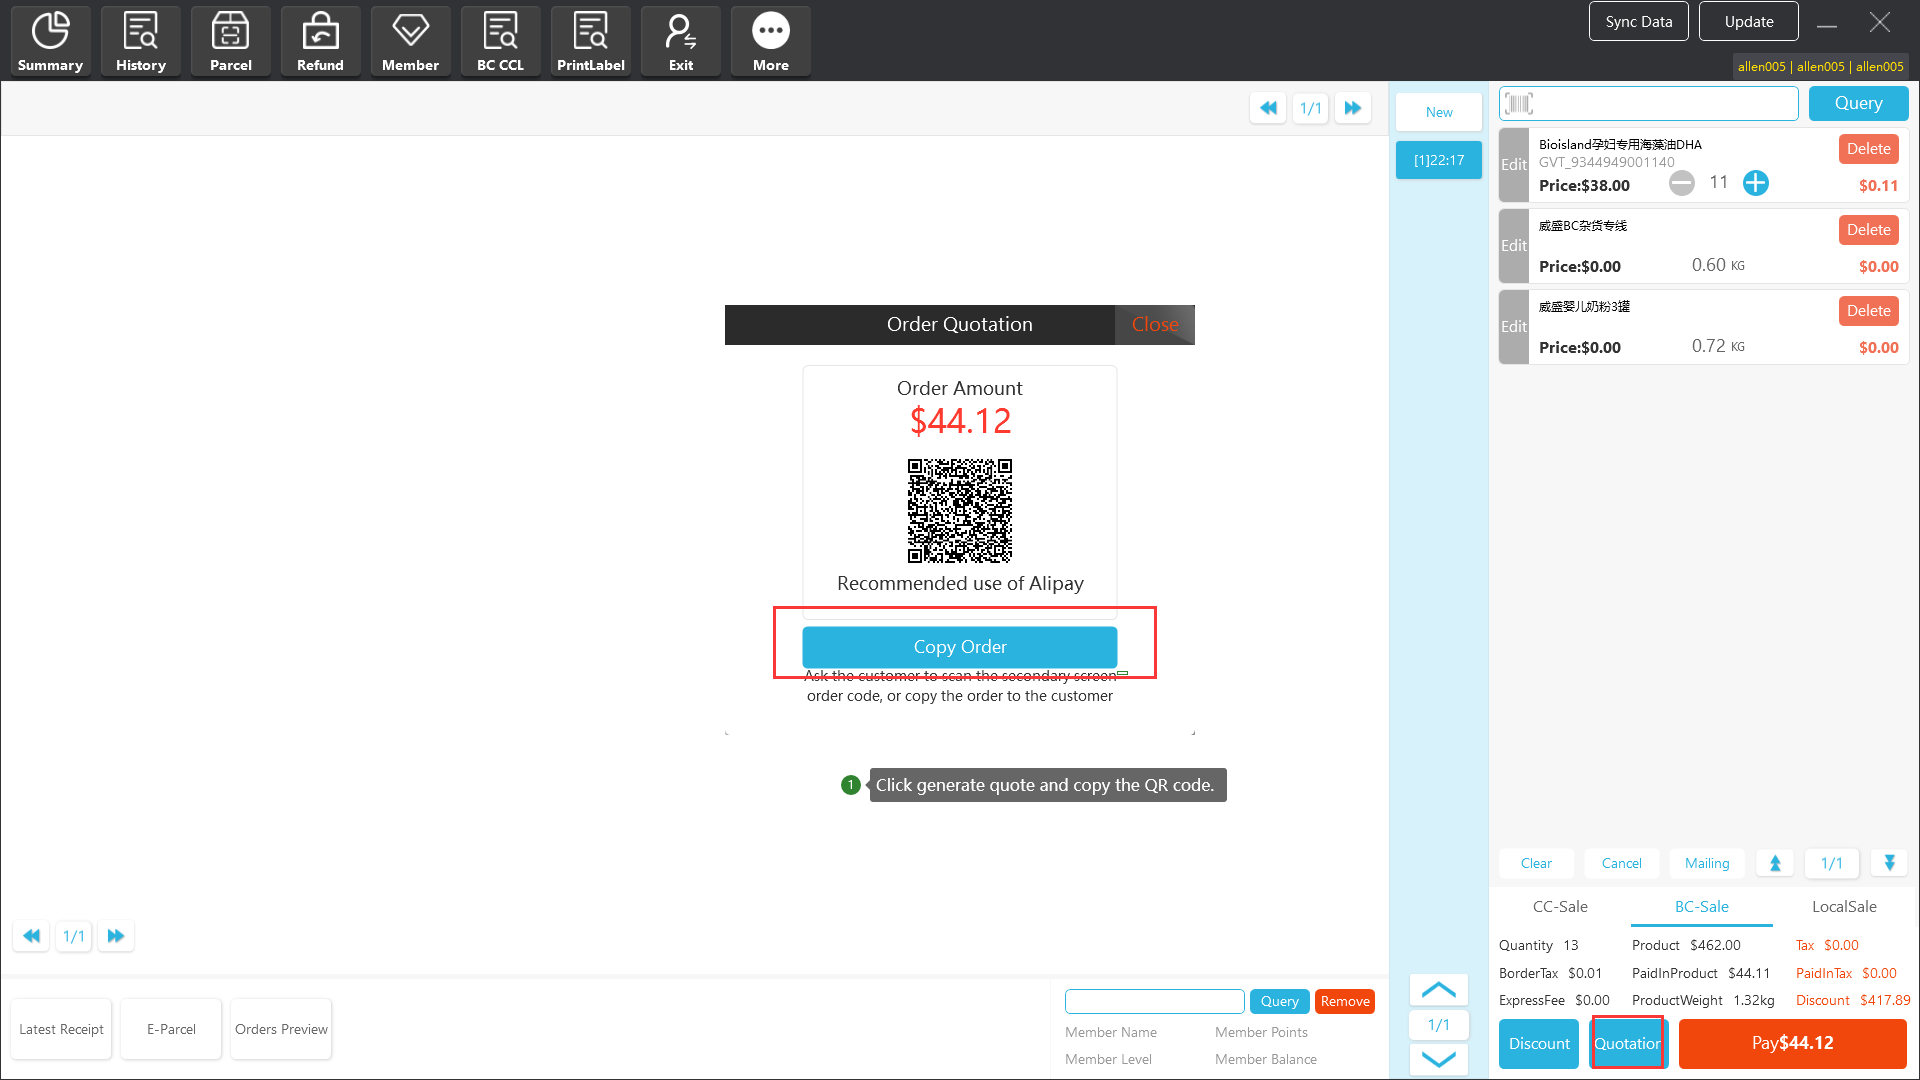
Step 5; Customers are required to scan the secondary screen order code with Alipay
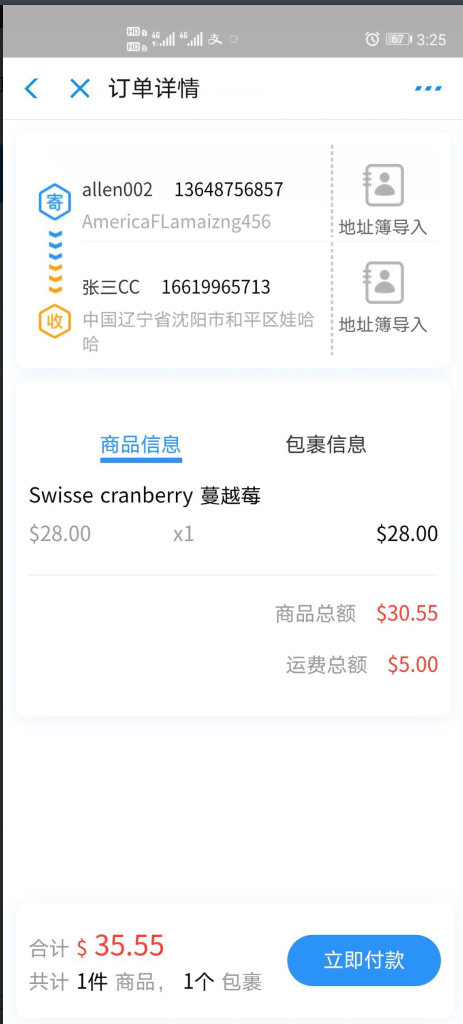
Step 6: Copy the order to the customer.
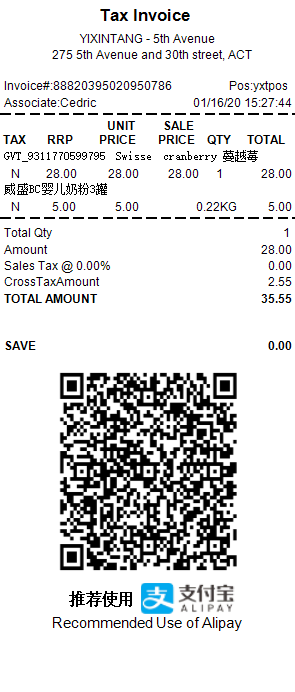
Step 7; The color of the order will be changed to green after the customer makes payment
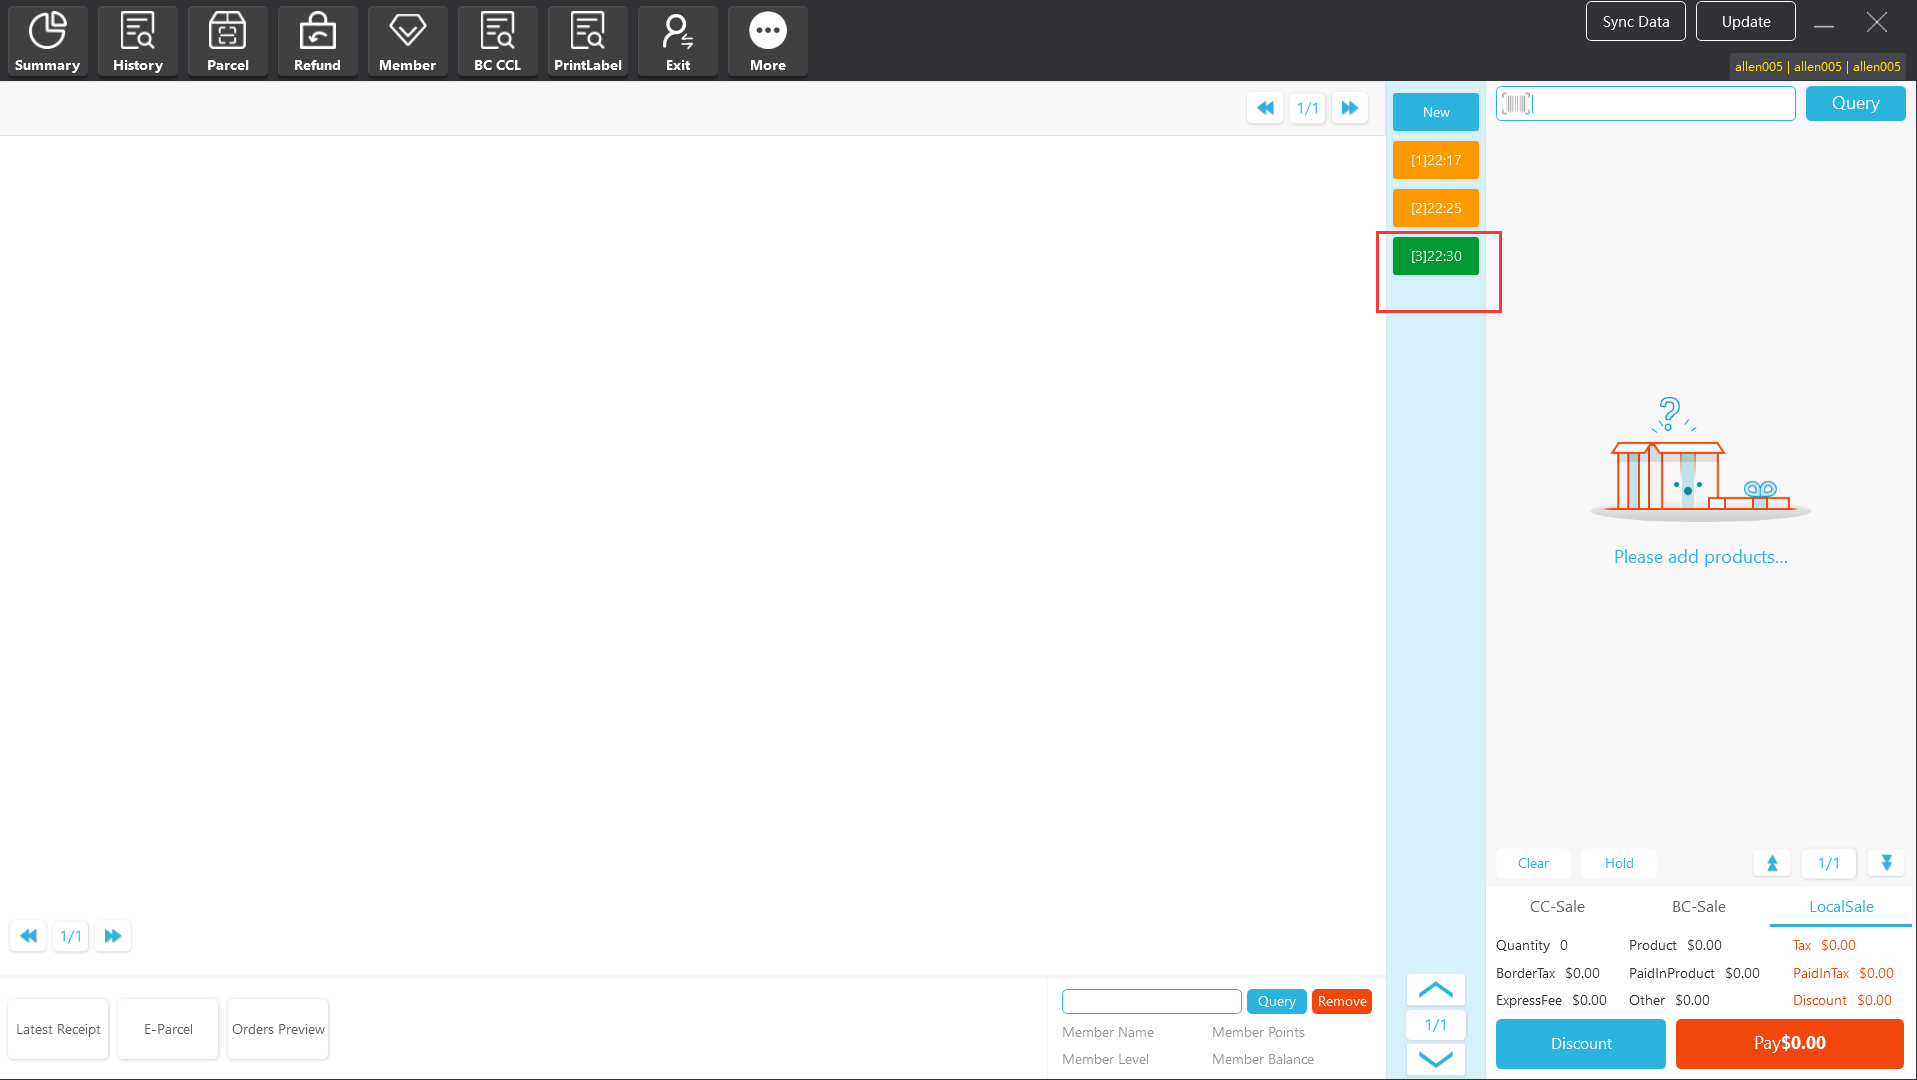
Step 8; After selecting the order, click “Finish Order" to print the logistics express sheet and the order.
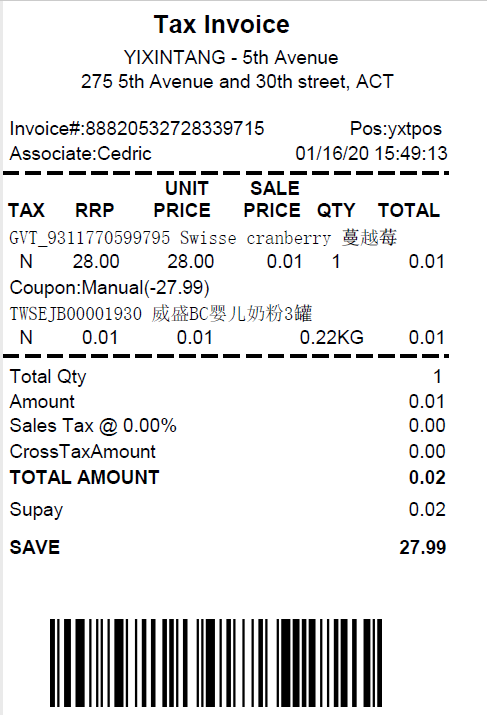
12.12 Reconciliation
12.12.1 First reconciliation on the day.
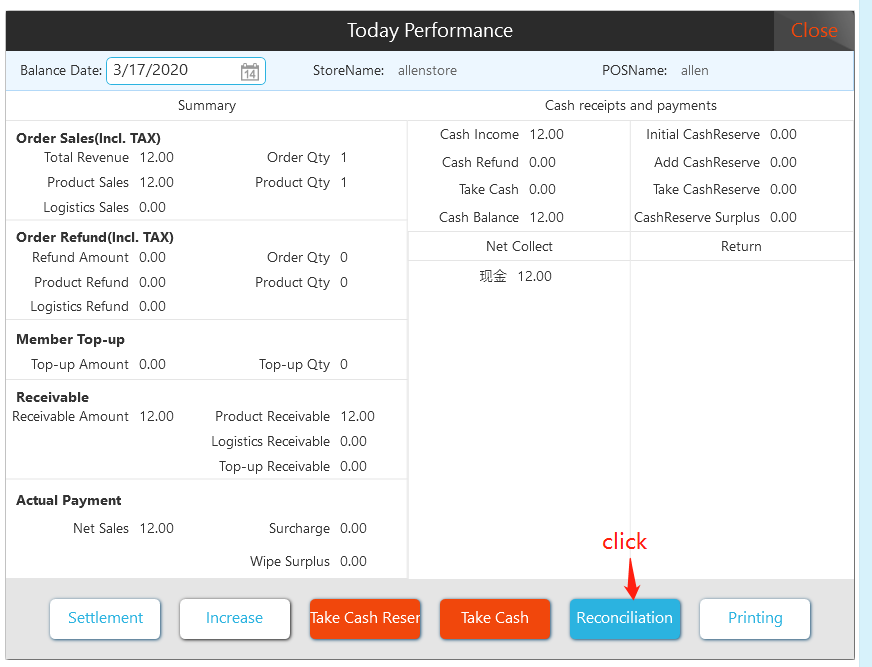
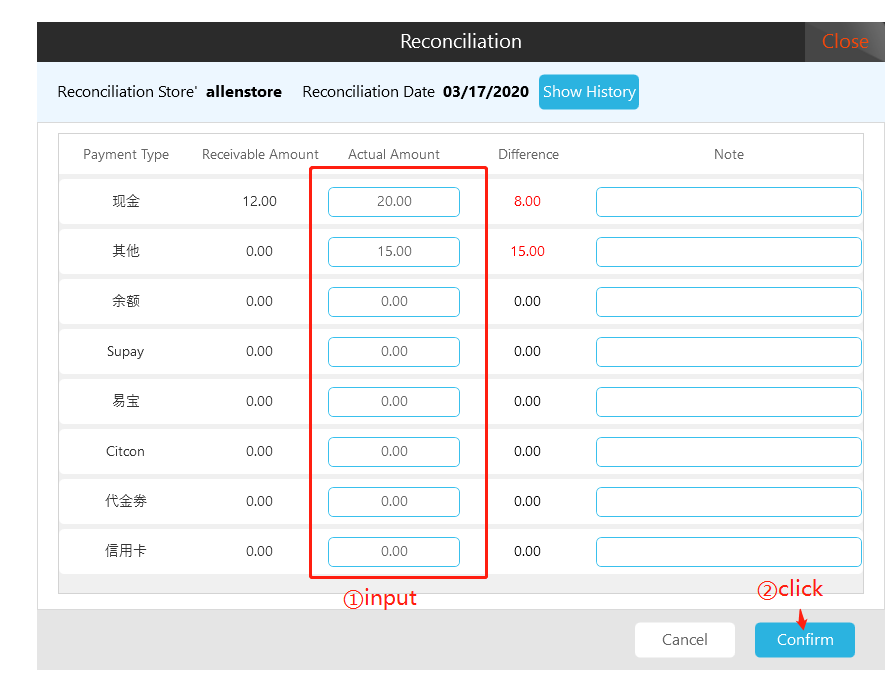
12.12.2 Multiple reconciliations on the day.

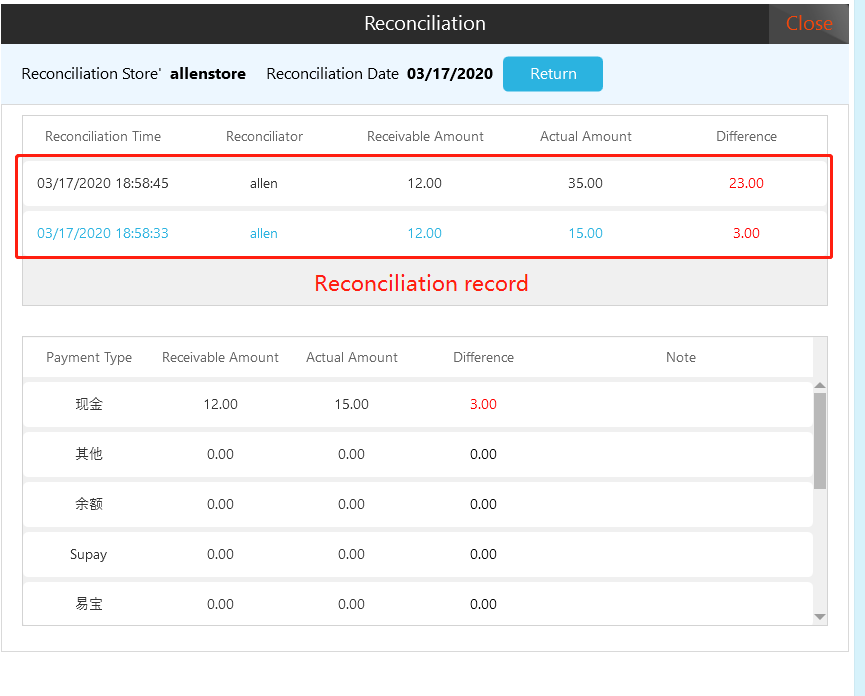
XIII. Sacking platform
13.1 Packing slips
13.1.1 Package management
- Manual pack
The data sources in the order list of the packing slips page of the package management are generally the paid but unshipped orders from the SaaS E-Mall. Take the export order number as the smallest unit. When there is only one package in an order, there is only one outbound order number (sample1). When an order contains ultiple packages, you will see duplicate order numbers and different outbound order numbers (sample2).
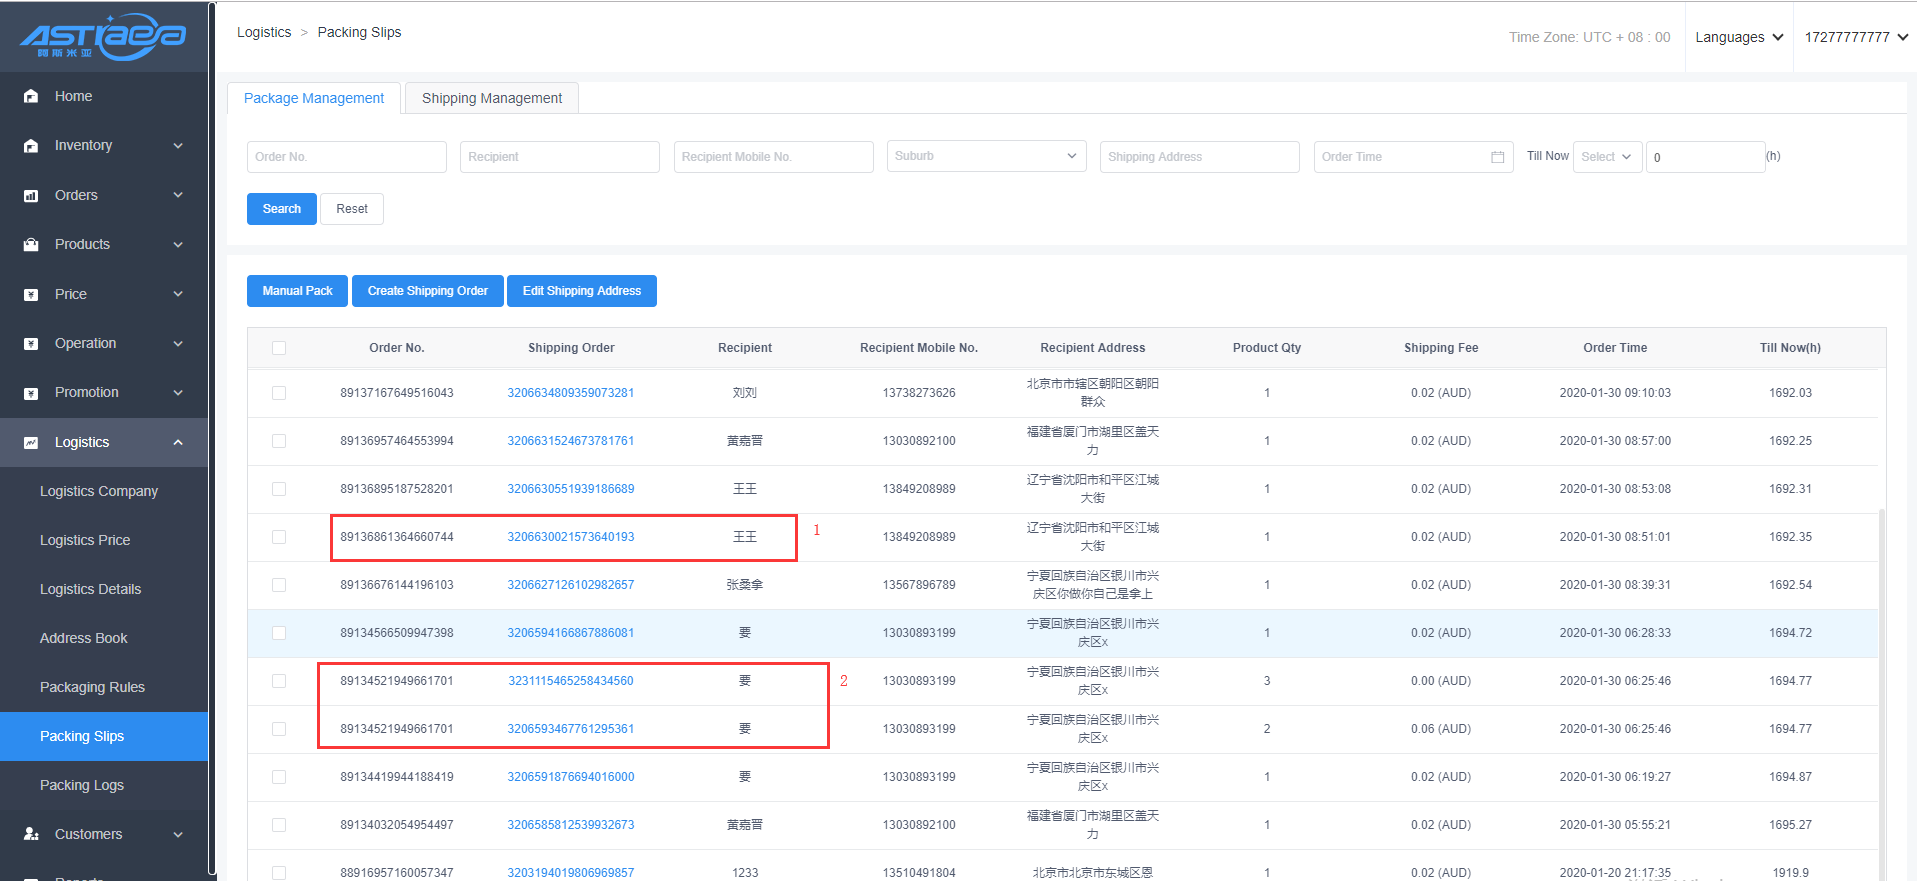
The manual pack is similar to the client shipping result page. You can create or delete packages, replace the logistics used by the packages, and redistribute the goods in each package. After entering the manual pack page, click Edit to change the package information. After editing the package information, you need to click Save to take effect.
- Generate a warehouse receipt
Generating shipping orders is to push the confirmed packing orders to the shipping order management list.
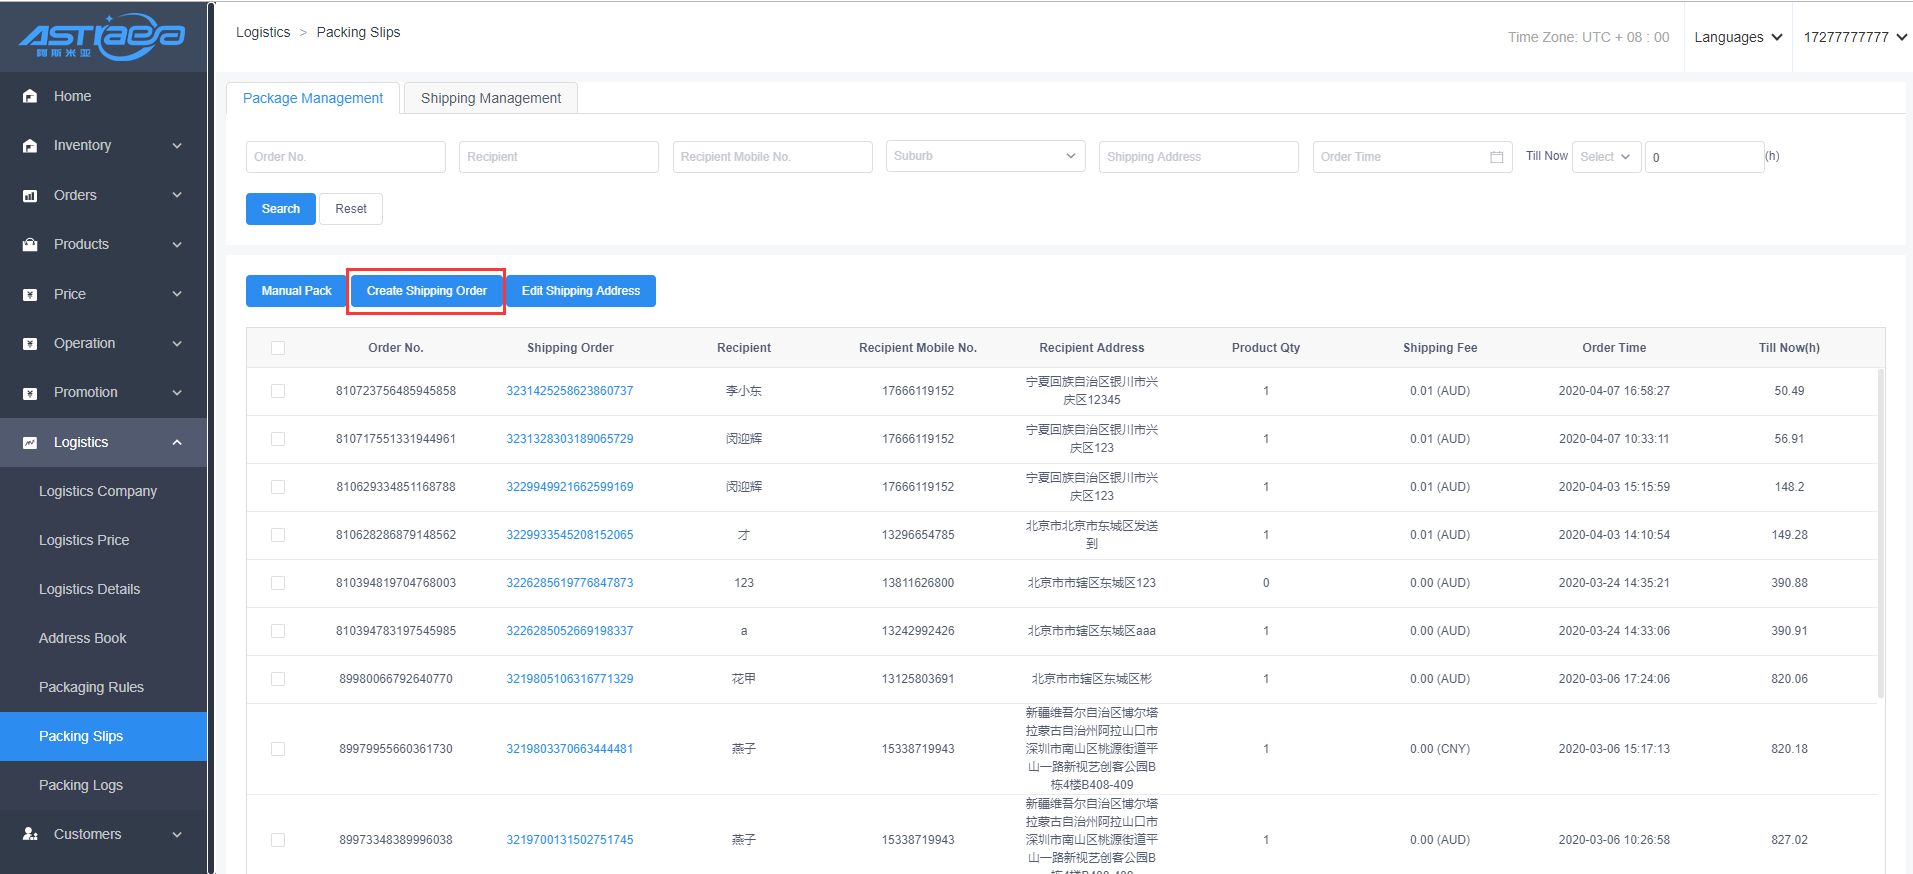
- Edit the recipient address**
Note; Before the order is generated, the relevant information of the recipient can be modified. No changes are allowed after the warehouse receipt is generated.
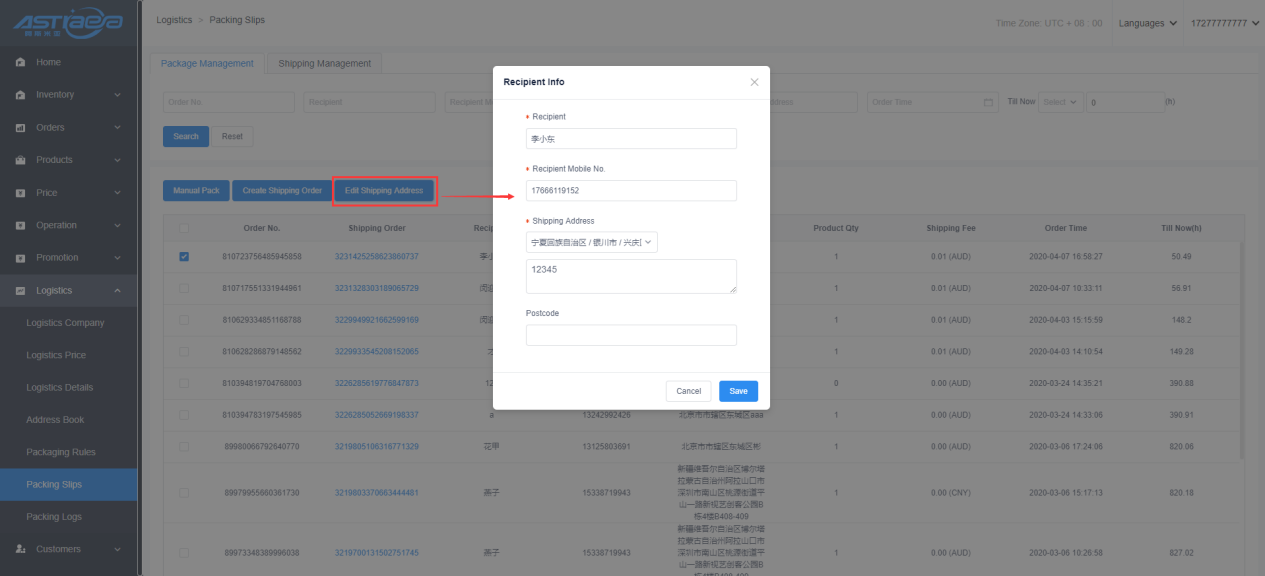
13.1.2 Shipping Management
After the order is generated from the package management list, it will be pushed to the shipping management list. The shipping order management list displays orders to be picked that have not been out of warehouse by default. On this page, you can print the picking order and shipping order. Pick first and then package will print the pick list. And ‘packing the goods first, picking the goods afterwards’ does not print the picking list.
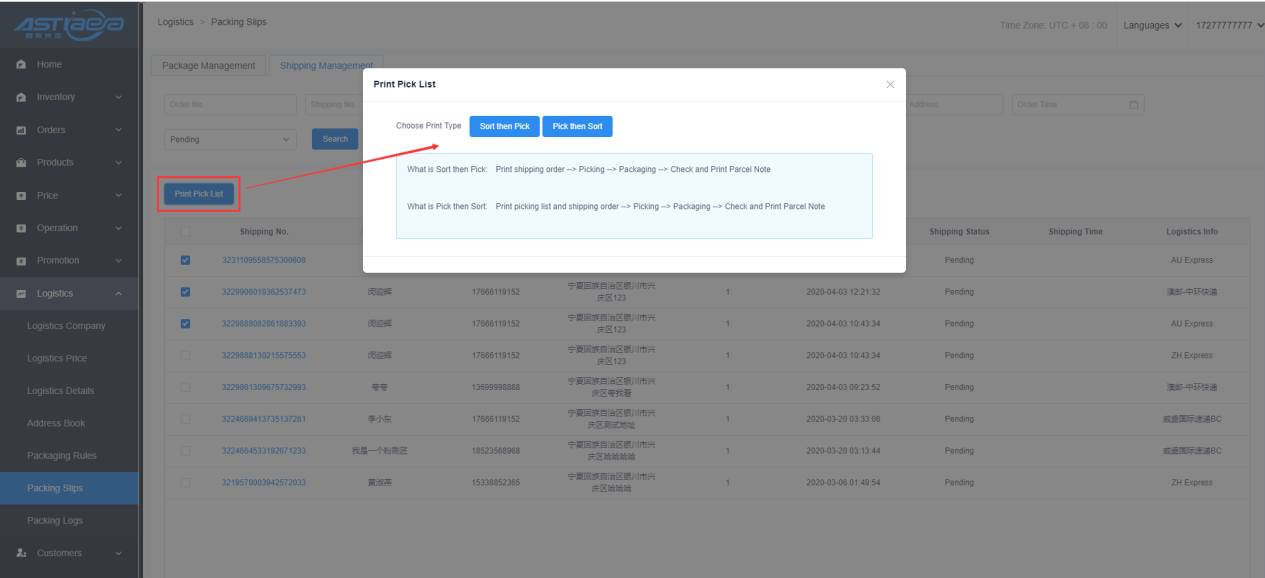
For the orders that have been out of the shipping management, you can view the package pictures of the goods and the bill pictures of the package taken through the sacking platform operation.
13.2 Packing logs
The packing logs list is an operation performed on the package management page according to each shipping operation recorded in the shipping order. You can also add note information separately for each operation.
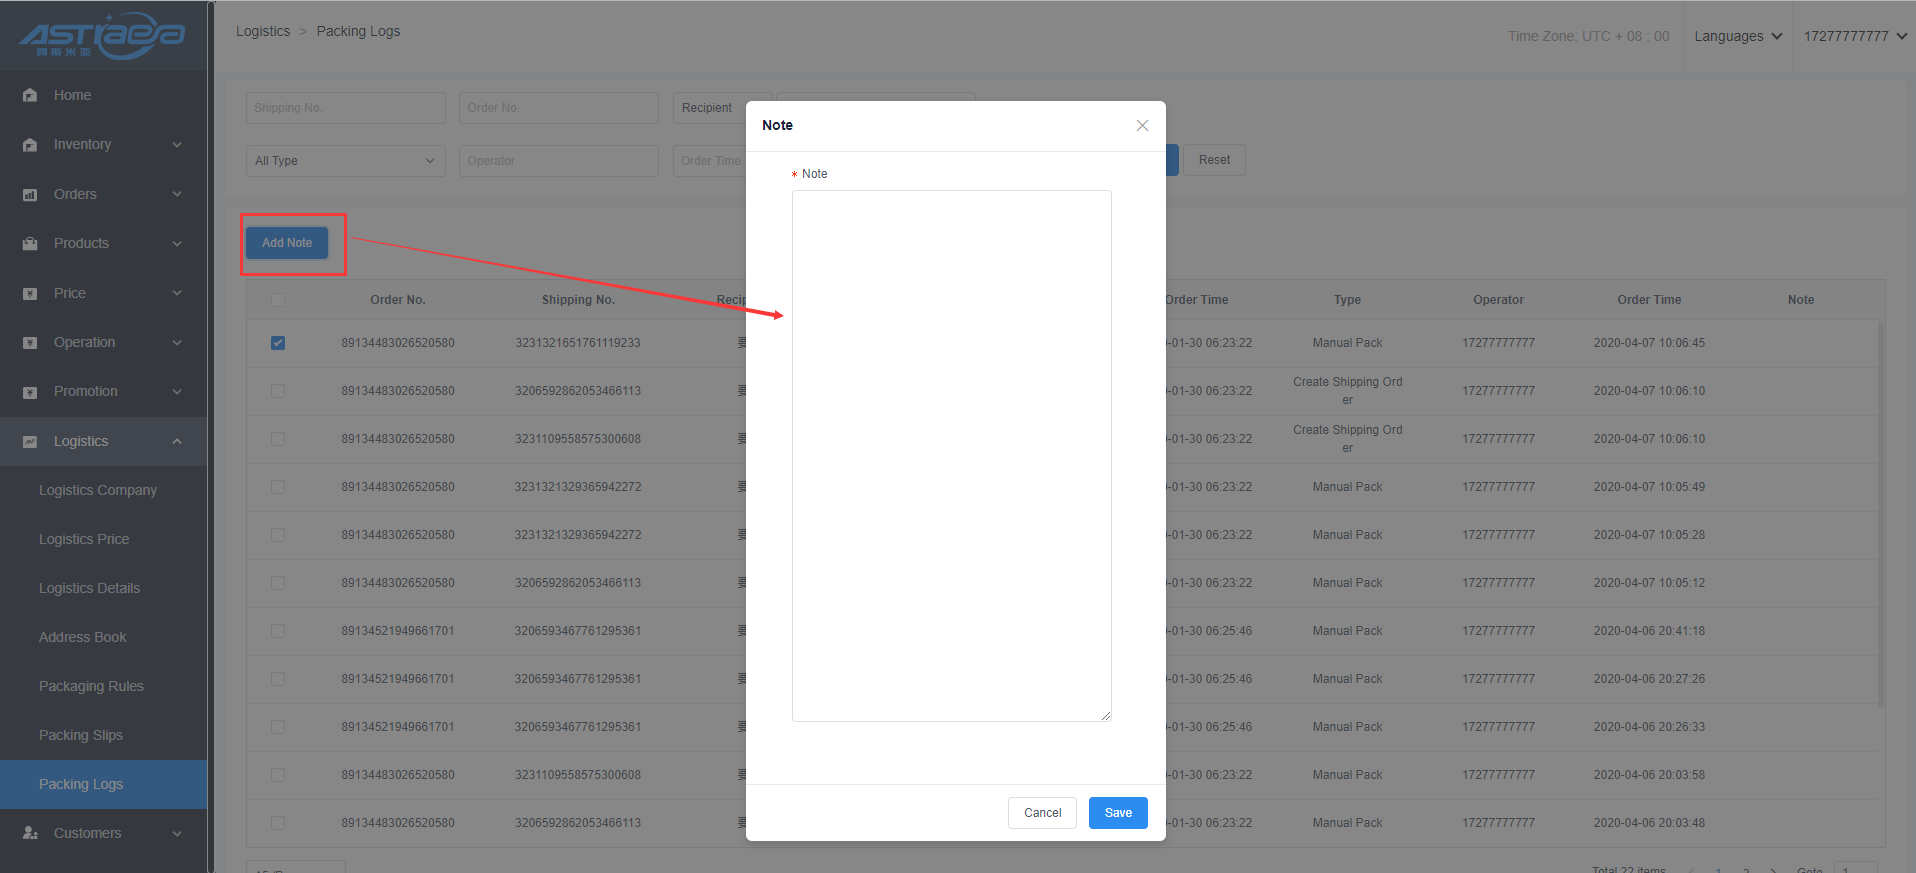
13.3 Sacking platform client
13.3.1 Login sacking platform
- Creating sacking platform at the sever
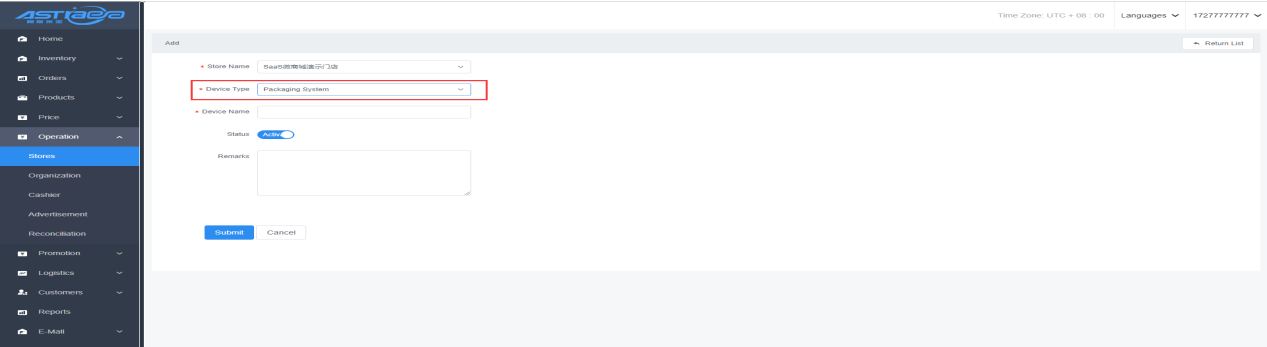
First of all,you need to established a sacking p0latform device at the sever.
- Obtaining permissions
The account used to log in to the sacking platform client is also the employee account of the store, but you need to obtain the permission to log in to the sacking platform first, so you need to first associate the sacking platform with a role, and then associate the role with the employee account.
- Login
After the above operation is completed, you can use the corresponding employee account to log in to the sacking platform client. The system will automatically obtain the sacking platform of the store corresponding to the account.

13.3.2 Sacking platform out of the warehouse
- Scan the warehouse receipt barcode to read the warehouse receipt information
After opening the login sacking platform, click the "Packing Checklist" tab at the top of the page to enter the packing checklist page. Use the barcode scanner to scan the bar code of the warehouse receipt and enter it into the keyword input box to query the warehouse receipt information. Or double-click directly in the waiting order list to select the outbound order.
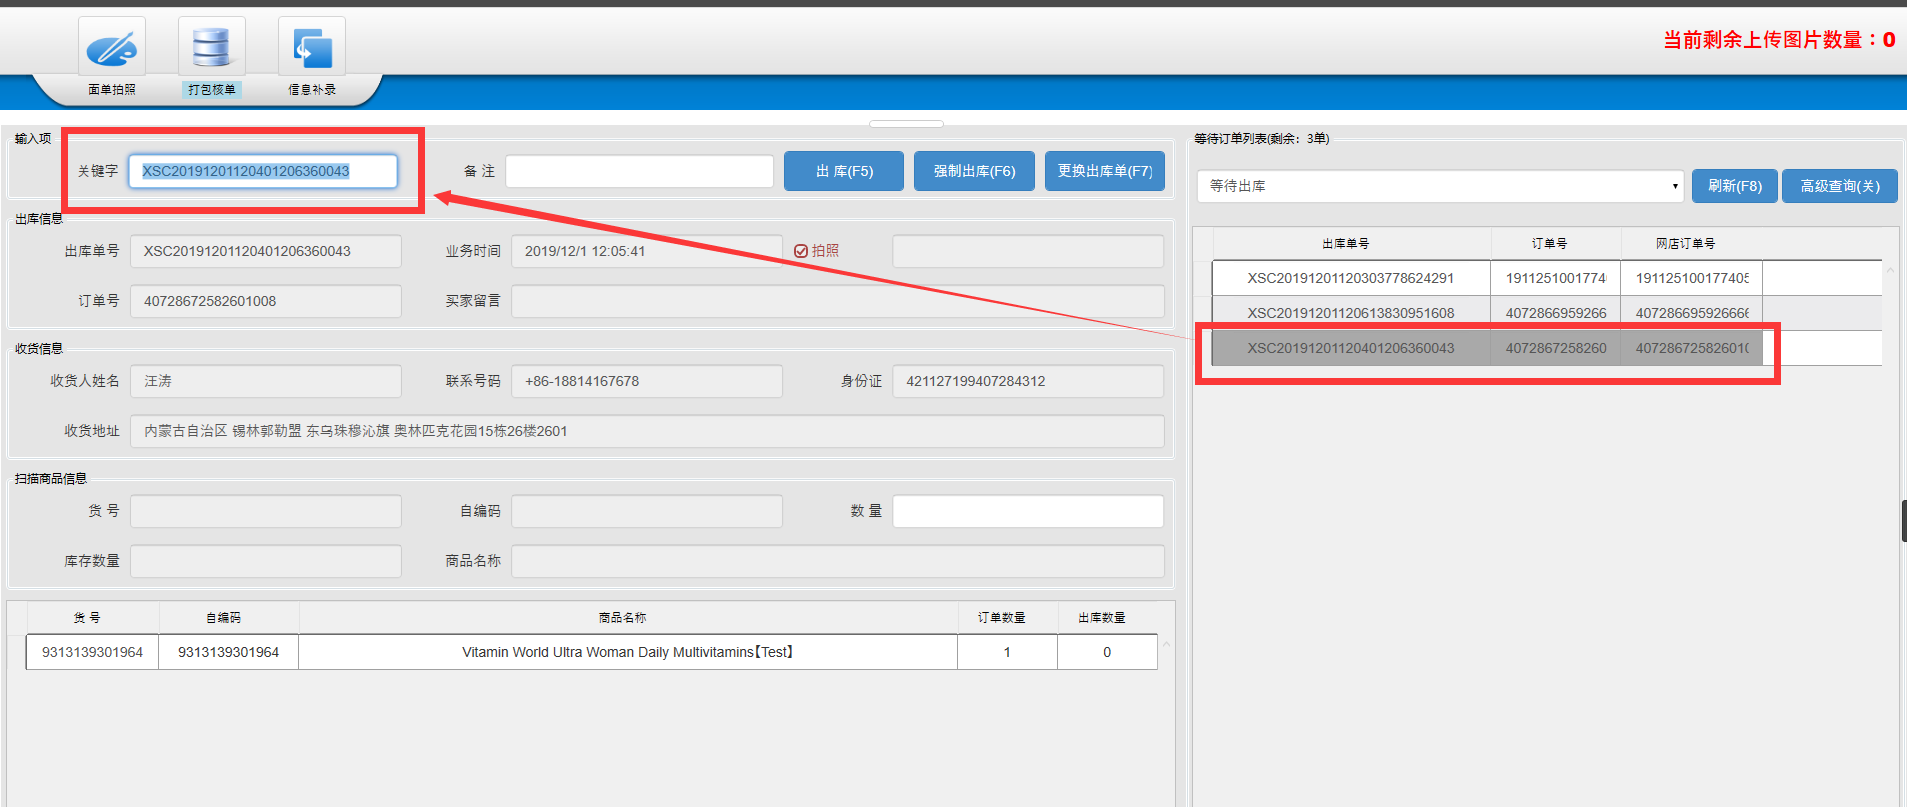
- Scan the barcode of the product to check the order
After querying the information of the shipping order,select the product according to the product information on the shipping order, use the barcode scanner to scan the barcode on the product to the keyword input box, and the system automatically checks whether the scanned product information matches the product information in the order.
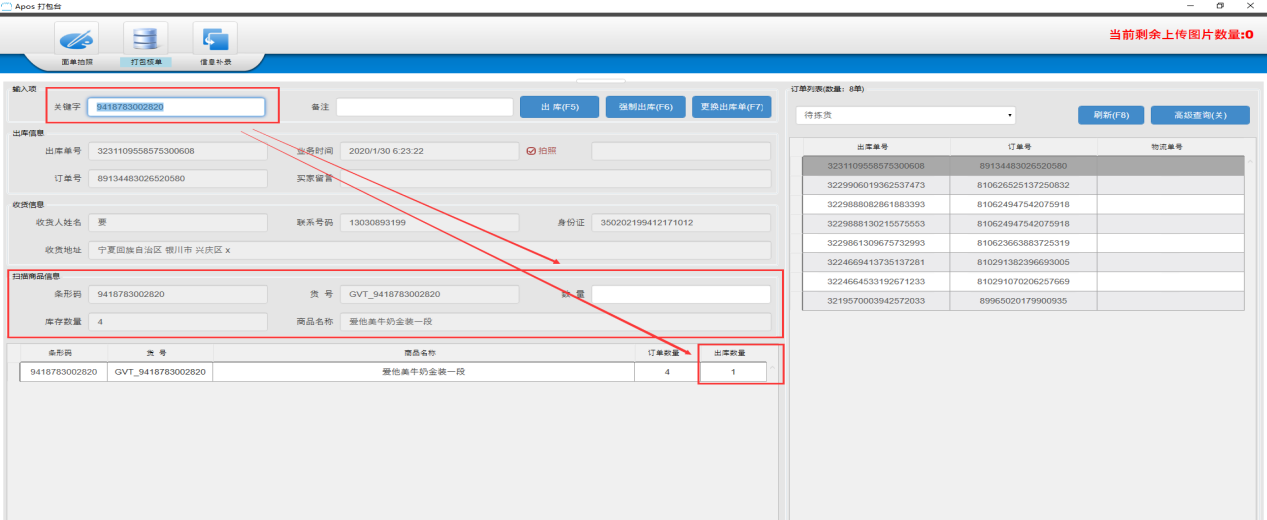
Scanning the product barcode once means that one product is out of stock. When there are multiple products in the order, you need to scan the product barcode multiple times.
- Take photos of packaged goods
After all the goods in the order are scanned out of the warehouse, the system will automatically pop up and take pictures of the packaged goods.The main window will show the area where the camera takes the picture.After placing the order out of stock items in the photo area, click the "photograph" button in the pop-up window.The captured area on the right side of the pop-up window will automatically display the pictures taken by the camera.
After clicking "Save / Close", the system will upload and save the packaged picture to the picture server after the order is successfully shipped.
- Package weighing
After the goods are packaged and photographed, the system will automatically pop up a pop-up box for packaging and weighing. When the system is connected to an electronic scale, the weight of the package weighed by the electronic scale can be obtained automatically, or the package weight can be entered manually.

- Print the thermal bill out of the library
After weighing and entering the weight, click OK, the system will automatically out of the warehouse and print the thermal bill. Orders that are successfully shipped out are automatically removed from the list of waiting orders.
- Information supplement
For the normal stock out process,,due to various reasons, the stock out step is successful,,but the logistics thermal information is not normal..We can reprint the thermal bill operation in the information supplement tab..After finding out the cause and solving it, you can find out the order that needs to be reprinted through the shipping order number and logistics order number in the "Information Supplement" tab,and click “Reprint Thermal bill”.
In addition to reprinting the thermal bill,you can also update the package weight,remake the thermal bill and remake the product packaging picture.
XIV. Dropshipping
14.1 List of announcements
14.1.1 Create Announcement
To create an announcement, you need to enter the system management background, so only system administrators can create announcements. When creating an announcement, you can specify the commercial tenant of a certain country to be visible according to different countries,or you can specify a specific merchant or a few merchants to be visible. After the display date is set, the system will display at the specified time according to the commercial tenant's time zone (for example, set the display time 2020/04 / 01—2020 / 04/02, visible to US commercial tenants, then the US commercial tenants will only be on 2020/04 / 01—2020 / 04 / 02 visible).
14.1.2 Enable notification
The newly added announcements are disabled by default, and need to be clicked to activate before they become effective. After the actual time exceeds the display time range, the notice will automatically expire, no longer displayed, and can also be manually disabled.
14.2 Dropshipping warehouse
14.2.1 Obtaining dropshipping permission

There are two system entrances for ordinary commercial tenants to open dropshipping port. One finds a notice to be dropshipped in the notice list when entering the sever background, and click to open the dropshipping model. The other is to click ‘Open dropshipping’ on the advertising page of the client ’s dropshipping screen.
14.2.2 Application for distribution channels
- Adding a distribution channel
After obtaining the distribution authority, you can apply for the opening of the distribution channel for yourself. You need to enter the relevant information of the distribution channel before applying for opening.
When adding the distribution channel information to submit, you can choose to apply for activation imhttps://gvt-libs.oss-cn-hongkong.aliyuncs.com/assets/en-us/apos-universal-web-userguide-v4.6.1-v1tely, or choose not to activate temporarily, and then apply for
activation later.
14.2.2 Application for dropshipping channels
- Adding a dropshipping channel
After obtaining the dropshipping authority, you can apply to open a dropshipping channel for yourself. Before applying for opening, you need to enter the relevant information of the dropshipping channel.
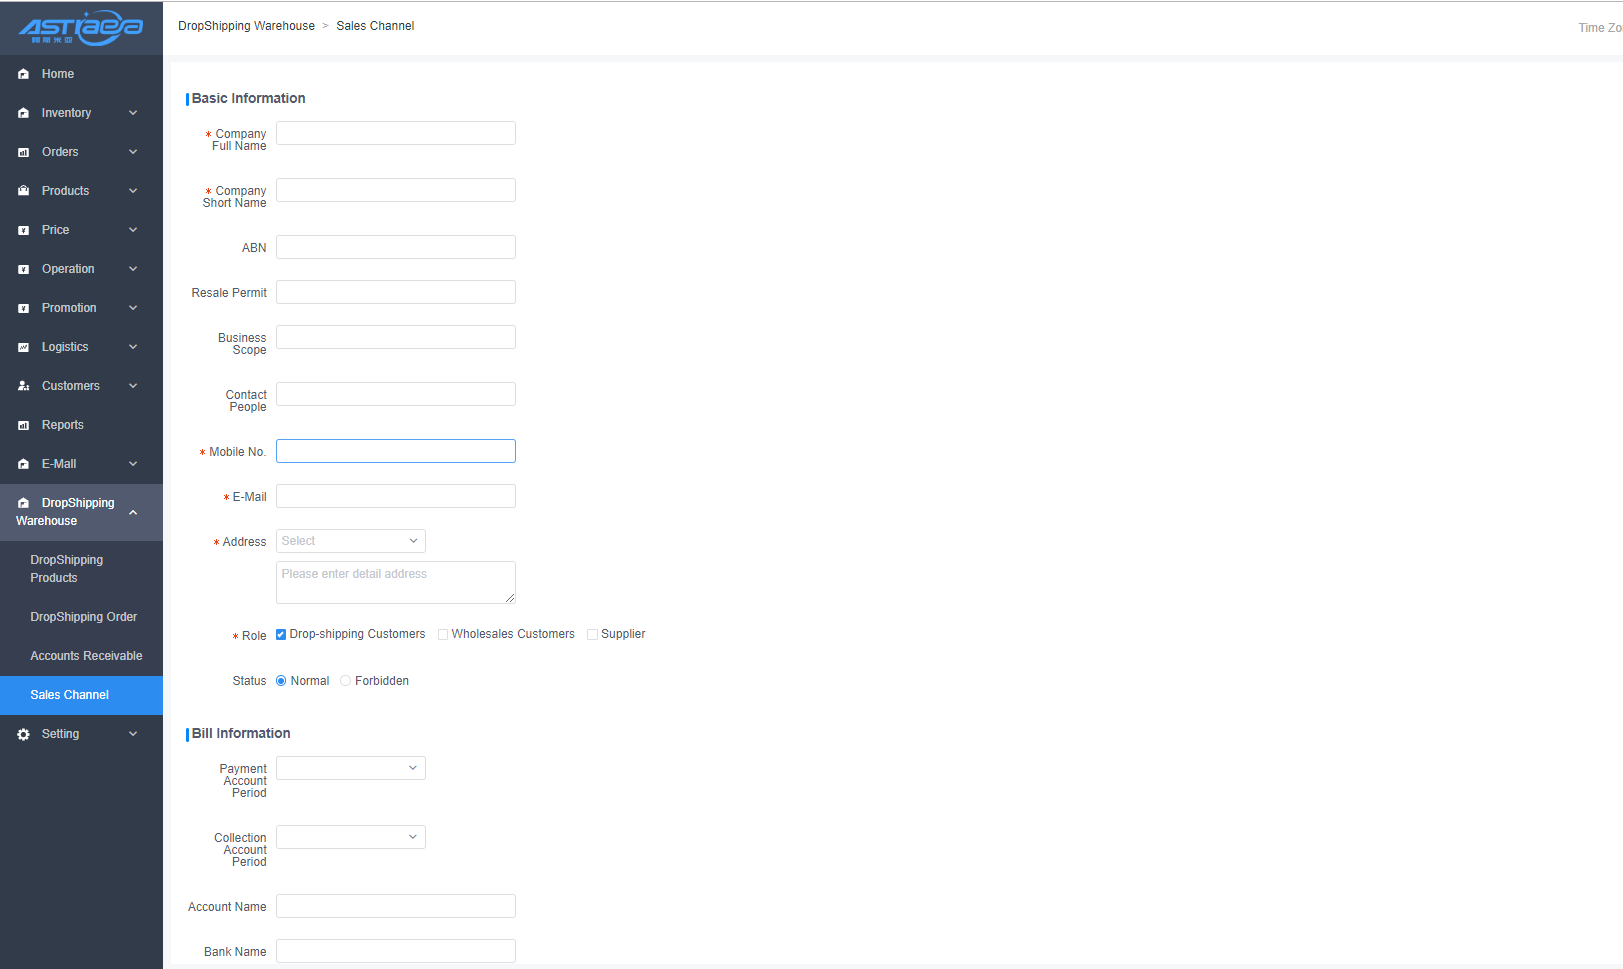
When adding the dropshipping channel information to submit, you can choose to apply for activation imhttps://gvt-libs.oss-cn-hongkong.aliyuncs.com/assets/en-us/apos-universal-web-userguide-v4.6.1-v1tely, or choose not to activate temporarily, and then apply for activation later.
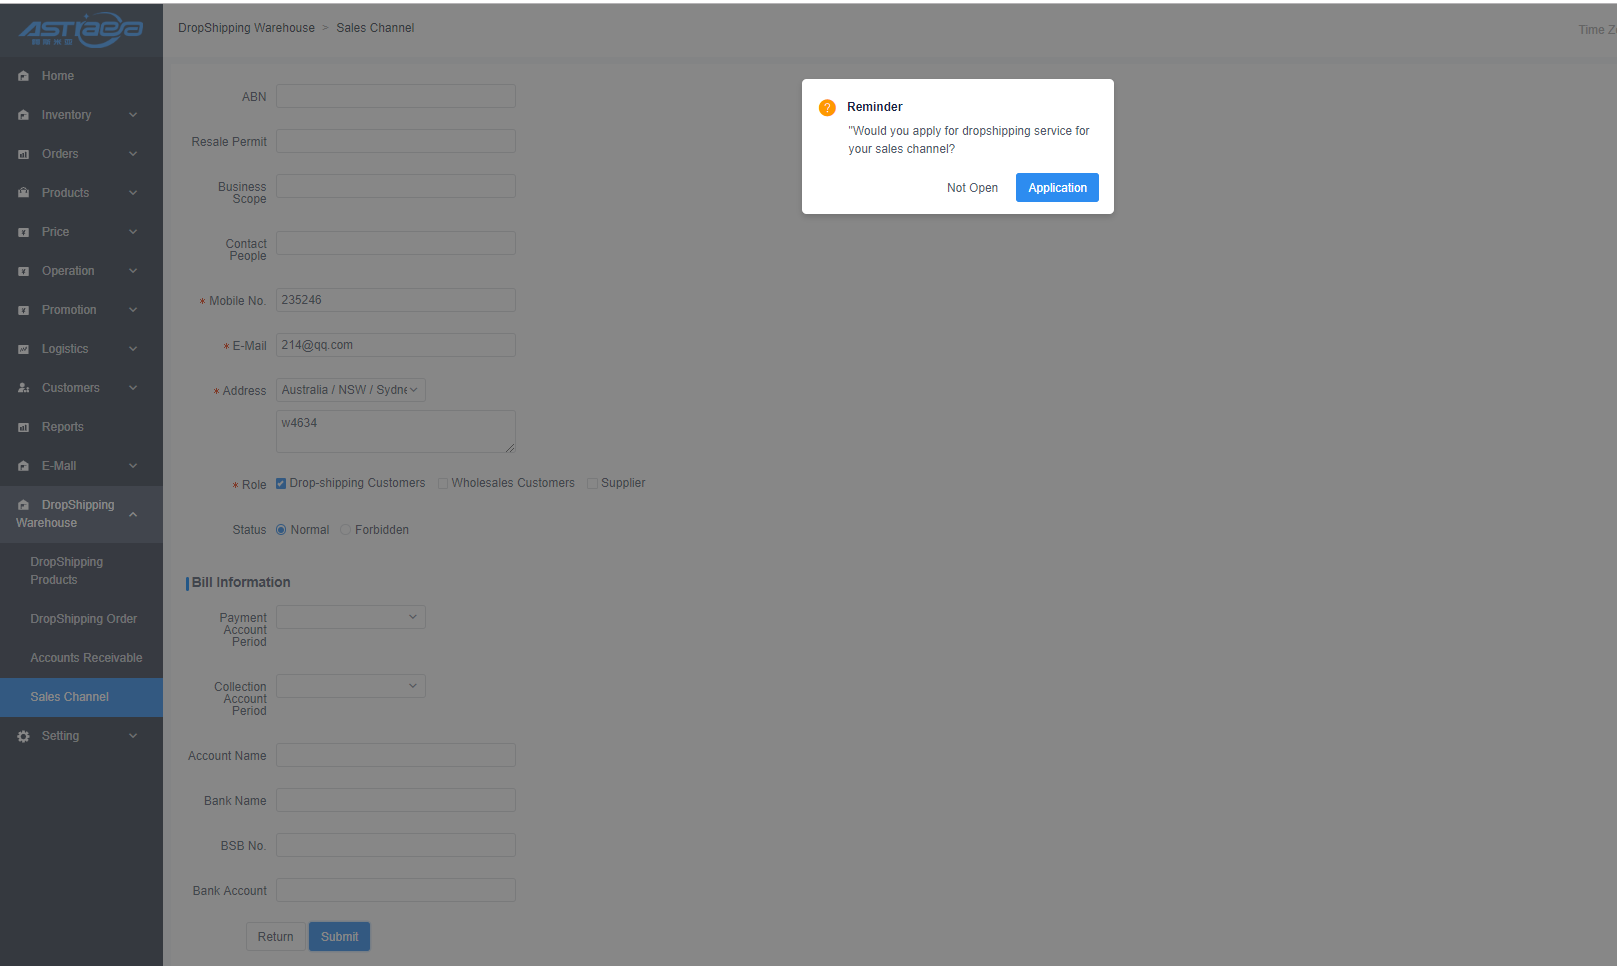
- Application for activation
If you choose not to open temporarily, the status of the dropshipping channel list is not open. You can click “Apply for activation” alone, or check multiple channels to apply for activation in batches. If you have already applied for activation, but the audit fails, you can view the reason for the failure, and reapply for activation after editing.
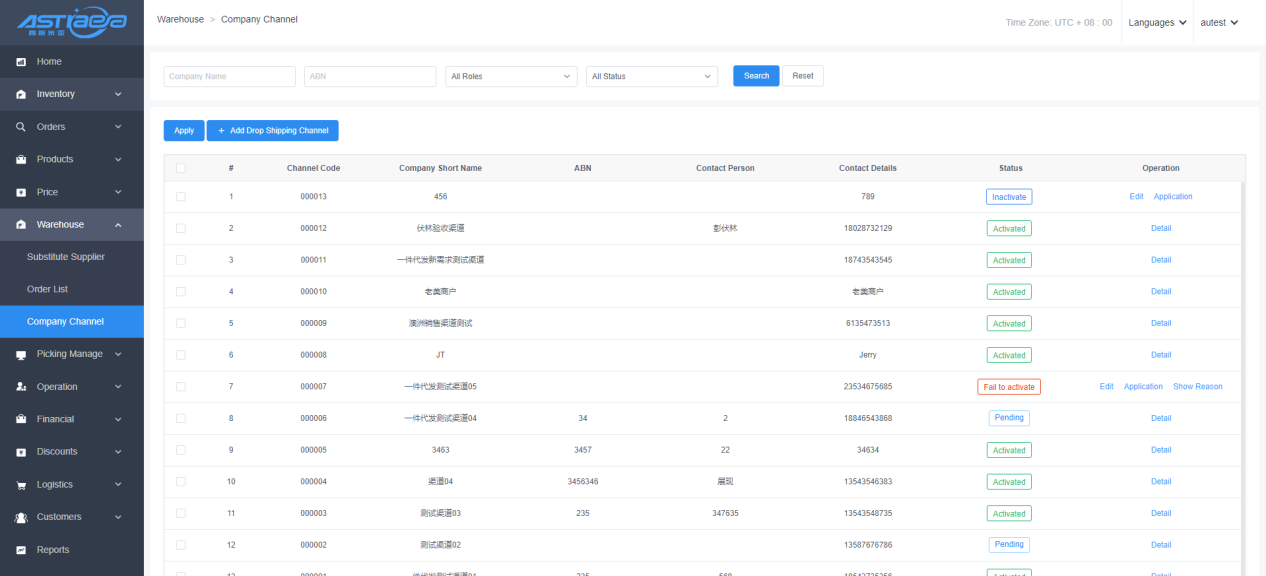
- Management side audit
After the commercial tenants applies for opening, there will be a corresponding application record in the management background. The system administrator can click on the company name to view the company information of the application for opening, approval and rejection.
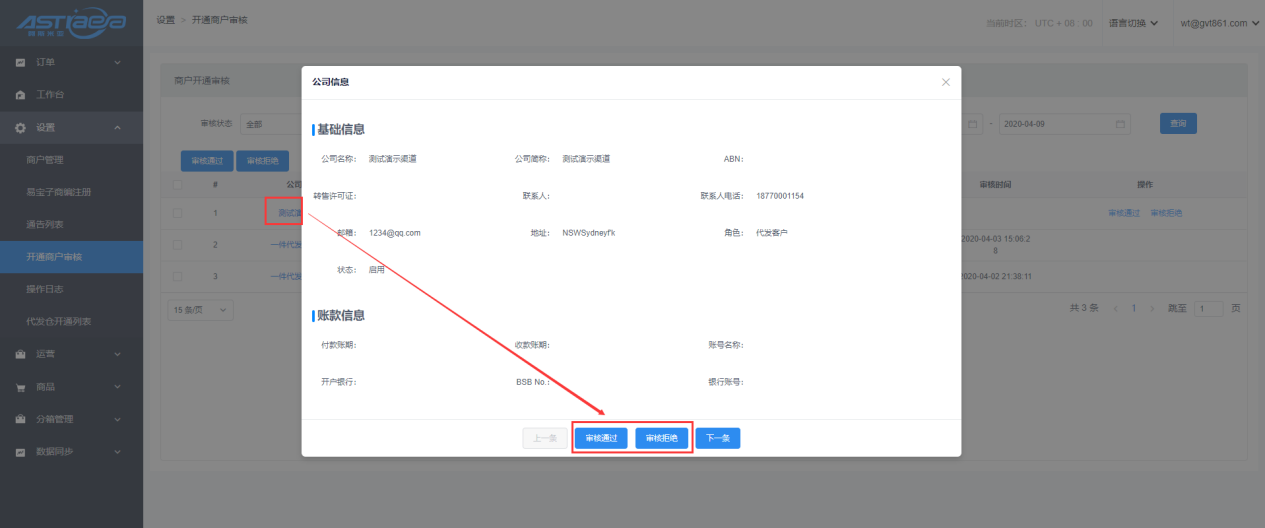
14.2.3 Set up the warehouse
Each new dropshipper will need to choose a store as its dropshipping warehouse in its own store. The dropshipping products are selected from the products that have been put on sale in the selected store.
Operation path: warehouse management "on behalf of the goods
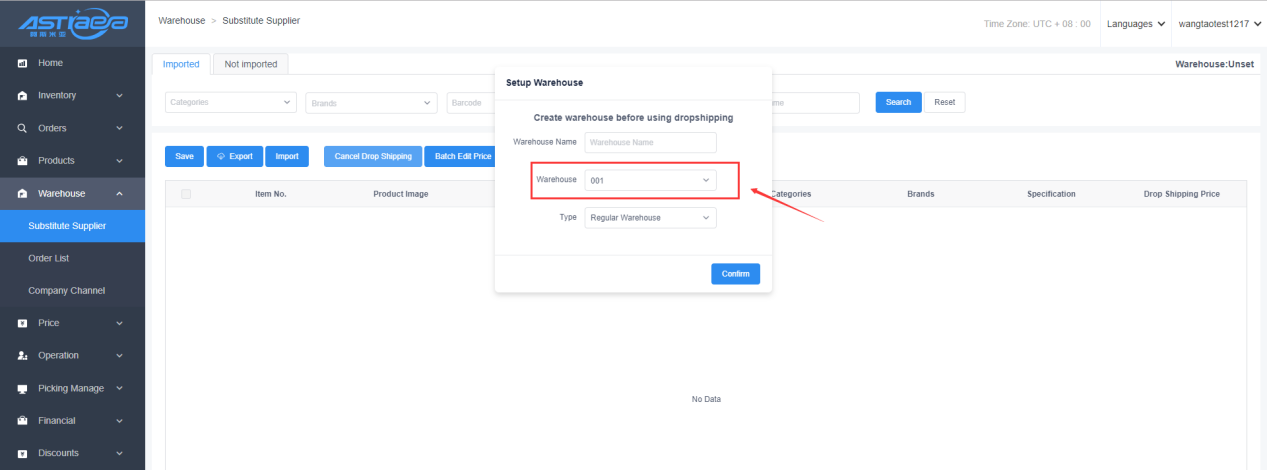
14.2.4 Set up dropshipping products
After setting up the dropshipping warehouse, you can choose the products in the dropshipping warehouse as the dropshipping products. The products in the product list on the unimported page are all from the products that have been added to the store in the warehouse. On the non-import page, you can set the dropshipping price of the dropshipping product, which will take effect after saving; after confirming the successful import, the product will be set as the dropshipping product.
Operation path;warehouse management -generation products-not imported
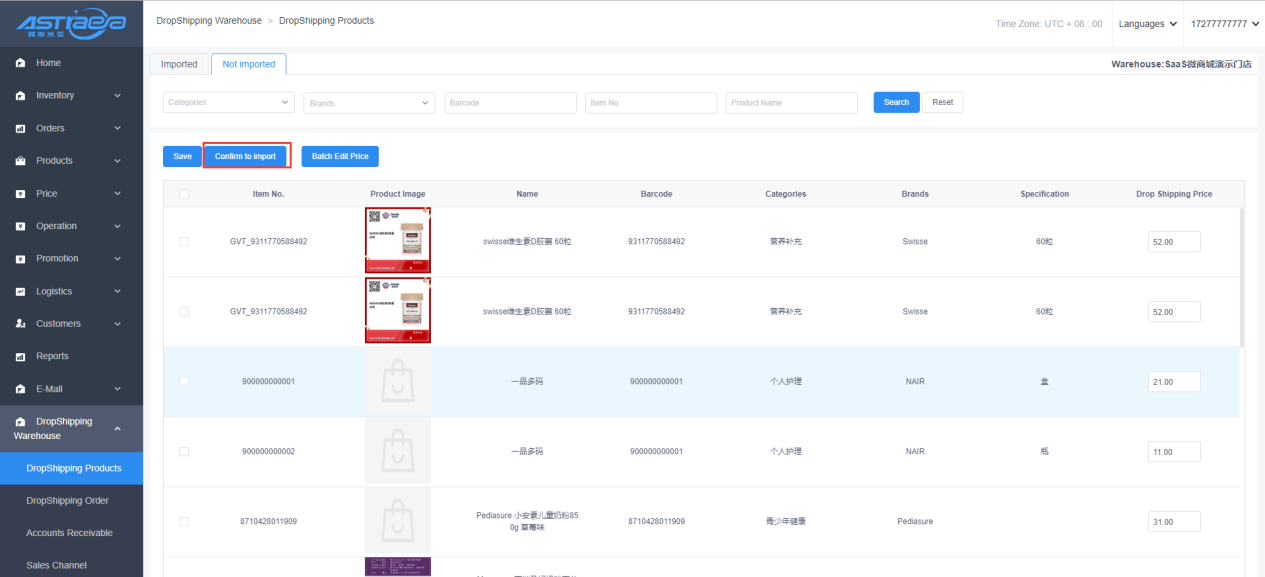
The products on the imported page are the products that have been successfully set as dropshipping products. In addition to setting the commission price and exporting the commission product data,this page can also cancel the qualification of the dropshipping mode. After canceling the dropshipping mode, the products that have been listed on the sales channel will be automatically removed from the list, and they cannot be found on the list.
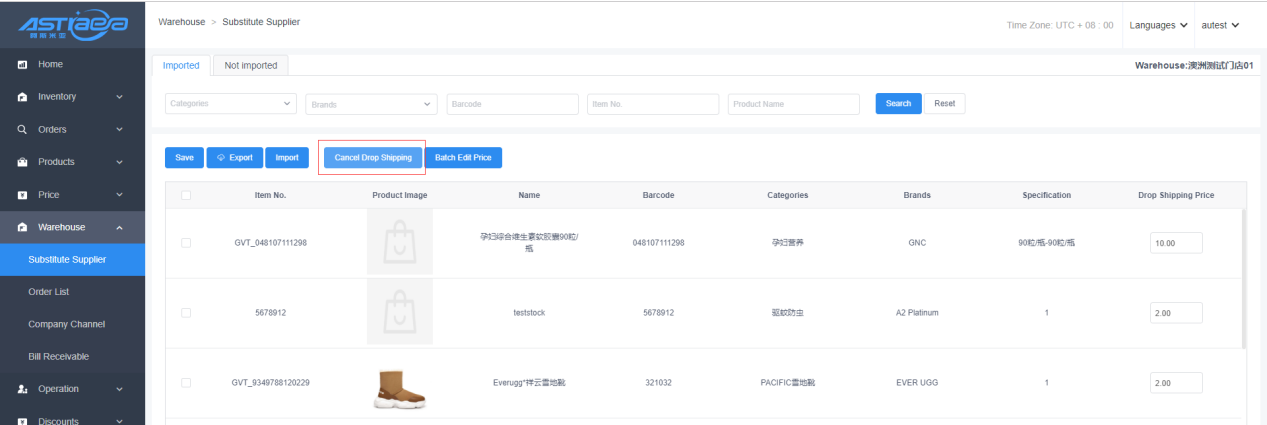
14.2.5 Add payment method
In order for the sales channel to place orders on sale push to the warehouse, each warehouse needs to create a new payment method of “preferred order payment”. Choose ‘EOS’ for payment type and device type.
Operation path;operation management-store management-payment management
**14.2.6 Dropshipping shippments **
All the sales orders shipped by the sales channel will eventually be pushed to the delivery store for delivery. There are two ways to ship dropshipping products of the warehouse; (1) enter the client of the warehouse, order inquiry page, select the unshipped order, print the logistics thermal bill and ship;(2) Open sacking platform,Package and deliver the orders of dropshipping products;
Please refer to the part 13 for the delivery operation of the sacking platform, The following only introduces the operation of the client delivery.

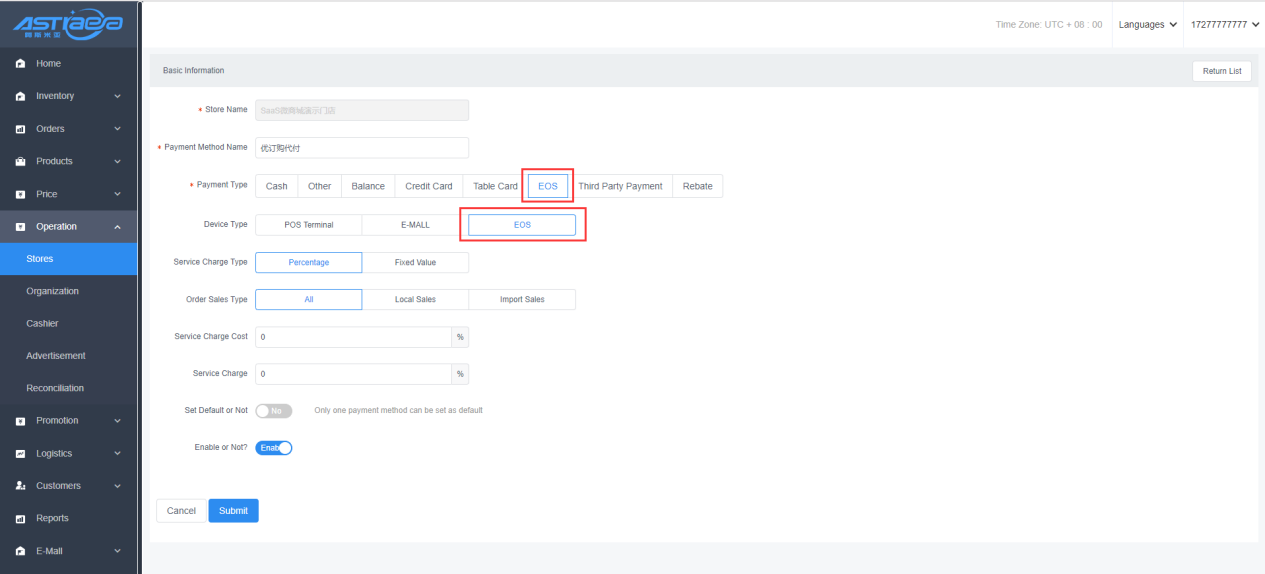
14.2.7 Accounts receivable
- Bills receivable
After opening the credit to the sales channel on behalf of the warehouse, you can view the order amount that has been generated by your sales channel and perform the charge-off, recharge review, and email reminder operations on the credit account of the sales channel in the account receivable bill.
Operation path; warehouse management-accounts receivable-bills receivable
Among them, the charge-off is the operation of the orders that have been generated using the advance payment reset by the sales channel. The recharge management can review the prepayment of the recharge of the sales channel, and the recharge amount approved can only be deducted from the order amount. The mailbox can send an email to the corresponding sales channel to remind the recharge.
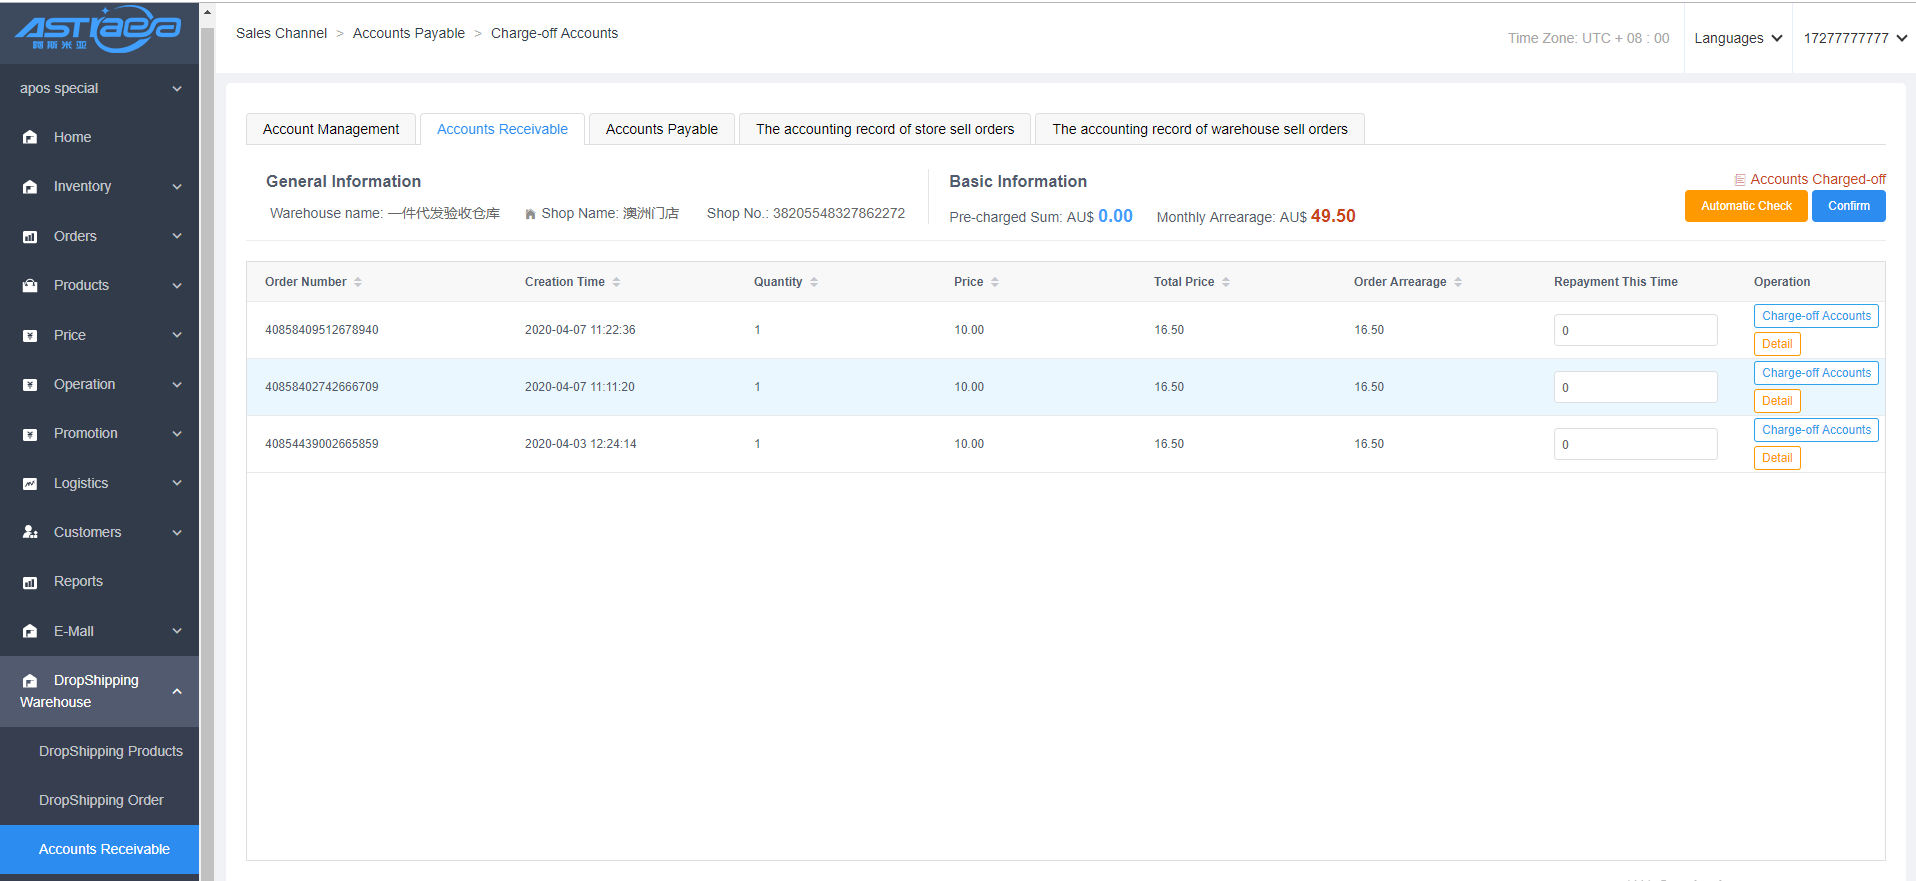
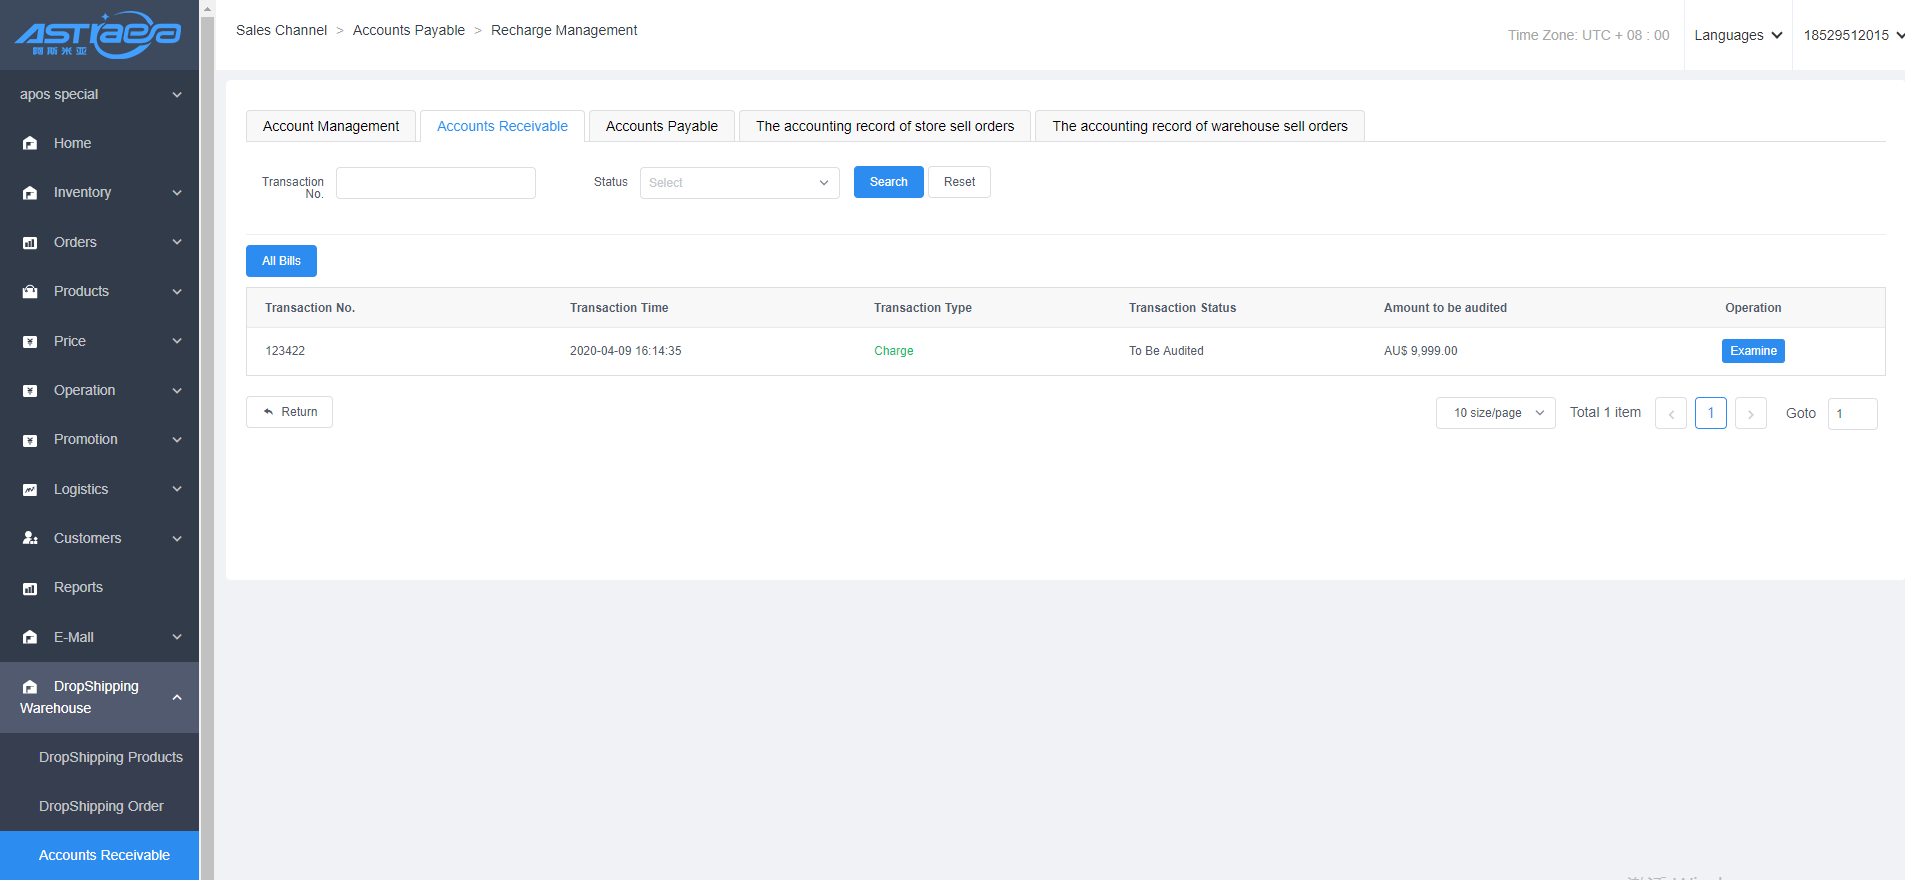
14.3 Sales channels
14.3.1 Set up a dropshipping product
The pending products are all the products from the associated warehouse, and the dropshipping price is set by the warehouse. The reference exchange rate is the exchange rate between the currency unit of the dropshipping tenant and the currency unit of the sales channel;the basic sales price in the table will be synchronized with the basic sales price in price management after it is put on active status.
The basic sales price of the dropshipping product can be set in several ways: fixed sales price, markup ratio, and markup amount; the stock of the dropshipping product will automatically synchronize the stock of the products on the warehouse, and the cost price is the dropshipping product price. The offer price cannot be changed.
Only after being put on the active status, the dropshipping products can be sold normally.
Operation path; sales channels-Dropshipping products-Pending
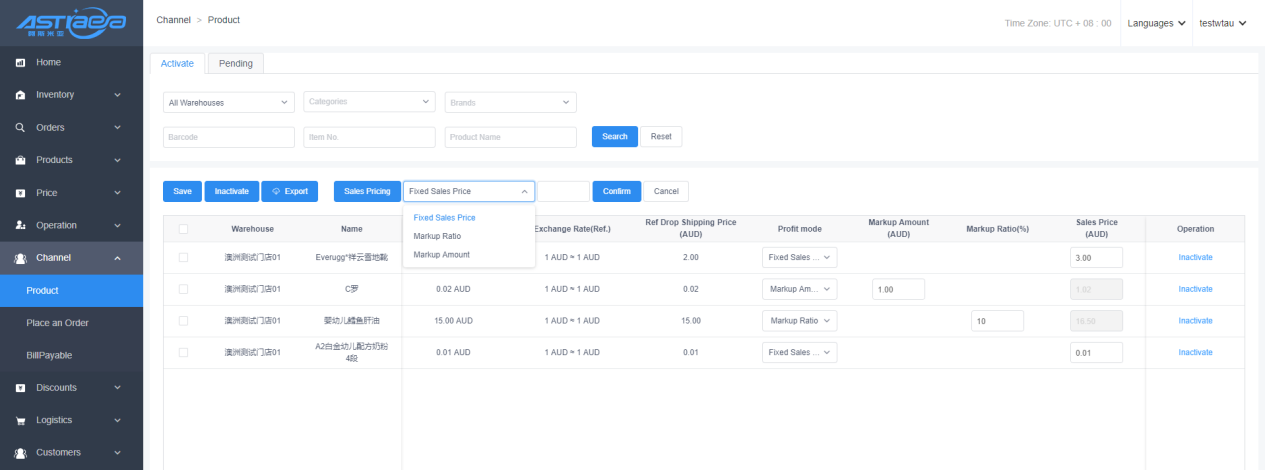
14.3.2 Inactive products
After the dropshipping product is put on active status, you can manually remove the dropshipping product. If there is a change in the dropshipping price set on the dropshipping warehouse, the dropshipping products on the sales channel will be automatically removed when the dropshipping price is changed at the same time.
Operation path;sales channel -dropshipping products-Activate
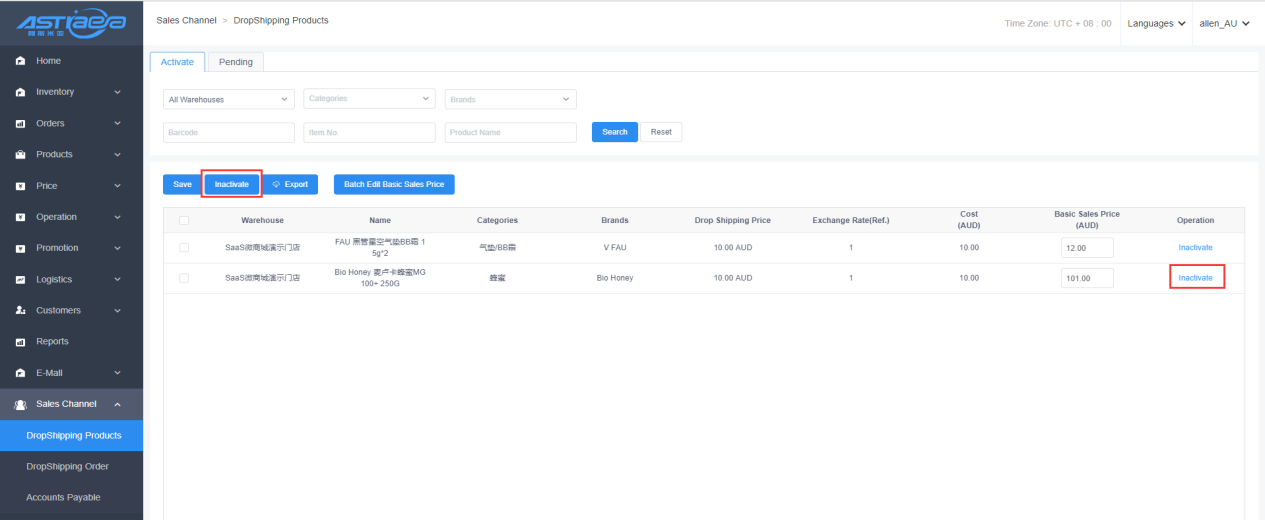
14.3.3 Place an order to buy dropshipping products
There are two entrances for placing orders on dropshipping sales channels, one is the Apos client and the other is the SaaS E-Mall. The following only introduces the relevant process of placing orders on the Apos client. For the process of placing orders on the SaaS E-Mall, please refer to the SaaS E-Mall operation manual.
The client's dropshipping product shortcut menu will display the dropshipping product logo. The dropshipping product only supports CC / BC cross-border purchases. To place an order for a dropshipping product, you must use the shipping function to fill in the sender's information, or do not fill in the sender's information when sending. After generating the quotation, use the Overseas Shopping Assistant to record the sender's information.
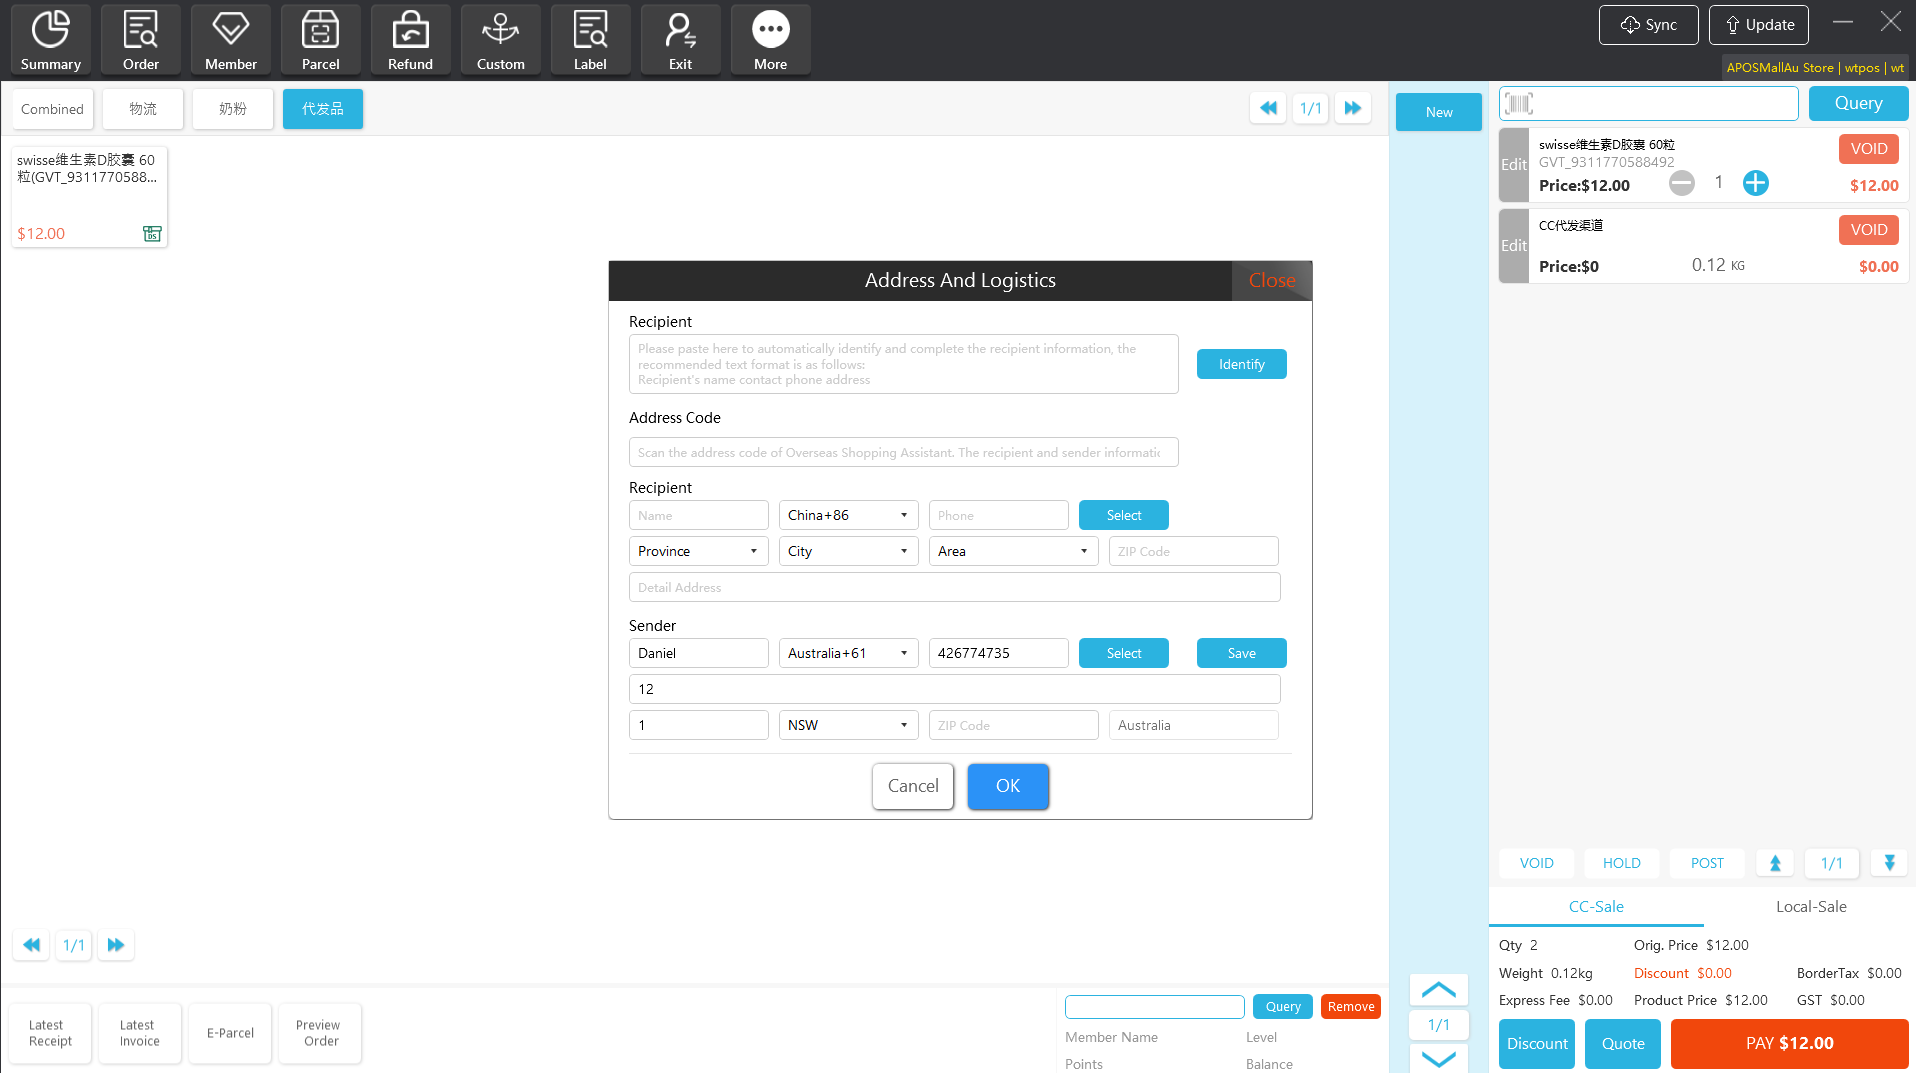
Generally speaking, the dropshipping product order system will be automatically pushed to the dropshipping warehouse. However, in some cases, the order will be cancelled automatically. For example, when the expected revenue (the amount of the order minus the amount of the dropshipping price) is less than zero or when the inventory of the dropshipping products in the dropshipping warehouse is insufficient,the automatic push of the order will fail.And these orders will be automatically saved in this pending order list,after the abnormal situation is processed, you can manually re-order.
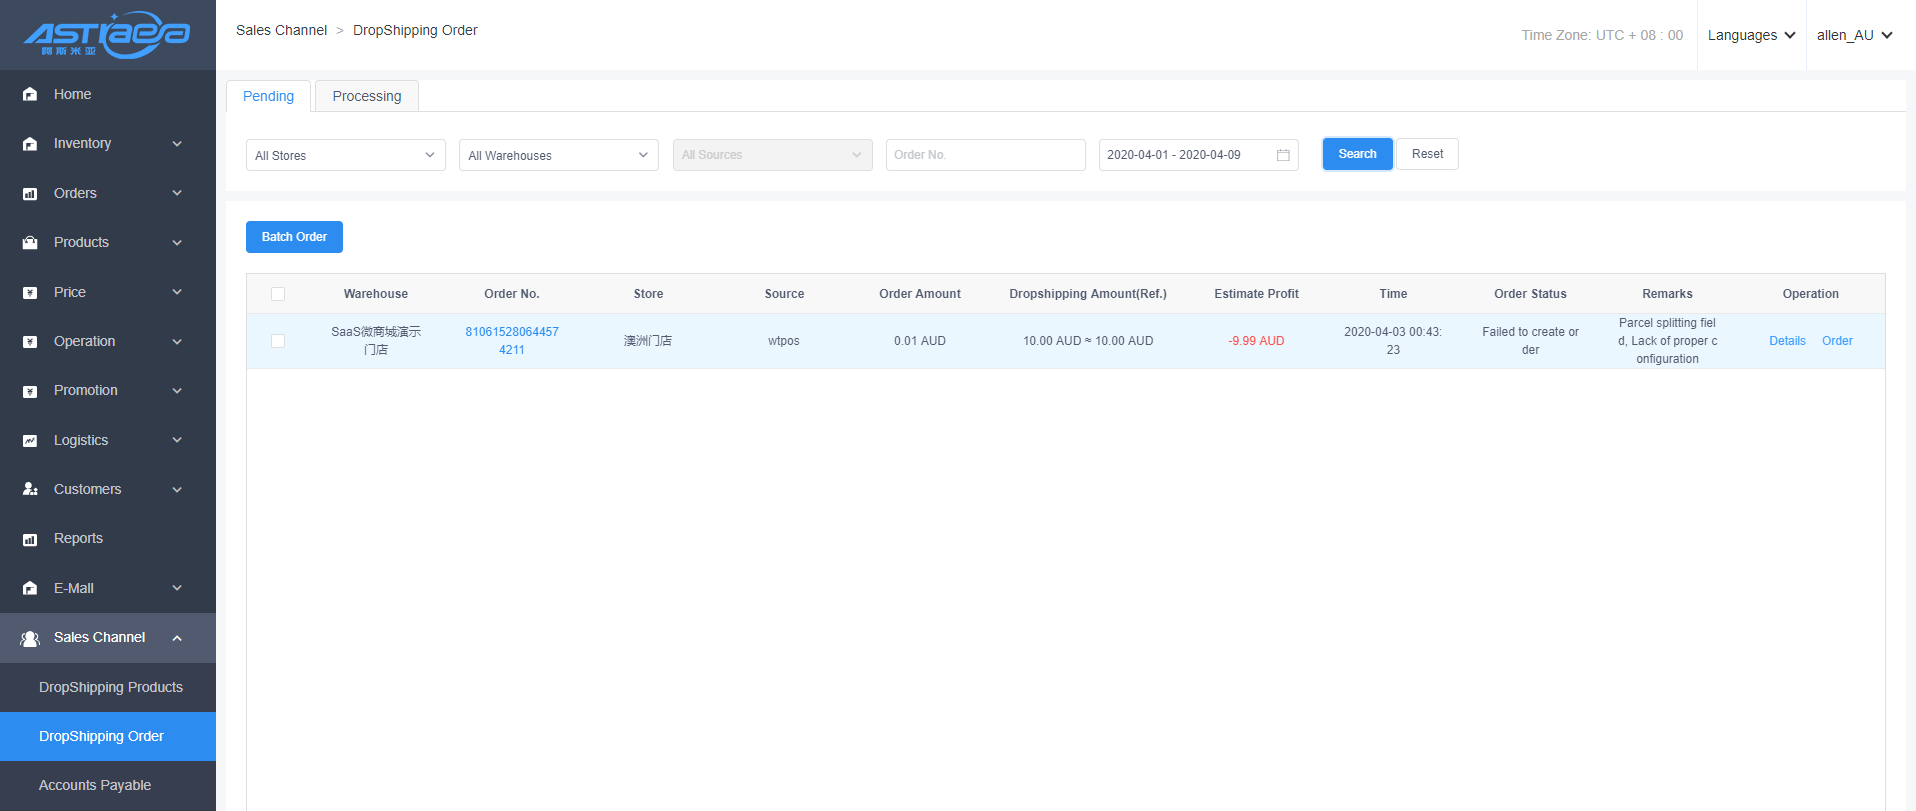
Orders that have been placed successfully will be displayed in the order list. The reference dropshipping amount of the placed order list includes the logistics cost of the warehouse.
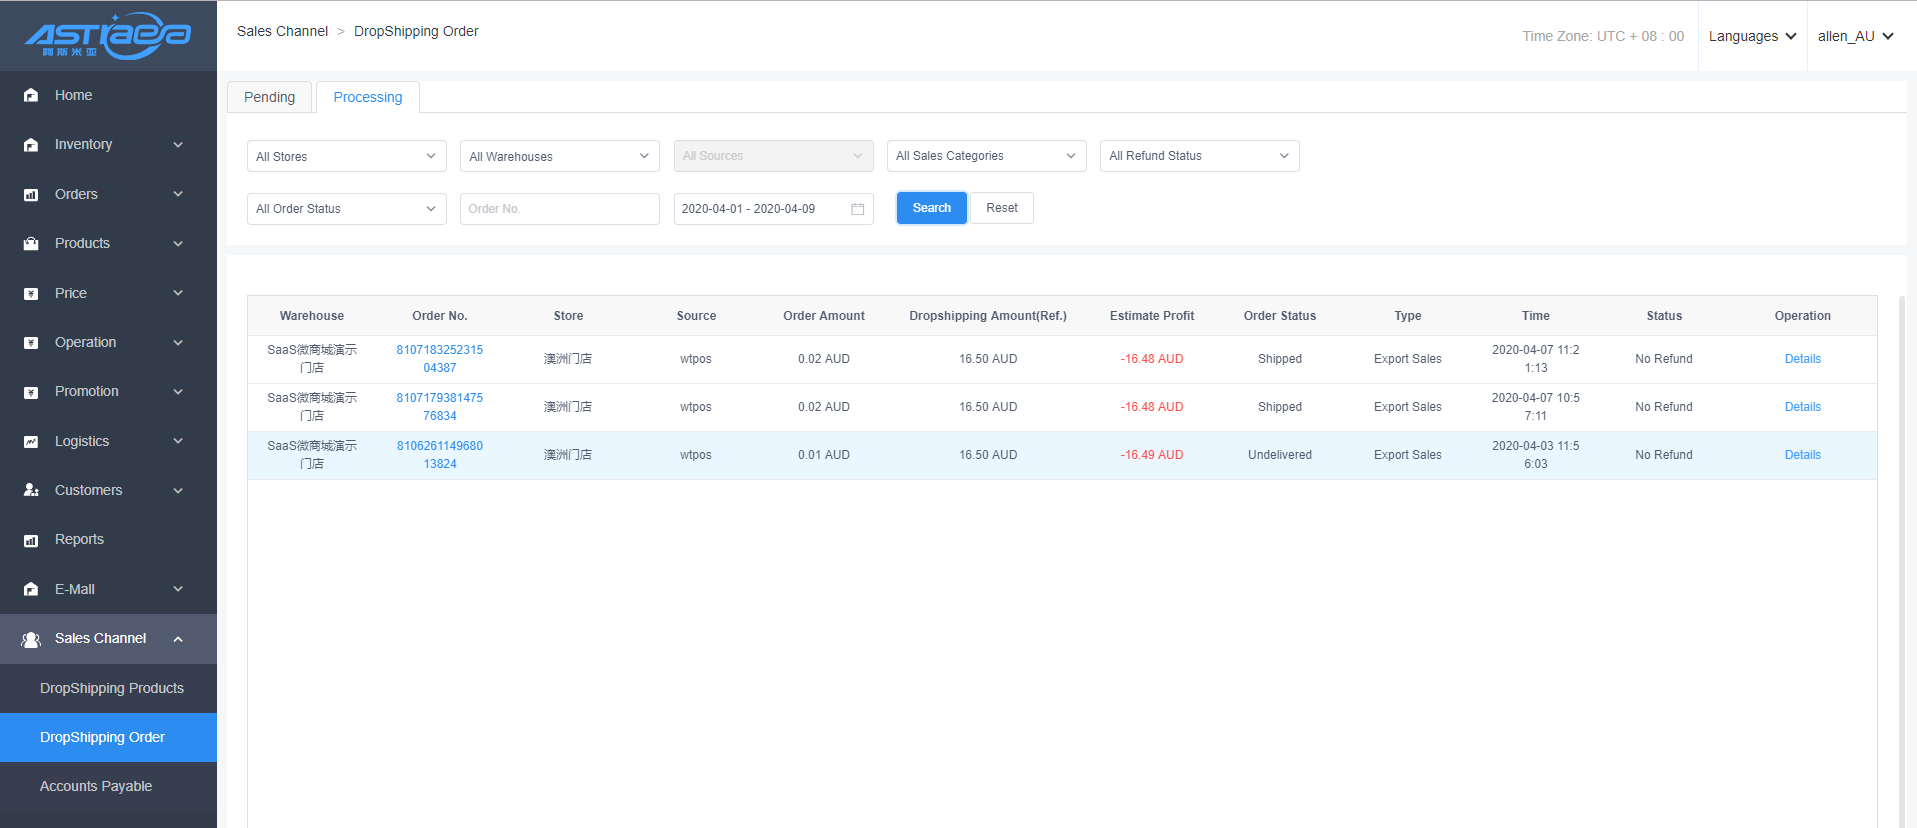
14.3.4 Accounts payable
- Account payable
The account payable in the sales channel show the amount that should be paid to the dropshipping warehouse after the sales channel places the order, as well as the relevant situation of your own account in the dropshipping warehouse.
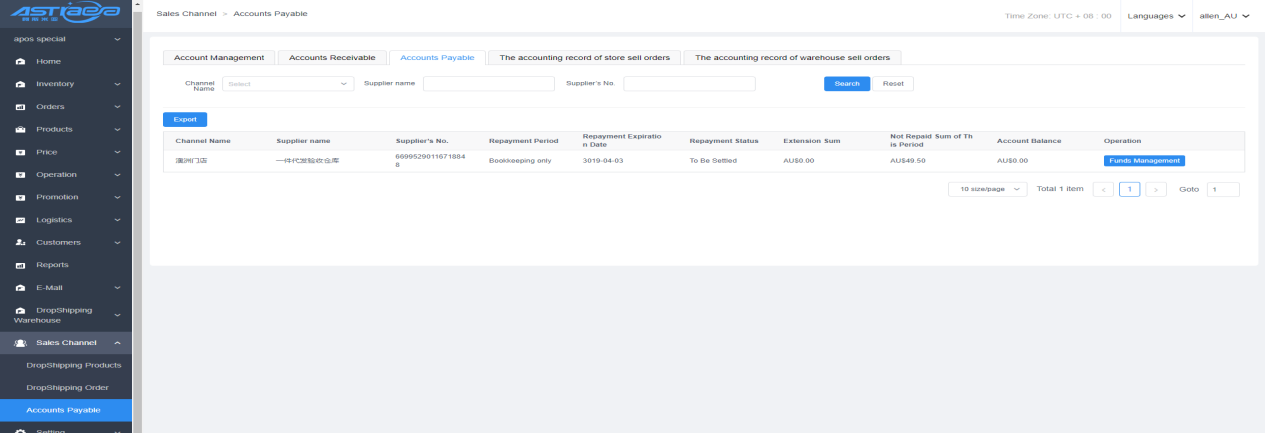
In the funds management, you can withdraw, recharge, and view historical bills for your account amount.
- The accounting record of store sell orders
The sales channel can check the actual profit of its own order on the
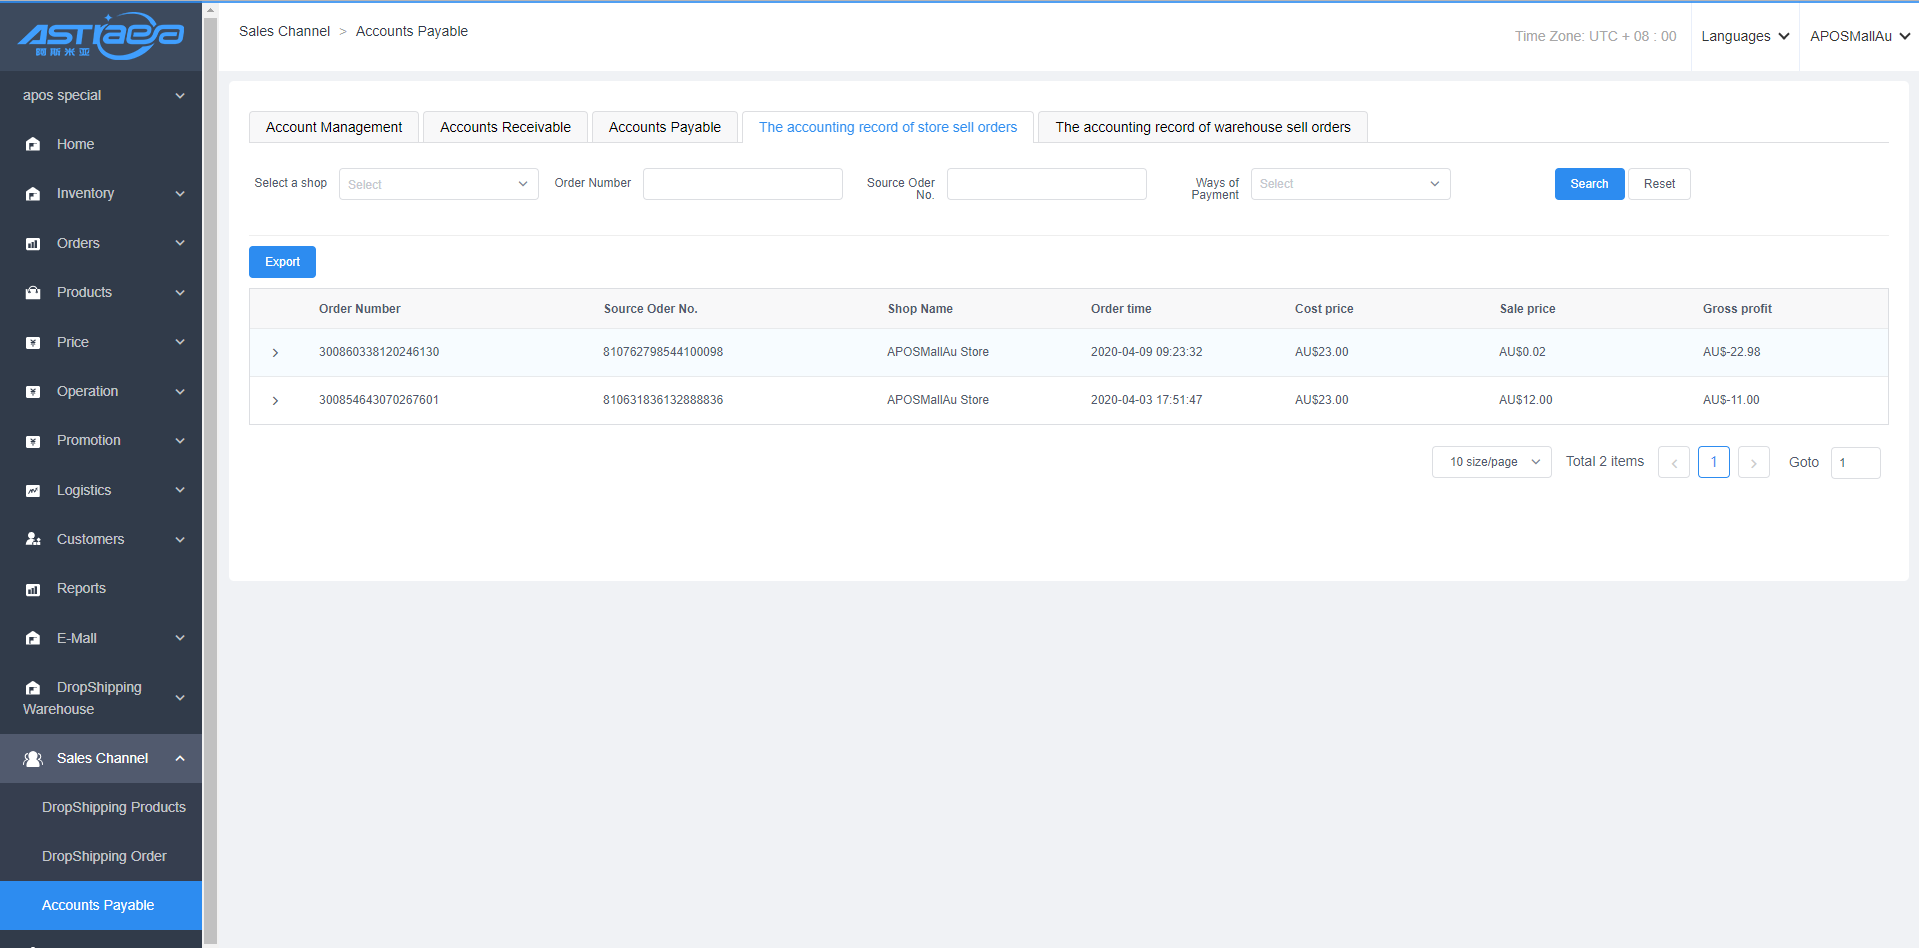
accounting record of store sell orders.
XV.Data authority
15.1 Business description
Data authorities are managed by the person who in charge of the organization and store. Employees can only view the data of the organization and its subordinate organizations. All data related to the store needs to be controlled by data authorities, including the drop-down list of the store, the data queried through the store,etc.Data authority can only be effective for employee accounts. Merchant tenant accounts do not apply data authority and can view all data.
The types of data authority control are mainly the following two.The subsequent function items independently list whether each function has the two types of data authority control types.Other items that require data authority control are described separately in the remarks of each function item.
The data authority control type is mainly the store list and all stores.
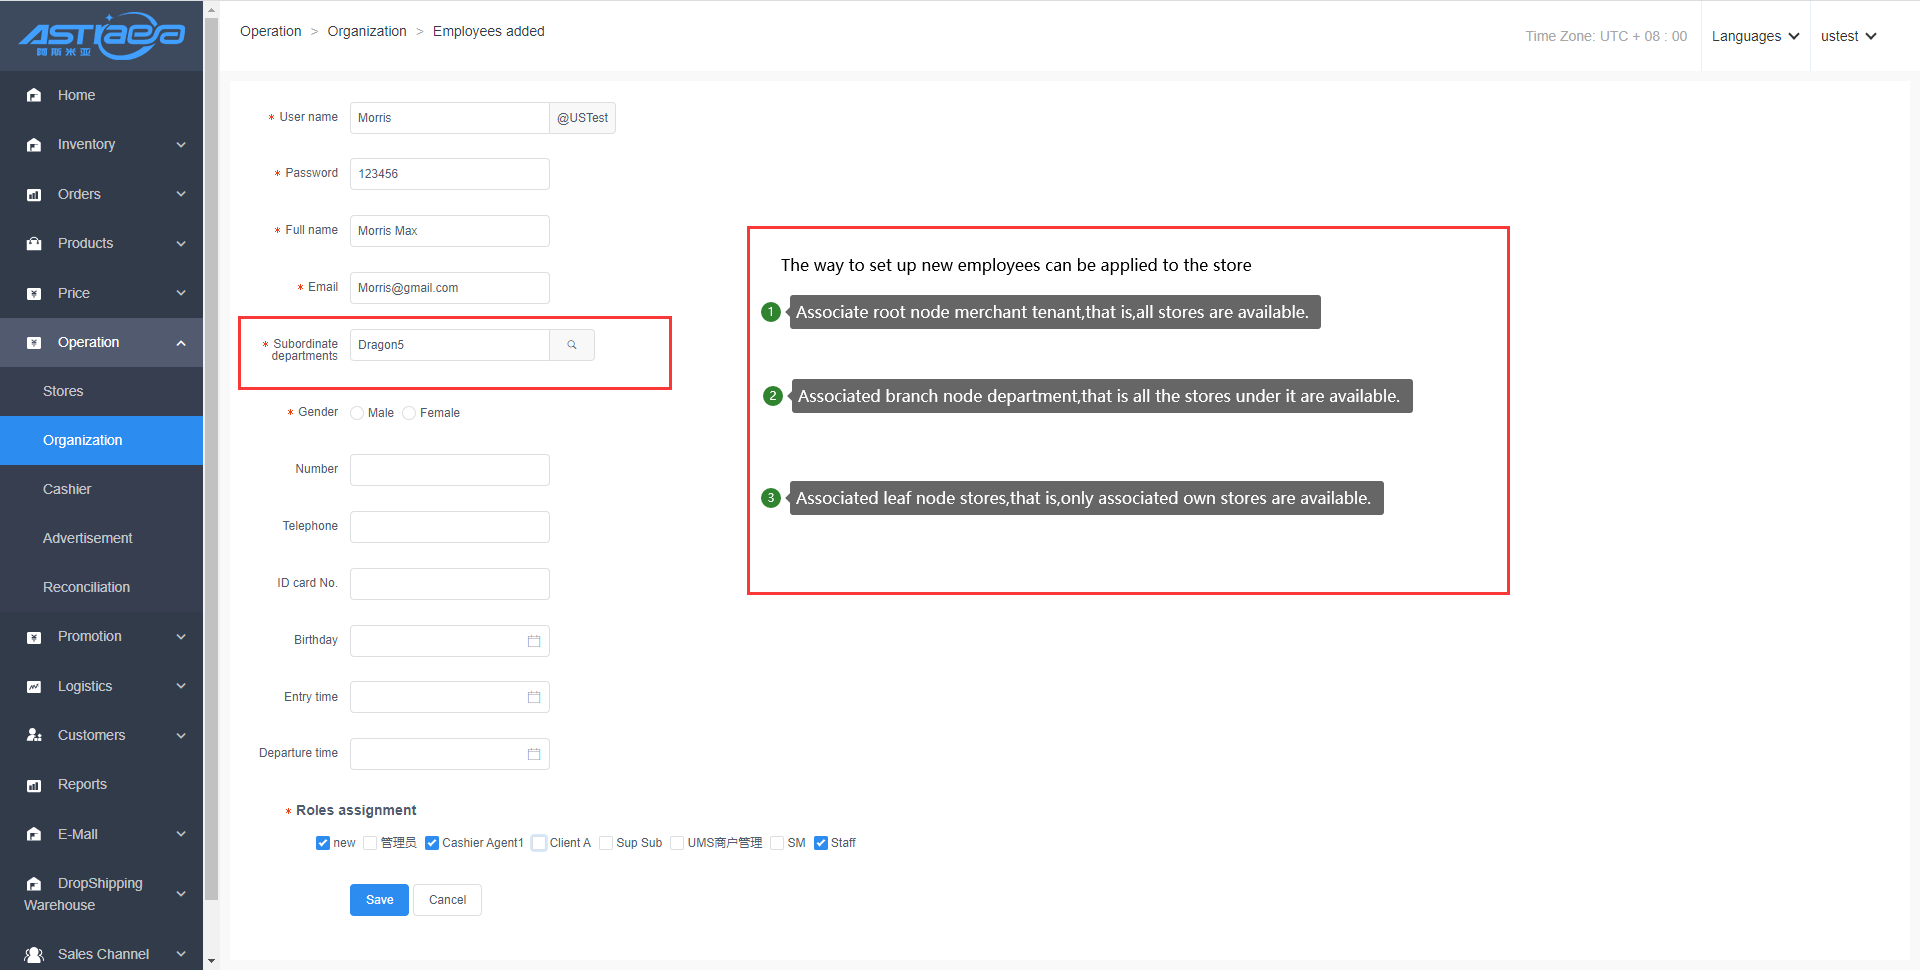
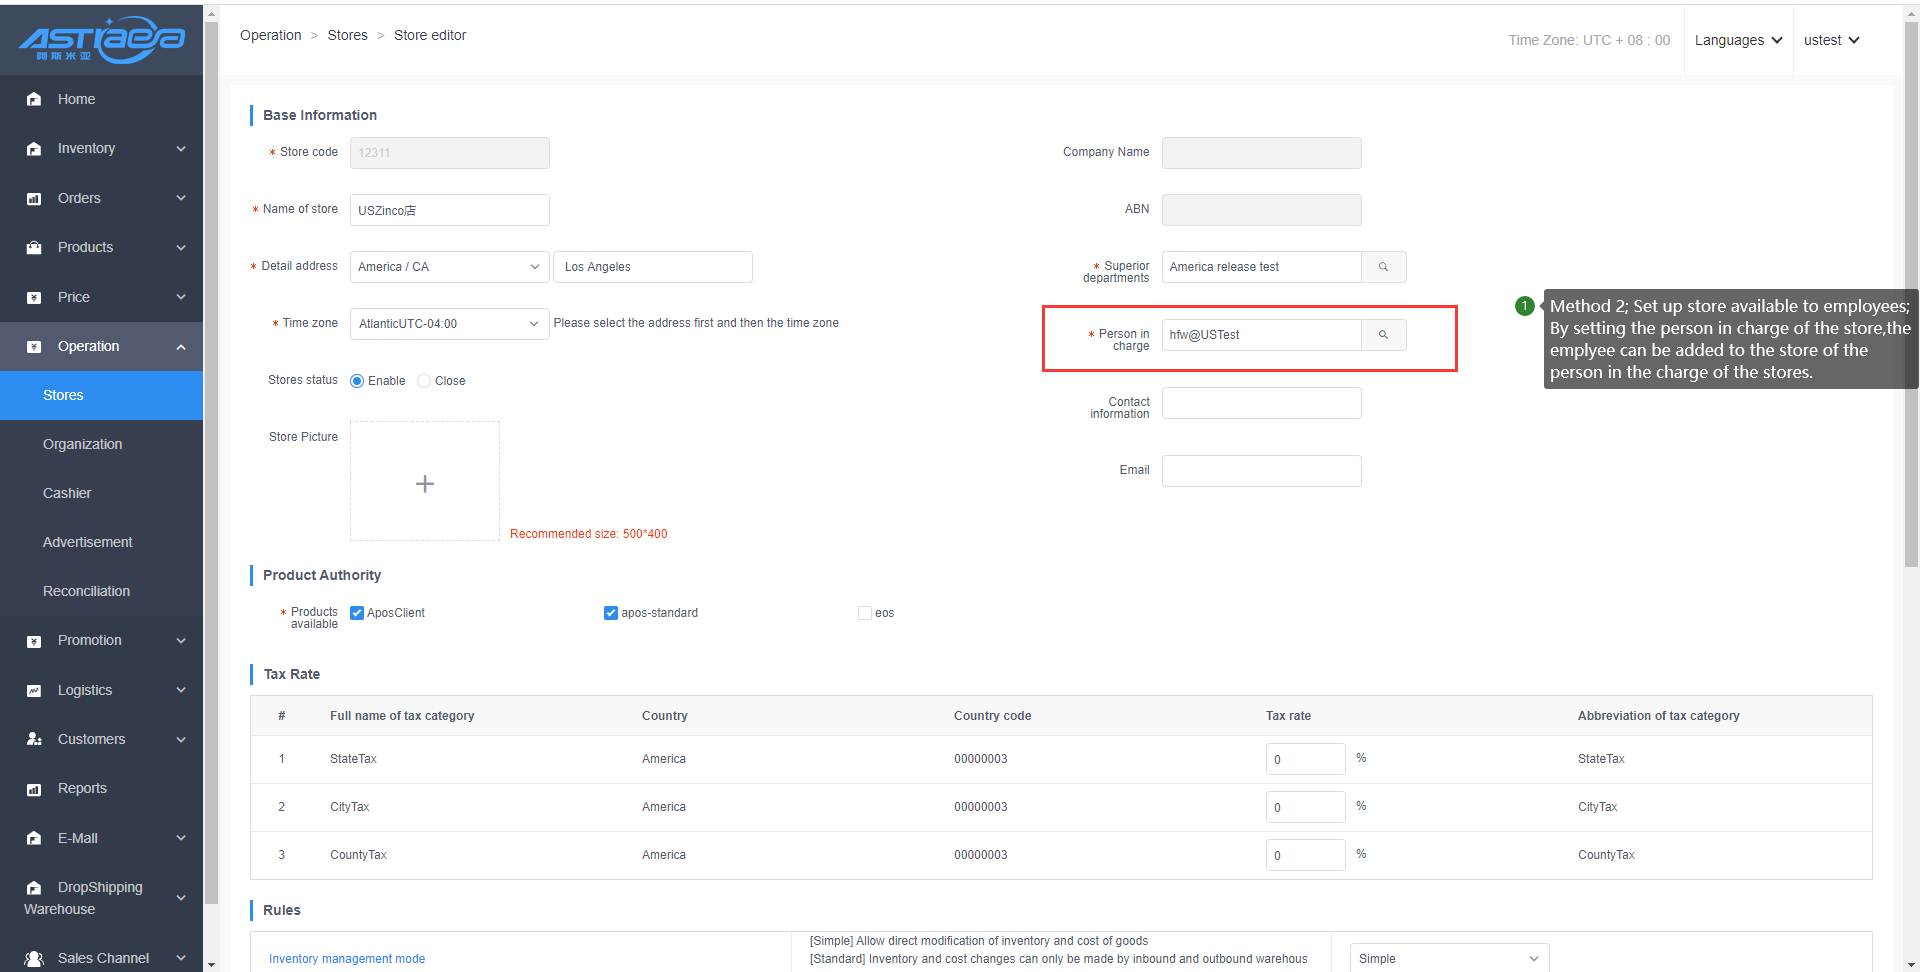
15.2 Functional modules involving data permissions
15.2.1 Home
The data queried is the store data available to the current employee.
15.2.2 Inventory management
Inventory management module contains PO list, PO details, Stock-in order list,Stock-in order details, select PO, select wholesale return order, Stock-out order list, Stock-out order details, select Stock-in PO, Stock-check order list, Stock-check order Details, set Stock-check range, inventory flow, product inventory.among them, the allocation stock-in stores in the warehouse level do not need to be controlled, indicating that they can receive the Allocation-out of all stores. The Allocation stock-out store in the stock-in level stores do not need control, which means that they can be stocked-in to all Store.
15.2.3 Order management
Order management module including sales orders, return orders.
15.2.4 Product management
Product module contains tax-free products and product labels.The source store does not need to control the data permission when copying the tax-free products, and the target store needs to control the data permission, indicating that the tax-free products can be copied from any store to the available stores.
As long as the applicable store in the created product label contains the available stores with employees,the employees can normally see all the applicable stores with the label data after logging in. For example,create the applicable store as ABC product label A, the available stores for employee A are only store C, employees A Log in to see the applicable store of product label A has store ABC.
Only the applicable stores of tag data are included in the employee's available stores, employees can prohibit&activation and editing and delete data, otherwise they can only view details and cannot prohibit&activation and deletion of data.
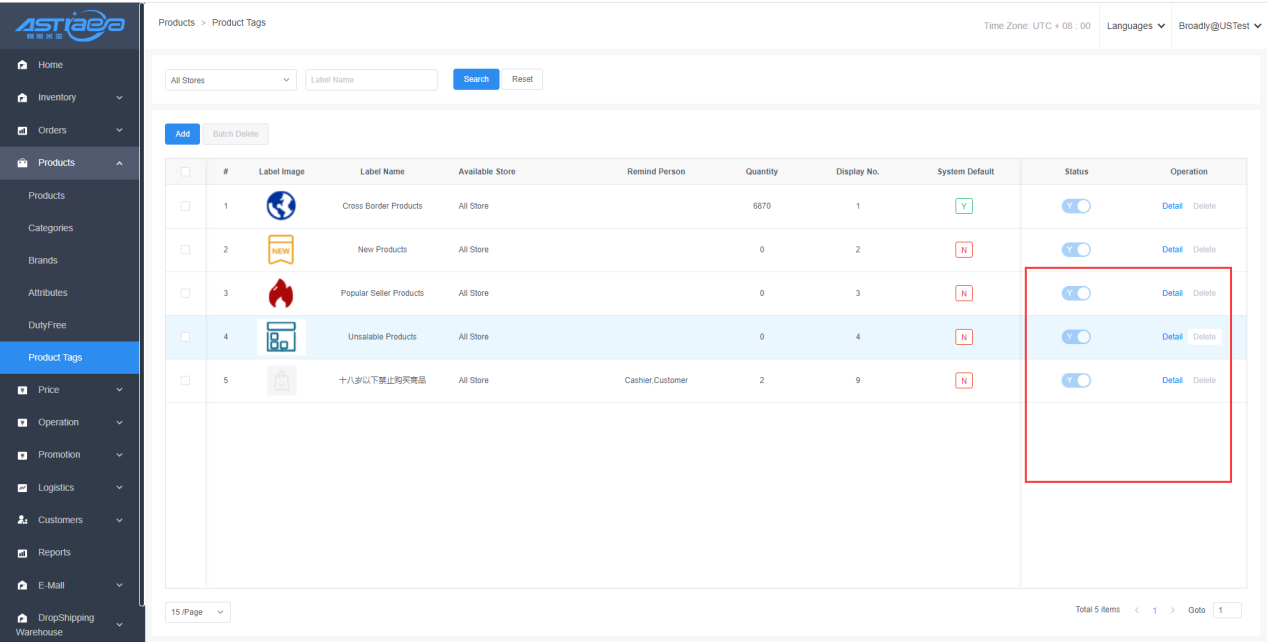
15.2.5 Price management
Price management module Including store price, wholesale price, dropshipping price, adjust store price, adjust wholesale price, adjust dropshipping price.
15.2.6 Operation management
Operation management module including store management,department management, sales commission,secondary-screen advertising,reconciliation.
As long as the applicable stores in the created commission plan and secondary-screen advertisements include available stores for employees,the employees can normally see all applicable stores of the tag data after login Store C. Employee A logs in and sees that the applicable store for commission scheme A has store ABC.
Only if the applicable stores of the data are all included in the employee's available stores, can the employee prohibit/activation and editing and delete the data, otherwise only the details can be viewed and the activation and deletion of the data cannot be prohibited.
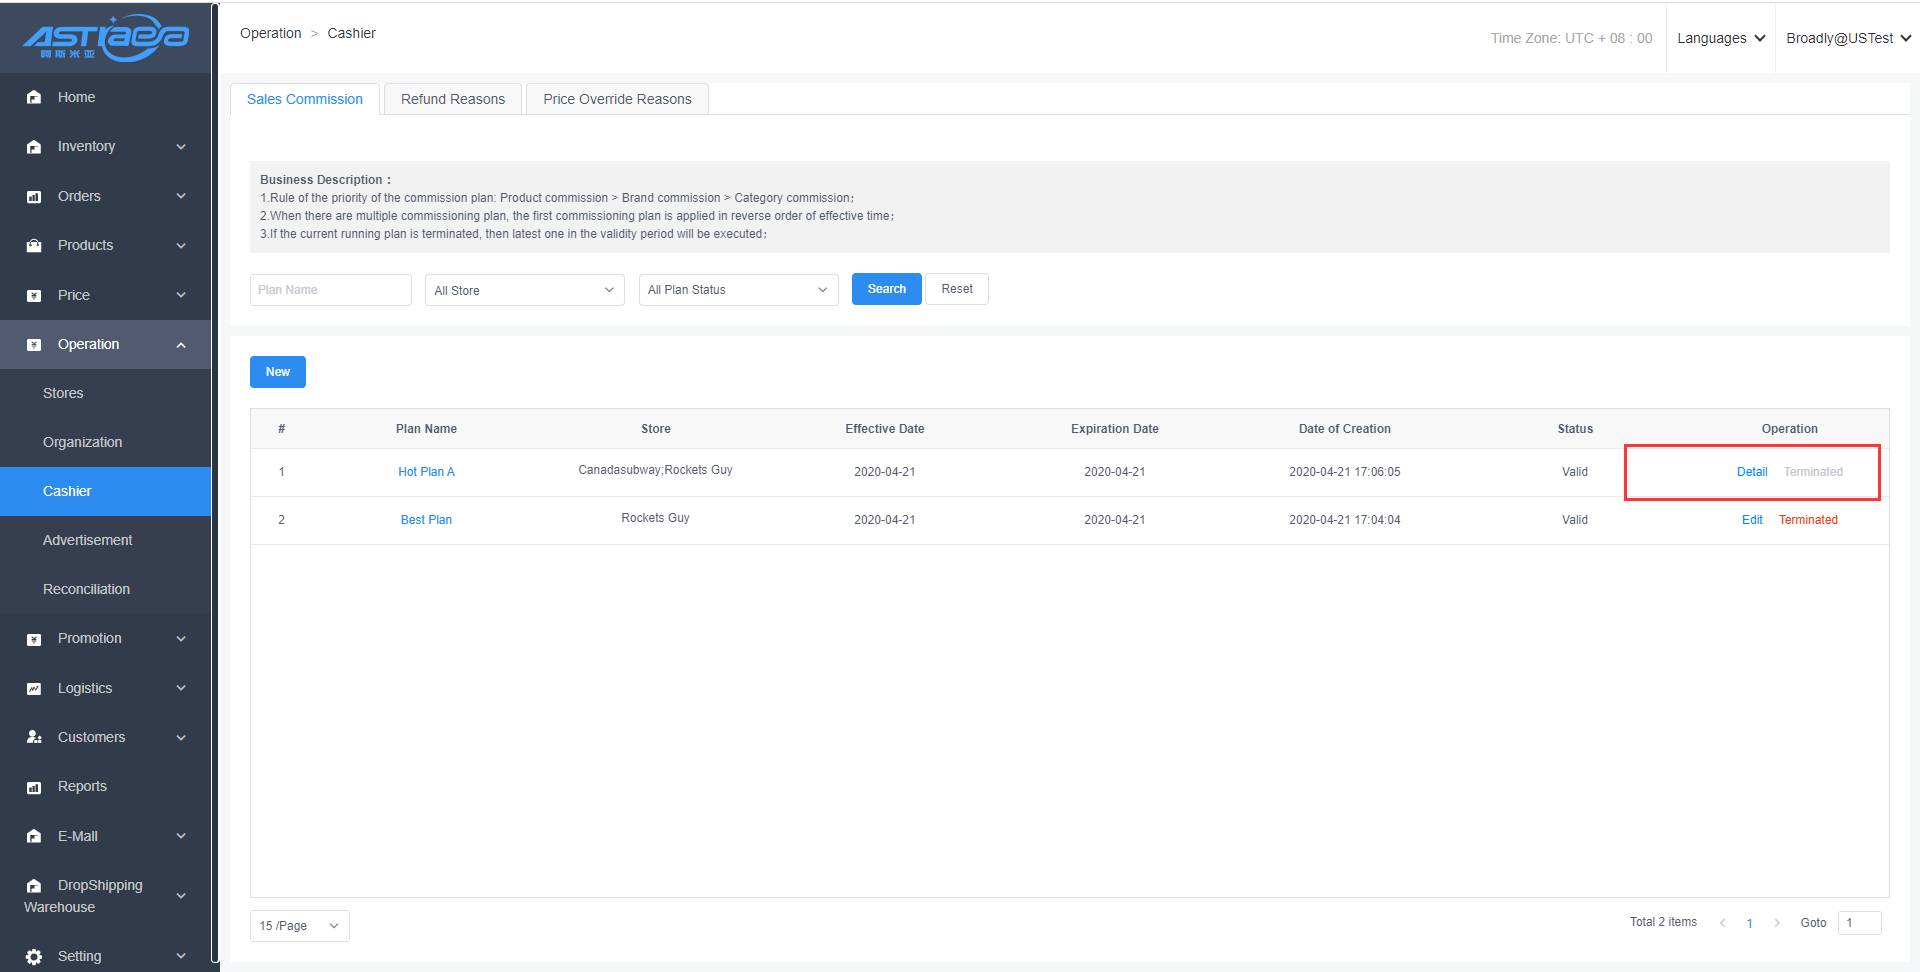
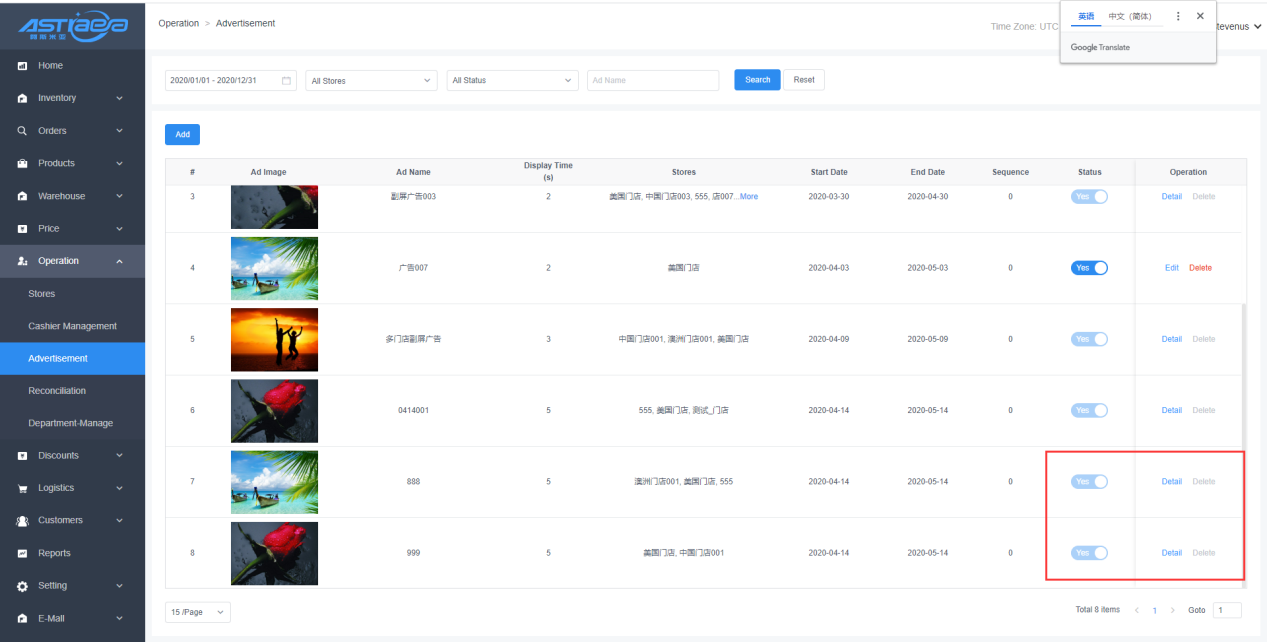
15.2.7 Promotion management
Promotion management module including Price-Break,BOGO,Coupons, Combo,Rebate,Exclusive,Redeem.
15.2.8 Logistics management
Logistics management module contains logistics groups, logistics companies, logistics prices, logistics details, and packing rules. when copying logistics prices, the source store does not need to control data permissions,and the target store needs to control data permissions,which indicating that the logistics price can be copied from any store to available stores.
15.2.9 Customer Center
Customer center module contains member Top-up details, Reward points details, time-card details, deposit details; member list balances, points, Time-card, deposit statistics are not subject to data authority control.
15.2.10 Report Center
Report center module Including sales reports, bills reports, stock reports, member reports (excluding member purchase summary reports), staff reports, and other reports.
15.2.11 System Management
System management module contains Cashier logs.
15.2.12 E-Mall management
E-Mall management module contains the store settings-business settings of the store binding to E-Mall,the store name does not require data permission control,it can normally display that the binding store is a non-available store.The selection of the binding store requires permission control,only the available stores.